By subash adhikari
A monorepo is a single repository that holds all the code and multiple projects in a single Git repository.
This setup is quite nice to work with because of its flexibility and ability to manage various services and frontends in one single repository. It also eliminates the hassle of tracking changes in multiple repositories and updating dependencies as projects change.
On the other hand, monorepos also come with their challenges, specifically as relates to Continuous Integration. As individual sub-projects within the monorepo change, we need to identify which sub-projects changed to build and deploy them.
This post will serve as a step by step guide to:
- Configure Continuous Integration for monorepos in Bulidkite.
- Deploy Buildkite Agents to AWS EC2 instances with autoscaling.
- Configure GitHub to trigger Bulidkite CI pipelines.
- Configure Buildkite to trigger appropriate pipelines when sub-projects within a monorepo change.
- Automate all of the above using bash scripts.
Pre-requisites
- AWS account to deploy the Buildkite agents.
- Configure AWS CLI to talk to AWS Account.
- Buildkite account to create continuous integration pipelines.
- GitHub account to host the monorepo sourcecode.
The complete source code is available in the buildkite-monorepo in GitHub.
Project Setup
The Buildkite workflow consists of Pipelines and Steps. The top-level containers for modeling and defining workflows are called Pipelines. Steps run individual tasks or commands.
The following diagram lists the pipelines we are setting up, their associated triggers, and each step that the pipeline runs.

Pull Request Workflow
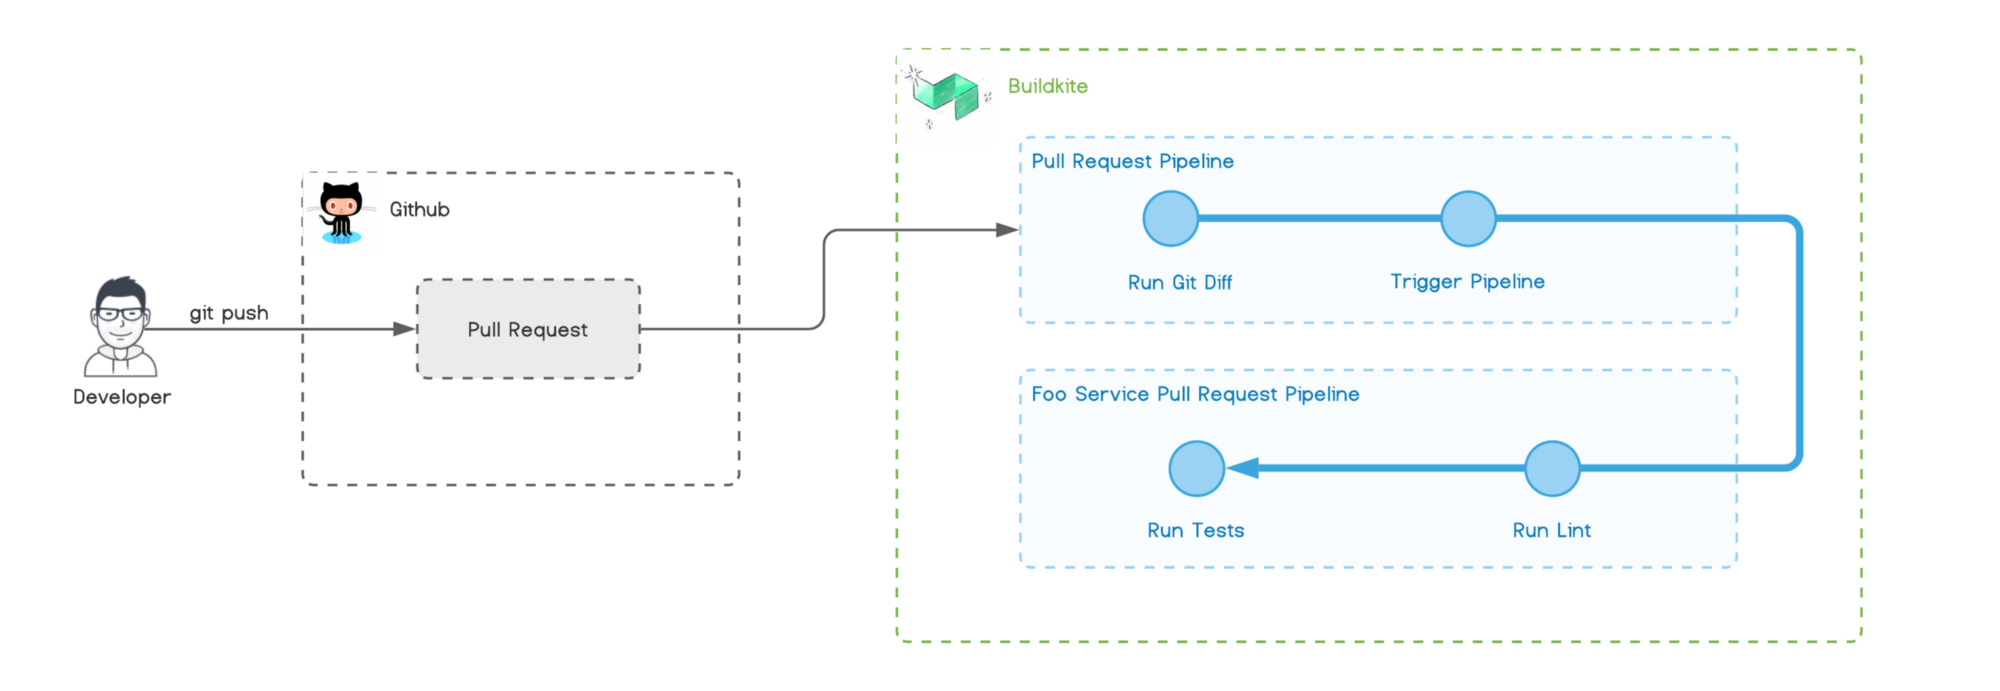
The above diagram visualizes the workflow for the Pull Request pipeline.
Creating a new Pull Request in GitHub triggers the pull-request pipeline in Buildkite. This pipeline then runs git diff to identify which folders (projects) within the monorepo have changed.
If it detects changes, then it will dynamically trigger the appropriate Pull Request pipeline defined for that project. Buildkite reports the status of each pipeline back to GitHub status check.
Merge Workflow
The Pull Request is merged when all status checks in Github pass. Merging Pull Request triggers the merge pipeline in Buildkite.

Similar to the previous pipeline, the merge pipeline identifies the projects that have changed and triggers the corresponding deploy pipeline for it. The Deploy pipeline initially deploys changes to the staging environment.
Once the deployment to staging is complete, production deployment is manually released.
Final project structure
├── .buildkite
│ ├── diff
│ ├── merge.yml
│ ├── pipelines
│ │ ├── deploy.json
│ │ ├── merge.json
│ │ └── pull-request.json
│ └── pull-request.yml
├── bar-service
│ ├── .buildkite
│ │ ├── deploy.yml
│ │ ├── merge.yml
│ │ └── pull-request.yml
│ └── bin
│ └── deploy
├── bin
│ ├── create-pipeline
│ ├── create-secrets-bucket
│ ├── deploy-ci-stack
│ └── stack-config
└── foo-service
├── .buildkite
│ ├── deploy.yml
│ ├── merge.yml
│ └── pull-request.yml
└── bin
└── deploy
Set Up the Project
Create a new Git project and push it to GitHub. Run the following commands in the CLI.
mkdir buildkite-monorepo-example
cd buildkite-monorepo-example
git init
echo node_modules/ > .gitignore
git add .
git commit -m "initialize repository"
git remote add origin <YOUR_GITHUB_REPO_URL>
git push origin master

Set up the Buildkite infrastructure
- Create a bin directory with some executable scripts inside it.
mkdir bin
cd bin
touch create-pipeline create-secrets-bucket deploy-ci-stack
chmod +x ./*
- Copy the following contents into
create-secrets-bucket.
#!/bin/bash

set -eou pipefail

CURRENT_DIR=$(pwd)
ROOT_DIR="$( dirname "${BASH_SOURCE[0]}" )"/..

BUCKET_NAME="buildkite-secrets-adikari"
KEY="id_rsa_buildkite"

echo "creating bucket $BUCKET_NAME.."
aws s3 mb s3://$BUCKET_NAME

# Generate SSH Key
ssh-keygen -t rsa -b 4096 -f $KEY -N ''

# Copy SSH Keys to S3 bucket
aws s3 cp --acl private --sse aws:kms $KEY "s3://$BUCKET_NAME/private_ssh_key"
aws s3 cp --acl private --sse aws:kms $KEY.pub "s3://$BUCKET_NAME/public_key.pub"


if [[ "$OSTYPE" == "darwin"* ]]; then
  pbcopy < id_rsa_buildkite.pub
  echo "public key contents copied in clipboard."
else
  cat id_rsa_buildkite.pub
fi

# Move SSH Keys to ~/.ssh directory
mv ./$KEY* ~/.ssh
chmod 600 ~/.ssh/$KEY
chmod 644 ~/.ssh/$KEY.pub

cd $CURRENT_DIR
The above script creates an S3 bucket that is used to store the ssh keys. Buildkite uses this key to connect to the Github repo. The script also generates an ssh key and sets its permission correctly.
Run the script

The script copies the generated public and private keys to the ~/.ssh folder. These keys can be used later to ssh into the EC2 instance, running the Buildkite agent for debugging.
Next, verify that the bucket exists and the keys are present in the new S3 bucket.

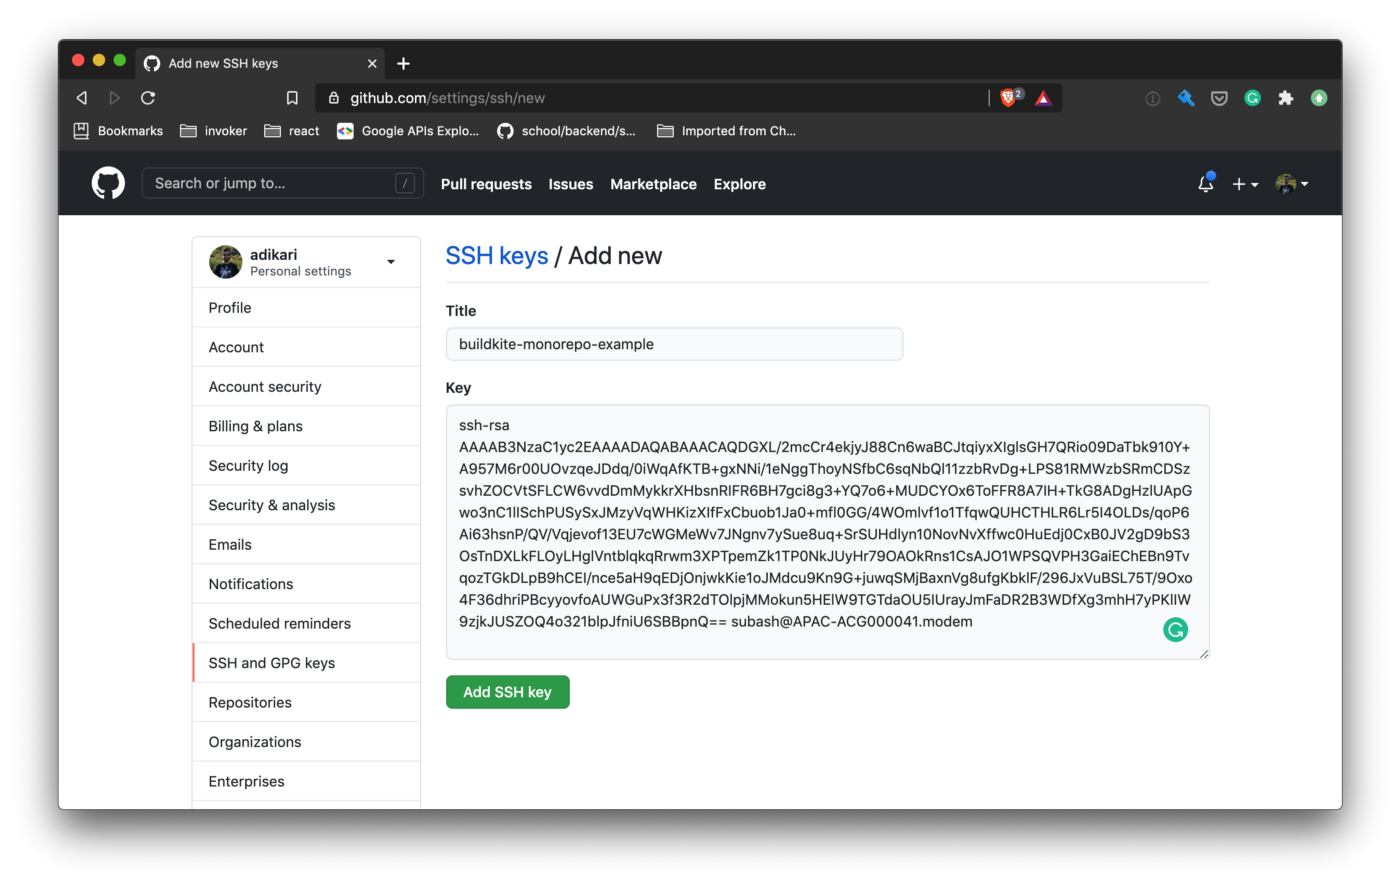
Navigate to https://github.com/settings/keys, add a new SSH key, then paste in the contents of id_rsa_buildkite.pub .
Deploy AWS Elastic CI Cloudformation Stack
The folks at Buildkite have created the Elastic CI Stack for AWS, which creates a private, autoscaling Buildkite Agent cluster in AWS. Let's deploy the infrastructure to our AWS Account.
Create a new file bin/deploy-ci-stack and copy the contents of the following script in it.
#!/bin/bash

set -euo pipefail

[ -z $BUILDKITE_AGENT_TOKEN ] && { echo "BUILDKITE_AGENT_TOKEN is not set."; exit 1;}

CURRENT_DIR=$(pwd)
ROOT_DIR="$( dirname "${BASH_SOURCE[0]}" )"/..
PARAMETERS=$(cat ./bin/stack-config | envsubst)

cd $ROOT_DIR

echo "downloading elastic ci stack template.."
curl -s https://s3.amazonaws.com/buildkite-aws-stack/latest/aws-stack.yml -O

aws cloudformation deploy \
  --capabilities CAPABILITY_NAMED_IAM \
  --template-file ./aws-stack.yml \
  --stack-name "buildkite-elastic-ci" \
  --parameter-overrides $PARAMETERS

rm -f aws-stack.yml

cd $CURRENT_DIR
You can get the BUILDKITE_AGENT_TOKEN from the Agents tab in Buildkite's Console.

Next, create a new file called bin/stack-config. Configuration in this file overrides the Cloudformation parameters. The complete list of parameters is available in the Cloudformation template used by Elastic CI.
On line 2, replace the bucket name with the bucket created earlier.
BuildkiteAgentToken=$BUILDKITE_AGENT_TOKEN
SecretsBucket=buildkite-secrets-adikari
InstanceType=t2.micro
MinSize=0
MaxSize=3
ScaleUpAdjustment=2
ScaleDownAdjustment=-1
Next, run the script in the CLI to deploy the Cloudformation stack.
./bin/deploy-ci-stack
The script will take some time to finish. Open up the AWS Cloudformation console to view the progress.

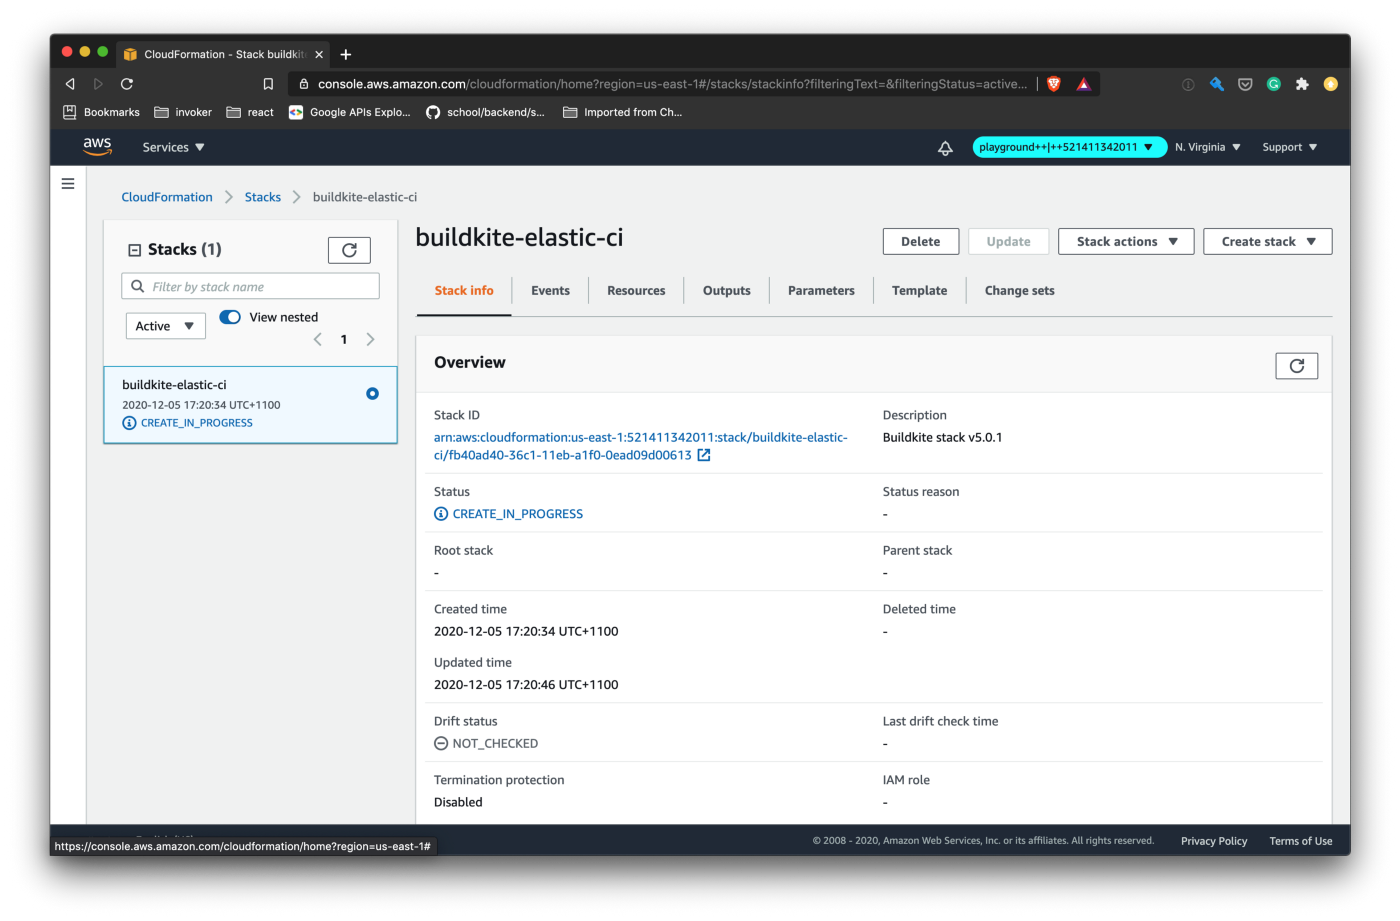
The Cloudformation stack would have created an Autoscaling Group that Buildkite will use to spawn up EC2 instances. The Buildkite Agents and the builds run inside those EC2 instances.

Create build pipelines in Bulidkite
At this point, we have the infrastructure ready that's required to run Buildkite. Next, we configure Buildkite and create some Pipelines.
Create an nAPI Access Token at https://buildkite.com/user/api-access-tokens and set the scope to write_builds, read_pipelines, and write_pipelines. More information about agent tokens is in this document.
Ensure the BUILDKITE_API_TOKEN is set on the environment. Either use dotenv or export it to the environment before running the script.
Copy the contents of the following script to bin/create-pipeline. Pipelines can be created manually in the Buildkite Console, but it is always better to automate and create reproducible infrastructure.
#!/bin/bash

set -euo pipefail

export SERVICE="."
export PIPELINE_TYPE=""
export REPOSITORY=git@github.com:adikari/buildkite-docker-example.git

CURRENT_DIR=$(pwd)
ROOT_DIR="$( dirname "${BASH_SOURCE[0]}" )"/..
STATUS_CHECK=false
BUILDKITE_ORG_SLUG=adikari # update to your buildkite org slug

USAGE="USAGE: $(basename "$0") [-s|--service] service_name [-t|--type] pipeline_type
Eg: create-pipeline --type pull-request
    create-pipeline --type merge --service foo-service
    create-pipeline --type merge --status-checks
NOTE: BUILDKITE_API_TOKEN must be set in environment
ARGUMENTS:
    -t | --type           buildkite pipeline type <merge|pull-request|deploy> (required)
    -s | --service        service name (optional, default: deploy root pipeline)
    -r | --repository     github repository url (optional, default: buildkite-docker-example)
    -c | --status-checks      enable github status checks (optional, default: true)
    -h | --help           show this help text"

[ -z $BUILDKITE_API_TOKEN ] && { echo "BUILDKITE_API_TOKEN is not set."; exit 1;}

while [ $# -gt 0 ]; do
    if [[ $1 =~ "--"* ]]; then
        case $1 in
            --help|-h) echo "$USAGE"; exit; ;;
            --service|-s) SERVICE=$2;;
            --type|-t) PIPELINE_TYPE=$2;;
            --repository|-r) REPOSITORY=$2;;
            --status-check|-c) STATUS_CHECK=${2:-true};;
        esac
    fi
    shift
done

[ -z "$PIPELINE_TYPE" ] && { echo "$USAGE"; exit 1; }

export PIPELINE_NAME=$([ $SERVICE == "." ] && echo "" || echo "$SERVICE-")$PIPELINE_TYPE

BUILDKITE_CONFIG_FILE=.buildkite/pipelines/$PIPELINE_TYPE.json
[ ! -f "$BUILDKITE_CONFIG_FILE" ] && { echo "Invalid pipeline type: File not found $BUILDKITE_CONFIG_FILE"; exit; }

BUILDKITE_CONFIG=$(cat $BUILDKITE_CONFIG_FILE | envsubst)

if [ $STATUS_CHECK == "false" ]; then
  pipeline_settings='{ "provider_settings": { "trigger_mode": "none" } }'
  BUILDKITE_CONFIG=$((echo $BUILDKITE_CONFIG; echo $pipeline_settings) | jq -s add)
fi
cd $ROOT_DIR
echo "Creating $PIPELINE_TYPE pipeline.."
RESPONSE=$(curl -s POST "https://api.buildkite.com/v2/organizations/$BUILDKITE_ORG_SLUG/pipelines" \
  -H "Authorization: Bearer $BUILDKITE_API_TOKEN" \
  -d "$BUILDKITE_CONFIG"
)
[[ "$RESPONSE" == *errors* ]] && { echo $RESPONSE | jq; exit 1; }
echo $RESPONSE | jq
WEB_URL=$(echo $RESPONSE | jq -r '.web_url')
WEBHOOK_URL=$(echo $RESPONSE | jq -r '.provider.webhook_url')
echo "Pipeline url: $WEB_URL"
echo "Webhook url: $WEBHOOK_URL"
echo "$PIPELINE_NAME pipeline created."
cd $CURRENT_DIR
unset REPOSITORY
unset PIPELINE_TYPE
unset SERVICE
unset PIPELINE_NAME
Make the script executable by setting the correct permission (chmod +x). Run ./bin/create-pipeline -h in the CLI for help.

The script uses Buildkite REST API to create the pipelines with the given configuration. The script uses a pipeline configuration defined as a json document and posts it to the REST API. Pipeline configurations live in the .bulidkite/pipelines folder.
To define the configuration for the pull-request pipeline, create .buildkite/pipelines/pull-request.json with the following content:
{
  "name": "$PIPELINE_NAME",
  "description": "Pipeline for $PIPELINE_NAME pull requests",
  "repository": "$REPOSITORY",
  "default_branch": "",
  "steps": [
    {
      "type": "script",
      "name": ":buildkite: $PIPELINE_TYPE",
      "command": "buildkite-agent pipeline upload $SERVICE/.buildkite/$PIPELINE_TYPE.yml"
    }
  ],
  "cancel_running_branch_builds": true,
  "skip_queued_branch_builds": true,
  "branch_configuration": "!master",
  "provider_settings": {
    "trigger_mode": "code",
    "publish_commit_status_per_step": true,
    "publish_blocked_as_pending": true,
    "pull_request_branch_filter_enabled": true,
    "pull_request_branch_filter_configuration": "!master",
    "separate_pull_request_statuses": true
  }
}
Next, create ./buildkite/pipelines/merge.json with the following content:
{
  "name": "$PIPELINE_NAME",
  "description": "Pipeline for $PIPELINE_NAME merge",
  "repository": "$REPOSITORY",
  "default_branch": "master",
  "steps": [
    {
      "type": "script",
      "name": ":buildkite: $PIPELINE_TYPE",
      "command": "buildkite-agent pipeline upload $SERVICE/.buildkite/$PIPELINE_TYPE.yml"
    }
  ],
  "cancel_running_branch_builds": true,
  "skip_queued_branch_builds": true,
  "branch_configuration": "master",
  "provider_settings": {
    "trigger_mode": "code",
    "build_pull_requests": false,
    "publish_blocked_as_pending": true,
    "publish_commit_status_per_step": true
  }
}
Finally, create .buildkite/pipelines/deploy.yml with the following content:
{
  "name": "$PIPELINE_NAME",
  "description": "Pipeline for $PIPELINE_NAME deploy",
  "repository": "$REPOSITORY",
  "default_branch": "master",
  "steps": [
    {
      "type": "script",
      "name": ":buildkite: $PIPELINE_TYPE",
      "command": "buildkite-agent pipeline upload $SERVICE/.buildkite/$PIPELINE_TYPE.yml"
    }
  ],
  "provider_settings": {
    "trigger_mode": "none"
  }
}
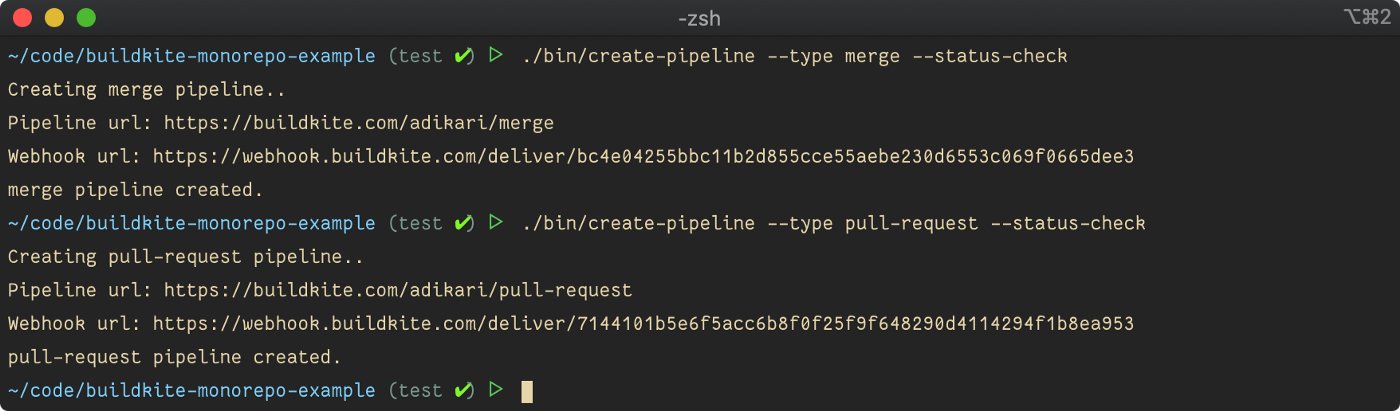
Now, run the ./bin/create-pipeline command to create a pull-request pipeline.
./bin/create-pipeline --type pull-request --status-checks
./bin/create-pipeline --type merge --status-checks
Copy the Webhook url from the console output and create a webhook integration in GitHub. The webhook URL is available in the pipeline settings in the Buildkite console if needed in the future.
We need to configure the webhook only for the pull-request and merge pipelines. All other pipelines are triggered dynamically.
Navigate to the GitHub repository Settings > Webhooks and add a webhook. Select Just the push event, then add the webhook. Repeat this for both pipelines.

Now in the Buildkite Console, there should be two newly created pipelines. 🎉

Next, add GitHub integration to allow Buildkite to send status updates to GitHub. You only need to set up this integration once per account. It is available at Setting > Integrations > Github in the Buildkite Console.

Next, create the remaining pipelines. These pipelines will be dynamically triggered by the pull-request and merge pipelines, so we do not need to create GitHub integration.
# foo service pipelines
./bin/create-pipeline --type pull-request --service foo-service
./bin/create-pipeline --type merge --service foo-service
./bin/create-pipeline --type deploy --service foo-service

# bar service pipelines
./bin/create-pipeline --type pull-request --service bar-service
./bin/create-pipeline --type merge --service bar-service
./bin/create-pipeline --type deploy --service bar-service

The Buildkite Console should now have all the pipelines listed. 🥳

Set up Buildkite Steps
Now that the pipelines are ready, let's configure steps to run for each pipeline.
Add the following script in .buildkite/diff. This script diffs between all the files changed in a commit against the master branch. The output of the script is used to trigger respective pipelines dynamically.
#!/bin/bash

[ $# -lt 1 ] && { echo "argument is missing."; exit 1; }

COMMIT=$1

BRANCH_POINT_COMMIT=$(git merge-base master $COMMIT)

echo "diff between $COMMIT and $BRANCH_POINT_COMMIT"
git --no-pager diff --name-only $COMMIT..$BRANCH_POINT_COMMIT
Change the permission of the script to make it executable.
chmod +x .buildkite/diff
Create a new file .buildkite/pullrequest.yml and add the following step configuration. We use the buildkite-monorepo-diff plugin to run the diff script and automatically upload and trigger the respective pipelines.
steps:
  - label: "Triggering pull request pipeline"
    plugins:
      chronotc/monorepo-diff#v1.1.1:
        diff: ".buildkite/diff ${BUILDKITE_COMMIT}"
        wait: false
        watch:
          - path: "foo-service"
            config:
              trigger: "foo-service-pull-request"
          - path: "bar-service"
            config:
              trigger: "bar-service-pull-request"
Now create the configuration for the merge pipeline by adding the following content in .buildkite/merge.yml.
steps:
  - label: "Triggering merge pipeline"
    plugins:
      chronotc/monorepo-diff#v1.1.1:
        diff: "git diff --name-only HEAD~1"
        wait: false
        watch:
          - path: "foo-service"
            config:
              trigger: "foo-service-merge"
          - path: "bar-service"
            config:
              trigger: "bar-service-merge"
At this point, we have configured the topmost level pull-request and merge pipelines. Now we need to configure individual pipelines for each service.
We'll configure pipelines for foo-service first. Create foo-service/.buildkite/pull-request.yml with the following content. When the pull-request pipeline for foo service runs, specify that the lint and test commands should run. The command option can also trigger other scripts.
steps:
  - label: "Foo service pull request"
    command:
      - "echo linting"
      - "echo testing"
Next, setup a merge pipeline for the foo service by adding the following content in foo-service/.buildkite/merge.yml:
steps:
  - label: "Run sanity checks"
    command:
      - "echo linting"
      - "echo testing"

  - label: "Deploy to staging"
    trigger: "foo-deploy"
    build:
      env:
        STAGE: "staging"

  - wait

  - block: ":rocket: Release to Production"

  - label: "Deploy to production"
    trigger: "foo-deploy"
    build:
      env:
        STAGE: "production"
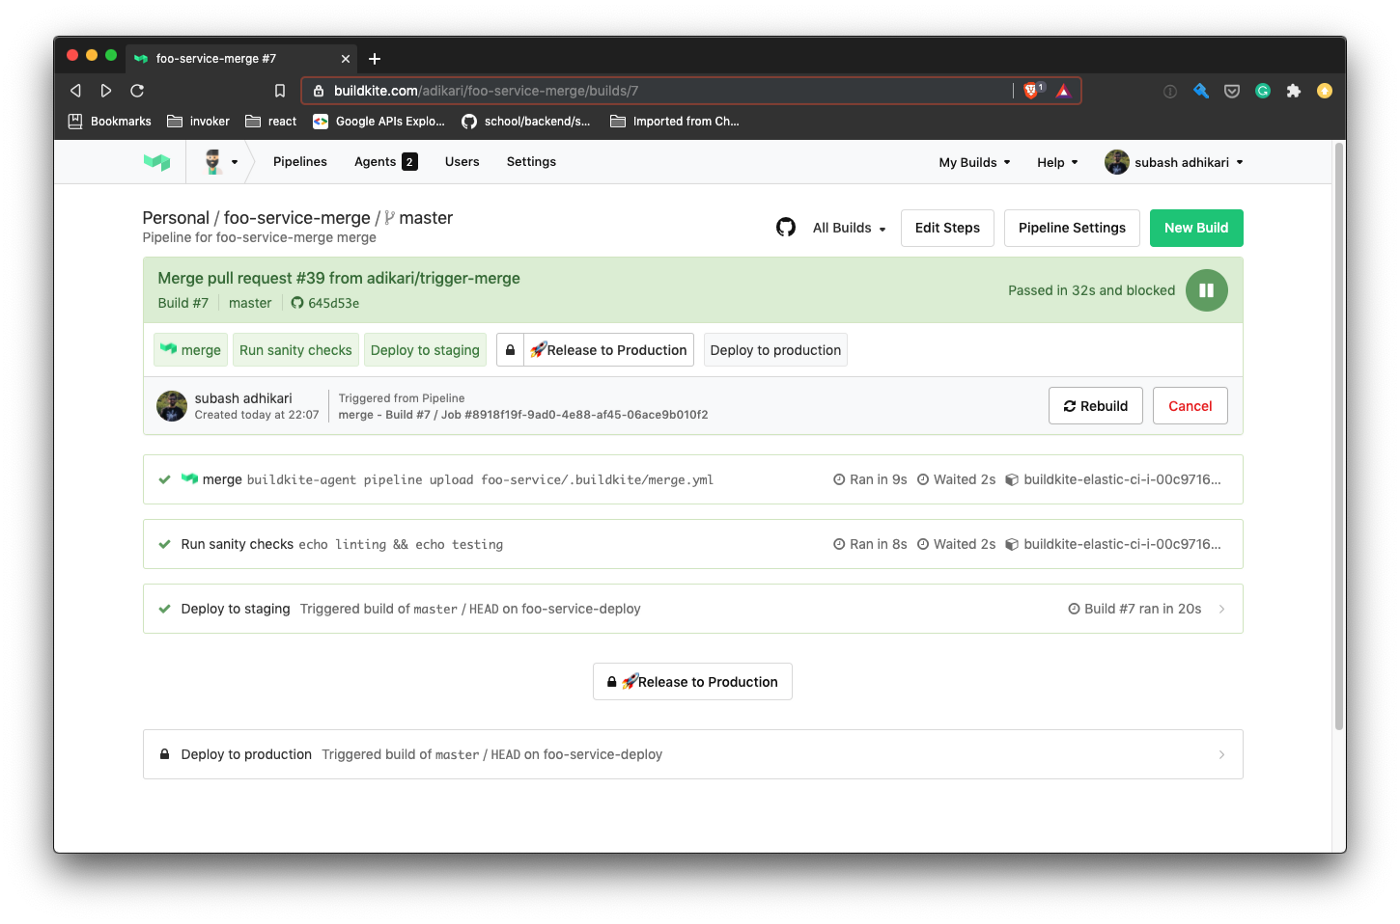
When the foo-service-merge pipeline runs, here is what happens:
- The pipeline runs the sanity check.
- Then
foo-deploypipeline is dynamically triggered. We pass theSTAGEenvironment to identify which environment to run the deployment against. - Once the deployment to staging is complete, the pipeline is blocked and the following pipeline is not triggered automatically. The pipeline can be resumed by pressing the “Release to Production” button.
- Unblocking the pipeline triggers
foo-deploypipeline again, but this time withproductionstage.
Finally, add configuration for the foo-deploy pipeline by adding foo-service/.buildkite/deploy.yml. In the deploy configuration, we trigger a bash script and pass the STAGE variable which was received from the foo-service-merge pipeline.
steps:
  - label: "Deploying foo service to ${STAGE}"
    command: "./foo-service/bin/deploy ${STAGE}"
Now, create the deploy script foo-service/bin/deploy and add the following content:
#!/bin/bash

set -euo pipefail

STAGE=$1

echo "Deploying foo service to $STAGE"
Make the deploy script executable like this:
chmod +x ./foo-service/bin/deploy
The pipeline and steps configuration for foo-service are now complete. Repeat all the above steps above to configure pipelines for bar service.
Test the overall workflow
We have configured Buildkite and GitHub and we've set up the appropriate infrastructure to run the builds. Next, test the entire workflow and see it in action.
To test the workflow, start by creating a new branch and modifying some file in foo-service. Push the changes to GitHub and create a Pull Request.
git checkout -b change-foo-service
cd foo-service && touch test.txt
echo testing >> test.txt
git add .
git commit -m 'making some change'
git push origin master

Pushing changes to GitHub should trigger the pull-request pipeline in Buildkite, which then triggers the foo-service-pull-request pipeline.
GitHub should report the status in GitHub checks. You can enable GitHub's branch protection to require the checks to pass before merging the Pull Request.

Once all the checks have passed in GitHub, merge the Pull Request. This merge will trigger the merge pipeline in Buildkite.

The changes in the foo service are detected, and foo-service-merge pipeline is triggered. The pipeline will eventually be blocked when the foo-service-deploy runs against the staging environment.
Unblock the pipeline by manually clicking the Release to Production button to run deployment against production.
Summary
In this post, we set up a continuous integration pipeline for a monorepo using Buildkite, Github, and AWS.
The pipeline gets our code from the development machine to staging, then to production. The build agents and steps run in autoscaled AWS EC2 instances.
We also created a bunch of bash scripts to create easily reproducible versions of this setup.
As an improvement to the current design, consider using the buildkite-docker-compose-plugin to isolate the builds in Docker containers.