
By Nyior Clement
In this article, we'll learn how to set up a CI/CD pipeline with GitHub Actions and AWS. I've divided the guide into three parts to help you work through it:
First, we'll cover some important terminology so you're not lost in a bunch of big buzzwords.
Second, we'll set up continuous integration so we can automatically run builds and tests.
And finally, we'll set up continuous delivery so we can automatically deploy our code to AWS.
Alright, that was a lot. Let's start by diving into each of these terms so you understand exactly what we're doing here.
Part One: Demystifying the Hefty Buzzwords
The key to making sense of the title of this piece lies in understanding the terms CI/CD Pipeline, GitHub Actions, and AWS.
If you already have a strong grasp of what these terms are, you can just skip to down to Part 2.
What is a CI/CD Pipeline?
A CI/CD Pipeline is simply a development practice. It tries to answer this one question: How can we ship quality features to our production environment faster? In other words, how can we hasten the feature release process without compromising on quality?
How does the CI/CD Pipeline help us hasten the feature release process, you might ask?
The diagram below depicts a typical feature delivery cycle with or without the CI/CD pipeline.
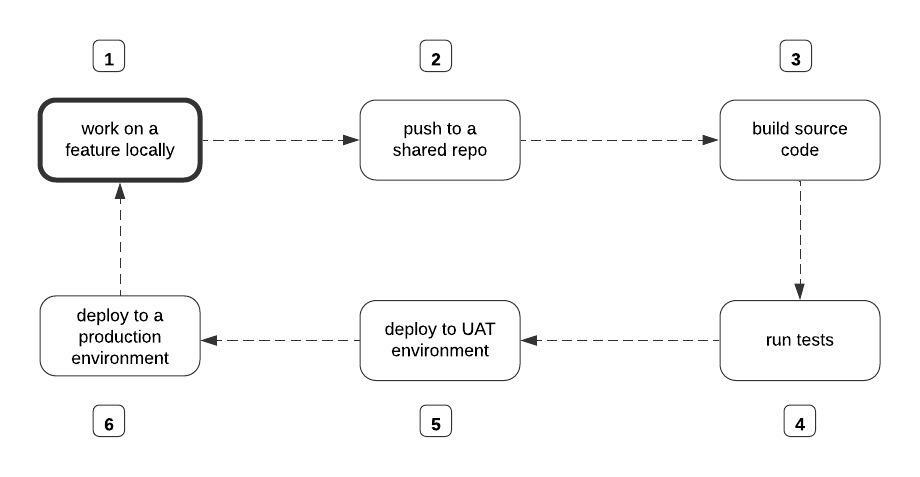 the feature release process. Source: Author
Without the CI/CD Pipeline, each step in the diagram above will be performed manually by the developer. In essence, to build the source code, someone on your team has to manually run the command to initiate the build process. Same thing with running tests and deployment.
The CI/CD approach is a radical shift from the manual way of doing things. It is entirely based on the premise that we can speed up the feature release process reasonably, if we automate steps 3-6 in the diagram above.
With the CI/CD Pipeline, we set up a mechanism that automatically starts the build process, runs the tests, deploys to the User Acceptance Testing (UAT) environment, and finally to the production environment each time a member of the team pushes their change to the shared repo, for example.
Continuous Integration happens each time the build process is initiated, and tests run on a new change.
Continuous Delivery happens when a newly integrated change is automatically deployed to the UAT environment and then manually deployed to the production environment from there.
Continuous Deployment happens when an update in the UAT environment is automatically deployed to the production environment as an official release.
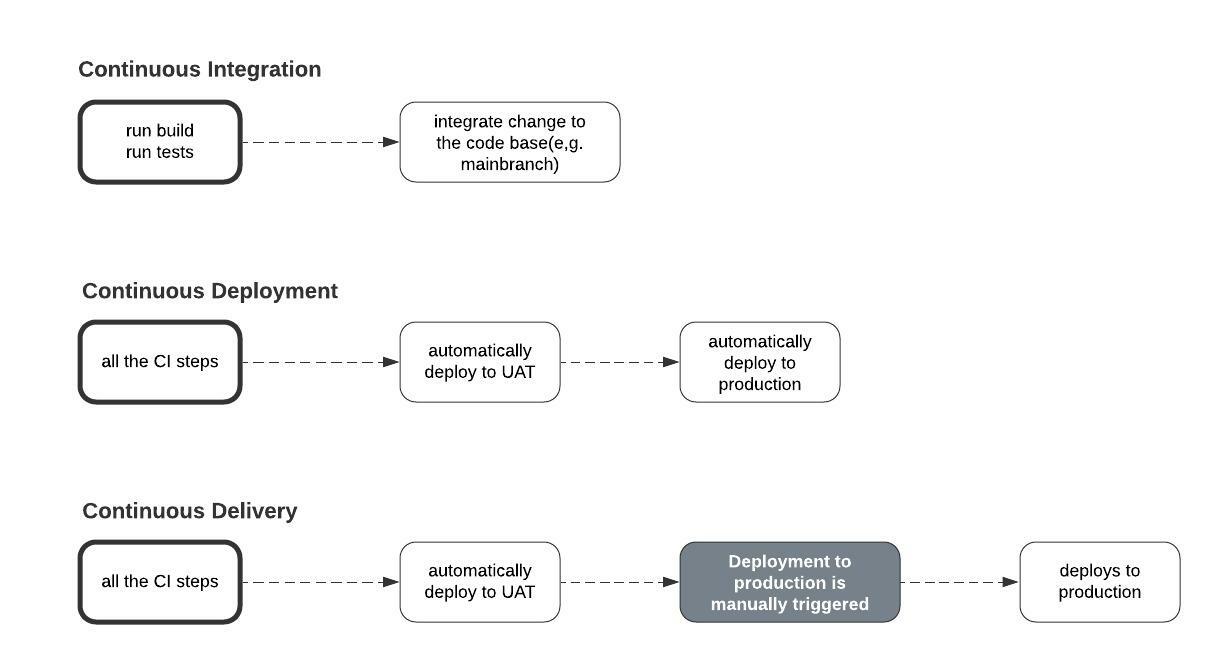 Continuous Integration vs Continuous Deployment vs Continuous Delivery. Source: Author
Note: If the deployment from the UAT environment to the production environment is initiated manually, then it is a Continuous Integration/Continuous Delivery setup. Otherwise, it is a Continuous Integration/Continuous Deployment set up.
However, we can't help but ask, what is that entity that automates the different phases of the CI/CD Pipeline?
There are variety of tools we can use to automate the build, tests, and deployment steps in the CI/CD Pipeline – for example, CI Circle, Travis CI, Jenkins, GitHub Actions, and so on. In this article we will be focusing on GitHub Actions.
What are GitHub Actions?
For want of a better way of making the GitHub Actions term super comprehensible, I'm going to oversimplify this.
In the CI/CD Pipeline, GitHub Actions is the entity that automates the boring stuff. Think of it as some plugin that comes bundled with every GitHub repository you create.
The plugin exists on your repo to execute whatever task you tell it to. Usually, you'd specify what tasks the plugin should execute through a YAML configuration file. Whatever command you add to the configuration file, will translate to something like this in plain English:
"hey GitHub Actions, each time a PR is opened on X branch, automatically build and test the new change. And each time a new change is merged into or pushed to X branch, deploy that change to Y server."
At the core of GitHub Actions lies five concepts: jobs, workflows, events, actions, and runners.
Jobs are the tasks you command GitHub Actions to execute through the YAML config file. A job could be something like telling GitHub actions to build your source code, run tests, or deploy the code that has been built to some remote server.
Workflows are essentially automated processes that contain one or more logically related jobs. For example, you could put the build and run tests jobs into the same workflow, and the deployment job into a different workflow.
Remember, we mentioned that you tell GitHub Actions what job(s) to execute through a configuration file right? GitHub Actions considers each configuration file that you put in some folder in your repo a workflow. We will talk more about this folder in the next part.
So, to create a separate workflow for the deployment job and then a different workflow that combines the build and tests jobs, you'd have to add two config files to your repo. But if you are merging all the three jobs into a single workflow, then you'd need to add just one config file.
Events are literally the events that trigger the execution of a job by GitHub Actions. Recall we mentioned passing jobs to be executed through a config file? In that config file you'd also have to specify when a job should be executed.
For example, is it on-PR to main? Is it on-push to main? is it on-merge to main? A job can only be executed by a GitHub Action when some event happens.
Okay, let me quickly correct myself. It's not always the case that some event has to happen before a job could be executed. You could schedule jobs too.
For example, in your config file, instead of specifying that the event that should trigger the execution of, let's say, the build-and-test job, you could schedule it to happen a 2am everyday. In fact, you could both schedule a job and specify an event for that same job.
Actions are the reusable commands that you can reuse in your config file. You can write your custom actions or use existing ones.
A runner is the remote computer that GitHub Actions uses to execute the jobs you tell it to.
For example, when the build-and-test job is triggered based on some event, GitHub Actions will pull your code to that computer and execute the job.
The same thing happens in the case of the deployment job. The runner triggers the deployment of the built code to some remote server you specify. In our case, we will be using a service called AWS.
What is AWS?
AWS stands for Amazon Web Services. It is a platform owned by Amazon, and this platform allows you access to a broad range of cloud computing services.
Cloud computing – I thought you said no big words? Most times businesses and even individual developers build applications just so other people can use them. For that reason, these applications have to be available on the interwebs.
Making an application accessible to some target users, ideally, entails uploading that application to a special computer that runs 24/7 and is super fast.
Imagine if it were the case that, before you could make your applications available to other internet users, you'd have to own and set up such a computer. It is quite doable, but it comes with a lot of hurdles.
For example, what if you just want to test out the application? You'd go through all the stress of setting up a hardware infrastructure just for testing? Furthermore, what if you want to upload 1000 different applications or your application is beginning to handle 1billion concurrent requests? Things start to get complicated.
Cloud computing platforms like AWS exist to save you all that stress. These platforms already have numerous of these special computers setup and kept in buildings called data centers.
Instead of having to setup your own hardware infrastructure from scratch, they allow you upload your application to one of their pre-configured computers over the internet. In return, you pay some certain amount to them.
In fact, some of these platforms have free plans that allows you test out small applications. In addition to uploading your application's code, some of these platforms also allow you host your database and store your media files, amongst other features.
In its most simplistic form, Cloud Computing is primarily about storing or executing (sometimes both) certain things on someone else's computer, usually, over a network.
So when I said AWS gives access to a wide range of cloud services, I was just saying it provides businesses and individuals with some special computer where they could upload their code, databases, and media files as a service.
Okay, now that we fully understand the different parts of our title, we will now restate it in the form of objectives. These objectives will then dictate what the remaining two parts in this article will contain.
Objective 1: How to automatically build and run unit tests on push or on PR to the main branch with GitHub Actions.
Objective 2: How to automatically deploy to AWS on push or on PR to the main branch with GitHub Actions.
Part 2: Continuous Integration – How to Automatically Run Builds and Tests
In this section, we will be seeing how we can configure GitHub Actions to automatically run builds and tests on push or pull request to the main branch of a repo.
Prerequisites
- A Django project setup locally with at least one view that returns some response defined.
- A testcase written for the view(s) you've defined.
I have created a demo Django project which you can grab from this repository:
git clone [https://github.com/Nyior/django-github-actions-aws](https://github.com/Nyior/django-github-actions-aws)
After you download the code, create a virtualenv and install the requirements via pip:
pip install -r requirements.txt
Note: The project already has all the files we will be adding incrementally as we proceed. Maybe you could still download and try to make sense of the content of the files as we proceed. The project is certainly not interesting. It's just created for demo purposes.
Now that you have a Django project setup locally, let's configure GitHub Actions.
How to Configure GitHub Actions
Okay, so we have our project setup. We also have a testcase written for the view that we have defined, but most importantly we've pushed our shiny change to GitHub.
The goal is to have GitHub trigger a build and run our tests each time we push or open a pull request on main/master. We just pushed our change to main, but GitHub Actions didn't trigger the build or run our tests.
Why not? Because we haven't defined a workflow yet. Remember, a workflow is where we specify the jobs we want GitHub Actions to execute.
In fact, Nyior, how did you even know that no build was triggered and by extension no workflow defined? Every GitHub repo has an Action tab. If you navigate to that tab, you'll know if a repo has a workflow defined on it or not.
How? See the images below.
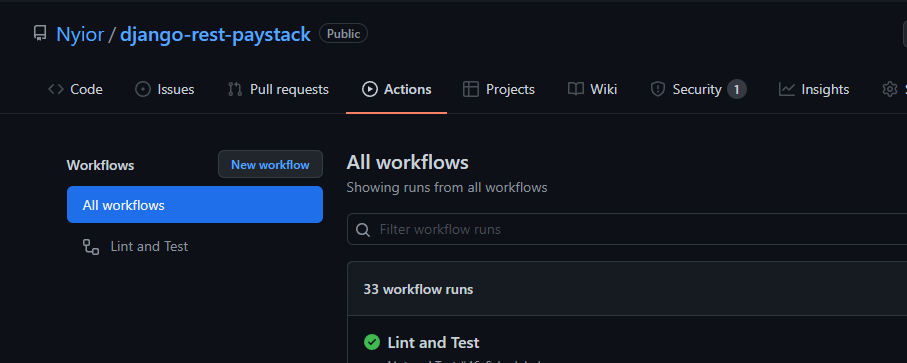 A GitHub Repo With a Workflow Defined on it
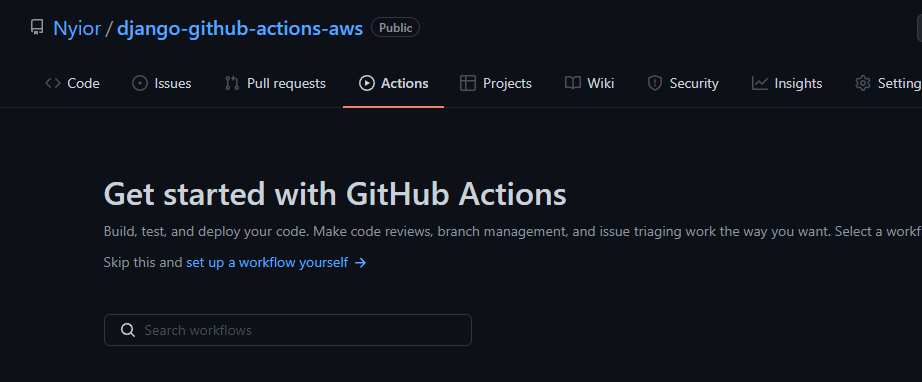 A GitHub Repo With No Workflow Defined on it
The first repo in the first image has a workflow defined on it named 'Lint and Test'. The second repo in the second image has no workflow – it's why you don't see a list with the heading 'All Workflows' as is the case with the first repo.
Oh okay, now I get it. So how do I define a workflow on my repo?
- Create a folder named
.githubin the root of your project directory. - Create a folder named
workflowsin the.githubdirectory: This is where you'll create all your YAML files. - Let's create our first workflow that will contain our build and test jobs. We do that by creating a file with a
.ymlextension. Let's name this filebuild_and_test.yml - Add the content below in the
yamlfile you just created:
name: Build and Test

on:
  push:
    branches: [main]
  pull_request:
    branches: [main]

jobs:
  test:
    runs-on: ubuntu-latest

    steps:
    - name: Checkout code
      uses: actions/checkout@v2
    - name: Set up Python Environment
      uses: actions/setup-python@v2
      with:
        python-version: '3.x'
    - name: Install Dependencies
      run: |
        python -m pip install --upgrade pip
        pip install -r requirements.txt

    - name: Run Tests
      run: |
        python manage.py test
Let's make sense of each line in the file above.
name: Build and TestThis is the name of our workflow. When you navigate to the actions tab, each workflow you define will be identified by the name you give it here on that list.on:This is where you specify the events that should trigger the execution of our workflow. In our config file we passed it two events. We specified the main branch as the target branch.jobs:Remember, a workflow is just a collection of jobs.test:This is the name of the job we've defined in this workflow. You could name it anything really. Notice it's the only job and the build job isn't there? Well, it's Python code so no build step is required. This is why we didn't define the build job.runs-onGitHub provides Ubuntu Linux, Microsoft Windows, and macOS runners to run your workflows. This where you specify the type of runner you want to use. In our case, we are using the Ubuntu Linux runner.- A job is made up of a series of
stepsthat are usually executed sequentially on the same runner. In our file above, each step is marked by a hyphen.namerepresents the name of the step. Each step could either be a shell script that is being executed or anaction. You define a step withusesif it's executing anactionor you define a step withrunif it's executing a shell script.
Now that you've defined a workflow by adding the config file in the designated folder, you can commit and push your change to your remote repo.
If you navigate to the Actions tab of your remote repo, you should see a workflow with the name Build and Test (the name which we've given it) listed there.
Part 3: Continuous Delivery – How to Automatically Deploy Our Code to AWS
In this section, we will see how we can have GitHub Actions automatically deploy our code to AWS on push or pull request to the main branch. AWS offers a broad range of services. For this tutorial, we will be using a compute service called Elastic Beanstalk.
Compute Service? Elastic Beanstalk? Come onnn :(
No worries, relax, you'll get it. Remember we mentioned that cloud computing is all about storing and executing certain things on someone else's computer via the internet right – certain things?
Yes. For example, we can store and execute source code or we can just store media files. Amazon knows this, and as a result, their cloud infrastructure encompasses a plethora of service categories. Each service category allows us do a certain thing out of the certain things that we can do.
For example, there is a service category that allows the upload and execution of source codes that power our applications (Compute Service). There is the service category that allows us persist our media files (Storage Service). Then there is the service category that allows us manage our databases (Database Service).
Each service category is made up of one or more services. Each service in a category just presents us with a different way of solving the problem that the category it belongs to addresses.
For example, each service in the compute category provides us with a different approach to deploying and executing our application code on the cloud – one problem, different approaches. Elastic Beanstalk is one of the services in the compute category. Others are, but not limited to, EC2 and Lambda.
Amazon S3 is one of the services in the storage category. And Amazon RDS is one of the services in the Database category.
Hopefully, you now understand what I mean by "we will be using a compute service called Elastic Beanstalk." Of all the compute services, why Elastic Beanstalk? Well, because it's one of the easiest to work with.
That Being Said, Let's Configure Stuff <3
For brevity's sake we are going with the Continuous Delivery setup. In addition, we are going to have just one one deployment environment that will serve as our UAT environment.
To help you get the big picture right, in summary, this is how our deployment setup is going to work: on push or pull request to main, GitHub Actions will test and upload our source code to Amazon S3. The code is then pulled from Amazon S3 to our Elastic Beanstalk environment. Picture the flow this way:
GitHub -> Amazon S3 -> Elastic Beanstalk
Why aren't we pushing directly to Elastic Beanstalk, you might ask?
The only other way we could upload code directly to an Elastic Beanstalk instance with our current setup, is if we were using the AWS Elastic Beanstalk CLI (EB CLI).
Using the EB CLI requires running some shell command that would then require that we respond with some input.
Now, if we are deploying from our local machine to Elastic Beanstalk, when we run the EB CLI commands, we'd be there to type in the required responses. But with our current setup, those commands would be executed on GitHub Runners. We wouldn't be there to provide the required responses. The EB CLI isn't the easiest deployment tool for our use case.
With the approach we've picked, we'd run a shell command that uploads our code to S3 and then another command that pulls the uploaded code to our Elastic Beanstalk instance. These commands, when run, do not require that we submit some responses. Having the Amazon s3 step is the easiest way to go about this.
To implement our approach and have our code deployed to Elastic Beanstalk, follow the steps below:
Step 1: Setup an AWS Account
Create an IAM. To keep things simple, when adding permissions, just add "Administrator Access" to the user (this has some security pitfalls, though). To accomplish this, follow the steps in modules 1 and 2 of this guide.
In the end, make sure to grab and keep your AWS secret and access keys. We will be needing them in the subsequent sections.
Now that we have an AWS account properly setup, it's time to set up our Elastic Beanstalk environment.
Step 2: Setup your Elastic Beanstalk Environment
Once logged into your AWS account, take the following steps to set up your Elastic Beanstalk environment.
First, search for "elastic beanstalk" in the search field as shown in the image below. Then click on the Elastic Beanstalk service.
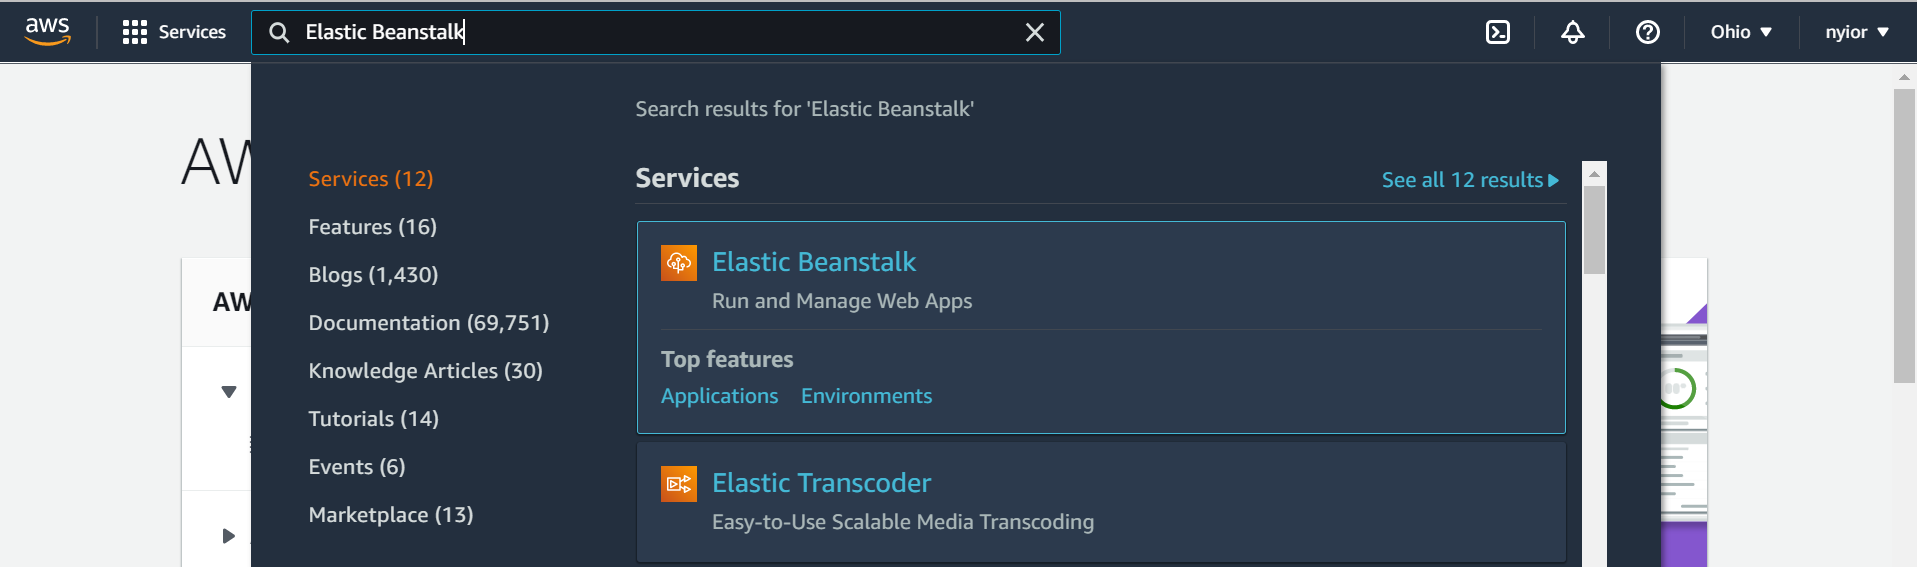 searching for elastic beanstalk.
Once you click on the Elastic Beanstalk service in the previous step, you'll be taken to the page shown in the image below. On that page, click on the "Create a New Environment" prompt. Make sure to select "Web server environment" in the next step.
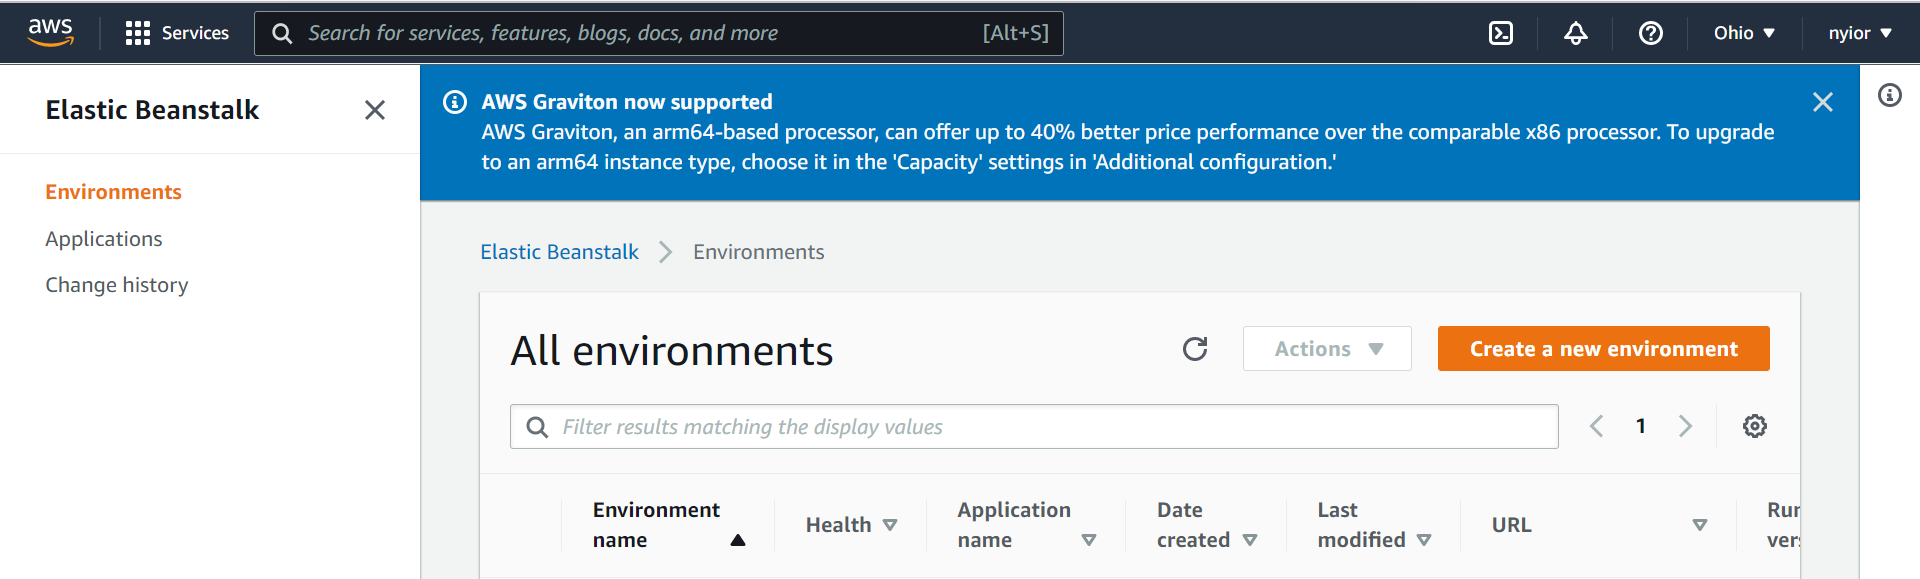 creating an environment
After selecting the "Web server environment" in the previous page you'll be taken to the page shown in the images below.
On that page, submit an application name, an environment name, and also select a platform. For this tutorial, we are going with the Python platform.
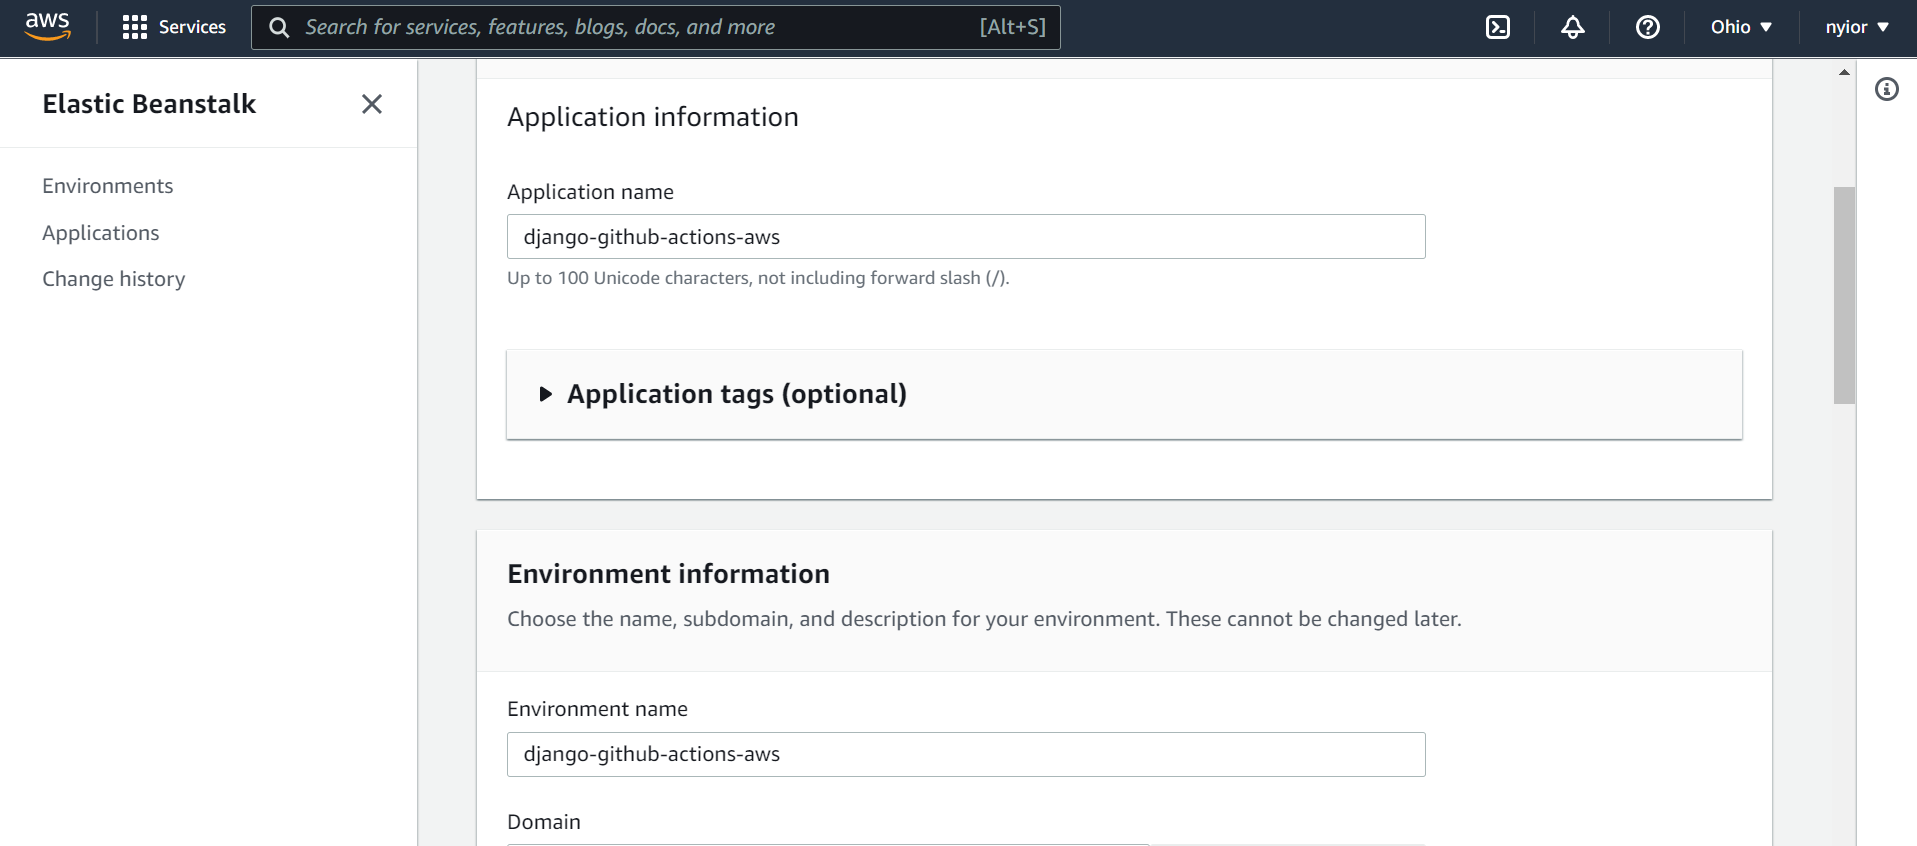 an application and an environment names
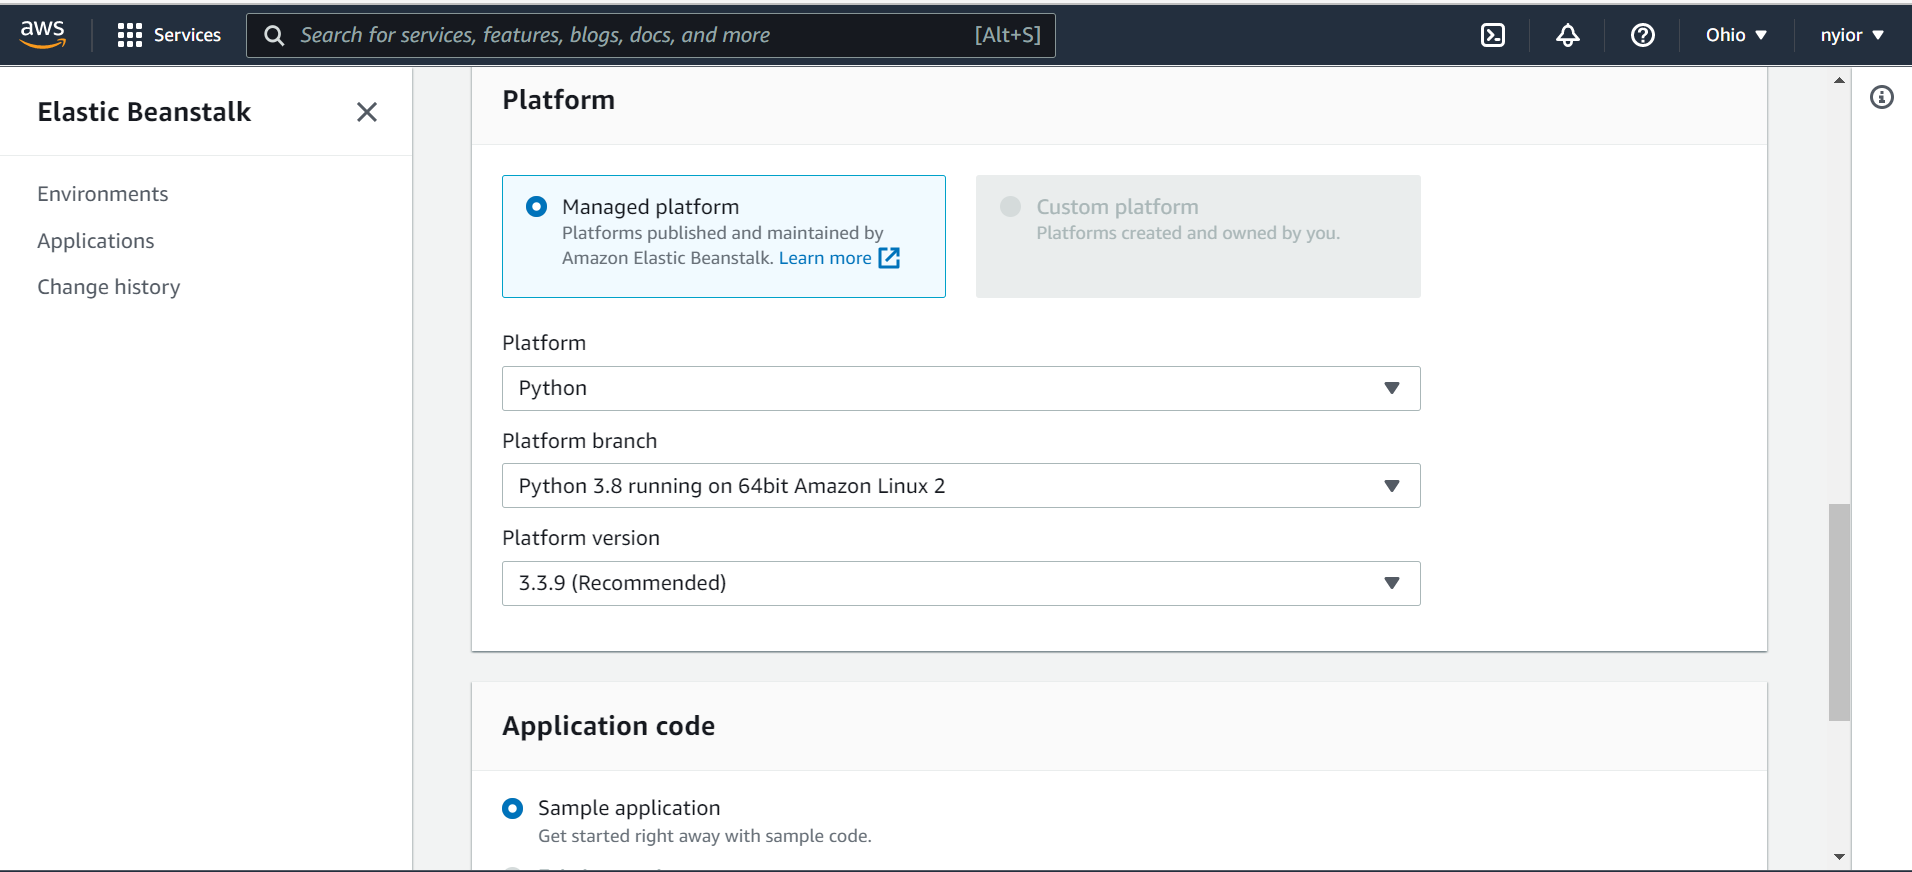 selecting a platform
Once you submit the form filled out in the previous step, after a while your application and its associated environment will be created. You should see the names you submitted displayed on the left side bar.
Grab the application name and the environment name. We will be needing them in the subsequent steps.
Now that we have our Elastic Beanstalk environment fully setup, it's time to configure GitHub Actions to trigger automatic deployment to AWS on push or pull request to main.
Step 3: Configure your Project for Elastic Beanstalk
By default, Elastic Beanstalk looks for a file named application.py in our project. It uses that file to run our application, but we don't have that file in our project. Do we? We need to tell Elastic Beanstalk to use the wsgi.py file in our project to run our application instead. To do that, take the following step:
Create a folder named .ebextensions in your project directory. In that folder create a config file. You can name it anything you want. I named mine eb.config. Add the content below to your config file:
option_settings:
  aws:elasticbeanstalk:container:python:
    WSGIPath: django_github_actions_aws.wsgi:application
After completing the step above, your project directory should now look similar to the one in the image below:
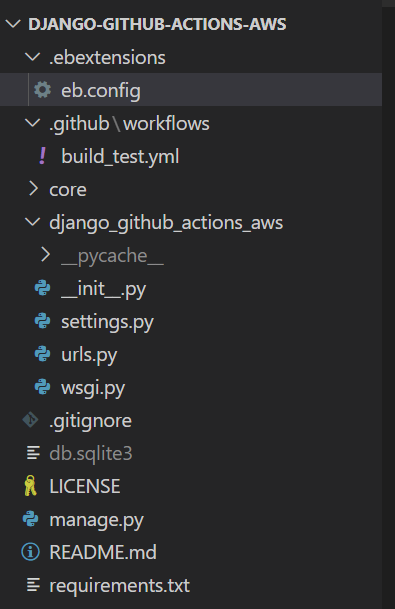 demo project structure
One last thing you need to do in this section is to go to your settings.py file and update the ALLOWED_HOSTS setting to all:
ALLOWED_HOSTS = ['*']
Note that using the wildcard has major security drawbacks. We are only using it here for demo purposes.
Now that we are done configuring our project for Elastic Beanstalk, it's time to update our workflow file.
Step 4: Update your Workflow File
There are five important pieces of information we need to complete this step: application name, environment name, access key id, secret access key, and the server region (after login, you can grab the region from the right-most section of the navbar).
Because the access key id and the secret access key are sensitive data, we'll hide them somewhere in our repository and access them in our workflow file.
To do that, head over to the settings tab of your repo, and then click on secrets as shown in the image below. There, you can create your secrets as key-value pairs.
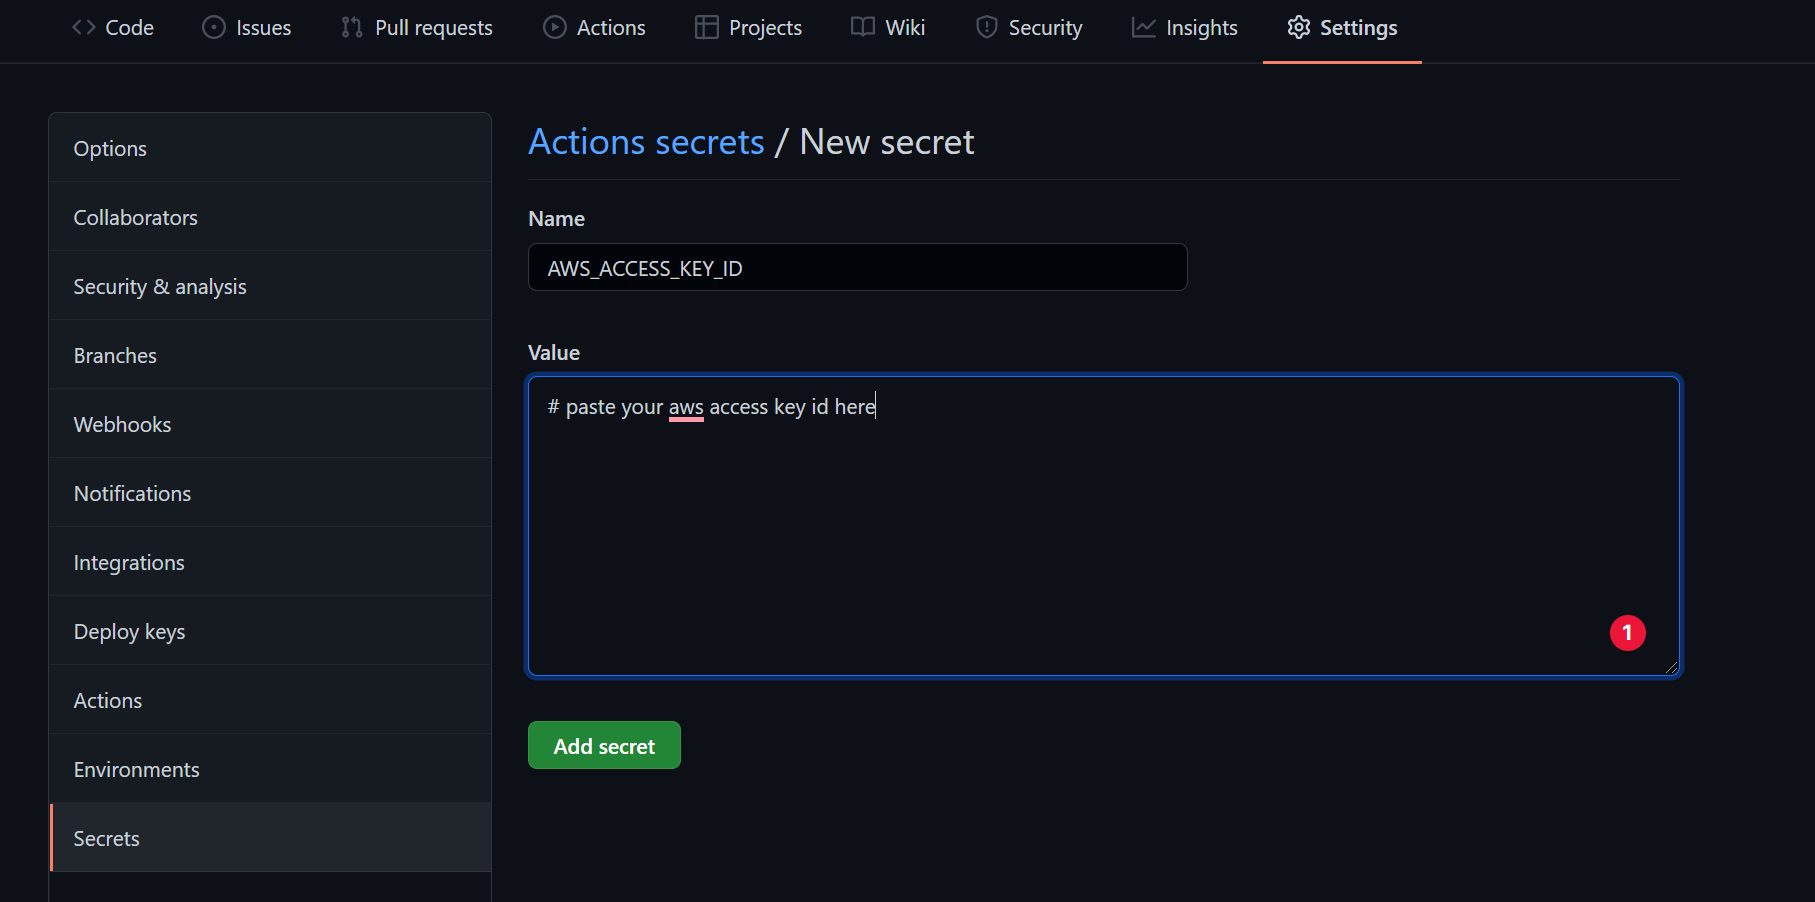 embedding secret data in your repo
Next, add the deployment job to the end of your existing workflow file:
deploy:
    needs: [test]
    runs-on: ubuntu-latest

    steps:
    - name: Checkout source code
      uses: actions/checkout@v2

    - name: Generate deployment package
      run: zip -r deploy.zip . -x '*.git*'

    - name: Deploy to EB
      uses: einaregilsson/beanstalk-deploy@v20
      with:

          // Remember the secrets we embedded? this is how we access them
        aws_access_key: ${{ secrets.AWS_ACCESS_KEY_ID }}
        aws_secret_key: ${{ secrets.AWS_SECRET_ACCESS_KEY }}

        // Replace the values here with your names you submitted in one of
        // The previous sections
        application_name: django-github-actions-aws
        environment_name: django-github-actions-aws

        // The version number could be anything. You can find a dynamic way
        // Of doing this.
        version_label: 12348
        region: "us-east-2"
        deployment_package: deploy.zip
needs simply tells GitHub Actions to only start executing the deployment job after the test job has been completed with a passing status.
The step Deploy to EB uses an existing action, einaregilsson/beanstalk-deploy@v20. Remember how we said actions are some reusable applications that takes care of some frequently repeated tasks for us? einaregilsson/beanstalk-deploy@v20 is one of those actions.
To reinforce the above, remember that our deployment was suppose to go through the following steps: GitHub -> Amazon S3 -> Elastic Beanstalk.
However, throughout this tutorial, we didn't do any Amazon s3 set up. Furthermore, in our workflow file we didn't upload to an s3 bucket nor did we pull from an s3 bucket to our Elastic Beanstalk environment.
Normally, we are supposed to do all that, but we didn't here – because under the hood, the einaregilsson/beanstalk-deploy@v20 action does all the heavy lifting for us. You can also create your own action that takes care of some repetitive tasks and make it available to other developers through the GitHub Marketplace.
Now that you've updated your workflow file locally, you can then commit and push this change to your remote. Your jobs will run and your code will be deployed to the Elastic Beanstalk instance you created. And that's it. We're done >>>
Wrapping Up
Wow! This was a really long one, wasn't it? In summary I explained what the terms GitHub Actions, CI/CD Pipeline, and AWS mean. In addition, we saw how we could configure GitHub Actions to automatically deploy our code to an Elastic Beanstalk instance on AWS.
If you love this work, and would like to stay up to date on future articles I will be putting out, let's connect on Twitter, Linkedin, or GitHub. I use those channels to share what I work on, immediately after I put them out.
Credits:
Cover image: www.freepik.com