

In this tutorial, you'll learn how to set up dynamic routing in Next.js. You'll also learn about pre-rendering and why it's important.
🔐 Here's what we'll cover:
- You'll get to know
getStaticPaths(), one of the core principles of Next.js. - You'll improve your general Next.js knowledge and confidence.
- You'll have access to a quick-replicable example for your own Next.js learning purposes.
📝 Prerequisites
- You should be familiar with what Next.js is and why you should consider using it.
- You should have some understanding of what Routing and Dynamic Routing mean in React and/or Next.js.
- For this example, I work with TypeScript. But it's not necessary for you to be familiar with TypeScript. I will address the code which would be omitted when using JavaScript. Also, whenever you see
.tsxregarding any files, you can just replace that with.jsif you are using JavaScript.
🎯 The Objective
This quick guide aims to help you manage fetching data, which can be used for pre-rendering purposes within dynamic routes in Next.js. We'll discuss some theory as well as a practical example.
While we are focusing on the actual logic of the required code, I won't do any CSS styling whatsoever. Feel free to get creative on the frontend for your own project when you're using the techniques we discuss in this tutorial.
🔎 How Routing Works in Next.js
While React itself uses a code-based approach for any routing intentions, Next.js utilizes a file-system for the concept of routing.
Therefore, you are probably familiar with code-based routing in React, which may look similar to this:
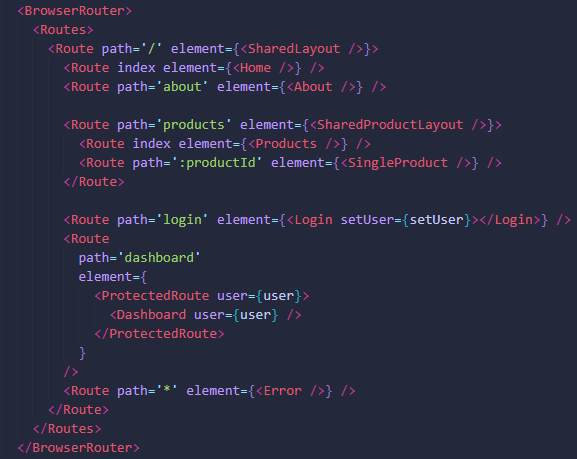 Example for code-based React Routing
With this code-based approach, you are, for example, able to navigate from the main route at / to the about page through /about.
You are also able to find a dynamic routing approach in this React example with the :productId path.
With Next.js, though, we don't use such code-based routing anymore. Instead, this React framework makes use of file-based routing. This means that you set up your routes directly through page files.
Consider the following pages folder containing subfolders and files:
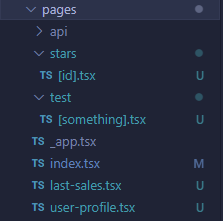 Example for file-based Next.js Routing
The index.tsx file would be the equivalent to the / path in the React Routing example from above. So you would be able to reach the content within the user-profile.tsx file through /user-profile – that's it!
On the other hand, if you want to reach out to some nested content, you can use /stars/[id] in order to find the content in the corresponding page file.
Maybe you noticed that I'm using square brackets for [id].tsx as well as for [something].tsx. That's needed in order to set up dynamic routing in Next.js.
You could technically insert any input you would like for [id] and the page would load for this specific path.
Just keep in mind that if this dynamic route requires a valid input for [id] (maybe some sort of existing product id for which we want to fetch the respective data), then there could be an error.
✂️ Data Fetching in Next.js with Dynamic Routing
Imagine you apply this dynamic routing approach to a shop page where you list a bunch of different items. Each item would have a link for more information about that specific item.
Within this Link element, you would be able to lead the user to a dynamic route with a valid parameter (the corresponding product id, for example). For such cases, dynamic routing is the best approach.
❗How does getStaticProps() work?
With this function, you can pre-render a page at build time. This is useful for Search Engine Optimization (SEO) purposes, for example, and can overall generate a better user experience.
The data which should be pre-rendered can typically be found on some database, for example. Like with getStaticProps(), you are able to directly write any server-side code within this function for data fetching purposes (instead of reaching out to an API route on the backend, which then goes through any required server-side actions).
There is more to say about getStaticProps(). If you are pretty new to all this stuff, I highly recommend checking out the official Next.js documentation on this topic.
❓ What's the purpose of getStaticPaths()?
While getStaticProps() on its own seems to already do all the work we need to be done for our pages, we will encounter an error when we use this function alone on dynamic routing pages. The error message will actually call you out on this specific fact that getStaticPaths() is missing.
 Screenshot of server error. SSG stands for Static-Site Generation
getStaticProps() utilizes the static-site generation concept. So Next.js will pre-render the respective page at build time. In the case of dynamic routes, however, Next.js doesn't know by itself which paths to pre-render. Instead, you have to step in and help – and this is where getStaticPaths() comes in handy.
So with getStaticPaths you can specify which paths of the dynamic routing should be pre-rendered and/or how unknown paths should be handled.
📋 Quick side note
If you are using getServerSideProps(), which can be used for similar reasons as getStaticProps(), you will notice that getStaticPaths() is actually not needed. Why is that?
getServerSideProps() doesn't use the static generation principle. Instead of building the page, Next.js pre-renders the page on each request with the returned data. This is called server-side rendering.
We don't have to tell Next.js which paths have to be statically pre-rendered while using getServerSideProps(), since there is no such thing for this function in the first place.
If you want to read more about this function, I can again recommend the official Next.js documentation for server-side rendering. However, this is out of the scope of this quick guide and I won't need getServerSideProps() for any of the following steps.
🔧 How to Setup Our Project
For this example, we will reproduce a small dynamic routing case. For this, I prepared a subfolder test in the pages folder. The pages folder gets automatically created by Next.js.
In the test folder, I insert the [something].tsx file ([something].js if you are using JavaScript and not TypeScript).
There is also a backendData folder at the root level of our Next.js application with the some-backend-data.json file (thus not in the pages folder). This file will provide us with the data which we will insert dynamically.
🔨 Setup for the backend JSON data
For this example, I'm creating some dummy data which will be embedded in the some-backend-data.json within the backendData folder. This way, we can reproduce a situation where you have access to some sort of data in the backend that you want to use on the frontend.
Here's what the some-backend-data.json file looks like:
{
    "stars": [
        {
            "id": "St2-18",
            "name": "Stephenson 2-18",
            "description": "Stephenson 2-18 is a red supergiant (RSG) or possible extreme red hypergiant (RHG) star in the constellation of Scutum.",
            "link": "https://en.wikipedia.org/wiki/Stephenson_2-18"
        },
        {
            "id": "UY-SC",
            "name": "UY Scuti",
            "description": "UY Scuti is an extreme red hypergiant or red supergiant star in the constellation Scutum.",
            "link": "https://en.wikipedia.org/wiki/UY_Scuti"
        },
        {
            "id": "RSGC1",
            "name": "RSGC1-F01",
            "description": "RSGC1-F01 is a red supergiant located in the RSGC1 open cluster in the constellation of Scutum.",
            "link": "https://en.wikipedia.org/wiki/RSGC1-F01"
        }
    ]
}
In this file you will find some JSON formatted data. There is "stars" which is just an array with three objects. All three objects have the same format and include an id, a name, a description, and a link to an external web page.
As you may have figured out by now, these are actually some real stars in our universe.
In a real-world situation, you would probably have some sort of connection to a databank, but the actual data you are receiving from this databank could technically be formatted as in this example. So this is sufficient for our example setup.
🔑 Imports and interface
As a next step, we can dive into actually creating the Next.js [something].tsx dynamic route. Let's start with the required imports for this example:
import { GetStaticProps, GetStaticPaths  } from 'next';
import { useRouter } from 'next/router';
import path from 'path';
import fs from 'fs/promises';

interface starInterface {
    id: string
    name: string
    description: string
    link: string
}
Keep in mind that I'm using TypeScript here. If you are using JavaScript, that's of course fine as well. Just remember that you don't need the interface starInterface or import { GetStaticProps, GetStaticPaths } from 'next'.
💎 How to Create the Data Fetching Function
For the next step, I will prepare an async function called getData(), which will be helpful for the getStaticProps() and getStaticPaths() functions. This will look quite confusing, especially if you have never had contact with backend JavaScript code like you would expect in any Node.js application, for example.
Just bear with me for a few more seconds. You don't have to understand the following code in detail. We just need to know what the result of the getData() function is.
async function getData() {
    const filePath = path.join(process.cwd(), 'backendData', 'some-backend-data.json');
    const fileData = await fs.readFile(filePath);
    const data = JSON.parse(jsonData.toString());

    return data;
  }
As you can see, there are three variables: filePath, fileData, and data. With filePath we are just focusing on the file where we have our JSON data placed. So we are targeting the current working directory (cwd), then the backendData folder, and then the JSON file.
With fileData we are trying to read this file and extract the actual JSON data that is stored in it.
We need data to convert this fileData so we can actually use it for our next steps.
All in all, getData() basically just provides us with the data from the some-backend-data.json file so we can utilize it in getStaticProps() as well as in getStaticPaths(). There is not much more to it.
🔨 Setup for getStaticProps()
After we implement getData() (which will come in handy when we try to fetch our dummy backend data), we'll now create the getStaticProps() function next.
Here, we'll use getStaticProps() to enable pre-rendering for the specific fetched data for the paths in our dynamic route.
Before we jump right into the code example below, have a quick thought about what we actually want to accomplish.
The user should be directed to this specific dynamic route, which is indicated by a unique identifier in the URL. By that, I mean that we want /test/St2-18 and test/UY-SC to lead to the same dynamic page.
The data that the user will see there should, however, differ from each other since we want to fetch data for St2-18 and UY-SC, respectively.
We have a getData() function which helps reach out to our backend data. But we still have to know which exact data we want to extract from our dummy backend.
For this step, we can pull the specific identifier from the URL, St2-18 for example, and combine this with our extracted getData() result data.
From there we can search for the specific object containing the data we want to display within our backend's getData() result.
Now, let's head back to our code example to see this process in action.
See the following code section where we implement getStaticProps():
export const getStaticProps: GetStaticProps = async (context) => {
    const itemID = context.params?.something;
    const data = await getData();
    const foundItem = data.stars.find((item: starInterface) => itemID === item.id);

    if (!foundItem) {
      return {
        props: { hasError: true },
      }
  }

  return {
    props: {
      specificStarData: foundItem
    }
  }
}
For JavaScript, you can just omit GetStaticProps as the type for getStaticProps().
getStaticProps() can provide us with a context parameter through which we can reach some helpful methods. For now, it's just important to understand that through context we are able to access params and then afterwards reach out to the current identifier of our specific path for which something is the placerholder.
Remember that this file is actually called [something].tsx, which is why we access something in this context.
With this approach, we successfully extract the information we need from our URL to search for the specific object in our backend data array. Then we save this information in the itemID variable.
Let's say the user reaches out to /test/St2-18, then itemID would hold the value of St2-18.
Since we have our handy getData() function, we can just get our backend data through this function and save it to data.
Since we now have itemID as well as data, we can combine both variables and create foundItem. This returns the object that includes the itemID as an id.
With the if statement, we are checking if foundItem actually exists. Or in other words, we check if our backend data contains data with the corresponding id we extracted through our itemID.
If no data can be found, we return this boolean hasError with the value true. This helps us manage such cases on the frontend.
If there is data, then we return our foundItem to the frontend. Keep in mind that everything you return in this props object will actually be exposed to the frontend. So don't return any credentials (personal API keys, for example).
🔨 Setup for getStaticPaths()
Before we head to the frontend part of our dynamic page, we still need to implement the getStaticPaths() function:
  export const getStaticPaths: GetStaticPaths = async () => {
    const data = await getData();
    const pathsWithParams = data.stars.map((star: starInterface) => ({ params: { something: star.id }}))

    return {
        paths: pathsWithParams,
        fallback: true
    }
  }
For JavaScript, you can just omit GetStaticPaths as the type for getStaticPaths(). You can also delete starInterface for JavaScript.
Within the getStaticPaths() function, we want to tell Next.js which paths should be pre-rendered.
For this step, we are accessing our backend data with getData(), as you saw in getStaticProps().
getStaticPaths() demands a specific form for the paths within the return. You actually have two options:
- The first one is the approach I am using in this example:
paths: [{ params: { something: star.id } }]. It should be an array with an object for every path you want Next.js to pre-render. - The second option is to use path strings like this:
paths: ['/test/St2-18', '...', '...'].
Both techniques achieve the same behavior, so just pick the one you prefer.
What is the fallback property?
It's important to understand is that you don't need to include every path which should be pre-rendered. This is especially helpful when you have a lot of cases to consider and don't want everything to be pre-rendered.
To handle such cases, the fallback property is particularly useful
You can read more about the fallback in detail in the official Next.js documentation.
In my own words, I would explain it like this:
fallbackset tofalsewould automatically lead to a 404 error page whenever the user tried to access a path which wasn't recognized bygetStaticPaths()through the paths property.fallbackset totruedoesn't automatically lead to a 404 error page whenever the user tries to access a path that doesn't exist ingetStaticPaths(). This way, we still reach out to the frontend and are able to handle the situation there by displaying some sort of loading sequence, for example. You can also display an error on the frontend if there wasn't any data to be fetched when there was no valid item data for the specific path parameter.fallbackset to'blocking'doesn't automatically lead to a 404 error page whenever the user tries to access a path that doesn't exist ingetStaticPaths(). It's similar tofallbackset totruebut now we basically omit any manual loading processes. Instead, the browser just takes a moment longer to fetch the data and then displays the page ready to go. This is helpful when you don't want to present a "Loading..." to the user, for example, and instead just let them wait a little longer before the page is loaded successfully. If no data could be found, then we still have the opportunity to create a manual error on the frontend.
Since we have such a small dataset, we are just giving every possible path to getStaticPaths(). So we technically don't need too much attention to the fallback property.
Still, I am setting fallback to true to show you how you can handle such manual errors as well as loading sequences that might occur.
📐 How to Configure the Frontend
In the last step, we'll configure our actual page. Anything in here will be the frontend content that the user will see:
function projectPage(props: { specificStarData: starInterface,
hasError: boolean }) {
  const router = useRouter();

  if (props.hasError) {
    return <h1>Error - please try another parameter</h1>
  }

  if (router.isFallback) {
      return <h1>Loading...</h1>
  }

  return (
    <div>
      <h1>{props.specificStarData.name}</h1>
      <p>{props.specificStarData.description}</p>
      <a href={props.specificStarData.link}>More Information here (link)</a>
    </div>
  )
}

export default projectPage;
For JavaScript, you don't have to mention the starInterface as well as boolean within the function's arguments.
In the code above you can find our specificStarData as well as hasError, which both hold some values. Besides that, we utilize the useRouter() hook in order to have access to isFallback, which helps us handle any fallback cases.
Remember that the fallback from getStaticPaths() can be set to true or 'blocking' if you are not able to provide every dynamic route for pre-loading. In these cases, it would prevent your page from crashing.
Instead, it will load for some time on the fly as the user accesses this specific dynamic route and then provides the respective information.
For this potential loading sequence, we use router.isFallback in order to return JSX with some sort of loading indication for the user.
If there actually is an error because the user tried to access a dynamic path for which no data can be found, hasError steps in, indicating that there is an actual error.
Assuming that the user actually reached a dynamic path for which data could be fetched, the actual intended JSX output will be returned.
Following all the configuration steps (with fallback: true), we receive this output for the /test/St2-18 path:
 Result for /test/St2-18
If we try to put in an invalid parameter, it first tries to load and then returns our manual set up error message:
 Result for /test/this-will-produce-an-error
🎲 How to Test the fallback Property
And that's pretty much it! The result is a dynamic route which uses getStaticProps() as well as getStaticPaths() in order to pre-render the fetched data from our dummy backend.
When you are working with getStaticPaths() for the first time, I recommend trying out the different fallback values (true, false, 'blocking') to find out how exactly your application's behavior changes.
Since we are using fallback: true in our example, we are also able to just insert one possible path out of the three without having our application crash.
So let's say we change the paths property within getStaticPaths() to paths: ['/test/St2-18']. While we inserted all the paths before, we now just use one path with the string method I mentioned earlier instead of the { params: { something: star.id }} format.
With this configuration, you can still access /test/UY-SC, for example, but you'll notice that the Loading... message appears for a brief moment because we prepared this case in our if-statement with router.isFallback. After the data is loaded, it will successfully show up on the screen.
When using fallback: 'blocking' and paths: ['/test/St2-18'], you'll notice that you can't see any Loading.... Instead, the browser just takes a moment longer to load the data before changing the browser's content.
It's up to you which way you prefer.
✅ Conclusion
While this example shows the fundamental parts of getStaticProps() as well getStaticPaths(), there is still more to read about these Next.js functions.
Still, all you've read here is enough to get started working with getStaticProps() and getStaticPaths() on your own in a lot of cases.
📃 Resources & learning material
- Official Next.js documentation for Data Fetching.
- For learning more about Next.js on the whole, I can strongly recommend checking out the udemy course by Maximilian Schwarzmüller for Next.js. This course helped me a lot, at least.