
By Adrien Zaganelli
Earlier this week, I read an article explaining how CSS-in-JS slows down the rendering of some React apps and how static CSS is faster. But CSS-in-JS is very popular because, among other features, you can style dynamically using JavaScript variables.
In this tutorial, I will show you how to recreate this perk in any of your web projects thanks to Webpack (and I assume you know how to use it). To start, we want Webpack to bundle our source files into a static dist/ folder .
You can check out the source code here.
1. Set up our app
The boring part
Create a folder for this tutorial, open your terminal, and init a project:
npm init -y
First things first, if it’s not already done, install node.js and Webpack:
npm install webpack webpack-cli --save-dev
Let’s create a script in our package.json that tells Webpack to use our config file:
  "scripts": {
    "build": "webpack --config webpack.config.js"
  }
At the root of your folder, create a globals.js file, where our shared variables will be stored:
module.exports = {
  myTitle: 'Hello freeCodeCamp!',
  myColor: '#42ff87',
};
The Webpack config file looks like this (webpack.config.js). Create it at the root of your folder:
module.exports = {
  entry: __dirname + '/app/index.js',
  output: {
    path: __dirname + '/dist',
    filename: 'index_bundle.js'
  },
};
Our source code will be located in an app folder. Create it like this:
mkdir app && cd app
You’ll need index.html and index.js files at this point. Create those files in the app folder:
touch index.html index.js
Perfect! You’re all set. ?
Your folder should look like this:
|-- node_modules/
|-- package.json
|-- webpack.config.js
|-- globals.js
|-- app/
    |-- index.html
    |-- index.js
2. Render our HTML files with the html-webpack-plugin
This app/index.html is empty. Let’s add some markup in it and then add a custom variable:
<html lang="en">
<head>
  <title>Webpack shared variables!</title>
</head>
<body>
  <h1><%= myTitle %></h1>
</body>
</html>
As you can see, we are trying to print a variable in our HTML... which is impossible! To make it work we’ll use the html-webpack-plugin that gives us the ability to use EJS syntax and inject data into it.
The plugin will generate a valid HTML file. In the meantime, you should rename your app/index.html file to app/index.ejs.
npm install --save-dev html-webpack-plugin
Let’s go back to our configuration file. html-webpack-plugin has an interesting templateParameters option that allows us to pass an object as parameter. Enable the plugin as follows in webpack.config.js:
const HtmlWebpackPlugin = require('html-webpack-plugin');
const globals = require('./globals.js')

module.exports = {
    // ... previous config, entry, output...
  plugins: [
    new HtmlWebpackPlugin({
      template: 'app/index.ejs',
      templateParameters: globals,
    })
  ]
};
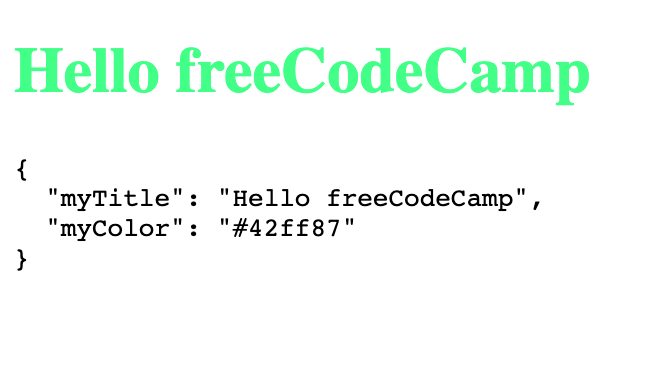
Run npm run build and ta-daaaaa « <%= myTitle %> » became « Hello freeCodeCamp » ! The work is done by Webpack during the compilation when it runs the html-webpack-plugin.
See? This was pretty simple with the right tool: HTML ✅
3. Use our variables in JavaScript
Phew, so many lines just to print a variable! ?With Webpack, things often get complicated. Well, this one is very simple: in JavaScript just import your file. In your app/index.js:
import globals from '../globals.js'

document.write(
'<pre>' +
  JSON.stringify(globals, null, 2) +
'</pre>'
);
This will print our globals object on the page. Now let’s move on to the CSS.
4. Use shared variables in our CSS
Here is our final boss ?
Okay guys you got me… I lied. We can’t use our globals directly in CSS – we must use a pre-processor. In this example, we will use SASS.
On the Webpack side, a plugin will not be enough. We must use a loader to convert SASS into CSS. In this case we need the sass-loader package, so install it according to the docs:
npm install sass-loader node-sass css-loader style-loader --save-dev
Back to coding. Now that we have SASS, create your style sheet file, app/style.scss:
h1 {
  color: $myColor;
}
Our SASS is set up – now how can we inject data into it? The sass-loader package has a prependData option! But it takes a string as a parameter, which means that your data should look like this: "$myColor: red; myTitle: '...'";.
We have to automate that and convert a JavaScript object into a string. I didn’t find a package on npm that satisfied me, so I wrote my own converter. Download the file and add it to your project (in my example it's utils/jsToScss.js).
Your final webpack.config.js should look like this:
const globals = require("./globals.js");
const HtmlWebpackPlugin = require("html-webpack-plugin");
const jsToScss = require("./utils/jsToScss.js");

module.exports = {
  entry: __dirname + "/app/index.js",
  output: {
    path: __dirname + "/dist",
    filename: "index_bundle.js"
  },
  plugins: [
    new HtmlWebpackPlugin({
      template: "app/index.ejs",
      templateParameters: globals
    })
  ],
  module: {
    rules: [
      {
        test: /\.s[ac]ss$/i,
        use: [
          // Creates `style` nodes from JS strings
          "style-loader",
          // Translates CSS into CommonJS
          "css-loader",
          // Compiles Sass to CSS
          {
            loader: "sass-loader",
            options: {
              prependData: jsToScss(globals)
            }
          }
        ]
      }
    ]
  }
};
Here is what you should see:
 https://glitch.com/edit/#!/shared-variables-webpack?path=webpack.config.js
If you are still reading this tutorial, thanks for your attention. I hope it helps you! Webpack is a very powerful tool you should dig more into ?
NB: In your dist/ folder you can see there isn't any CSS generated. That's because I use the style-loader to keep this demo simple. To generate the CSS file, take a look at the mini-css-extract-plugin.