
By Ondrej Polesny
We all know we should write unit tests. But, it's hard to know where to start and how much time to devote to tests compared to actual implementation. So, where to start? And is it just about testing code or do unit tests have other benefits?
In this article, I will explain the different types of tests, and which benefits unit testing brings to development teams. I'll showcase Jest - a JavaScript testing framework.
Different types of testing
Before we dive into unit testing specifics, I want to do a quick run through of the different types of tests. There is often some confusion around them and I'm not surprised. Sometimes the line between them is quite thin.
Unit tests
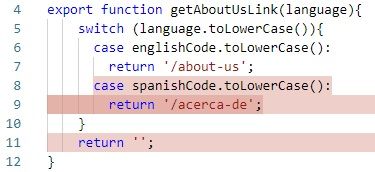
Unit tests only test a single part of your implementation. A unit. No dependencies or integrations, no framework specifics. They're like a method that returns a link in a specific language:
export function getAboutUsLink(language){
switch (language.toLowerCase()){
case englishCode.toLowerCase():
return '/about-us';
case spanishCode.toLowerCase():
return '/acerca-de';
}
return '';
}
### Integration tests
At some point, your code communicates with a database, file system or another third party. It could even be another module in your app.
That piece of implementation should be tested by integration tests. They typically have a more complicated setup that involves preparing testing environments, initializing dependencies, and so on.
### Functional tests
Unit tests and integration tests give you confidence that your app works. Functional tests look at the app from the user's point of view and test that the system works as expected.
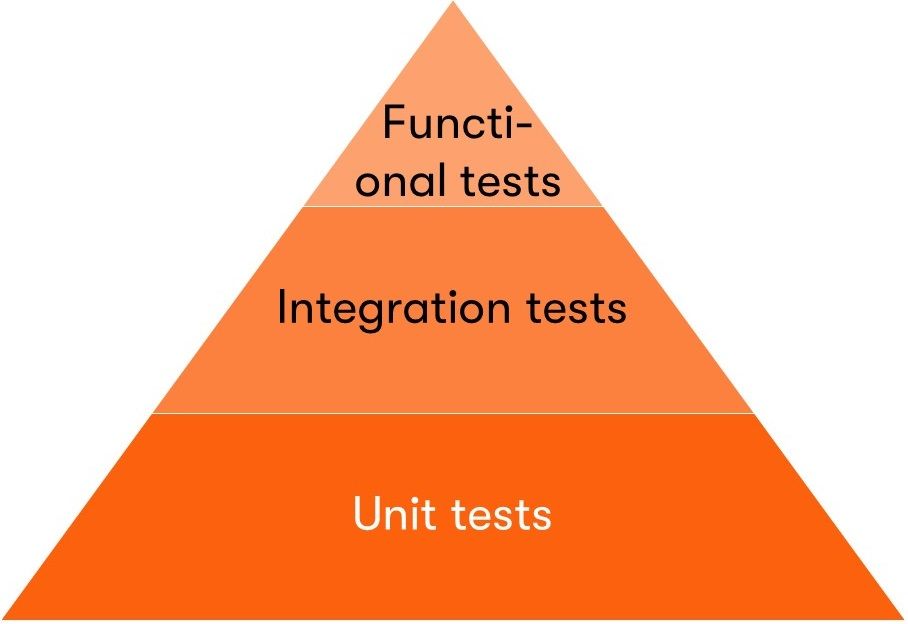
In the diagram above, you see that unit tests form the large base of your application's testing suite. Typically, they are small, there are a lot of them, and they are executed automatically.
So now let's get into unit tests in a bit more detail.
## Why Should I Bother Writing Unit Tests?
Whenever I ask developers whether they wrote tests for their application, they always tell me: "I did not have time for them" or "I don't need them, I know it works."
So I smile politely and tell them what I want to tell you. Unit tests are not only about testing. They help you in other ways, too, so you can:
**Be confident that your code works.** When was the last time you committed a code change, your build failed, and half of your app stopped working? Mine was last week.
But that's still OK. The real problem is when the build succeeds, the change is deployed, and your app starts being unstable.
When that happens, you start losing confidence in your code and eventually just pray for the app to work. Unit tests will help you discover issues much sooner and gain confidence.
**Make better architectural decisions.** Code changes, but some decisions about platform, modules, structure, and others need to be made during the early stages of a project.
When you start thinking about unit testing right at the start, it will help you structure your code better and achieve proper separation of concerns. You won't be tempted to assign multiple responsibilities to single code blocks as those would be a nightmare to unit-test.
**Pinpoint functionality before coding.** You write the method's signature and start implementing it right away. Oh, but what should happen in case a parameter is null? What if its value is outside of the expected range or contains too many characters? Do you throw an exception or return null?
Unit tests will help you discover all these cases. Look at the questions again and you'll find it's exactly what defines your unit test cases.
I'm sure there are many more benefits to writing unit tests. These are just the ones that I recall from my experience. Those that I learned the hard way.
## How to Write Your First JavaScript Unit Test
But let's get back to JavaScript. We will start with [Jest](https://jestjs.io/), which is a JavaScript testing framework. It's a tool that enables automatic unit testing, provides code coverage, and lets us easily mock objects. Jest also has an extension for Visual Studio Code [available here](https://marketplace.visualstudio.com/items?itemName=Orta.vscode-jest).
There are also other frameworks, if you're interested, you can check them in [this article](https://www.browserstack.com/guide/top-javascript-testing-frameworks).
```js
npm i jest --save-dev
Let's use the previously mentioned method getAboutUsLink as an implementation we want to test:
const englishCode = "en-US";
const spanishCode = "es-ES";
function getAboutUsLink(language){
    switch (language.toLowerCase()){
      case englishCode.toLowerCase():
        return '/about-us';
      case spanishCode.toLowerCase():
        return '/acerca-de';
    }
    return '';
}
module.exports = getAboutUsLink;
I put this into the index.js file. We can write tests in the same file, but a good practice is to separate unit tests into a dedicated file.
The common naming patterns include {filename}.test.js and {filename}.spec.js. I used the first, index.test.js:
const getAboutUsLink = require("./index");
test("Returns about-us for english language", () => {
    expect(getAboutUsLink("en-US")).toBe("/about-us");
});
First, we need to import the function we want to test. Every test is defined as an invocation of the test function. The first parameter is the name of the test for your reference. The other is an arrow function where we call the function we want to test and specify which result we expect. I
n this case, we call getAboutUsLink function with en-US as the language parameter. We expect the result to be /about-us.
Now we can install the Jest CLI globally and run the test:
npm i jest-cli -g
jest
If you see a configuration-related error, make sure you have your package.json file present. In case you don't, generate one using npm init.
You should see something like this:
 PASS  ./index.test.js
  √ Returns about-us for english language (4ms)
  console.log index.js:15
    /about-us
Test Suites: 1 passed, 1 total
Tests:       1 passed, 1 total
Snapshots:   0 total
Time:        2.389s
Great job! This was the first simple JavaScript unit test from start to end. If you installed the Visual Studio Code extension, it will run tests automatically once you save a file. Let's try it by extending the test with this line:
expect(getAboutUsLink("cs-CZ")).toBe("/o-nas");
Once you save the file, Jest will inform you that the test failed. That helps you discover potential issues even before committing your changes.
Testing Advanced Functionality and Mocking Services
In real life, the language codes for the getAboutUsLink method would not be constants in the same file. Their value is typically used throughout the project so they would be defined in their own module and imported into all functions that use them.
import { englishCode, spanishCode } from './LanguageCodes'
You can import these constants into the test the same way. But the situation will get more complicated if you're working with objects instead of simple constants. Take a look at this method:
import { UserStore } from './UserStore'
function getUserDisplayName(){
  const user = UserStore.getUser(userId);
  return `${user.LastName}, ${user.FirstName}`;
}
This method uses imported UserStore:
class User {
    getUser(userId){
        // logic to get data from a database
    }
    setUser(user){
        // logic to store data in a database
    }
}
let UserStore = new User();
export { UserStore }
In order to properly unit test this method, we need to mock UserStore. A mock is a substitute for the original object. It allows us to separate dependencies and real data from the tested method's implementation just like dummies help with crash tests of cars instead of real people.
If we didn't use the mock, we'd be testing both this function and the store. That would be an integration test and we would likely need to mock the used database.
Mocking a Service
To mock objects, you can either provide a mocking function or a manual mock. I will focus on the latter as I have a plain and simple use-case. But feel free to check out other mocking possibilities Jest provides.
jest.mock('./UserStore', () => ({
    UserStore: ({
        getUser: jest.fn().mockImplementation(arg => ({
            FirstName: 'Ondrej',
            LastName: 'Polesny'
        })),
        setUser: jest.fn()
    })
}));
First, we need to specify what are we mocking - the ./UserStore module. Next, we need to return the mock that contains all exported objects from that module.
In this sample, it's only the User object named UserStore with the function getUser. But with real implementations, the mock may be much longer. Any functions you don't really care about in the scope of unit testing can be easily mocked with jest.fn().
The unit test for the getUserDisplayName function is similar to the one we created before:
test("Returns display name", () => {
    expect(getUserDisplayName(1)).toBe("Polesny, Ondrej");
})
As soon as I save the file, Jest tells me I have 2 passing tests. If you're executing tests manually, do so now and make sure you see the same result.
Code Coverage Report
Now that we know how to test JavaScript code, it's good to cover as much code as possible with tests. And that is hard to do. In the end, we're just people. We want to get our tasks done and unit tests usually yield an unwanted workload that we tend to overlook. Code coverage is a tool that helps us fight that.
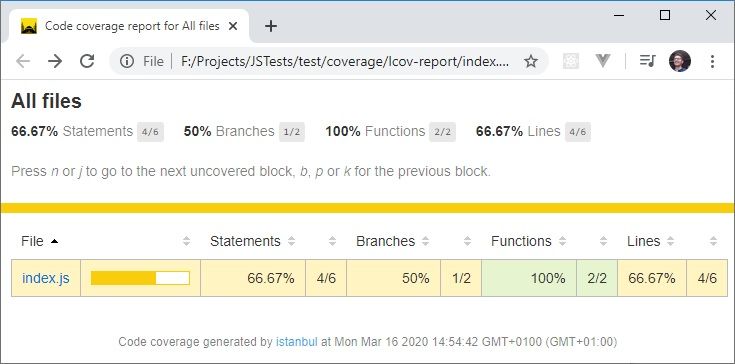
Code coverage will tell you how big a portion of your code is covered by unit tests. Take for example my first unit test checking the getAboutUsLink function:
test("Returns about-us for english language", () => {
   expect(getAboutUsLink("en-US")).toBe("/about-us");
});
It checks the English link, but the Spanish version stays untested. The code coverage is 50%. The other unit test is checking the getDisplayName function thoroughly and its code coverage is 100%. Together, the total code coverage is 67%. We had 3 use cases to test, but our tests only cover 2 of them.
To see the code coverage report, type the following command into the terminal:
jest --coverage
Or, if you're using Visual Studio Code with the Jest extension, you can run the command (CTRL+SHIFT+P) Jest: Toggle Coverage Overlay. It will show you right in the implementation which lines of code are not covered with tests.
By running the coverage check, Jest will also create an HTML report. Find it in your project folder under coverage/lcov-report/index.html.
Now, I don't have to mention that you should strive for 100% code coverage, right? :-)
Summary
In this article, I showed you how to start with unit testing in JavaScript. While it's nice to have your code coverage shine at 100% in the report, in reality, it's not always possible to (meaningfully) get there. The goal is to let unit tests help you maintain your code and ensure it always works as intended. They enable you to:
- clearly define implementation requirements,
- better design your code and separate concerns,
- discover issues you may introduce with your newer commits,
- and give you confidence that your code works.
The best place to start is the Getting started page in the Jest documentation so you can try out these practices for yourself.
Do you have your own experience with testing code? I'd love to hear it, let me know on Twitter or join one of my Twitch streams.