By Zack
When I first started developing on the Ethereum platform, syncing a node was one of the first few things I did. With no one to hold my hand and nowhere to consolidate all the common errors I encountered, I wasted weeks just syncing a node. It was such a headache that I almost gave up.
Not knowing the terminology only made it harder.
And so, in this article, I want to consolidate all the common errors you might face and explain the reasons behind each step when syncing a node. Hopefully, you won’t have such a nasty early experience as I did.
A quick intro
In Ethereum, developers create pieces of an application that run on the network. These are called smart contracts. Although you can deploy them manually without syncing to an Ethereum node, in the long run it’s more convenient for the development process to sync (especially when we want to use development frameworks like Truffle).
To sync an Ethereum node, we will need the following software:
- Geth — Client for an Ethereum node.
- Ethereum Wallet — User interface for an Ethereum node.
Let’s get started.
Install Geth
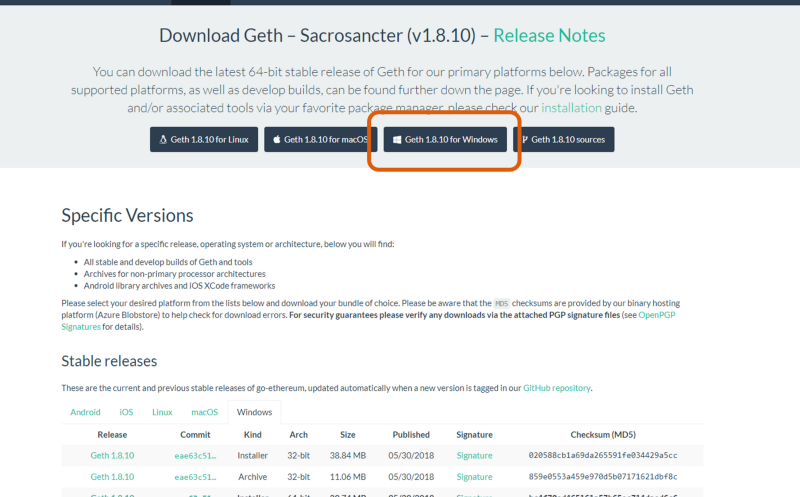
To download Geth, go here for Windows users. Then click on the “Geth for Windows” button.
For MacOS users, I recommend that you download using homebrew. You can do so with the following commands:
brew tap ethereum/ethereumbrew install ethereum
Refer to Geth’s instructions for more details.
Check that Geth is installed properly by typing geth version in the terminal (MacOS) or PowerShell (Windows).
Install Ethereum Wallet
We call the GUI that interacts with the network the “wallet”. You can find many different wallets for Ethereum with a quick Google search (such as Parity, Jaxx, and MyEtherWallet). I personally like using Ethereum Wallet. It has a user-friendly interface, and I’m also a bit biased because it is developed by Ethereum itself.
You can find the installer here.
Note: I prefer Ethereum Wallet to Mist. Mist is basically a browser that renders decentralized applications (dApps) and websites.
For the development of a smart contract, we will only need the Ethereum Wallet.
Mainnet vs Testnet
In Ethereum, there are two main networks: the mainnet and the testnet.
The mainnet is used to transact real Ether. The Ether’s value is tied to real fiat currency via cryptocurrency exchanges.
As developers, we do not want to run application tests with real money. That is what the testnet is for.
We call the testnet Ropsten.
Run Geth and Ethereum Wallet
When you’re developing a smart contract, you should sync the testnet first. We will only need to sync the mainnet when we are ready to deploy.
You will need about 30GB of storage space to sync a testnet. As there are more transactions in the mainnet, you will need about 100GB to sync a mainnet.
Note: some say that you need an SSD storage for fast writing so that the sync can catch up with the latest block. Personally, I find that HDD storage is alright. However, if given the choice, I would definitely use SSD storage.
For Windows users
For easy access, I recommend that you create a folder to store the blockchain. For example, “C:\EthereumTestnet”.
After creating the folder, try running the following command:
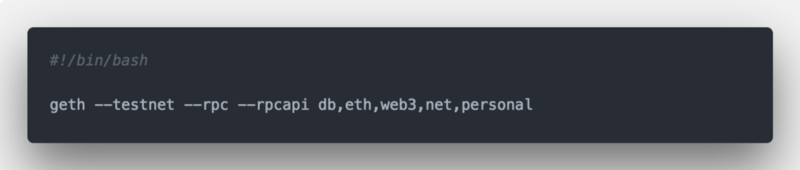
geth — testnet — data-dir=”C:\EthereumTestnet” — rpc — rpcapi eth,web3,net,personal
Edit: It seems like some arguments have changed. If you encountered such error “flag provided but not defined: -data-dir”, try changing the argument name to — datadir instead to data-dir.
The argument --testnet specifies that we want to sync to the Ropsten network. Thus, to sync the mainnet, you just need to take out the argument --testnet and change the data directory. For example:
geth — data-dir=”C:\EthereumMainnet” — rpc — rpcapi eth,web3,net,personal
The --rpc argument enables the HTTP-RPC server. This allows us to use certain services, such as what is stated in --rpcapi eth,web3,net,personal.
After entering the command, you should see something like this:
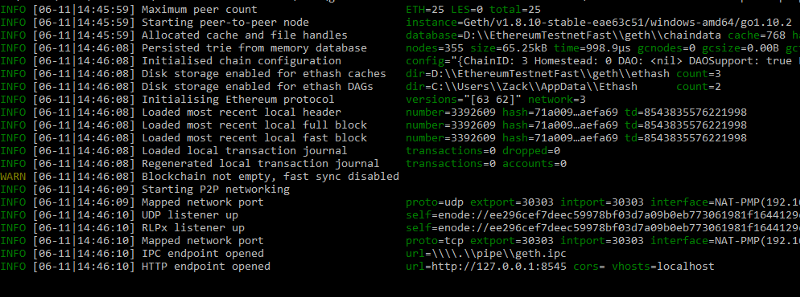
In order not to corrupt the blockchain, especially after many hours of syncing, you should NOT close the command prompt abruptly. Always stop the sync by pressing Ctrl + C and wait until Geth shuts down the program for you.

However, it is difficult to remember all the command and rpc services you need. That’s why I suggest creating a shortcut or a batch file to help you.
Simply create a file using any text editor you have and save it as .bat file. For example, RunGethTestnet.bat (the name is not important). Copy and paste the command into the file and save it. The next time you need to run Geth for Ropsten, just double click on the file.
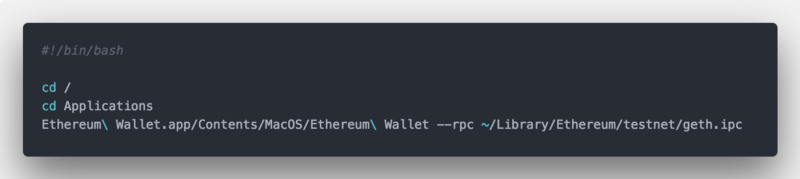
After running Geth, we have to run the Ethereum Wallet. As we want the interface to locate the exact location where we synced our files using Geth, we execute it from the console.
Similar to Geth, I saved a batch file for it as well with an example command, such as the one below:

Note that your command might look a little different from mine, as you might store your application in a different directory.
Alternatively, you can add the application to your path.
The argument --node-datadir="C:\EthereumTestnet" states where I stored my chaindata, which is the exact same one I specified for Geth.
For Mac Users
It is slightly simpler for MacOS, because the chaindata is downloaded automatically to the library and not hidden from us. So, we won’t need to specify the data directory.
Nevertheless, I recommend creating a script file to make running Geth and Ethereum Wallet easier.
Note: Geth has to run before Ethereum Wallet.
Running Ethereum Wallet alone will automatically start the syncing process as it will automatically run a Geth client in the background. This is user-friendly, but does not enable the RPC services we want to use. Thus, we want to ensure RPC is enabled in both our Geth and Ethereum Wallet execution.
A few notes
- The syncing process is very long, and can take up to 2–3 days. Please have patience and consider leaving your computer turned on overnight.
- The syncing speed depends on your internet speed, peers count, and writing speed of your storage drive.
- As the data are stored in blocks and linked together, corruption in one block can corrupt the whole chaindata. This can potentially waste your effort in waiting days for the node to sync. Therefore, it is very important to shut down your Geth properly. In certain cases, you might want to rollback. But prevention is better than cure here.
- The progress bar on your Ethereum Wallet is NOT accurate. Relying on it will give you a lot of anxiety and frustration.
- Geth runs on port 30303 for external listening.
- The default port used for internal communication, for example between your wallet and Geth, is 8545.
Make sure your port to Geth client is opened
It’s really important to make sure that the connection to your Geth client is not limited. One huge headache I encountered was to let my firewall limit the number of connections I could have through the Geth client.
You can spot this problem by looking at the peers count. If it stays consistently low at about 1–3 peers (for at least half an hour), there is a good chance your connection is limited. A healthy range is above 5 peers.
MacOS users
When you run Geth, there should be a notification for you to allow connection. Well, of course, click on “Allow.
To check, go to System Preferences> System & Privacy.
Under Firewall tab, click on Firewall Options.

Windows users
To open your port, go to Control panel > System and Security > Windows defender firewall.
Click on Advanced settings. On the side panel, click on Inbound Rules.

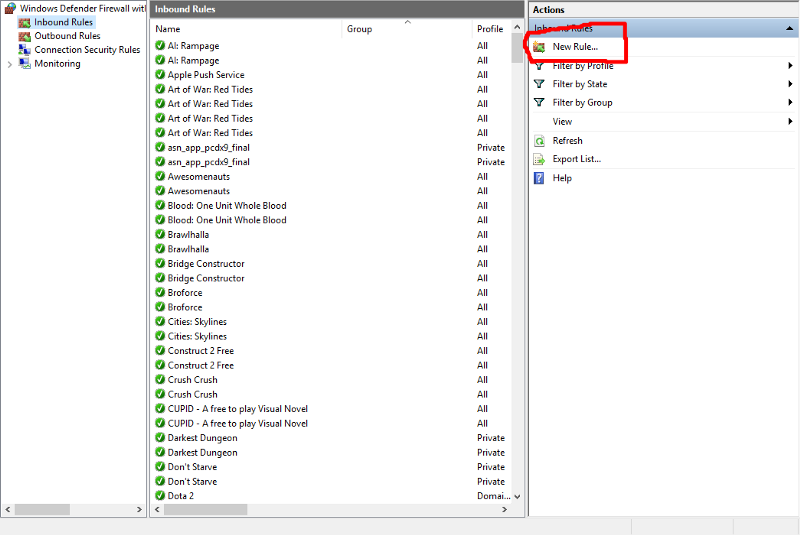
The inbound ports you want to open are TCP and UDP 30303. So I created one rule for TCP 30303 and another for UDP 30303.
You may need to open your outbound ports for TCP 30303 too.
Note that any third party firewall/anti-virus might limit your connections as well, so make sure to configure it accordingly.
Attach to Geth
To retrieve more information about your node, you can attach to the Geth client and execute commands with it using the RPC services.
Here’s a simple way to check your syncing status: attach to the client by entering the following command on a separate terminal/console.
geth attach [http://127.0.0.1:8545](http://127.0.0.1:8545)
Again, you might want to store it in a batch/script file for your own convenience.
After running the command, you should see something like this.
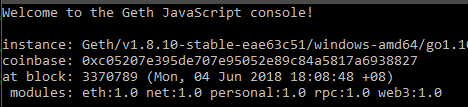
Type web3.eth and you should see a lot of information. To retrieve specific information on syncing, type web3.eth.syncing instead.

As you can see, the progress bar found at the top of the Ethereum Wallet is merely a comparison between the highestBlock and the currentBlock. As the highestBlock known to your computer might not be the actual highest block, the progress bar might not reflect the real progress.
In fact, the highestBlock and knownStates will continue to increase as you sync your nodes.
Some final points
As the technology is rapidly changing, always use the stable version of the client and wallet to avoid giving yourself more headaches.
Also, note that there is always a workaround for any of the issues you face. When you face a problem syncing, you can try to search for solutions as you are likely not the first one to face the same problem.
And always remind yourself that you do not need to sync a node to develop a smart contract. Doing so only helps to facilitate your understanding of the environment as well as your development process. So, don’t beat yourself up over it if you encounter problems so early in the development process.
For more of such articles, follow me or visit my site — A developer’s perspective.