
By Rakesh Potnuru
Testing is a vital part of software development. The sooner you start testing, the better.
In this article, I'll show you how to write tests for your NodeJs/ExpressJS and MongoDB/Mongoose applications with Jest and Supertest.
Let's get started
First let's set up a demo Express.js app.
Let's say we are building a backend REST API for an eCommerce application.
This app should:
- Get all the products
- Get a product by id
- Add product(s) to the database
- Delete product(s) from the database
- Update product information
Express.js App Set Up
Step 1: Project set up
First, create a folder and start a blank application with npm.
npm init
Fill all the details it asks for.
Then, install express, mongoose, axios and dotenv with the following command:
npm i express mongoose axios dotenv
Here's a link to the package.json on my GitHub.
Step 2: Create the boilerplate
Let's create all the folders and files and then fill them with some boilerplate code.
This is how your folder hierarchy should look:
.
├── controllers
│   └── product.controller.js
├── models
│   └── product.model.js
├── routes
│   └── product.route.js
├── package-lock.json
├── package.json
├── .env
├── app.js
└── server.js
Use these files' code by copying and pasting. Analyze the code and flow as best you can.
[product.controller.js](https://github.com/itsrakeshhq/jest-tests-demo/blob/main/controllers/product.controller.js)[product.model.js](https://github.com/itsrakeshhq/jest-tests-demo/blob/main/models/product.model.js)[product.route.js](https://github.com/itsrakeshhq/jest-tests-demo/blob/main/routes/product.route.js)[app.js](https://github.com/itsrakeshhq/jest-tests-demo/blob/main/app.js)[server.js](https://github.com/itsrakeshhq/jest-tests-demo/blob/main/server.js)
Step 3: Database setup
I advise using two databases for a project—one for testing, the other for development. But just one database will be sufficient for learning purposes.
First, create a MongoDB account or log in.
Then create a new project. Give it a name and press the Next button.
 Naming the project
Then click Create Project after that.
We must create a database in the following window by selecting a cloud provider, a location, and specs. So press Build a Database to get going.
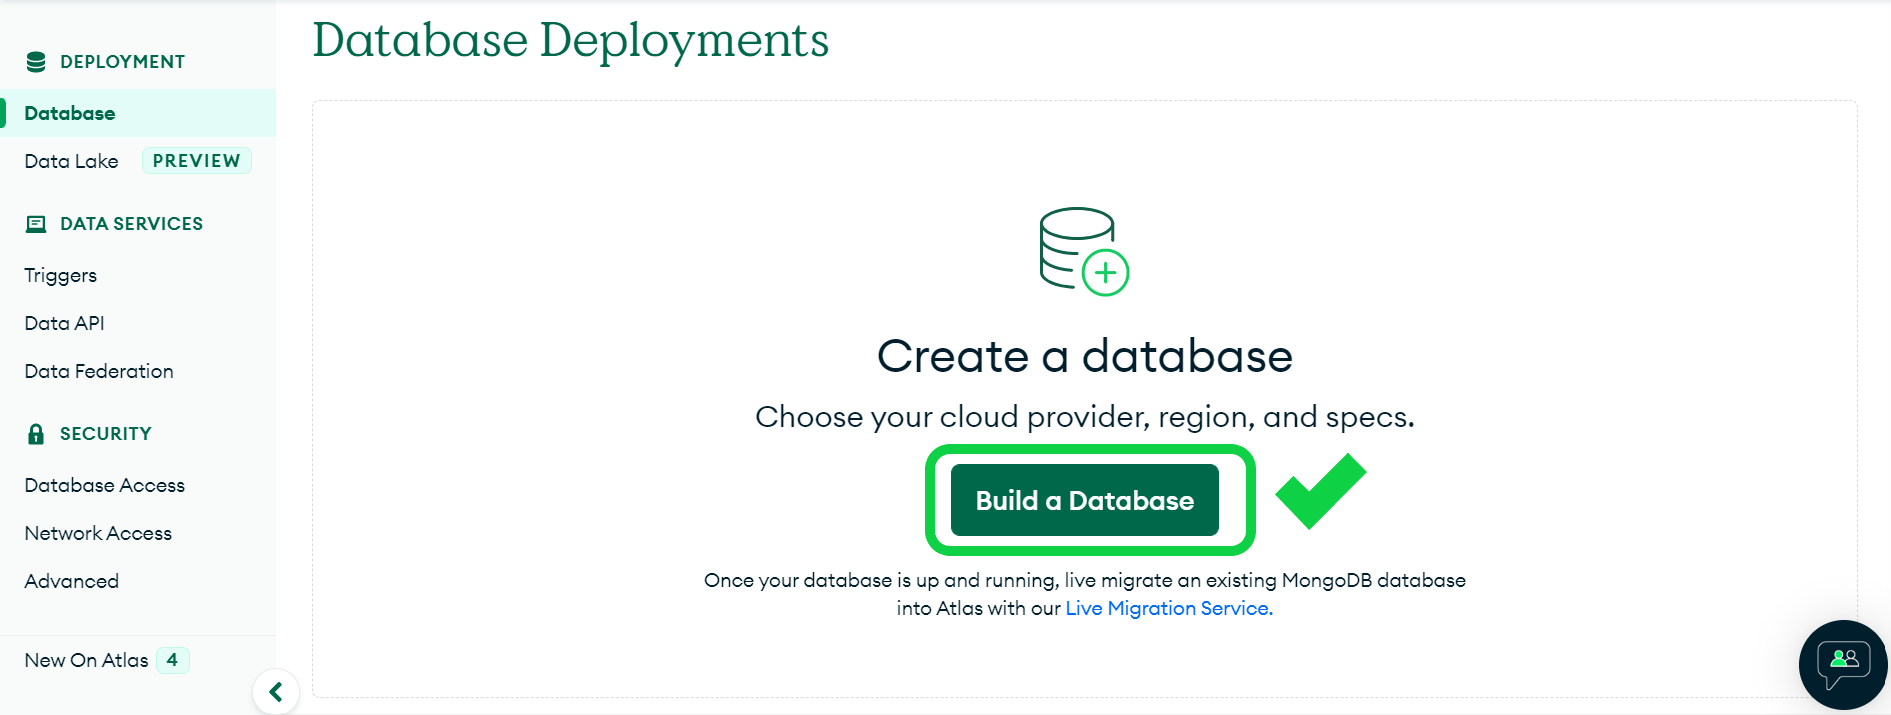 Build a database
Choose "Shared" because it is sufficient for learning purposes. And then click Create.
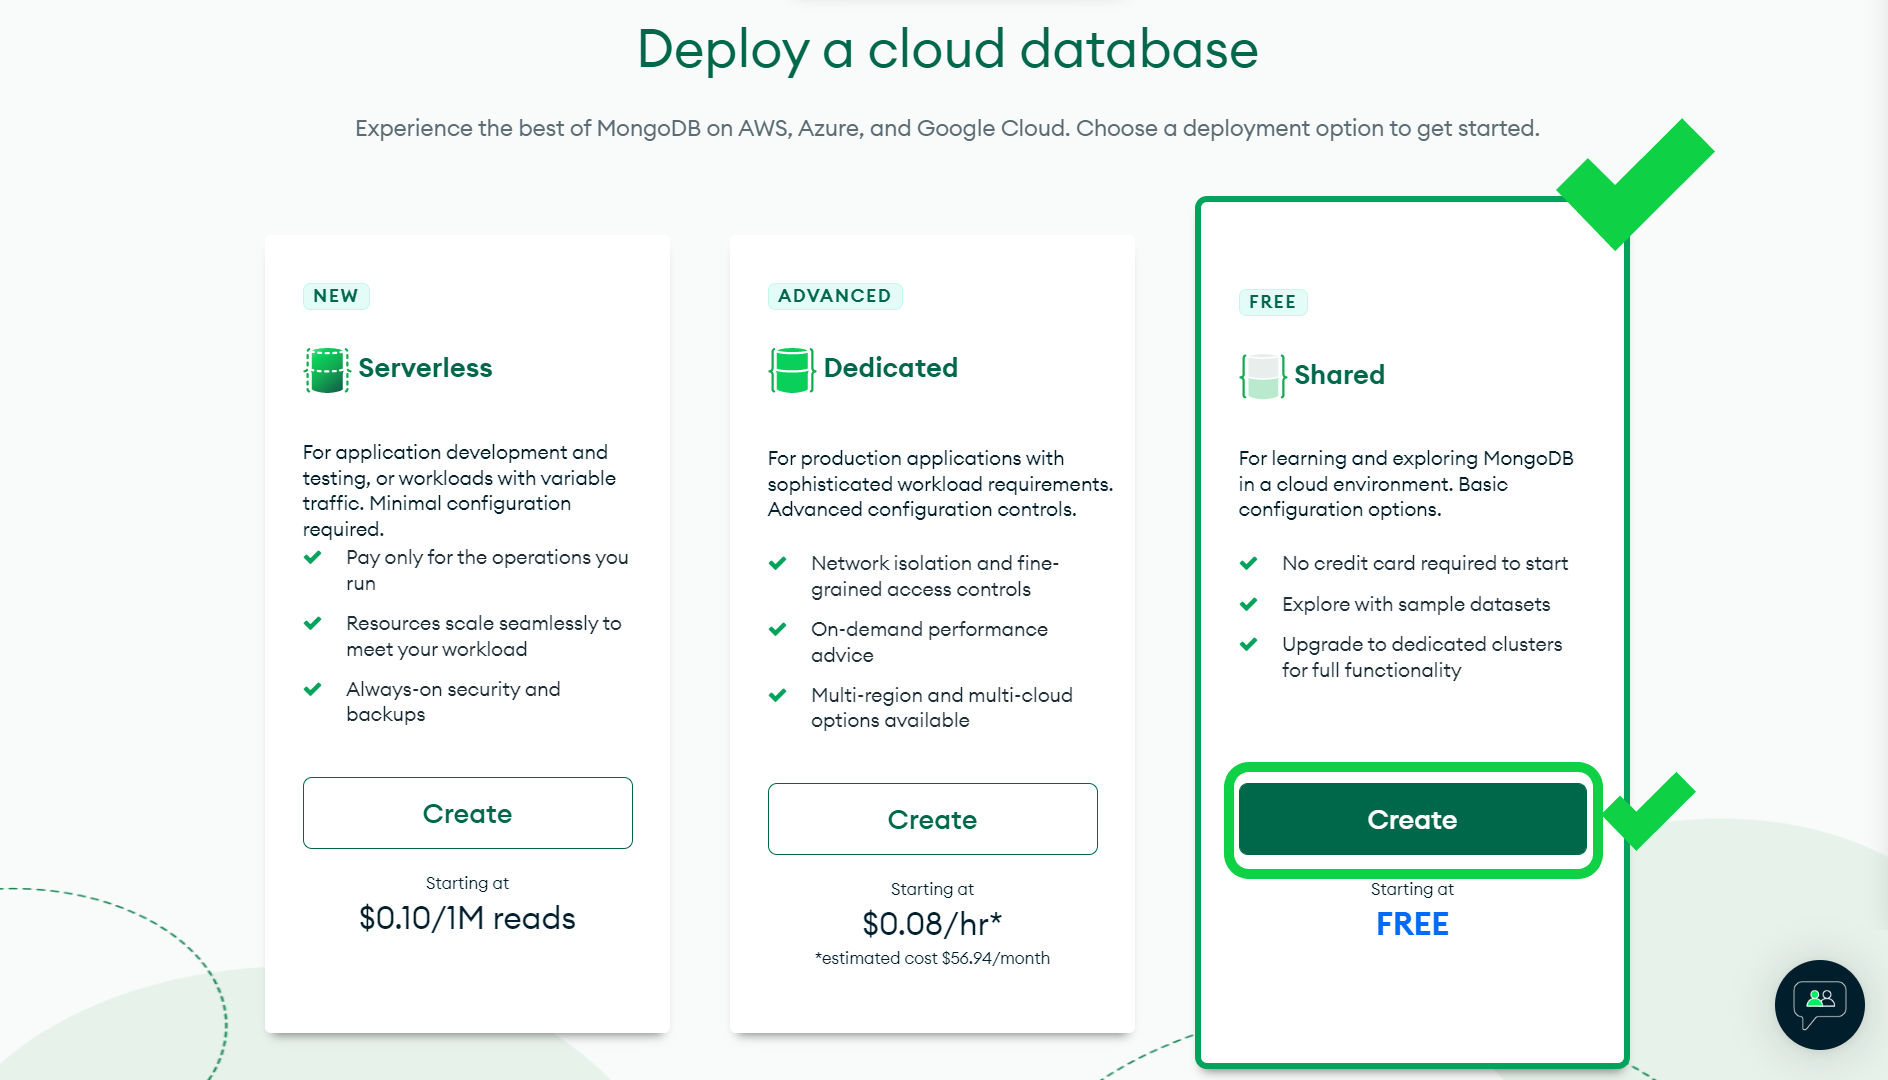 Choose a deployment option
Next, select "aws" as your cloud provider and the region that is closest to you. Following your selection, click Create Cluster.
The cluster's formation will take some time. Create a user to access your database in the meanwhile.
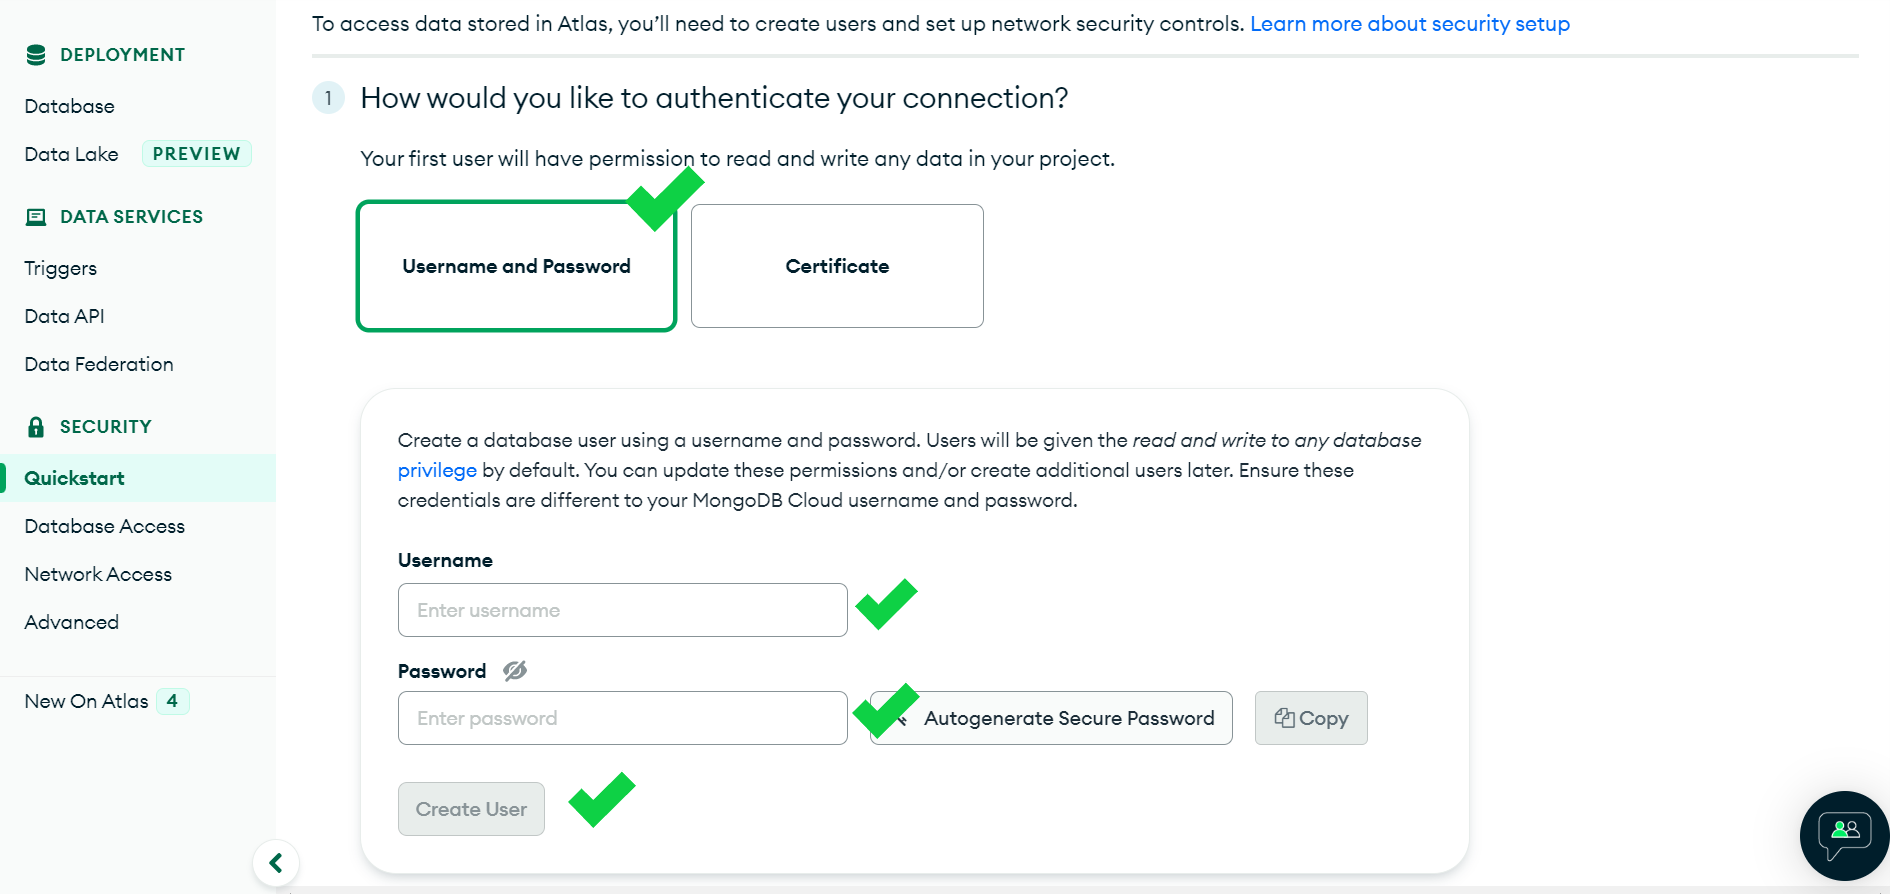 Create Superuser
Choose "My Local Environment" because we are developing our application. You can then add an IP addresses. To conclude, click Close.
 Add IP addresses
You will receive a URI string after the database is set up, which we'll use to connect to the database. The string appears as follows:
mongodb+srv://<YOUR_USERNAME>:<YOUR_PASSWORD>@<YOUR_CLUSTER_URL>/<DATABASE_NAME>?retryWrites=true&w=majority
Put this string in the .env file.
MONGODB_URI=your database string
Now we're ready to start testing our app.
How to Write Tests with Jest and SuperTest
Step 1: Install packages
You need three npm packages to begin writing tests: jest, supertest, and cross-env. You can install them like this:
npm i jest supertest cross-env
jest: Jest is a framework for testing JavaScript code. Unit testing is the main usage of it.supertest: Using Supertest, we can test endpoints and routes on HTTP servers.cross-env: You can set environmental variables inline within a command using cross-env.
Step 2: Add test script
Open your package.json file and add the test script to the scripts.
"scripts": {
    "test": "cross-env NODE_ENV=test jest --testTimeout=5000",
    "start": "node server.js",
    "dev": "nodemon server.js"
},
In this case, we're using cross-env to set environment variables, jest to execute test suites, and testTimeout is set to 5000 because certain requests might take a while to finish.
Step 3: Start writing tests
First, create a folder called tests at the application's root, and then create a file there called product.test.js. Jest searches for the folder tests at the project's root when you do npm run test. As a result, you must place your test files in the tests folder.
Next, import the supertest and mongoose packages into the test file.
const mongoose = require("mongoose");
const request = require("supertest");
Import dotenv to load environment variables, and import app.js as that is where our application starts.
const mongoose = require("mongoose");
const request = require("supertest");
const app = require("../app");

require("dotenv").config();
You'll need to connect and disconnect the database before and after each test (because we don't require the database once testing is complete).
/* Connecting to the database before each test. */
beforeEach(async () => {
  await mongoose.connect(process.env.MONGODB_URI);
});

/* Closing database connection after each test. */
afterEach(async () => {
  await mongoose.connection.close();
});
Now you can write your first unit test.
describe("GET /api/products", () => {
  it("should return all products", async () => {
    const res = await request(app).get("/api/products");
    expect(res.statusCode).toBe(200);
    expect(res.body.length).toBeGreaterThan(0);
  });
});
In the above code,
- We use
describeto describe the unit test. Even though it is not required, it will be useful to identify tests in test results. - In
it, we write the actual test code. Tell what the test performs in the first argument, and then in the second argument, write a callback function that contains the test code. - In the callback function, the request is sent to the endpoint first, and the expected and actual responses are then compared. The test passes if both answers match, else, it fails. ✨ As simple as that ✨.
You can write tests for all the endpoints in the same manner.
describe("GET /api/products/:id", () => {
  it("should return a product", async () => {
    const res = await request(app).get(
      "/api/products/6331abc9e9ececcc2d449e44"
    );
    expect(res.statusCode).toBe(200);
    expect(res.body.name).toBe("Product 1");
  });
});

describe("POST /api/products", () => {
  it("should create a product", async () => {
    const res = await request(app).post("/api/products").send({
      name: "Product 2",
      price: 1009,
      description: "Description 2",
    });
    expect(res.statusCode).toBe(201);
    expect(res.body.name).toBe("Product 2");
  });
});

describe("PUT /api/products/:id", () => {
  it("should update a product", async () => {
    const res = await request(app)
      .patch("/api/products/6331abc9e9ececcc2d449e44")
      .send({
        name: "Product 4",
        price: 104,
        description: "Description 4",
      });
    expect(res.statusCode).toBe(200);
    expect(res.body.price).toBe(104);
  });
});

describe("DELETE /api/products/:id", () => {
  it("should delete a product", async () => {
    const res = await request(app).delete(
      "/api/products/6331abc9e9ececcc2d449e44"
    );
    expect(res.statusCode).toBe(200);
  });
});
Then run npm run test to run the test suites (suite - test file).
 Test results
And that's it! You now know how to test your Express/Mongoose apps with Jest and SuperTest.
Now go forth and create new tests for your apps. :)
If you have any questions, feel free to message me on Twitter.