

Two of the most fundamental image editing functions are resizing and cropping. But you should do these carefully because they have the potential to degrade image quality.
Cropping always includes removing a portion of the original image, resulting in the loss of some pixels.
This post will teach you how to upload, crop, and resize images in the browser.
I built this project in a Codesandbox. To get started quickly, fork the Codesandbox or run the project.
Prerequisites
To follow along with this tutorial, you should have some JavaScript and React.js experience. Experience with Next.js isn't a requirement, but it's nice to have.
You also need a Cloudinary account to store the media files.
Cloudinary offers a safe and complete API for quickly and efficiently uploading media files from the server, browser, or a mobile application.
Finally you'll need Next.js. It's an open-source React-based front-end development web framework that allows server-side rendering and the generation of static websites and applications.
Project Setup and Installation
Use the npx create-next-app command to scaffold a new project in a directory of your choice to create a new project.
You can do this with the command:
npx create-next-app <project name>
To install the dependencies, use these commands:
cd <project name>
npm install cloudinary-react
Once the app is created, and the dependencies are installed, you'll see a message with instructions for navigating to your site and running it locally.
You can do this with the command:
npm run dev
Next.js will start a hot-reloading development environment accessible by default at http://localhost:3000.
How to Build the User Interface
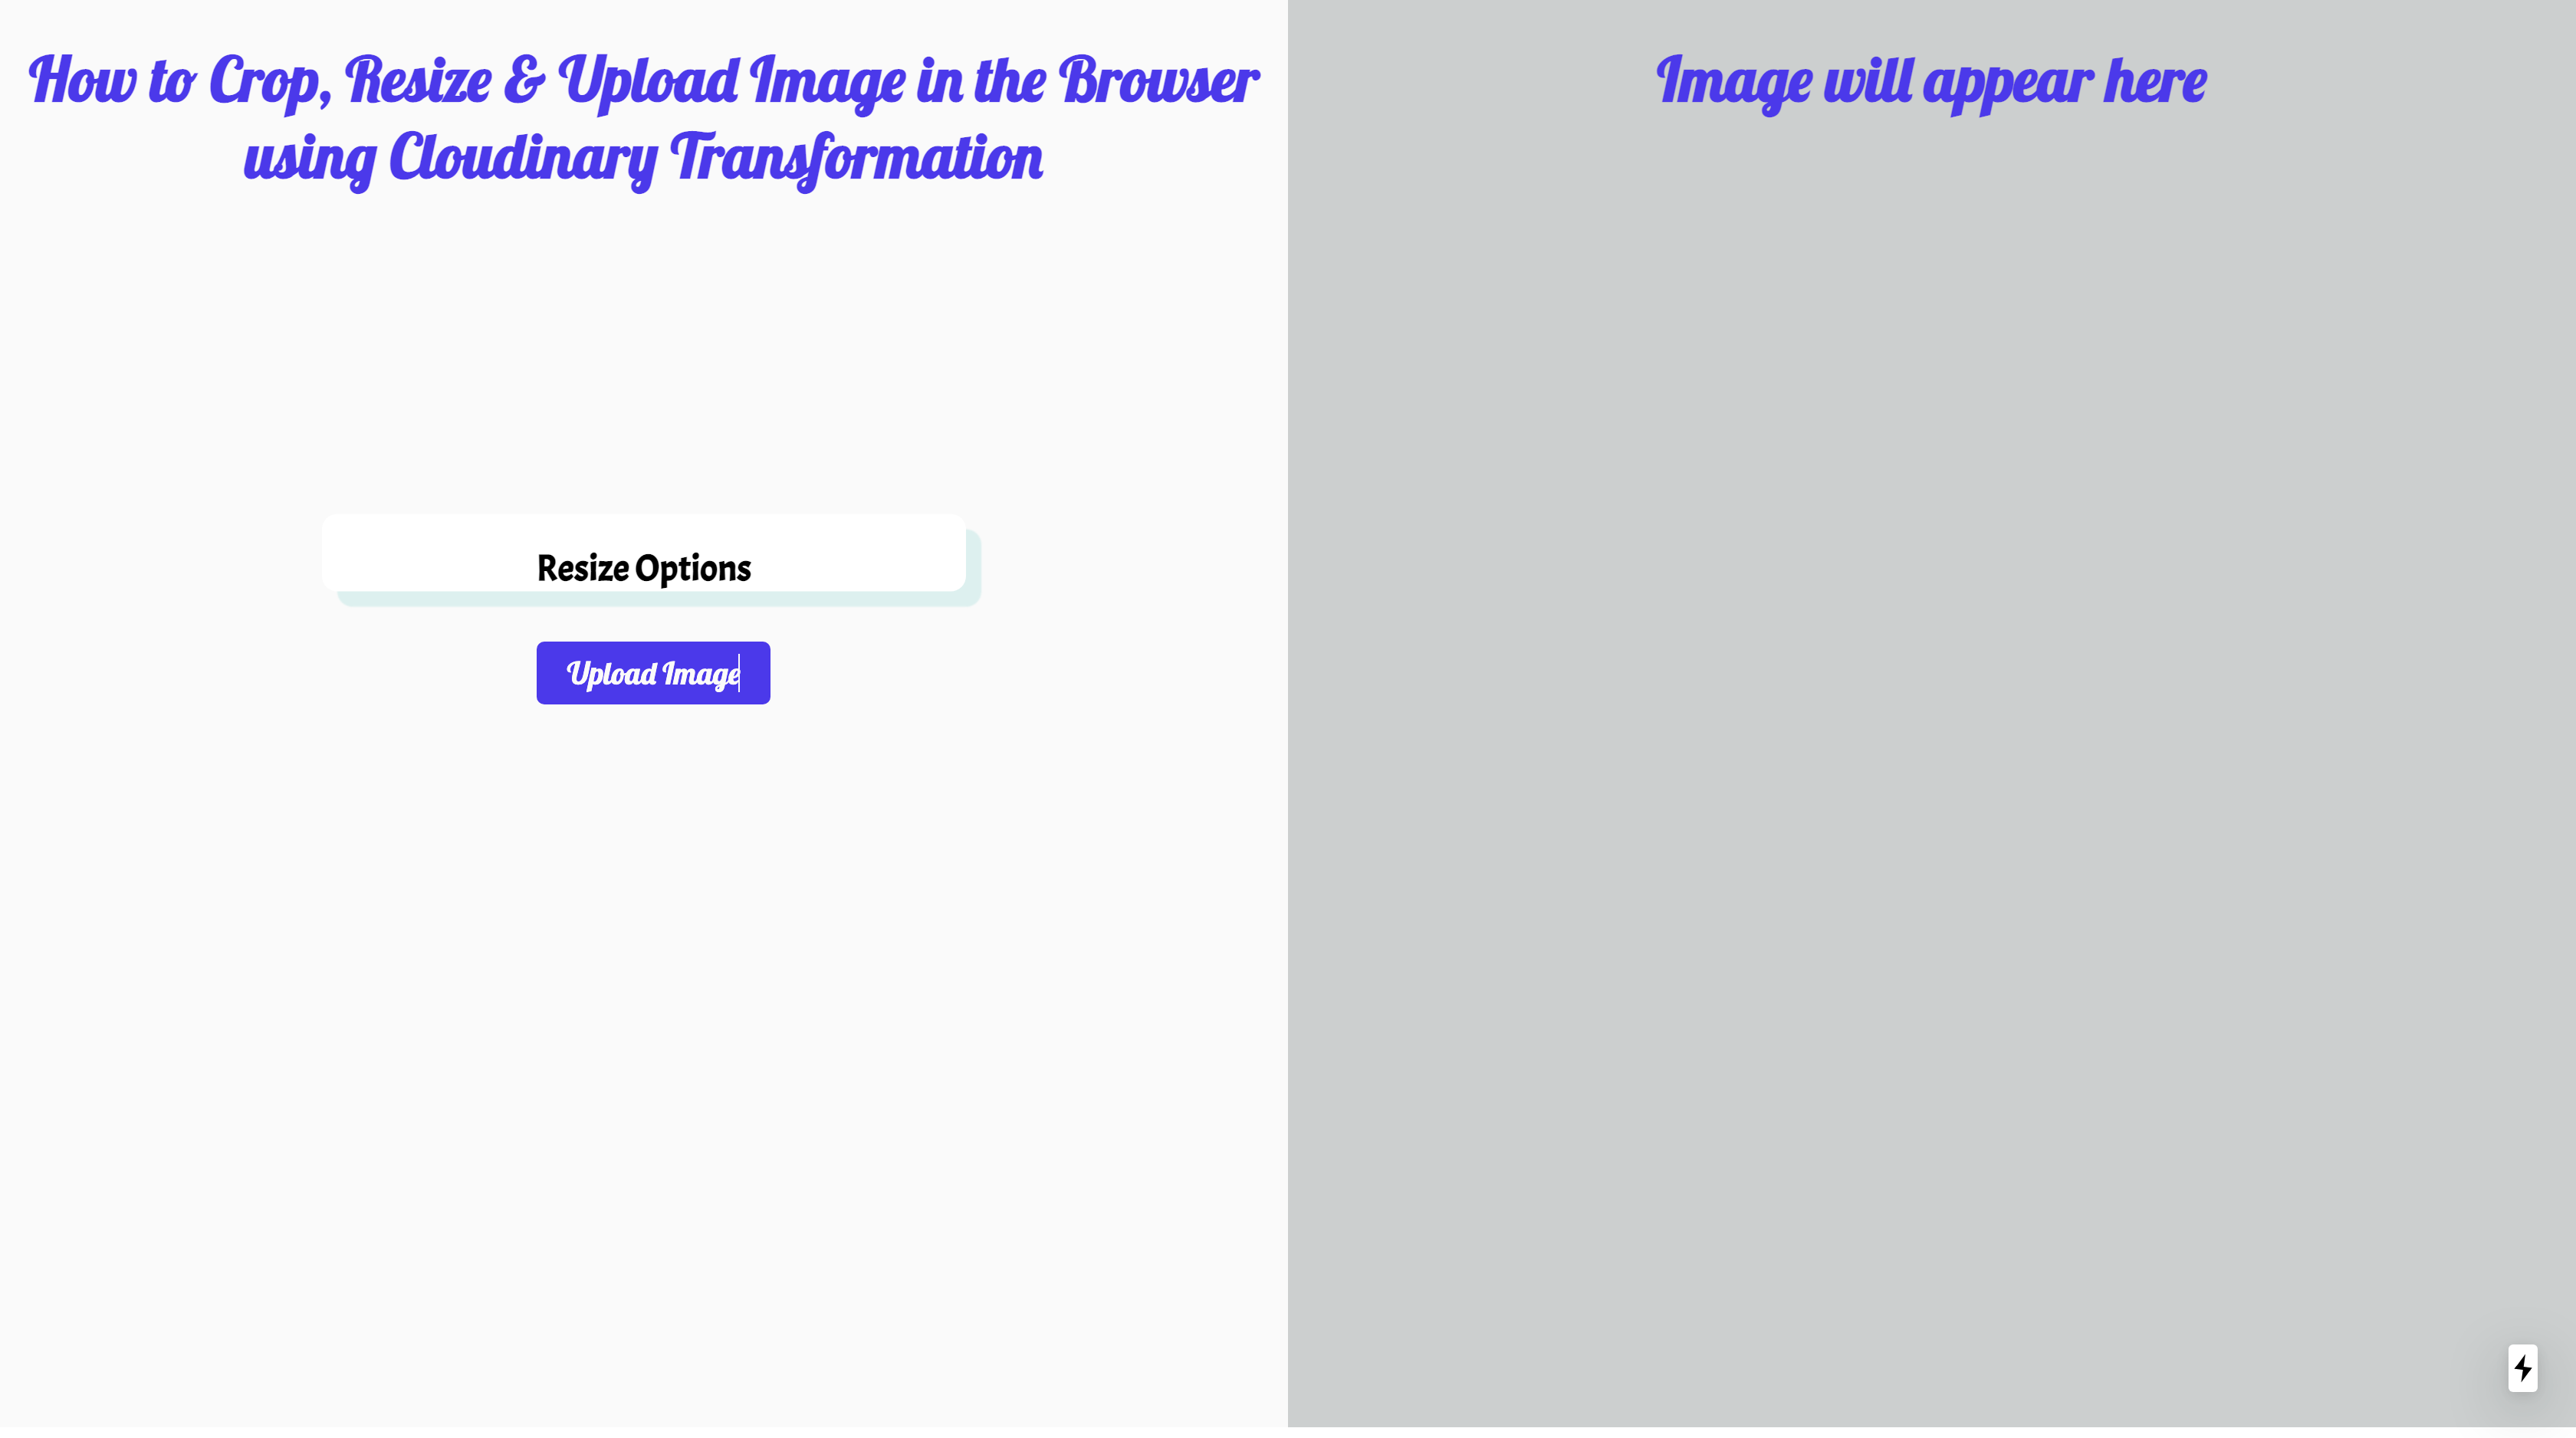
For our project, we'll want the user interface to upload, crop, and resize images on the home page. We will do this by updating the pages/index.js file to a component:
import React, { useState } from "react";
import Head from "next/head";

const IndexPage = () => {

  return (
    <>
      <div className="main">
        <div className="splitdiv" id="leftdiv">
          <h1 className="main-h1">
            How to Crop, Resize & Upload Image in the Browser using Cloudinary
            Transformation
          </h1>
          <div id="leftdivcard">
            <h2 className="main-h2">Resize Options</h2>
          </div>

          <button type="button" id="leftbutton">
            Upload Image
          </button>
        </div>

        <div className="splitdiv" id="rightdiv">
        <h1> Image will appear here</h1>
        </div>
      </div>
    </>
  );
};
export default IndexPage;
The current user interface doesn't look that great, though. We'll add some styling with CSS in the style.css file like this:
@import url("https://fonts.googleapis.com/css?family=Acme|Lobster");

/* This allow me to have the full width of the page without the initial padding/margin*/
body,
html {
  margin: 0;
  padding: 0;
  height: 100%;
  width: 100%;
  font-family: Acme;
  min-width: 700px;
}

.splitdiv {
  height: 100%;
  width: 50%;
}

/* This part contains all of the left side of the screen */
/* ----------------------------------------- */
#leftdiv {
  float: left;
  background-color: #fafafa;
  height: 932px;
}

#leftdivcard {
  margin: 0 auto;
  width: 50%;
  background-color: white;
  margin-top: 25vh;
  transform: translateY(-50%);
  box-shadow: 10px 10px 1px 0px rgba(78, 205, 196, 0.2);
  border-radius: 10px;
}

#leftbutton {
  background-color: #512cf3;
  border-radius: 5px;
  color: #fafafa;
  margin-left: 350px;
}

/* ----------------------------------------- */

/* This part contains all of the right side of the screen */
/* ----------------------------------------- */
#rightdiv {
  float: right;
  background-color: #cbcfcf;
  height: 932px;
}

#rightdivcard {
  margin: 0 auto;
  width: 50%;
  margin-top: 50vh;
  transform: translateY(-50%);
  background-position: bottom;
  background-size: 20px 2px;
  background-repeat: repeat-x;
}

/* ----------------------------------------- */

/* Basic styling */
/* ----------------------------------------- */

button {
  outline: none !important;
  font-family: Lobster;
  margin-bottom: 15px;
  border: none;
  font-size: 20px;
  padding: 8px;
  padding-left: 20px;
  padding-right: 20px;
  margin-top: -15px;
  cursor: pointer;
}

h1 {
  font-family: Lobster;
  color: #512cf3;
  text-align: center;
  font-size: 40px;
}

input {
  font-family: Acme;
  font-size: 16px;
  font-family: 15px;
}

input {
  width: 30%;
  height: 20px;
  padding: 16px;
  margin-left: 1%;
  margin-right: 2%;
  margin-top: 15px;
  margin-bottom: 10px;
  display: inline-block;
  border: none;
}

input:focus {
  outline: none !important;
  border: 1px solid #512cf3;
  box-shadow: 0 0 1px round #719ece;
}

/* ----------------------------------------- */

.main {
  height: 100%;
  width: 100%;
  display: inline-block;
}

.main-h2 {
  padding-top: 20px;
  text-align: center;
}

.body-h1 {
  padding-top: 20px;
  text-align: center;
  color: white;
}

.inner-p {
  color: white;
  text-align: center;
}

.main-align {
  text-align: center;
}

.form-control {
  margin-left: 15px;
}
Our application should now look like this on http://localhost:3000/:
How to Create the Image Upload Widget
Cloudinary's upload widget lets us upload media assets from multiple sources, including Dropbox, Facebook, Instagram, and images that were taken right from our device's camera. We'll use the upload widget in this project.
Create a free cloudinary account to obtain your cloud name and upload_preset.
upload_presets allows us to define a set of asset upload choices centrally rather than providing them in each upload call. A Cloudinary cloud name is a unique identifier associated with your Cloudinary account.
First, from a content delivery network (CDN), we will add the Cloudinary widget's JavaScript file in our index.js located in pages/index.js. We will include this file using next/head to include all meta tags, which lets us add data to the Head portion of our HTML document in React.
Next, in the pages/index.js file, we'll import Head from next/head and add the script file.
import React, { useState } from "react";
import Head from "next/head";

const IndexPage = () => {

  return (
    <>
      <Head>
        <title>How to Crop and Resize Image in the Browser</title>
        <link rel="icon" href="/favicon.ico" />
        <meta charSet="utf-8" />
        <script
          src="https://widget.Cloudinary.com/v2.0/global/all.js"
          type="text/javascript"
        ></script>
      </Head>
      <div className="main">
          [...]
      </div>
    </>
  );
};
export default IndexPage;
In the pages/index.js file, we will create an instance of the widget in a method triggered when clicking a button and a state variable imagePublicId..
import React, { useState } from "react";
import Head from "next/head";

const IndexPage = () => {
  const [imagePublicId, setImagePublicId] = useState("");

  const openWidget = () => {
    // create the widget
    const widget = window.cloudinary.createUploadWidget(
      {
        cloudName: "olanetsoft",
        uploadPreset: "w42epls7"
      },
      (error, result) => {
        if (
          result.event === "success" &&
          result.info.resource_type === "image"
        ) {
          console.log(result.info);
          setImagePublicId(result.info.public_id);
        }
      }
    );
    widget.open(); // open up the widget after creation
  };

  return (
    <>
      //...
    </>
  );
};
export default IndexPage;
The widget requires our Cloudinary cloud_name and uploadPreset. The createWidget() function creates a new upload widget. On successfully uploading an image, we assign the public_id of the asset to the relevant state variable.
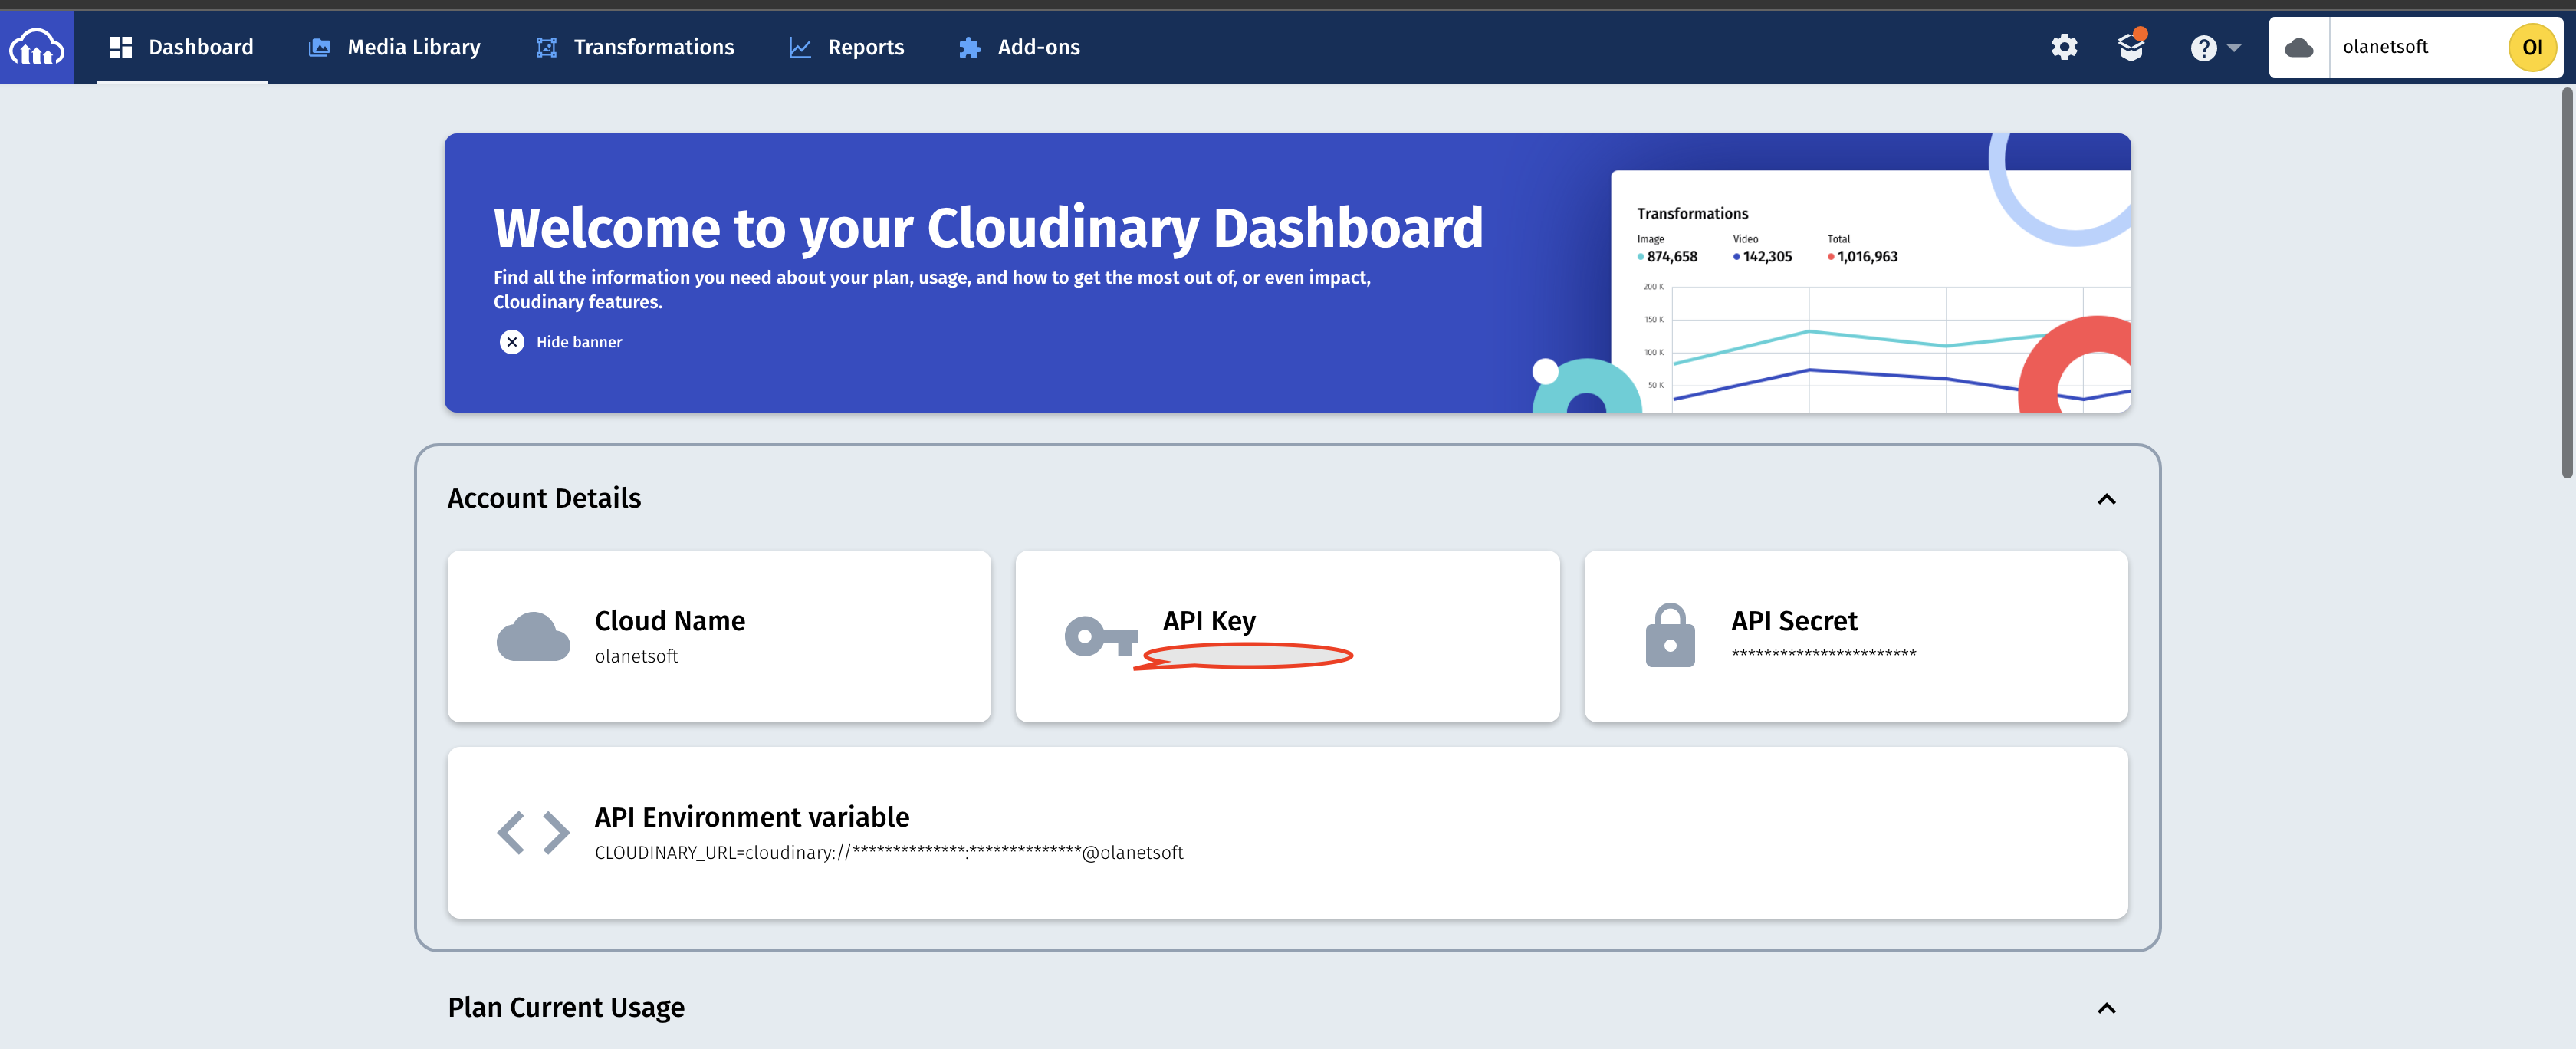
To get our cloudname and uploadPreset, we follow the steps below:
You can get the cloud name from your Cloudinary dashboard, as shown below.
You can find an upload preset in the Upload tab of your Cloudinary settings page. You access this by clicking on the gear icon in the top right corner of the dashboard page.

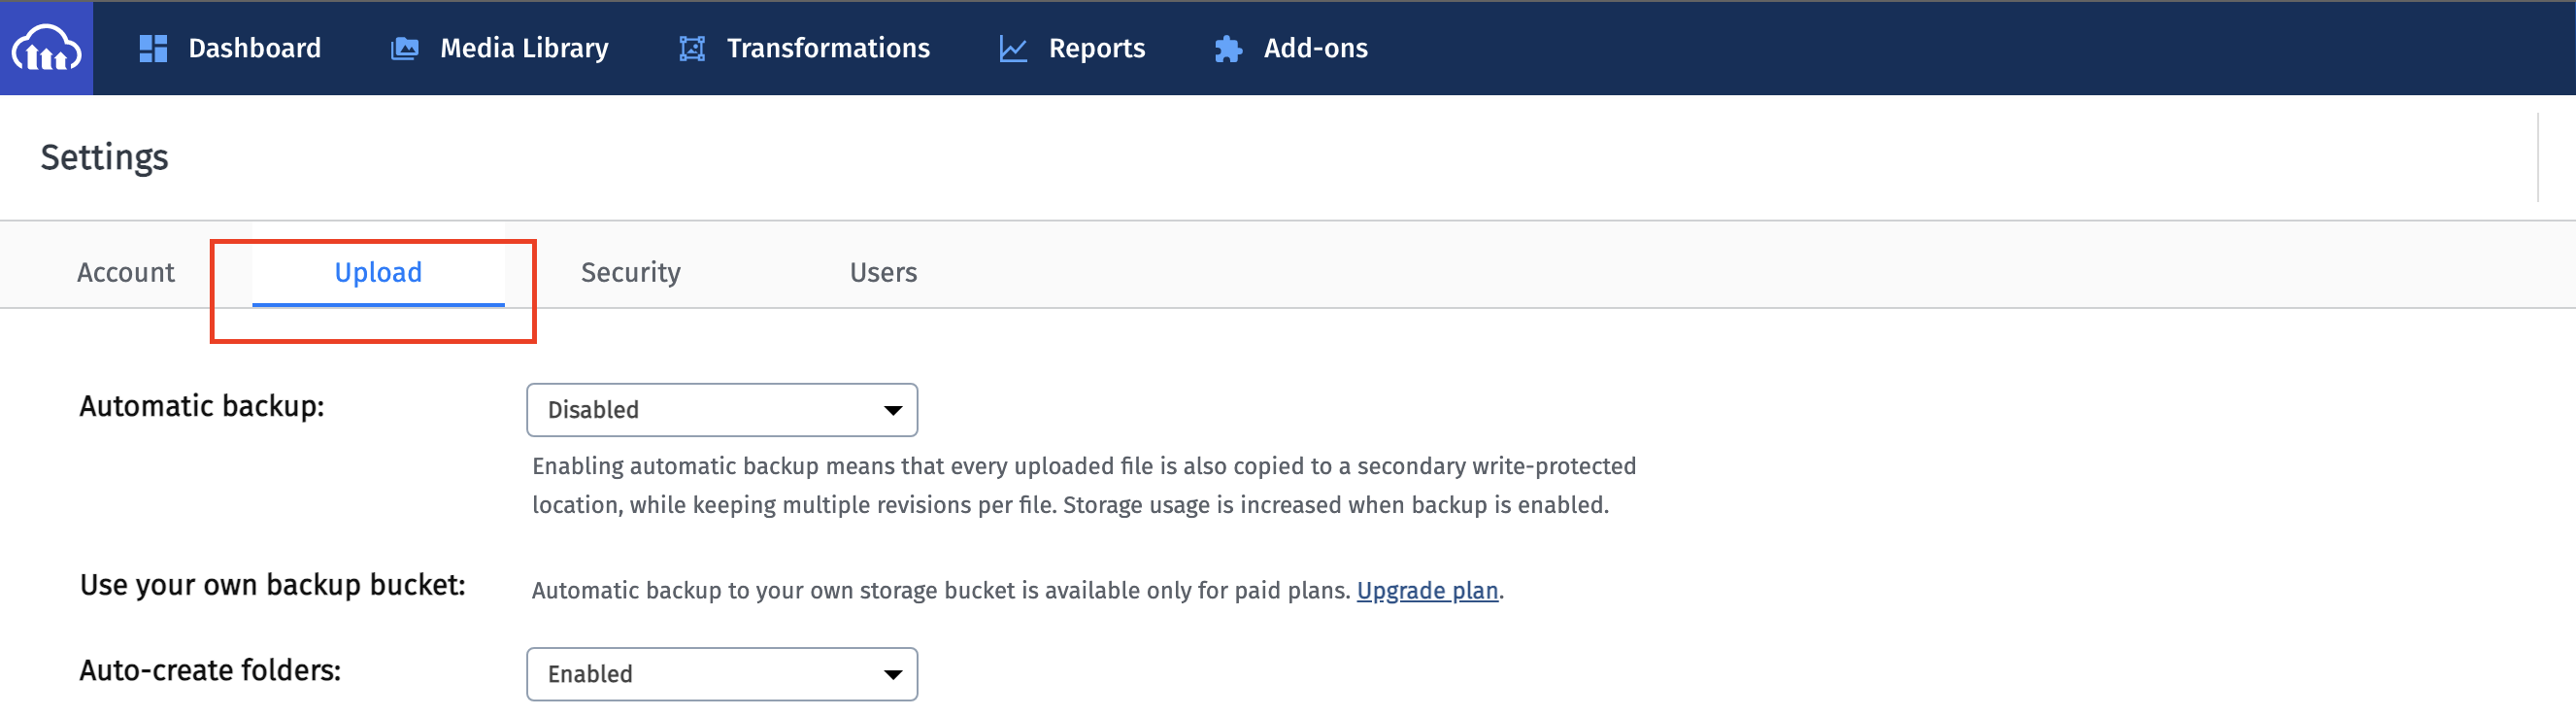
Scroll down to the bottom of the page to the upload presets section, where you'll see your upload preset or the option to create one if you don't have any.
We'll proceed to call the openWidget function in the onClick handler of our image upload button, as shown below:
//...

const IndexPage = () => {
//...
  return (
    <>
     //....
      <div className="main">
        <div className="splitdiv" id="leftdiv">
          //...
          <div id="leftdivcard">
            <h2 className="main-h2">Resize Options</h2>
             //...
            </div>

          <button type="button" id="leftbutton" onClick={openWidget}>
            Upload Image
          </button>
        </div>

        <div className="splitdiv" id="rightdiv">
        <h1> Image will appear here</h1>
        </div>
      </div>
    </>
  );
};
export default IndexPage;
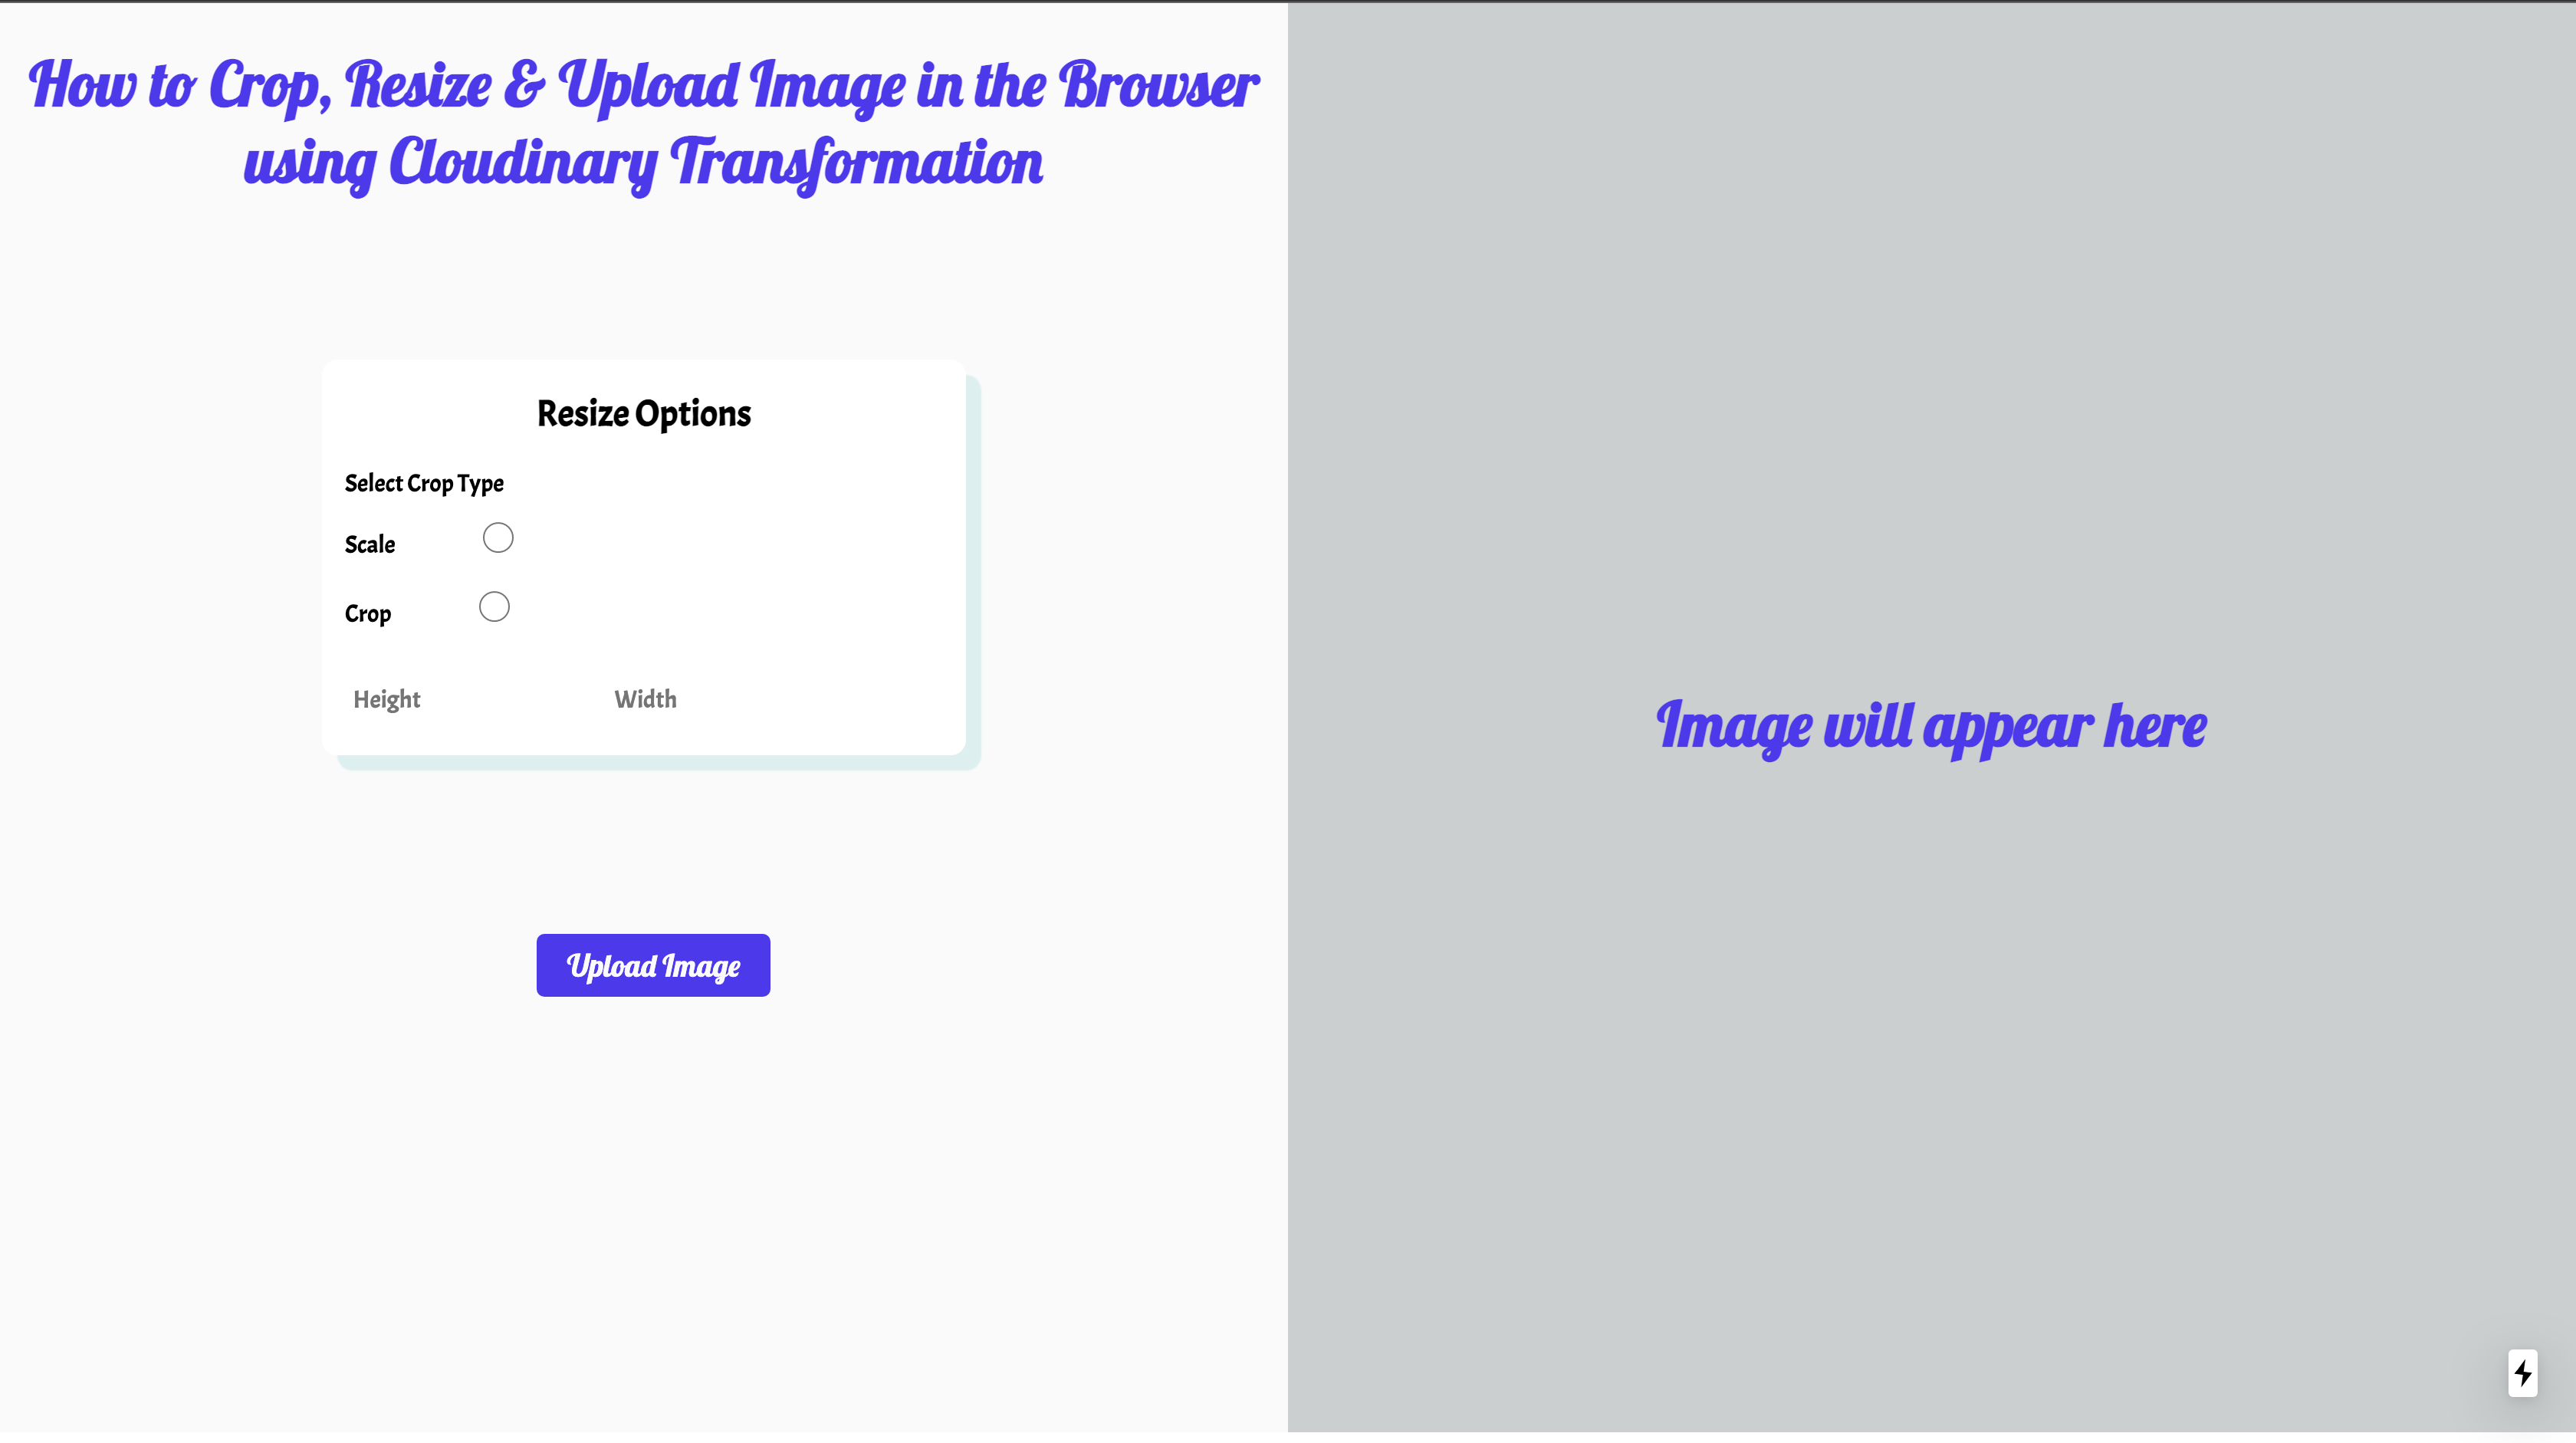
When we open our app in the browser and click the Upload Image button, we should see something like this:

How to Implement Custom Transformation Functions
We need to create a component that handles the transformation depending on the props passed to it. We will create a components/ directory in the root folder. Inside it, we will create a file called image.js with the following content:
import { CloudinaryContext, Transformation, Image } from "cloudinary-react";

const TransformImage = ({ crop, image, width, height }) => {
  return (
    <CloudinaryContext cloudName="olanetsoft">
      <Image publicId={image}>
        <Transformation width={width} height={height} crop={crop} />
      </Image>
    </CloudinaryContext>
  );
};

export default TransformImage;
In the code snippet above, we imported CloudinaryContext, a wrapper Cloudinary component used to manage shared information across all its children Cloudinary components. The rendered TransformImage component takes data of the image transformation as props.
The above code block will render the uploaded image when we import it into pages/index.js:
//...
import TransformImage from "../components/image";

const IndexPage = () => {
  const [imagePublicId, setImagePublicId] = useState("");
  const [alt, setAlt] = useState("");
  const [crop, setCrop] = useState("scale");
  const [height, setHeight] = useState(200);
  const [width, setWidth] = useState(200);

  return (
    <>
     //...
      <div className="main">
        <div className="splitdiv" id="leftdiv">
          //...
       </div>
        <div className="splitdiv" id="rightdiv">
          <h1> Image will appear here</h1>
          <div id="rightdivcard">
            {imagePublicId ? (
              <TransformImage
                crop={crop}
                image={imagePublicId}
                width={width}
                height={height}
              />
            ) : (
              <h1> Image will appear here</h1>
            )}
          </div>
        </div>
      </div>
    </>
  );
};
export default IndexPage;
Next, we will add the Resize Options radio button so that we can select different resize and crop options with the following code snippet:
//...

const IndexPage = () => {
//...

  return (
    <>
    //...
      <div className="main">
        <div className="splitdiv" id="leftdiv">
          //...
          <div id="leftdivcard">
            <h2 className="main-h2">Resize Options</h2>

          <label className="form-control">Select Crop Type</label>
            <div>
              <label className="form-control">Scale</label>
              <input
                type="radio"
                value="scale"
                name="crop"
                onChange={(event) => setCrop(event.target.value)}
              />
            </div>
            <div>
              <label className="form-control">Crop</label>
              <input
                type="radio"
                value="crop"
                name="crop"
                onChange={(event) => setCrop(event.target.value)}
              />
            </div>
            <input
              type="number"
              placeholder="Height"
              onChange={(event) => setHeight(event.target.value)}
            />
            <input
              type="number"
              placeholder="Width"
              onChange={(event) => setWidth(event.target.value)}
            />
          </div>

          <button type="button" id="leftbutton" onClick={openWidget}>
            Upload Image
          </button>
        </div>

        <div className="splitdiv" id="rightdiv">
          //...
        </div>
      </div>
    </>
  );
};
export default IndexPage;
In the code snippet above, we:
- Added crop type and also width and height options
- Added an
onChangeproperty to keep track of the changes in the height and width input field, respectively
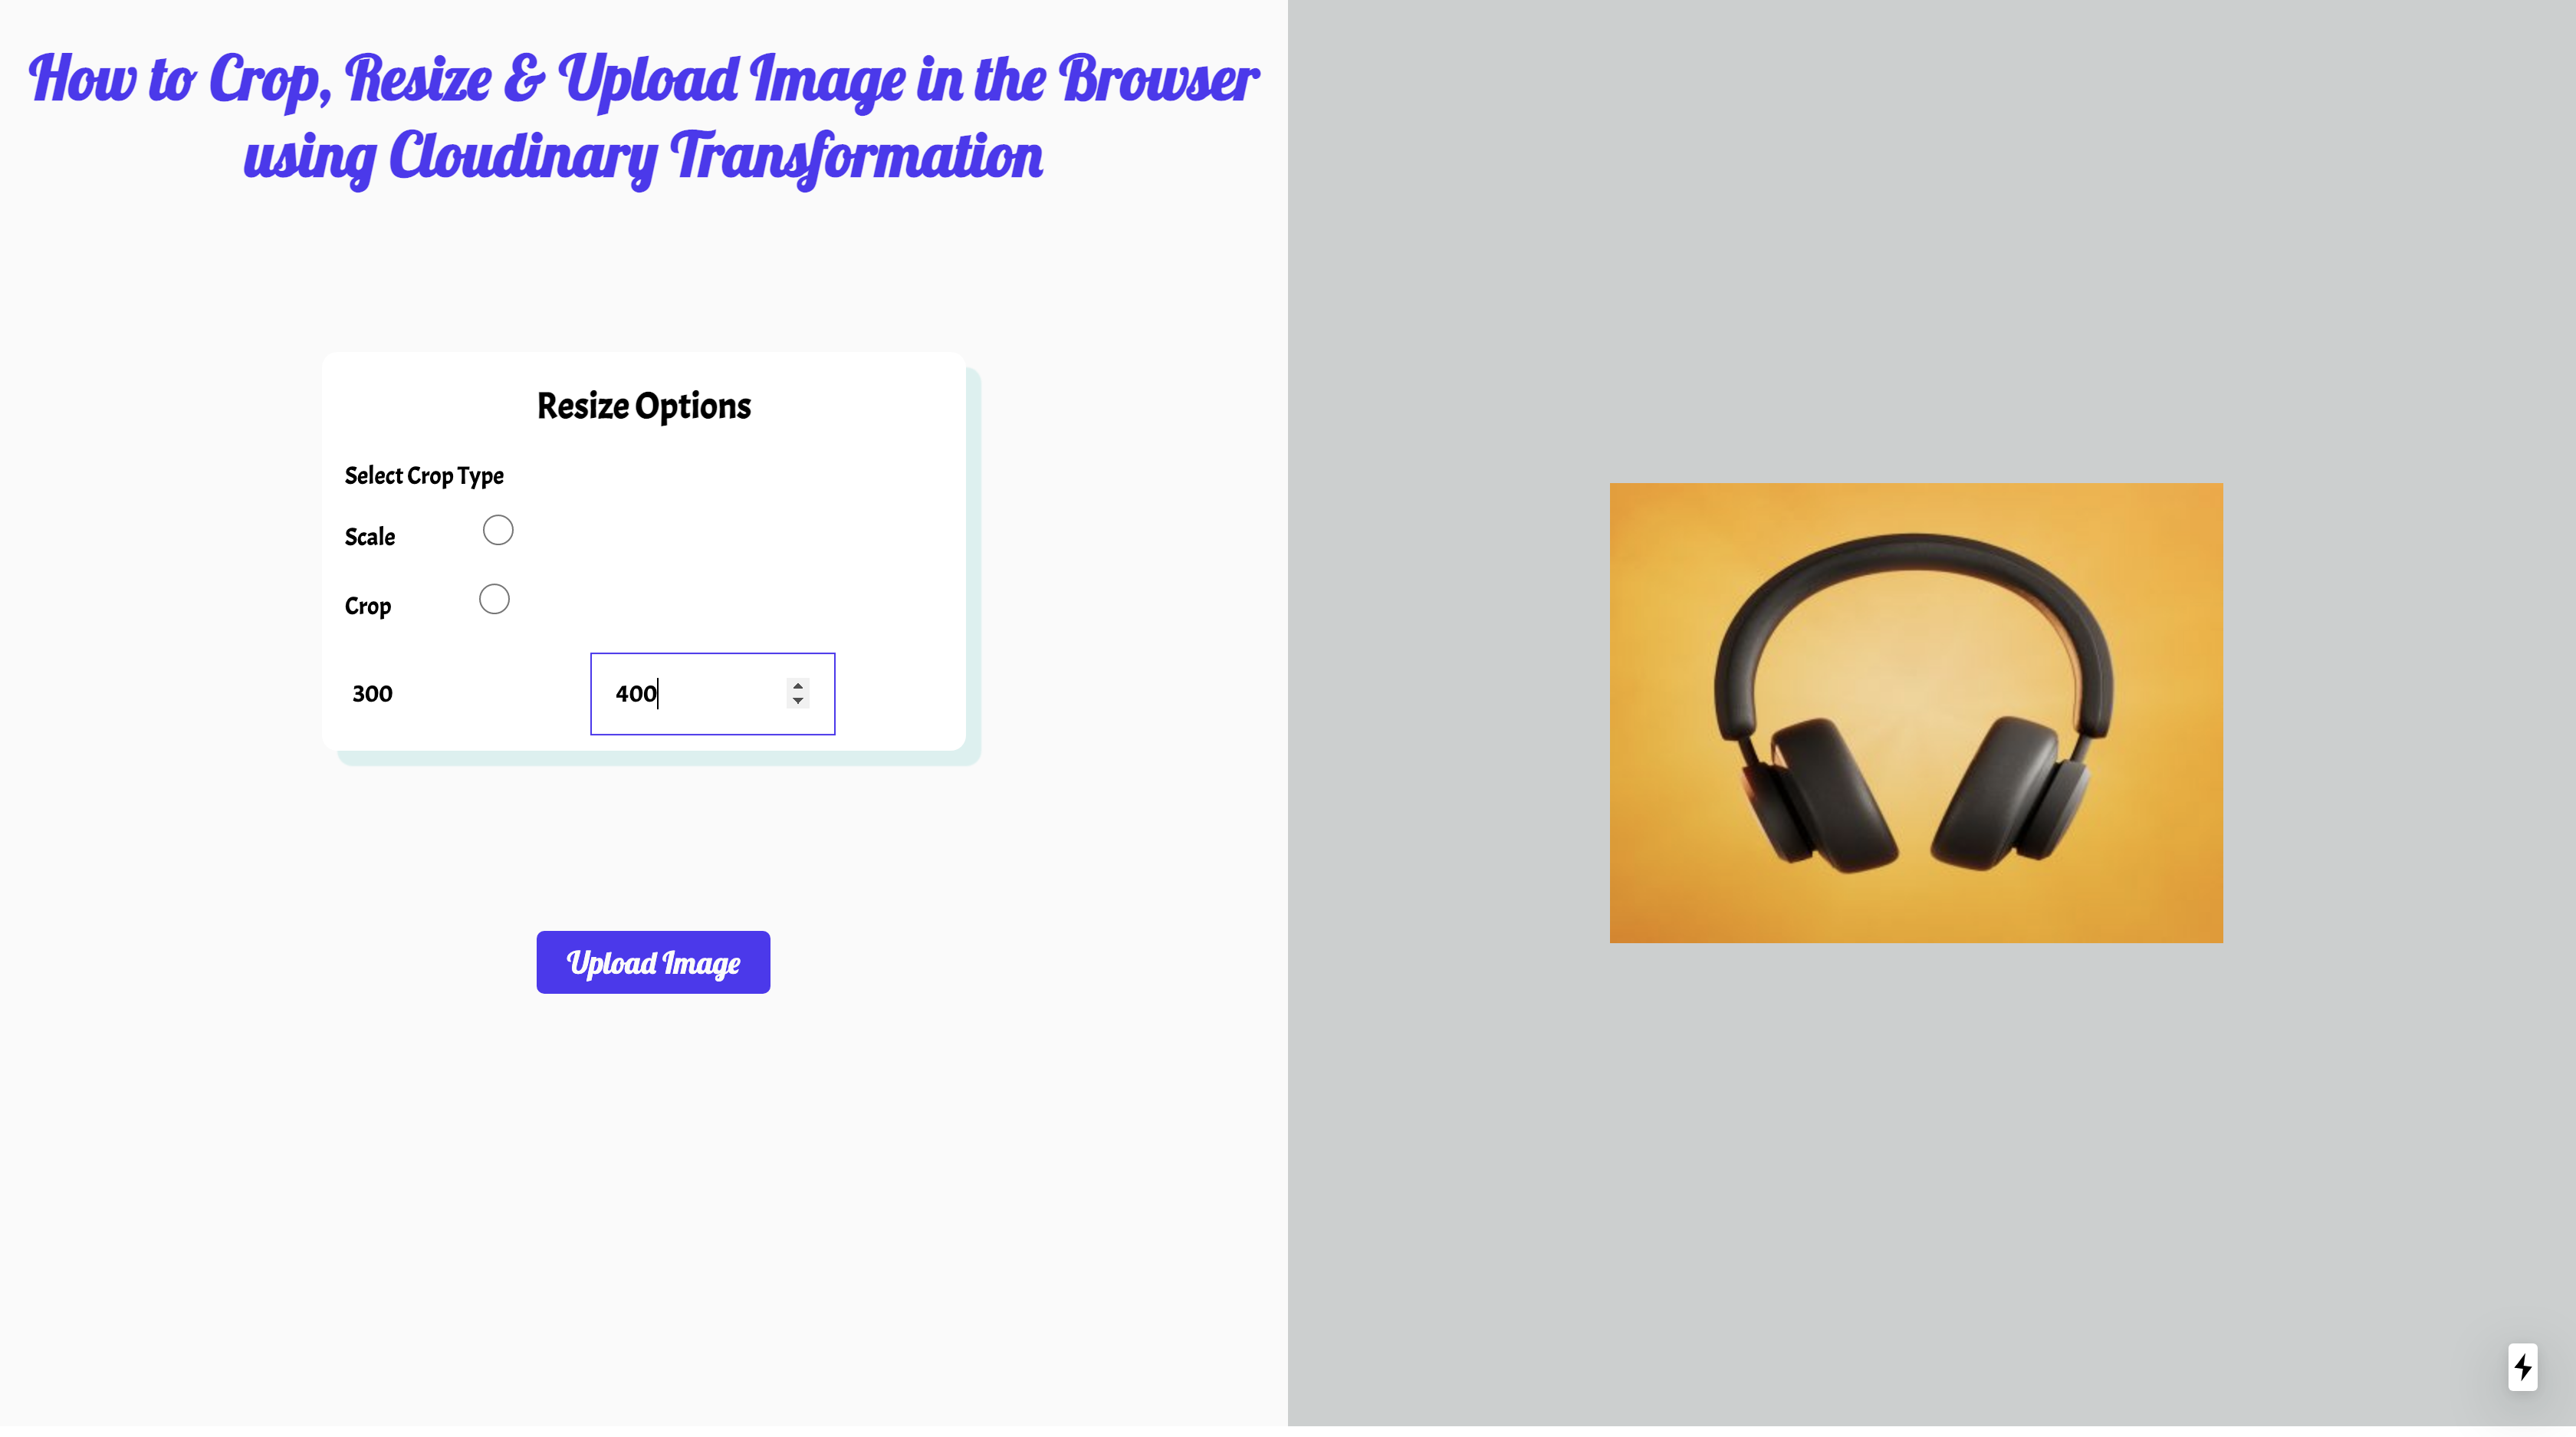
Our application's final output should look similar to what we have below:
Here's the GitHub Repository for the project if you want to have a look at the full code: https://github.com/Olanetsoft/how-to-upload-crop-and-resize-images-in-the-browser-in-next.js
Conclusion
This post shows how to upload, crop, and resize images in the browser in Next.js.
Resources
You may find these resources helpful.