

File upload is a common feature in a lot of modern applications. These platforms accept different file formats, including jpeg, png, gif, pdf, txt, zip, and mp3.
Some applications will also restrict uploads to a specific file type. For example, when uploading your resume on LinkedIn, you will see a subtext specifying DOC, DOCX, and PDF.
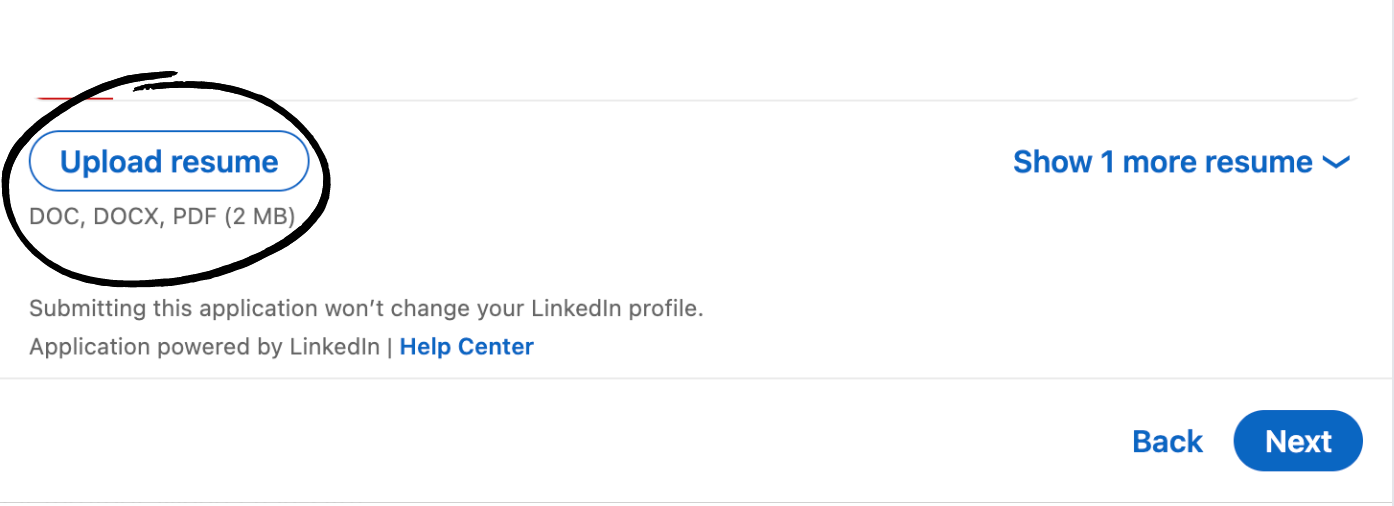 Upload resume page on LinkedIn
Some other file upload use cases are:
- Adding a profile picture on Instagram.
- Adding a product image to a Shopify store.
- Adding a screenshot to a freeCodeCamp tutorial.
- Selling digital products such as PDF files on Selar.
Where do uploaded files go? It is advisable to save your files using cloud storage service providers. They allow users to access the file from anywhere. They also provide secure storage for the files. For example, Amazon Simple Storage Service (S3) has access policy settings which allow you to determine who has access to your S3 bucket.
You can read more about Amazon S3 security and access management on the official website.
In this tutorial, I will show you how to upload files to an S3 bucket with a Node.js application.
Prerequisites
To follow this tutorial, you should understand the following:
- Basic HTML.
- The Node.js server.
- The Express.js framework.
You should also have an AWS account with an active S3 bucket. There are clear steps for setting up your AWS account and creating an S3 bucket in the AWS documentation.
Now, let's get started.
How to Create the Node.js Server
This application will use a couple of packages:
express: This is a Node.js framework for APIs.dotenv: This is to access environment variables in the.envfile.formidable: This is a data parser that supports file uploads.@aws-sdk/lib-storage: This is an AWS SDK library for uploading large files.@aws-sdk/client-s3: This is an AWS SDK S3 Client for Node.js.
Install them by running this command:
npm install express dotenv formidable @aws-sdk/lib-storage @aws-sdk/client-s3
Next, create an index.js file to set up the server. Since this application is for tutorial purposes, I will set up the HTML form in the same file. You can go with a different setup.
const express = require('express');
const app = express();
require('dotenv').config();

app.set('json spaces', 5); // to pretify json response

const PORT = process.env.PORT || 3000;

app.get('/', (req, res) => {
  res.send(`
    <h2>File Upload With <code>"Node.js"</code></h2>
    <form action="/api/upload" enctype="multipart/form-data" method="post">
      <div>Select a file:
        <input type="file" name="file" multiple="multiple" />
      </div>
      <input type="submit" value="Upload" />
    </form>

  `);
});

app.listen(PORT, () => {
  console.log(`Server running on port ${PORT}.`)
})
Start the server with the node index.js command.
To confirm that everything works as expected, check for the message Server running on port 3000. on your terminal.
With the server up and running, open this link http://127.0.0.1:3000/ (replace 3000 with your port number) on your browser. It should render a form on the webpage.
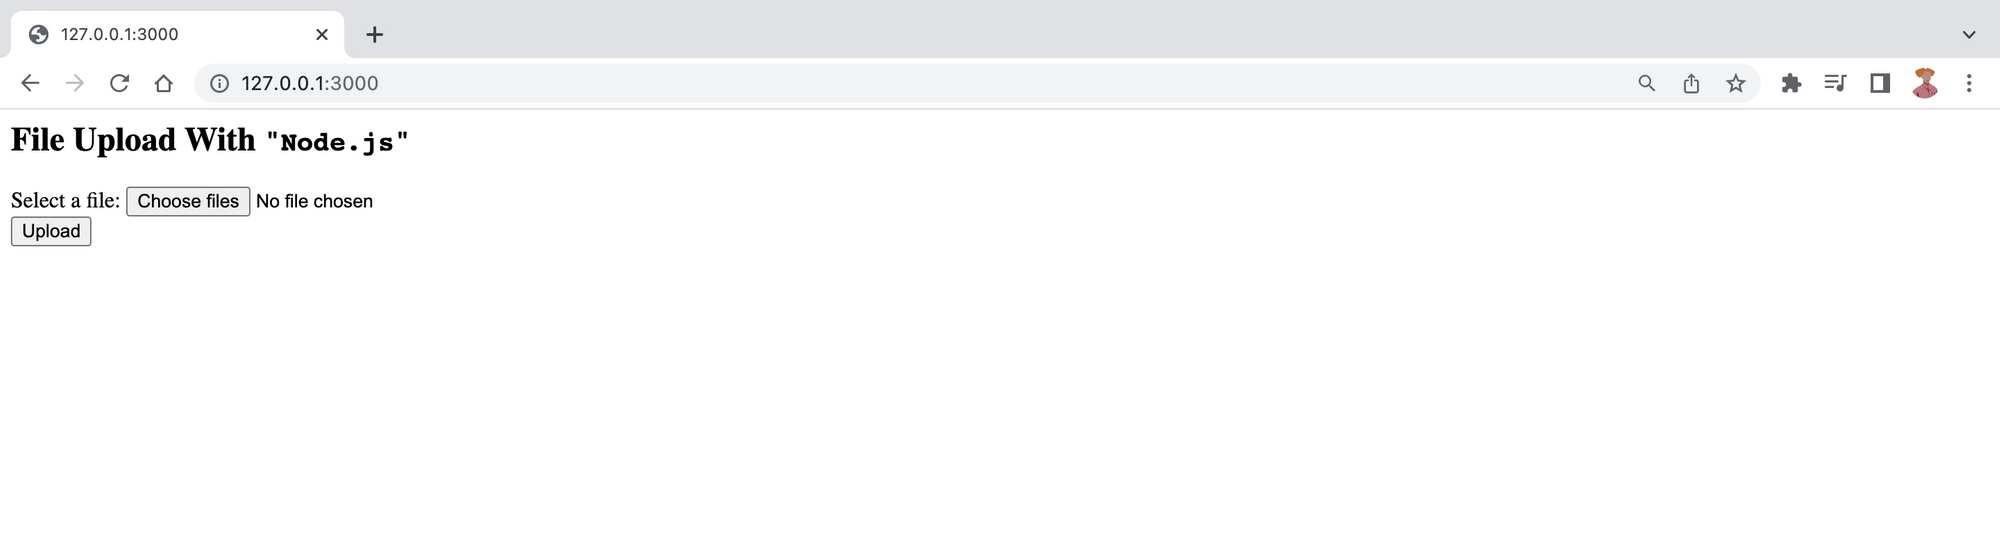 Form page for the file upload
How to Configure the File Parser
We will serve the files from the client to the S3 bucket using the Node.js formidable package.
The formidable module accepts an options object that contains a range of file properties. These properties have default values which you can overwrite to configure the parser according to your needs. Some of the keys are:
allowEmptyFiles: This is assigned a boolean value. It determines if empty files should be allowed and its value istrueby default.minFileSize: This key accepts a number value representing the smallest file size allowed. The default value is 1 byte.maxFileSize: This also accepts a number value. It represents the largest file size allowed. The default value is 200 megabytes (MB).
I want my app to accept files smaller than or equal to 100 MB in size, so I must set it as the maxFileSize option in the options object.
Open a fileparser.js file and add the code below:
const formidable = require('formidable');

const parsefile = async (req) => {
    return new Promise((resolve, reject) => {
        let options = {
            maxFileSize: 100 * 1024 * 1024, //100 MBs converted to bytes,
            allowEmptyFiles: false
        }

        const form = formidable(options);

        form.parse(req, (err, fields, files) => {});
    })
}

module.exports = parsefile;
This service returns a promise that resolves with the upload details if successful. Otherwise, it rejects with the relevant error details. It generates a form instance that does not accept empty uploads and will only parse 100 MB or less. It also calls the form.parse() method to process the incoming request.
The parse method accepts two arguments – the request payload and a callback function. You can access fields, files, and any parse() error (as err) details here.
You may overwrite this method if you are interested in directly accessing the multipart stream. Doing so will disable any
'field'/'file'events processing which would occur otherwise, making you fully responsible for handling the processing. (Formidable)
We will not be overwriting this part since we need the form instance to stream the file to the S3 bucket. We will explore this later in this tutorial.
How to Handle Form Events
If you are unfamiliar with events in programming, take a look at this definition before continuing:
Events are things that happen in the system you are programming, which the system tells you about so your code can react to them. (Source: MDN)
The form instance emits different events while processing a file, including:
- An
errorevent for errors in the parsing process. - A
fileevent when it receives a file/field pair. - A
progressevent after parsing each chunk of data.
You can specify how you want to handle these events using the form.on() method.
The on() method accepts an event name and a listener function, which is triggered whenever the form emits the event. The request will sometimes timeout, like in an error event, if the event is not handled. You can control what happens when the program emits a particular event in the listener function.
Update the fileparser.js file with the on() method:
const formidable = require('formidable');

const parsefile = async (req) => {
    return new Promise((resolve, reject) => {
        let options = {
            maxFileSize: 100 * 1024 * 1024, //100 MBs converted to bytes,
            allowEmptyFiles: false
        }

        const form = formidable(options);

        form.parse(req, (err, fields, files) => {});

        form.on('error', error => {
            reject(error.message)
        })

        form.on('data', data => {
            if (data.name === "successUpload") {
                resolve(data.value);
            }
        })


    })
}

module.exports = parsefile;
The data listener will return a successful response when the S3 upload is successful S3. However, the error listener will listen for error events and send the error response to the client.
For example, I get this error message when I try to upload an empty file.
 Error response for an empty file upload
Another event you will listen for is the fileBegin event.
Disclaimer: I came across this solution on GitHub. I tweaked it to fit my use case, and it worked perfectly.
It is emitted whenever a new file is detected in the upload stream. Use this event if you want to stream the file to somewhere else while buffering the upload on the file system. (Formidable)
How to Create the File Stream
A benefit of streaming is that we do not need to wait to receive the entire file before processing. Every chunk of data is processed as it is received.
Import the Transform class from the Node.js stream module into the fileparser.js file. This class will create a transform stream which will pass as the body of the uploaded object.
The transform stream is a type of duplex stream that reads data, transforms the data, and then writes the transformed data in a specified format. (LogRocket Blog)
Next, call the form.on method with a fileBegin event name and the listener function.
What does the listener function here do?
The function has two parameters – formName and file. They represent the name of the form that contains the file and the file object containing details of the file, respectively. The focus in this section is the file object.
file is an instance of the Formidable PersistentFile class created from the Node.js EventEmitter class. The PersistentFile class has some methods, including open() and end(). You can overwrite them to determine what happens when any is triggered.
Create an asynchronous function to handle the stream upload and assign it to the file.open method.
Update the fileParser.js file as shown:
const formidable = require('formidable');
const Transform = require('stream').Transform;

const parsefile = async (req) => {
    return new Promise((resolve, reject) => {
        let options = {
            maxFileSize: 100 * 1024 * 1024, //100 MBs converted to bytes,
            allowEmptyFiles: false
        }

        const form = formidable(options);

        form.parse(req, (err, fields, files) => {});

        form.on('error', error => {
            reject(error.message)
        })

        form.on('data', data => {
            if (data.name === "successUpload") {
                resolve(data.value)
            }
        })

        form.on('fileBegin', (formName, file) => {

            file.open = async function () {
                this._writeStream = new Transform({
                    transform(chunk, encoding, callback) {
                        callback(null, chunk)
                    }
                })

                this._writeStream.on('error', e => {
                    form.emit('error', e)
                });
            }

        })


    })
}

module.exports = parsefile;
This function creates an instance of the Transform class that processes the data chunks with an internal transform method. The resulting stream is then set as the write stream for the file object using this._writeStream.
Next, we add the on listener to this._writeStream to handle any errors in the streaming process.
How to Upload to the S3 Bucket
This is where the file storage happens.
Import the Upload module of the @aws-sdk/lib-storage package in the fileparser.js file. The module allows us to upload the file in parts. We will also import the S3Client from @aws-sdk/client-s3.
const { Upload } = require("@aws-sdk/lib-storage");
const { S3Client, S3 } = require("@aws-sdk/client-s3");
You will need your AWS credentials to configure the upload.
- Follow the instructions on the AWS website to retrieve the access keys.
- Check the S3 console to confirm your bucket name and region.
- Add them to your
.envfile and assign them to thefileparser.jsfile.
PORT=3000
AWS_ACCESS_KEY_ID=
AWS_SECRET_ACCESS_KEY=
S3_REGION=eu-central-1
S3_BUCKET=prac-s3
Next, you will create a new instance of the Upload module imported from @aws-sdk/lib-storage within the file.open method. We will configure that instance with some options, including:
client: This is the destination of the file. Since we are uploading to an S3 bucket, we will use theS3Clientprovided by AWS. Create a new instance of theS3Clientand add your AWS credentials – AWS secret access key and AWS access key ID – to configure it. You also need to specify the bucket's region in the client.params: This object contains the name of the S3 bucket (Bucket), theKey(that is, the file name), the access control list (ACL) that defines access to the data, and theBody(that is, the generated transform stream).queueSize: This defines the number of parts to be processed simultaneously. The default is 4.partSize: This defines the size of each part that is processed. The smallest size possible is 5MB.
Here is the updated fileparser.js file:
const { Upload } = require("@aws-sdk/lib-storage");
const { S3Client } = require("@aws-sdk/client-s3");
const Transform = require('stream').Transform;

const accessKeyId = process.env.AWS_ACCESS_KEY_ID;
const secretAccessKey = process.env.AWS_SECRET_ACCESS_KEY;
const region = process.env.S3_REGION;
const Bucket = process.env.S3_BUCKET;

const parsefile = async (req) => {
    return new Promise((resolve, reject) => {
        let options = {
            maxFileSize: 100 * 1024 * 1024, //100 MBs converted to bytes,
            allowEmptyFiles: false
        }

        const form = formidable(options);

        form.parse(req, (err, fields, files) => {});

        form.on('error', error => {
            reject(error.message)
        })

        form.on('data', data => {
            if (data.name === "successUpload") {
                resolve(data.value);
            }
        })

        form.on('fileBegin', (formName, file) => {

            file.open = async function () {
                this._writeStream = new Transform({
                    transform(chunk, encoding, callback) {
                        callback(null, chunk)
                    }
                })

                this._writeStream.on('error', e => {
                    form.emit('error', e)
                });

                // upload to S3
                new Upload({
                    client: new S3Client({
                        credentials: {
                            accessKeyId,
                            secretAccessKey
                        },
                        region
                    }),
                    params: {
                        ACL: 'public-read',
                        Bucket,
                        Key: `${Date.now().toString()}-${this.originalFilename}`,
                        Body: this._writeStream
                    },
                    tags: [], // optional tags
                    queueSize: 4, // optional concurrency configuration
                    partSize: 1024 * 1024 * 5, // optional size of each part, in bytes, at least 5MB
                    leavePartsOnError: false, // optional manually handle dropped parts
                })
                    .done()
                    .then(data => {
                        form.emit('data', { name: "complete", value: data });
                    }).catch((err) => {
                        form.emit('error', err);
                    })
            }

        })


    })
}

module.exports = parsefile;
The done method chained to the Upload instance returns a promise when the upload process is complete.
If the upload is successful, the promise resolves with an object containing information about the uploaded file. The form instance emits a data event with the complete name and the returned data. The emitted event sends a successful response to the client.
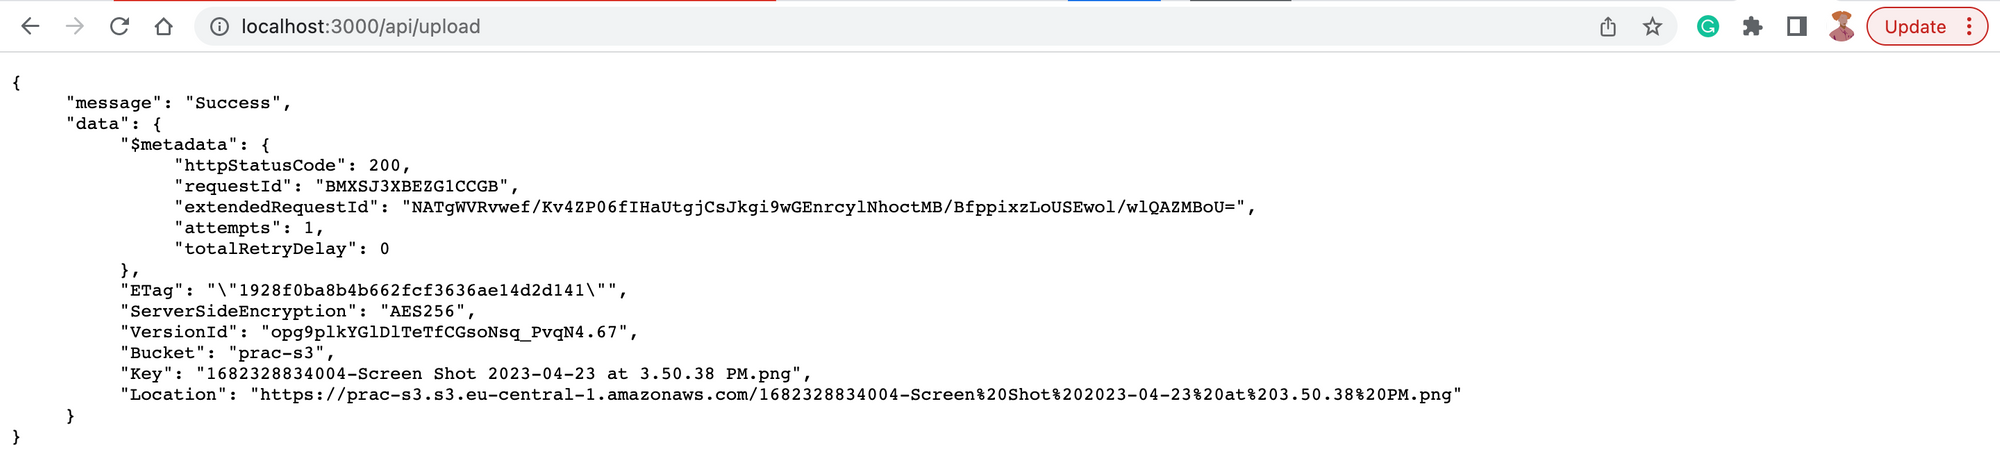 Successful upload response
The response data has relevant details that pertain to the upload, including:
$metadata: An object containing the status code, the number of upload attempts, and so on.Key: The name of the file.Location: A URL pointing to the file's location. It also downloads it.
If the upload is unsuccessful, it rejects the promise with an error message and the form instance triggers an error event.
You also want to ensure that every chunk of data is written to the stream before it closes. Modify the file.end() method to ensure the write stream emits a finish event before calling its end method. The finish event signifies that the program has written all the data to the stream, and the stream has closed. And the end event on the stream object indicates that the stream has ended.
The updated fileparser.js file:
const { Upload } = require("@aws-sdk/lib-storage");
const { S3Client } = require("@aws-sdk/client-s3");
const Transform = require('stream').Transform;

const accessKeyId = process.env.AWS_ACCESS_KEY_ID;
const secretAccessKey = process.env.AWS_SECRET_ACCESS_KEY;
const region = process.env.S3_REGION;
const Bucket = process.env.S3_BUCKET;

const parsefile = async (req) => {
    return new Promise((resolve, reject) => {
        let options = {
            maxFileSize: 100 * 1024 * 1024, //100 MBs converted to bytes,
            allowEmptyFiles: false
        }

        const form = formidable(options);

        form.parse(req, (err, fields, files) => {});

        form.on('error', error => {
            reject(error.message)
        })

        form.on('data', data => {
            if (data.name === "successUpload") {
                resolve(data.value);
            }
        })

        form.on('fileBegin', (formName, file) => {

            file.open = async function () {
                this._writeStream = new Transform({
                    transform(chunk, encoding, callback) {
                        callback(null, chunk)
                    }
                })

                this._writeStream.on('error', e => {
                    form.emit('error', e)
                });

                // upload to S3
                new Upload({
                    client: new S3Client({
                        credentials: {
                            accessKeyId,
                            secretAccessKey
                        },
                        region
                    }),
                    params: {
                        ACL: 'public-read',
                        Bucket,
                        Key: `${Date.now().toString()}-${this.originalFilename}`,
                        Body: this._writeStream
                    },
                    tags: [], // optional tags
                    queueSize: 4, // optional concurrency configuration
                    partSize: 1024 * 1024 * 5, // optional size of each part, in bytes, at least 5MB
                    leavePartsOnError: false, // optional manually handle dropped parts
                })
                    .done()
                    .then(data => {
                        form.emit('data', { name: "complete", value: data });
                    }).catch((err) => {
                        form.emit('error', err);
                    })
            }

            file.end = function (cb) {
                this._writeStream.on('finish', () => {
                    this.emit('end')
                    cb()
                })
                this._writeStream.end()
            }

        })


    })
}

module.exports = parsefile;
An easier-to-read update could involve abstracting the S3 upload process and calling it within the fileparser.js file.
Finally, update the index.js file with the upload route. Import the fileparser module and create a POST route. The module is a promise, which means you can handle the response with .then() and errors using .catch().
The updated index.js file:
const express = require('express');
const app = express();
require('dotenv').config();

app.set('json spaces', 5); // to pretify json response

const PORT = process.env.PORT;
const fileparser = require('./fileparser');

app.get('/', (req, res) => {
  res.send(`
    <h2>File Upload With <code>"Node.js"</code></h2>
    <form action="/api/upload" enctype="multipart/form-data" method="post">
      <div>Select a file:
        <input name="file" type="file" />
      </div>
      <input type="submit" value="Upload" />
    </form>

  `);
});

app.post('/api/upload', async (req, res) => {
  await fileparser(req)
  .then(data => {
    res.status(200).json({
      message: "Success",
      data
    })
  })
  .catch(error => {
    res.status(400).json({
      message: "An error occurred.",
      error
    })
  })
});

app.listen(PORT, () => {
  console.log(`Server running on port ${PORT}.`);
})
And there you have it!
Conclusion
In this article, you have seen how to set up your Node.js application to handle file upload. You also saw how the formidable package facilitates the process using events and how to set up the AWS-SDK Upload module.
This repo contains the code. At the time of writing, the code logic in the samples here is the same as the repo's content.