

Apache Airflow is an open-source workflow management system that makes it easy to write, schedule, and monitor workflows.
A workflow as a sequence of operations, from start to finish. The workflows in Airflow are authored as Directed Acyclic Graphs (DAG) using standard Python programming.
You can configure when a DAG should start execution and when it should finish. You can also set up workflow monitoring through the very intuitive Airflow UI.
You can be up and running on Airflow in no time – it’s easy to use and you only need some basic Python knowledge. It's also completely open source.
Apache Airflow also has a helpful collection of operators that work easily with the Google Cloud, Azure, and AWS platforms.
In this article we are going to cover
What are Directed Acyclic Graphs (DAGs)?
What are Operators?
How to Create your First DAG
A Use-Case for DAGs
How to Set Up Cloud Composer
How to Run the Pipeline on Composer
What are Directed Acyclic Graphs, or DAGs?
DAGs, or Directed Acyclic Graphs, have nodes and edges. DAGs should not contain any loops and their edges should always be directed.
In short, a DAG is a data pipeline and each node in a DAG is a task. Some examples of nodes are downloading a file from GCS (Google Cloud Storage) to Local, applying business logic on a file using Pandas, querying the database, making a rest call, or uploading a file again to a GCS bucket.
Visualizing DAGs

Correct DAG with no loops

Incorrect DAG with Loop
You can schedule DAGs in Airflow using the schedule_interval attribute. By default it’s "None" which means that the DAG can be run only using the Airflow UI.
You can schedule the DAG to run once every hour, every day, once a week, monthly, yearly or whatever you wish using the cron presets options (@hour, @daily, @weekly, @hourly, @monthly, @yearly).
If you need to run the DAG every 5 mins, every 10 mins, every day at 14:00, or once on a specific day like every Thursday at 10:00am, then you should use these cron-based expressions.
*/5 * * * * = Every 5 minutes
0 14 * * * = Every day at 14:00
What are Operators?
A DAG consists of multiple tasks. You can create tasks in a DAG using operators which are nodes in the graph.
There are various ready to use operators available in Airflow, such as:
LocalFilesystemToGCSOperator – use it to upload a file from Local to GCS bucket.
PythonOperator – use it to execute Python callables.
functionEmailOperator – use it to send email.
SimpleHTTPOperator – use it to make an HTTP Request.
How to Create Your First DAG
The example DAG we are going to create consists of only one operator (the Python operator) which executes a Python function.
from airflow import DAG
from datetime import datetime
from airflow.operators.python_operator import PythonOperator

def message():
    print("First DAG executed Successfully!!")

with DAG(dag_id="FirstDAG", start_date=datetime(2022,1,23), schedule_interval="@hourly",
         catchup=False) as dag:

    task = PythonOperator(
        task_id="task",
        python_callable=message)

task
The first step is to import the necessary modules required for DAG development. The line with DAG is the DAG which is a data pipeline that has basic parameters like dag_id, start_date, and schedule_interval.
The schedule_interval is configured as @hourly which indicates that the DAG will run every hour.
The task in the DAG is to print a message in the logs. We have used the PythonOperator here. This operator is used to execute any callable Python function.
Once the execution is complete, we should see the message “First DAG executed Successfully” in the logs. We are going to execute all our DAGs on GCP Cloud Composer.

Airflow UI
After successful execution, the message is printed on the logs:

Logs
A Use-Case for DAGs
The use-case we are going to cover in this article involves a three-step process.
In step one, we will upload a .csv file in some input GCS bucket. This file should be processed by PythonOperator in the DAG. The function which will be executed by the PythonOperator consists of Pandas code, which represents how users can use Pandas code for transforming the data in the Airflow Data Pipeline.
In step two, we'll upload the transformed .csv file to another GCS bucket. This task will be handled by the GCSToGCSOperator.
Step three is to send the status email indicating the that the pipeline execution is completed which will be handled by the EmailOperator.
In this use-case we will also cover how to notify the team via email in case any step of the execution failed.
How to Install Cloud Composer
In GCP, Cloud Composer is a managed service built on Apache Airflow. Cloud Composer has default integration with other GCP Services such as GCS, BigQuery, Cloud Dataflow and so on.
First, we need to create the Cloud Composer Environment. So search for Cloud Composer on the search bar and click on "Create Environment" as shown below:

Create Environment
In the Environments option, I am selecting the "Composer 1" option as we don’t need auto-scaling.

Once we select the type of composer we need, we'll need to do some basic configuration just like in any GCP managed service ("Instance Name", "Location", and so on).
The node count here should always be 3 as GCP will setup the 3 services needed for Airflow.

Once we're done with that, it'll set up an Airflow instance for us. To upload a DAG, we need to open the DAGs folder shown in ‘DAGs folder’ section.

Airflow Instance
If you go to the "Kubernetes Engine" section on GCP, we can see 3 services up and running:

Kubernetes Engine
All DAGs will reside in a bucket created by Airflow.
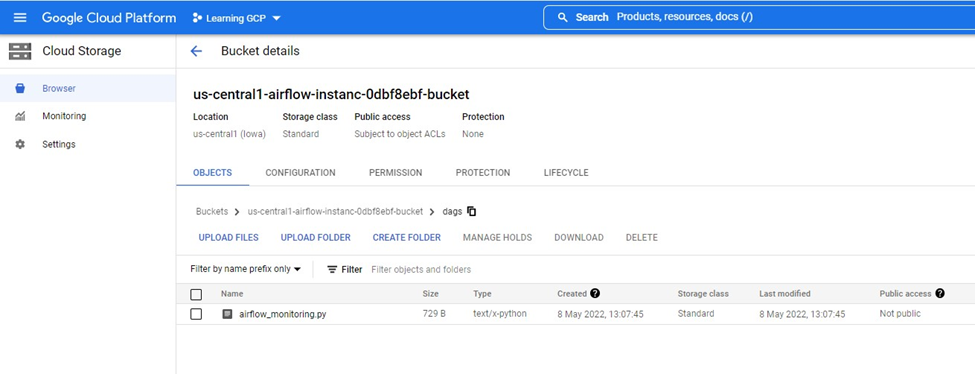
Airflow Instance bucket for DAGs
How to Create and Run the Pipeline on Composer
In the Pipeline, we have two buckets. input_csv will contain the csv which requires some transformation, and the transformed_csv bucket will be the location where the file will be uploaded once the transformation is done.
The entire pipeline code is the following:
from airflow import DAG
from datetime import datetime
import pandas as pd

from airflow.utils.email import send_email
from airflow.operators.python_operator import PythonOperator
from airflow.operators.email_operator import EmailOperator
from airflow.providers.google.cloud.transfers.gcs_to_gcs import GCSToGCSOperator


def transformation():
    trainDetailsDF = pd.read_csv('gs://input_csv/Event_File_03_16_2022.csv')
    print(trainDetailsDF.head())


with DAG(
        dag_id="pipeline_demo",
        schedule_interval="@hourly",
        start_date=datetime(2022, 1, 23),
        catchup=False
) as dag:
    buisness_logic_task = PythonOperator(
        task_id='ApplyBusinessLogic',
        python_callable=transformation,
        dag=dag)

    upload_task = GCSToGCSOperator(
        task_id='upload_task',
        source_bucket='input_csv',
        destination_bucket='transformed_csv',
        source_object='Event_File_03_16_2022.csv',
        move_object=True,
        dag=dag
    )

    email_task = EmailOperator(
        task_id="SendStatusEmail",
        depends_on_past=True,
        to='youremail',
        subject='Pipeline Status!',
        html_content='<p>Hi Everyone, Process completed Successfully! <p>',
        dag=dag)

    buisness_logic_task >> upload_task >> email_task
In the first task, all we are doing is creating a DataFrame from the input file and printing the head elements. In the logs it looks like this:

DataFrame Head
In the second task, GCSToGCSOperator, we have used the attribute move_object=True which will delete the file from the Source bucket.
Once we upload the file to the bucket, we can see that the DAG is being scheduled. The name of the DAG is "pipeline_demo".
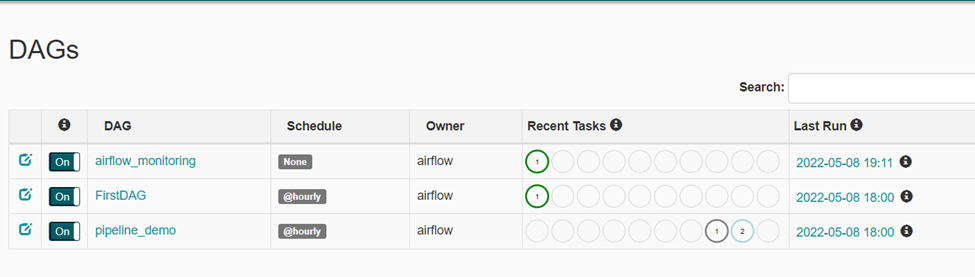
DAGs
Note that in case if you encounter any "import errors" after uploading or executing a DAG, something like this:

You can upload these missing packages through the "PYPI Packages" option in GCP. This will update the environment after few minutes.

Updating environment with missing Packages
To open an Airflow UI, Click on the "Airflow" link under Airflow webserver.

Airflow Instance, click Airflow link to Open UI
The Airflow UI looks like this:

Upon successful execution of Pipeline, here's what you should see:

In order to send email if a task fails, you can use the on_failure_callback like this:
def notify_email(contextDict, **kwargs):
    title = "Airflow alert: {task_name} Failed".format(**contextDict)
    body = """
    Task Name :{task_name} Failed.<br>
    """.format(**contextDict)
    send_email('youremail’, title, body)


buisness_logic_task = PythonOperator(
    task_id='ApplyBusinessLogic',
    python_callable=transformation,
    on_failure_callback=notify_email,
    dag=dag)
We're doing the notification email configuration on composer through Sendgrid. Also, once you are done with Cloud Composer, don't forget to delete the instance as it cannot be stopped.
Conclusion
Apache Airflow is a fairly easy-to-use tool. There's also a lot of help now available on the internet and the community is growing.
GCP simplified working with Airflow a lot by creating a separate managed service for it.