
When you're building complex applications, one seemingly simple feature can be difficult to implement: user authentication.
Though some apps don't need it depending on their use case, many do. You might spend a ton of time building an authentication module to provide a secure experience to your users and protect their data and privacy. But you can also extract this out into a separate service like AWS Cognito.
According to the site,
Amazon Cognito helps you implement customer identity and access management (CIAM) into your web and mobile applications.
In short, AWS Cognito is designed to simplify the implementation of user authentication and authorization. With Cognito, you can focus on building your application's core functionality, while offloading the complexities of user management to the service.
In this tutorial, we will dive into the world of AWS Cognito by creating an AWS Cognito User Pool for user authentication. You'll see how to read the data from AWS Cognito and display it in a simple NextJS app.
Here is a quick demo of the app that we'll be building. I'll be focusing more on AWS Cognito than on NextJS, because you can port this service with any UI framework you wish. Still, you can get the full source code of the NextJS repo from here.
 AWS Cognito integrated with NextJS app
What is an AWS Cognito User Pool?
AWS Cognito User Pools are a fully managed user directory service that allows you to create and manage a pool of users for your application.
User Pools provide a set of features that enable you to handle user registration, sign-in, and account recovery seamlessly.
Benefits of AWS Cognito User Pools
Easy Integration
Cognito User Pools seamlessly integrates with various application platforms and frameworks, including web, mobile, and server-side applications, making it versatile for different use cases.
Secure User Authentication
User Pools supports various authentication methods, including email and password, social sign-in (such as Google, Facebook, or Amazon), and multi-factor authentication. This ensures robust security for user authentication.
User Registration and Management
User Pools simplifies the user registration process by providing customizable sign-up pages and email verification. It also offers user self-service features like password reset and profile management, reducing the burden on the application backend.
Scalability and Performance
AWS handles the scalability and performance aspects of the user pool, allowing you to seamlessly handle millions of users without worrying about infrastructure provisioning or performance optimization.
How to Create an AWS Cognito User Pool
Let's dive into the step-by-step process of creating an AWS Cognito User Pool.
Sign in to AWS Management Console
Sign in to your AWS Management Console using your credentials.
AWS Cognito Service
Search for "Cognito" in the AWS Management Console search bar and open the Cognito service. You will see a page as shown below:
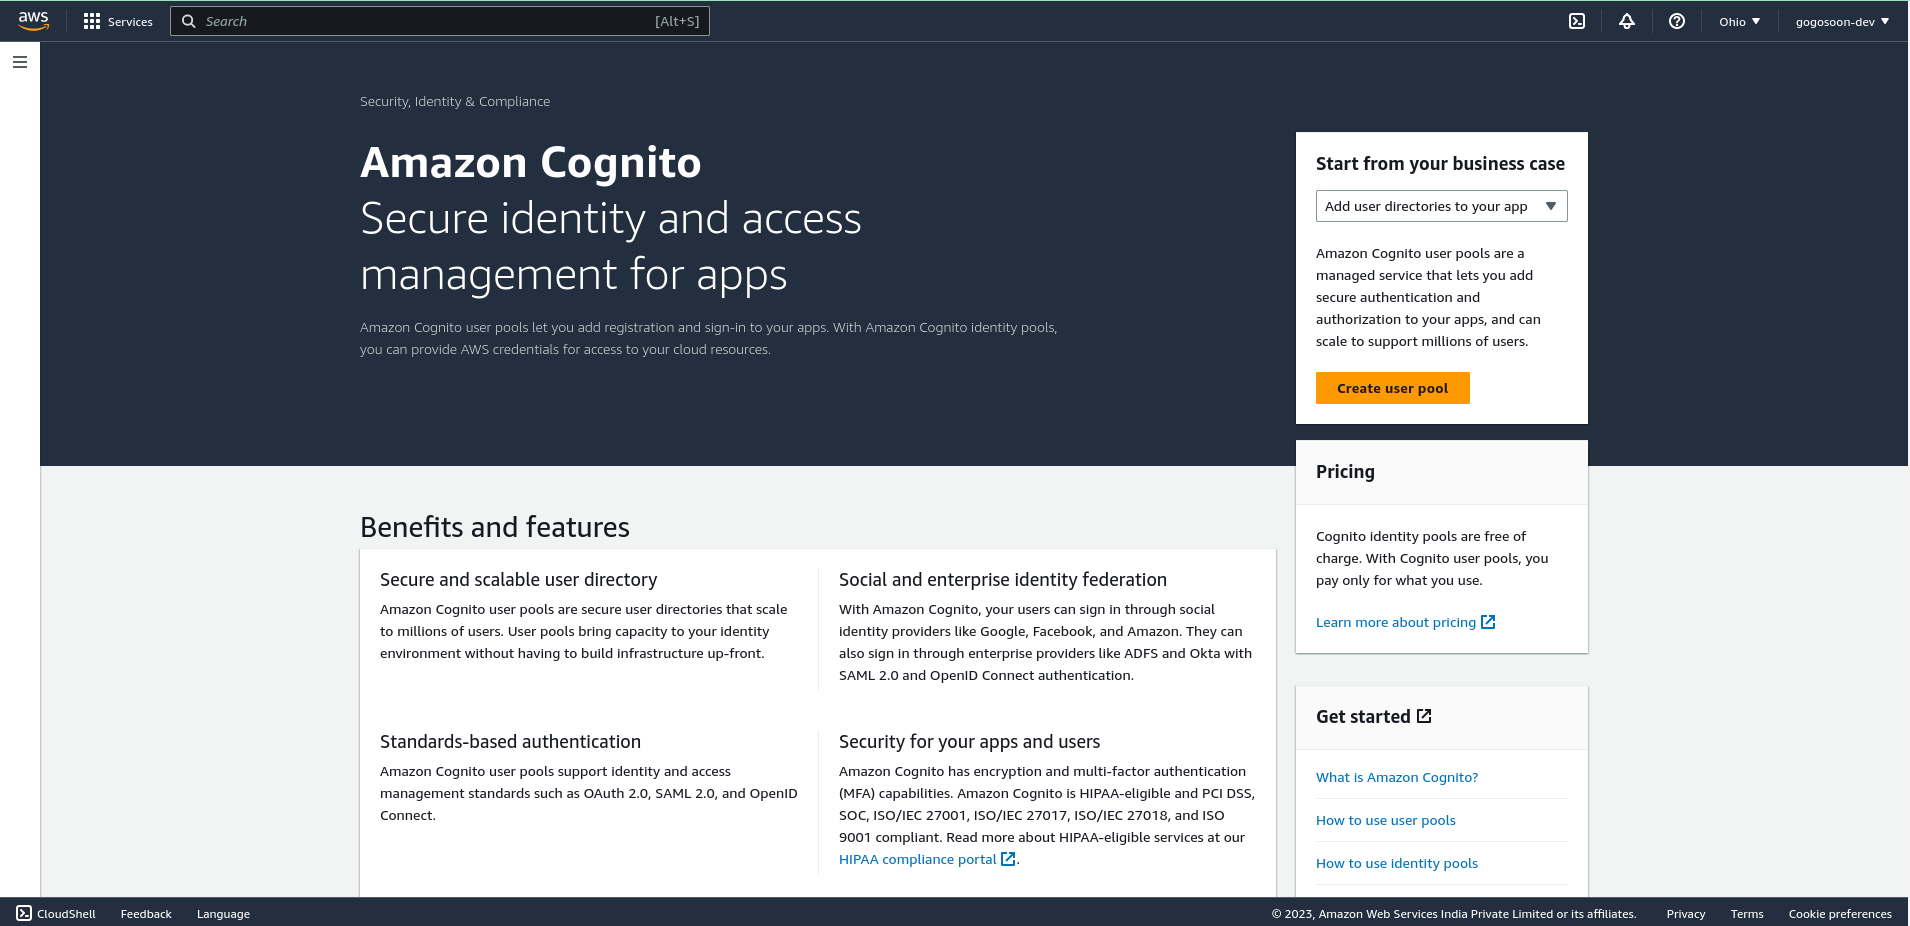 AWS Cognito Console
Create a User Pool
Click on the "Create User Pool" button. You can see two provider types. One is the Cognito user pool which will be selected by default and provides regular email and password authentication. The other one is Federated identity providers which will allow users to log in with their social identity like Facebook, Google, and so on.
To keep it simple, I'm selecting only the Cognito user pool and selecting a User name and Email for sign-in options
 AWS Cognito - Configure sign-in options
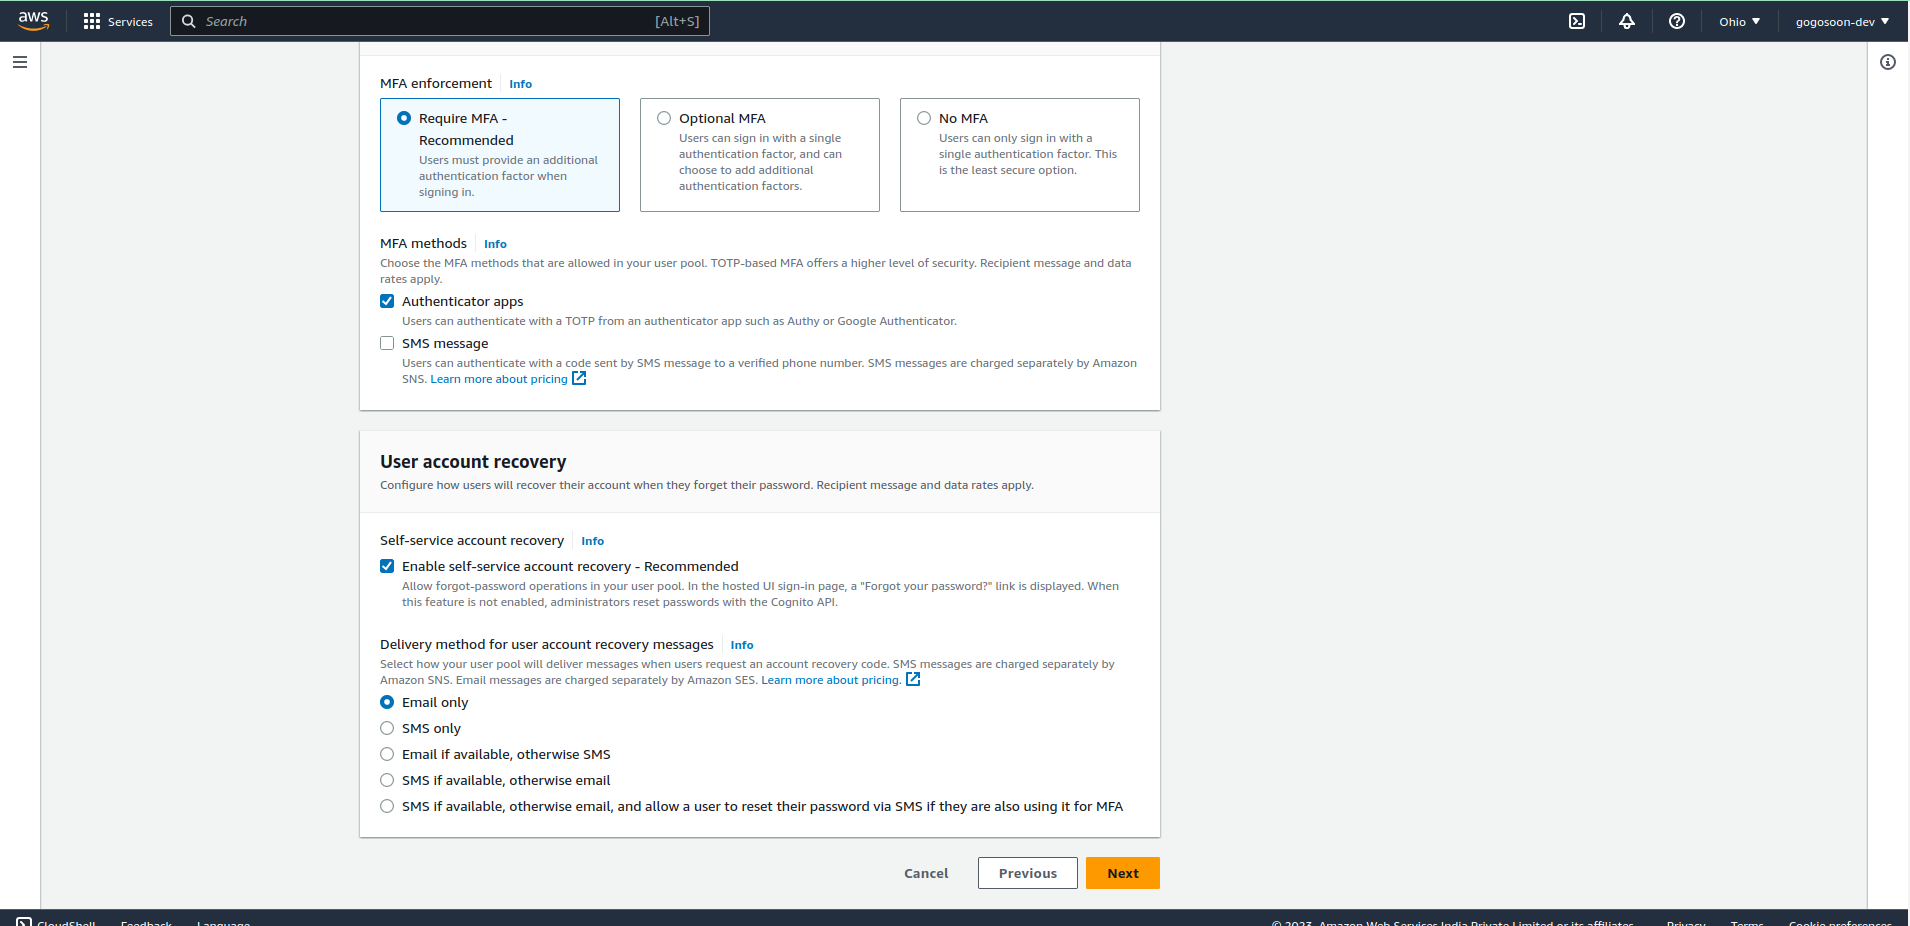
Configure security requirements
Configure your desired settings, such as password policies, multi-factor authentication, MFA methods, and User account recovery.
 AWS Cognito - Set password policy and MFA
 AWS Cognito - Set User account recovery
Configure sign-up experience
Configure the sign-up experience based on your needs. You can set required attributes and custom attributes which will be shown to the user on the Sign-up page. Those data will be stored in the Cognito user pool.
Configure message delivery
You'll want to select the email provider as "SES" for production applications. Since this is a demo, I'm selecting the "Send email with Cognito" option.
 AWS Cognito - Configure message delivery
Integrate your app
Provide a unique name for your user pool. Check the "Use the Cognito Hosted UI" option to use the UI provided by AWS.
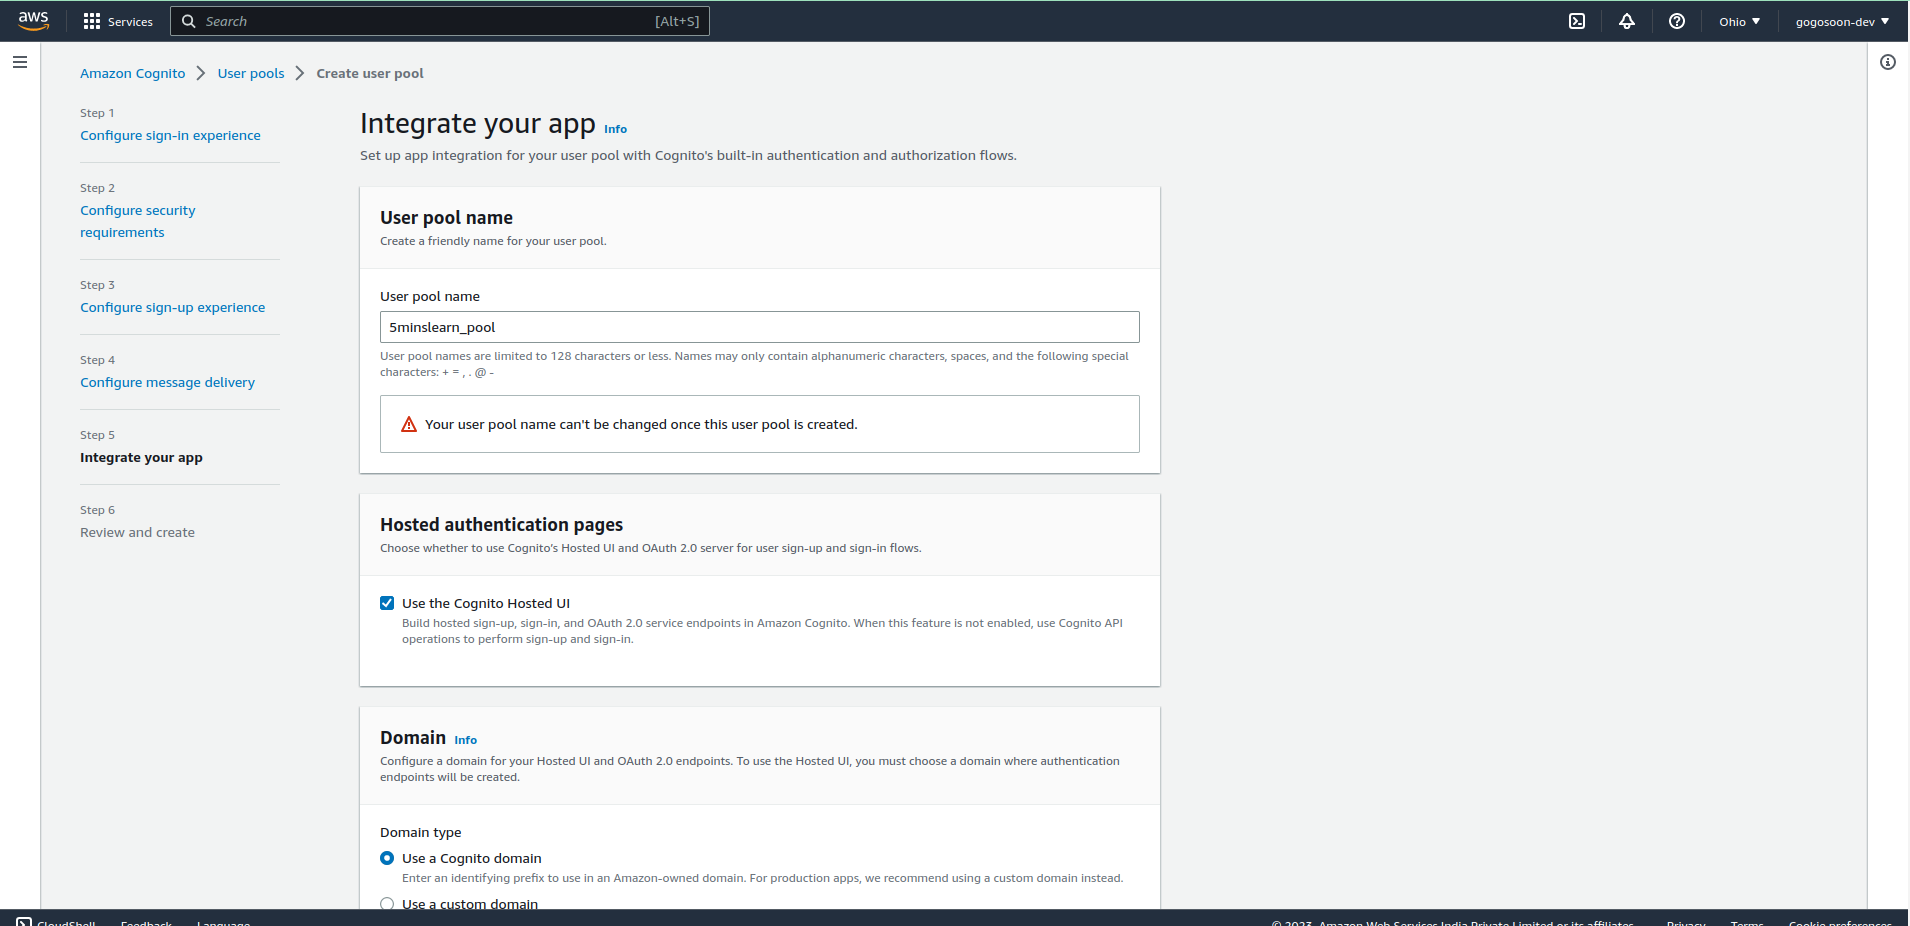 AWS Cognito - Integrate App
Choose your desired domain type. To use a custom domain you must provide a DNS record and AWS Certificate Manager certificate.
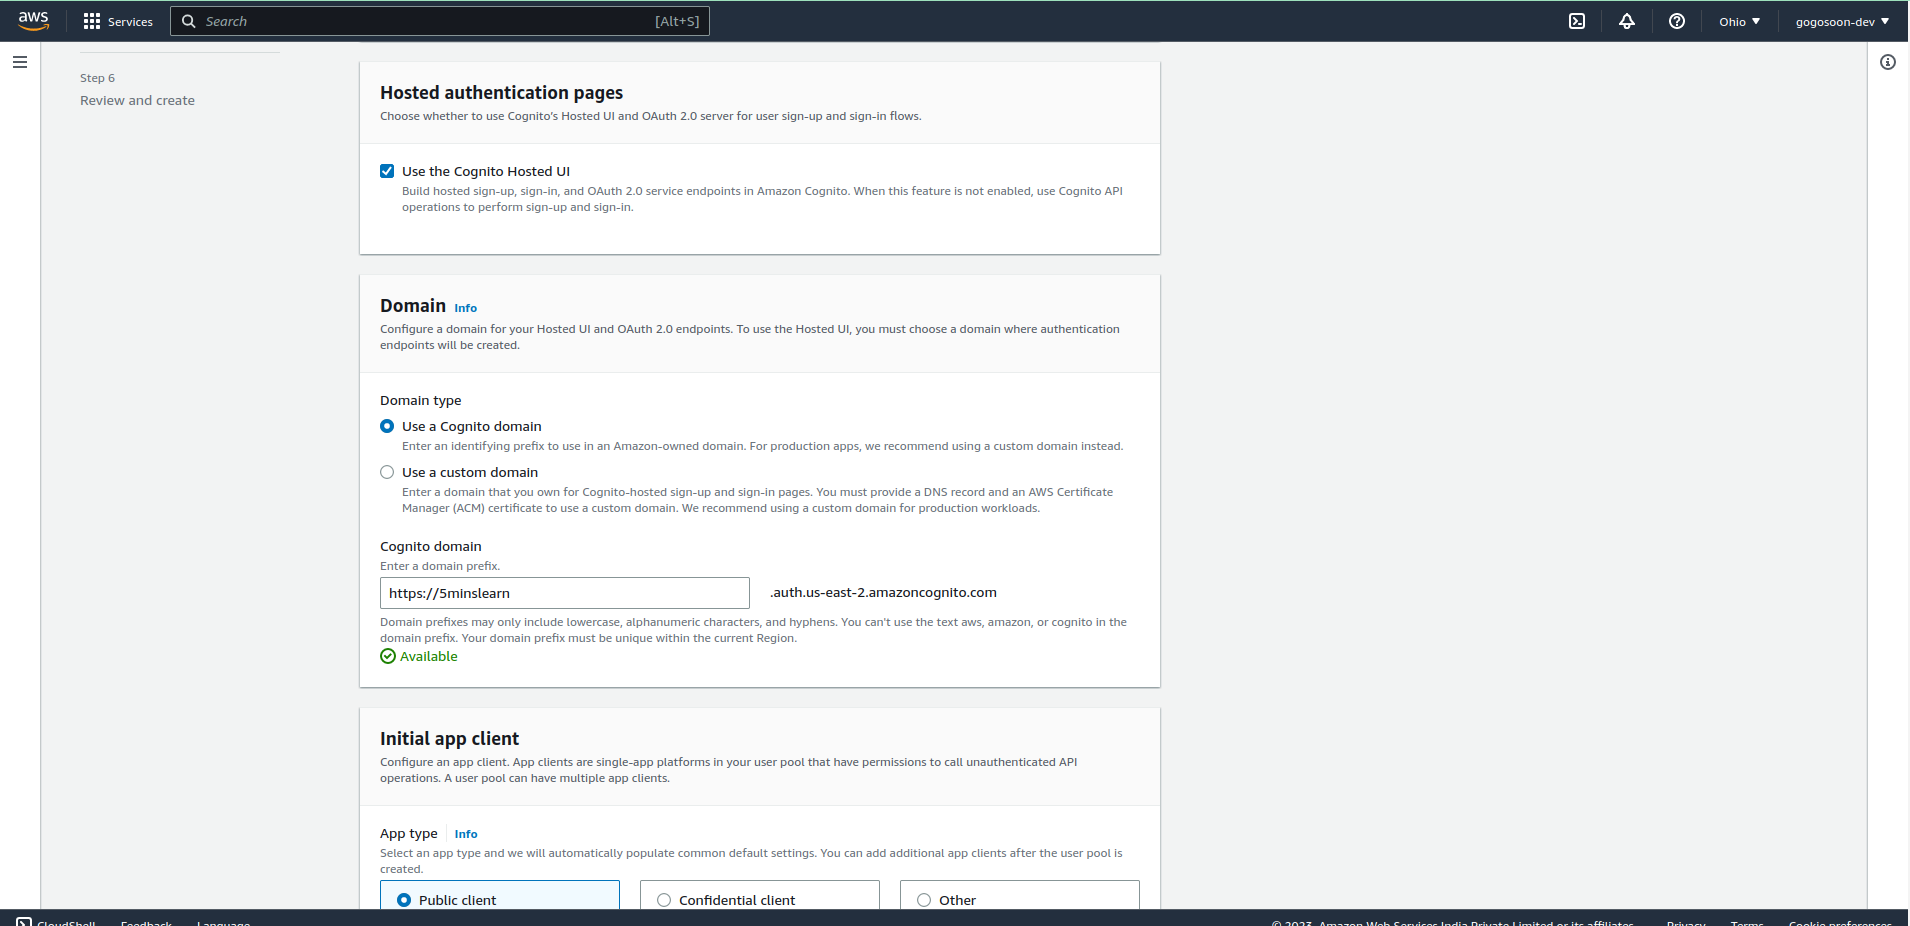 AWS Cognito - Select Domain type
The next step is to initialize the app client. This app client represents your application and allows it to interact with the user pool. Configure the app client settings, including the allowed OAuth scopes and callback URLs. In our case here, it'll be http://locahost:3000, as we'll be running only on our local machine.
Enter a user friendly "App client name". You need to provide the callback URL of your site. After authentication, the user will be redirected to this URL.
We have to query the Cognito service to fetch user details. To do so, we need a client secret. Select the "Generate a client secret" option.
Explore all other options on the page and configure them based on your needs. I hope they're self explanatory. If you don't understand any of the options, just leave them as the default selection.
 AWS Cognito - Generate a client secret
Review and Create
Finally, a review page will be shown where you can review all your configurations. Click on "Create pool" to create your user pool.
We're half done. We've successfully created the User Pool.
Hosted UI Customization
To customize your login page, click on the user pool you just created and click on App Integration tab.
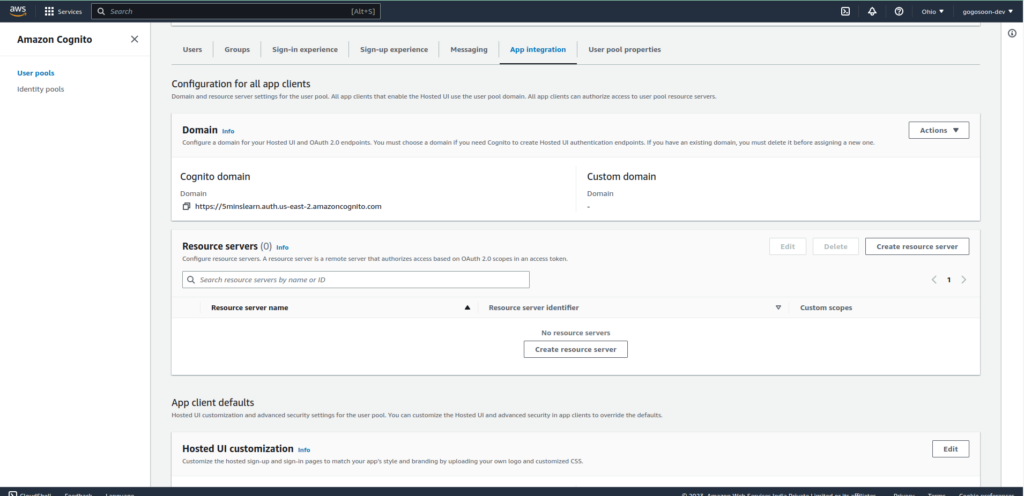 AWS Cognito - App integration Tab
Locate Hosted UI Customization and click the "Edit" button. You can upload your logo and custom CSS and that will be applied on the Signup and Login page.
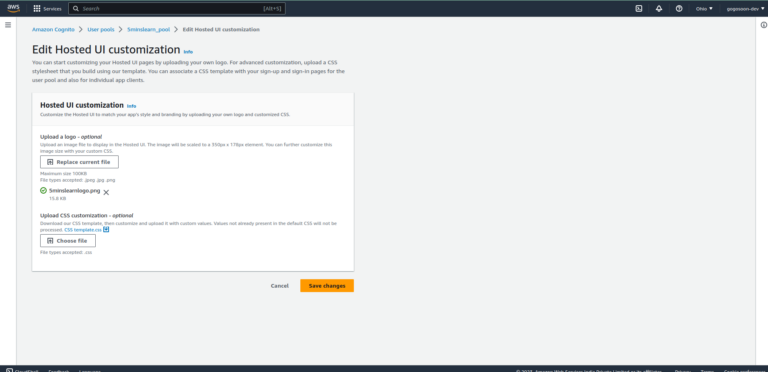 AWS Cognito - Hosted UI customization
You can view the hosted UI with your customization applied by constructing the following URL, with the specifics for your user pool, and typing it into a browser: https://<your_domain>/login?response_type=code&client_id=<your_app_client_id>&redirect_uri=<your_callback_url>. You can pull all the data from the dashboard.
Hit the URL. If you don't see the login page loaded and see an error page instead, don't panic. The changes you made on the dashboard may take a few minutes to be available.
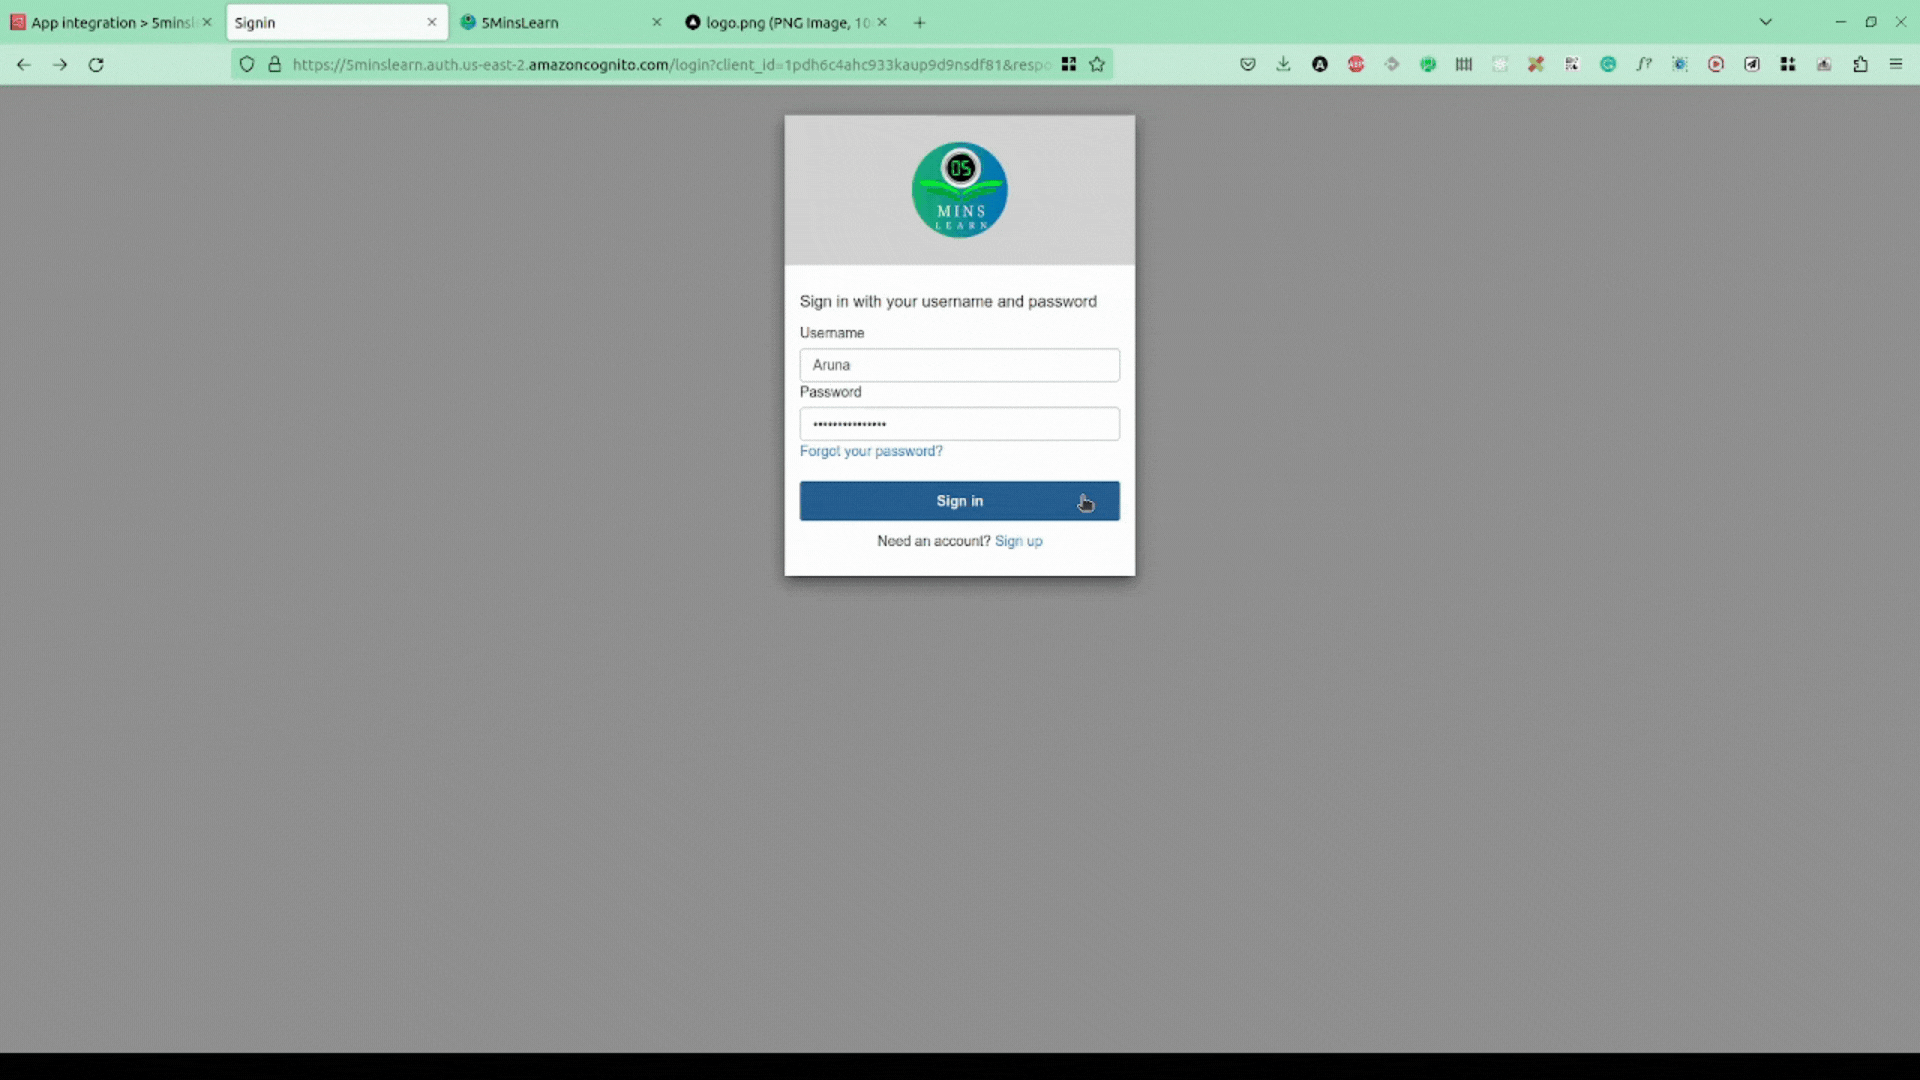
 Sign in page
As we don't have any account created, let's try to sign-up. AWS Cognito handles all the hassle of sending a verification email, asking the user to setup MFA, and so on.
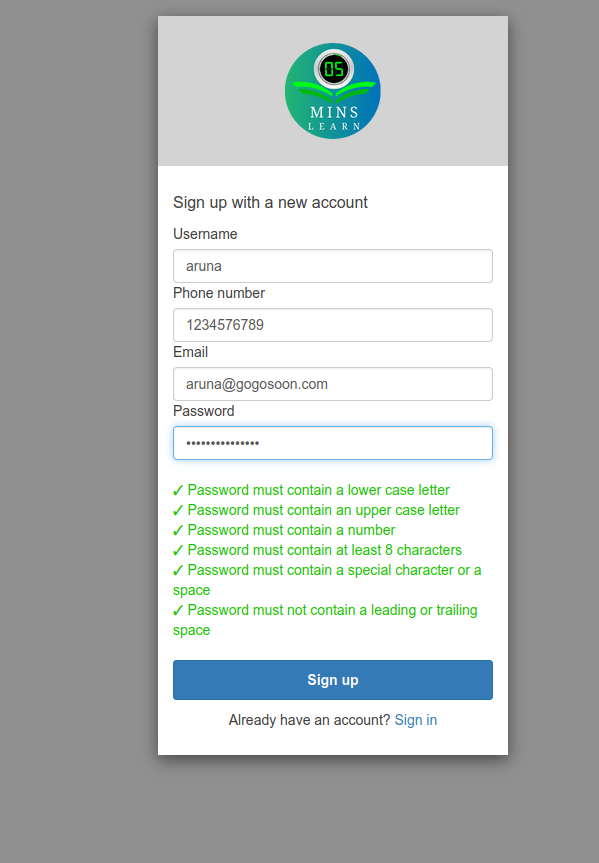 Sign up page
 AWS Cognito - Email verification
 AWS Cognito - MFA
Hopefully, on pressing your final "Sign in" button, you'll be taken to an error page. Do you know why? We don't have our client up and running. If you notice the URL, you'll be in http://localhost:3000.
But, this is the right time for us to verify if our integration is correct. Let's open the User pool dashboard and see if our new signed up user is shown there.
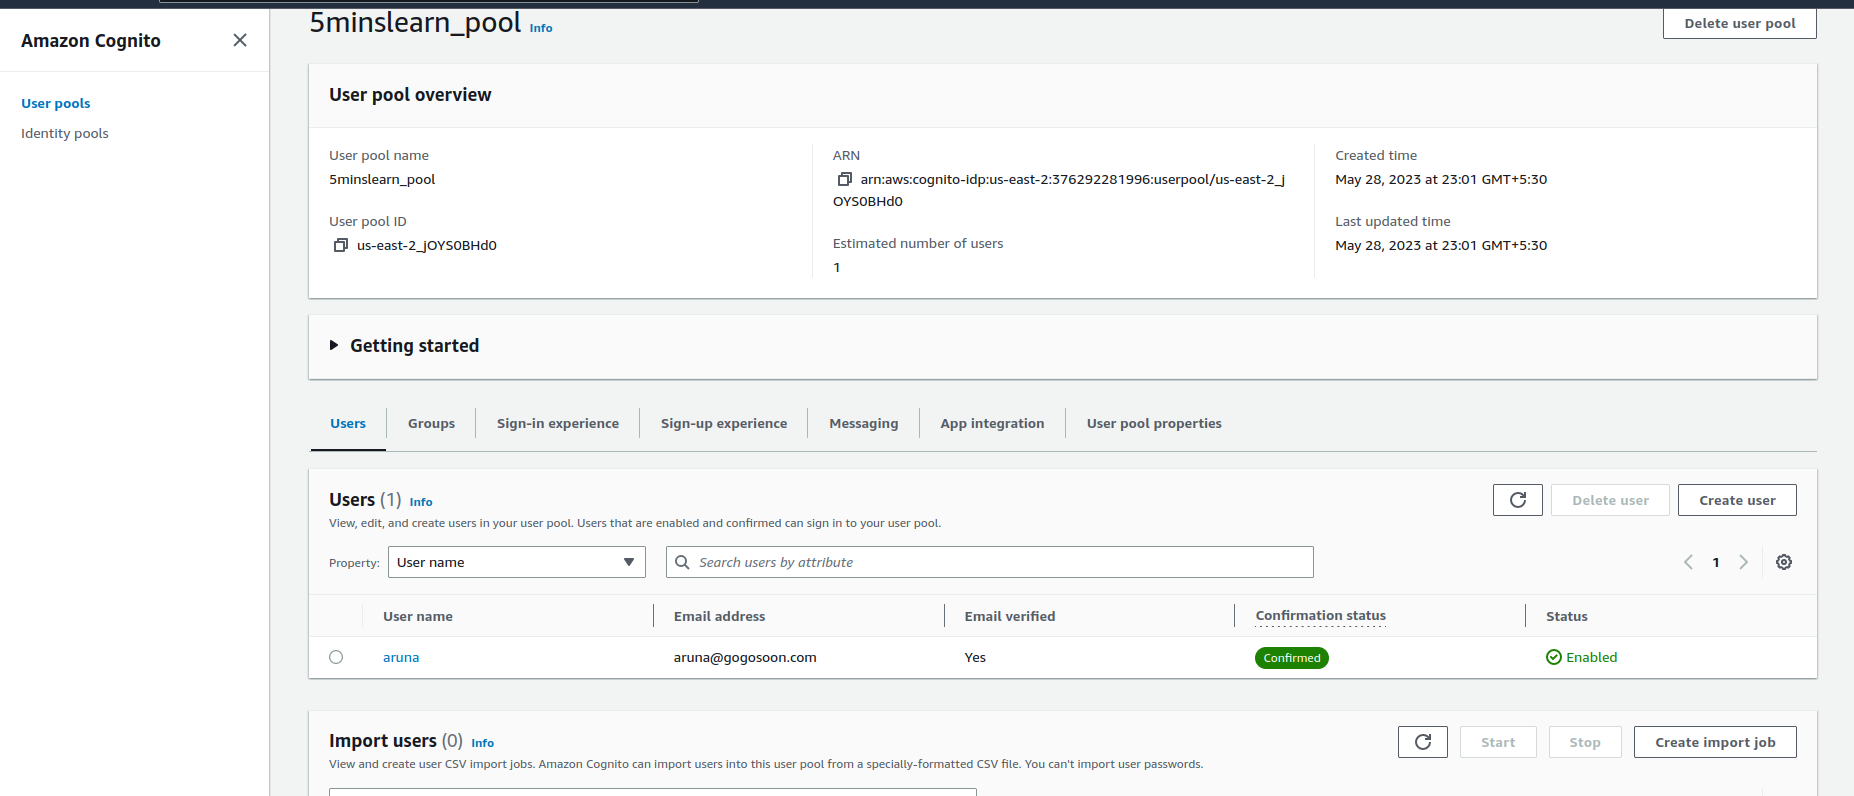 AWS Cognito - Users database
Great work! Our first user has shown up in the dashboard. Now let's pull the user info from the Cognito using NextJS.
How to Pull the User Info from AWS Cognito using NextJS
To pull the data from Cognito, we are going to use the APIs provided by Cognito. First, we need to get the access token using the Token endpoint and use that access token to get the user info using the User Info endpoint
To follow along with me you can use this repo which contains the NextJS boilerplate code.
Clone the repo, install the dependencies by entering the yarn install command, and run the app by entering the yarn dev command.
Once you're done, you'll land on this page after hitting http://localhost:3000:

If you follow the same signup / sign-in process as we done above, you'll be re-directed to the above page.
Post Request to AWS Cognito Token Endpoint
Sample Request:
POST https://mydomain.auth.us-east-1.amazoncognito.com/oauth2/token&Content-Type='application/x-www-form-urlencoded'&Authorization=Basic ZGpjOTh1M2ppZWRtaTI4M2V1OTI4OmFiY2RlZjAxMjM0NTY3ODkw
&grant_type=authorization_code&client_id=1example23456789&code=AUTHORIZATION_CODE&redirect_uri=com.myclientapp://myclient/redirect
The token endpoint needs the following parameters:
- Domain name – Go to the Cognito user pool, and in the App integration tab you can find the Domain name.
- Client ID and Client Secret – At the bottom of the same page, find the app client list and click on the app client you created. You can see the Client ID and Client Secret.
- Authorization Code – this is a code that is available in the URL we're being redirected to. (Refer to the below screenshot)
 AWS Cognito - Authorization Code
Let's write the code to get the authorization code.
Open the index.tsx file and add the following code:
import { useSearchParams } from "next/navigation";
...
...
export default function Home() {
const searchParams = useSearchParams();
const code = searchParams.get("code");
...
Create an .env.local file in the project root folder and add the following credentials into it:
NEXT_PUBLIC_COGNITO_CLIENT_ID=<cognito_client_id>
NEXT_PUBLIC_COGNITO_CLIENT_SECRET=<cognito_client_secret>
NEXT_PUBLIC_COGNITO_DOMAIN=<cognito_domain>
Now add the useEffect with the following block of code inside it:
import axios from 'axios';

...

export default function Home() {
  const searchParams = useSearchParams();
  const code = searchParams.get("code");
  const [name, setName] = useState("");
  const [email, setEmail] = useState("");
  useEffect(() => {
    if (!code) return;
    const clientID = process.env.NEXT_PUBLIC_COGINTO_CLIENT_ID || "";
    const clientSecret = process.env.NEXT_PUBLIC_COGNITO_CLIENT_SECRET || "";
    const cognitoDomain = process.env.NEXT_PUBLIC_COGNITO_DOMAIN || "";
    const credentials = `${clientID}:${clientSecret}`;
    const base64Credentials = Buffer.from(credentials).toString("base64");
    const basicAuthorization = `Basic ${base64Credentials}`;
    const headers = {
      "Content-Type": "application/x-www-form-urlencoded",
      Authorization: basicAuthorization,
    };
    const data = new URLSearchParams();
    let token = "";
    data.append("grant_type", "authorization_code");
    data.append("client_id", clientID);
    data.append("code", code);
    data.append("redirect_uri", "http://localhost:3000");
    axios
      .post(
        `${cognitoDomain}/oauth2/token`,
        data,
        { headers }
      )
      .then((res) => {
        if (res.status != 200) return;
        token = res?.data?.access_token;
        const userInfoHeaders = {
          Authorization: "Bearer " + token,
        };
        axios
          .get(
            `${cognitoDomain}/oauth2/userInfo`,
            { headers: userInfoHeaders }
          )
          .then((userInfo) => {
            if (userInfo.status != 200) return;
            setName(userInfo.data?.username);
            setEmail(userInfo.data?.email);
          });
      });
  }, [code]);

...
...
What are we doing in the above code? Let's explore.
We need to get the access token. This token is needed to authorize the user whenever they use the app.
To get that token, we have to make an HTTP POST request to the AWS Cognito service attaching the Base64 encode of our client id and secret in the Authorization Header. Also, we have to pass the code that we received from the URL when the user was redirected.
We'll use this token to get the user's info. We're storing the user info (name and email) in the app's state variable.
We got the user's name and email from the above code. Let's display them on the screen.
...
...
<h2 className={inter.className}>Welcome to 5minslearn!</h2>
      {name && email ? (
        <>
          <h2 className={inter.className}>{name}</h2>
          <p className={inter.className}>{email}</p>
        </>
      ) : (
        <></>
      )}
...
...
Awesome. Our app is completely ready now.
Once you sign-in from Cognito again, you'll be redirected to your site and you'll be shown a page with your name and email (like the one shown in the below screenshot).
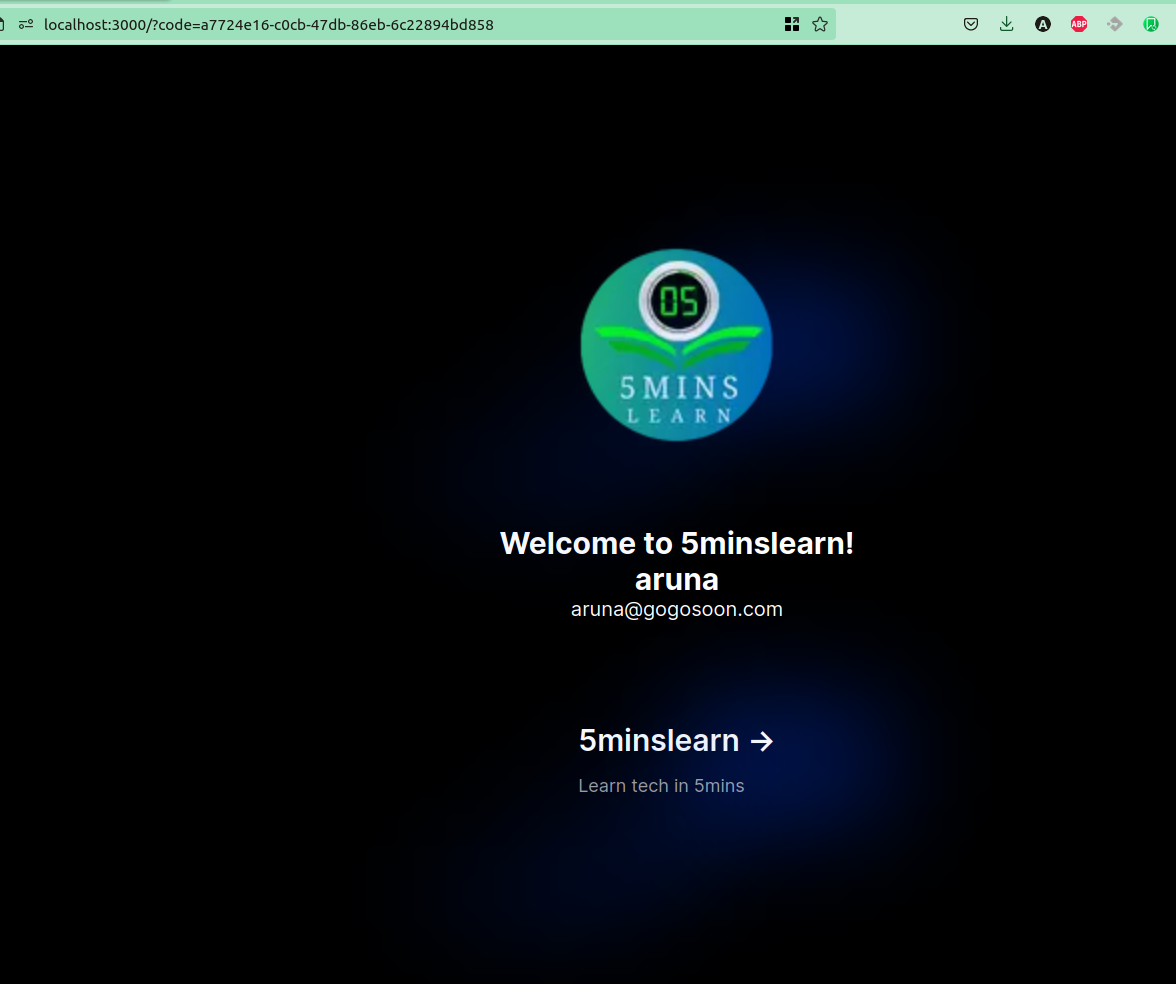 Get user name and email from AWS Cognito using Next.js
Awesome – we successfully pulled the data from AWS Cognito and showed it in our app.
Conclusion
In this tutorial, you learned how to build user authentication by creating a Cognito user pool. You also saw how to pull data from Amazon Cognito using NextJS.
Hope you enjoyed reading this article! Here's the link to the repo.
If you wish to learn more about AWS, subscribe to my newsletter (https://5minslearn.gogosoon.com/) and follow me on social media.