
By Tobias Günther
Branches are one of the core concepts in Git. And there's an endless amount of things you can do with them. You can create and delete them, rename and publish them, switch and compare them... and so much more.
My intention with this post is to create a comprehensive overview of the things you can do with branches in Git. I didn't want to produce a book-length article, so I won't go into detail for all of the actions. But I will provide links if you want to learn more.
Here's an overview of what we're going to cover:
- How to create branches
- How to rename branches
- How to switch branches
- How to publish branches
- How to track branches
- How to delete branches
- How to merge branches
- How to rebase branches
- How to compare branches
How to Create a Branch in Git
Before you can work with branches, you need to have some in your repository. So let's start by talking about how to create branches:
```git / cli $ git branch
When providing just a name to the `git branch` command, Git will assume that you want to start your new branch based on your currently checked out revision. If you'd like your new branch to start at a _specific_ revision, you can simply add the revision's SHA-1 hash:

```git / cli
$ git branch <new-branch-name> 89a2faad
It goes without saying that you can only create new branches in your local repository. "Creating" branches in a remote repository happens by publishing an existing local branch - which we'll talk about later.
How to Rename a Branch in Git
Mistyping a branch's name or simply changing your mind after the fact is all too easy. That's why Git makes it pretty easy to rename a local branch. If you want to rename your current HEAD branch, you can use the following command:
```git / cli $ git branch -m
In case you'd like to rename a different local branch (which is NOT currently checked out), you'll have to provide the old _and_ the new name:

```git / cli
$ git branch -m <old-name> <new-name>
These commands, again, are used to work with local branches. If you'd like to rename a remote branch, things are a little bit more complicated - because Git doesn't allow you to rename remote branches.
In practice, renaming a remote branch can be done by deleting the old one and then pushing up the new one from your local repository:
```git / cli
First, delete the current / old branch:
$ git push origin --delete
Then, simply push the new local branch with the correct name:
$ git push -u origin
If you're using a [Git desktop GUI like Tower](https://www.git-tower.com/?utm_source=freecodecamp&utm_medium=guestpost&utm_campaign=working-with-branches-in-git), you won't be bothered with these details: you can simply rename both local and remote branches from a contextual menu (no need to delete and re-push anything):
## How to Switch Branches in Git
The current branch (also referred to as the HEAD branch) defines the context you're working in at the moment. Or in other words: the current HEAD branch is where new commits will be created.
Having said that, it makes sense that _switching_ the currently active branch is one of the most-used actions any developer performs when working with branches.
And since switching branches is also referred to as "checking out" branches, you won't be surprised to learn the command that's used to make this happen:
```git / cli
$ git checkout <other-branch>
However, because the git checkout command has so many different duties, the Git community (fairly recently) introduced a new command you can now also use to change the current HEAD branch:
```git / cli $ git switch
I think it makes a lot of sense to move away from the `checkout` command – because it's used to perform so many different actions – and instead move towards the new `switch` command, which is absolutely unambiguous about what it does.

## How to Publish a Branch in Git

As I already said in the section about "creating branches" above, it's not possible to _create_ a new branch on a remote repository.

What we can do, however, is _publish an existing local branch_ on a remote repository. We can "upload" what we have locally to the remote and thereby share it with our team:

```git / cli
$ git push -u origin <local-branch>
The command, overall, is probably not a big surprise for you. But one parameter, the -u flag, is worth explaining – which I'll do in the next section.
But to give you the short version here: it tells Git to establish a "tracking connection" which will make pushing and pulling much easier in the future.
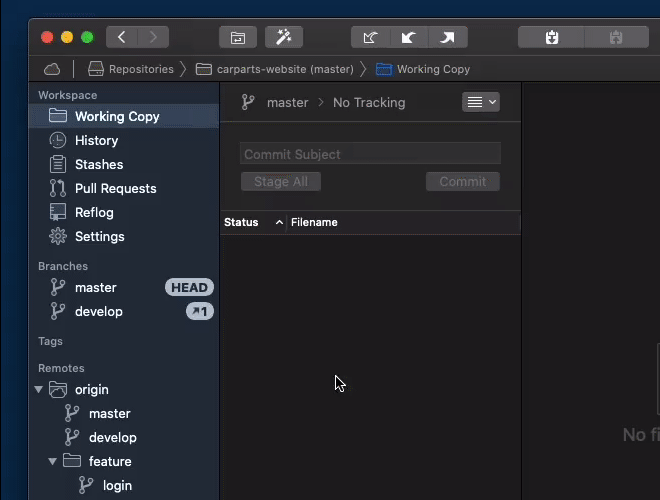
How to Track Branches in Git
By default, local and remote branches have nothing to do with each other. They are stored and managed as independent objects in Git.
But in real life, of course, local and remote branches often do have a relationship with each other. For example, a remote branch is often something like the "counterpart" of a local one.
Such a relationship can be modeled in Git: one branch (typically a local one) can "track" another one (typically remote).
![]()
Once such a tracking relationship has been established, a couple of things will become a lot easier: most notably, when pushing or pulling, you can simply use the vanilla commands without any further parameters (for example, a simple git push).
The tracking connection helps Git fill in the blanks – which branch on which remote you want to push to, for example.
You have already read about one way to establish such a tracking connection: using git push with the -u option when publishing a local branch for the first time does exactly that. After that, you can simply use git push without mentioning the remote or the target branch.
This also works the other way around: when creating a local branch that should be based on a remote one. In other words, when you want to track a remote branch:
```git / cli $ git branch --track origin/
Alternatively, you could also use the `git checkout` command to achieve this. If you want to name the local branch after the remote one, you only have to specify the remote branch's name:

```git / cli
$ git checkout --track origin/<base-branch>
If you want to learn more about this topic, check out this post about "Tracking Relationships in Git".
How to Delete a Branch in Git
Not all branches are meant to live forever. In fact, most branches in any repository will be short-lived. So if you find yourself wanting to do a little housecleaning, here's how to delete a local branch:
```git / cli $ git branch -d
Note that you might also need the `-f` option in case you're trying to delete a branch that contains un-merged changes. Use this option with care because it makes losing data very easy!

To delete a remote branch, we cannot use the `git branch` command. Instead, `git push` will do the trick, using the `--delete` flag:

```git / cli
$ git push origin --delete <branch-name>
When deleting a branch, keep in mind that you need to check if you should delete its counterpart branch, too.
For example, if you have just deleted a remote feature branch, it might make sense to also delete its local tracking branch. That way, you make sure you aren't left with lots of obsolete branches – and a messy Git repository.
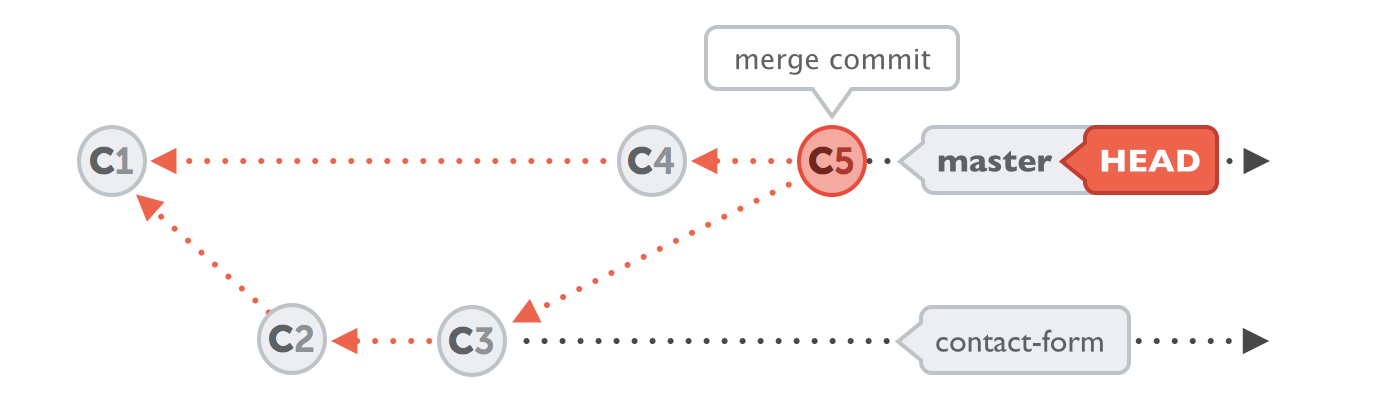
How to Merge Branches in Git
Merging is probably the most popular way to integrate changes. It allows you to bring all of the new commits from another branch into your current HEAD branch.
One of the great things about Git is that merging branches is so simple and stress-free. It requires just two steps:
```git / cli
(1) Check out the branch that should receive the changes
$ git switch main
(2) Execute the "merge" command with the name of the branch that contains the desired changes
$ git merge feature/contact-form
Often, the result of a merge will be a separate new commit, the so-called "merge commit". This is where Git combines the incoming changes. You can think of it like a knot that connects two branches.
There is, of course, a lot more to say about `git merge`. Here are some free resources that help you learn more:
* [How to Undo a Merge in Git](https://www.git-tower.com/learn/git/faq/undo-git-merge/?utm_source=freecodecamp&utm_medium=guestpost&utm_campaign=working-with-branches-in-git)
* [How to Fix and Solve Merge Conflicts](https://www.git-tower.com/learn/git/faq/solve-merge-conflicts/?utm_source=freecodecamp&utm_medium=guestpost&utm_campaign=working-with-branches-in-git)
* [An Overview of "git merge"](https://www.git-tower.com/learn/git/commands/git-merge/?utm_source=freecodecamp&utm_medium=guestpost&utm_campaign=working-with-branches-in-git)
## How to Rebase Branches in Git
An alternative way to integrate commits from another branch is using `rebase`. And I'm very careful to call it an "alternative" way: it's not better or worse, but simply different.
If and when you use rebase mainly comes down to personal preference and the conventions in your team. Some teams love rebase, some prefer merge.
To illustrate the differences between merge and rebase, take a look at the following illustrations. Using `git merge`, the result of our integration of _branch-B_ into _branch-A_ would look like this:
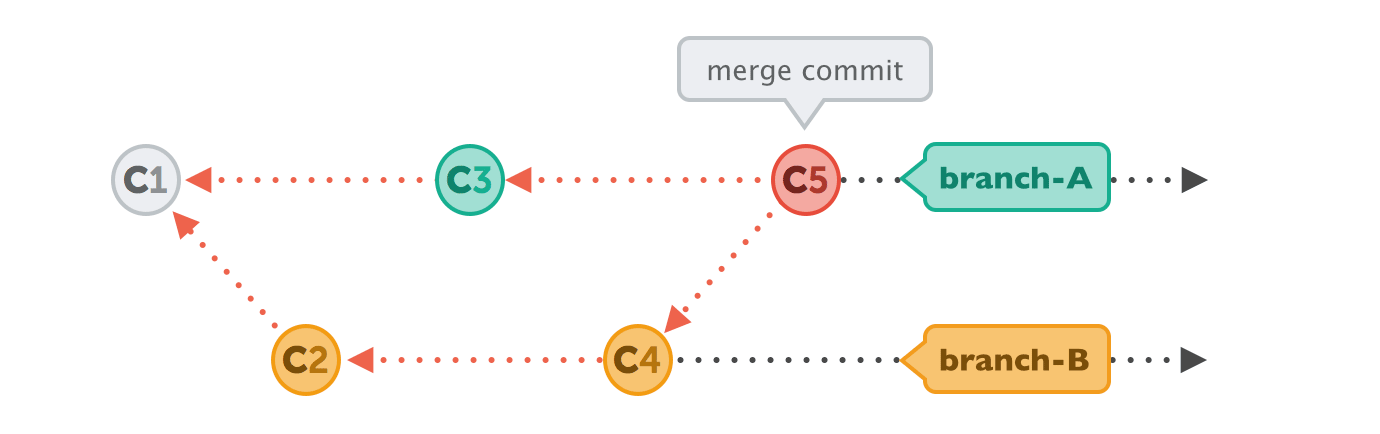
Using `git rebase`, on the other hand, the end result will look quite different – especially because no separate merge commit will be created. Using rebase, it appears as if your development history happened in a straight line:

Starting the actual process is pretty simple:
```git / cli
# (1) Check out the branch that should receive the changes
$ git switch feature/contact-form
# (2) Execute the "rebase" command with the name of the branch that contains the desired changes
$ git rebase main
For a deeper understanding of rebase, I recommend the post "Using git rebase instead of git merge".
How to Compare Branches in Git
In certain situations, it can be very helpful to compare two branches. For example, before you decide to integrate or delete a branch, it's interesting to see how it differs from another branch. Does it contain any new commits? And if so: are they valuable?
To see which commits are in branch-B but not in branch-A, you can use the git log command with the double dot syntax:
```git / cli $ git log branch-A..branch-B
Of course, you could also use this to compare your local and remote states by writing something like `git log main..origin/main`.

If instead of the _commits_ you'd prefer to see the _actual changes_ that make up those differences, you can use the `git diff` command:

```git / cli
$ git diff branch-A..branch-B
How to Become More Productive with Git
Working with branches in Git has many facets! But this is true for Git in general: there's a ton of powerful features that many developers don't know or can't use productively.
From Interactive Rebase to Submodules and from the Reflog to File History: it pays to learn these advanced features – by becoming more productive and making fewer mistakes.
One particularly helpful topic is learning how to undo mistakes with Git. If you want to dive deeper into how you can save your neck from the inevitable mistakes, check out this video about undoing mistakes in Git.
Have fun becoming a better programmer!
About the Author
Tobias Günther is the Co-founder of Tower, the popular Git desktop client that helps more than 100,000 developers around the world to be more productive with Git.