
By Caleb Olojo
In this article, you will learn about environment variables in Vanilla JavaScript. You'll also learn how to serve API keys to your application through the Netlify build command.
What are JavaScript environment variables?
Environment variables are very common when you're using JavaScript frameworks like React or Vue for creating frontend user interfaces or NodeJS on the server side.
The whole point (or at least, the way I understand it) of environment variables is that they give you the flexibility to set conditions for how you want the application or software to behave in different modes – development and production.
You create these conditions when the UI/frontend of the software gets to interact with an API or a backend server that requires a method of authentication before providing the results of the action (like an API call). The most common method involves provisioning an API key before you can complete a request.
If you've tried getting data from an API before, you have to supply this API key so that the request for data can be successful. This involves adding an Authorization header to the API call.
Take a look at a typical fetch request and its authorization header below.
const apiCall = () => {
    fetch(url, {
        headers: {
            Authorization: `bearer ${private_api_key}`
        }
    })
    .then(res => res.json())
    .then(data => console.log(data))
    .catch(err => JSON.stingify(err))
}
Environment variables store variables, as the name implies. The values or things that get assigned to these variables could be API keys that you need to perform certain requests or operations.
To create an environment variable, all you need to do is create a new file called .env in the root folder of the project you're working on. Then you can begin to add all the variables that you do not want to reveal to anyone.
The .gitignore file holds the list of files that Git shouldn't track, and the .env file will be in this file.
How to Use .env Files in VanillaJS
You use environment variables in the back-end of an application. Now, you're probably like "but I can create a .env file in a React app".
The truth is, you're quite right – but React has been bootstrapped in such a way that Node.js is included in it. This means that you need to use the Node package manager to perform certain operations.
You can also create a .env file when you're using VanillaJS, but you wouldn't be able to access the process.env global variable that Node provides at runtime. Node treats the .env file as an object, so it has the ability to do this: process.env.env_variable.
const env = {
    env_variable: "bgrtyaqQtyfadV0F08BHGvfsgskl",
    topic_id: "F08BHGvfsgsklgrtyaqQtyfadV0F08"
}

console.log(process.env.env_variable)

// prints bgrtyaqQtyfadV0F08BHGvfsgskl to the console
You use VanillaJS on the client-side, so it's not really feasible to create a .env and use environment variables. This is because you can't use the process.env global variable Node provides (to get access to the variables created inside the .env file) in the browser.
So how then can you actually use environment variables? Hmm...especially since you can't use environment variables while writing client-side JavaScript (I mean VanillaJS).
The npm package called dotenv provides one solution because it has an access to the Node global variable process.env.
Once you have the package installed, a node_modules it'll automatically create a folder accompanied with two files, package.json and package-lock.json. These hold the details of the application.
But as soon as you use it, JavaScript will throw an error saying that require is not defined:
require("dotenv").config()

const apiCall = () => {
    fetch(url, {
        headers: {
            Authorization: `bearer ${process.env.env_variable}`
        }
    })
    .then(res => res.json())
    .then(data => console.log(data))
    .catch(err => JSON.stingify(err))
}
This error happens because require is not in the node_module or list of packages that'd make the dotenv package function.
In a nutshell, dotenv needs require to function. You can get require from RequireJS, but that's another hassle there. You would have to read through the docs on how to apply the scripts that would make Node's global variable available on the client-side.
Why go through all that hassle?
Really. Why?
Folks typically use public APIs either for a personal project or to mess around with some concepts that they haven't quite gotten the hang of.
Most times, these APIs do not require the use of private (API) keys for one authentication or the other. This is common when you're dealing with endpoints that allow only the GET method of fetching data.
APIs like GitHub's or Twitter's require the use of api_keys to authenticate the user before they allow the request to go through. The GitHub GraphQL API, for instance, requires an access token for a successful API call. But the access token has some quirks, one of which is the ability to perform 5000 requests in an hour.
You can never commit this access token into the Git workflow of your project. If you do commit it, GitHub will delete it for security reasons. This is where it becomes an issue that VanillaJS can't hold environment variables.
The access token provided by GitHub (that eventually gets deleted once it is committed into the workflow) will not allow the application to function in production mode. It'd work perfectly fine in development – but once it is deleted, and the repository/project is deployed to Netlify, then Netlify can't access the keys again.
How do you resolve this issue?
Netlify has a "build and deploy" settings tab. This allows you to alter how the continuous deployment process takes place with your projects or repositories on GitHub.
You can decide to stop all the concurrent automatic builds once Netlify detects a push to the master or main branch, deactivate all builds until the project is done completely on development mode, and many more features that I can't remember.
But, that's not the focus of this article. What we're concerned about is how to use the GitHub access token locally (by ensuring that it doesn't get into the commit history) and then allow Netlify to have access to it, in production.
The image below shows the "build and deploy" tab on Netlify.
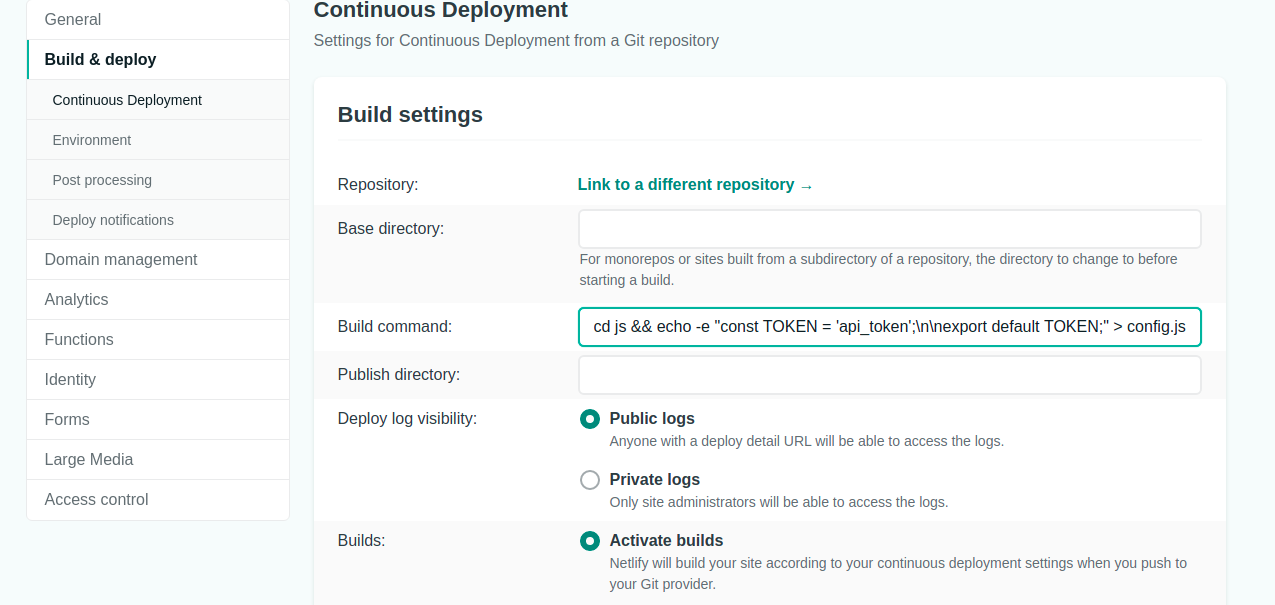
Notice the build command input field? Using the code snippet below:
cd js && echo -e "const TOKEN = 'api-token';\n\nexport default TOKEN;" > config.js
the command above will simply inject a new file called, config.js inside the js folder during the build process. This gives Netlify access to your API key (access token).
If there is no js folder in your project, that is you have all files in the root folder of the project, you can simply add echo -e "const TOKEN = 'api-token';\n\nexport default TOKEN;" > config.js as the build command.
const TOKEN = 'api-token';

export default TOKEN;
To make sure you're able to use the ES6 import statement in the JavaScript file, you need to add the type="module" attribute in the script tag
<script src="./index.js" type="module"></script>
Conclusion
This might not seem like the best practice or method for using environment variables. This is because your API key might still be visible to anyone who views or visits your app on the internet when they open the devtools on their favourite browser.
But it helped me bypass the issue of GitHub deleting these keys which will in turn stop the application from working in production.
You should only consider this method when you're using an API that, when your API key is revealed, won't cause much harm when it is used by a third party.
Thank you for reading this article. I hope it helps. ;)