
By Dler Ari
One of the major challenges when building a web-app is how quickly you can scale and respond to the market needs. When the demand (requirements) increases, the capabilities (features) increase too. It is therefore important to have a solid architectural structure so that the app grows organically. We don’t want to end up in situations where the app can’t scale because everything in the app is deeply entangled.
Write code that is easy to delete, not easy to extend.
- Tef, Programming is Terrible
In this article, we’ll create a simple dashboard using ES6 modules, and then present optimization techniques for improving the folder structure and ease write less code. Let’s see dive into why ES6 modules are important, and how to effectively apply it.
JavaScript has had modules for a long time. However, they were implemented via libraries, not built into the language. ES6 is the first time that JavaScript has built-in modules (source).
TL;DR — If you want to see a practical example where we create a dashboard using ES6 modules from an architectural design layout, jump to section 4.
Here’s what we’ll address
- Why ES6 modules are needed
- Back in the days when scripts were loaded manually
- How ES6 modules work (
importvsexport) - Let’s build a dashboard with modules
- Optimization techniques for dashboard example
If you want to become a better web developer, start your own business, teach others, or improve your development skills, I’ll be posting weekly tips and tricks on the latest web languages.
1. Why ES6 modules are needed
Let’s view a couple of scenarios as to why modules are relevant.
Scenario 1 — Don’t reinvent the wheel
As developers, we often recreate things that has already been created without even being aware, or copy and paste stuff to reduce time. In the end, it adds up, and we are left with x number of identical copies scattered throughout the app. And for each time we need to change something, we must do it x times depending on how many copies we have.
Example
For instance, imagine a car factory trying to reinvent the engine every time it produced a new car, or an architect starting from scratch after each drawing. It’s not impossible to do this, but then what is the point of knowledge if you cannot reuse the experience you’ve acquired.
Scenario 2— Knowledge barrier
If the system is deeply entangled, and lack of documentation, its difficult for old/new developers to learn how the app works, and how things are connected.
Example
For instance, a developer should be able to see what the outcome of a change is without guessing, otherwise we end up with lots of errors without knowing where to start. A solution is to use modules for encapsulating behaviour, we can easily narrow down the debug process and quickly identify the root of the problem.
I’ve recently written an article about “Developers that constantly want to learn new things”, with tips on how to improve knowledge.
Scenario 3— Unexpected behavior
By avoiding separation-of-concerns (design principle), it can lead to unexpected behaviour.
Example
For instance, let’s say someone increases the volume in the car, and that starts the windshield wipers. That is an example of an unexpected behaviour, and not something we want in our application.
In short, we need ES6 modules in order to effectively reuse, maintain, separate and encapsulate internal behaviour from external behaviour. It’s not about making the system complex, but having the ability to easily scale and delete stuff without breaking the system.
2. Back in the days when scripts were loaded manually
If you’ve done web development for a couple of years, then you’ve definitely encountered dependency conflicts such as scripts not loading in the right order, or that the elements of the DOM tree cannot be accessed by JS.
The reason is that the HTML on a page is loaded in the order in which it appears, which means we cannot load scripts before the content inside the <body> element has finished loading.
For instance, if you try to access an element within the <body> tag using document.getElementById("id-name") and the element is not loaded yet, then you get an undefined error. To make sure that scripts are loaded properly we can use and defer async. The former will make sure that each script loads in the order it appears, while the latter loads the script whenever it becomes available.
The old fashioned way of solving such issue was to load the scripts right before the </body> element.
<!DOCTYPE html>
<head>
</head>
<body>

  <!--HTML content goes here-->

  <script src="js/jquery.js"></script>
  <script src="js/script2.js"></script>
  <script src="js/script3.js"></script>
  <script src="js/script4.js"></script>
</body>
</html>
But in the long run, the number of scripts adds up and we may end up with 10+ scripts while trying to maintain version and dependency conflicts.
Separation-of-concerns
In general, loading scripts as shown above is not a good idea in terms of performance, dependencies and maintainability. We don’t want the index.html file to have the responsibility of loading all the scripts — we need some sort of structure and separation of logic.
The solution is to utilize ES6’s syntax, import and export statements, an elegant and maintainable approach that allows us to keep things separated, and only available when we need it.
The import and export statements
The export keyword is used when we want to make something available somewhere, and the import is used to access what export has made available.
The thumb rule is, in order to
importsomething, you first need toexportit.
And what can we actually export?
- A variable
- An object literal
- A class
- A function
- ++
To simplify the example as shown above, we can wrap all scripts one file.
import { jquery } from './js/jquery.js';
import { script2 } from './js/script2.js';
import { script3 } from './js/script3.js';
import { script4 } from './js/script4.js';
And then just load app.js script in our index.html. But first, in order to make it work, we need to use type="module" (source) so that we can use the import and export for working with modules.
<!DOCTYPE html>
<head>
</head>
<body>

  <!--HTML content goes here-->

  <script type="module" src="js/app.js"></script>
</body>
</html>
As you can see, the index.html is now responsible for one script, which makes it easier to maintain and scale. In short, the app.js script becomes our entry point that we can use to bootstrap our application.
Note: I would not recommend having all scripts loaded in one file such as app.js, except the ones that require it.
Now that we have seen how we can use the import and export statements, let’s see how it works when working with modules in practice.
3. How ES6 modules work
What is the difference between a module and a component? A module is a collection of small independent units (components) that we can reuse in our application.
What’s the purpose?
- Encapsulate behaviour
- Easy to work with
- Easy to maintain
- Easy to scale
Yes, it makes development easier!
So what is a component really?
A component may be a variable, function, class and so forth. In other words, everything that can be exported by the _export_ statement is a component (or you can call it a block, a unit etc).
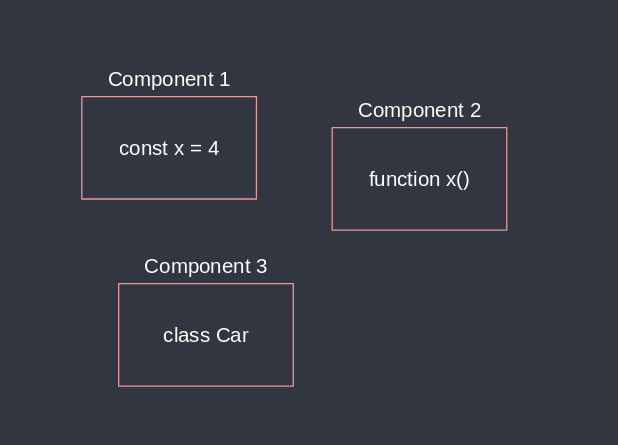 What is a component
So what is a module really?
As mentioned, a module is a collection of components. If we have multiple components that communicate, or simply must be shown together in order to form an integrated whole, then you most likely need a module.
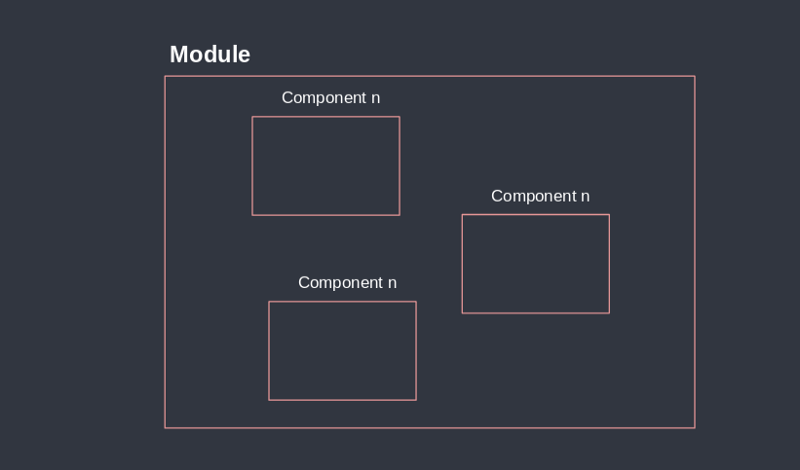 What is a module
Its a challenge to make everything reusable
A principal engineer with over 30 years of experience in electrical engineering once said, we cannot expect everything to be reused because of time, cost and not everything is meant to be reused. It is better to reuse to some extent than expecting things to be reused 100%.
In general, it means that we don’t have to make everything reusable in the app. Some things are just meant to be used once. The rule of thumb is that if you need something more than two times, then maybe it is a good idea to create a module or a component.
At first, it may sound easy to make something reusable, but remember, it requires taking the component out from its environment, and expect it to work in another one. But often times, we have to have to modify parts of it to make it fully reusable, and before you know it, you’ve created two new components.
Antoine, wrote an article describing 3 essential rules of creating reusable JS components, which is recommend to read. When he presented VueJS to his team, an experienced coworker says:
That’s great in theory, but in my experience these fancy “reusable” things are never reused.
The idea is that, not everything should be reused, such as buttons, input-fields and check boxes and so forth. The whole job of making something reusable requires resources and time, and often we end up with over-thinking scenarios that would never occur.
The CEO of Stack Overflow, Joel Spolsky says:
A 50%-good solution that people actually have solves more problems and survives longer than a 99% solution that nobody has because it’s in your lab where you’re endlessly polishing the damn thing. Shipping is a feature. A really important feature. Your product must have it.
4. Let’s build a dashboard with modules
Now that we have a basic understanding of how modules work, let’s view a practical example you’ll most likely encounter when working with JS frameworks. We’ll be creating a simple dashboard following an architectural design that consist of layouts and components.
The code for the example can be found here.
Step 1 — Design what you need
In most cases, developers would jump directly into the code. However, design is an important part of programming and it can save you a lot of time and headache. Remember, design should not be perfect, but something that leads you to the right direction.
So this is what we need based on the architectural design.
- Components:
users.js,user-profile.jsandissues.js - Layouts:
header.jsandsidebar.js - Dashboard:
dashboard.js
All components and layouts will be loaded in dashboard.js and then we will bootstrap dashboard.js in index.js.
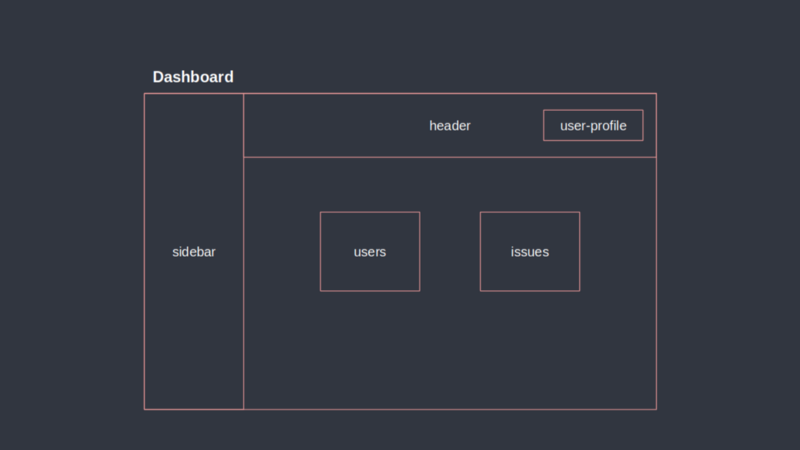 Architectural design of our dashboard
So why do we have a layouts and components folder?
A layout is something that we need once, for instance a static template. The content inside the dashboard may change, but the sidebar and header will stay the same (and these are what is known as layouts). A layout can be either an error page, footer, status page and so forth.
The components folder is for general components we most likely will reuse more than once.
It is important to have a solid ground structure when dealing with modules. In order to effectively scale, folders must have reasonable names that make it easy to locate stuff and debug.
Later I’ll show you how to create a dynamic interface, which requires having a folder space for the components and layouts we need.
Step 2— Setup folder structure
As mentioned, we have 3 main folders: dashboard, components and layouts.
- dashboard
- components
- layouts
index.html
index.js ( entry point )
And in each file inside the folder, we export a class.
- dashboard
    dashboard.js
- components
    issues.js
    user-profile.js
    users.js
- layouts
    header.js
    sidebar.js
index.html
index.js ( entry point )
Step 3 — Implementation
The folder structure is all set, so the next thing to do is to create the component (a class) in each file and then export it. The code convention is the same for the rest of the files: every component is simply a class, and a method that consoles “x component is loaded” where x is the name of the component in order to indicate that the component has been loaded.
Let’s create a user class and then export it as shown below.
class Users {

  loadUsers() {
    console.log('Users component is loaded...')
  }

}

export { Users };
Notice, we have various options when dealing with the export statement. So the idea is that you can either export individual components, or a collection of components. For instance if we export the class, we can access the methods declared within by creating a new instance of the class.
export { name1, name2, …, nameN };
export function FunctionName(){...}
export class ClassName {...}
...

export * from …;
export { name1, name2, …, nameN } from …;
export { import1 as name1, import2 as name2, …, nameN } from …;
export { default } from …;
...
Alright, so if you look at the architectural diagram in step 1, you’ll notice that the user-profile component is encapsulated by the header layout. This means that when we load the header layout, it will also load the user-profile component.
import { UserProfile } from '../components/users-profile.js';

class Header {

  loadHeader() {
    // Creata a new instance
    const userProfile = new UserProfile();

    // Invoke the method (component)
    userProfile.loadUserProfile();

    // Output loading status
    console.log('Header component is loaded...')
  }

}

export { Header };
Now that each component and layout has an exported class, we then import it in our dashboard file like this:
// From component folder
import { Users } from '../components/users.js';
import { Issues } from '../components/issues.js';

// From layout folder
import { Header } from '../layouts/header.js';
import { Sidebar } from '../layouts/sidebar.js';


class Dashboard {

  loadDashboard(){

    // Create new instances
    const users = new Users();
    const issues = new Issues();
    const header = new Header();
    const sidebar = new Sidebar();

    console.log('Dashboard component is loaded');
  }

}

export { Dashboard }
In order to understand what is really going on in the dashboard file, we need to revisit the drawing in step 1. In short, since each component is a class, we must create a new instance and then assign it to an object. Then we use the object to execute the methods as shown in method loadDashboard().
Currently, the app doesn’t output anything because we haven’t executed the method loadDashboard(). In order to make it work we need to import the dashboard module in file index.js like this:
import { Dashboard } from './dashboard/dashboard.js';

const dashboard = new Dashboard();

dashboard.loadDashboard();
And then the console outputs:
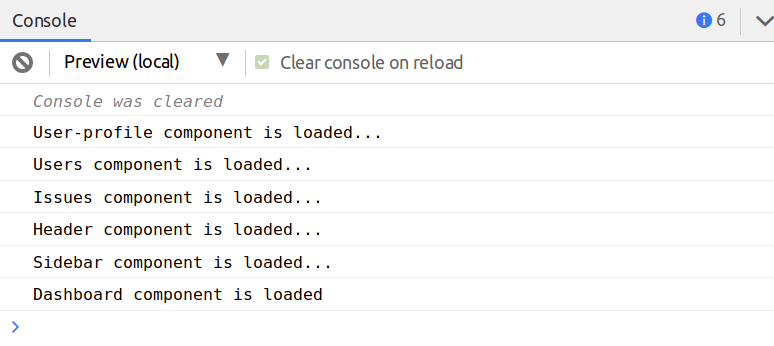 ES6 Components loaded
As shown, everything works and the components load successfully. We can also go ahead and create two instances and then do something like this:
import { Dashboard } from './dashboard/dashboard.js';

const dashboard_1 = new Dashboard();
const dashboard_2 = new Dashboard();

dashboard_1.loadDashboard();
dashboard_2.loadDashboard();
Which outputs the same as shown above, but since we have to new instances, we get the results twice.
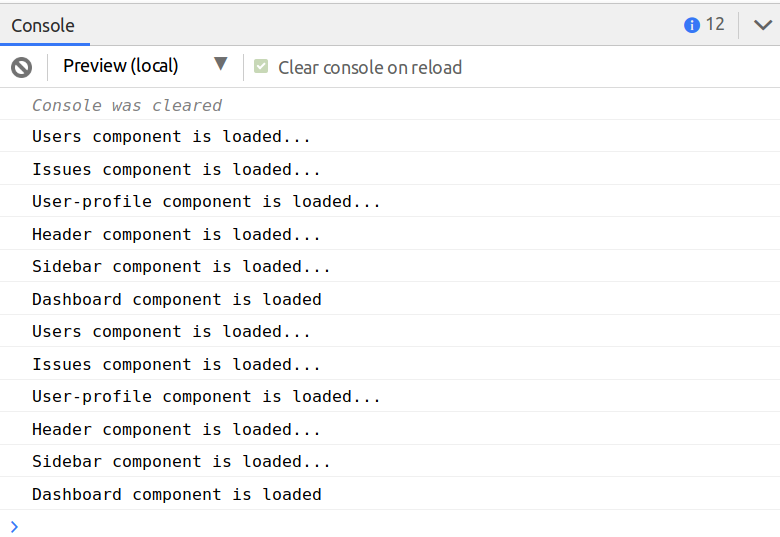 Two unique instances of dashboard
In general, this allows us to easily maintain and reuse the module in the files needed without interfering with other modules. We just create a new instance which encapsulates the components.
However, as previously mentioned, the purpose was to cover the dynamic of how we can work with modules and components using the import and export statements.
In most cases when working with JS frameworks, we usually have a route that can change the content of the dashboard. Right now, everything along such as layouts is loaded every time we invoke the method loadDashboard() which is not an ideal approach.
5. Optimization techniques for dashboard example
Now that we have a basic understanding of how modules work, the approach is not really scalable or intuitive when we deal with large applications that consist of a lots of components.
We need something that is known as a dynamic interface. It allows us to create a collection of the components we need, and easily access it. If you are using Visual Studio Code, the IntelliSense shows you what components are available, and which one you’ve already used. It means you don’t have to open the folder/file manually to see what components has been exported.
So if we have a module with twenty components, we don’t want to import each component one line after the other. We simply want to get what we need, and that’s it. If you’ve worked with namespaces in languages such as C#, PHP, C++ or Java, you’ll notice that this concept is similar in nature.
Here’s what we want to achieve:
// FILE: dashboard.js

// From component folder
import { users, issues } from '../components';

// From layout folder
import { header, sidebar } from '../layouts';


class Dashboard {

  loadDashboard(){

    // Invoke methods
    users.loadUsers();
    issues.loadIssues();
    header.loadHeader();
    sidebar.loadSidebar();

    console.log('Dashboard component is loaded');
  }

}

export let dashboard = new Dashboard();
As shown, we have less lines of code, and we made it declarative without losing the context. Let’s see what changes we’ve made.
Create a dynamic interface (also known as a barrels)
A dynamic interface allows us to create a collection of things we need. It’s like creating a toolbox with our favorite tools. One thing that is important to mention is that a dynamic interface should not be added in every single folder, but to folders that consist of many components.
They greatly simplify the imports and make them look clearer. We just don’t want to have too many barrel files since that is counter productive and usually leads to circular dependency issues which sometimes can be quite tricky to resolve.
In order to create a dynamic interface, we create a file named index.js which is located in the root of each folder to re-export a subset of files or components we need. The same concept works in TypeScript, you just change the type from .js to .ts like index.ts.
The index.js is the first file that loads when we access the root folder space — it’s the same concept as index.html that boots our HTML content. This means we don’t have to explicitly write import { component } from './components**/index.js**' , but instead import { component } from './components.
Here’s how a dynamic interface looks.
// Root space -> components folder

// Dynamic interface
export { users } from './users';
export { issues } from './issues';
export { userProfile } from './user-profile';
By using a dynamic interface, we end up with one less root level to access, and also less code.
// Before
import { Users } from '../components/users.js';
import { Issues } from '../components/issues.js';
import { Header } from '../layouts/header.js';
import { Sidebar } from '../layouts/sidebar.js';

// After (with dynamic interface)
import { users, issues } from '../components';
import { header, sidebar } from '../layouts';
Create a new instance at runtime
We removed the four instances in our dashboard.js, and instead created an instance at runtime when every component is exported. If you want to decide the name of the object, you can do export default new Dashboard(), and then import dashView without the curly braces.
// Before
export class { dashboard };
const dashboard = new Dashboard();
dashboard.loadDashboard();

// After
export const dashboard = new Dashboard();
dashboard.loadDashboard()
As shown, we can directly invoke the method without needing to create a new instance, and also write less code. However, this is a personal preference and you can freely decide what is a practical use case for your app and requirements.
And finally, we load all components and layouts with one method.
import { dashboard } from './dashboard/dashboard';

dashboard.loadDashboard();
Conclusion
I started with the intention of just showing a short example of how you can import and export a component, but then felt the need to share everything I know (almost). I hope this article provides you some insight into how to deal with ES6 modules effectively when building apps, and the things that are important in terms of separation-of-concerns (design principle).
The takeaways:
- With ES6 modules we can easily reuse, maintain, separate and encapsulate components from being changed by external behavior
- A module is a collection of components
- A component is an individual block
- Don’t try to make every everything reusable as it requires time and resources, and most often we don’t reuse it
- Create an architectural diagram before diving into the code
- In order to make components available in other files, we must first
exportand thenimport - By using
index.js(same concept for TypeScriptindex.ts) we can create dynamic interfaces (barrels) to quickly access the things we need with less code and fewer hierarchical paths - You can
exporta new instance at runtime by usingexport let objectName = new ClassName()
The good news is that things have changed and we are moving towards a component-based and reusable paradigm. The question is how can we reuse not only plain JS code, but HTML elements too in a practical and intuitive way. It looks like that ES6 modules combined with web components may just give us what we need to build performant and scalable apps.
Here are a few articles I’ve written about the web-ecosystem along with personal programming tips and tricks.
- A comparison between Angular and React
- A chaotic mind leads to chaotic code
- Developers that constantly want to learn new things
- Learn these core Web Concepts
- Boost your skills with these important JavaScript methods
- Program faster by creating custom bash commands
You can find me on Medium where I publish on a weekly basis. Or you can follow me on Twitter, where I post relevant web development tips and tricks along with personal dev stories.