By Damian Demasi
In this tutorial, you will learn how to work in a team with a central repository on GitHub. You will work on issues, commits, pull requests, code reviews, and more.
I don't consider myself an expert on Git, but I have learned a lot about it in my first month working as a software developer.
I wrote this tutorial to share how Git is used in professional environments. Bear in mind that there is not just a single way of using Git – so this is just one approach, and it may differ from what you see in your professional career.
A good read to start working with Git workflows is this Comparing Workflows tutorial.
The Project
Harry and Hermione had the great idea of building a SaaS app to allow people to build their own potions online and share them with the rest of the world. They named it Potionfy, and this will be their first start-up.

They decided to use GitHub as the central repository in which all their work was going to be stored. They chose React and Ruby on Rails as the app technology stack.
The Team
Potionfy will be bootstrapped by Harry and Hermione themselves by using their savings. They will work their home garage and they expect to have an MVP ready in 4 weeks.
Let's see how they will work together in building the SaaS product and the obstacles they will have to overcome in doing so.
Initial Project Setup
This project will use two fictional team members – Harry and Hermione – with two separate GitHub accounts. So you may want to start creating two accounts on GitHub for this.
Bonus: in order to simplify things, if you have a Gmail account you can use your Gmail address with a plus and a string after the first part of it, and all email communications will be centralised in one account, like so:
my_email_address+harry@gmail.com
my_email_address+hermione@gmail.com
Step 1: How to create two different GitHub accounts
In order to follow along with this tutorial, you'll need two different GitHub accounts. I chose to create two, but you can just use your own and create another one. Here is how my set-up looks:

Step 2: How to set up your local development environment
We are going to use a local development environment and set up Git on it. I decided to use a virtual machine running Linux, but you can use your own environment (I just want to avoid any kind of configuration problem with Git).
We have to make sure Git is installed in our system:
git --version
This command should return the version of Git that is installed in your system. In my case, my virtual Ubuntu didn't have it installed, so I ran:
sudo apt install git
Step 3: teamwork considerations
Harry will be the one working locally in our development environment, and Hermione will choose to work directly on GitHub by using an online VSCode (more on this later).
How to Get Started Working on the Project
Step 1: How to create the repository and build the team (for free)
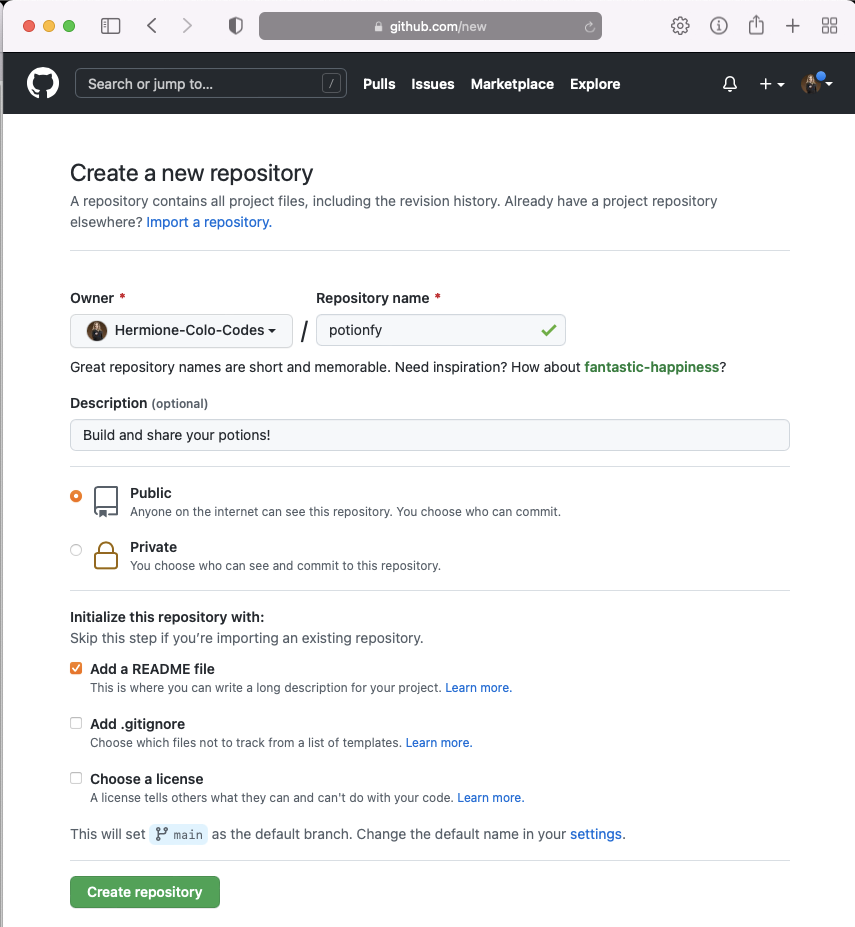
Hermione is the leader of the team, as she is more experienced in coding, so she has decided to create a new repository to host the code for the SaaS product.
To create the repository, she simply used the GitHub web interface and clicked on the Repositories tab, and then on the New button. She named the repository potionfy and she added a short description and a Readme.md file.
After the repository was created, she invited Harry to work on it. To do so, she clicked on the Settings tab in the potionfy repository, then in the Manage access option, and finally in the Add people button.
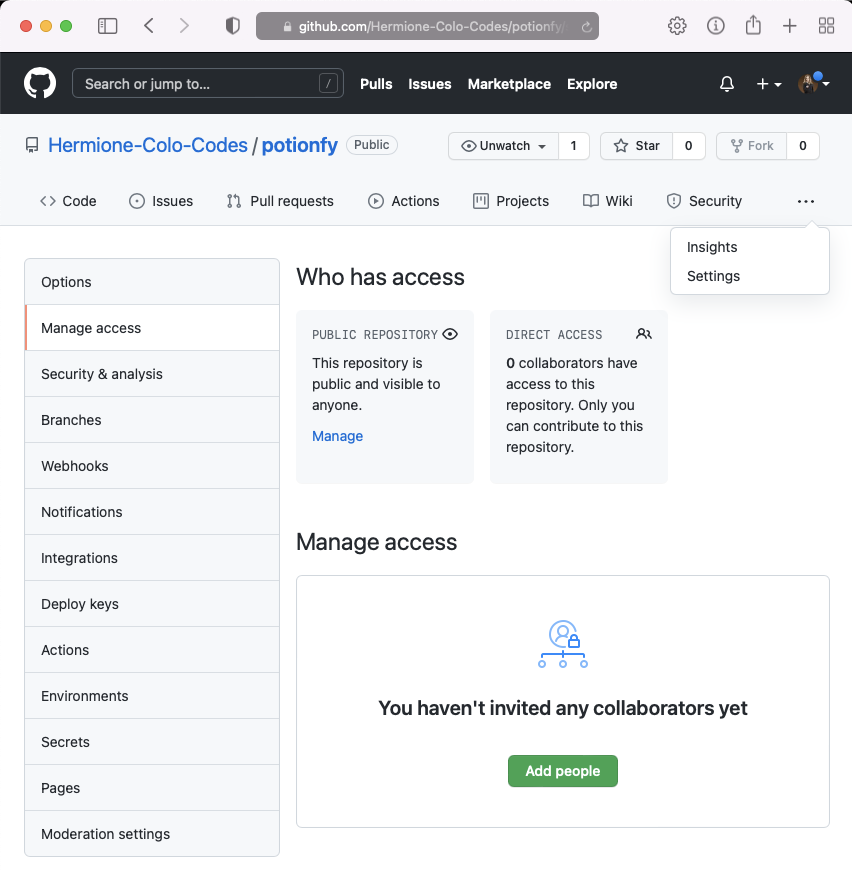
By entering Harry's GitHub username (or email address) in the pop-up window and clicking on the Add Harry(...) to this repository, she managed to send the invitation to Harry.

A couple of seconds later, Harry received the invitation to his email:

He accepted it, and by doing so, both team members were ready to start working on their project.
NOTE: In case the invitation link does not work (as in my case), Harry needs to go to Hermione's GitHub profile, click on the potionfy repository, and accept the invitation there:


Step 2: How to create a file
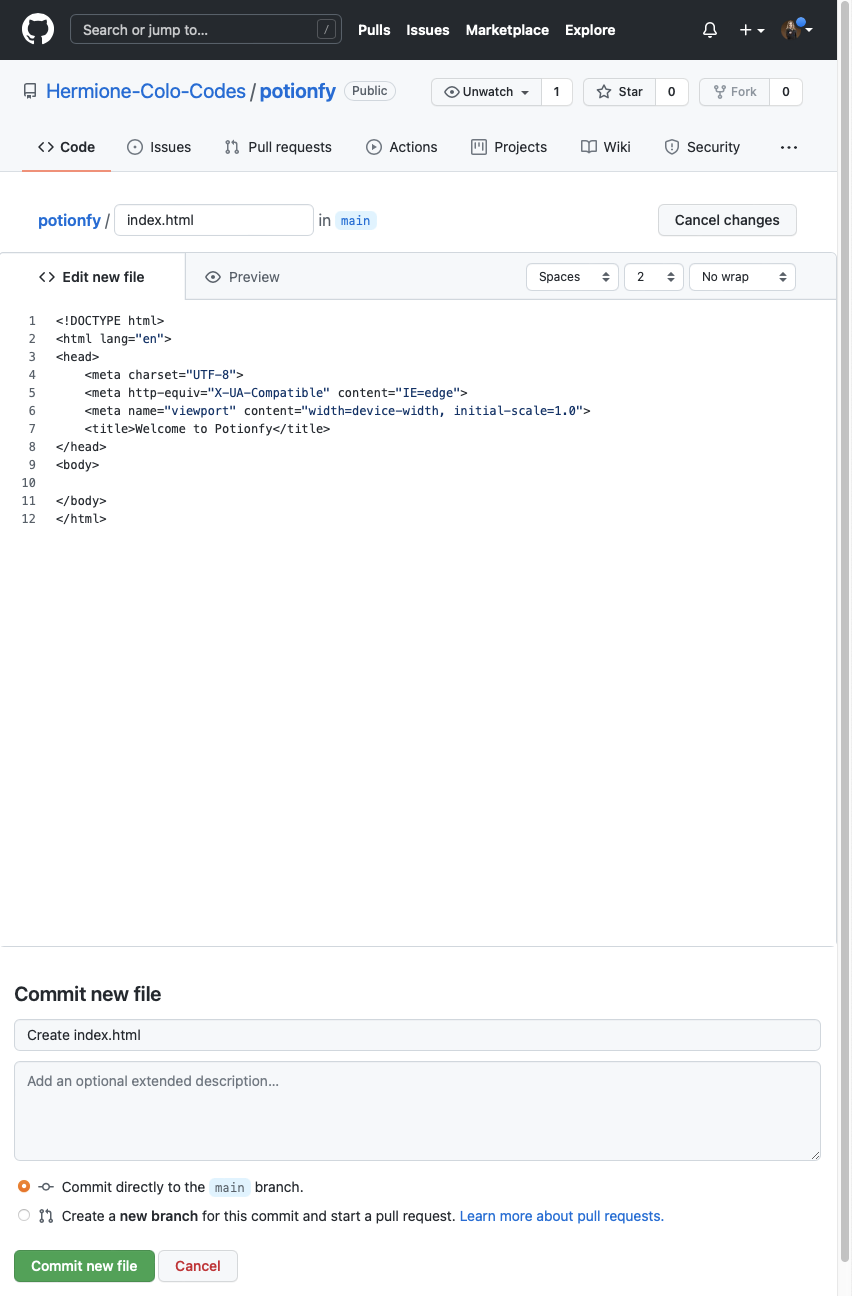
Hermione started the project by creating the initial file the Potionfy SaaS product will use: index.html.
In order to do so, she created the file using the GitHub web interface by positioning herself in the repository and clicking on the Add file > Create new file buttons.

Then she added the name of the file, its content, and a meaningful commit message. After clicking on the Commit new file button, the file was created on the repository.
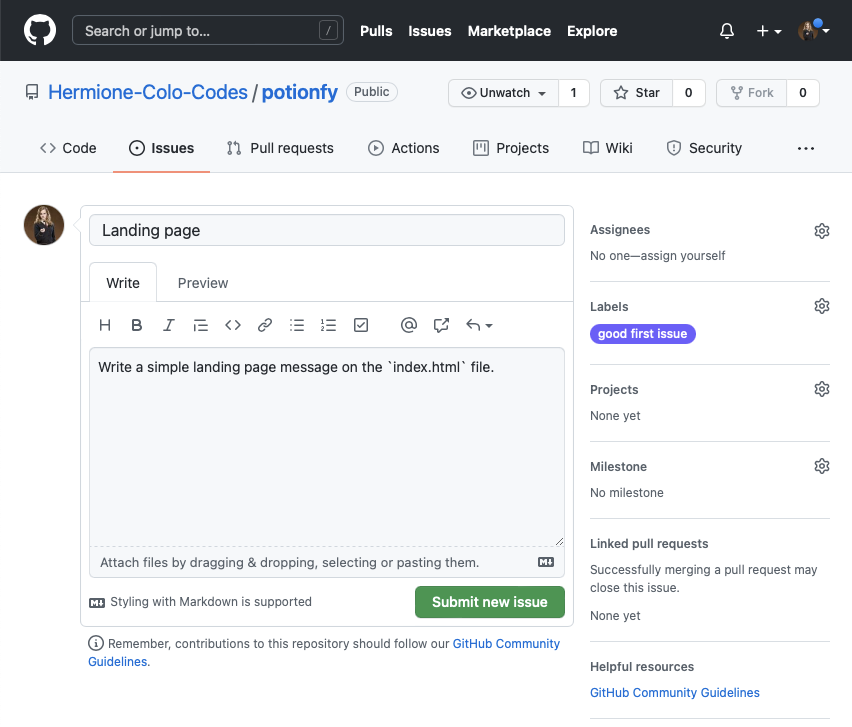
Step 3: How to create an issue and work on it
Hermione needs to move on to work on the marketing related to Potionfy launch, so she told Harry to add a simple landing message to the index.html file. So, she proceeded to create an issue in the repository by clicking on the Issues tab and clicking on the New issue button.

After the issue was created, Harry took a look at it (also by going to the issues tab in the Potionfy repository) and let Hermione know that he will be working on it by leaving a comment and assigning the issue to himself.
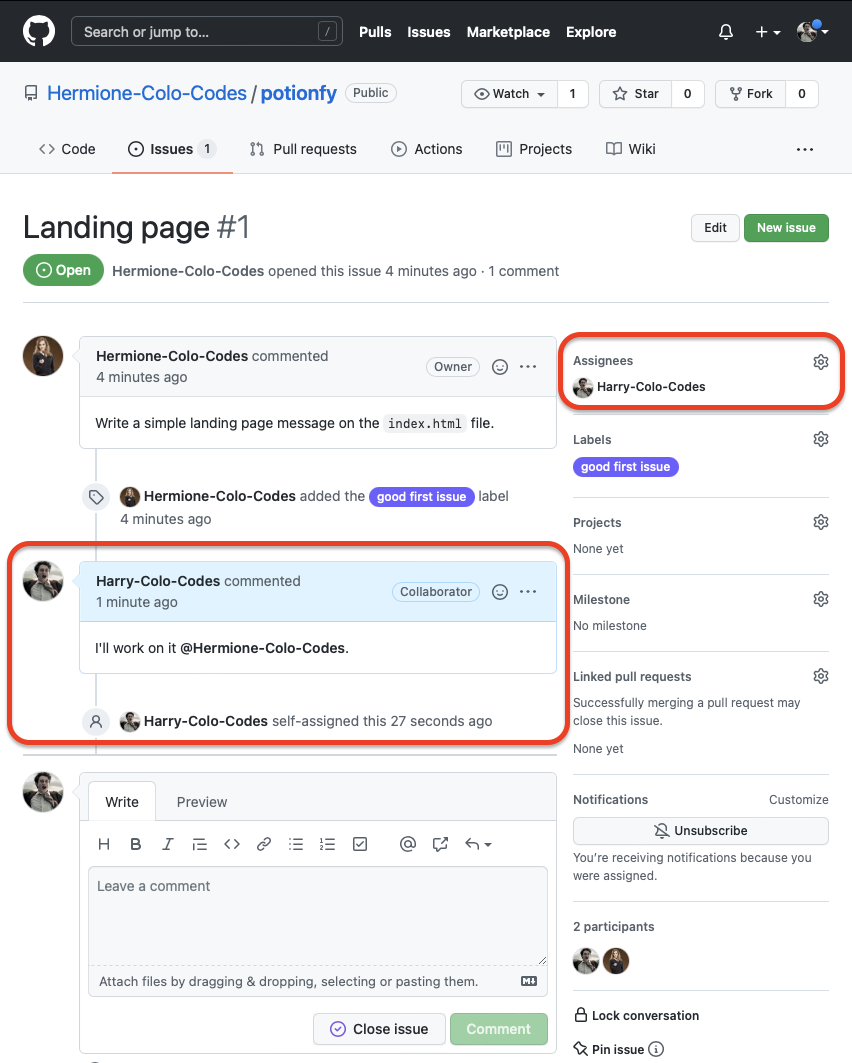
By working with this dynamic, the team will know who is working on what.
Step 4: How to set up the local development environment
In order to work on the project's index.html file, Harry chose to work locally, so he needed to clone the potionfy repository in his development environment (the Linux virtual machine).
The first thing he had to do was set up the SSH keys to work with GitHub. He followed GitHub's Generating a new SSH key and adding it to the ssh-agent tutorial to do so. He then added the key to his GitHub account, following the Adding a new SSH key to your GitHub account tutorial.
Then, Harry opened Hermione's repository on GitHub and copied the link to clone it:

Now in his local development environment, he created a new directory in which all his work would be centralised:
$ mkdir ~/development
$ cd ~/development
Finally, he cloned the repository by typing git clone and pasting the code he just copied from GitHub (which is the address of the repository):
$ git clone git@github.com:Hermione-Colo-Codes/potionfy.git
In this way, he now has a local copy of the repository and he is ready to start working on it.
$ ll
total 12
drwxrwxr-x  3 parallels parallels 4096 Nov 17 07:34 ./
drwxr-xr-x 23 parallels parallels 4096 Nov 17 07:33 ../
drwxrwxr-x  3 parallels parallels 4096 Nov 17 07:34 potionfy/
GitHub workflow
In order to work on a repository, this is the workflow GitHub recommends:
- Create a branch
- Make changes
- Create a pull request
- Address review comments
- Merge your pull request
- Delete your branch
For more information about this, you can read this document.
Step 1: Create a branch
As it is a good practice not to work on the master branch directly, Harry created a new branch related to the issue on which he will be working.
He chose to do this on the GitHub repository, but he could have done the same in his local environment using Git commands.
He chose a meaningful name and prefixed the name with the number of the related issue (which is 1, in this case).

More information about how to create a branch on GitHub can be found here.
Step 2: Work on the branch locally
After the branch was created, Harry started working on it.
git pull
The first thing he did was a pull of the whole repository so he could see the branch in his local development environment.
~/development/potionfy$ git pull
Warning: Permanently added the ECDSA host key for IP address '13.237.44.5' to the list of known hosts.
From github.com:Hermione-Colo-Codes/potionfy
 * [new branch]      1-add-landing-message -> origin/1-add-landing-message
Already up to date.
git checkout
With the new branch in his environment, he switched to it by using the git checkout <name_of_branch> command. After doing so, he ensured he was working in the correct branch with the git branch command.
~/development/potionfy$ git checkout 1-add-landing-message
Branch '1-add-landing-message' set up to track remote branch '1-add-landing-message' from 'origin'.
Switched to a new branch '1-add-landing-message'

~/development/potionfy$ git branch
* 1-add-landing-message
  main
Solve the issue
Harry started working on solving the issue. In order to do so, he opened the index.html file and added a h1 header to it.

After the changes were made, he saw how Git reacted to this change.
~/development/potionfy$ git status
On branch 1-add-landing-message
Your branch is up to date with 'origin/1-add-landing-message'.

Changes not staged for commit:
  (use "git add <file>..." to update what will be committed)
  (use "git restore <file>..." to discard changes in working directory)
    modified:   index.html

no changes added to commit (use "git add" and/or "git commit -a")
parallels@parallels-Parallels-Virtual-Platform:~/development/potionfy$
He then added the file to the staging area with the git add command and committed the change with the git commit command.
~/development/potionfy$ git add -A

~/development/potionfy$ git commit -m "Add landing message. #1"

~/development/potionfy$ git status
Note how the commit message also includes the id of the issue, which in this case is #1.
Push to the repository
The next step Harry needs to do is to push the changes to the repository.
~/development/potionfy$ git push

Create a pull request
Harry then clicked on the Compare and pull request button in the GitHub repository (making sure his branch was selected in the branch left drop-down menu).
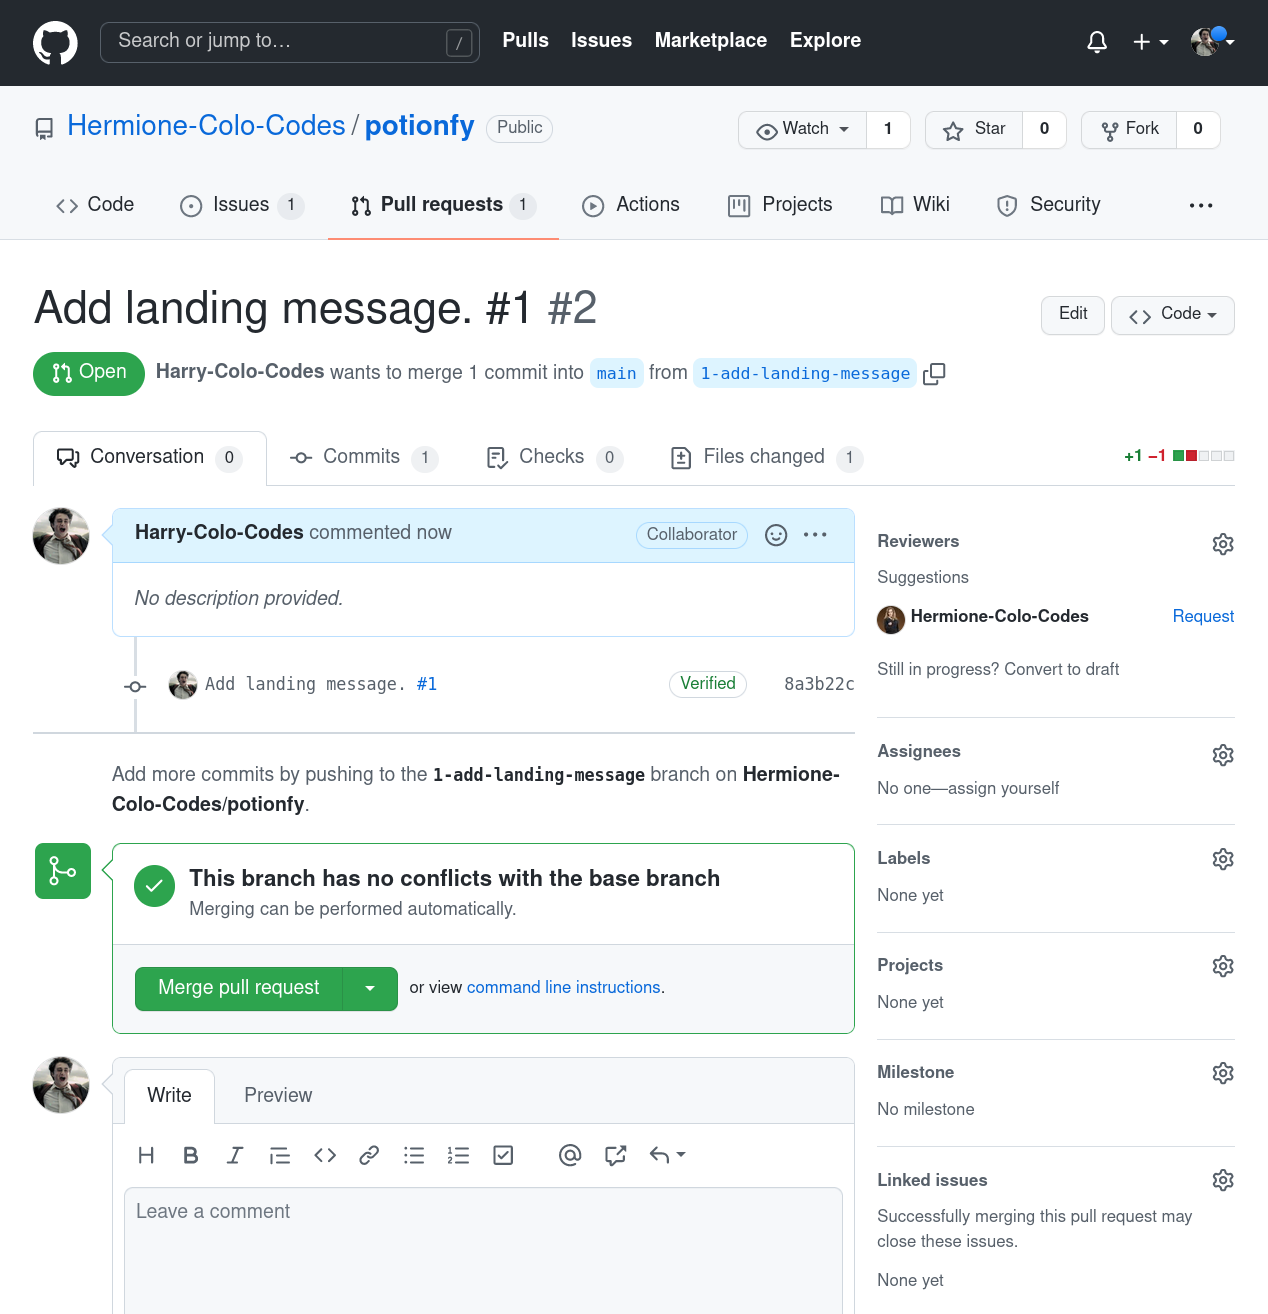
This pull request will be analysed by Hermione and she will decide if it can be merged to the master branch or not.
Quick recap so far
Up to this point in the tutorial, we learned how Harry and Hermione decided to build a SaaS app to allow people to build their own potions online and share them with the rest of the world. They named it Potionfy.
Hermione created a remote repository, then an issue to address the task of building a landing page, and how Harry worked on that issue locally and created a pull request once he finished working on it.
Now, we are going to see:
- how Hermione reviews Harry's code,
- how the code is merged on the master branch,
- the decision of using a
developbranch, - how the team works in the develop branch and merges changes into main,
- and how the team solves merge conflicts.

How to Do Code Reviews
Step 1: How to create a code review
Hermione has finished with her marketing and promotion tasks, and she now has time to review Harry's code.
In order to do so, she opens the GitHub repository and clicks on the Pull requests tab to find Harry's pull request.

After clicking on it, she then clicks on the Commits tab, and finally in Harry's last commit (this is just one way of accessing the files modified on the pull request).
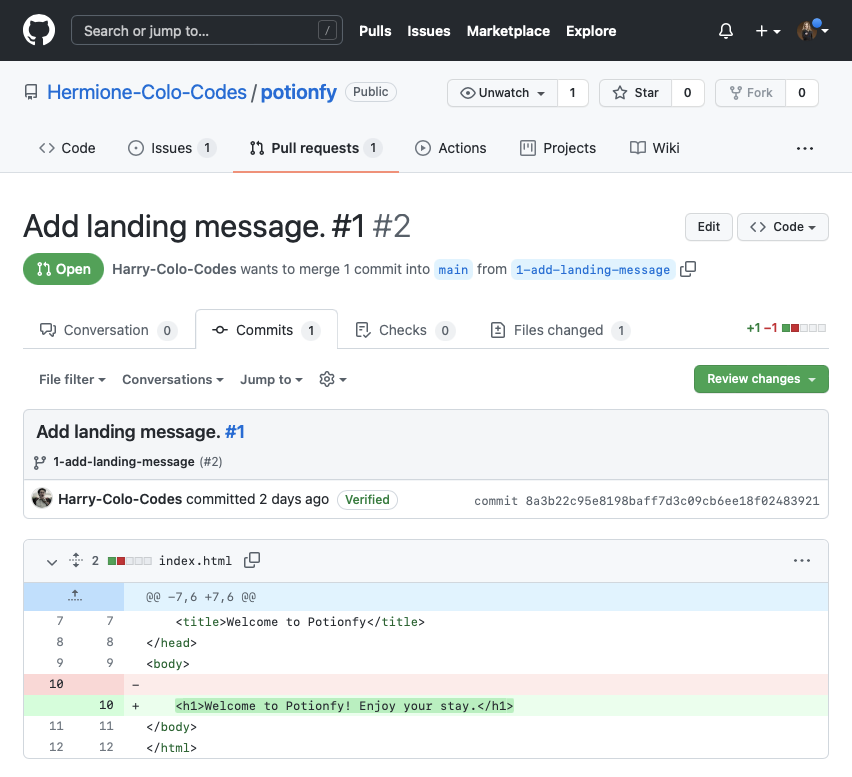
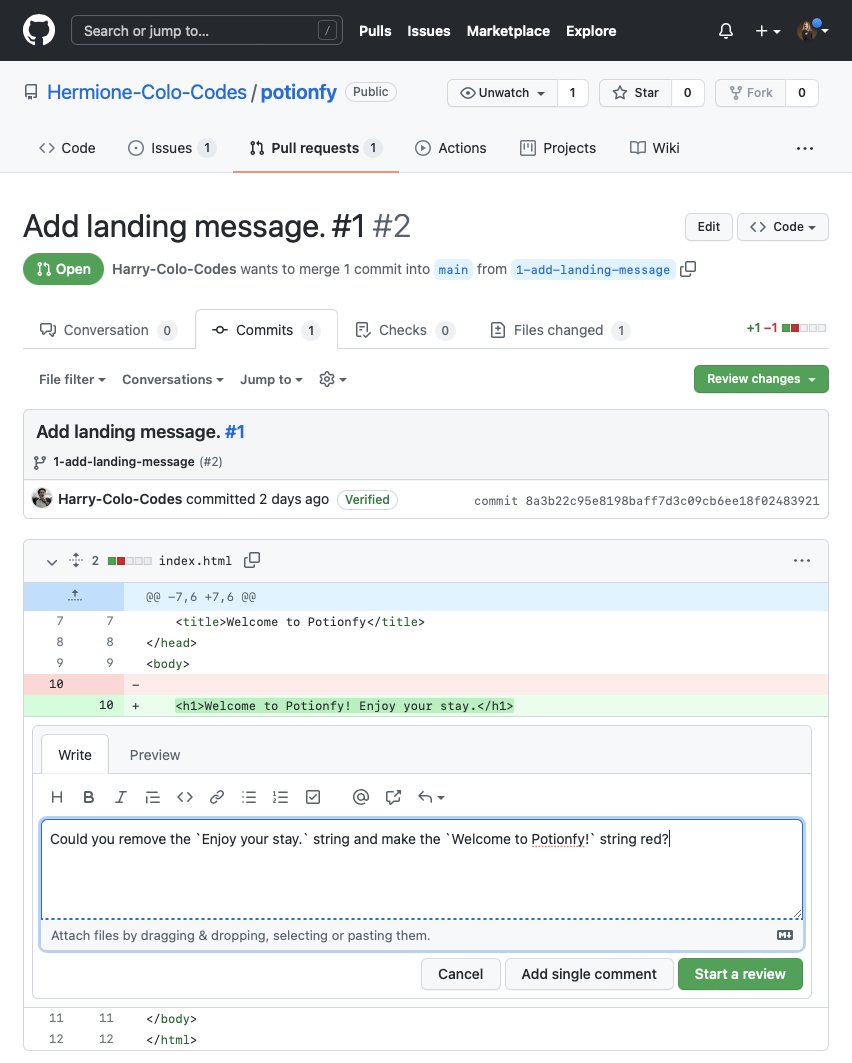
She is not entirely convinced about the <h1> code, so she clicks on the plus icon that appears when she hovers that line of code, and writes a comment to Harry. Finally, she clicks on the Start a review button.
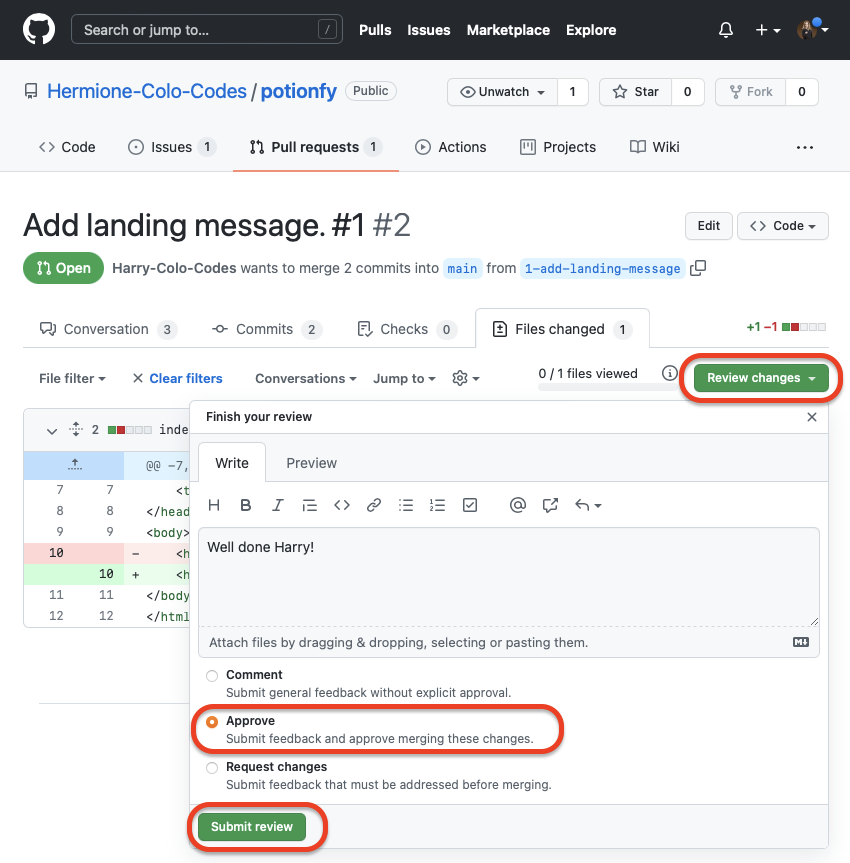
As she has no other comments about the code, she now clicks on the Review changes button to make the review visible to the rest of the team.

You can find more information about making reviews in this Reviewing proposed changes in a pull request article.
Step 2: How to address the review and create a code change
Harry checks his pull request and finds a new conversation there: Hermione's review.

Harry answers Hermione's comment and clicks on the Resolve conversation button.

Now that the conversation is resolved, Hermione can submit the review indicating that there are requested changes so Harry can actually work on them.

Note: this is just one version of the review process in GitHub, and it can differ from the actual way your team chooses to handle them.
Harry checks the pull request again and finds that it has Changes requested.

Step 3: How to implement the changes
As Harry likes to work locally, he continues working on the branch he had created in order to implement the code changes.
$ git checkout 1-add-landing-message
Once he is sure he is working on the correct branch, he makes the changes in the index.html file.

Note: for simplicity sake, we are not creating a separate CSS file here.
Once Harry finishes tweaking the code, he stages the changes, commits them (making sure to include the id of the issue because he is still working on it), and pushes them to GitHub.
$ git add -A

$ git commit -m "Add colour and remove text. #1"

$ git push
Step 4: How to merge the pull request
Now it's Hermione's turn. She goes to the pull request and finds a new commit: the one Harry did and pushed to GitHub.

She then clicks on the Files changed tab and finds the ones that she suggested implemented on the index.html file.

As she is satisfied with the changes, she proceeds to approve them by clicking on the Review changes button and selecting the Approve option.
Harry sees that his pull request was approved by Hermione, and he proceeds to merge it into the main branch of the project.

He decided not to delete the branch, as he wants to leave it there for future reference (although it would be a good idea to delete it).
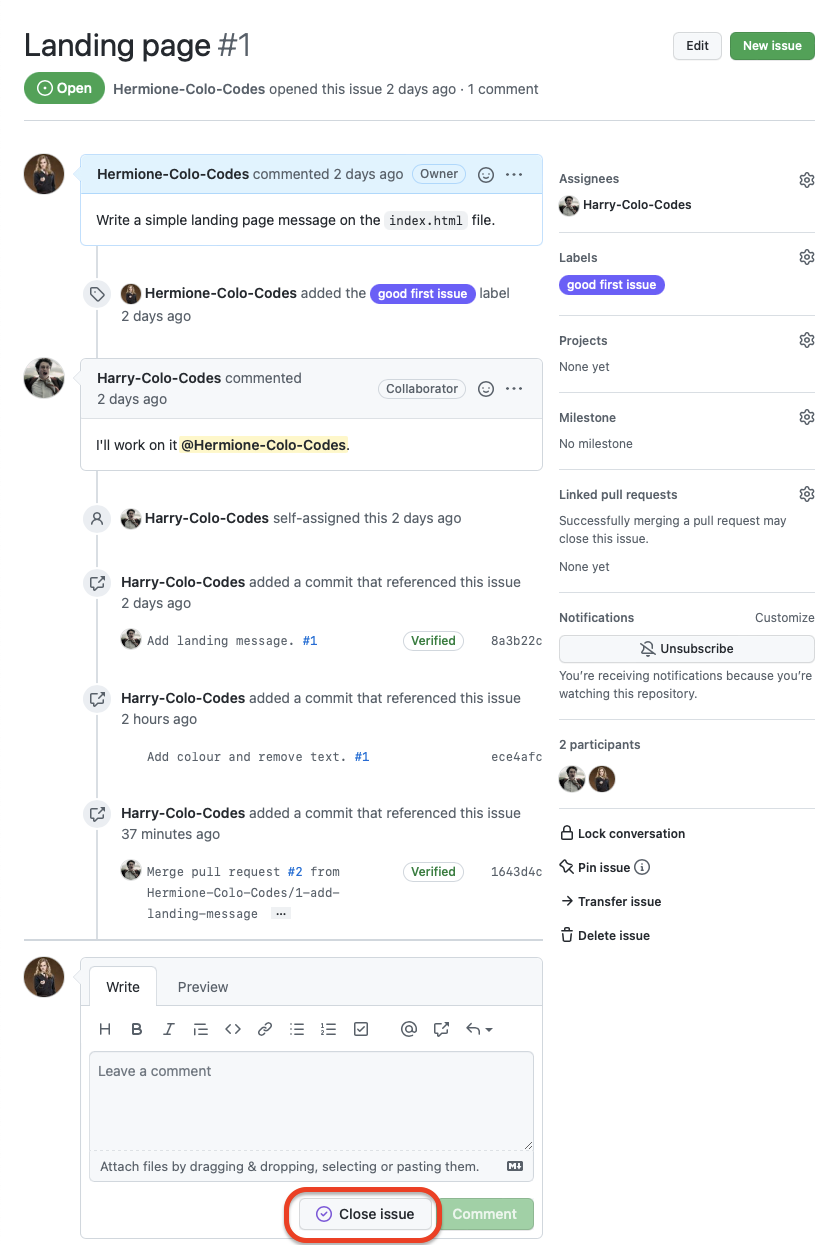
As Hermione is satisfied with how the issue was solved, she proceeds to close it by going to the Issues tab and clicking on the Close issue button.
If you want to see a graphical representation of the whole process up to this point, you can click on the Insights tab and then on the Network option. You will be able to actually see how the branching and merging were performed.

How to Use a develop Branch in Git
When working with real projects, merging changes into the main branch like you saw up to this point is not recommended.
Instead of working directly with the main branch (often called production), you will be working with a develop branch. You will be branching issues out of that develop branch and merging them back into the develop branch.
Once a group of issues have been solved, that develop branch will be merged into the main (or production) branch, usually denoting a version change in the app.

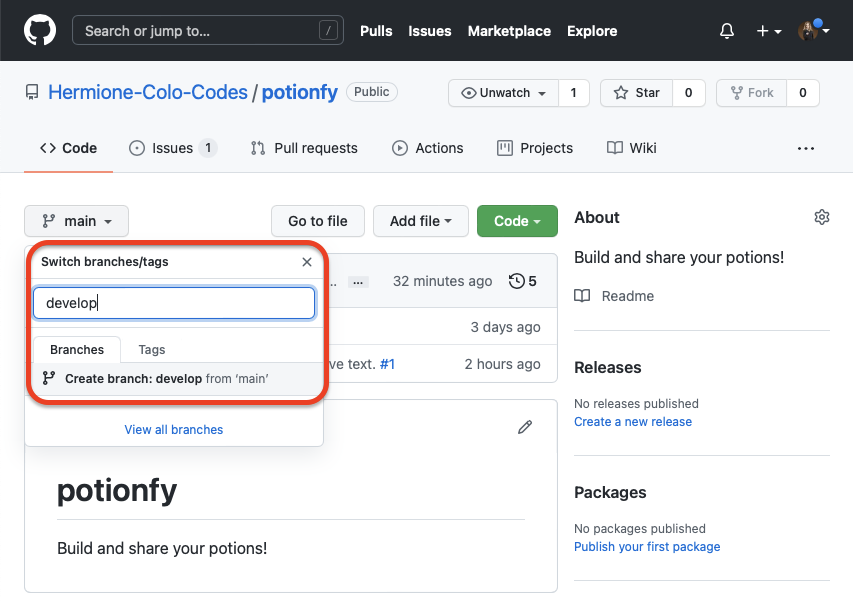
Hermione is aware of this, and now that the landing page is live and accessible to customers, she decided to preserve that production environment and work on a development branch.
In order to do so, she creates a develop branch out of the main one, so she and Harry can work on that branch without impacting the production environment.
How to Handle Merge Conflicts in Git
Hermione wants to add a new feature to the landing page: a form to capture clients' emails. In order to do so, she creates a new issue.

Once the issue is created, Harry decides to start working on it. To do so, he branches out from the develop branch (by selecting that branch on the GitHub interface) a new one called 3-email-form (including the issue number at the front to make it clear how this branch will relate to the issues).

He then pulls that branch locally and starts working on it.
$ git pull

$ git checkout 3-form
Harry decides to include a simple form into the index.html file:
<form action="mailto:hermione@potionfy.com" method="post" enctype="text/plain">
Name:<br>
    <input type="text" name="name"><br>
    E-mail:<br>
    <input type="text" name="mail"><br>
    <input type="submit" value="Send">
    <input type="reset" value="Reset">
</form>
Note: This code is just to exemplify how Harry is working on a file and it's not how this type of form could actually be built.
Harry stages and commits his changes locally using the Contact form. #3 message.
$ git add -A

$ git commit -m "Contact form. #3"

$ git push

Before Harry could create a new pull request, Hermione decides to build a placeholder for the form on the index.html file on her own. In order to do so, she creates a new branch out of develop called 3-email-form-placeholder.
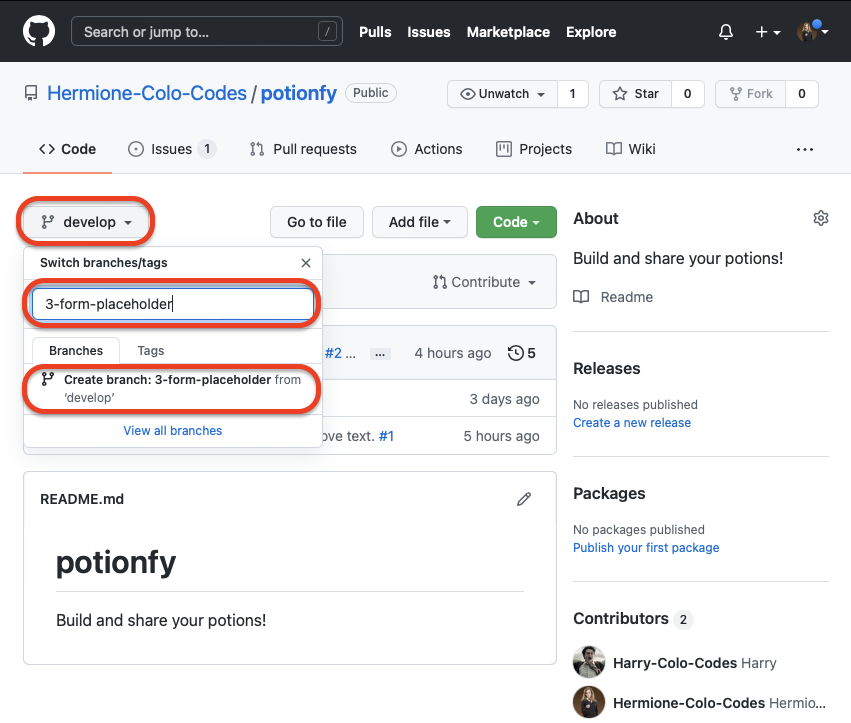
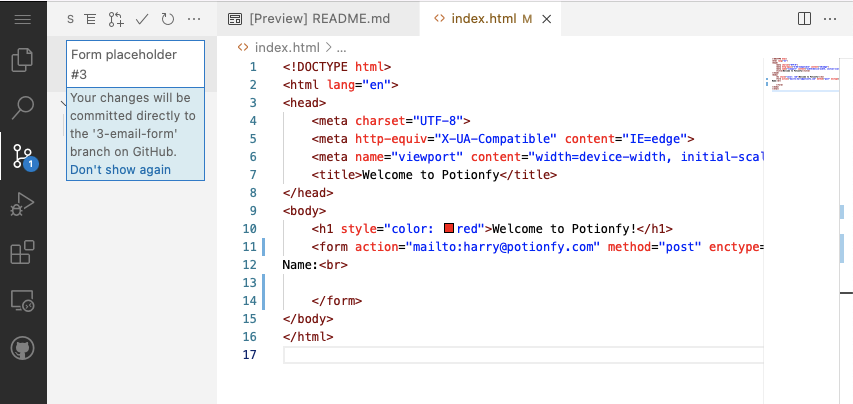
To work on the index.html file, she uses the GitHub online code editor (basically, a VSCode for the web). In order to open it, she just presses the . key on her keyboard and the GitHub page is transformed into a VSCode interface (like magic 😉).

She then proceeds to add the following code to the file:
<form action="mailto:harry@potionfy.com" method="post" enctype="text/plain">

</form>
After saving the file, she commits the changes right there on her browser window by using VSCode's graphical interface:
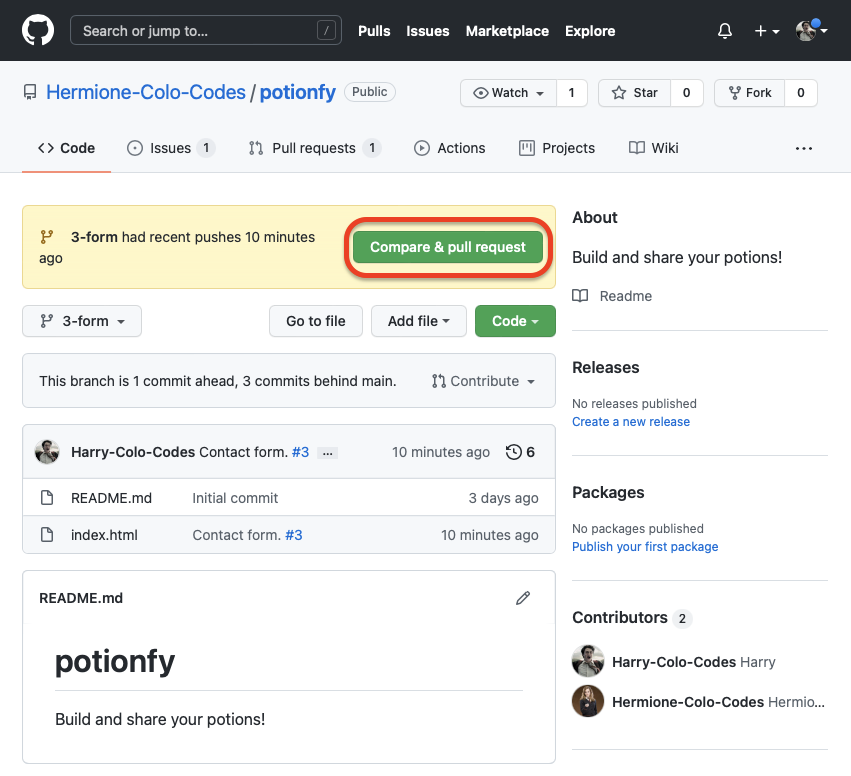
Once the commit is complete, she opens GitHub again and decides to create her own pull request and merge her changes to the develop branch.


On the other hand, Harry also decides to create a pull request to merge his changes into the develop branch.
At this point, GitHub lets him know that his pull request won't be able to merge automatically to the develop branch.

Harry supposes that his branch is no longer reflecting the state of the develop branch and that the develop branch has changed because someone else merged changes affecting the index.html file on which he was working on. Nevertheless, he proceeds to create a pull request.
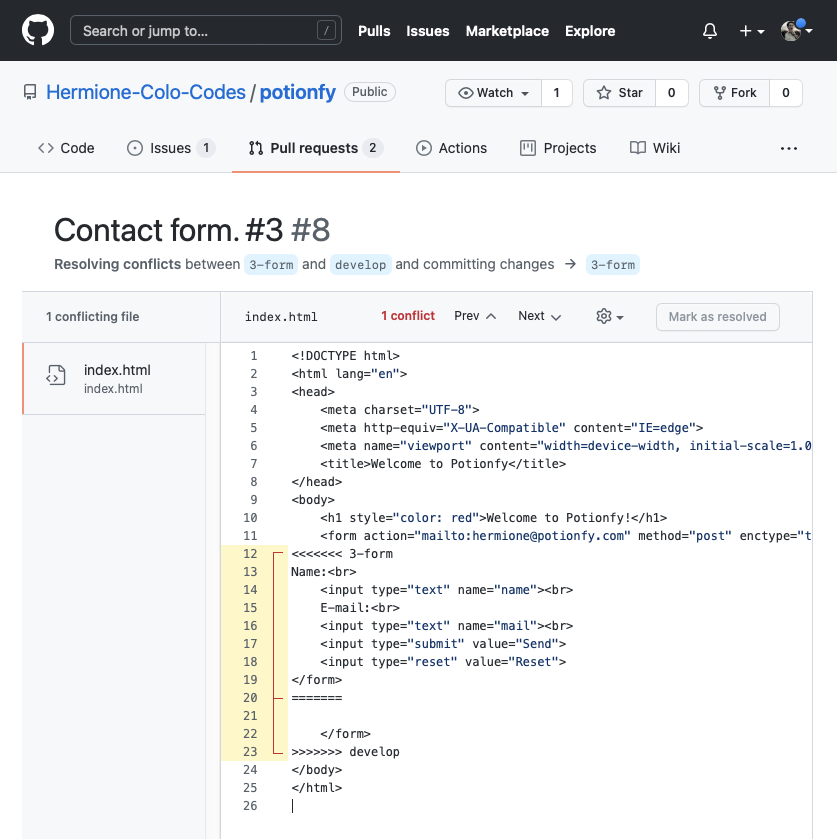
What he sees next is GitHub's way of letting him know that there is a conflict affecting the file he modified. He proceeds to click on the Resolve conflicts button.

He can now see that the index.html indeed was modified, and the changes made to that file are affecting the lines he himself modified.
For more information about solving conflicts, you can read the Resolving a merge conflict on GitHub article.
Harry proceeds to modify the file directly on the GitHub site to remove the conflicting changes and then clicks on the Mark as resolved button.
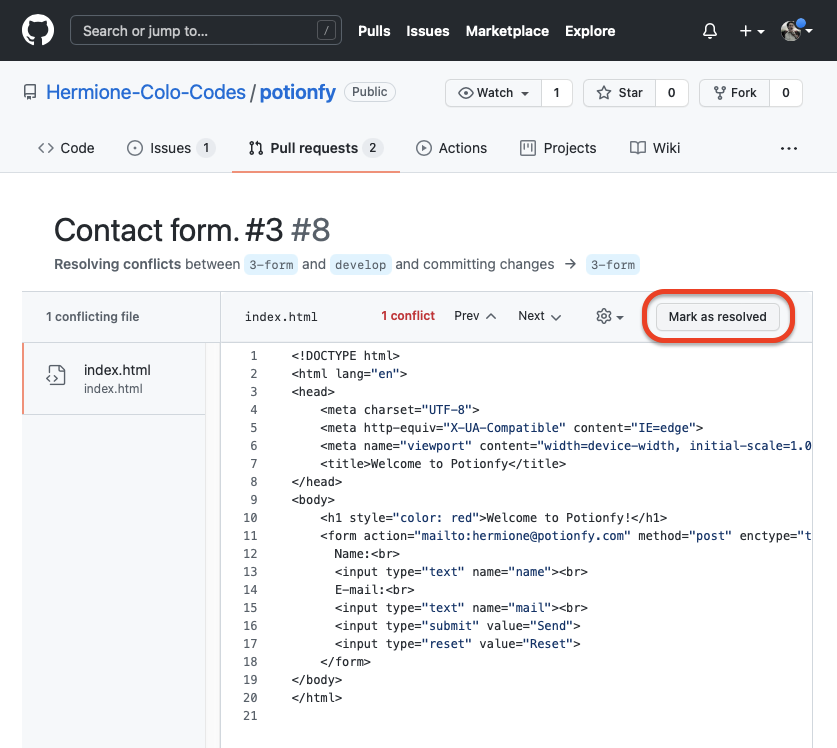
Once the conflict is marked as resolved, he clicks on the Commit merge button.

Finally, his branch was conflict-free and he can merge his pull request (assuming Hermione reviewed his code and approved it, just as she did earlier).

Conflicts ofter arise when teammates are working on different branches that affect a common file. A great way to prevent merge conflicts is to do a pull request on the develop branch, merge that updated develop branch into the branch you are working on, and then do a push followed by a pull request.
$ git branch
x-my-branch # This is an example name

$ git checkout develop

$ git pull

$ git checkout x-my-branch

$ git merge develop

# You make some changes on the files of the x-my-branch branch

$ git add -A

$ git commit -m "<a message>"

$ git push
Final Thoughts
After working on their landing page, Harry and Hermione managed to get lots of email addresses from potential customers and continued developing their MVP. They managed to get funding from a local venture capital firm, and they are now in the process of hiring other developers to launch Potionfy to the public.
I'm sure they would love to take a look at your resume to consider you for a position in their company, so good luck!

🗞 If you enjoyed this article, you may like other articles I publish. The best way to know about them would be by subscribing to my newsletter.
🐦 You can follow and contact me on my Twitter account.
Cheers!
Damian.-