

When I was a young girl, we used to have sports competitions like running a hundred meters, relays, swimming, and basketball games.
My strengths were swimming and basketball. I went home with many gifts or, as my school's game master said, a token of appreciation.
A token is a secure form used to transmit data between two parties. The medals I got from the competitions hold a lot of value for me, and if I gave them to someone else, they would merely be trinkets.
JavaScript Object Notation (JSON) is a format used to present structured data based on JavaScript syntax. We use it to transmit data in web applications by sending the data from the server to the client's display.
JWT (JSON Web Token) is a form of transmitting a JSON object as information between parties. Let's learn more about what JWTs are and how they work.
The Importance of JWTs
JWTs are important for two main reasons:
Authorization: in our competitions, we had to present our school identification cards for verification before getting our medals.
Our school IDs acted like log in requests in applications. These requests, in apps, contain a JWT that allows users to get permission to access any resources that are accessible with that token.
Information exchange: my medals were a badge of honor and a way to get a certificate signed and stamped by our games master for legitimacy.
We use JWTs to exchange information in cases where they are signed – for example using public-private key pairs to make sure that the integrity of the information is not compromised since the payload and header are used to compute signatures.
How Do JWTs Work?
A JWT is an authorization token that is included in requests. Here's an example of what one looks like:
eyJ0eXAiOiJKV1QiLCJhbGciOiJIUzI1NiJ9.eyJ0b2tlbl90eXBlIjoiYWNjZXNzIiwiZXhwIjoxNjczNTI3ODMzLCJpYXQiOjE2NzM1Mjc0MzAsImp0aSI6IjNkMGRkMGZiZjA5ZjRmZWU4MTZmMGQyOTQ5OWU3ZmFmIiwidXNlcl9pZCI6IjFmYTBiMGJkLWY4MmMtNDQzNy1iMmViLTMwOTYzMGZkNzQ2NiJ9.-swqFh4MCecycmodQfO8ZmfsDJ3DqoZBsdNzEWhfzhA
You can get a JWT through logging in with a username and password. In exchange the server returns an access and refresh token in the form of a JWT. The tokens access resources on the server.
The lifetimes of the access and refresh tokens vary since access tokens last for five minutes or less while the refresh tokens can last for 24 hours. But you can customize the timelines of both types of tokens.
If the access token expires, the client uses the refresh token to summon a new access token from the server. Once the refresh token expires, the user must log in again with their username and password to get a new pair of tokens.
It works this way to prevent damage that can occur when a token is compromised and to prevent unauthorized access.
Different parts of a JWT
JWTs hold information in three parts, as you can see in the following code blocks:
header.payload.signature
header = eyJ0eXAiOiJKV1QiLCJhbGciOiJIUzI1NiJ9F5
payload = eyJ0b2tlbl90eXBlIjoiYWNjZXNzIiwiZXhwIjoxNTQzODI4NDMxLCJqdGkiOiI3ZjU5OTdiNzE1MGQ0NjU3OWRjMmI0OTE2NzA5N2U3YiIsInVsztZXJfaWQiOjF9
signature = Ju70kdcaHKn1Qaz8H42zrOYk0Jx9kIciuhkTn9Xx7vhikY
The above JWT is encoded using Base64. Once decoded, the information will include something similar to the following parts:
Header
The header contains:
- type: the specification that the token is a JWT
- algorithm: the signing algorithm used to sign said token
Algorithms that are used to sign include RSA, HMAC, or SHA256. The signatures for the tokens serve two purposes – integrity and authenticity.
An example of a header with the algorithm and type is as shown below:
{
  "alg": "HS256",
  "typ": "JWT"
}
Payload
The payload contains the intended messages which are commonly known as claims and metadata, as well as any other information.
There are three types of claims:
- Registered claims: they include exp (expiration time), iss (issuer), sub (subject) and aud (audience). They are highly recommended since they provide information on the use and condition of use of the token.
- Public claims: these are claims that are unique to avoid collisions with other services that use JWT.
- Private claims: these are claims that are used specifically between two parties that understand the meaning and use. Like the example of my medals, my games master and I understood the value.
Below is an example of what a payload looks like.
{
  "token_type": "access",
  "exp": 1543828431,
  "jti": "7f5997b7150d46579dc2b49167097e7b",
  "user_id": 4
}
token_typeis a label that shows what kind of token this is. Case in point, it's anaccess token.expstands for expiration. It's the time the token will stop working – in this case the number represents date and time in Unix time.jtistands forJWT ID. It's a unique identifier for this specific token. The ID is used to keep track of which tokens have been used, to prevent use of the same token more than once.user_id: is an identifier of the user this token belongs to. In this case, the number 4 is the user identification.
Signature
The signature verifies that information is only accessed by authorized people. It is issued by the JWT backend using base64 + payload +SECRET_KEY.
The signature is verified for each request. To validate the signature, you use the SECRET_KEY. Remember the purpose of having it called SECRET_KEY is so that it is secret.
Now let's see how JWTs work in practice with an example.
Project Setup
To illustrate how JWTs work, I will use the simple JWT, which is a JSON Web Token authentication plugin for Django Rest Framework (DRF).
Prerequisites
To follow along, you should have some prior knowledge of HTML files and how to set up a Django project. You should also be familiar with what an API (Application Programming Interface) is.
You will also need to have a Django project already setup. You could name it tokenization also add an app called access.
Once your app and project are set up, you are good to go.
Simple JWT Installation
As mentioned, I will be using the simple JWT which provides JWT authentication for the Django Rest Framework (DRF).
DRF is a third-party package for Django used as a toolkit for building Web API's. It provides a seamless experience while you build, test, debug and maintain RESTful APIs using in Django.
RESTful APIs (Representational State Transfer APIs) are a type of web API that allow communication between different applications over the internet in a fast, reliable, and scalable way.
RESTful APIs are stateless. This means that requests contain information to finalize the request, and the server does not need to remember the history of previous requests.
To install simple JWT, use the command below in your terminal:
pip install djangorestframework_simplejwt
How to Set Authentication to Simple JWT
Go to your project (tokenization), and in the settings.py file, add the following code to configure the REST framework to use simple JWT for authentication:
REST_FRAMEWORK = {
    'DEFAULT_AUTHENTICATION_CLASSES': [
        'rest_framework_simplejwt.authentication.JWTAuthentication',
    ],
}
The code above specifies the default authentication class to be used for all API views in the application.
DEFAULT_AUTHENTICATION_CLASSES': [ 'rest_framework_simplejwt.authentication.JWTAuthentication', ] sets the default authentication class to be JWTAuthentication from the rest_framework_simplejwt package. This means that all API views in the project will use JWT authentication by default.
How to Define Uniform Resource Locator Patterns
In your project (tokenization), create a file (if you have not created one yet) namedurls.py . Then add the following code:
from django.urls import path
from rest_framework_simplejwt import views as jwt_views

urlpatterns = [
    path('api/token/', jwt_views.TokenObtainPairView.as_view(), name='token_obtain_pair'),
    path('api/token/refresh/', jwt_views.TokenRefreshView.as_view(), name='token_refresh'),
]
The path function creates a new URL pattern and maps it to the specified view.
The URL (Uniform Resource Locator) path /api/token/ is mapped to the view jwt_views.TokenObtainPairView.as_view(). The as_view()method converts the class-based view to a function-based view used in routing. The name parameter makes it easy to refer to the URL pattern in other parts of your code.
We have now created an endpoint for obtaining JWT tokens. If a request is made to the endpoint, TokenObtainPairView, view handles the request and returns a JWT token in the response for authentication.
How to Customize the Token Timelines
To customize the timeline of the tokens, first add the rest_framework_simplejwt in your installed apps section in the project (tokenization) under the settings.py file. The purpose for adding the rest_framework_simplejwt is for configuration.
To add the timeline we want, we will first create a dictionary called SIMPLE_JWT. Then we'll create variables to hold timelines for the access and refresh token.
The code snippet below shows how to set up the timelines for the tokens:
INSTALLED_APPS = [
    #other files
    'rest_framework_simplejwt',
]

SIMPLE_JWT = {
    'ACCESS_TOKEN_LIFETIME': timedelta(minutes=5),
    'REFRESH_TOKEN_LIFETIME': timedelta(days=1),
}
Before you use the timedelta you will need to import it like this: python from datetime import timedelta.
Visual Interaction of the API
In this section, we will use the Django Rest Framework web interface to access the endpoints.
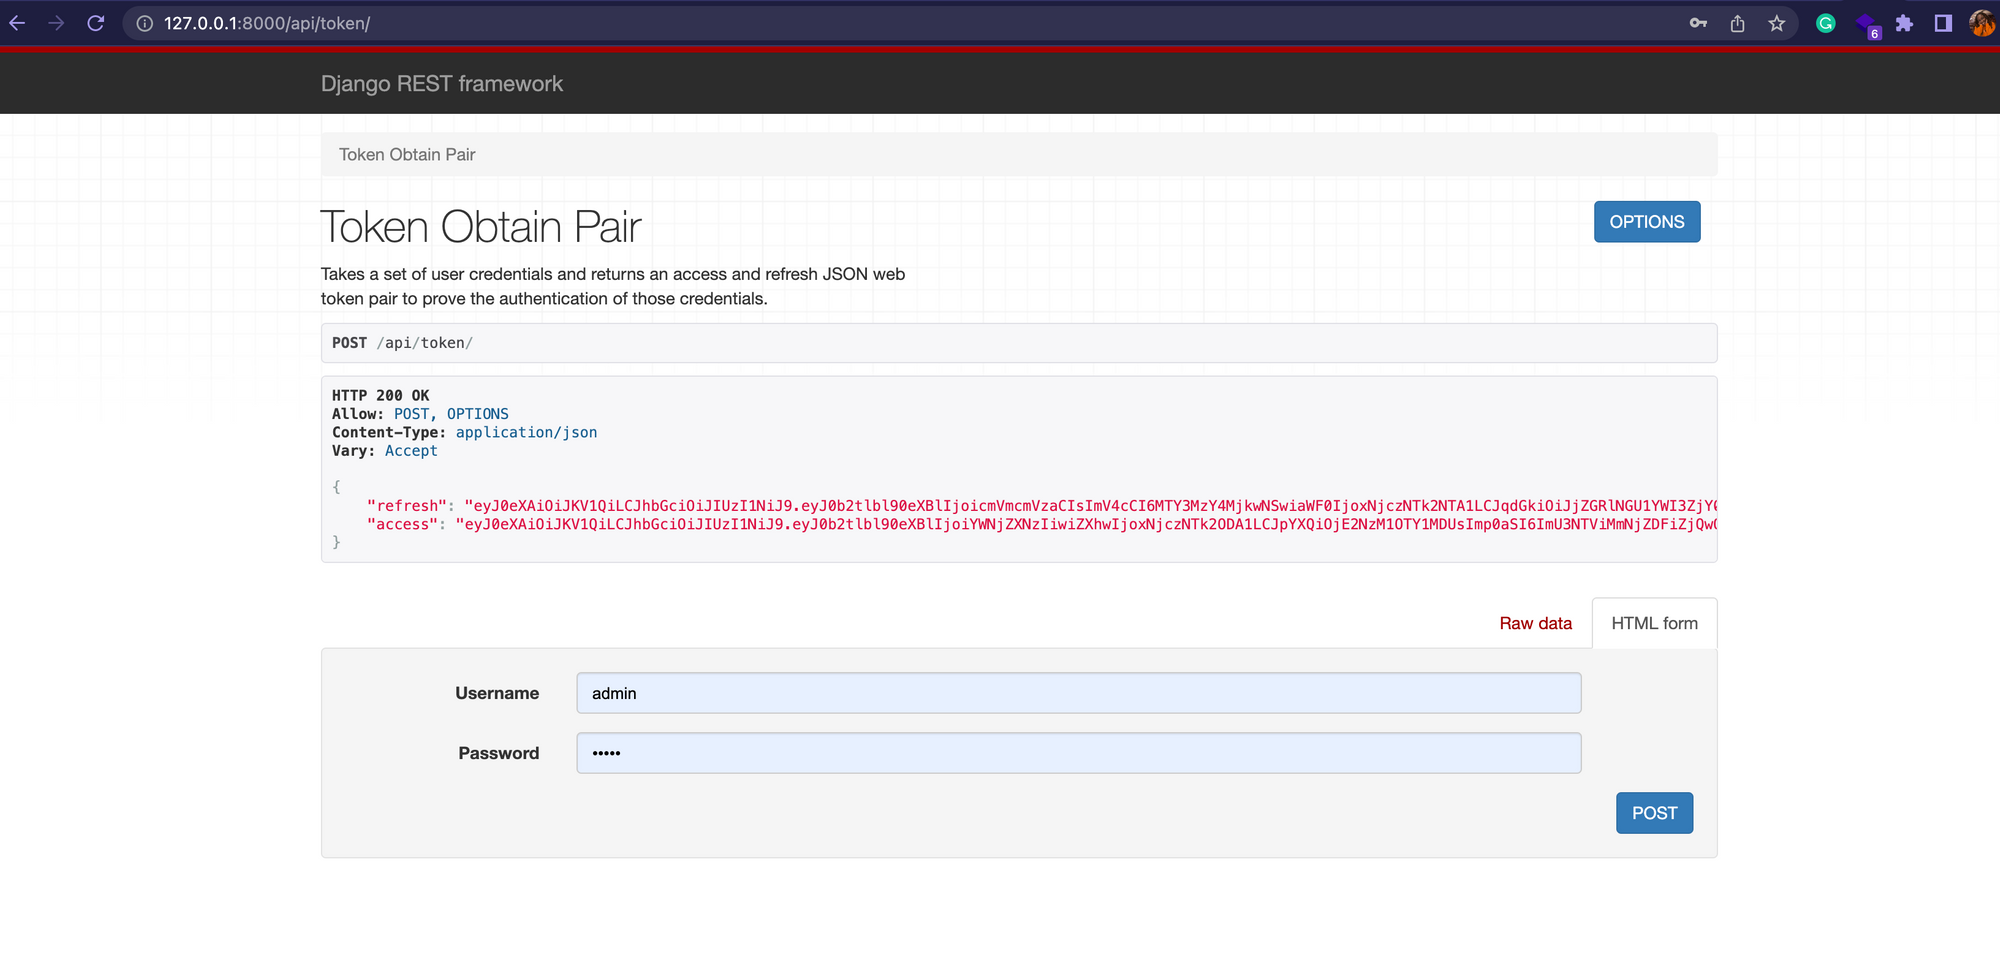 Testing tokenization
The access and refresh tokens are highlighted in red, as shown above. To get the tokens for a user, you need to input the correct password and username for an existing user.
Use a refresh token through this endpoint for an access token: /api/token/refresh/
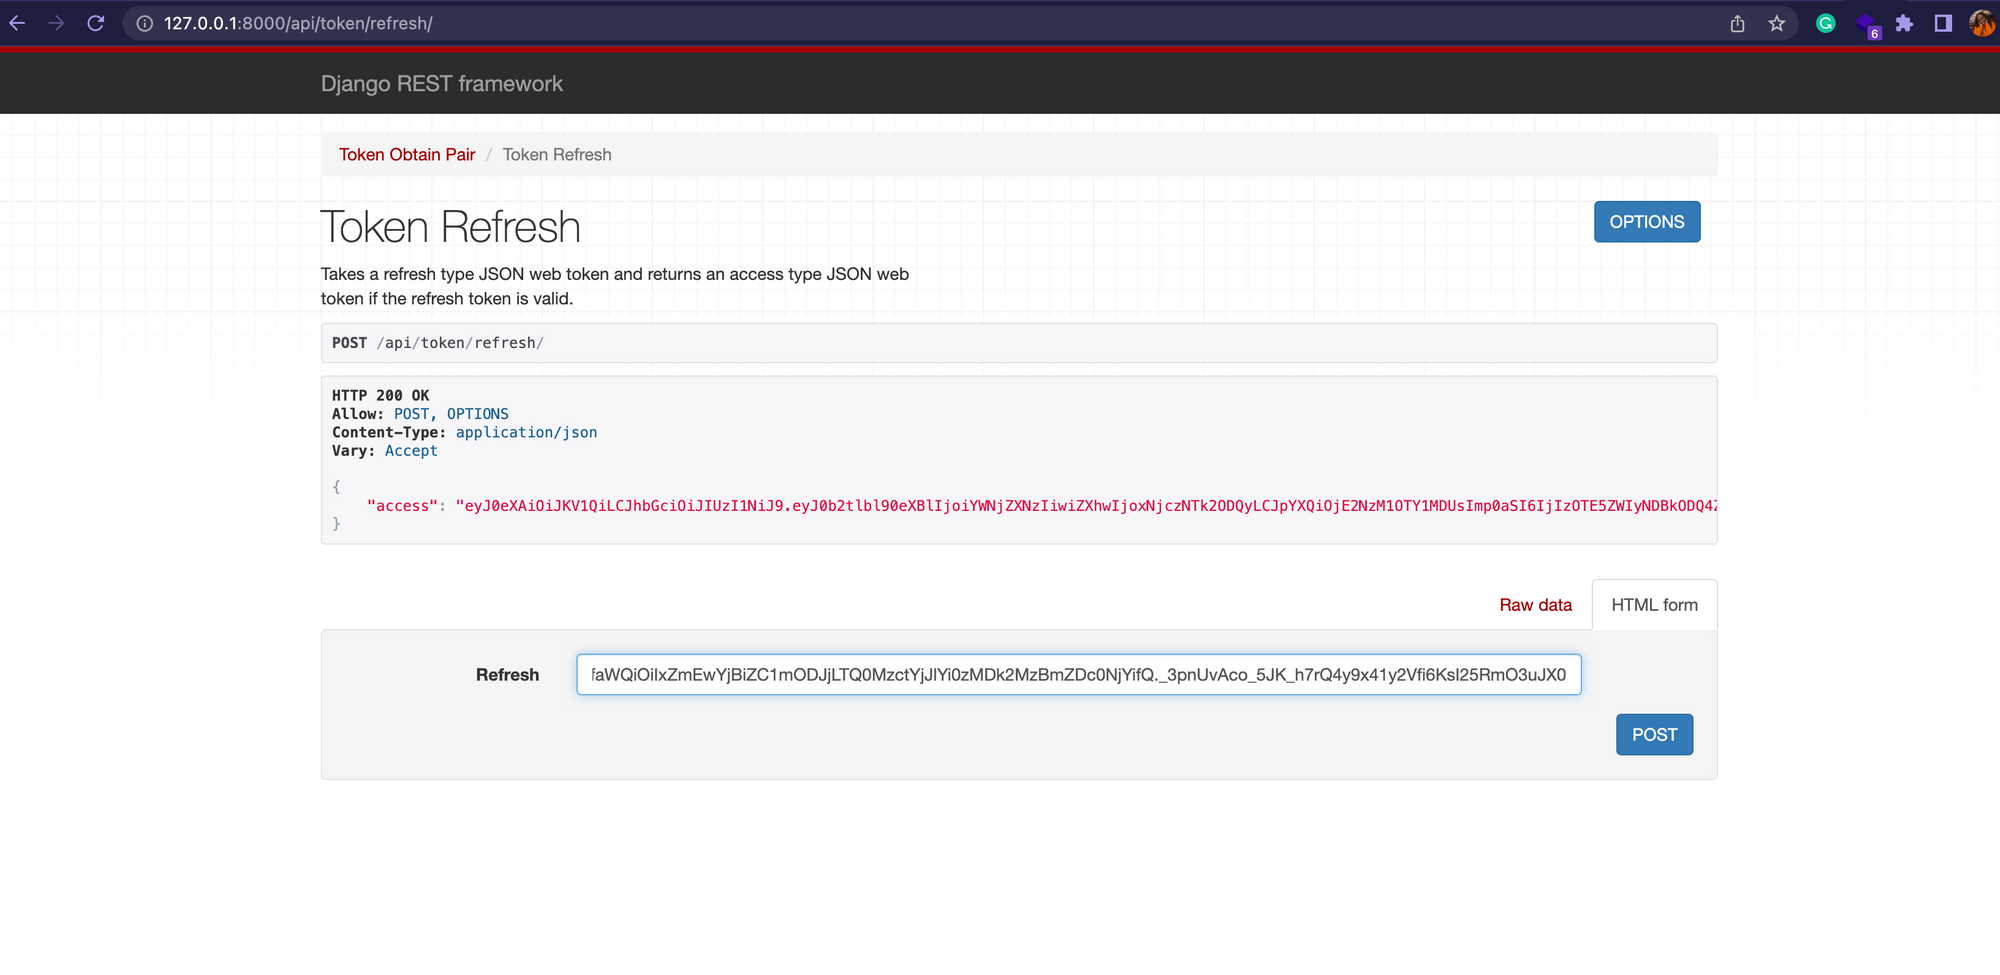 Refresh token
A refresh token gets an access token without the user using their login credentials to extend the user's session. This provides a seamless user experience and improves security by reducing the number of times a user has to key in their credentials.
How to Add a Homepage
If you want to create a visually appealing interface, you can build a custom homepage to replace the current display of the API endpoints and error messages.
To add a homepage to your Django project, follow these steps:
- Create a
templatesfolder in your application (access). Then, add aindex.htmlfile inside. - Create a
staticfolder in your application (access) and add aimgfolder inside. - In this case, I wanted to display an image, so I added the
me.pngin the img folder. - Add the code below to your
htmlfile:
{% load static %}
<!DOCTYPE html>
<html>
<head>
    <title>Home</title>
    <style>
        body {
            background-image: url("{% static 'img/me.png' %}");
            background-size: cover;
        }
    </style>
</head>
</html>
You will notice that we needed to add {% load static %} at the top of the file for proper styling and functioning of the site. {% load static %} serves files like stylesheets(CSS), scripts(JS), and images to your HTML templates to provide the user with a seamless experience while viewing your site.
How to Define the URL Patterns For Your Home Page
In your app's (access) urls.py file (create one if you do not have it) add this:
from django.urls import path
from django.views.generic import TemplateView

app_name='access'

urlpatterns=[
path('', TemplateView.as_view(template_name='home.html'), name='home'),

]
In your project's (tokenization) settings.py file, add the following code so that the static files are served:
# Static files settings
STATIC_ROOT = os.path.join(BASE_DIR, 'static')
STATIC_URL = '/static/'
STATICFILES_DIRS = [os.path.join(BASE_DIR, 'access/static')]
Once you run the server, your home page should be like this:
 home page
Bugs and Solutions
At some point, I may have deleted the migrations file which deleted some of the data I had. This caused the following error django.db.utils.OperationalError: no such table: customUser.
I was able to solve this through running the command python manage.py migrate --run-syncdb . The command syncs tables by looking into tables not created and then creating them.
I also had an issue of using a port that was already being used by a program I had left running and forgotten about.
To close a port you should identify the process using it by running the command lsof -i :<port_number>. This will show you the user using it and PID. To stop the process use kill <PID>. Additionally, you can use sudo kill -9 -u <username> <pid> .
It's good to know that to kill the port you will need administrator permissions. Also, stopping a process can cause data loss or unusual behavior so ensure your data is backed up before doing this.
Wrapping Up
In this tutorial, you have learned how JWTs work, the structure of different tokens, how to use JWT and DRF to get tokens, how to create and serve static files in Django, and how to handle deleting migration files and kill a port.
There is so much you can learn about Django and the Django Rest Framework.
The code for this article can be found here.
May your keyboard be swift, your bugs be few, and your fun meter be off the charts as you code away!
Thanks for reading my article on how to implement tokenization using JWT and Django Rest Framework. I'm always up for a good chat about coding and tech, so give me a follow on Twitter and let's continue the conversation there.