
By Adam Henson
GitHub Actions are used to automate software engineering workflows. Similar to tools like CircleCI, Jenkins, Travis and many others, GitHub Actions provides a declarative API for defining workflows. These workflows can include jobs to build, test, and deploy applications.
Lighthouse is an open-source project from Google for improving the quality of web pages. It provides user-centric metrics to audit SEO, performance, accessibility, best practices, and progressive web apps. For a deeper dive about Lighthouse please read “How to analyze website performance with Lighthouse”. This post will demonstrate the following:
- Basic implementation of Lighthouse in a GitHub Actions workflow.
- Advanced setup to display Lighthouse results in pull request comments.
- S3 Lighthouse report uploads.
- Slack notifications.
Lighthouse Check GitHub Action
This post will provide a guide for using Lighthouse Check Action for automating Lighthouse audits. It can be used within a workflow - triggered by any event. This post will demonstrate how to use the action when triggered by a pull request event.
Basic Example
With the following steps we can create a basic workflow.
- Create and checkout a new branch locally.
- Create a file in your project with a path similar to the following
.github/workflows/my-workflow.yml(replacingmy-workflowwith any name of your choice). - Populate the file from above with the example shown below, replacing the
urlsfield with a comma separated list of the URLs you’d like to test. - Commit changes locally and push the branch up to your remote.
- From your new branch, open a pull request.
name: Lighthouse Check
on: [pull_request]

jobs:
  lighthouse-check:
    runs-on: ubuntu-latest
    steps:
    - uses: actions/checkout@master
    - run: mkdir /tmp/artifacts
    - name: Run Lighthouse
      uses: foo-software/lighthouse-check-action@master
      with:
        outputDirectory: /tmp/artifacts
        urls: 'https://www.foo.software,https://www.foo.software/contact'
    - name: Upload artifacts
      uses: actions/upload-artifact@master
      with:
        name: Lighthouse reports
        path: /tmp/artifacts
And Voilà ? — we have a workflow with Lighthouse! Assuming you have GitHub Actions enabled in your repo, you should see something like the below (note: at the time of this writing GitHub Actions are in “beta” mode and require registration).
 GitHub repository tabs
Clicking on “Actions” will list all workflows currently running and previous.
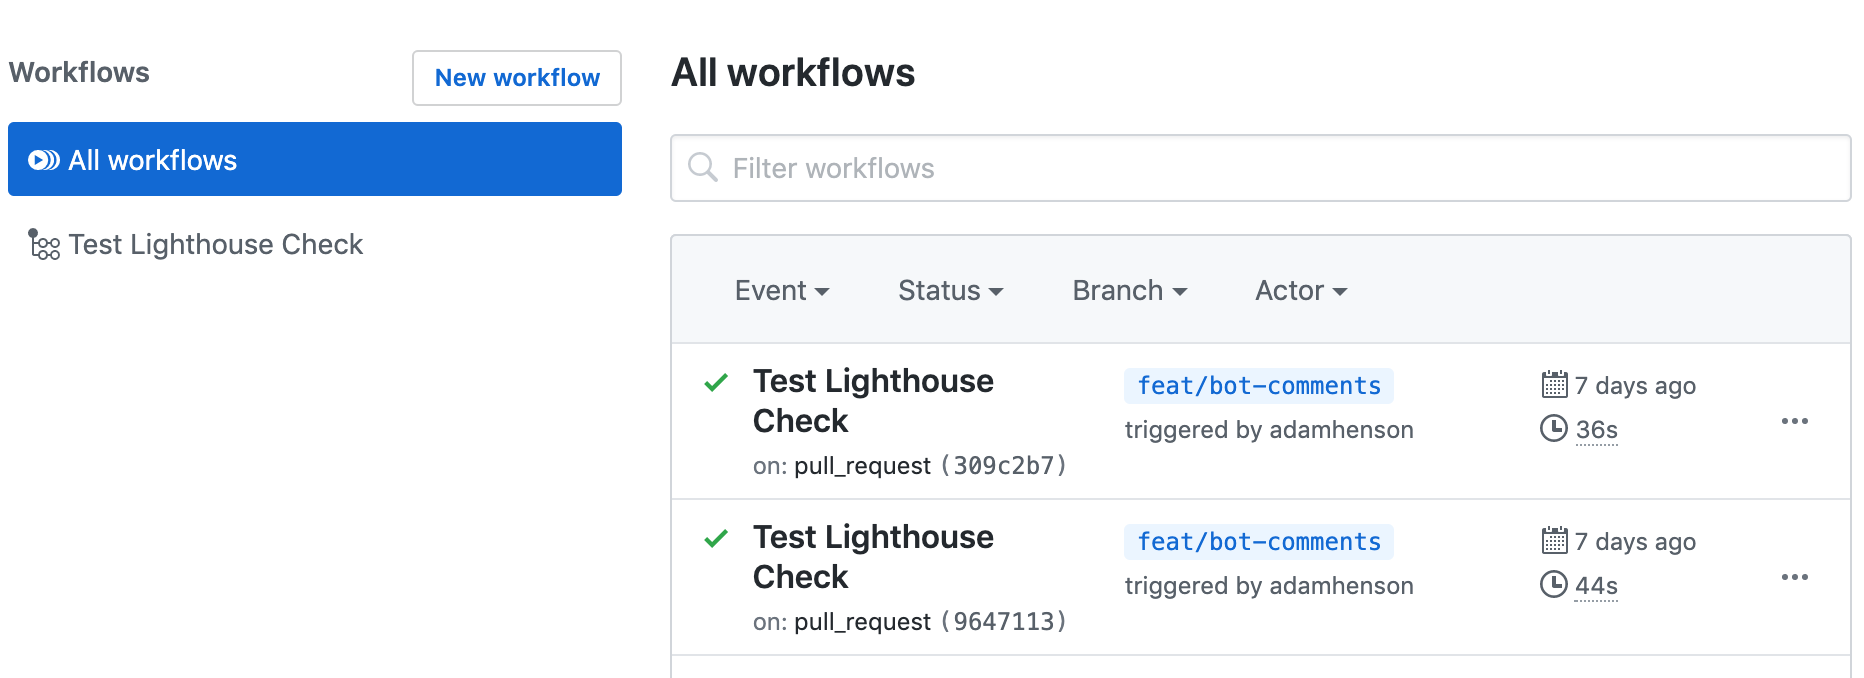 List of GitHub Actions workflows
After following the steps from our basic example, you should see one item on this list. Clicking in will show us Lighthouse results printed to the console.
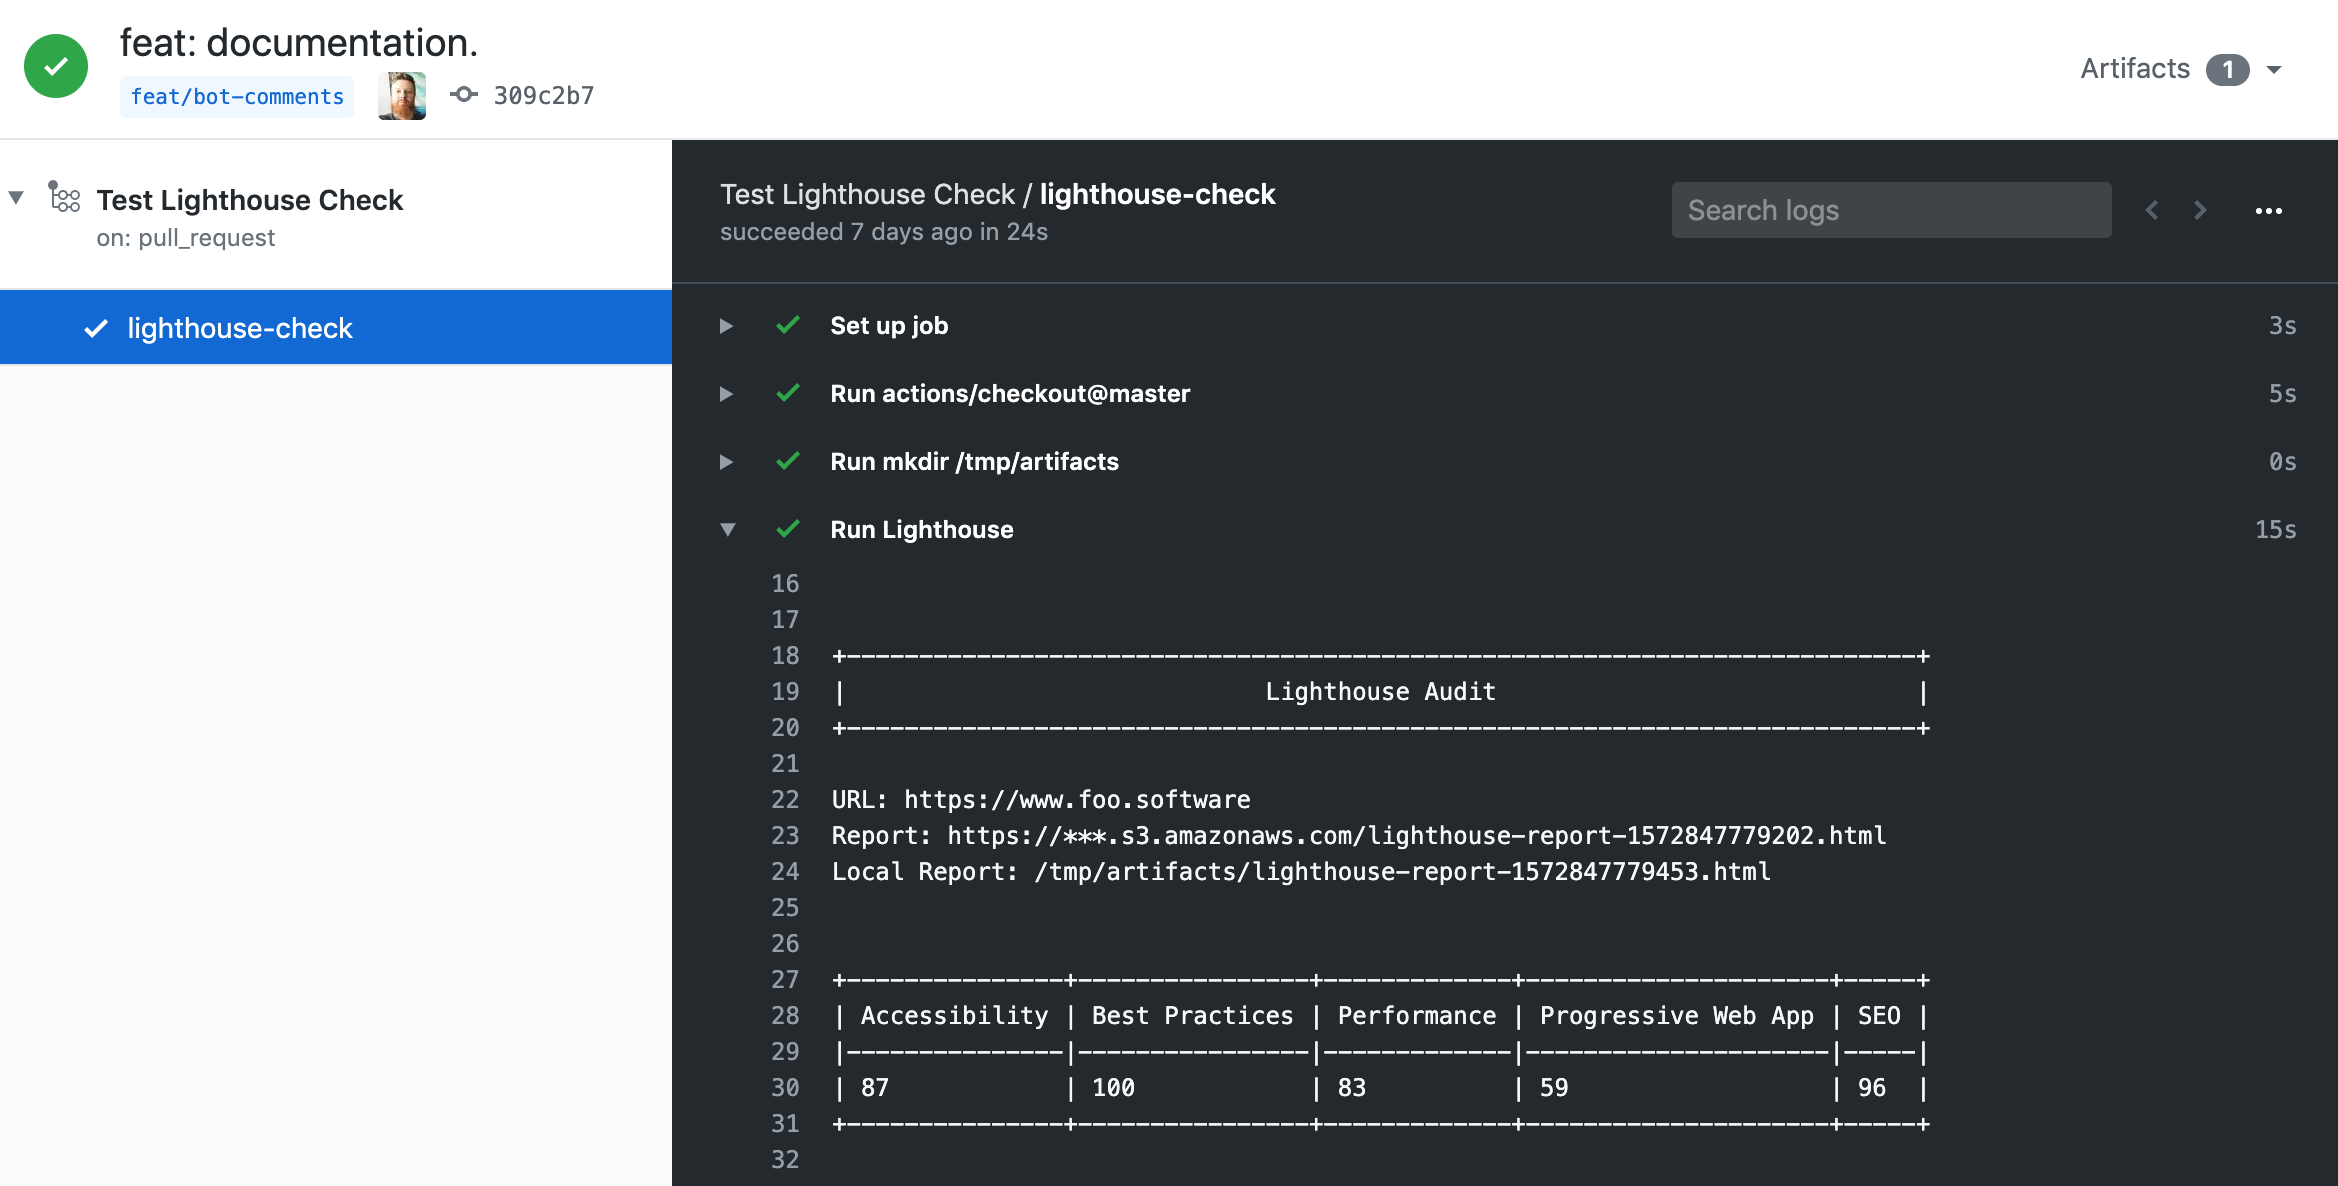 Lighthouse results printed out in the console
From our configuration, we also have results captured in HTML reports saved as “artifacts”.
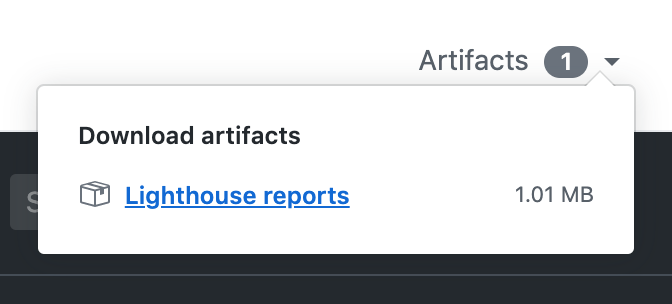 Clicking through the “Artifacts” dropdown downloads the HTML reports
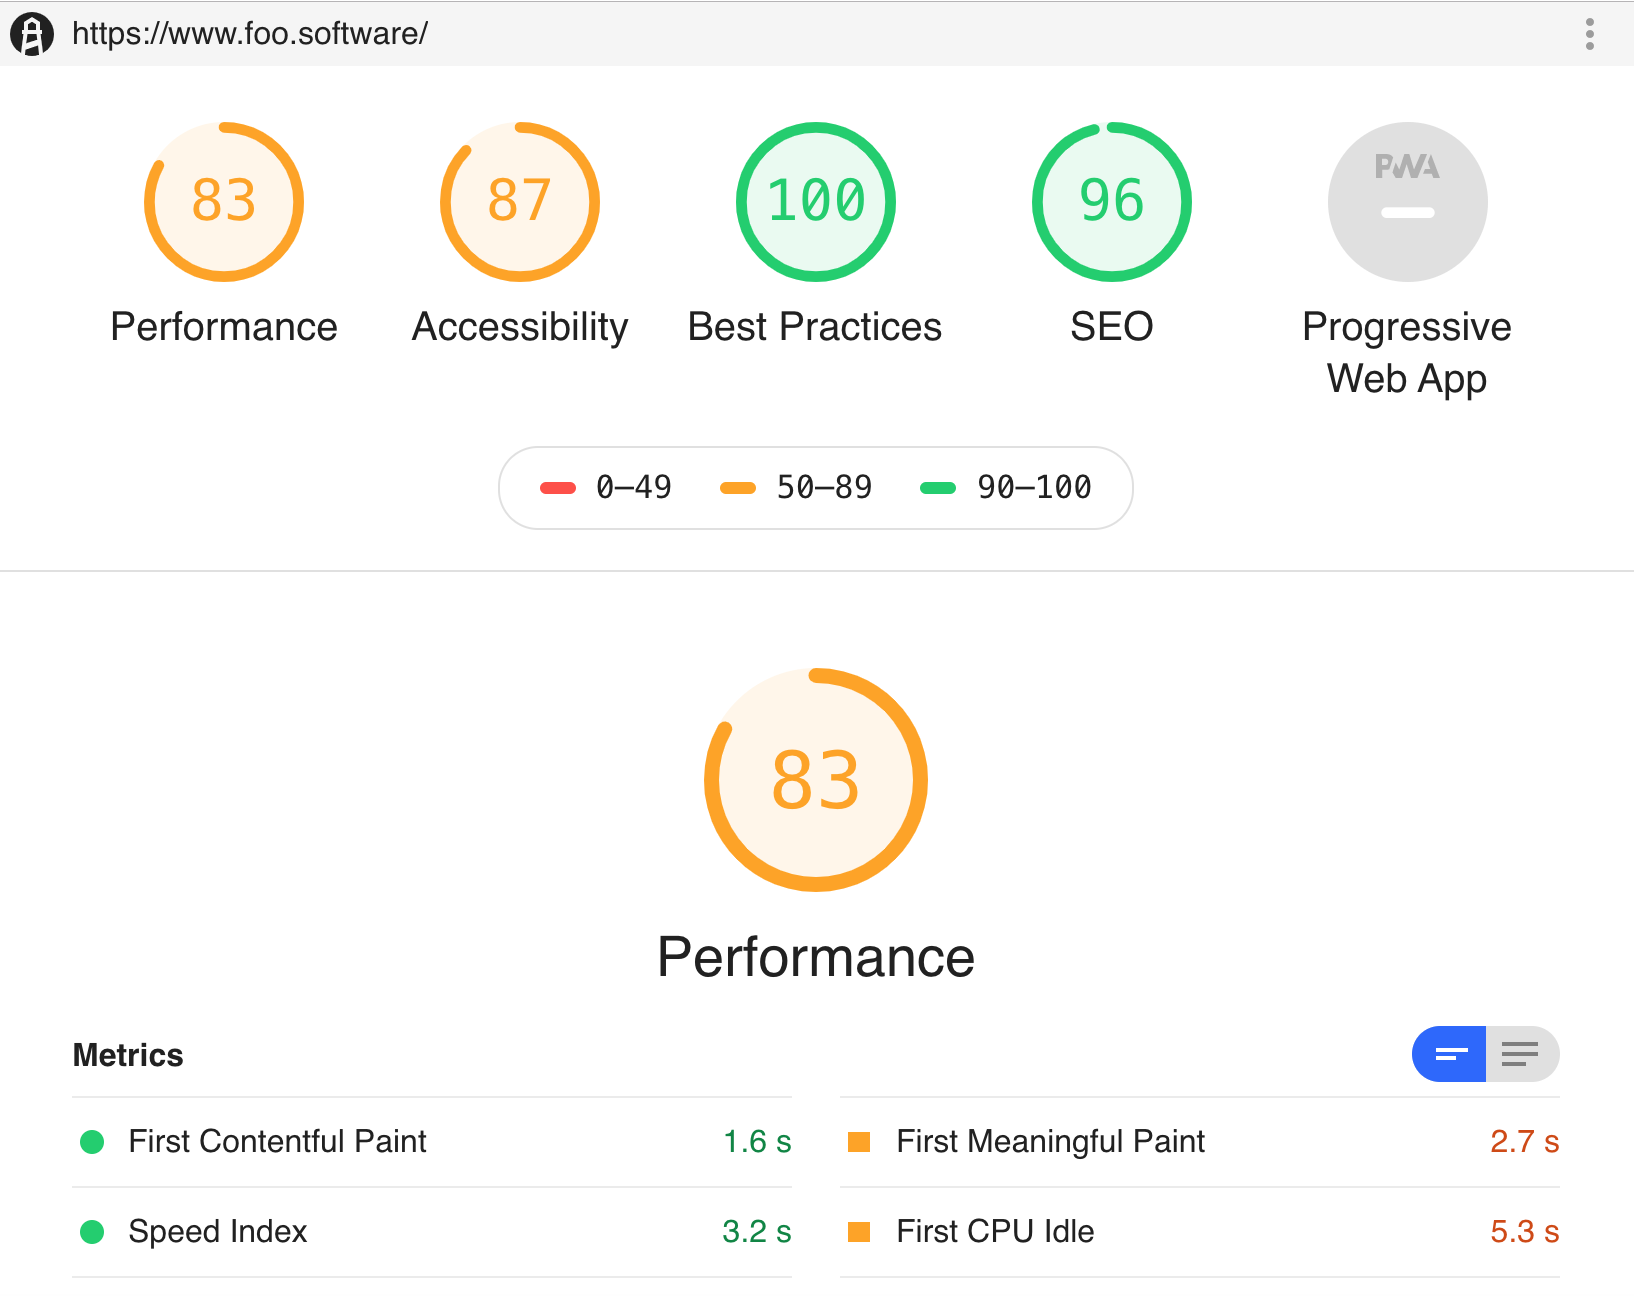 Full Lighthouse report as an HTML file downloaded from “Artifacts”
Advanced Example
Lighthouse Check Action offers a complete set of bells and whistles by utilizing [lighthouse-check](https://github.com/foo-software/lighthouse-check) NPM module under the hood. There’s so much more we can do with this. Let’s proceed!
Pull Request Comments
By utilizing this feature, comments are posted with Lighthouse results on every commit. We can do so by following the steps below.
- Create a new user or find an existing one to act as a “bot”.
- Create a personal access token from this user account.
- Create a GitHub secret to hold the encrypted value from above. In our example we name it
LIGHTHOUSE_CHECK_GITHUB_ACCESS_TOKEN. - Update our workflow file with the diff shown below.
- Commit and push.
with:
+  accessToken: ${{ secrets.LIGHTHOUSE_CHECK_GITHUB_ACCESS_TOKEN }}
  outputDirectory: /tmp/artifacts
With this, we’ve created a bot to post Lighthouse results on pull requests ?!
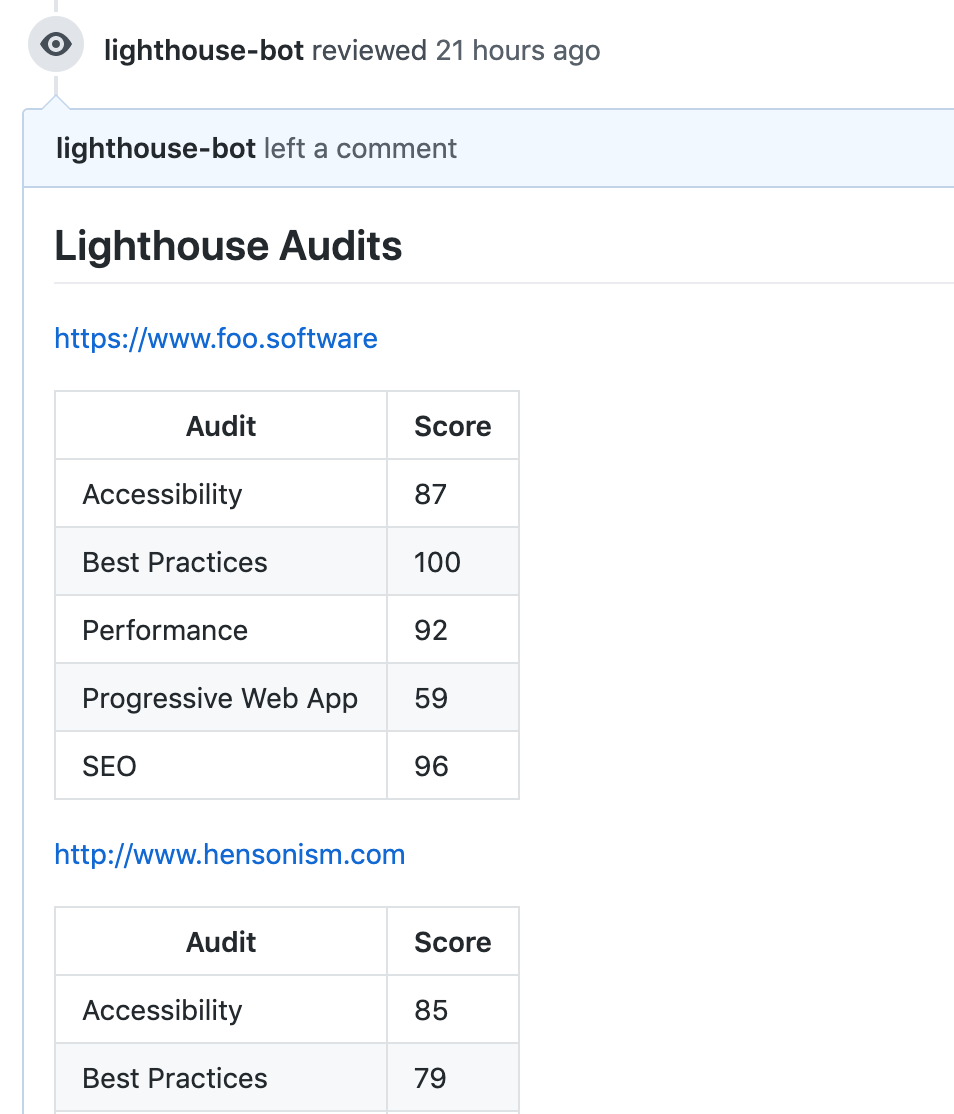 Lighthouse results as PR comments
S3 Report Uploads
In our example we persist results by uploading reports as artifacts in our workflow. This solution could be sufficient in some cases, but artifacts aren’t stored permanently. In order to view reports, we need to navigate into the workflow and manually download reports from the artifact view.
But what if we want a more dependable way of storing and referencing reports? This is where the S3 feature comes into play. We can configure AWS S3 storage by following the below steps.
- Create an AWS account if you don’t already have one.
- Create an S3 bucket if you don’t already have one.
- Acquire an AWS access key id and secret access key.
- Create GitHub secrets for these two values. In our example we’ll use
LIGHTHOUSE_CHECK_AWS_ACCESS_KEY_IDandLIGHTHOUSE_CHECK_AWS_SECRET_ACCESS_KEY, respectively. - Add the bucket name and region (example:
us-east-1) as GitHub secrets:LIGHTHOUSE_CHECK_AWS_BUCKETandLIGHTHOUSE_CHECK_AWS_REGION.
Next, we’ll update our configuration with the following diff.
with:
  accessToken: ${{ secrets.LIGHTHOUSE_CHECK_GITHUB_ACCESS_TOKEN }}
+  awsAccessKeyId: ${{ secrets.LIGHTHOUSE_CHECK_AWS_ACCESS_KEY_ID }}
+  awsBucket: ${{ secrets.LIGHTHOUSE_CHECK_AWS_BUCKET }}
+  awsRegion: ${{ secrets.LIGHTHOUSE_CHECK_AWS_REGION }}
+  awsSecretAccessKey: ${{ secrets.LIGHTHOUSE_CHECK_AWS_SECRET_ACCESS_KEY }}
In our next commit and push, reports are automatically uploaded to S3 ✅! We also have a them linked in our PR comments.
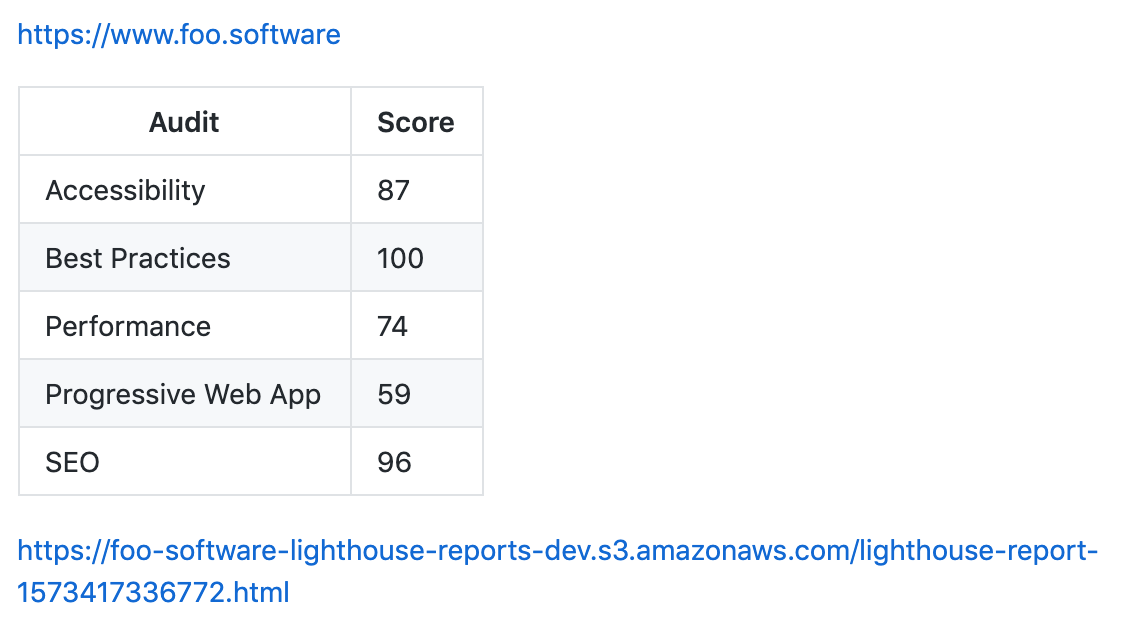 Lighthouse result PR comment with S3 report linked
Slack Notifications
What’s a new feature in a DevOps workflow without Slack notifications? A sad one indeed. Let’s ramp things up by adding notifications to a Slack channel for our whole team to see. We can accomplish this in the below steps.
- Create an “Incoming Webhook” in your Slack workspace and authorize a channel.
- Add the Webhook URL as a GitHub secret —
LIGHTHOUSE_CHECK_WEBHOOK_URL. - Add GitHub data and the Webhook URL to our configuration with the diff below. The GitHub data will be rendered in our notifications. We pass GitHub data through configuration with the GitHub “context”.
with:
  accessToken: ${{ secrets.LIGHTHOUSE_CHECK_GITHUB_ACCESS_TOKEN }}  +  author: ${{ github.actor }}
  awsAccessKeyId: ${{ secrets.LIGHTHOUSE_CHECK_AWS_ACCESS_KEY_ID }}
  awsBucket: ${{ secrets.LIGHTHOUSE_CHECK_AWS_BUCKET }}
  awsRegion: ${{ secrets.LIGHTHOUSE_CHECK_AWS_REGION }}
  awsSecretAccessKey: ${{ secrets.LIGHTHOUSE_CHECK_AWS_SECRET_ACCESS_KEY }}
+  branch: ${{ github.ref }}
  outputDirectory: /tmp/artifacts
+  sha: ${{ github.sha }}
+  slackWebhookUrl: ${{ secrets.LIGHTHOUSE_CHECK_WEBHOOK_URL }}
  urls: 'https://www.foo.software,https://www.foo.software/contact'
Our next commit and push introduces Slack notifications! The “Lighthouse audit” link in the below screenshot navigates to the S3 report as configured✨.
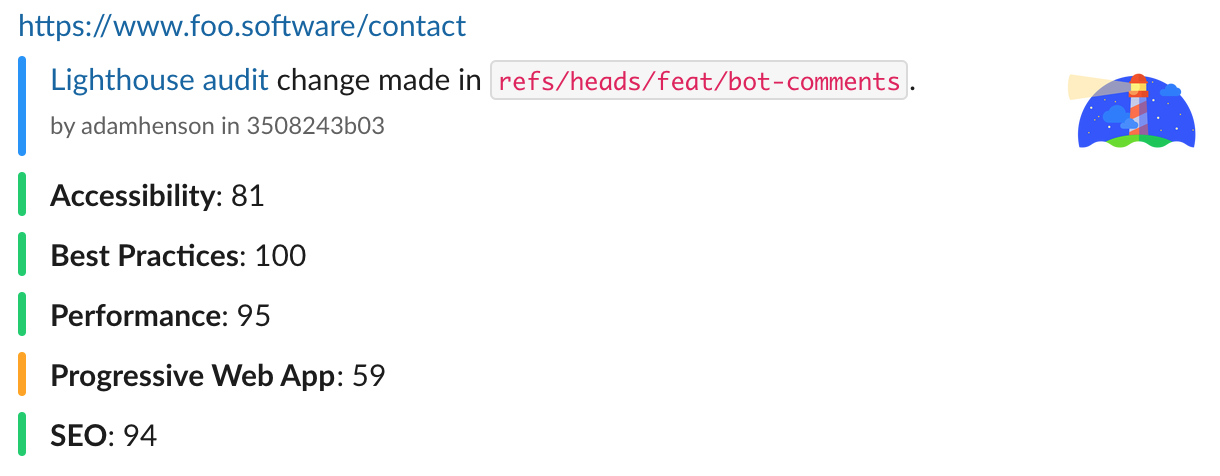 Lighthouse Slack notification
Maintaining a Historical Record
Foo’s Automated Lighthouse Check is tool we can use to manage a historical record of Lighthouse audits. We can connect to it with the Lighthouse Check GitHub! By doing so you can run Lighthouse remotely versus in a local, dockerized GitHub environment. With this we can be assured our Lighthouse results aren't flaky from GitHub infrastructure change. Follow the documented steps to connect with Automated Lighthouse Check.
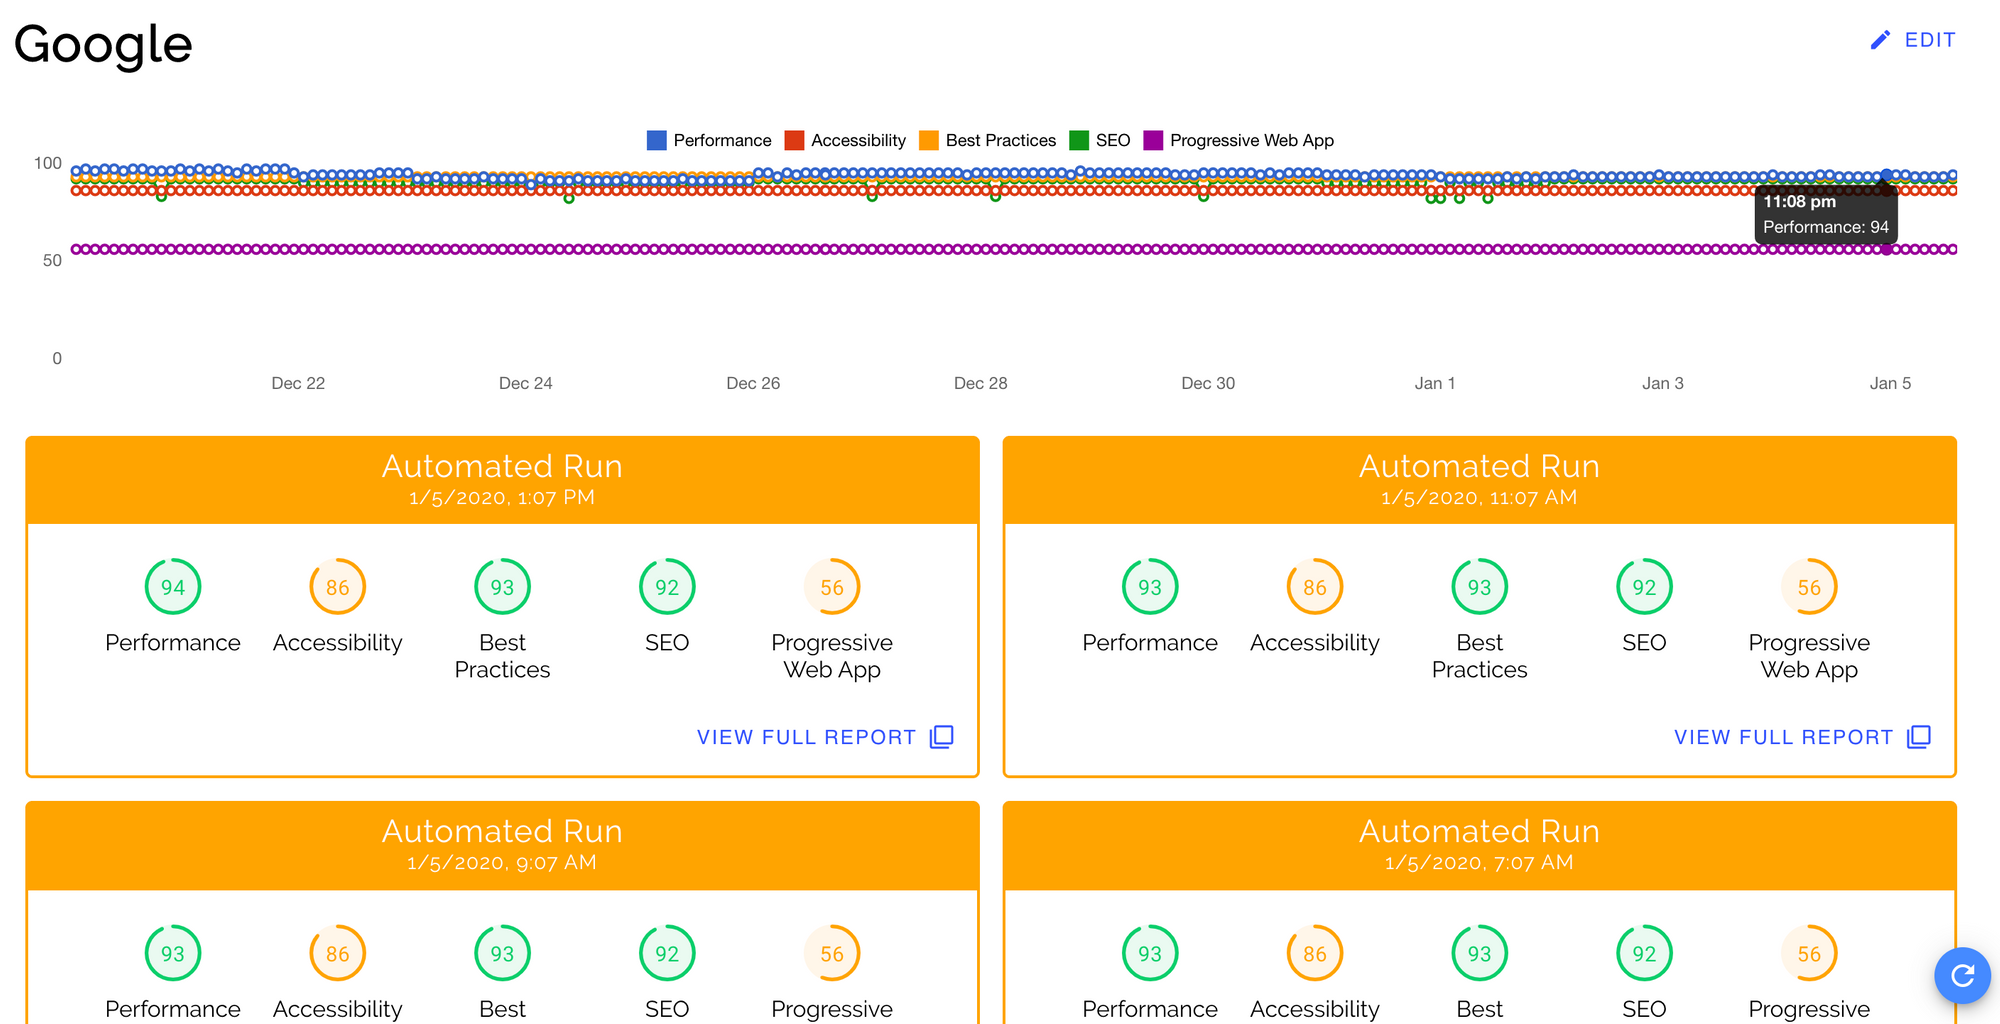 A historical record of Lighthouse audits with "Automated Lighthouse Check"
What Now?
You can find a full example from the above in the Lighthouse Check Action documentation. I hope this article can provide a helpful addition to your DevOps workflow! With Lighthouse integrated in a CI/CD pipeline, we can stay fully equipped to ensure high quality in website SEO, performance, accessibility, best practice, and progressive web apps.