

PropTypes are a good first line defense when it comes to debugging your apps. But before getting into detail about PropTypes, we have to understand the concept of props.
Props are the read-only properties that are shared between components to give the unidirectional flow of React a dynamic touch. They're mainly shared from the parent component to the child component, but the reverse is also possible (though not recommended).
In this blog, we will discuss how to validate or check the props that we are passing to avoid complex debugging at a later stage.
What are PropTypes?
PropTypes are simply a mechanism that ensures that the passed value is of the correct datatype. This makes sure that we don’t receive an error at the very end of our app by the console which might not be easy to deal with.
I don't recommend using them in short apps like projects for self-practice but it's totally up to you. For larger projects like for a client, it's often a wise choice and a good practice to use them.
There are many different types of PropTypes and all of them have their unique ES6 classes which we can use. We will discuss every type in this article.
How to use PropTypes
Before the release of React 15.5.0, PropTypes were available in the React package, but now we have to add the prop-types library in our project.
We can do so by running the following command in our terminal:
npm install prop-types --save
We can use PropTypes to validate any data we are receiving from props. But before using it we will have to import it as always in our app:
import PropTypes from 'prop-types';
They are often used after the component ends and starts with the name of the component as shown:
import React from 'react';
import { PropTypes } from "prop-types";

const Count = (props) => {
  return (
    <>
      .........
    </>
  )
};

Count.propTypes = {
  //// key is the name of the prop and
// value is the PropType
}
export default Count;
PropTypes are also objects with a key and a value pair where the ‘key’ is the name of the prop while the value represents the type or class by which they are defined.
Since defining PropTypes on a component does not depend on the component implementation, we will be leaving out the code for the component itself in all the following examples. The code above can be simplified to the following:
Count.propTypes = {
// Put props here
}
Let's discuss how many types of PropTypes are there before understanding them with an example.
Basic Types of PropTypes
The most basic way we can check a prop's type is by checking if it falls under the category of primitive types in JavaScript, such as a boolean, string, object, and so on.
Below is the list of all data types that are considered primitive or the basic ones with their classes that we can use to check props.
| Type | Class | Example |
| String | PropType.string | “helllo” |
| Object | PropType.object | {name: “Rohit”} |
| Number | PropType.number | 10 |
| Boolean | PropType.bool | true/false |
| Function | PropType.func | const say = {console.log(“hello”)} |
| Symbol | PropType.symbol | Symbol(“m”) |
Below is an example that shows us how to use these PropTypes for type checking in our app. As we discussed already, they are defined as objects with a key and a value pair where the key is the name of the object while value contains the classes which will be used for type checking.
Count.propTypes = {
  name: PropTypes.string,
  age: PropTypes.number,
  address: PropTypes.object,
  friends: PropTypes.array,
};
In the above code, the name prop is expected to have a value which is a string, age is a number, address is an object, and friends is an array. If any value other than this has been used for the same props as a value, it will show an error in the console like this:

Console error for wrong PropTypes
We can chain any of the above with isRequired to make sure a warning is shown if the prop isn't provided.
Count.propTypes = {
  basicObject: PropTypes.object,
  numbers: PropTypes.objectOf(PropTypes.numbers),
  messages: PropTypes.instanceOf(Message),
  contactList: PropTypes.shape({
    name: PropTypes.string.isRequired,
    phone: PropTypes.string.isRequired,
  }),
};
Collective Type
We have seen how to validate or check to see what category of basic data type props fall into. But there are many more ways that props can be passed and used – such as collective types like an array of numbers, strings, and so on. So what about them?
We can also check the props for them. Below are the various ways in which a data type can be combined and used.
Array Types
Here we will discuss all the possibilities that can be formed with an array with their examples just like we saw with basic types.
| Type | Class | Example |
| Array | PropTypes.array | [] |
| Array of numbers | PropTypes.arrayOf([type]) | [1,2,3] |
| Array of string | PropTypes.oneOf([arr]) | [“Red”, “blue”] |
| Array of objects | PropTypes.oneOfType([types]) | PropTypes.string, |
Count.propTypes = {
  counts: PropTypes.array,
  users: PropTypes.arrayOf(PropTypes.object),
  alarmColor: PropTypes.oneOf(['red', 'blue']),
  description: PropTypes.oneOfType([
  PropTypes.string,
  PropTypes.instanceOf(Title)
  ]),
  }
Object Types
Just like the array types, here are some of the collective object types:
| Type | Class | Example |
| Object | PropTypes.object | {name: “Anu”} |
| Number Object | PropTypes.objectOf() | {age: 25} |
| Object Shape | PropTypes.shape() | {name: PropTypes.string, |
| Instance | PropTypes.objectOf() | New message() |
Count.propTypes = {
  basicObject: PropTypes.object,
  numbers: PropTypes.objectOf(PropTypes.numbers),
  messages: PropTypes.instanceOf(Message),
  contactList: PropTypes.shape({
    name: PropTypes.string,
    phone: PropTypes.string,
  }),
};
Advance Type Checking
There are many ways other than basic type checking we can use to check our props. This method mainly focuses on the React code rather than the data types.
How to Check for a React Component
If you want to just check to see if a prop is a React component, you can use PropTypes.element. This is useful for ensuring that a component only ever has one child component.
| Type | Class | Example |
| Element | PropTypes.element | <Title /> |
Count.propTypes = {
  displayEle: PropTypes.element,
};
How to Check for a React Component Name
Finally, we can check to see if the prop is the name of a React component by using PropTypes.elementType.
Component.propTypes = {
  as: PropTypes.elementType
}
<AnotherComponent as={Component} />
Custom Types
We can also have a custom validator or type checking for props but it requires an error object if the validation fails.
You can use this for both arrays and objects but the error object will be called for each key in the array or object. The first two arguments of the validator are the array or object itself and the current item's key.
| Type | Class | Example |
| Custom | function(props, propName, componentName) {} | “hello” |
| Custom Array | PropTypes.arrayOf(function(props, propName, componentName) {}) | [“hello”] |
Count.propTypes = {  // normal functionn
  customProp: function (props, propName, componentName) {
    if (!/matchme/.test(props[propName])) {
      return new Error(
        "Invalid prop `" +
          propName +
          "` supplied to" +
          " `" +
          componentName +
          "`. Validation failed."
      );
    }
  },
};
Count.propTypes = { // array function
  customArrayProp: PropTypes.arrayOf(function (
    propValue,
    key,
    componentName,
    location,
    propFullName
  ) {
    if (!/matchme/.test(propValue[key])) {
      return new Error(
        "Invalid prop `" +
          propFullName +
          "` supplied to" +
          " `" +
          componentName +
          "`. Validation failed."
      );
    }
  }),
};
Default PropTypes
Sometimes, we want to be able to set a default value for a prop. For instance, our parent component might not require a title to be passed. But we still want a title to be rendered.
In cases like this, we can set a default value for our title which will automatically be rendered if the title has not been passed as a prop from our parent component.
Header.defaultProp = {
  title: "GitHub Users",
};
We can read more about this in the official documentation.
Example Time
Let’s understand how all this works with some simple React code.
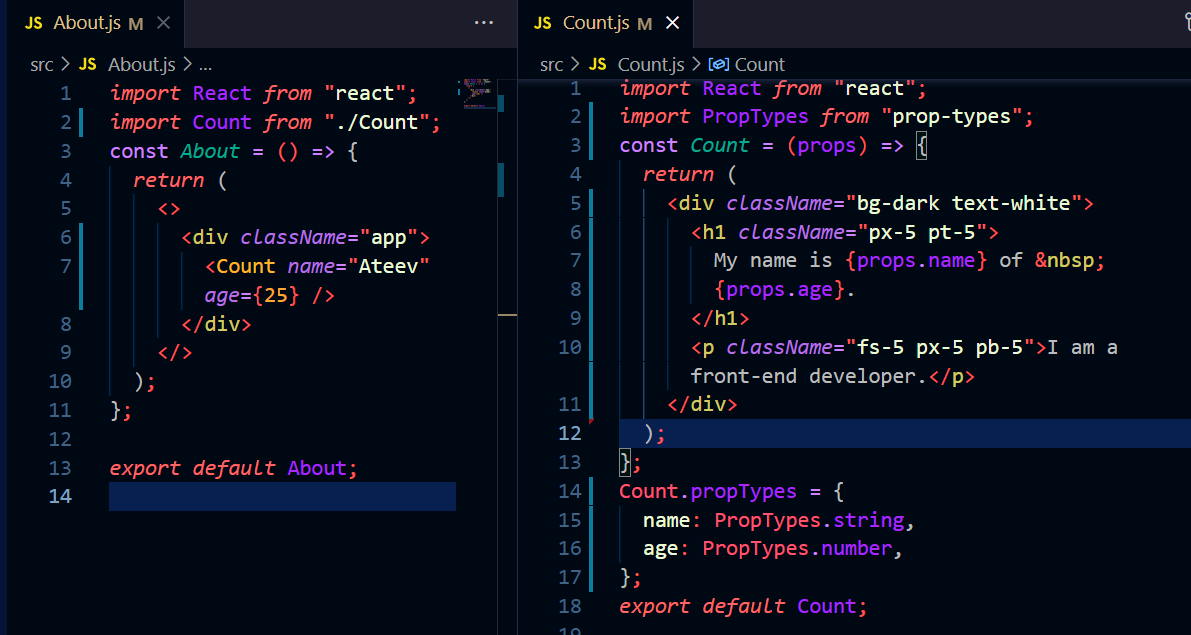
We will make two reusable components, About.js and Count.js. The About Component is the parent component and the Count Component is the child component as shown here:

What if we change the value of the age prop from a number to a string without changing its type (PropTypes)?
import React from "react";
import Count from "./Count";
const About = () => {
  return (
    <>
      <div className="app">
        <Count name="Ateev" age="25" />
      </div>
    </>
  );
};

export default About;
We will receive an error in the console saying this:
It clearly states that the value of the age prop passed does not match the value expected (PropTypes).
From the above example, it should now be clear how we can use PropTypes. You can also see how useful they are for debugging your apps when the app is too big to find the bug with just conventional methods.
Conclusion
PropTypes are a great way to catch errors at run time and act as the first line of defense for your applications. They're not as type-safe as TypeScript but they're much easier to set up and work with.
You can also go through some of my other blogs: