By Ibrahima Ndaw
Redux is a predictable state container for JavaScript apps. It's a popular library for managing state in React apps.
Redux can offer a better developer experience when you use it along with TypeScript. TypeScript is a superset of JavaScript that type-checks code to make it robust and understandable.
In this guide, I will show you how to use Redux in your React TypeScript project by building an app that allows you to add, delete, and show articles.
Let's dive in.
- Prerequisites
- Setting up
- Create the types
- Create the action types
- Create the action creators
- Create a reducer
- Create a store
- Create the components
Prerequisites
This tutorial assumes that you have at least a basic understanding of React, Redux, and TypeScript.
So, if you're not familiar with these technologies, first try to read this practical guide to TypeScript or this React Redux tutorial. Otherwise, let's get started.
Setting up the project
To use Redux and TypeScript, we need to create a new React app.
To do so, let's open the CLI (command-line interface) and execute this command:
npx create-react-app my-app --template typescript
Next, let's structure the project as follows:
├── src
|  ├── components
|  |  ├── AddArticle.tsx
|  |  └── Article.tsx
|  ├── store
|  |  ├── actionCreators.ts
|  |  ├── actionTypes.ts
|  |  └── reducer.ts
|  ├── type.d.ts
|  ├── App.test.tsx
|  ├── App.tsx
|  ├── index.css
|  ├── index.tsx
|  ├── react-app-env.d.ts
|  └── setupTests.ts
├── tsconfig.json
├── package.json
└── yarn.lock
The file structure of the project is quite simple. However, there are two things to note:
- The
storefolder that contains files related to React Redux. - The
type.d.tsfile that holds the TypeScript types, which can be used now in other files without importing.
That said, we can now install Redux and create our very first store.
So, let's open the project and run the following command:
yarn add redux react-redux redux-thunk
Or when using npm
npm install redux react-redux redux-thunk
We also have to install their types as development dependencies to help TypeScript understand the libraries.
So, let's execute this command again on the CLI.
yarn add -D @types/redux @types/react-redux @types/redux-thunk
Or for npm:
npm install -D @types/redux @types/react-redux @types/redux-thunk
Great! With this step forward, we can now create the TypeScript types for the project in the next section.
Create the types
TypeScript types allows you to set types for your variables, function parameters, and so on.
- type.d.ts
interface IArticle {
  id: number
  title: string
  body: string
}

type ArticleState = {
  articles: IArticle[]
}

type ArticleAction = {
  type: string
  article: IArticle
}

type DispatchType = (args: ArticleAction) => ArticleAction
Here, we start by declaring the interface IArticle which reflects the shape of a given article.
Then, we have ArticleState, ArticleAction, and DispatchType that will serve as types for, respectively, the state object, the action creators, and the dispatch function provided by Redux.
That said, we now have the necessary types to start using React Redux. Let's create the action types.
Create the action types
- store/actionTypes.ts
export const ADD_ARTICLE = "ADD_ARTICLE"
export const REMOVE_ARTICLE = "REMOVE_ARTICLE"
We need two action types for the Redux store. One for adding articles and another for deleting.
Create the action creators
- store/actionCreators.ts
import * as actionTypes from "./actionTypes"

export function addArticle(article: IArticle) {
  const action: ArticleAction = {
    type: actionTypes.ADD_ARTICLE,
    article,
  }

  return simulateHttpRequest(action)
}

export function removeArticle(article: IArticle) {
  const action: ArticleAction = {
    type: actionTypes.REMOVE_ARTICLE,
    article,
  }
  return simulateHttpRequest(action)
}

export function simulateHttpRequest(action: ArticleAction) {
  return (dispatch: DispatchType) => {
    setTimeout(() => {
      dispatch(action)
    }, 500)
  }
}
In this tutorial, I will simulate the HTTP request by delaying it for 0.5 seconds. But, feel free to use a real server if you want to.
Here, the function addArticle will dispatch an action for adding a new article, and the method removeArticle will do the opposite. So delete the object passed in as an argument.
Create a reducer
A reducer is a pure function that receives the state of the store and an action as parameters and then returns the updated state.
- store/reducer.ts
import * as actionTypes from "./actionTypes"

const initialState: ArticleState = {
  articles: [
    {
      id: 1,
      title: "post 1",
      body:
        "Quisque cursus, metus vitae pharetra Nam libero tempore, cum soluta nobis est eligendi",
    },
    {
      id: 2,
      title: "post 2",
      body:
        "Harum quidem rerum facilis est et expedita distinctio quas molestias excepturi sint",
    },
  ],
}
As you can see here, we declare an initial state to have some articles to show when the page loads. The state object needs to match the type ArticleState - otherwise, TypeScript will throw an error.
- store/reducer.ts
const reducer = (
  state: ArticleState = initialState,
  action: ArticleAction
): ArticleState => {
  switch (action.type) {
    case actionTypes.ADD_ARTICLE:
      const newArticle: IArticle = {
        id: Math.random(), // not really unique
        title: action.article.title,
        body: action.article.body,
      }
      return {
        ...state,
        articles: state.articles.concat(newArticle),
      }
    case actionTypes.REMOVE_ARTICLE:
      const updatedArticles: IArticle[] = state.articles.filter(
        article => article.id !== action.article.id
      )
      return {
        ...state,
        articles: updatedArticles,
      }
  }
  return state
}

export default reducer
Next, we have the reducer function that expects the previous state and an action to be able to update the store. Here, we have two actions: one for adding and another for deleting.
With that in place, we can now handle the state with the reducer. Let's now create a store for the project.
Create a store
A Redux store is where your app's state lives.
- index.tsx
import * as React from "react"
import { render } from "react-dom"
import { createStore, applyMiddleware, Store } from "redux"
import { Provider } from "react-redux"
import thunk from "redux-thunk"

import App from "./App"
import reducer from "./store/reducer"

const store: Store<ArticleState, ArticleAction> & {
  dispatch: DispatchType
} = createStore(reducer, applyMiddleware(thunk))

const rootElement = document.getElementById("root")
render(
  <Provider store={store}>
    <App />
  </Provider>,
  rootElement
)
As you can see, we import the reducer function and then pass it as an argument to the method createStore in order to create a new Redux store. The redux-thunk middleware needs to be proceeded as a second parameter as well to the method to be able to handle asynchronous code.
Next, we connect React to Redux by providing the store object as props to the Provider component.
We can now use Redux in this project and access the store. So, let's create the components to get and manipulate the data.
Create the components
- components/AddArticle.tsx
import * as React from "react"

type Props = {
  saveArticle: (article: IArticle | any) => void
}

export const AddArticle: React.FC<Props> = ({ saveArticle }) => {
  const [article, setArticle] = React.useState<IArticle | {}>()

  const handleArticleData = (e: React.FormEvent<HTMLInputElement>) => {
    setArticle({
      ...article,
      [e.currentTarget.id]: e.currentTarget.value,
    })
  }

  const addNewArticle = (e: React.FormEvent) => {
    e.preventDefault()
    saveArticle(article)
  }

  return (
    <form onSubmit={addNewArticle} className="Add-article">
      <input
        type="text"
        id="title"
        placeholder="Title"
        onChange={handleArticleData}
      />
      <input
        type="text"
        id="body"
        placeholder="Description"
        onChange={handleArticleData}
      />
      <button disabled={article === undefined ? true : false}>
        Add article
      </button>
    </form>
  )
}
To add a new article, we will be using this form component. It receives the function saveArticle as a parameter, which allows adding a new article to the store.
The article object should follow the type IArticle to make TypeScript happy.
- components/Article.tsx
import * as React from "react"
import { Dispatch } from "redux"
import { useDispatch } from "react-redux"

type Props = {
  article: IArticle
  removeArticle: (article: IArticle) => void
}

export const Article: React.FC<Props> = ({ article, removeArticle }) => {
  const dispatch: Dispatch<any> = useDispatch()

  const deleteArticle = React.useCallback(
    (article: IArticle) => dispatch(removeArticle(article)),
    [dispatch, removeArticle]
  )

  return (
    <div className="Article">
      <div>
        <h1>{article.title}</h1>
        <p>{article.body}</p>
      </div>
      <button onClick={() => deleteArticle(article)}>Delete</button>
    </div>
  )
}
The Article component shows an article object.
The function removeArticle has to dispatch to access the store and hence delete a given article. That's the reason we use the useDispatch hook here, which lets Redux complete the removing action.
Next, the use of useCallback helps to avoid unnecessary re-rendering by memoizing values as dependencies.
We finally have the components we need to add and show the articles. Let's now add the last piece to the puzzle by using them in the App.tsx file.
- App.tsx
import * as React from "react"
import { useSelector, shallowEqual, useDispatch } from "react-redux"
import "./styles.css"

import { Article } from "./components/Article"
import { AddArticle } from "./components/AddArticle"
import { addArticle, removeArticle } from "./store/actionCreators"
import { Dispatch } from "redux"

const App: React.FC = () => {
  const articles: readonly IArticle[] = useSelector(
    (state: ArticleState) => state.articles,
    shallowEqual
  )

  const dispatch: Dispatch<any> = useDispatch()

  const saveArticle = React.useCallback(
    (article: IArticle) => dispatch(addArticle(article)),
    [dispatch]
  )

  return (
    <main>
      <h1>My Articles</h1>
      <AddArticle saveArticle={saveArticle} />
      {articles.map((article: IArticle) => (
        <Article
          key={article.id}
          article={article}
          removeArticle={removeArticle}
        />
      ))}
    </main>
  )
}

export default App
The useSelector hook enables access to the state of the store. Here, we pass shallowEqual as a second argument to the method to tell to Redux to use shallow equality when checking for changes.
Next, we rely on useDispatch to dispatch an action for adding articles in the store. Finally, we loop through the array of articles and pass each to the Article component to show it.
With that, we can now browse to the root of the project and then execute this command:
yarn start
Or for npm:
npm start
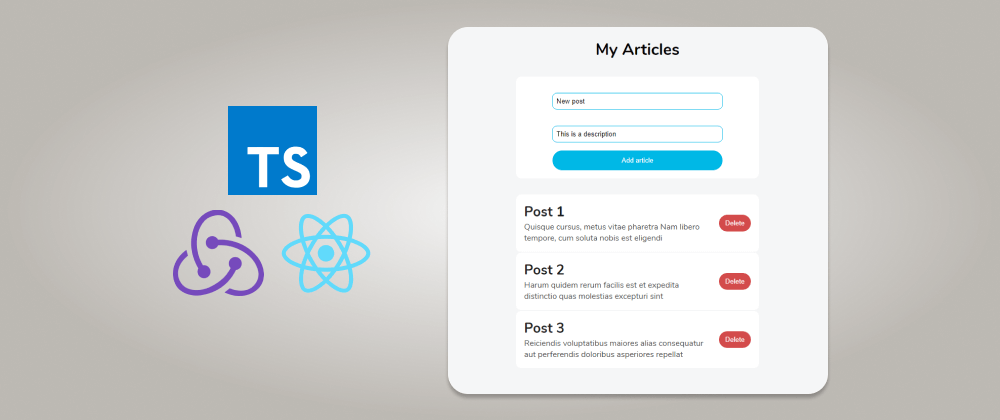
If you open http://localhost:3000/ in the browser, you should see this:

Great! Our app looks good. With this, we have now finished using Redux in a React TypeScript app.
You can find the finished project in this CodeSandbox.
You can find other great content like this on my blog or follow me on Twitter to get notified.
Thanks for reading.