

Next.js gives us CSS Modules by default, providing benefits like scoped styles and focused development in our app. How can we give our Next.js CSS superpowers with Sass?
- What are CSS Modules?
- What is Sass?
- What are we going to build?
- Step 0: Creating a new Next.js app
- Step 1: Installing Sass in a Next.js app
- Step 2: Importing Sass files into a Next.js app
- Step 3: Using Sass variables in a Next.js app
- Step 4: Using Sass mixins with global imports in Next.js
What are CSS Modules?
CSS Modules are essentially CSS files that, when imported into JavaScript projects, provide styles that are scoped to that particular part of the project by default.
When importing your module, the classes are represented by an object mapped with each class name, allowing you to apply that class right to your project.
For instance, if I had a CSS module for the title of my page:
.title {
  color: blueviolet;
}
And I import that into my React project:
import styles from './my-styles.css'
I can then apply that title right to an element as if it were a string:
<h1 className={styles.title}>My Title</h1>
By scoping styles, you no longer have to worry about breaking other parts of the application with cascading styles. It’s also easier to manage smaller chunks of code that pertain to a specific piece of the application.
What is Sass?
Sass is an extension of the CSS language that provides powerful features like variables, functions, and other operations that allow you to more easily build complex features into your project.
As an example, if I wanted to store my color above in a variable so I can easily change it later, I can add:
$color-primary: blueviolet;

.title {
  color: $color-primary;
}
If I wanted to change that color but only in one spot, I can use built-in color functions to change the shade:
$color-primary: blueviolet;

.title {
  color: $color-primary;
  border-bottom: solid 2px darken($color-primary, 10);
}
One additional benefit is the ability to nest styles. This allows for easier, more logical organization of your CSS.
For instance, if I wanted to change only a <strong> element nested in a title, I can add:
$color-primary: blueviolet;
$color-secondary: cyan;

.title {

  color: $color-primary;
  border-bottom: solid 2px darken($color-primary, 10);

  strong {
    color: $color-secondary;
  }

}
What are we going to build?
We're going to create a new React app using Next.js.
With our new app, we'll learn how to install and configure Sass so that we can take advantage its features inside of Next.js.
Once set up Sass, we'll walk through how to use Sass variables and mixins to recreate some of the default elements of the Next.js UI.
Want to skip the tutorial and dive into the code? Check out Next.js Sass Starter on GitHub: https://github.com/colbyfayock/next-sass-starter
Step 0: Creating a new Next.js app
To get started with a new Next.js app, we can use Create Next App.
In your terminal, navigate to where you want to create the new project and run:
yarn create next-app my-next-sass-app
Note: you can use npm instead of yarn for any examples with installation and package management.
Once the installation finishes, you can navigate into the directory, and start your development server:
yarn dev
Which should start your new Next.js project at http://localhost:3000!
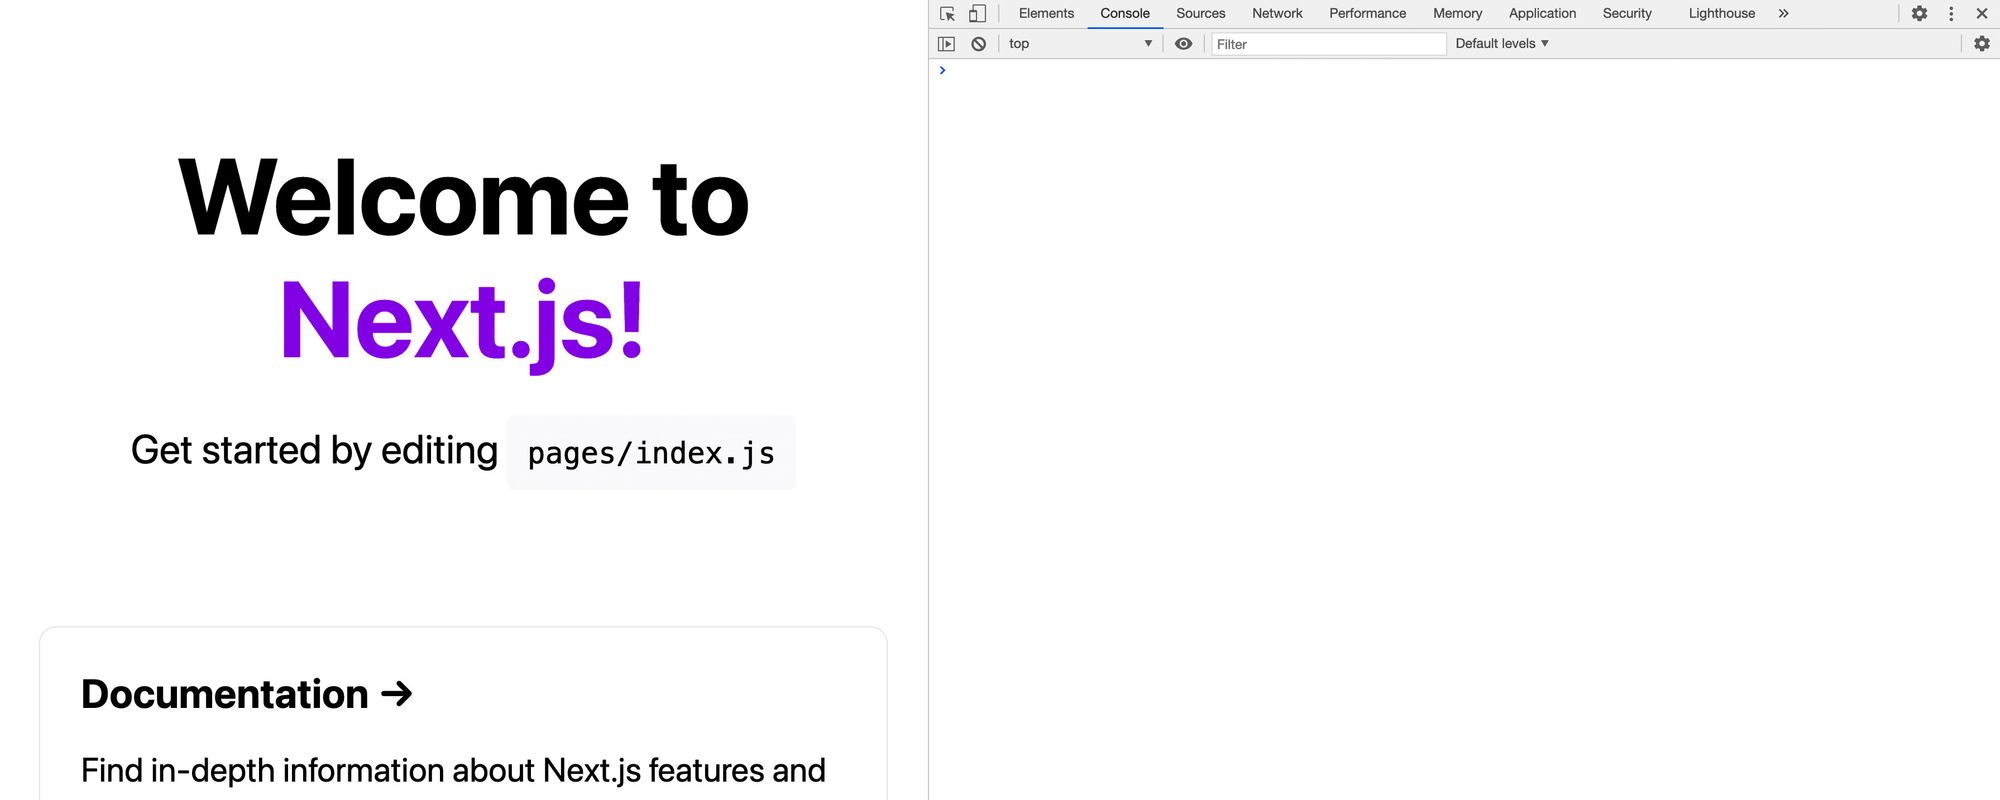
 New Next.js app
If this is your first time creating a new Next.js app, have a look around! It comes with a basic homepage as well as two CSS files:
/styles/globals.css/styles/Home.module.css
Here we’ll be focusing on the home file. If you look inside pages/index.js, there, you’ll see that we’re importing the home file, making those styles available.
Next.js has CSS Modules built in by default. This means that when we import our home styles file, the CSS classes are added to the styles object, and we apply each of those class names to the React elements from that object, such as:
<h1 className={styles.title}>
That means that our styles are scoped to that single page.
To learn more about CSS Modules or the built-in support in Next.js, you can check out the following resources:
- https://github.com/css-modules/css-modules
- https://nextjs.org/docs/basic-features/built-in-css-support
Step 1: Installing Sass in a Next.js app
While Next.js comes with some good built-in CSS support, it doesn’t come with Sass completely built in.
Luckily, to get Sass up and running inside of our Next.js app, all we need to do is install the Sass package from npm, which will let Next.js include those files in its pipeline.
To install Sass, run the following inside of your project:
yarn add sass
And if we start back up our development server and reload the page, we’ll actually notice that nothing has happened yet, which is a good thing!
But next we’ll learn how to take advantage of our CSS superpowers.
Step 2: Importing Sass files into a Next.js app
Now that Sass is installed, we’re ready to use it.
In order you use any Sass-specific features though, we’ll need to use Sass files with either the .sass or .scss extension. For this walkthrough, we’re going to use the SCSS syntax and the .scss extension.
To get started, inside of pages/index.js, change the import of the styles object at the top of the page to:
import styles from '../styles/Home.module.scss'
And once the page reloads, as we probably expect, the page is actually broken.
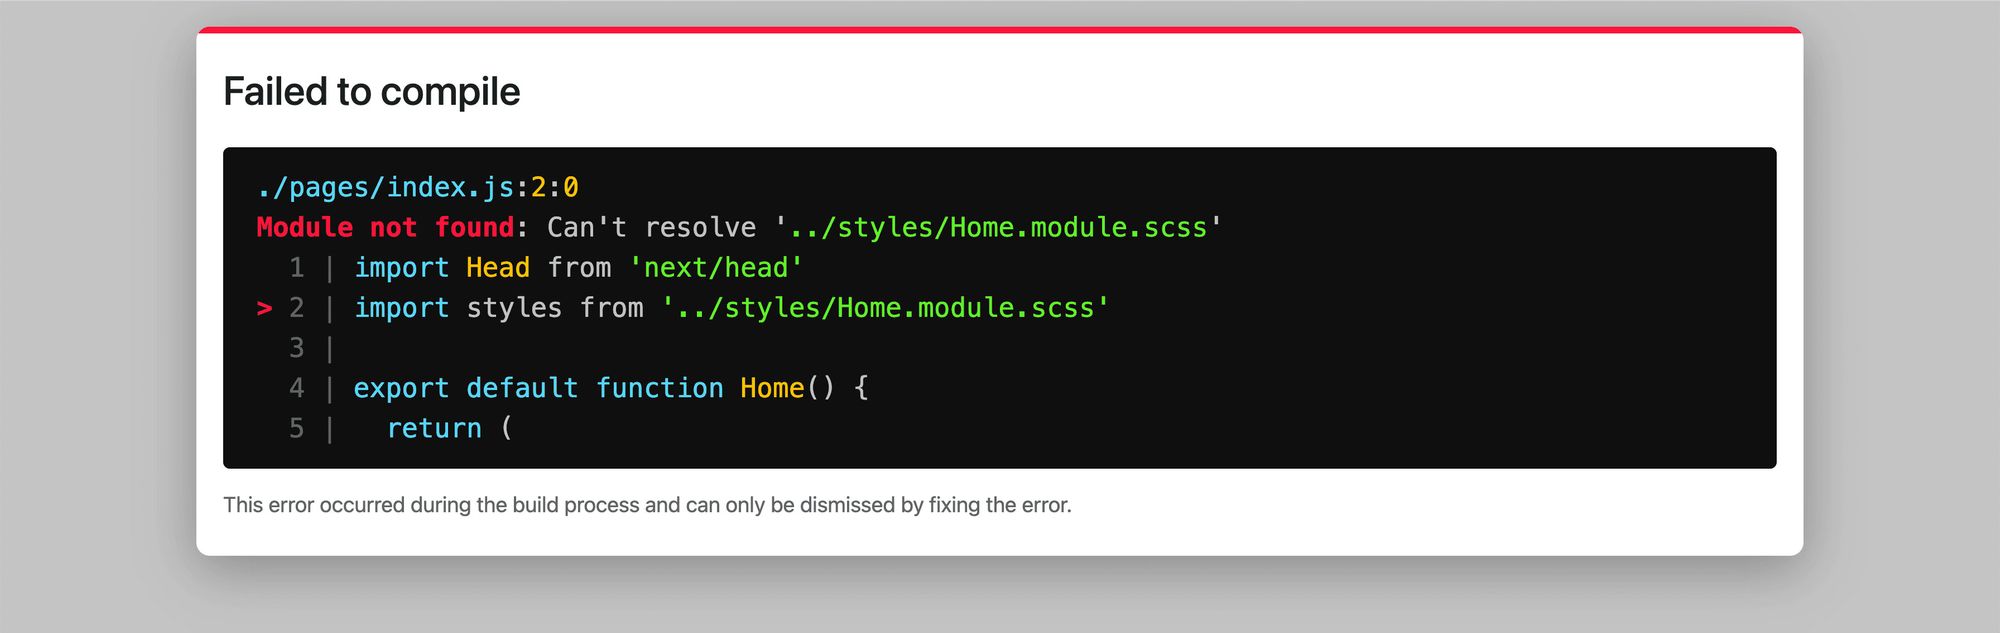 Next.js failed to compile
To fix this, rename the file:
/styles/Home.module.css
to
/styles/Home.module.scss
The difference is we’re changing the file extension from .css to .scss.
Once the page reloads, we’ll see that our Next.js site is loading and is back ready for action!
 New.js app loading
_Note: We’re not going to cover the global styles file here – you can do the same thing by renaming the global styles file and updating the import inside of /pages/_app.js_
Next, we’ll learn how to use Sass features for our Next.js app.
Step 3: Using Sass variables in a Next.js app
Now that we’re using Sass in our project, we can start using some of the basic features like variables.
To show how this works, we’re going to update the blue inside of our app to my favorite color, purple!
At the top of /styles/Home.module.css, add the following:
$color-primary: #0070f3;
The color #0070f3 is what Next.js uses by default in the app.
Next, update each location that uses that color in our home CSS file to our new variables, such as changing:
.title a {
  color: #0070f3;
to
.title a {
  color: $color-primary;
If we refresh the page, nothing should change.
 Unchanged Next.js app
But now because we’re using a variable to define that color, we can easily change it.
At the top of the page, change the $color-primary variable to purple or whatever your favorite color is:
$color-primary: blueviolet;
And when the page reloads, we can see that our colors are now purple!
 Next.js app with purple color
Variables are just the start to the superpowers Sass gives our CSS, but we can see that they allow us to easily manage our colors or other values throughout our application.
Step 4: Using Sass mixins with global imports in Next.js
One of the other many features of Sass is mixins. They give us the ability to create function-like definitions, allowing us to configure rules that we can repeat and use throughout our app.
In our example, we’re going to create a new mixin that allows us to create responsive styles using a media query throughout our app. While we can already do that with a media query alone, using a mixin allows us to use a single definition, keeping that consistent and allowing us to manage that responsive definition from one place.
Because this mixin is something we want to use throughout our entire application, we can also use another feature of Sass, which is the ability to import files.
To get started, create a new file under the /styles directory:
/styles/_mixins.scss
We’re using an underscore in front of our filename to denote that it’s a partial.
Next, inside of our /styles/Home.module.scss file, let’s import that new file:
@import "mixins";
Once the page reloads, we’ll notice nothing changed.
If we lookout the bottom of Home.module.scss, we’ll see that we’re using a media query to make the .grid class responsive. We’re going to use that as a basis for our mixin.
Inside of _mixins.scss, add the following:
@mixin desktop() {
  @media (max-width: 600px) {
    @content;
  }
}
Note: while we probably can come up with a better name for this mixin than desktop, we’ll use that as the basis of our example.
The @content means that any time we use our desktop mixin, it will include the nested content in that location.
To test this out, back in our Home.module.css file, let’s update our .grid snippet:
@include desktop() {
  .grid {
    width: 100%;
    flex-direction: column;
  }
}
If we open our app back up and shrink the browser window, we can see that we still have our responsive styles!
 Responsive styles in Next.js
We can even take this a step further. Sass allows you to nest styles. For instance, instead of writing:
.footer {
  // Styles
}

.footer img {
  margin-left: 0.5rem;
}
We can include that img definition right inside of the original .footer definition:
.footer {

  // Styles

  img {
    margin-left: 0.5rem;
  }

}
That img definition will compile to .footer img, just the same as if it was written in standard CSS.
So with that in mind, we can use the same concept and move our desktop mixin into our original .grid class:
.grid {

  @include desktop() {
    width: 100%;
    flex-direction: column;
  }

}
And if you notice, because we’re inside of the .grid class already, we can remove that from inside of the mixin, as it will already be applied.
This allows for much easier organization of our responsive styles.
Finally, if we look back at our app, we’ll notice that still, nothing has changed, which means we’re successfully using our Sass mixin.
 No change in our Next.js app
What else can we do with Sass and Next.js?
We’re only scratching the surface here with Sass. Because our CSS modules now have the power of Sass, we have a ton of capabilities that don’t come by default with CSS.
Color Functions
Sass has a ton of functions built in that allow us to manipulate colors, mixing and matching shades much more easily.
Two that I use often are darken and lighten, that allow you to take a color and change the shade.
Learn more about all of the available color functions in Sass.
Custom Functions
While mixins seem like functions, we can define true functions in Sass that allow us to perform complex operations and produce values based on an input.
Learn more about custom functions in Sass.
Other Value Types
While most of the time with CSS we’re using strings or numbers, we saw that a simple extension of that is the ability to use variables.
In addition to variables, Sass gives us more value types like Maps, which function sort of like an object, and Lists, which are kind of like arrays.
Learn more about the value types in Sass.
More
There are a ton of features available in Sass and lots of articles that cover the most used features. Take some time to explore the documentation and find what’s out there!
