
SurrealDB is a newly launched database that has recently started gaining popularity in the programming world.
SurrealDB was built with the Rust language and was created by Tobie Morgan Hitchcock and Jaime Morgan Hitchcock.
SurrealDB's new database comes with many features, but I'm most interested in the Deno surrealDB library.
In this article, we'll create a simple todo app with the Fresh framework and SurrealDB database. We'll use the Fresh framework to build out the API with surrealDB.
The Fresh framework is a new JavaScript framework introduced by Deno itself. Fresh uses the Preact library to design and build components. Fresh comes with inbuilt TypeScript and Tailwind CSS support and Island-based architecture. There's also no configuration needed.
Deno and Fresh are production ready. So you can build any web app and deploy it with one single click. But keep in mind that SurrealDB may not be. According to their docs, SurrealDB is production ready but the documentation is not super clear on the issue.
All the code is available on GitHub.
Here's a Demo of What We'll be Building:
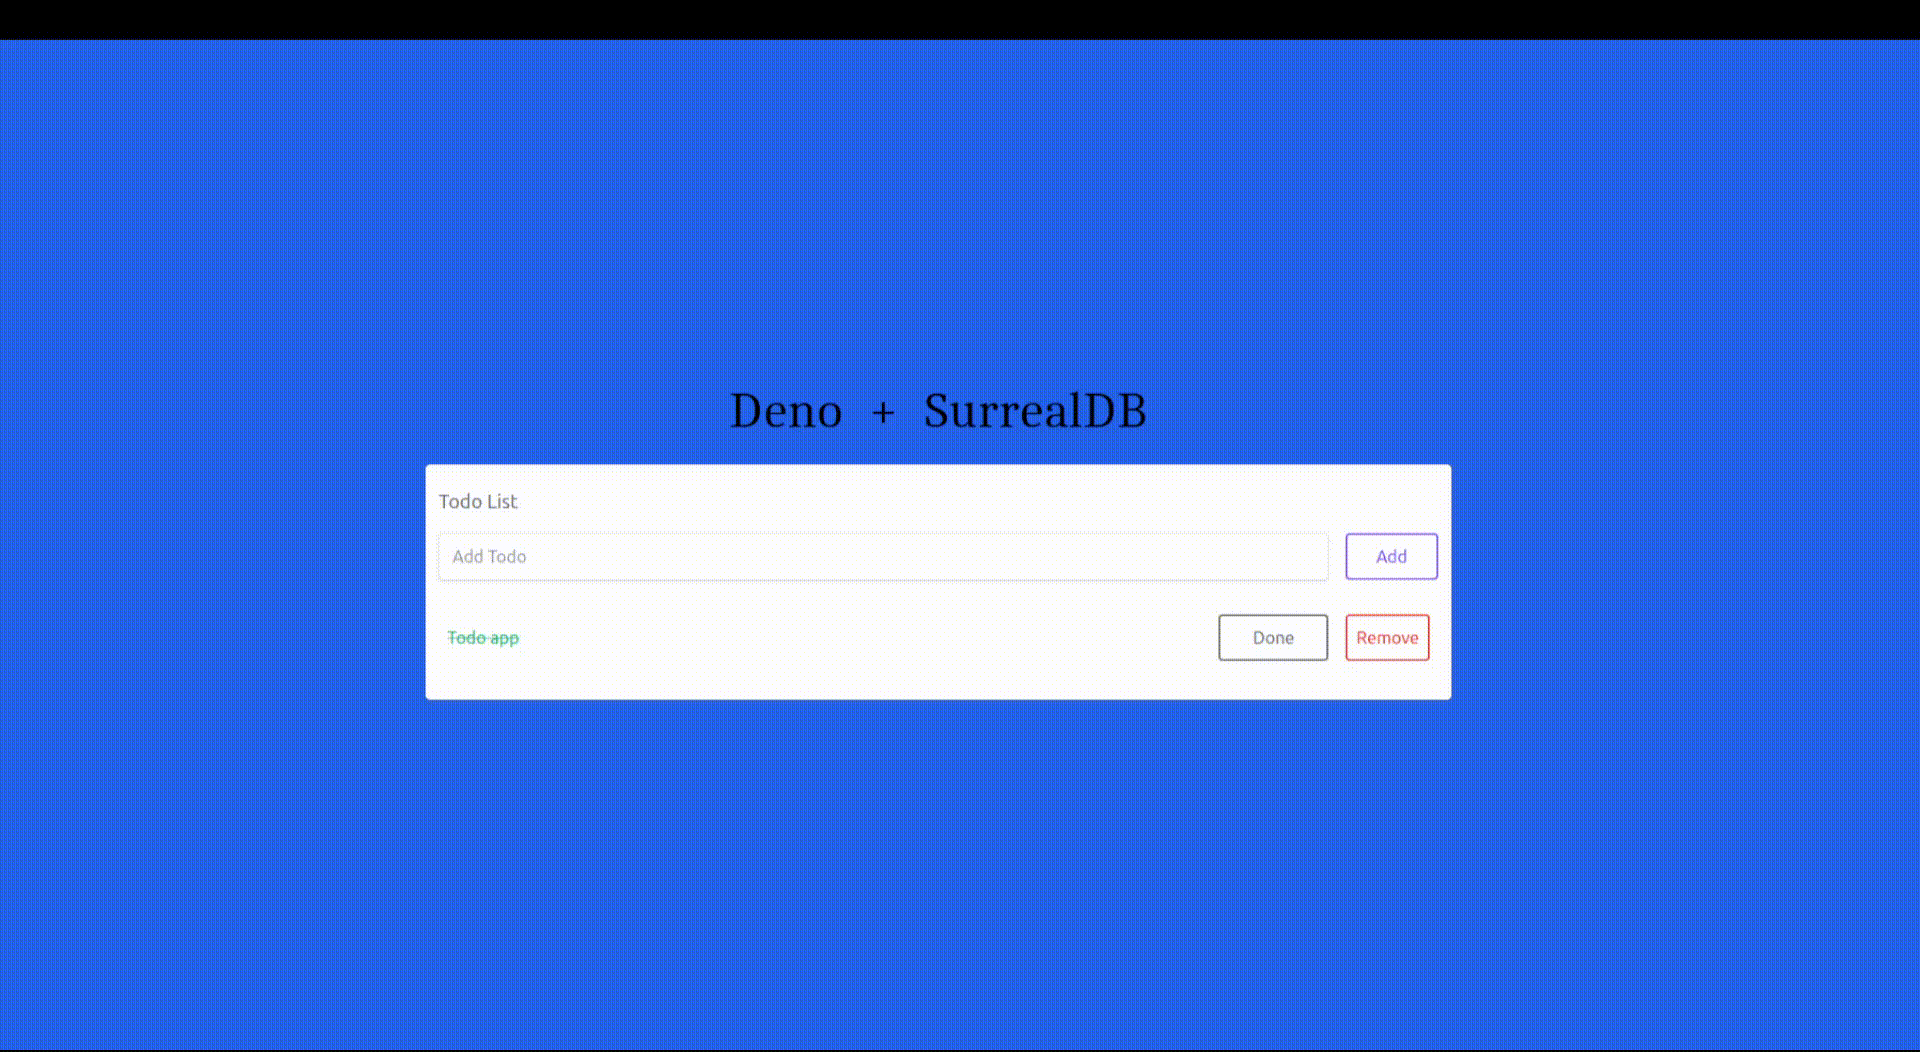 TODO Application demo
How to Install SurrealDB, Deno, and the Fresh Framework
There are three requirements to follow along with this tutorial: the first is having Deno installed, the second is having the SurrealDB database, and the last one is using the Fresh framework.
First, we'll install the surrealDB database and the Fresh framework with Deno. You can skip this part if you have already installed both Deno and the SurrealDB packages.
How to Install the SurrealDB database on Linux
The SurreadDB installation process is pretty easy for all operating systems. For example, in Linux, you can install the database with one single curl command.
If you have a different operating system, I suggest reading the SurrealDB installation docs.
In Linux, use this command:
curl -sSf https://install.surrealdb.com | sh
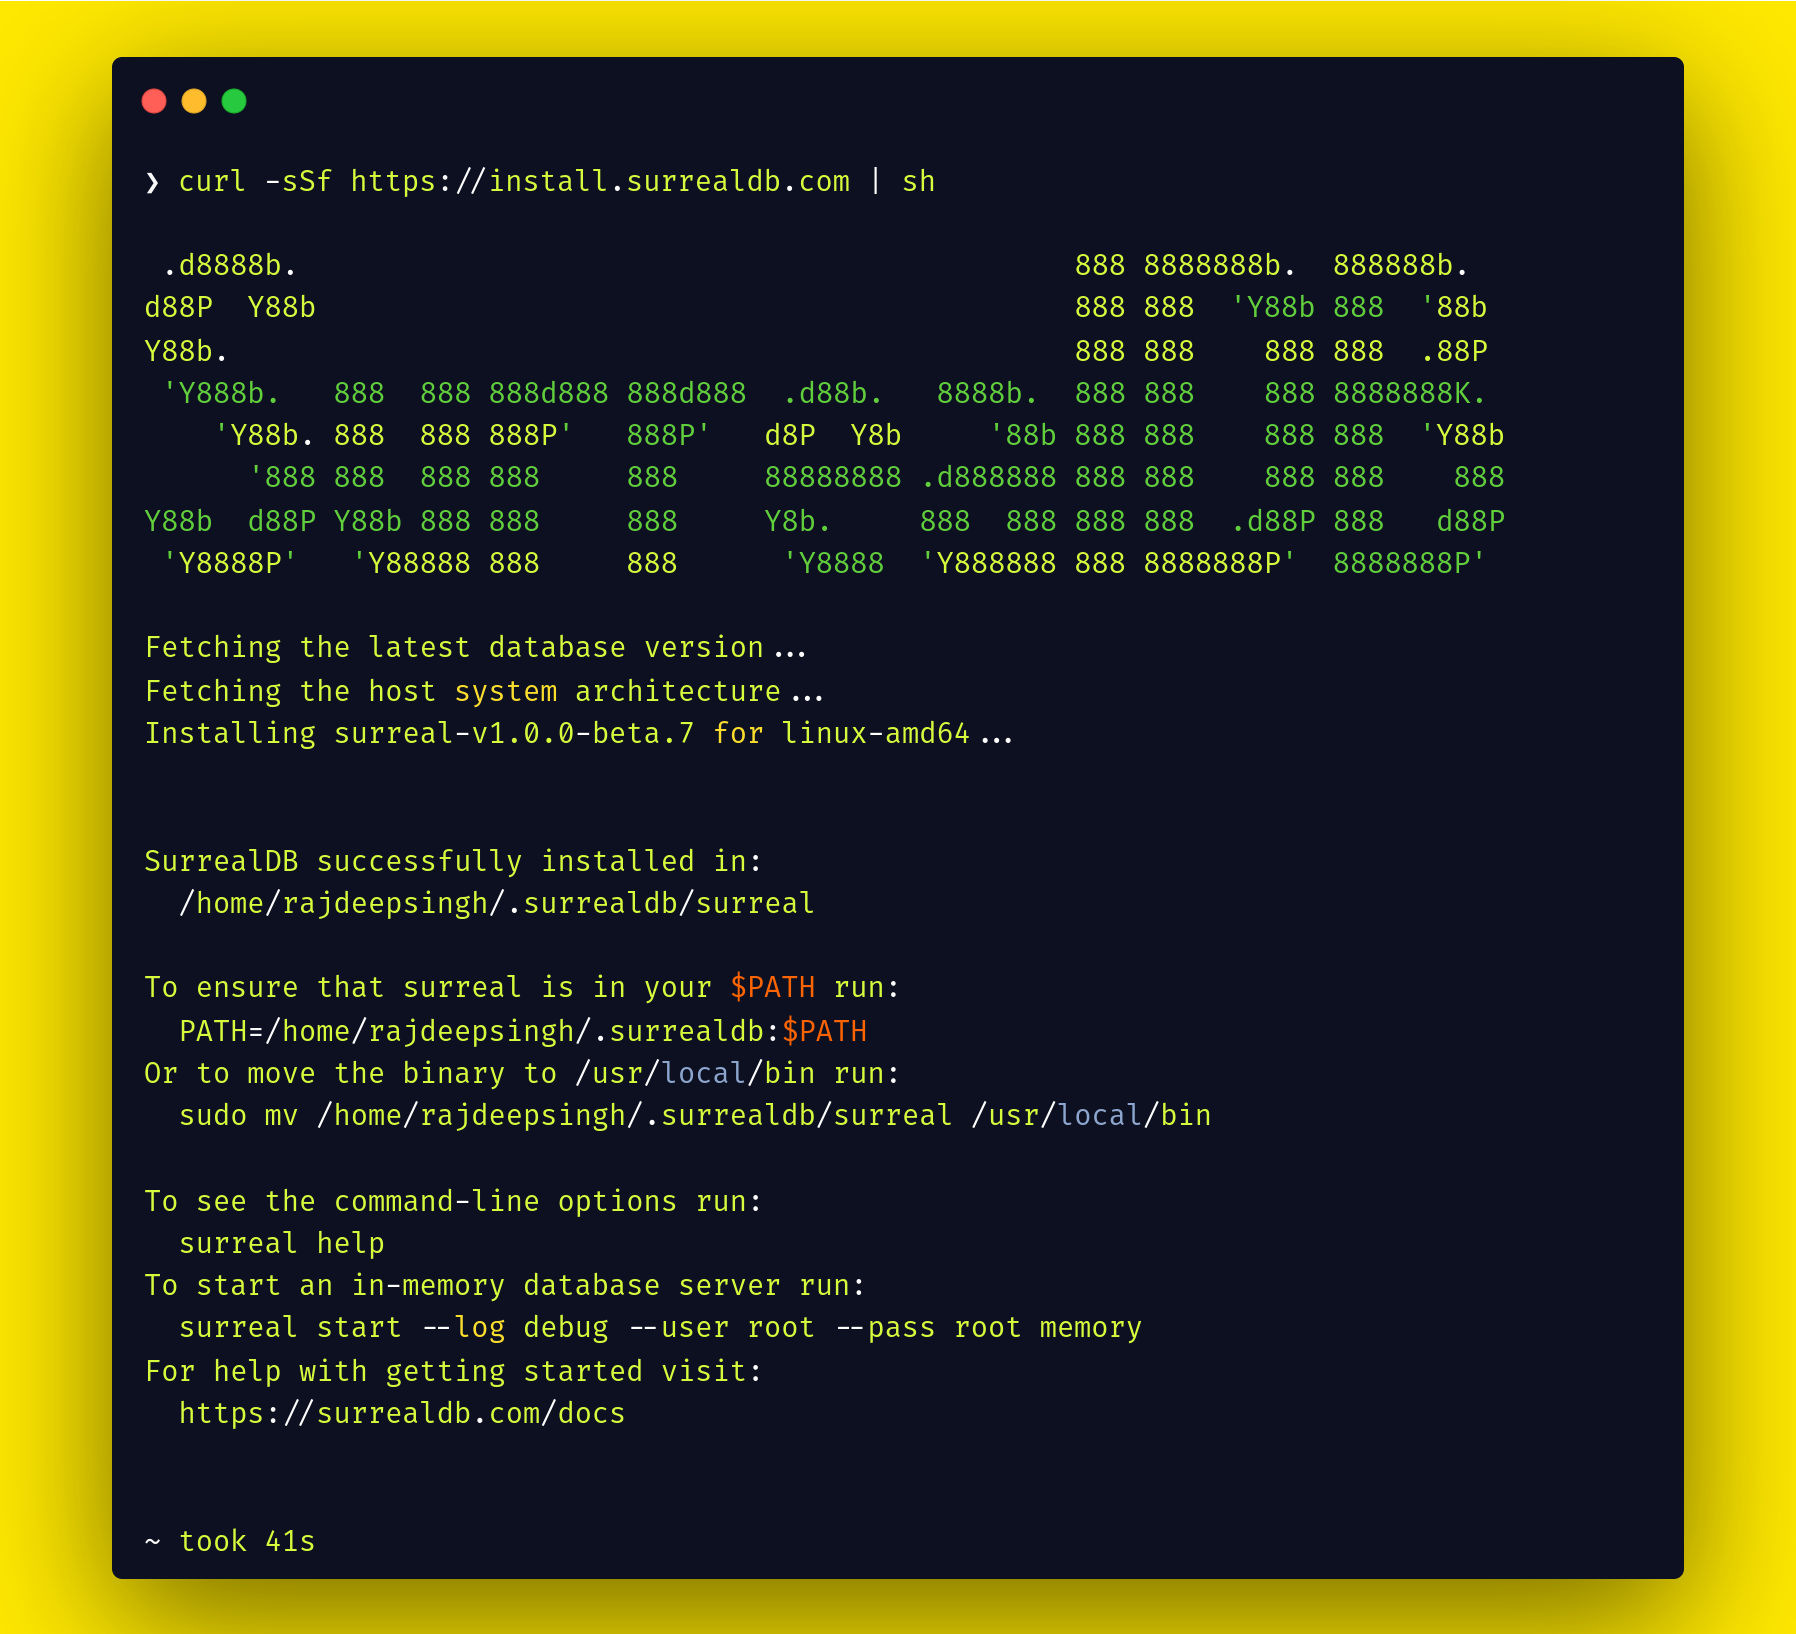 Install the SurrealDB database in Linux.
To start the surrealDB database in Linux, run the following command:
surreal start --log debug --user root --pass root memory
- You use the
--userflag for your username. In my case, my username is root. - You use the
--passflag for your password. In my case, my password is root.
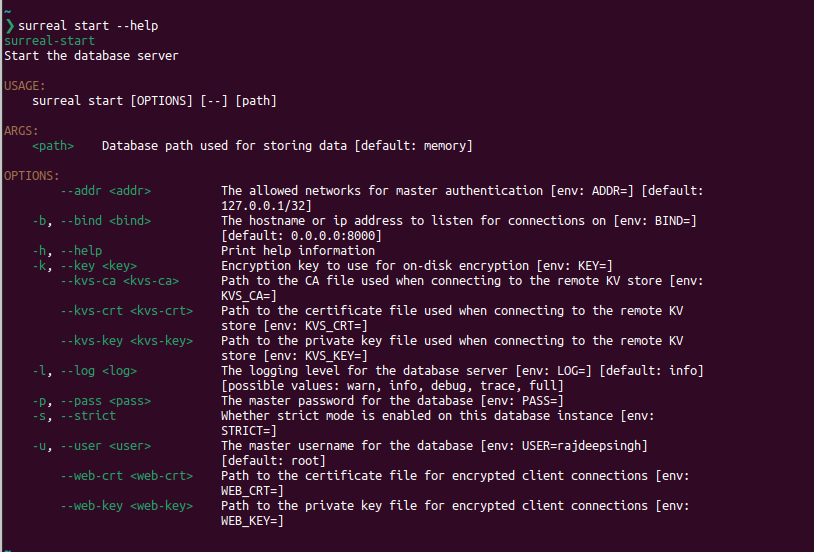
To learn more about all the flags or options, run surreal start --help command. This is what you'll see:
Now you're ready to use the SurrealDB database.
How to Install Deno on Linux
Deno is a newer JavaScript run time environment. It's fast and secure when you compare it to Node.js.
To learn more about Deno, you can read this helpful tutorial I found on freeCodeCamp written by Brian Barrow.
To install Deno on Linux, you need one command:
curl -fsSL https://deno.land/install.sh | sh
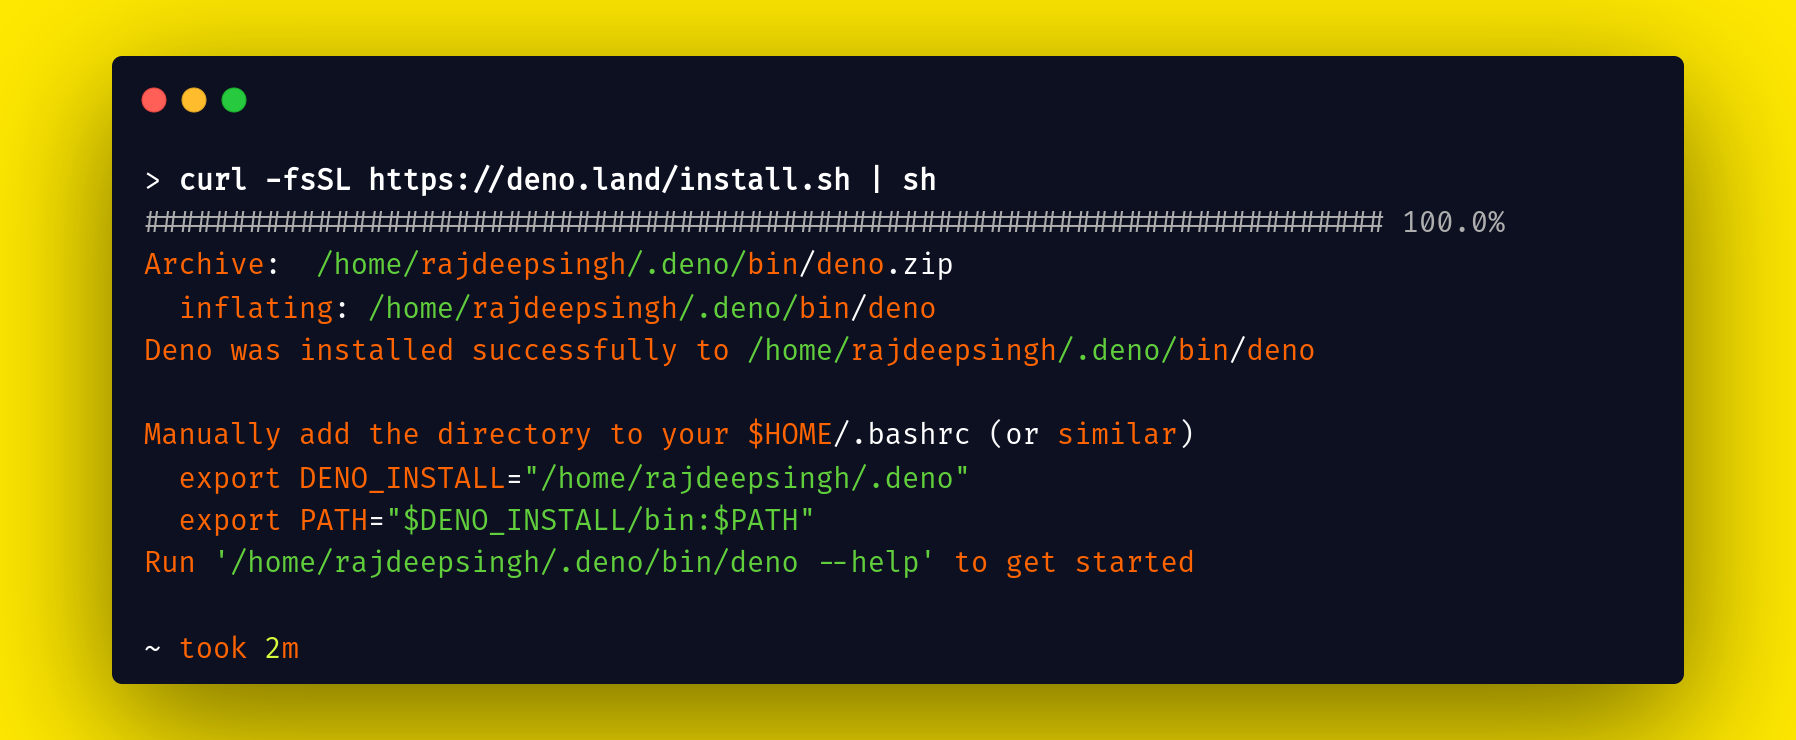 Install deno in Linux
How to Install the Fresh Framework with Deno
Fresh is a new JavaScript framework based on Deno. The Fresh framework supports TypeScript by default. In addition, Fresh sends zero DB of JavaScript by default to the client.
You can set up a Fresh project with the following command:
deno run -A -r https://fresh.deno.dev my-new-fresh-project
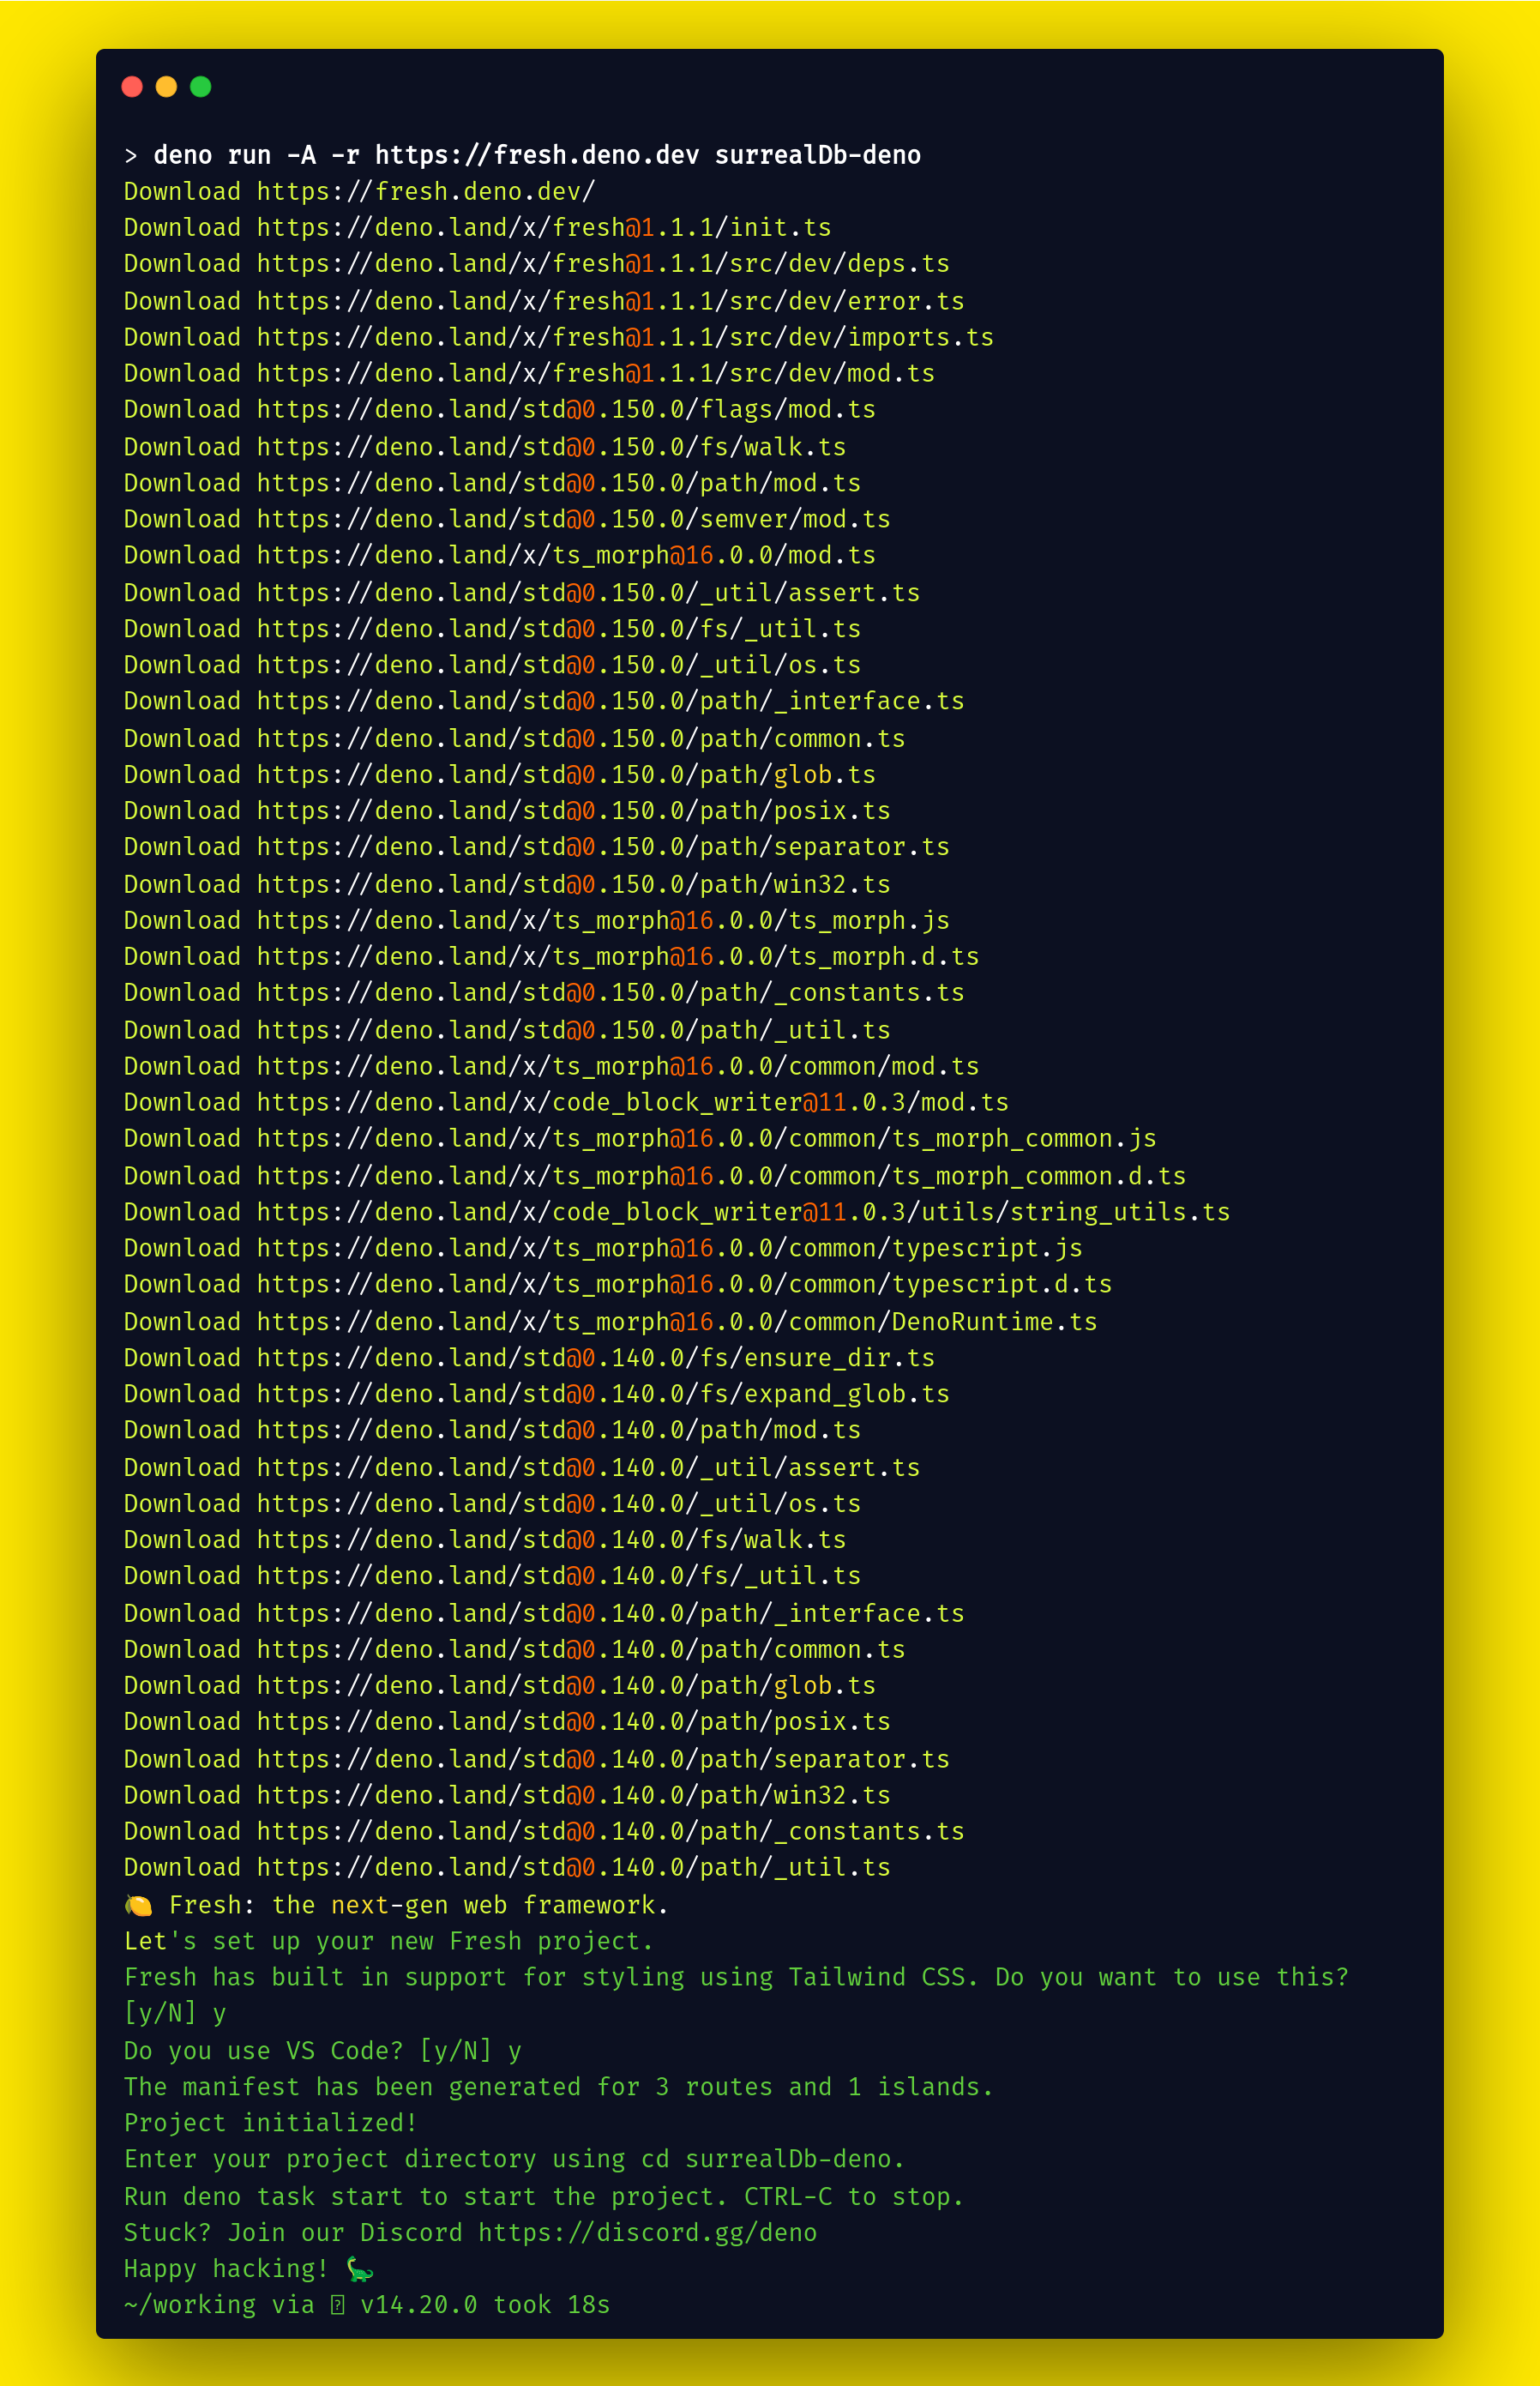
You can run a local development server with deno task start .
Note that both the Fresh framework and SurrealDB use the same 8000 port. In the SurrealDB, I didn't find any document about port changing. But in Fresh, you can easily change the port inside main.ts file. Then, without changing the port, your Fresh localhost redirects the SurrealDB local host.
For example, you can change the port in Fresh like this:
// change port in main.ts

await start(manifest, { port:3002, plugins: [twindPlugin(twindConfig)] });
Fresh Framework Project Structure
The project folder structure is pretty straightforward. For this project, we must follow the folder and file structure to create a todo list app with SurrealDB.
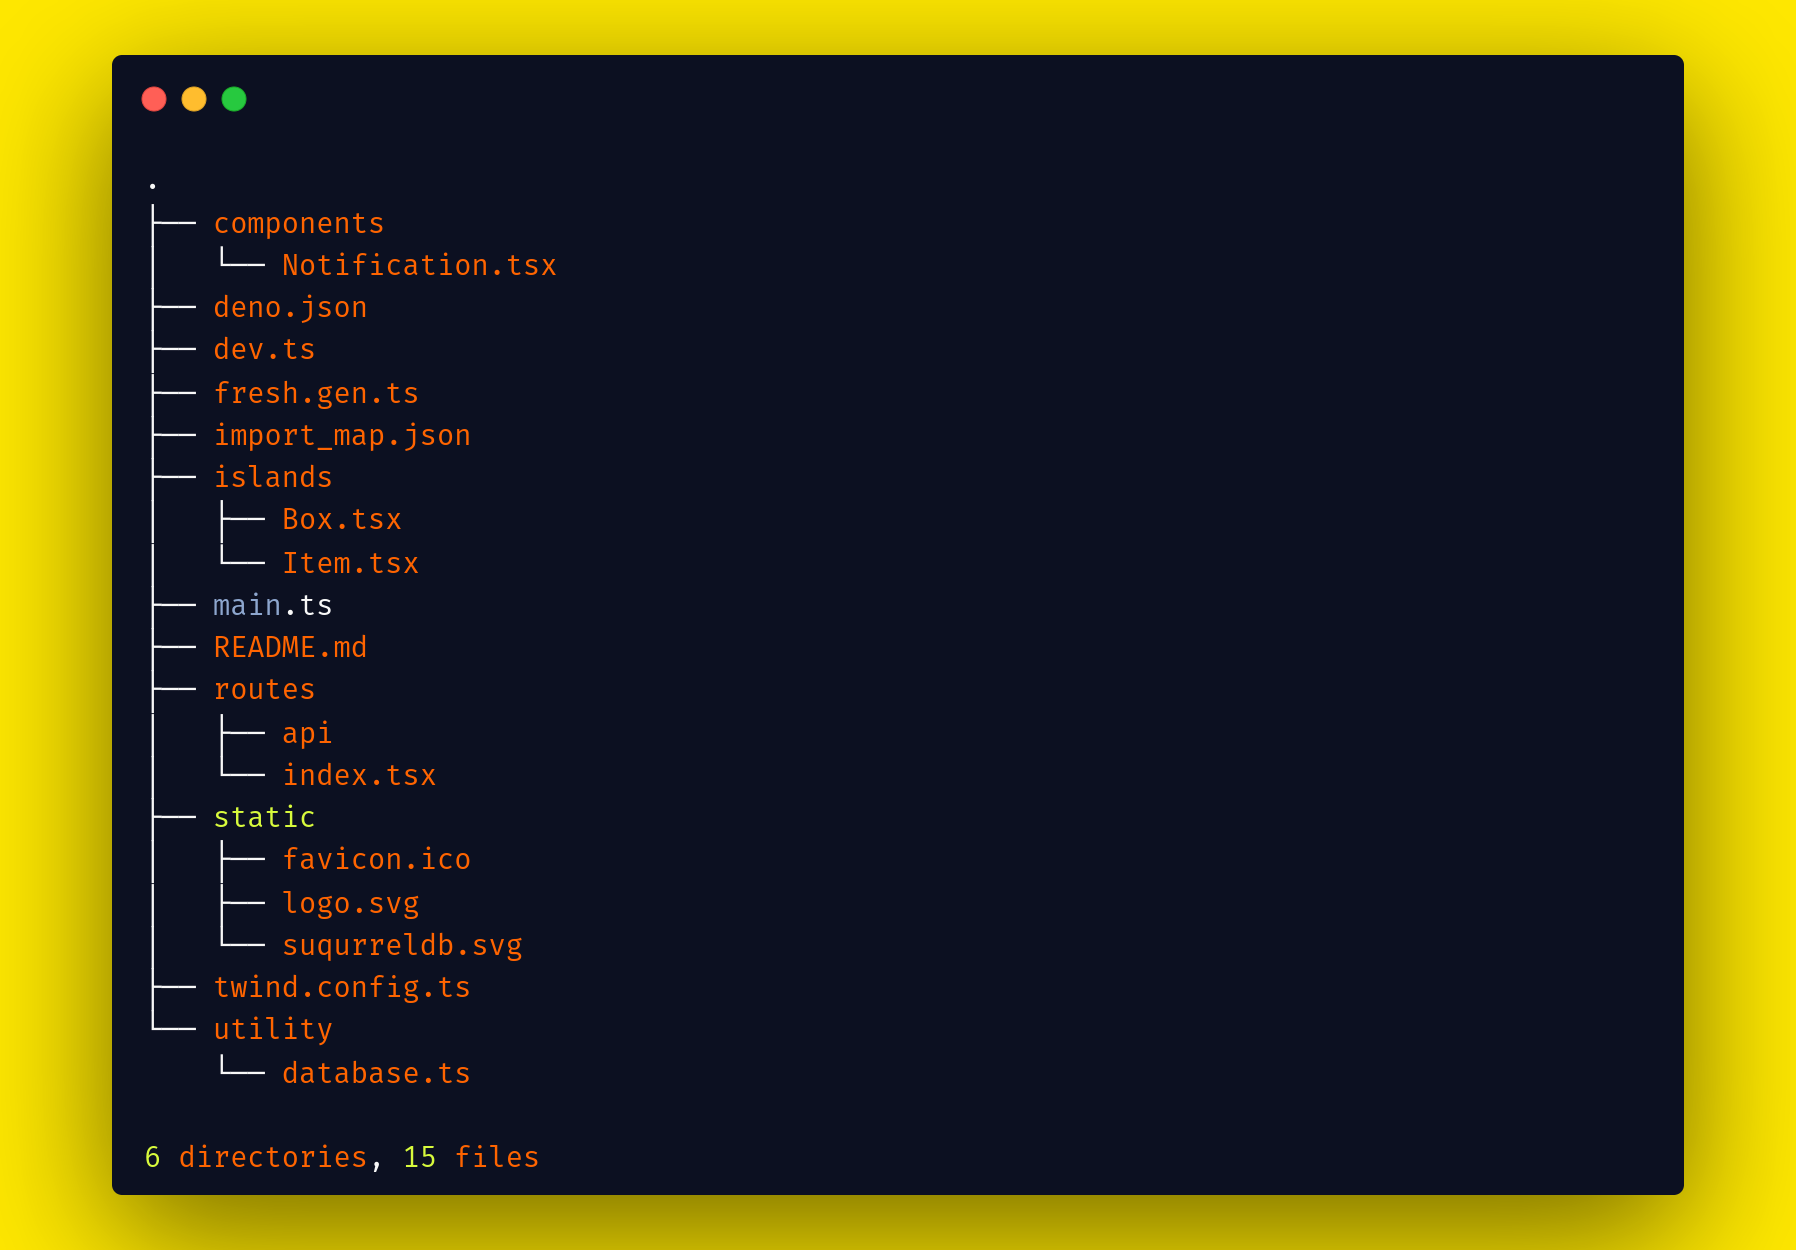 File and folder structure
Let's further discuss some essential files here:
- The components folder helps contain all custom components built with Preact.
- In the
deno.jsonfile you add tasks and the importMap file. Tasks are similar to scripts in Node, and in the importMap section, you pass a JSON file that contains all your import packages from Deno. dev.tsis a file created only for development.fresh.gen.tsgenerates and updates automatically based ondev.ts. It includes all routes, islands, and other configurations.- The
import_map.jsonfile contains imports of all packages which you need to run your project. - Islands enable client-side browser-based interactivity in Fresh. Basically, with the island folder, you send JavaScript to the browser. By default, the Fresh framework sends zero KB JavaScript.
main.tsis the main entry point that helps start your application.- The
routesfolder handles your path and API. It is similar to the Next.js pages folder. - The
staticfolder contains all static files like JavaScript, images, and fonts under a root directory. All are accessed by reference and start with the base URL (/). For example,/logo.svg. twind.config.tsconfigures Tailwind CSS- The
utilityfolder contains the database configuration.
You can learn more about folder structure from Fresh's official docs.
Again, to run a local development server, use the command deno task start .
How to Install the SurrealDB Database Library in the Fresh Framework
You need the Deno-based surrealDB library (module). It's a SurrealDB library created by the SurrealDB team.
The SurrealDB library (module) helps you connect your application to your database. The surrealDB module connects your local and remote databases very easily.
To install the SurrealDB module in the Fresh framework, simply copy the following code and paste it into import_map.json file:
"surrealdb" : "https://deno.land/x/surrealdb@v0.2.0/mod.ts"
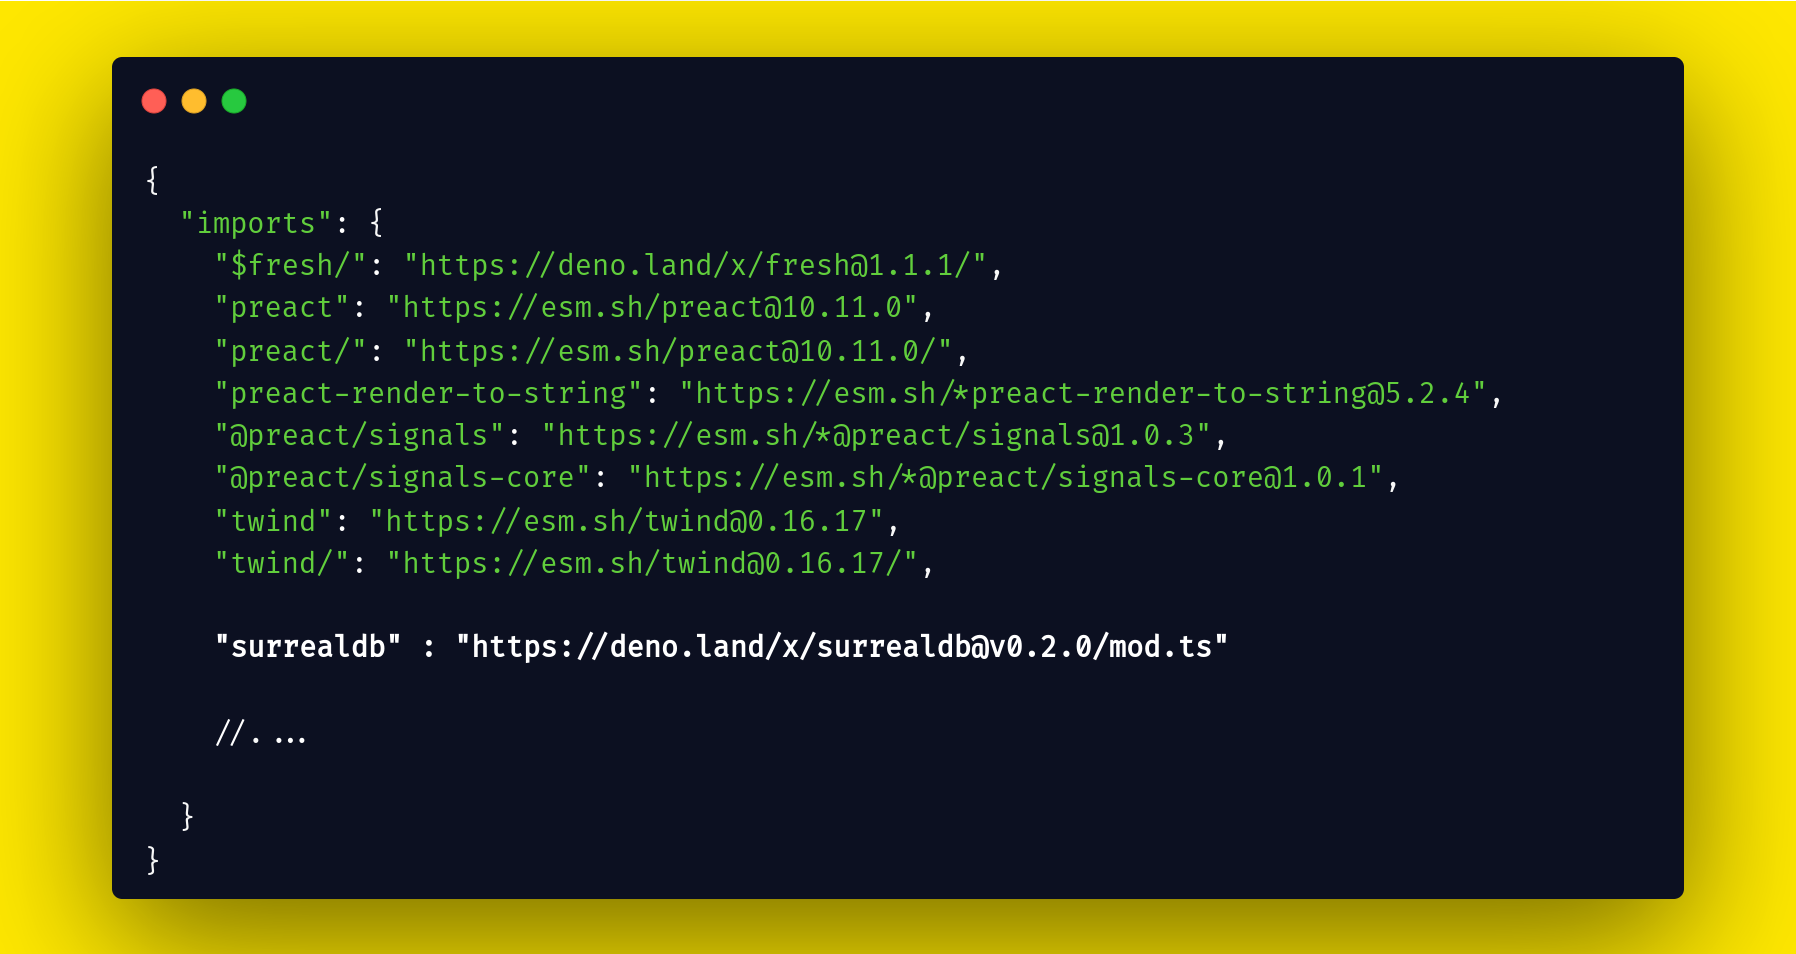 _Paste the following code into
 import_map.json file_
How to Setup the SurrealDB Database in Fresh
The first step is to create a setup file for the SurrealDB database. The setup file helps you connect the Fresh framework to the SurrealDB database.
In my case, I create a database setup in a separate utility/database.ts file. The separate file helps reduce your code and is easier to manage.
// utility/database.ts

//  import surrealdb
import Surreal from "surrealdb";

// load Environment Variables
import "https://deno.land/x/dotenv@v3.2.0/load.ts";

// get DATABASE_URL url
const domain = Deno.env.get("DATABASE_URL")

// surreal database
const db = new Surreal(domain);

// signin
await db.signin({
    user: 'root',
    pass: 'root',
});


//  Select a specific namespace /  database
await db.use('test', 'test');

export default db
To connect the database, ensure that your database is running and your password and username match your database conditionals.
For example, run your local SurrealDB user name and password that's the same as in your utility/database.ts file.
surreal start --log debug --user root --pass root memory
How to Use SurrealDB Module (Library) Methods
The SurrealDB module comes with inbuilt methods. All the methods help you perform CURD operations on the SurrealDB database. These methods allow you to create quickly and get, update, and delete things from the database.
In this article, we'll use four methods which are create() , update() , delete() and select().
There are other methods provided by SurrealDB, which you can read about on the surrealDB module documentation page.
How to Create the API Endpoints
To create a Todo app, you need four endpoints. We'll use the Fresh framework to create APIs. All the API routes go in the routes/api folder.
- Get
- Post
- Isdone (Update)
- Delete
The Get API
The Get API lets you show all data from the todo table. To access all data from Todo table, you need a select() function provided by the SurrealDB module.
import { HandlerContext } from "$fresh/server.ts";
import db from "../../utility/database.ts";


export async function handler(_req: Request, _ctx: HandlerContext) {

    try {
        // get all todo list
        const todo = await db.select("todo");

        // return todo
        return Response.json(JSON.stringify(todo))

    } catch (error) {

        return new Response(error);
    }


}
The Post API
In the Post API, you'll create a new todo based on the title. All the todos are saved inside the todo table. With the get API, you access all todos from the todo table.
To create a new todo item in the database, you can use the SurrealDB module's inbuilt create() function.
import { HandlerContext } from "$fresh/server.ts";

// import module uuid from deno
import * as mod from "https://deno.land/std@0.156.0/uuid/mod.ts";

// import database
import db from "../../utility/database.ts";


export async function handler(_req: Request, _ctx: HandlerContext) {
    // get url
    const url = new URL(_req.url);

    // get title from url
    const title = url.searchParams.get("title") || "";

    try {

        // Create a new person with a random id

        const NAMESPACE_URL = "6ba7b810-9dad-11d1-80b4-00c04fd430c8";

        // create a unique uuid for demo purposes
        const uuid = await mod.v5.generate(NAMESPACE_URL, new TextEncoder().encode("python.org"));

        // create new data based on value
        const created = await db.create("todo", {
            uuid: uuid,
            title: title,
            isDone: false
        });

        // return data
        return Response.json({ sucessfull: "your data submit sucessfully", created })

    } catch (error) {

        return new Response(error);
    }


}
The Isdone (Update) API
The Isdone API helps to update the todo items inside the todo table. To update data from the table the surrealDB module provides an inbuilt update function for this.
With the update function, you can promptly update the todos by one or more items in one request.
import { HandlerContext } from "$fresh/server.ts";

// import database
import db from "../../utility/database.ts";


export async function handler(_req: Request, _ctx: HandlerContext) {
// get URL
  const url = new URL(_req.url);
  // get todo id based on id we update todo.
  const todoid = url.searchParams.get("todoID") || "";
  // get title
  const todoTitle = url.searchParams.get("todoTitle") || "";
  // get uuid
  const todoUuid = url.searchParams.get("todoUuid") || "";


    try {

        // update the todo
        const person = await db.update(todoid, {
            isDone: true,
            title: todoTitle,
            uuid: todoUuid
        });

        return Response.json({sucessfull:"your data submit sucessfully ",person})

    } catch (error) {

        return new Response(error);
    }


}
The Delete API
You use the Delete API to delete a todo from the todo list. You'll use the inbuilt delete() function. With this inbuilt function, you can quickly delete a todo based on the todo's id.
import { HandlerContext } from "$fresh/server.ts";

// import database
import db from "../../utility/database.ts";


export async function handler(_req: Request, _ctx: HandlerContext) {
    // get url
    const url = new URL(_req.url);

    // get todo id – based on id we delete todo.
    const todoid = url.searchParams.get("todoID") || "";


    try {

        // delete specified todo item
        await db.delete(todoid);

        return Response.json({ sucessfull: "your data submit sucessfully " })

    } catch (error) {

        return new Response(error);
    }

}
How to Create the UI for the Todo App
 UI for dashboard
The Box.tsx and Item.tsx files come from an island folder. Both files are known as components. In both components, we need JavaScript integration. For that reason, we create both components inside the island folder.
Index page
The index page shows that both the Box.tsx and Item.tsx files come from the island. We'll design the home (Index) page layout with them.
import { Handlers } from "$fresh/server.ts";

//  Import Box components from island
import Box from "../islands/Box.tsx";

//  Import Item components from island
import Item from "../islands/Item.tsx";

// to load Environment variable
import "https://deno.land/x/dotenv@v3.2.0/load.ts";

// get Environment variable
let domain= Deno.env.get("DOMAIN")


interface todo {
  id: string;
  title:string;
  isDone:boolean
}

//  Call get API with fresh handler
export const handler: Handlers<todo | null> = {

  async GET(_, ctx) {

    // call get api
    const response = await fetch(domain + "/api/get").then(
      (response)=> response.json()
    ).then(
      (response)=> JSON.parse(response)
    ).catch(
      error=> console.log(error)
    );

    //  pass data into component props
    return ctx.render(response);
  }
};

export default function Home({data}: { data: any; }) {
  return (
    <div class="h-screen w-screen flex flex-col items-center justify-center bg-blue-600 font-sans">
      <div class="flex flex-row w-4/6 justify-center mx-auto">
        <h2 class="m-2 p-1 text-5xl font-mono font-serif cursor-pointer">Deno</h2>
        <h2 class="m-2 p-1 text-5xl font-mono font-serif cursor-pointer">SurrealDB</h2>
      </div>

      <div class="bg-white rounded shadow container mx-auto p-3 m-4 w-3/6 lg:w-3/6 xl:w-3/6 md:w-3/6 2xl:w-3/6 ">
            <div class=" flex mb-4 flex-col py-2">
                <h1 class="text-gray-500  text-lg">Todo List</h1>
                <Box/>
            </div>
            <div class="p-2">
              {
                data.map( (item: any) =>
                  <Item item={item} />
                )
              }
            </div>
        </div>
    </div>
  );
}
The Box.tsx Component
The Box component helps call the post API and create a new todo in the database. Box.tsx is an island-based component that's created with Preact. Preact is similar to React, but Preact is a lightweight version of the library.
On the Box component, we get the value in the input with the onChange Event. Then, after the user clicks on the add button, we call the post API to create a new todo in the SurrealDB database.
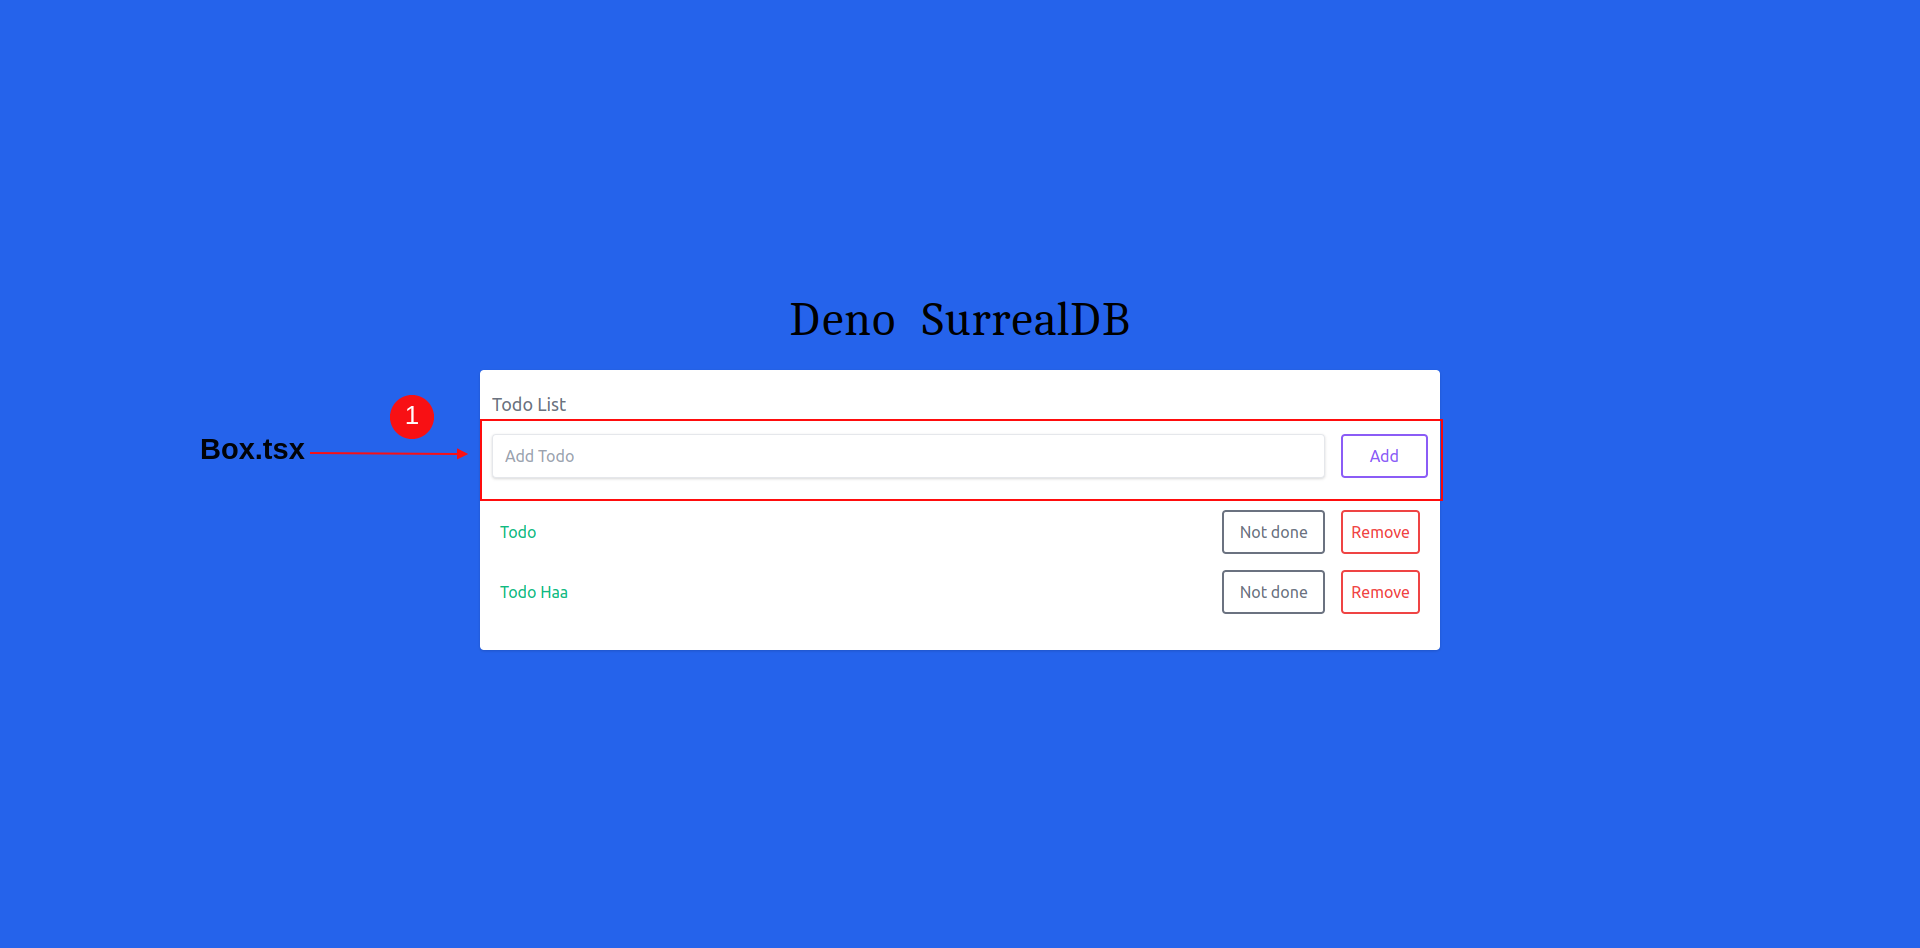 Design the box component with fresh framework
import { useState } from "preact/hooks";

// import Notification from components
import Notification from "../components/Notification.tsx";

interface todo {
    id: string;
    title: string;
    isDone: boolean
}


export default function Box({ data }: { data: any; }) {

    //  title
    const [title, setTitle] = useState("");

    // show Notification based on success
    const [successful, setSuccessful] = useState(false);


    function submit() {

        if (title) {
            //  call post api
            fetch(`/api/post?title=${encodeURIComponent(title)}`)
                .then((res) => res.json())
                .then((data) => {
                    console.log("your data submit sucessfully ");

                    // change false to true
                    setSuccessful(true)
                });
        }
    }


    return (
        <>
          <Notification  successful={successful}  setSuccessful={setSuccessful} />

            <div class="flex mt-4 justify-between">
                <input onChange={(event) => setTitle(event.currentTarget.value)} class="shadow appearance-none border rounded w-full py-2 px-3 mr-4 text-gray-600" placeholder="Add Todo" />
                <button onClick={submit} class="flex-shrink p-2 border-2 rounded text-purple-500 border-purple-500 hover:text-white hover:bg-purple-500 w-24">Add</button>
            </div>
        </>
    );
}
The Item.tsx Component
Item component calls two APIs – one is the delete API and the second is the update API. The delete API deletes an item from the todo table and the update API updates item in the todo table in the database.
Item.tsx is an island component similar to the Box component. The item component is also built with Preact.
Our first button changes based on whether the todo is complete or pending, and the second button deletes the todo based on the Todo's ID.
First, we get the value in the input with the onChange Event. And after the user clicks on the add button, we call the post API to create a new todo in the SurrealDB database.
When the remove button gets clicked, we call the delete API with the todo ID to delete the todo from the database. When the Not Done button gets clicked, we call the Isdone API to update Isdone in the database.
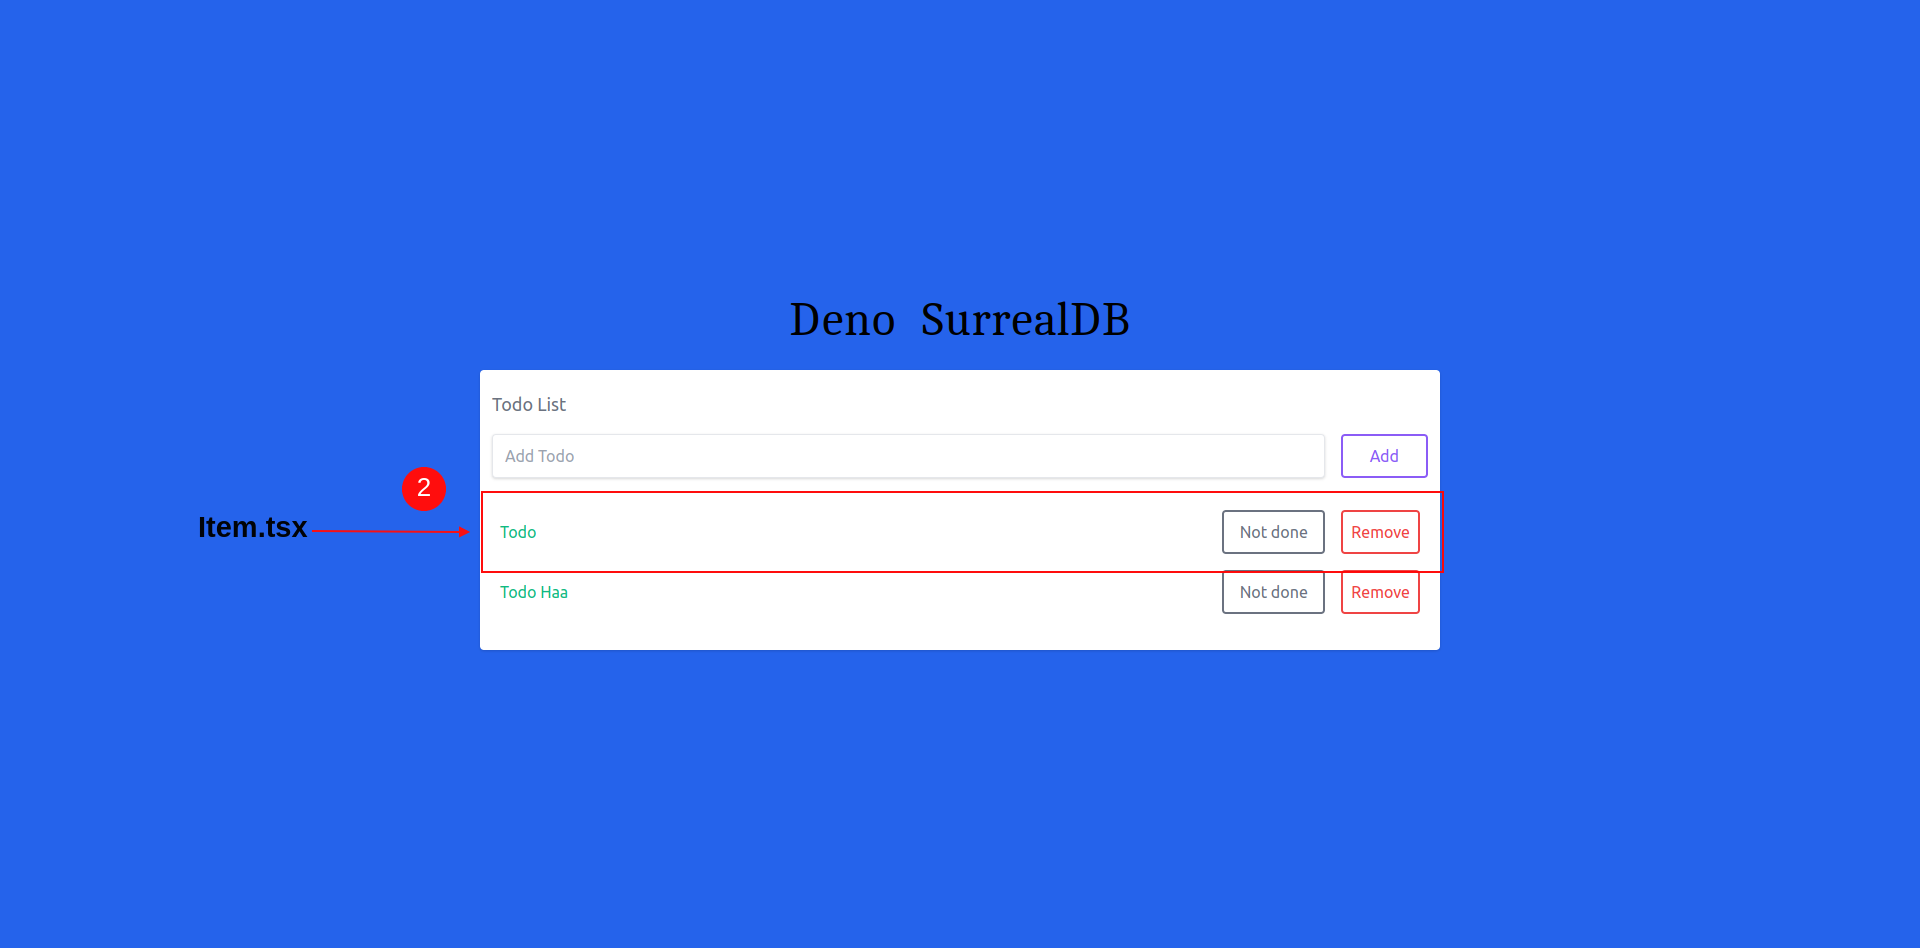 Item component in the fresh framework
import { useState } from "preact/hooks";

// import Notification from components
import Notification from "../components/Notification.tsx";

interface todo {
    id: string;
    title: string;
    isDone: boolean
}


export default function Item({ item }) {

    // todo
    const [todo, setTodoID] = useState(
        {
            id: item.id,
            title: item.title,
            uuid: item.uuid
        }
    );

    // show Notification based on success
    const [successful, setSuccessful] = useState(false);

    //  delete dfunction
    function deleteItem() {

        if (todo.id) {
            //  call delete api
            fetch(`/api/delete?todoID=${encodeURIComponent(todo.id)}`)
                .then((res) => res.json())
                .then((data) => {
                    console.log("your data submit sucessfully ");
                    setSuccessful(true)
                });
        }
    }


    // isdone
    function isDone() {

        if (todo.id) {
            //  call isdone api
            fetch(`/api/isdone?todoID=${encodeURIComponent(todo.id)}&todoTitle=${encodeURIComponent(todo.title)}&todoUuid=${encodeURIComponent(todo.uuid)}`)
                .then((res) => res.json())
                .then((data) => {
                    console.log("your data submit sucessfully ");
                    setSuccessful(true)
                });
        }
    }

    return (
        <>

            <Notification successful={successful} setSuccessful={setSuccessful} />

            <div class="flex mb-4 items-center">
                <p class={`${item.isDone === false ? "w-full text-green-500 cursor-pointer" : " w-full line-through decoration-purple-600 text-green-500 cursor-pointer"}`}>{item.title}</p>
                <button onClick={isDone} class="flex-shrink p-2 ml-4 mr-2 border-2 rounded hover:text-white text-gray-500 border-gray-500 hover:bg-gray-500 w-32">
                    {item.isDone === true ? "Done" : " Not done"}
                </button>
                <button onClick={deleteItem} class="flex-shrink p-2 ml-2 border-2 rounded text-red-500 border-red-500 hover:text-white hover:bg-red-500 w-24">Remove</button>
            </div>
        </>
    );
}
And there you have it - we've implemented all our functionality in our Todo app.
Conclusion
SurrealDB is a helpful database, and I hope you enjoyed learning about it in this tutorial.
There are often a lot of requirements to start working with other databases, but SurrealDB is very simple. You need one command to start the database locally and work with it. It is a new revolution in databases.
The big problem is that SurrealDB is not clear on whether it comes with production capabilities. As of right now, it doesn't seem to fulfill the one-click production-ready web app (like MongoDB Atlas, for example).
You can deploy SurrealDB with a Docker image. The problem is that documents are sometimes not enough info for a new developer (for example, how to change passwords and users in a Docker container).
Without cloud Infrastructure, you would not be able to deploy the application with SuurealDB. So for that reason, I did not provide a live demo of the Todo app. But I know that in the future, SuurealDB will change the future of databases.