

Firebase provides some great services like NoSQL databases, authentication, cloud storage, and much more.
In this tutorial, we will learn how to use your React application to read and add data to your Firebase database.
To demonstrate this, we will learn how to build a Todo app using React and Cloud Firestore (Firebase9 web SDK). Before we start building, let's understand the tools we will use for this tutorial.
What is Cloud Firestore?
Unlike some databases that store data in tables (SQL databases), Cloud Firestore is a non-tabular database that stores data in collections.
According to the docs,
"Cloud Firestore is a flexible, scalable database for mobile, web, and server development. Cloud Firestore does not require you to explicitly create collections or documents. Cloud Firestore stores data in documents, which are stored in collections."
Since we won't focus on the design part in this tutorial, I'll provide the CSS styling. Let's go ahead and set up our database.
How to Set Up Your Cloud Firestore
Before you set up Cloud Firestore, you'll need to sign into your Firebase console. Here’s how.
Sign into Firebase
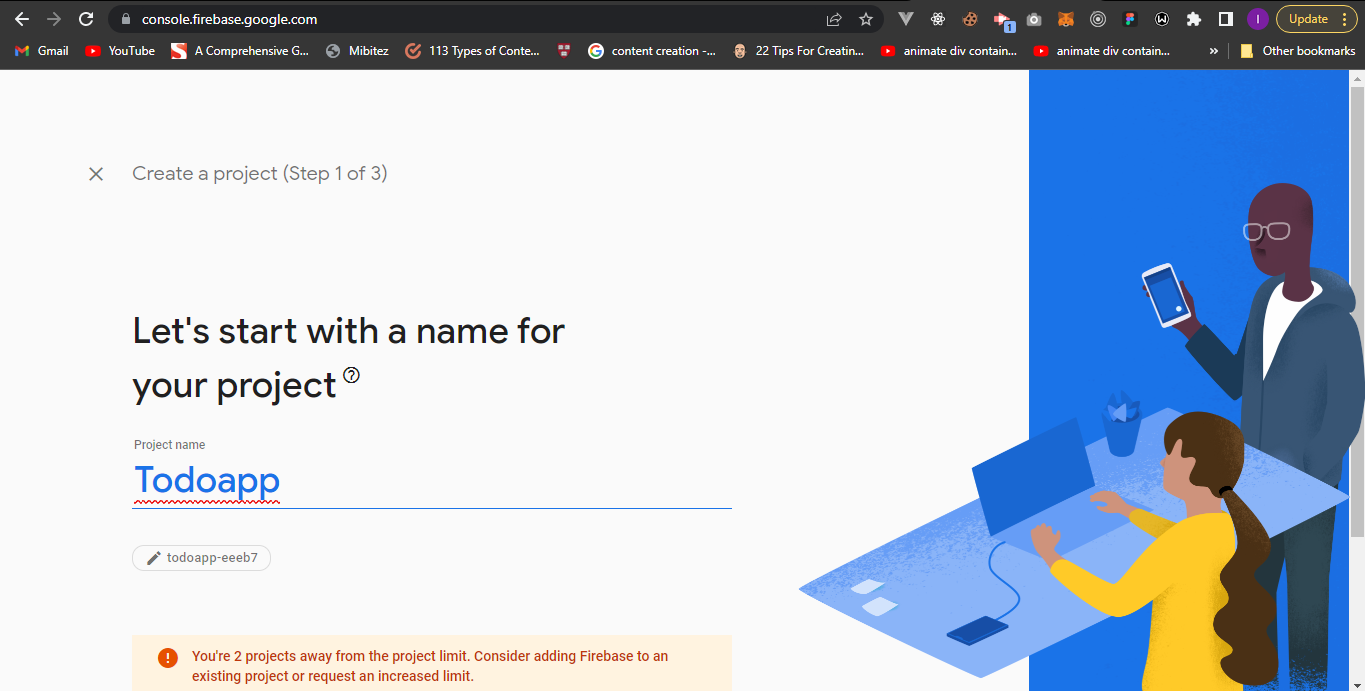
Go to Firebase Console and sign in with your Google account. If you don’t have an account yet, sign up with your Google account and follow the prompts to create a new project.
 firebase console
Pick a suitable name for your project and click continue. For this tutorial, we will name our project Todo-app.
 setting up firebase
Your next screen is a prompt to enable Google Analytics. You can choose to turn it off. We won’t be needing Google Analytics for this tutorial, so I will turn it off.
Congratulations, you have successfully set up your Cloud Firestore. Your next screen will be the Firebase console dashboard.
 firebase dashboard
How to Set Up a React App for Firebase
We will be creating a new React app using npx. We will create a new React app with firebase-react-app as the app name and also the directory’s name. Using the command line, enter the following code to create a new React app:
$ npx create-react-app firebase-react-app
To start your React app, use the following commands. It opens your React app in Visual Studio Code, navigates into your new directory, and finally runs your React app.
$ code .
$ cd firebase-storage
$ npm run start
There are a bunch of starter files and code we won’t be needing for this tutorial. We will delete the App.test.js, index.css, and logo.svg files. We'll also delete the starter code in the App.css and App.js files.
Overview of the Firebase Console
The Firebase dashboard has a sidebar and a main view. The sidebar has been categorized into different products that Firebase offers. Apart from our area of interest, Cloud Firestore, Firebase has a lot of products with awesome services for authentication, storage, databases, and more.
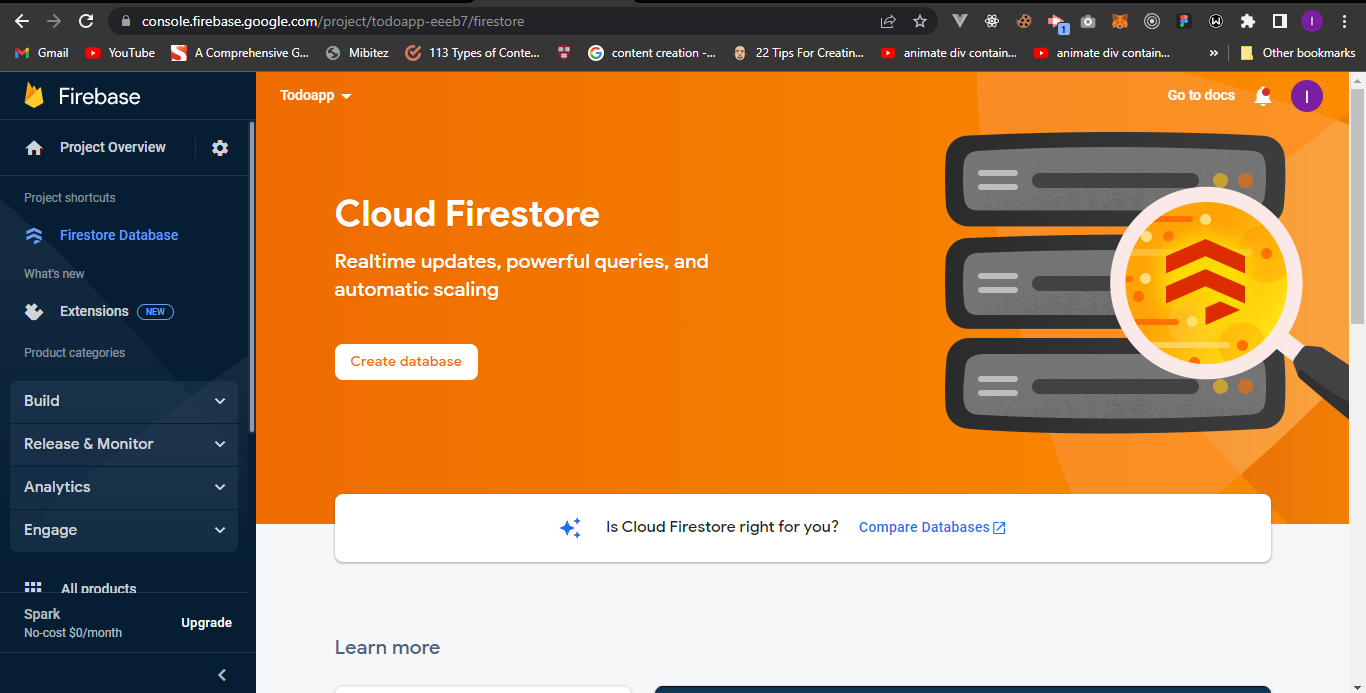
To start using the Cloud Firestore services, navigate to your Firebase dashboard, click on the Build dropdown, and select Firestore Database.
 Firebase dashboard showing the cloud firestore view
Select the option to create a database and set the security rules to start in test mode. Select the default Firestore location and click to enable your database.
Continue configuring your Firebase by adding the Firebase web SDK to our React app. To do this, click on the web icon on your project overview screen.
 Click the web icon
Your next prompt will require you to add Firebase to your web app. You'll need to choose a nickname for your app. We will be using Todo-app as the nickname for our app.
We won’t be needing Firebase hosting. So, you can leave the box for Firebase hosting unchecked. Then, click on register app.
 Firebase screen to register your web app
Your next prompt will require you to install Firebase's latest SDK using npm and will also provide your web app configuration.
$ npm install firebase
Click on Continue to Console. You are halfway to adding Firebase to your React app.
Your web app configuration will be displayed with your unique API keys and some other useful information.
Create a file named firebase.js in the src directory and paste your Firebase configuration in the firebase.js file. We will also import the Cloud Firestore SDK into our React app. Here is how your firebase.js should look like:
 // Import the functions you need from the SDKs you need
import { initializeApp } from "firebase/app";
import { getFirestore } from "firebase/firestore";
// TODO: Add SDKs for Firebase products that you want to use
// https://firebase.google.com/docs/web/setup#available-libraries
// Your web app's Firebase configuration
const firebaseConfig = {
  apiKey: "XXXXXXXXXXXXXXXXXXXXXXXXXXXXXX",
  authDomain: "XXXXXXXXXXXXXXXXXXXXXXXXXXXXXX",
  projectId: "XXXXXXXXXXXXXXXXX",
  storageBucket: "XXXXXXXXXXXXXXXXXXXXXXXX",

  messagingSenderId: "XXXXXXXXXXXXXXX",
  appId: "XXXXXXXXXXXXXXXXXXXXXXXXXXXXXX"
};
// Initialize Firebase

const app = initializeApp(firebaseConfig);
// Export firestore database
// It will be imported into your react app whenever it is needed
export const db = getFirestore(app);
Congratulations again. You have successfully initialized Firebase and Cloud Firestore, and exported them so that you can use them in your React app.
How to Create Our Application
For the sake of writing cleaner code, we’ll create a components folder inside our src directory. We will then create a Todo.js file inside our components folder. This new file will be imported into the App.js file so as to be rendered.
The Todo.js file will have the following code:
import React, { useState } from 'react';
import "../App.css";

const Todo = () => {
    const [todo, setTodo] = useState("")

    const addTodo = (e) => {
        e.preventDefault();
    }

    return (
        <section className="todo-container">
            <div className="todo">
                <h1 className="header">
                    Todo-App
                </h1>

                <div>

                    <div>
                        <input
                            type="text"
                            placeholder="What do you have to do today?"
                            onChange={(e)=>setTodo(e.target.value)}
                        />
                    </div>

                    <div className="btn-container">
                        <button
                            type="submit"
                            className="btn"
                            onClick={addTodo}
                        >
                            Submit
                        </button>
                    </div>

                </div>

                <div className="todo-content">
                    ...
                </div>
            </div>
        </section>
    )
}

export default Todo
Code explanation:
The Todo.js file has an input tag (to take the user’s input), a button with an onClick function (we will be using that to post data to our Firestore), and an onChange function that handles the states.
We won't be going deep into handling form input. The above code shows how to do so with the useState hook.
Whenever the button is clicked, the value of the input, which will be handled by the useState hooks, will be added to the Cloud Firestore.
Like I mentioned above, this is not a CSS tutorial. So here is the code for the CSS styling that you can copy and paste in:
*{
    padding: 0;
    margin: 0;
    box-sizing: border-box;
}
.todo-container {
    display: flex;
    justify-content: center;
    align-items: center;
}

.todo {
    width: 70%;
    margin: 3rem auto 0 auto;
}

.header {
    font-size: 2.5rem;
    margin-bottom: 1rem;
    text-align: center;
}

input {
    padding: 10px 3px;
    width: 100%;
}

.btn-container {
    display: flex;
    justify-content: center;
    align-items: center;
    margin-top: 1rem;
}

.btn {
    padding: 10px 1rem;
    background: #334;
    color: white;
    border-radius: 5px;
    cursor: pointer;
}

.todo-content {
    margin-top: 2rem;
}
How to Add Data to Cloud Firestore
You can add data gotten from the input to the Cloud Firestore using the following code:
import { collection, addDoc } from "firebase/firestore";
import {db} from '../firebase';

    const addTodo = async (e) => {
        e.preventDefault();

        try {
            const docRef = await addDoc(collection(db, "todos"), {
              todo: todo,
            });
            console.log("Document written with ID: ", docRef.id);
          } catch (e) {
            console.error("Error adding document: ", e);
          }
    }
Code explanation:
In Cloud Firestore, data is stored in collections. To add data to Firestore, import the Collection and addDoc functions. We also import the db initialized in the firebase.js file.
When the button is clicked, the Cloud Firestore creates a collection (we have named todos) and adds data as a document to the todos collection.
Congratulations if you are still following. You have successfully added your data to Firebase.
How to Read Data
You can always check your Firebase console dashboard to see all the data you have added.
To fetch data added to your Firestore, we will use the Firebase get method to read all documents added to a collection. You can add read data added to the Cloud Firestore using the following code:
import { collection, getDocs } from "firebase/firestore";
import {db} from '../firebase';
Import { useState } from ‘react’;

   const [todos, setTodos] = useState([]);

    const fetchPost = async () => {

        await getDocs(collection(db, "todos"))
            .then((querySnapshot)=>{
                const newData = querySnapshot.docs
                    .map((doc) => ({...doc.data(), id:doc.id }));
                setTodos(newData);
                console.log(todos, newData);
            })

    }

    useEffect(()=>{
        fetchPost();
    }, [])
Code explanation:
We imported the collection and getDocs functions from Firebase. We used the getDocs function to get data from the collection we initially created. We used the useEffect hook to fetch data after each re-rendering. We used the useState hook to handle the data gotten from Firestore. We mapped through each document in the Todos collection and added each value to the setTodos array.
The todo array now has all the data we added to the Firestore. We can read each todo input we added to the Firestore database by using the following code:
<div className="todo-content">
    {
        todos?.map((todo,i)=>(
            <p key={i}>
                {todo.todo}
            </p>
        ))
    }
</div>
If you are still following up to this point, congratulations. You have successfully added and read data from the Cloud Firestore using React.js. Below is the complete code of our Todo.js file:
import "../App.css";
import React, { useState, useEffect } from 'react';
import { collection, addDoc, getDocs } from "firebase/firestore";


const Todo = () => {
    const [todo, setTodo] = useState("");
    const [todos, setTodos] = useState([]);

    const addTodo = async (e) => {
        e.preventDefault();

        try {
            const docRef = await addDoc(collection(db, "todos"), {
              todo: todo,
            });
            console.log("Document written with ID: ", docRef.id);
          } catch (e) {
            console.error("Error adding document: ", e);
          }
    }

    const fetchPost = async () => {

        await getDocs(collection(db, "todos"))
            .then((querySnapshot)=>{
                const newData = querySnapshot.docs
                    .map((doc) => ({...doc.data(), id:doc.id }));
                setTodos(newData);
                console.log(todos, newData);
            })

    }

    useEffect(()=>{
        fetchPost();
    }, [])


    return (
        <section className="todo-container">
            <div className="todo">
                <h1 className="header">
                    Todo-App
                </h1>

                <div>

                    <div>
                        <input
                            type="text"
                            placeholder="What do you have to do today?"
                            onChange={(e)=>setTodo(e.target.value)}
                        />
                    </div>

                    <div className="btn-container">
                        <button
                            type="submit"
                            className="btn"
                            onClick={addTodo}
                        >
                            Submit
                        </button>
                    </div>

                </div>

                <div className="todo-content">
                    {
                        todos?.map((todo,i)=>(
                            <p key={i}>
                                {todo.todo}
                            </p>
                        ))
                    }
                </div>
            </div>
        </section>
    )
}

export default Todo
Conclusion
If you followed the instructions up to this point, you should be able to work with Cloud Firestore in your React app.
Cloud Firestore does more than add and fetch data. You can check the documentation to learn more.
I hope you learnt a lot through this tutorial. Happy Coding!