
When you're building a website and coding all the cool features you had planned, you'll want to test if everything works as expected.
Now, you can’t do that just by going through the website yourself – you need to check if each unit of your code is working as you want. For that, you need to write unit tests. And they can be quite a hassle when you actually get down to writing them.
So, in this post, I am going to show you how you can get started with writing unit tests in React. I will explain the process through several examples to help you understand better.
For this post, I assume you have a basic knowledge of React. If not, then head over to the docs to get started.
How Is a Test Structured?
Testing involves checking if your code is functioning as it's supposed to by comparing the expected output with the actual output.
What to Test
In general, your tests should cover the following aspects of your code:
If a component renders with or without props
How a component renders with state changes
How a component reacts to user interactions
What Not to Test
Testing most of your code is important, but here are some things you do not need to test:
Actual Implementation: You do not need to test the actual implementation of a functionality. Just test if the component is behaving correctly.
Let’s say you want to sort an array on the click of a button. There’s no need to test the actual sorting logic. You only test if the function was called and if the state changes are rendering correctly.Third Party libraries: If you are using any third party libraries like Material UI, no need to test those – they should already be tried and tested.
This might seem a little complicated at the moment, but you should understand better through examples.
Any test in React, no matter how complicated, follows this structure:
Render the component
Get an element from the component and simulate any user interactions
Write an assertion.
How to Set Up Our Project
First, create the app with create-react-app. We’ll be using Jest and React Testing Library. Both of them come pre - installed with create-react-app. You can see what it looks like here:
"dependencies": {
    "@testing-library/jest-dom": "^5.16.5",
    "@testing-library/react": "^13.4.0",
    "react": "^18.2.0",
    "react-dom": "^18.2.0",
    "react-scripts": "5.0.1",
    "web-vitals": "^2.1.4"
},
As you can see, Jest is not visible here. But, if you go to the node_modules folder, you will see Jest there. So, no need to install it separately.
Also, make sure you have the following lines in your setupTests.js file:
import '@testing-library/jest-dom';
import '@testing-library/jest-dom/extend-expect';
Also, in your package.json file, modify your scripts like this:
"scripts": {
    "start": "react-scripts start",
    "build": "react-scripts build",
    "test": "react-scripts test --watchAll --coverage",
    "eject": "react-scripts eject"
},
This will run your tests in watch mode and also show you the coverage (that is, the portion of the code covered by your tests). You can also define the coverage threshold by adding another property jest. For now, keep the threshold at 80%.
"jest": {
    "coverageThreshold": {
        "global": {
            "lines": 80
        }
    }
}
That’s it, now you are ready to start testing. Let’s first start with a basic test.
How to Write Your First Test for a React App
Let’s write a test for the following component:
const FirstTest = () => {
  return (
    <div>
        <h2> First test </h2>
    </div>
  )
}
Here, we just need to test if the h2 element renders. Now, where should we write the tests? We can write them inside a __tests__ folder anywhere in the src folder. The test file just needs to have a .test.js/jsx extension and the test runner will pick it up.
This is how the test looks in our FirstTest.test.jsx file:
import { render, screen } from '@testing-library/react'
import FirstTest from '../components/FirstTest';

test("Example 1 renders successfully", () => {
    render(<FirstTest/>);

    const element = screen.getByText(/first test/i);

    expect(element).toBeInTheDocument();
})
First, import the required methods. The test() method contains an individual test. It takes the name of the test and a callback function as the two arguments.
Now, following the structure mentioned above, render the component you're testing using the render method. Then, use the screen object to make a query for an element. In this case, it’s the h2 element. Our query gets an element containing text that matches the regex /first test/i (i means ignore case).
Lastly, make the assertion using the expect method. We expect the element to be in the document and it is, so the test passes.
There are lots of other assertions you can make in your tests. You can read more about them here. Also, you can find a list of ways to query an element here. We’ll use some of them in our further examples.
How to Test With Mock Data in React
Here, we have a component with a prop data that displays a list of items. Let’s assume this data comes from the backend and your component is displaying this data.
import React from 'react'

const TestWithMockData = ({data}) => {
  return (
    <div>
        <ul>
            {data.map(item => (
                <li key={item.id}>
                    {item.id}
                    {item.first_name},
                    {item.last_name},
                    {item.email}

                </li>
            ))}
        </ul>
    </div>
  )
}

export default TestWithMockData
While writing tests for a component with props, you need to pass some mock data while rendering this component that pertains to your functionality. Here, one object in our data contains four fields, so we pass some mock data here.
const mockData = [
    {
        "id": 1,
        "first_name": "Fletcher",
        "last_name": "McVanamy",
        "email": "mmcvanamy0@e-recht24.de",
        "age": 30
      }, {
        "id": 2,
        "first_name": "Clarice",
        "last_name": "Harrild",
        "email": "charrild1@dion.ne.jp",
        "age": 35
      },
]
Note that the actual data could contain thousands of records, but the mock data only needs to be relevant to what you want to test. Now, let’s write the test and check if the list renders.
test("List renders successfully", () => {
    render(<TestWithMockData data={mockData} />)
    expect(screen.getByText(/fletcher/i)).toBeInTheDocument();
})
How to Test With Mock Data Covering All Branches in React
Let’s introduce some branching in the above component. We’ll have another prop, displayUnorderedList, that determines whether to display an ordered or unordered list. We’ll also render Senior for age > 50 and Not Senior otherwise.
import React from 'react'

const TestWithMockData = ({data, displayUnorderedList, handleClick}) => {
  return (
    <div>
        {displayUnorderedList ?
            <ul>
                {data.map(item => (
                    <li key={item.id}>
                        {item.id}
                        {item.first_name},
                        {item.last_name},
                        <a onClick={() => {
                            console.log("email link clicked")
                            handleClick()
                        }}>{item.email}</a>

                        {item.age > 50 ? 'Senior' : 'Not senior'}

                    </li>
                ))}
            </ul>
        :
            <ol>
                {data.map(item => (
                    <li key={item.id}>
                        Last name: {item.last_name}
                    </li>
                ))}
            </ol>
        }
    </div>
  )
}

export default TestWithMockData
Here's the coverage report so far:
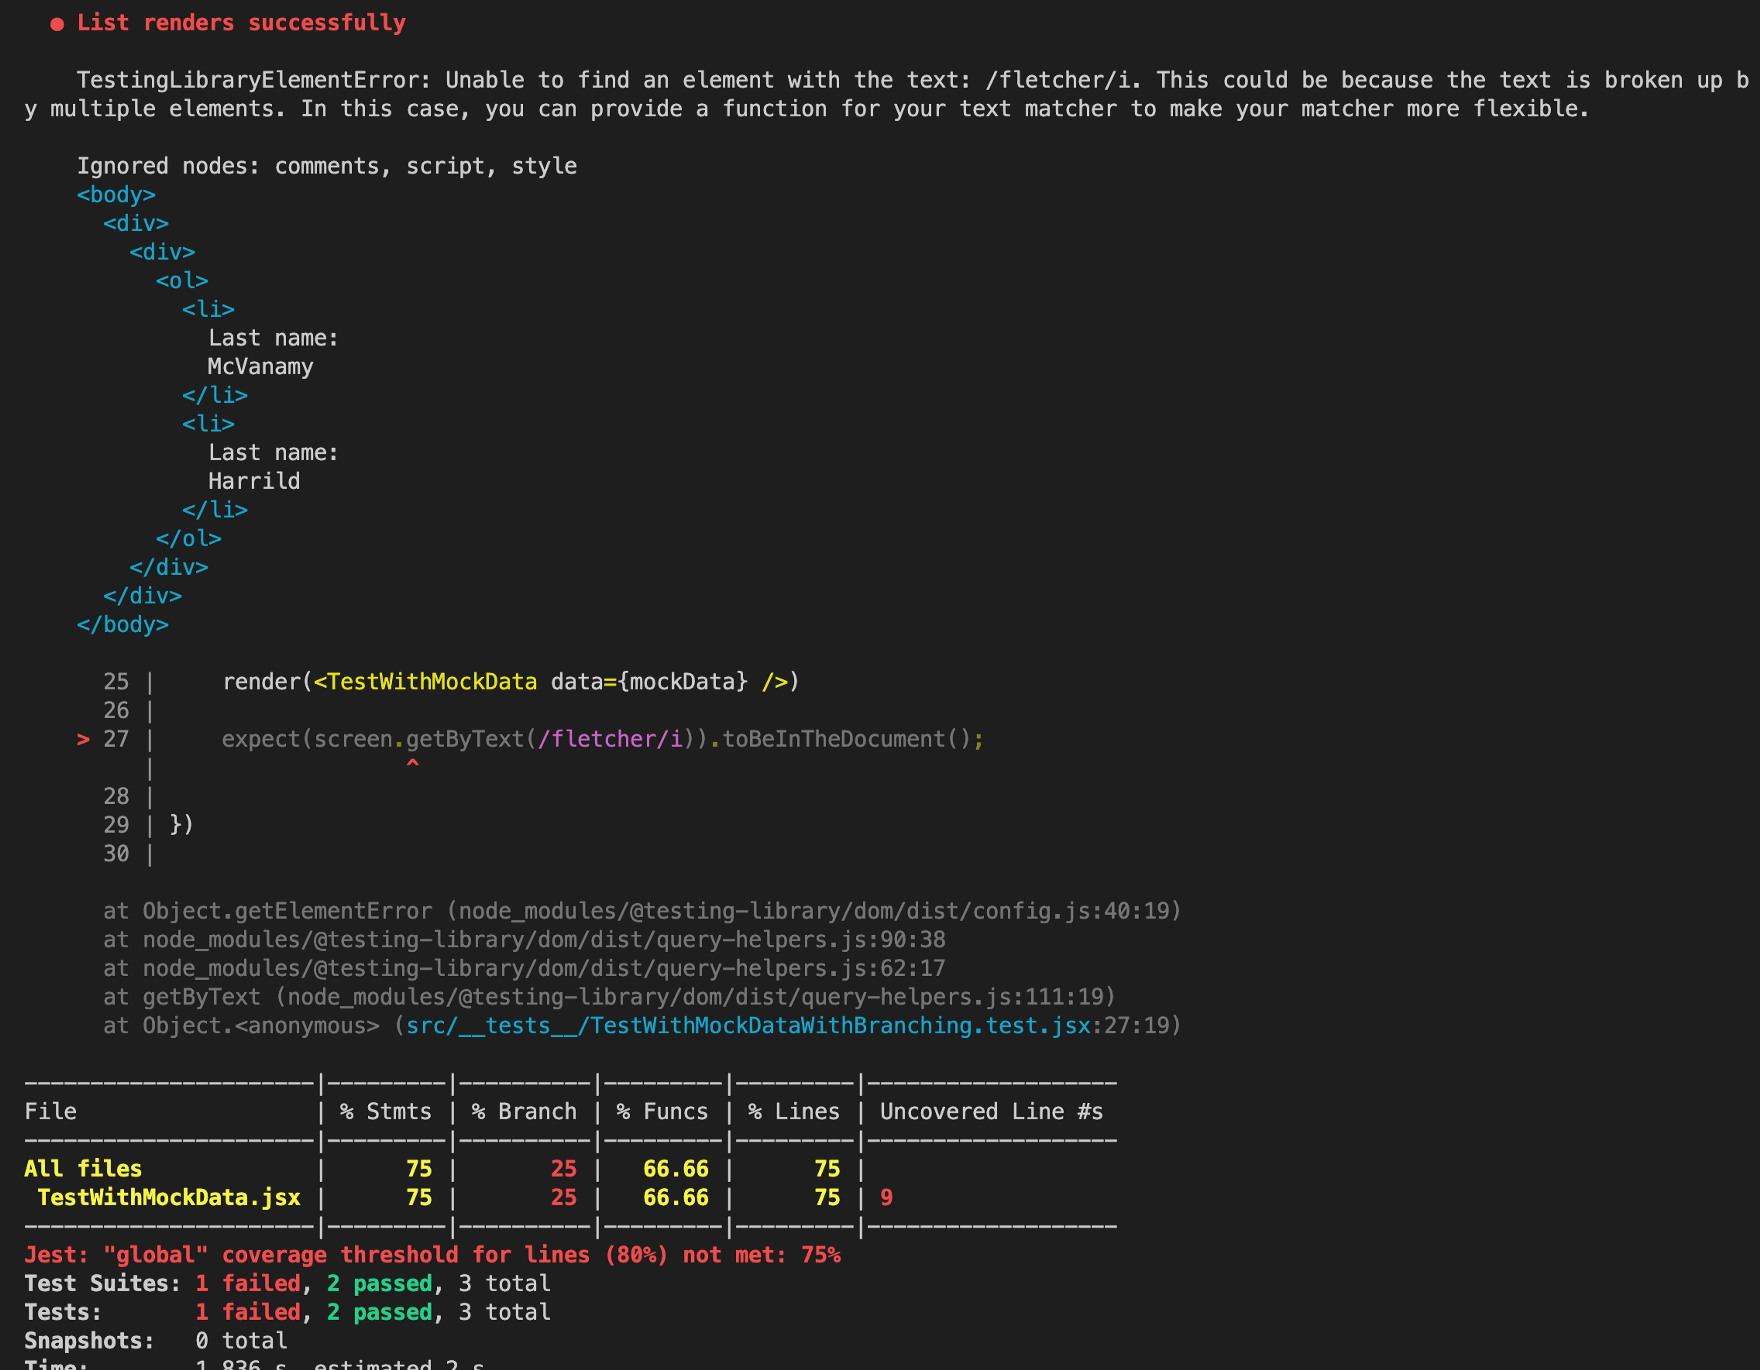
Failed Test: Unable to find the element
You can see that Line 9 (that is, the unordered list part) is not covered by our existing tests. And our previous test has also failed since it is unable to find fletcher in the component.
Why is this so? In our previous test, we have not passed the displayUnorderedList prop to the component so it is null. So, the component renders the ordered list and it does not contain the first_name.
So, let’s write another test covering the ordered list part.
test("Ordered list renders", () => {
    render(<TestWithMockData data={mockData} displayUnorderedList={false} />)

    expect(screen.getByText(/McVanamy/i)).toBeInTheDocument()
})
Here, pass the prop’s value as false to render the ordered list. Also, add the displayUnorderedList prop to the failing test and pass the value true.
Now, all our tests pass with 100% coverage.

Uncovered Branch
One line is still not covered by the test cases, which is the branching logic for age. So, add another record to the mock data that has an age greater than 50.
{
    "id": 3,
    "first_name": "Amby",
    "last_name": "Emmer",
    "email": "aemmer2@buzzfeed.com",
    "age": 67
}
Now, all our tests should pass with 100% coverage.
How to Test User Interactions in React
The most important part of testing any UI app is testing its behaviour with various user interactions. Almost every functionality in a UI app involves user interactions.
You can use the user-event library to simulate user interactions. It has methods for simulating various user events such as click, type, hover, and so on.
First, we need to install the library:
npm install --save-dev @testing-library/user-event
We can use this library to simulate user events. In our examples, we’ll interact with different elements, mostly input and button elements.
How to Test a Function Call on Click of an Element
In our above component, we need toTestWithMockData, make the email field clickable and call a function handleClick on it. This will be passed as props to the component. There, replace {item.email} with:
<a onClick={() => {
    console.log("email link clicked")
    handleClick()
}}>{item.email}</a>
Now, our test coverage takes a hit. To cover this scenario, write the following test:
test("Email link click handler called", async () => {
    const mockHandleClick = jest.fn();
    render(<TestWithMockData
                data={mockData}
                displayUnorderedList={true}
                handleClick = {mockHandleClick}
          />)
    await userEvent.click(screen.getByText(/mmcvanamy0@e-recht24.de/i));
    expect(mockHandleClick).toHaveBeenCalled();
})
First, create the mock of the handleClick function using jest.fn(). We do not need the actual implementation of the method, as we only want to test the behaviour of the component. So, we create an empty mock and pass the same as props. Read more about mocking functions here.
Now, query the <a> element by text (any email from the mock data). Use the click() method to simulate a click event. Use await as simulating a user event is an asynchronous operation.
Write an assertion in the end to check if the method was called. The method was called, so our test passes with 100% coverage.
How to Query Input Fields and Buttons
So far, we have used only one method of querying elements – getByText(). Now, let’s see how you can query input fields and buttons.
<input placeholder='Enter name'/>
<button> Submit </button>
To query these elements, you can do the following:
const inputElement = screen.getByRole('textbox')
getByRole finds an element by the given role. In this case, the textbox role means the input element.
How is role determined? Each element has a defined role, so you do not need to specify an explicit role attribute. You can see a list of roles for different elements here. Whatever element you want, just do getByRole and refer to the list.
For button, the default role is ‘button’ as you can see here:
const button = screen.getByRole('button')
What if we add another input element, <input placeholder=’Enter description’/>? The test runner will now throw an error saying that there are two elements with the same role. What should we do in such a scenario? Use another query getByPlaceholderText().
const nameInput = screen.getByPlaceholderText(/enter name/i);
const descrInput = screen.getByPlaceholderText(/enter description/i);
You can also use getByLabelText() if your input has a label.
<label htmlFor='password'> Enter password</label>
<input type='password' id='password'/>
const passwordInput = screen.getByLabelText(/enter password/i);
For querying buttons, we can do screen.getByRole('button').
<button> Submit </button>
<button> Apply</button>
Since we have two buttons here, just doing getByRole will throw an error. So, we use a name option.
const submitButton = screen.getByRole('button', { name: /submit/i });
const applyButton = screen.getByRole('button', { name: /apply/i });
The name option can contain the label of a form element, text of a button, or the value of the aria-label attribute of any element. We can also do getByText() for a button.
const submitButton = screen.getByText(/submit/i);
How to Test State Updates in React
We have seen how to query form elements like input and button. Now, let’s simulate some user interactions and test state updates. What do I mean by testing state updates?
State updates cause a component to re-render. So, when your functionality performs a state update, you should test how the component is behaving due to the state change.
First, let’s take a simple example where we set the state as soon as the component is loaded – that is, in the useEffect block.
const TestingStateChange = () => {
    const [loaded, setLoaded] = useState(false)
    useEffect(() => {
        setLoaded(true)
    }, [])
  return (
    <div>
        {loaded && <h3> Page Loaded </h3>}
    </div>
  )
}
Here, your entire component, starting from the useEffect statement to the end, is uncovered. When you write the following test, not only does the HTML part get covered but also the useEffect part where you set the state.
test("Testing page load", () => {
    render(<TestingStateChange/>)
    expect(screen.getByText(/page loaded/i)).toBeInTheDocument();
})
This is how you test state updates. You test whether the component behaves as you expect with a state change.
How to Test a State Change on Click of a Button
Let’s have a button and a text that toggles on the click of the button.
const [toggleTextVisible, setToggleTextVisible] = useState(false)`
{toggleTextVisible && <p> Text visible </p> }

<button onClick={() => { setToggleTextVisible(!toggleTextVisible) }}>
    Toggle text
</button>
We’ll write the test for this:
test("Toggle text visible", async () => {
    render(<TestingStateChange/>);
    await userEvent.click(screen.getByText(/toggle text/i));
    expect(screen.getByText(/text visible/i)).toBeInTheDocument();
})
With userEvent, we have simulated the click of a button and asserted if the text is visible.
Now, let’s test another scenario where we check if the above button is disabled on the click of another button.
const [btnDisabled, setBtnDisabled] = useState(false);
Add a disabled={btnDisabled} attribute to the above button and create another button that controls its value.
<button onClick={() => { setBtnDisabled(!btnDisabled) }}>
      Toggle button disabled
</button>
Use the toBeDisabled() method to test if the button is disabled.
test("Button disabled on click", async () => {
    render(<TestingStateChange/>)
    await userEvent.click(screen.getByText(/toggle button disabled/i));
    expect(screen.getByText(/toggle text/i)).toBeDisabled();
})
How to Test if an Element Was Added to a List
Let’s perform another assertion. Here, we’ll check if an element was added to a list. We’ll have some data and create a state with the data as the initial value. We'll display it while also having a button to add an element to it.
const [elements, setElements] = useState(data);
<h3> List </h3>
{elements.map(item => (
    <div key= {item.id}>
       {item.id}: { item.name }
    </div>
))}
<button onClick={() => {
    setElements([...elements, {
        id: 4,
        name: 'abhinav'
    }])
}}> Add to list </button>
Add an attribute data-testid='record' to each record to help query the element. Let’s write the test for this:
test("Element added to the list", async () => {
    render(<TestingStateChange/>)
    expect(screen.getAllByTestId('record').length).toBe(3);

    await userEvent.click(screen.getByText(/add to list/i));
    expect(screen.getAllByTestId('record').length).toBe(4);
})
To get multiple elements with the same query, use the getAllBy… method. In this case, there are multiple elements with the test-id record, so using the getAllByTestId() method gets a list of all such elements.
Here, we have checked the length of the list. We can add another assertion to check if the new element is visible.
expect(screen.getByText(/abhinav/i)).toBeInTheDocument();
How to Test if an Element Was Removed From a List
Now, let’s add another button that removes an element from the list.
<button onClick={() => {
    setElements(elements.filter(item => item.id != 2))
}}> Remove from list </button>
The test for this:
test("Element removed from list", async () => {
    render(<TestingStateChange/>)
    await userEvent.click(screen.getByText(/remove from list/i));
    expect(screen.getAllByTestId('record').length).toBe(2);
})
Here, we test whether the length of the list was reduced. All our tests pass with 100% coverage.
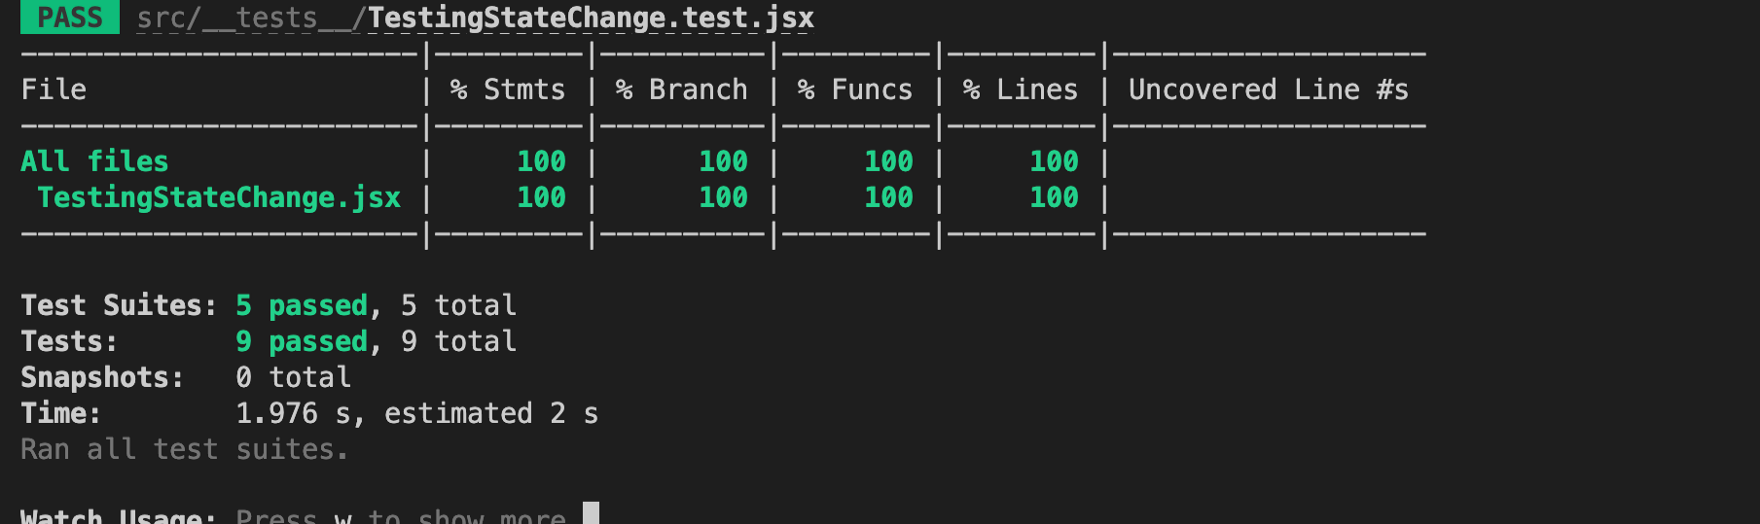
Coverage Report for Testing State Change: Tests Passed
How to Test API Calls in React
API calls are an important part of any UI application. Let’s understand how to test an API call.
In this example, we have a file data.json that has some data. We’ll make an API call to fetch this data.
For demonstration, we’ll save this file on the local server only (inside the public folder), but the procedure remains the same when fetching a file from a remote server.
We’ll use fetch to make the API call.
fetch("http://localhost:3000/data.json")
  .then(res => {
      return res.json();
  })
  .then(data => {
      // Store the data in state
  })
Now, let’s have a state to store the data and render it.
const [data, setData] = useState([])
<div>
    {data.map(item => (
        <div>
            {item.name}
        </div>
    ))}
</div>
How do we write the test for this? One way is to mock the fetch method and provide our own mock implementation. But what if there are multiple Fetch API calls in the component? You cannot have the same mock implementation for everyone.
So, we put the fetch call in a separate function and have a mock implementation of that function. We put our API call in a FetchData method that returns the promise returned by fetch.
We put the method in a separate Services.js file and export it from there.
export const FetchData = () => {
    return fetch("http://localhost:3000/data.json")
        .then(res => {
            return res.json();
        })
}
Now, when we call this method inside our component, it looks like this:
const [data, setData] = useState([])

useEffect(() => {
    FetchData().then(data => {
        setData(data);
    })
})

return (
  <div>
      {data.map(item => (
          <div>
              {item.name}
          </div>
      ))}
  </div>
)
Now, let’s write the test for this. The main thing is to mock the FetchData method. First, import all methods from Services.js as a module.
import * as services from '../utils/Services'
Let’s mock our function using jest.spyOn(). The method takes two arguments, the object and the method name as a string.
const mockFetchData = jest.spyOn(services, 'FetchData')
        .mockImplementation(async () => {
            return [{
                name: 'kunal'
            }];
        })
spyOn creates an empty mock of the method. Now, we provide our mock implementation where we return some mock data. This will be called when our component renders.
render(<TestingAPICalls/>)
expect(mockFetchData).toHaveBeenCalled();
We use toHaveBeenCalled() to test if the method was called. It was – so the test passes. Now, to test the behaviour of our component, let’s test if the name was rendered.
expect(screen.getByText(/kunal/i)).toBeInTheDocument();
In this case, the test fails as it is unable to find the element. Why is this so?

Failed Test: Unable to find the element
Since API calls and state updates are asynchronous, the text hasn’t been rendered yet. To test asynchronous behaviour, wrap the query in a waitFor() block.
await waitFor(() => {
    expect(screen.getByText(/kunal/i)).toBeInTheDocument();
})
waitFor does exactly what the name suggests. It waits for the asynchronous behaviour to finish before making the query. Now, our test passes with 100% coverage.
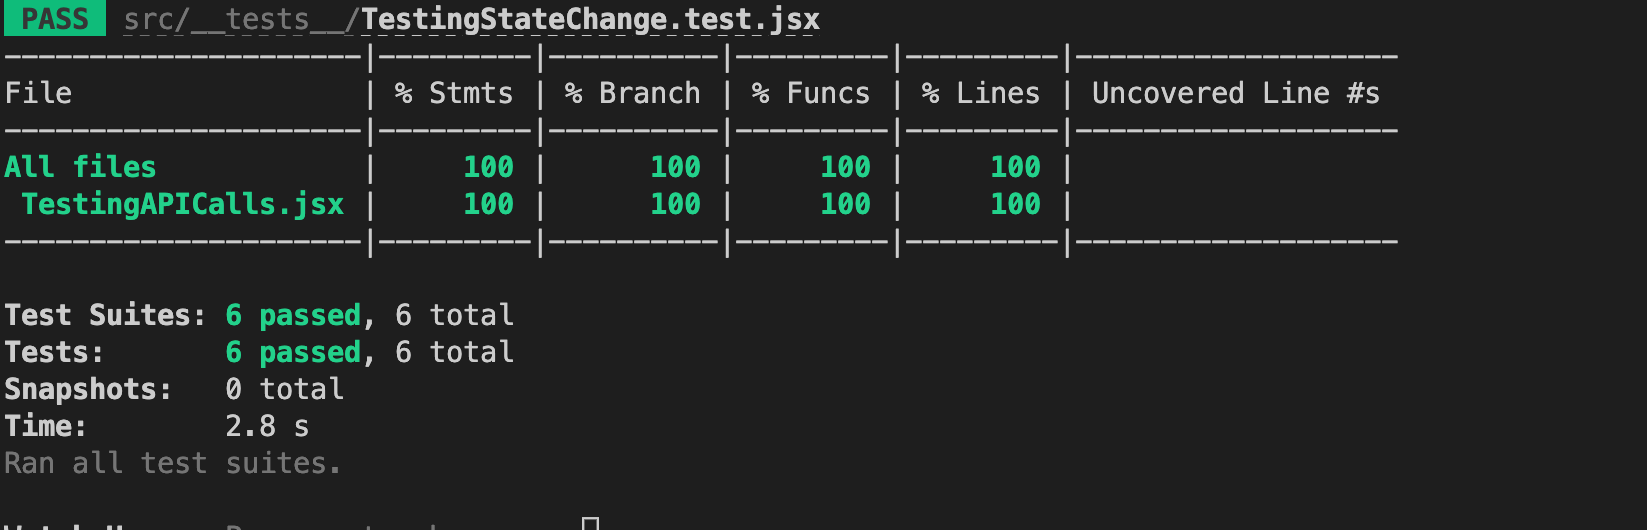
100% Coverage for Testing API Calls
You can find the complete code on GitHub.
Conclusion
Phew! That was a long one. But it needed to be. I have explained, through basic examples, how you can start writing tests in React.
This article started from a basic test with a simple assertion and explained how to use mock data to serve the purpose of your test.
I also explained how to simulate user interactions, how to test a component’s behaviour on state updates, and lastly how to test API calls. Hopefully, all these examples help you write tests for your upcoming project.
If you are unable to understand the content or find the explanation unsatisfactory, please let me know. New ideas are always appreciated! Feel free to DM me on LinkedIn if you want to discuss anything. Until then, Goodbye!