
You can use HTML's <a> tag to link to different parts of a website, to another web page, or to a separate website entirely.
By default, it is underlined and given a bluish color, but you can override these style defaults with CSS (which a lot of people do).
Most importantly, though, this tag takes the href attribute, in which you specify which website, web page, or part of the same web page to link to.
In addition to the href attribute, the <a> tag also takes the target attribute. This lets the page or website you're linking to open in another browser tab. You just need to set the value of the target attribute to blank.
Basic a href tag Syntax
Here's the basic syntax for the <a> tag:
<a href="https://www.freecodecamp.org/">freeCodeCamp</a>
In this tutorial, we will examine how to link to another website, link to another page on the same website, and link to a specific part of the same web page – all with the <a> tag.
How to Link to Another Website (External Link)
We've already touched briefly on the href attribute. The value of this attribute tells which website to link to. The value must be an absolute URL, which means you have to specify the full web address of the website, for example, https://www.freeCodeCamp.org.
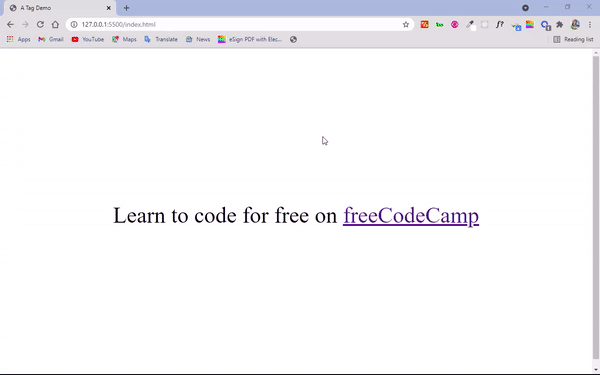
<p>
   Learn to code for free on
   <a href="https://www.freecodecamp.org/">freeCodeCamp</a>
</p>
 body {
     display: flex;
     align-items: center;
     justify-content: center;
     height: 100vh;
     font-size: 3rem;
     }
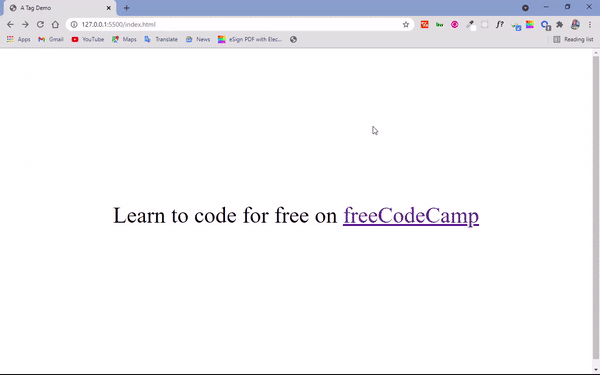
If you're dealing with external links, it is better to open them in a separate tab so the user doesn't have to click back and forth to scan links in the original site. This helps provide a more pleasant user experience.
 <p>
      Learn to code for free on
      <a href="https://www.freecodecamp.org/" target="_blank">freeCodeCamp</a>
 </p>
How to Link to a Page on the Same Website
When you're linking to a page on the same website, the value assigned to the href attribute is what makes the difference.
So, instead of specifying an absolute URL, you'll use a relative one. For example, you'll use contact.html instead of https://www.freeCodeCamp.org.
You can see how to link to pages on the same website below:
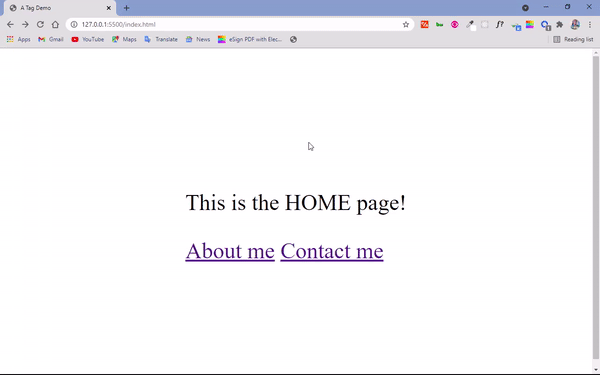
The code that does it looks like this:
To link to the Home Page:
<div>
   <p>This is the HOME page!</p>
   <a href="about.html">About me</a>
   <a href="contact.html">Contact me</a>
</div>
body {
     display: flex;
     align-items: center;
     justify-content: center;
     height: 100vh;
     font-size: 3rem;
     }
To link to the Contact Page:
<div>
  <p>This is the CONTACT page!</p>
</div>
body {
     display: flex;
     align-items: center;
     justify-content: center;
     height: 100vh;
     font-size: 3rem;
     }
To link to the About Page:
<div>
      <p>This is the ABOUT page!</p>
</div>
body {
    display: flex;
    align-items: center;
    justify-content: center;
    height: 100vh;
    font-size: 3rem;
    }
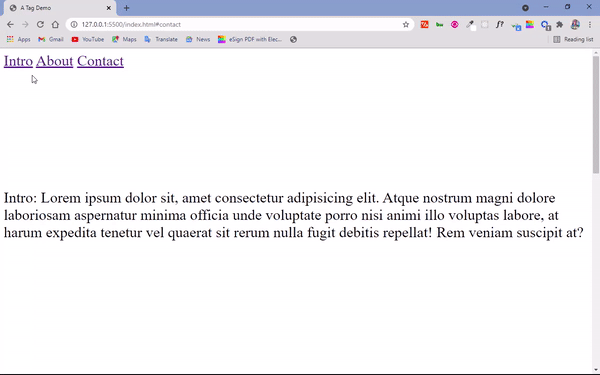
How to Link to a Specific Part of a Web Page
You use the <a> tag, alongside its href attribute, to link to a specific part(s) on the same web page in combination with the id attribute.
Almost every HTML element takes the id attribute. So when you identify the portion of the web page you want to link to, assign it an id and then pass it to the href attribute as a value with the number symbol (#) preceding it.
The code snippets below demonstrate how to link to specific parts on the same web page:
<a href="#intro">Intro</a>
<a href="#about">About</a>
<a href="#contact">Contact</a>
<p id="intro">
      Intro: Lorem ipsum dolor sit, amet consectetur adipisicing elit. Atque
      nostrum magni dolore laboriosam aspernatur minima officia unde voluptate
      porro nisi animi illo voluptas labore, at harum expedita tenetur vel
      quaerat sit rerum nulla fugit debitis repellat! Rem veniam suscipit at?
</p>

<p id="about">
      About me: Lorem ipsum dolor sit amet consectetur adipisicing elit. Debitis
      quos nesciunt nemo dignissimos quisquam quasi harum, vero illum, ducimus
      similique placeat ut rerum hic non aliquid itaque dolores expedita libero
      consequuntur sit rem quod officia? Fugiat explicabo natus optio dolorem?
</p>

<p id="contact">
      Contact me: Lorem ipsum dolor sit amet consectetur adipisicing elit.
      Debitis quos nesciunt nemo dignissimos quisquam quasi harum, vero illum,
      ducimus similique placeat ut rerum hic non aliquid itaque dolores expedita
      libero consequuntur sit rem quod officia? Fugiat explicabo natus optio
      dolorem?
 </p>
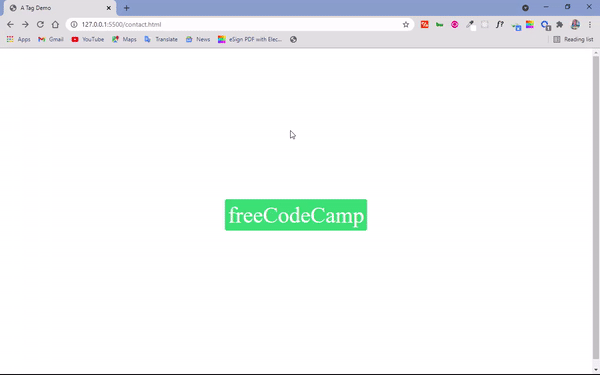
How to Make Buttons with the <a> Tag
It's pretty common to use the <a> tag to make buttons and then style them with CSS.
You typically use the input type of button (<input type=”button”>) and the button element <button>…</button> to do this. But you might have to add some JavaScript to get them to do what you want them to do.
With the <a> tag, you can simply specify where you want to link to as the href value.
<a class="btn" href="https://www.freecodecamp.org">freeCodeCamp</a>
 body {
    display: flex;
    align-items: center;
    justify-content: center;
    height: 100vh;
    font-size: 3rem;
}

.btn {
    background-color: #2ecc71;
    border: 1px solid white;
    border-radius: 5px;
    text-decoration: none;
    color: white;
    padding: 6px;
}

.btn:hover {
      background-color: #0fa84f;
}
What does the code above do?
We attached a class attribute of btn (for button) to the <a> tag so we could style it. Targetting the tag through that assigned class, we set a greenish background for it, a border of 1px width, solid style, and white color with a border-radius set to 5px so we could have a slightly rounded border.
To remove the default underline assigned to <a> tags, we set a text decorator of none. We also set a padding of 6px for more spacing between the text and the border.
With the :hover pseudo-class provided by CSS, we were able to specify a slight change in the background color any time a user hovers their mouse over the button.
In the end, we have the result below:
Conclusion
I hope this tutorial helped you figure out all the things you can do with the <a> tag so you can start making good use of it on your websites.
Thank you for reading, and keep coding.