
By Camila Ramos Garzon
In this article, we'll be discussing the get, put, and post HTTP methods. You'll learn what each HTTP method is used for as well as why we use them.
In order to get a deep understanding of how HTTP methods work, I'll also go over key context and background information.
Topics we'll cover in this post:
- HTTP Protocol
- Client-server architecture
- APIs
By the end of this article you'll have a good understanding of the functions of each request method. You'll also have experience making requests and working with a web API.
What is HTTP?
HTTP is a protocol, or a definite set of rules, for accessing resources on the web. Resources could mean anything from HTML files to data from a database, photos, text, and so on.
These resources are made available to us via an API and we make requests to these APIs via the HTTP protocol. API stands for application programming interface. It is the mechanism that allows developers to request resources.
Client-Server Architecture
In order to understand the HTTP methods, it’s important to cover the concept of client/server architecture. This architecture describes how all web applications work and defines the rules for how they communicate.
A client application is the one that a user is actually interacting with, that's displaying the content. A server application is the one that sends the content, or resource, to your client application. A server application is a program that is running somewhere, listening, and waiting for a request.
The main reason for this separation is to secure sensitive information. Your entire client application gets downloaded into the browser, and all of the data can be accessed by anyone accessing your web page.
This architecture helps protect things like your API keys, personal data, and more. Now modern tools like Next.js and Netlify allow developers to run server code in the same app as their client app, without needing a dedicated server application.
Client-Server Communication
Client and server applications communicate by sending individual messages on an as-needed basis, rather than an ongoing stream of communication.
These communications are almost always initiated by clients in the form of requests. These requests are fulfilled by the server application which sends back a response containing the resource you requested, among other things.
Why We Need A Server-Client Architecture
Let’s say you were building a weather web app, for example. The weather app that your user is going to interact with is the client application – it has buttons, a search bar, and displays data like city name, current temperature, AQI, and so on.
This weather app wouldn’t have every city and its weather information coded directly into it. This would make the app bloated and slow, would take forever to research and manually add to a database, and would be a headache to update every single day.
Instead, the app can access weather data by city using the Weather web API. Your app would gather your user’s location and then make a request to the server saying, “Hey, send me the weather information for this specific city.”
Depending on what you are trying to achieve, you would use the various request methods that are available. The server sends back a response containing the weather information and a few other things, depending on how the API is written. It may also send back things like a timestamp, the region this city is located in, and more.
Your client application communicated with a server application running somewhere, whose only job is to listen continuously for a request to that address. When it receives a request, it works to fulfill that request either by reading from a database, another API, local file, or a programmatic calculation based on data you pass in.
The Anatomy of an HTTP Request
An HTTP request must have the following:
- An HTTP method (like
GET) - A host URL (like
https://api.spotify.com/) - An endpoint path(like
v1/artists/{id}/related-artists)
A request can also optionally have:
- Body
- Headers
- Query strings
- HTTP version
The Anatomy of an HTTP Response
A response must have the following:
- Protocol version (like
HTTP/1.1) - Status code (like
200) - Status text (
OK) - Headers
A response may also optionally have:
- Body
HTTP Methods Explained
Now that we know what HTTP is and why it’s used, let’s talk about the different methods we have available to us.
In the weather app example above, we wanted to retrieve weather information about a city. But what if we wanted to submit weather information for a city?
In real life, you probably wouldn’t have permissions to alter someone else’s data, but let’s imagine that we are contributors to a community-run weather app. And in addition to getting the weather information from an API, members in that city could update this information to display more accurate data.
Or what if we wanted to add a new city altogether that, for some reason, doesn’t already exist in our database of cities? These are all different functions – retrieve data, update data, create new data – and there are HTTP methods for all of these.
HTTP POST request
We use POST to create a new resource. A POST request requires a body in which you define the data of the entity to be created.
A successful POST request would be a 200 response code. In our weather app, we could use a POST method to add weather data about a new city.
HTTP GET request
We use GET to read or retrieve a resource. A successful GET returns a response containing the information you requested.
In our weather app, we could use a GET to retrieve the current weather for a specific city.
HTTP PUT request
We use PUT to modify a resource. PUT updates the entire resource with data that is passed in the body payload. If there is no resource that matches the request, it will create a new resource.
In our weather app, we could use PUT to update all weather data about a specific city.
HTTP PATCH request
We use PATCH to modify a part of a resource. With PATCH, you only need to pass in the data that you want to update.
In our weather app, we could use PATCH to update the rainfall for a specified day in a specified city.
HTTP DELETE request
We use DELETE to delete a resource. In our weather app, we could use DELETE to delete a city we no longer wanted to track for some reason.
HTTP Method FAQs
What’s the difference between PUT and POST?
PUT requests are idempotent, meaning that executing the same PUT request will always produce the same result.
On the other hand, a POST will produce different outcomes. If you execute a POST request multiple times, you'll create a new resource multiple times despite them having the same data being passed in.
Using a restaurant analogy, POSTing multiple times would create multiple separate orders, whereas multiple PUT requests will update the same existing order.
What’s the difference between PUT and PATCH?
The key differences are that PUT will create a new resource if it cannot find the specified resource. And with PUT you need to pass in data to update the entire resource, even if you only want to modify one field.
With PATCH, you can update part of a resource by simply passing in the data of the field to be updated.
What if I just want to update part of my resource? Can I still use PUT?
If you just want to update part of your resource, you still need to send in data for the entire resource when you make a PUT request. The better-suited option here would be PATCH.
Why is a body optional for a request and response?
A body is optional because for some requests, like resource retrievals using the GET method, there is nothing to specify in the body of your request. You are requesting all data from the specified endpoint.
Similarly, a body is optional for some responses when a status code is sufficient or there is nothing to specify in the body, for example with a DELETE operation.
HTTP Request Examples
Now that we’ve covered what an HTTP request is, and why we use them, let’s make some requests! We’re going to be playing with the GitHub Gist API.
"Gist is a simple way to share snippets and pastes with others. All Gists are Git repositories, so they are automatically versioned, forkable and usable from Git." (Source: Github)
You will need a GitHub account for this. If you don’t already have one, this is a great opportunity to start one to save your code in the future.
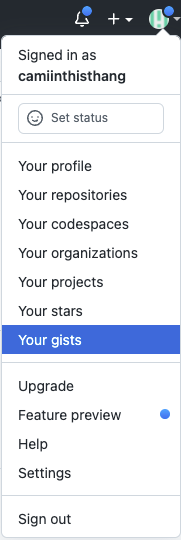
Every user on GitHub can create gists, retrieve their gists, retrieve all public gists, delete a gist, and update a gist, amongst other things. To keep things simple we will use Hoppscotch, a platform with a nice interface used to quickly and easily make HTTP requests.
A quick Hoppscotch walkthrough:
- There is a drop down menu where you can select the method you want to create a request with.
- There is a text box where you should paste the URL of of the API endpoint you want to access.
- There is a Headers section where we will be passing in headers as instructed by the GitHub docs.

- There is a body area where we will pass in content to our body as instructed by the GitHub docs.

- The right column will quickly let you know if your request was successful. If it is green, you successfully made your request, and if it's red there was an error.

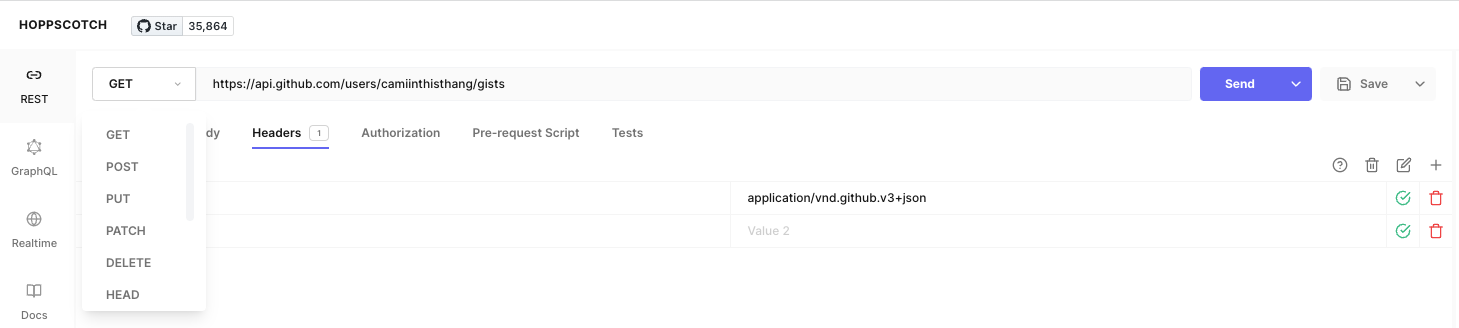
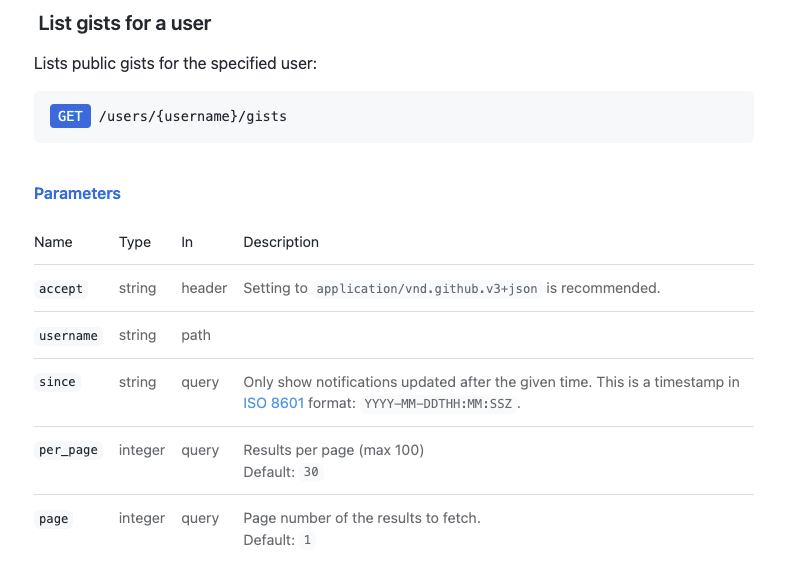
How to Make a GET Request
To make a GET request to retrieve all of a specific users’ gists, we can use the following method and endpoint: GET /users/{username}/gists. The documentation tells us the parameters that we can pass in to make this request.
We see that in the path we have to pass in a string with the target user’s username. We also see that we have to pass in a header called accept and set it to application/vnd.github.v3+json.
We're given the URL for this API:
https://api.github.com
We're given the endpoint path for this specific operation:
/users/{username}/gists
To make this request:
- Paste in the full URL + path in the input field of Hoppscotch. Be sure to replace
usernamewith an actual username. If you don't have a GitHub with existing Gists, you can use mine: camiinthisthang. - Select the
GETrequest method - In the Headers tab, set accept as a header and set the value to
application/vnd.github.v3+json

- Hit send!
At the bottom, you'll see your response formatted as JSON. In order to read this more clearly, copy the response and paste it into an online JSON formatter.
In the formatter, you're able to tell that the response is an array of objects. Each object represents one gist, showing us information like the URL, the ID, etc.
How to Make a POST Request
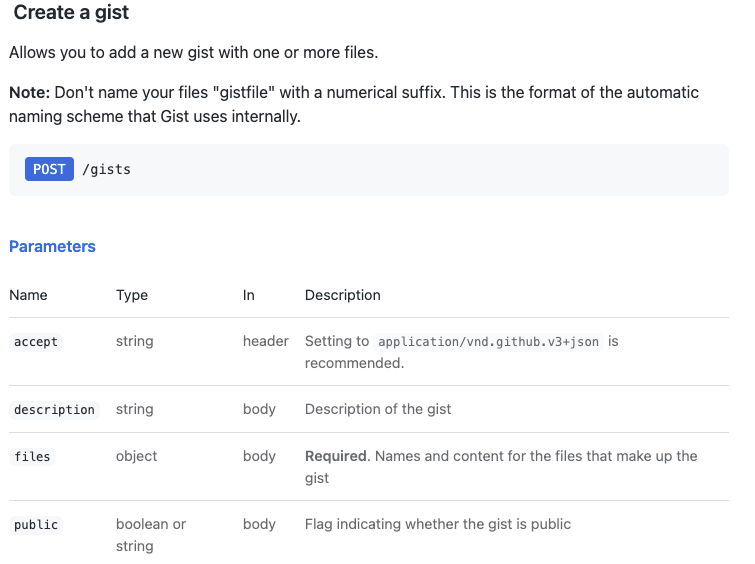
Now let's create a resource using the POST method. In this context, the new resource would be a new gist.
First we’ll have to create a personal access token. To do that, go to your settings page and hit Generate token.
Name your token and select the scope “Create Gists”:

Then click the green Generate token button at the bottom of the page.

Copy your access code and paste it somewhere you can easily retrieve it.
Now we're ready to make our request! The documentation tells us we should pass in a header, and a files object in the body. We can optionally pass in a few other things, including a boolean that dictates if this gist is public or private.
We're given the URL for this API:
https://api.github.com
We're given the endpoint path for this specific operation:
/gists
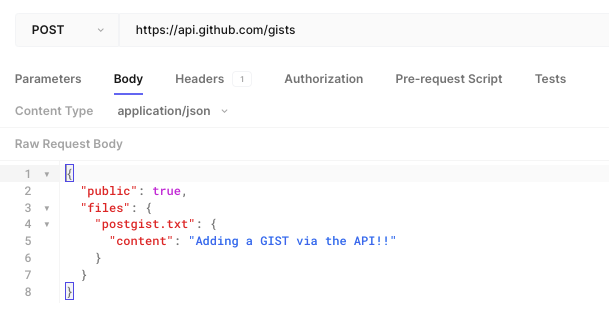
To make this request:
- Paste the full URL + path into the input field of Hoppscotch.
- Select the
POSTrequest method - In the Headers tab, set accept as a header and set the value to
application/vnd.github.v3+json - In the Body tab, set the content type to
application/json. Then start off with an object{}.
Inside of this object, we'll set the public boolean to true. Then we'll define the property files, and the value is another object with a key of the name of your new gist. The value for this should be another object whose key is content. The value here should be whatever you want to actually add to the gist.
Here is the code for you to copy/paste:
{
  "public": true,
  "files": {
    "postgist.txt": {
      "content": "Adding a GIST via the API!!"
    }
  }
}
- In the Authorization tab, set the authorization type to
Basic Auth. Type in your Github username and pass your personal access token we created in the password field.
After we run this, we get a long response. An easy way to check that your gist was created is to go to your Gists in GitHub.
We see that we successfully added a Gist!

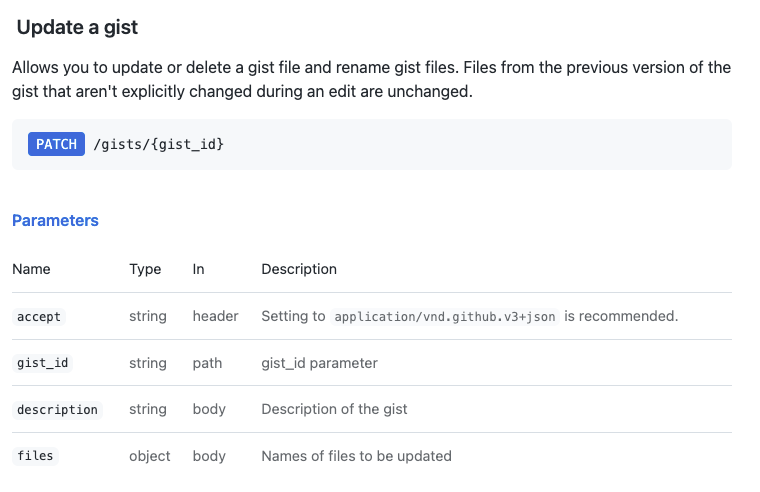
How to Make a PATCH Request
Let's update the title and description of the Gist we just created. Remember: PATCH allows you to update a part of a resource, not the entire resource. Anything that we don’t pass in will remain unchanged.
We didn’t actually pass a description to our Gist when we created it, so we can patch this and create one.
We're given the URL for this API:
https://api.github.com
We're given the endpoint path for this specific operation:
/gists/{gist_id}
To make this request:
- Paste in the full URL + path in the input field of Hoppscotch. Get the
Gist IDof the gist you want to update. You can find the ID by going to the Gist in GitHub and copying the alphanumeric string at the end of the URL.

Select the
PATCHrequest method.In the Headers tab, set accept as a header and set the value to
application/vnd.github.v3+json.In the Authorization tab, set the authorization type to
Basic Auth. Type in your GitHub username and pass your personal access token we created in the password field.In the Body tab, we'll pass in the updated description and title. Here is the code:
{
  "description": "Adding a description via the API",
  "files": {
    "postgist.txt": {
      "content": "Adding a GIST via the API!! -- adding this line at the end to make the content slightly longer"
    }
  }
}
If we refresh our Gist, we see that we have an updated title and description!

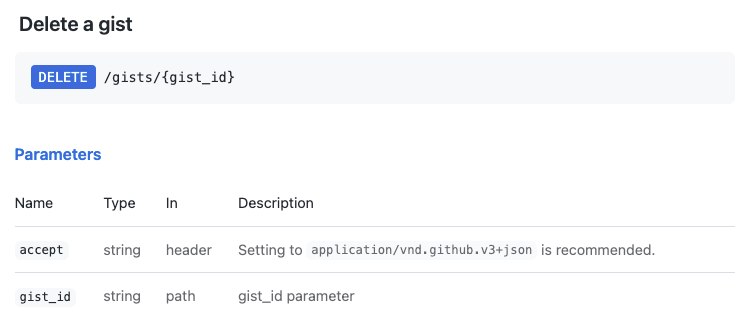
How to Make a DELTE Request
Let's delete the Gist we created. We should pass in the header and the Gist ID.
We're given the URL for this API:
https://api.github.com
We're given the endpoint path for this specific operation:
/gists/{gist_id}
To make this request:
- Paste in the full URL + path in the input field of Hoppscotch. Get the
Gist IDof the gist you want to update. You can find the ID by going to the Gist in GitHub and copying the alphanumeric string at the end of the URL.
Select the
DELETErequest methodIn the Headers tab, set accept as a header and set the value to
application/vnd.github.v3+json.
If we navigate to our Gists, we see that this one doesn't exist and we successfully deleted the resource.
How to Make Requests in Your App
We used Hoppscotch because it lets us quickly make requests without having to spin up a whole app or download anything.
If you wanted to make requests in a JavaScript/React app, you could use Javascript fetch or Axios.
For a step-by-step code walk through of how to make a simple app that uses HTTP request methods and an API, check out my video on youtube where we create a web app that displays information about all of the countries via an API.
You Did It!
If you're reading this, go ahead and give yourself a pat on the back because you've learned about web APIs, the HTTP protocol, the client-server architecture – and you've also made your first requests.
If you liked this style of teaching, I create content specifically for beginners and early-career engineers on YouTube, Tik Tok, Twitter, and Hashnode. You can also find code snippets and a way to reach me via my personal website.