By Shingo Nakayama
TL;DR
The most popular way to display a collection of similar data is to use tables, but HTML tables have the drawback of being difficult to make responsive.
In this article, I use CSS Grid Layout Module and CSS Properties (and no Javascript) to layout tables that wrap columns depending on screen width, which further changes to a card based on layout for small screens.
For the impatient, look at the following pen for a prototypical implementation.
A Little History of Responsive HTML Tables
Responsive tables aren’t a new topic, and there are many solutions that have already been proposed. “Responsive Table Data Roundup” first published in 2012 by Chris Coyier, has things summarized very neatly (including a 2018 update).
“Really Responsive Tables using CSS3 Flexbox” by Vasan Subramanian shows an idea of wrapping columns, implemented with Flexbox.
Even though many interesting ideas have been proposed, libraries like bootstrap opt for horizontal scrolling for small screens.
As we now have CSS Grid, I think we could have a better common alternative to horizontal scrolling.
HTML Tables
Starting with the basics, a table in HTML is a layout format for displaying collections of items through a matrix of rows and columns. Items are laid out in rows, with the same data attributes in the same columns, with the rows often sorted with one or more sortable attributes. The format gives you a birds-eye view to quickly grasp and examine large quantities of data.
For example, here’s a hypothetical table of purchase order details, that you may see in a purchasing application.
 Table of purchase order details
An item, in this case, is a purchase order detail, that has attributes such as part number, part description, etc.
When using HTML tables, the layout of the data is hardcoded as rows and columns (e.g. <tr> and <td>). This may be sufficient for usage by a screen that fits the whole table width, but in reality, this does not apply for the myriad of devices that exist today. In terms of hacks, you can alter the display property of tables and use any layout you can do with CSS in general, but that doesn’t seem semantically correct.
Tables Redefined (= Collection of Items)
Let’s start by redefining how table data should be expressed in HTML.
As stated earlier, since table data is essentially an ordered collection of items, it seems natural to use ordered lists. Also, since tables are often used to supplement textual descriptions, it seems natural to enclose this in a section, but this would depend on the context of how the table data is being used.
<section>
 <ol>
  <!-- The first list item is the header of the table -->
  <li>
   <div>#</div>
   <!-- Enclose semantically similar attributes as a div hierarchy -->
   <div>
    <div>Part Number</div>
    <div>Part Description</div>
   </div>
   ...
  </li>
  <!-- The rest of the items in the list are the actual data -->
  <li>
   <div>1</div>
   <!-- Group part related information-->
   <div>
    <div>100-10001</div>
    <div>Description of part</div>
   </div>
  ...
  </li>
 ...
 </ol>
</section>
Vanilla <div>'s are used to express item attributes since HTML5 does not define an appropriate tag for this. The key here is to express semantically similar attributes as a hierarchy of <div>'s. This structure will be used when defining how the data should be laid out. I will come back to this in the next section on the topic of styling.
As for the actual data inside the <div> element, the first item in the list is the header, and the rest of the items are the actual data.
Now, it’s time to start talking about styling the items with CSS Grid.
Styling Item Collections
The basic idea here is to display all attributes of the item as a normal table, display width permitting. This layout has the luxury of being able to see as many items (rows) as possible.
![]() Full Table
Full Table
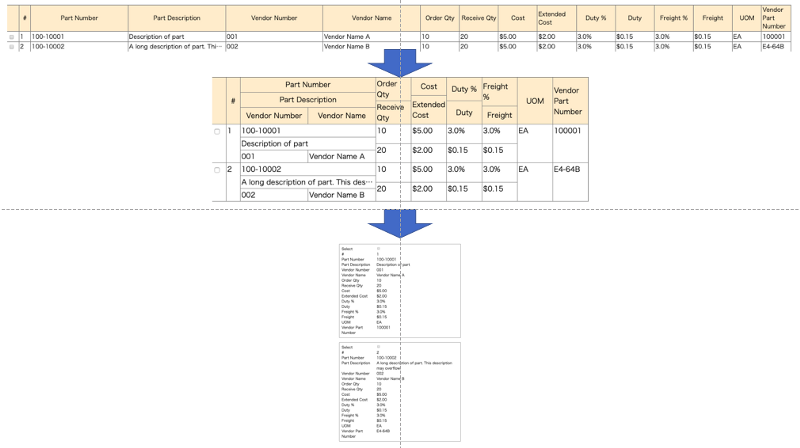
When the width of the display becomes narrower, some attributes are stacked vertically, in order to save horizontal space. The choice of stacking attributes should be based on:
- Do the attributes make sense when stacked vertically? and,
- When stacked vertically, does it save horizontal space?
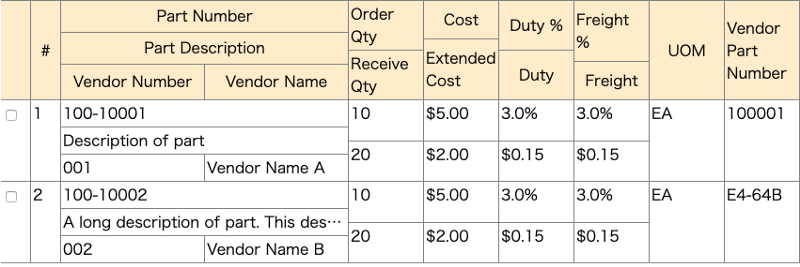
 Wrapping Table 1. Start by wrapping columns that need little width, and give the other columns space
 Wrapping Table 2. Wrap “Part Description”, to be able to see the description
 Wrapping Table 3. Further wrap “Vendor Name”
 Wrapping Table 4. Wrap vendor related information under part related information
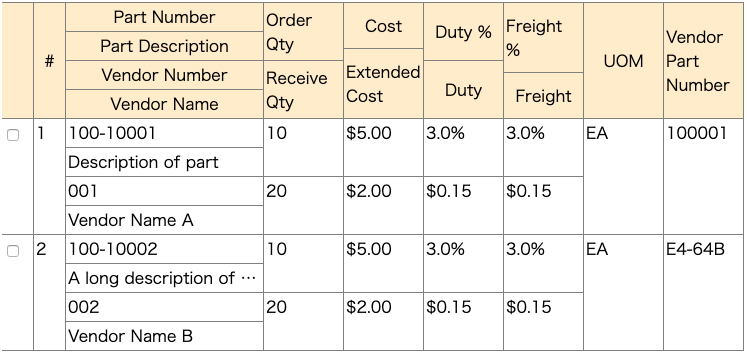 Wrapping Table 5. Fully wrapped
When the width further shrinks to the size of a mobile device, each item is displayed as a card. This layout has redundancy because the attribute names are repeatedly displayed on each card, and has the least glanceability, but does not compromise usability (e.g. horizontal scrolling, super small text, etc).
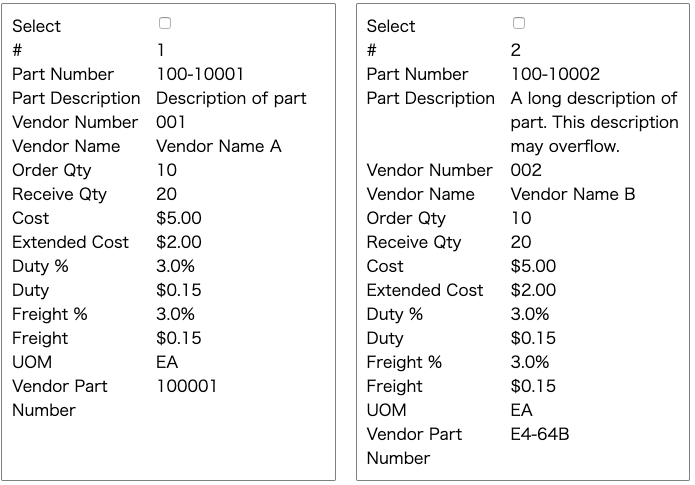 Two Column Card Layout
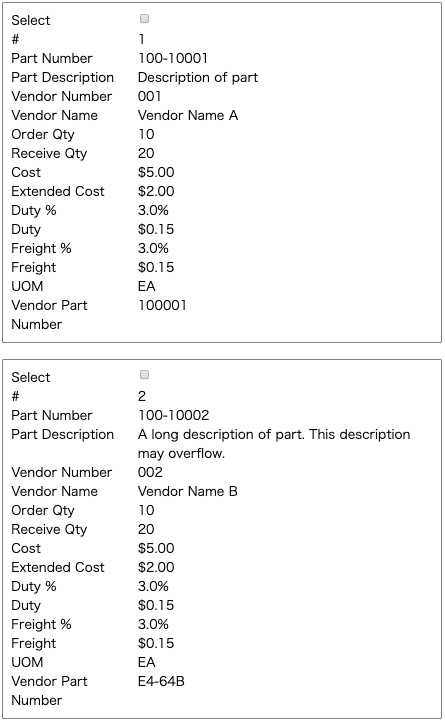 One Column Card Layout
Now let’s dive into the details.
Styling Step 1: Full Table
Here’s a visual summary of how things will be implemented with CSS Grid.
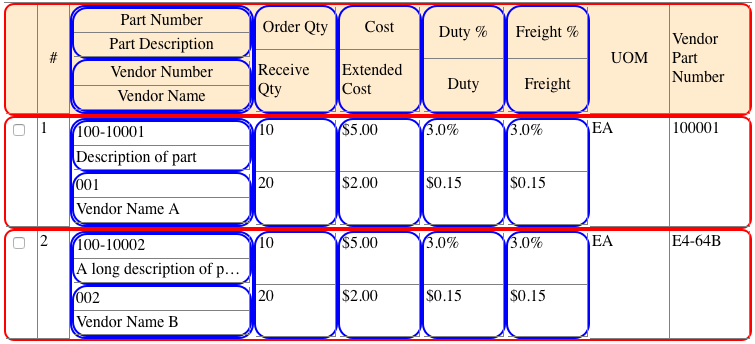 Grid containers
In order to make columns wrap, multiple grid containers are defined as a hierarchy. The red box is a grid container for each row, and the blue box is a container for each column group that wraps.
Let’ s start by setting the list as a grid container by defining a class called .item-container and applying it to the <li>(the red box).
.item-container {
    display: grid;
    grid-template-columns: 2em 2em 10fr 2fr 2fr 2fr 2fr 5em 5em;
}
The number of explicit columns specified with grid-template-columns is nine, which is the number of top-level <div>'s, directly under <li>.
The column’s width is defined in relative length to make the columns wrap. The actual fraction has to be fine-tuned, based on the content.
The columns that don’t wrap are defined in absolute length to maximize width usage for the wrapping columns. In the purchase order details example, the second column is a two-digit Id, so I set the width to double that size of 2 m’s.
Next, we define another grid container called .attribute-container and apply it on all intermediate <div>’s under the list (the blue box).
.attribute-container {
    display: grid;
    grid-template-columns: repeat(auto-fit, minmax(var(--column-width-min), 1fr));
    }
The minimum column width for all grid items under .attribute-container is specified with a CSS variable called --column-width-min(more on this later) using the minmax function, with the maximum set to take the rest of the space (e.g. one fraction). Since grid-template-columns are repeated, available horizontal space will be split into the maximum number of columns that could take at least --column-width-min, and the rest of the columns would go to the next line. The column’s width will be stretched if there is excess horizontal space because the repeat is auto-fited.
Styling Step 2: Wrapping Table
Next, --column-width-min needs to be specified independently for each column in order to wrap. Just to be clear, the variables need to be specified in order for the full table to render properly as well. To do this, a class is set for each .attribute-container, and a different --column-width-min is specified for each class scope.
Let’s take a look at the HTML where .part-id is applied,
<div class="attribute-container part-id">
    <div>Part Number</div>
    <div>Part Description</div>
</div>
and the CSS:
.part-id {
    --column-width-min: 10em;
}
This specific grid container will have two columns, as long as the available width is wider than 10em for each grid item (e.g. the grid container is wider than 20em). Once the grid container’s width becomes narrower than 20em, the second grid item will go to the next row.
When we combine CSS properties like this, we need only one grid container .attribute-container, with the details changing where the class is applied.
We can further nest .attribute-containers, to have multiple levels of wrapping with different widths, as in the following exert.
<div class="attribute-container part-information">
    <div class="attribute-container part-id">
        <div class="attribute" data-name="Part Number">Part Number</div>
        <div class="attribute" data-name="Part Description">Part Description
    </div>
    </div>
    <div class="attribute-container vendor-information">
        <div class="attribute">Vendor Number</div>
        <div class="attribute">Vendor Name</div>
    </div>
</div>
.part-information {
    --column-width-min: 10em;
}
.part-id {
    --column-width-min: 10em;
}
.vendor-information {
    --column-width-min: 8em;
}
All of the above is enclosed in the following media query. The actual breakpoint should be selected based on the width necessary when your table is wrapped to the extreme.
@media screen and (min-width: 737px) {
...
}
Styling Step Three: Card Layout
The card layout will look like a typical form with attribute names in the first column and attribute values in the second column.
To do this, a class called .attribute is defined and applied to all leaf <div> tags under the <li>.
.attribute {
    display: grid;
    grid-template-columns: minmax(9em, 30%) 1fr;
}
The attribute names are taken from a custom attribute of the leaf <div> called data-name, for example <div class=”attribute” data-name="Part Number">, and a pseudo-element is created. The pseudo-element will be subject to the grid container’s layout.
.attribute::before {
    content: attr(data-name);
}
The first item in the list is the header and does not need to be displayed.
/* Don't display the first item, since it is used to display the header for tabular layouts*/
.collection-container>li:first-child {
    display: none;
}
And finally, the cards are laid out in one column for mobile devices, but two for screens with a little bit more width, but not enough for displaying a table.
/* 2 Column Card Layout */
@media screen and (max-width: 736px) {
    .collection-container {
        display: grid;
        grid-template-columns: 1fr 1fr;
        grid-gap: 20px;
    }
...
}
/* 1 Column Card Layout */
@media screen and (max-width:580px) {
    .collection-container {
        display: grid;
        grid-template-columns: 1fr;
    }
}
Finishing Notes
Accessibility is an area that wasn’t considered at all and may have some space for improvement.
If you have any ideas or second thoughts, please feel free to comment!
And of course, thanks for reading.