
By Dominic Fraser
Flow is a static type checker for Javascript. This post is intended for those who have heard of Flow, but have not yet tried to use it within a React app. If this is the first time you have heard of Flow then I can recommend these four posts by Preethi Kasireddy as a great introduction.
One great thing about Flow is that it is possible use it incrementally. You do not have to completely refactor an existing project to start using it. It can be added only to new files, or slowly tried in existing files to see if it provides benefits to your specific project before committing fully.
As the setup of a new tool can often be the most challenging, in this post we are going to take an existing project and walk through the setup of adding Flow. A general introduction to syntax is covered in the second of Preethi’s posts, and the Flow docs are also very readable.
We will be using this example repo, with two directories for pre- and post- Flow. It uses Skyscanner’s custom Create React App script backpack-react-scripts, paired with their custom Backpack components. This is aimed at creating examples more complex than single snippets, yet still readable even if you are unfamiliar with them.
The exact nature of the app is unimportant compared to seeing the difference between it’s implementation without and with Flow. Very few files change here, but they are often the most frustrating to get right!
Let’s walk through each step, and then take a look at converting the example components.
Install the main dependencies
Alongside Flow itself install babel-cli and babel-preset-flow so that babel can remove the type annotations on compile.
npm install flow-bin babel-cli babel-preset-flow --save-dev
Setup Babel
In order for these to take effect create a .babelrc file, or add to your existing .babelrc the following config:
{
  "presets": ["flow"]
}
Setup scripts
If you use any hooks, such as a pretest script, you may want to update these as well as adding the basic Flow script to your package.json:
"scripts": {
  "flow": "flow",
  "pretest": "npm run flow && npm run lint"
}
Generate a flowconfig
If you are running flow for the first time you can generate a template .flowconfig by running npm run flow init. In our example we can see we extend it to add the following:
Ignore patterns
To avoid Flow parsing your node modules and build output these can easily be ignored.
[ignore].*/node_modules/*.*/build/*
Add CSS Modules support
If you are using CSS Modules their type needs to be specified in order for Flow to understand them, or else you will receive this error:
Error: [flow] Cannot resolve module
CSSModule.
This is done in two steps. First the below is added to your .flowconfig:
[libs]
./src/types/global.js  // this can be any path and filename you wish
[options]
module.name_mapper='^\(.*\)\.scss$' -> 'CSSModule'
module.system=haste
And secondly a CSS Module type is created in the file referenced in [libs].
// @flow
declare module CSSModule {
  declare var exports: { [key: string]: string };
  declare export default typeof exports;
}
Sync with other linters being used
In the example project ESLint is already used to provide standard linting. There are some initial configuration steps needed to get ESLint to play nicely with Flow, and some later ones due to the specific types used in this project.
For general setup the following is added to our .eslintrc:
"extends": [
  "plugin:flowtype/recommended"
],
"plugins": [
  "flowtype"
]
Extensions specific to this example, and the errors they avoid, will be covered towards the end of this post.
Flow typed libdefs
The final piece of setup is to get ready for using libdefs created using the flow-typed NPM package. This is used to create definitions for installed node modules, and by default creates these files in a flow-typed/ directory.
We do want to commit this file, but do not want ESLint to lint it. This creates a problem, as previously our linting script in our package.json is set to use our .gitignore to know while files ESLint should also ignore:
"lint:js": "eslint . --ignore-path .gitignore --ext .js,.jsx",
We now want to change this, as we want ESLint to also ignore the to-be-created flow-typed/ directory. We can alter our script to:
"lint:js": "eslint . --ext .js,.jsx",
This means it will now fall back to using a .eslintignore file, so we have to create this, duplicate what is in our .gitignore, and add the extra directory to ignore to it.
Finally, we need to install flow-types. We do this globally.
npm install flow-typed -g
libdefs can either be full definitions or stubs that accept any types. A list of full definitions is maintained. To see if there is one available for a package you are using use
flow-typed install my-dependency@<version.being.used>
and this will either add it to your flow-typed directory, or prompt you to create a stub using
flow-typed create-stub my-dependency@<version.being.used>
If you want to create a full definition you can do so, and also contribute it back to the repository so it is available to other developers.
A simple process to follow is only to create libdefs as they are specifically required. For each component you are converting to use Flow add its imports using flow-typed at that time, it is not necessary to add types for all dependencies if they are not being used in files where Flow is also being used.
Converting existing components
That is all the general setup done, now we can look at converting our example components!
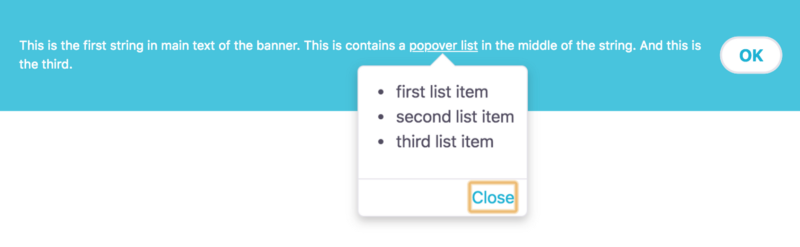
We have two, a stateful component and a function component. Overall these create a banner than has some text and a button. The text on the banner can be clicked to open a popover, containing a bullet pointed list.
Add flow-typed definitions
For any component, the first step is to create flow-typed definitions for any imports in the component we are working in.
For example, if we only had imports of
import React from 'react';
import BpkButton from 'bpk-component-button';
then we would try:
flow-typed install bpk-component-button@<its.installed.version>
if it was not available, and it currently is not, then we would stub its definition:
flow-typed create-stub bpk-component-button@latest
In the example repo we can see the list of all created definitions for the components we moved to using Flow. These were added one at a time as each component had Flow integrated with them.
Function Components
In our example without Flow we use PropTypes for some limited type checking and their ability to define defaultProps for use in development.
It may look a little complex on first glance, but there is relatively little that we need to change in order to add Flow.
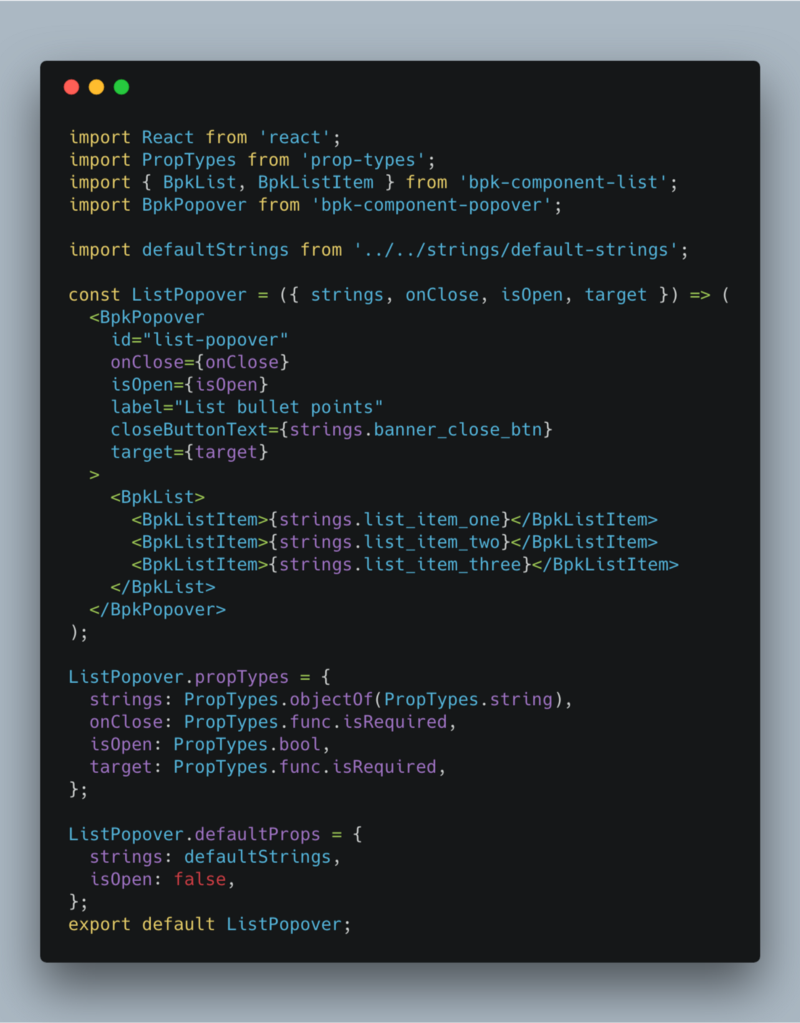
To transform this to use Flow we can first remove the PropTypes import and definitions. The // @flow annotation can then be added to line one.
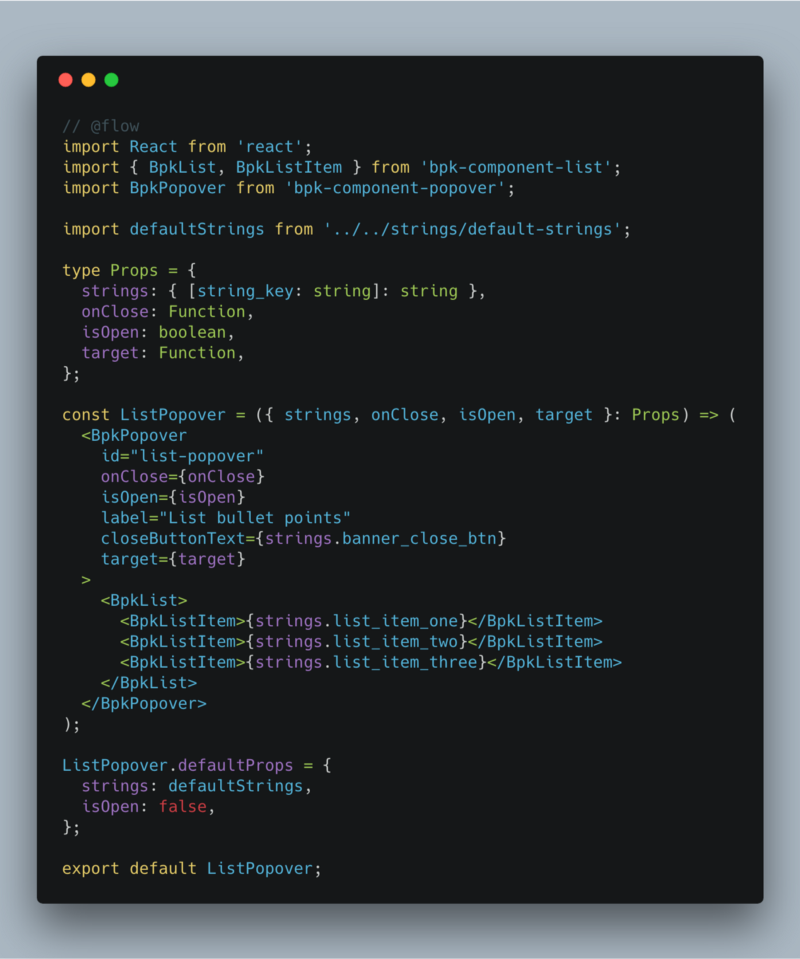
For this component we are only going to type check the props passed in. To do so we will first create a Props type, much cleaner than defining each prop individually inline.
type Props = {
  strings: { [string_key: string]: string },
  onClose: Function,
  isOpen: boolean,
  target: Function,
};
Here the latter three types are self-explanatory. As strings is an object of strings an object as a map has been used, checking each key and value in the object received to check that their types match, without having to specify their exact string keys.
The prop-types definitions can then be removed along with its import. As defaultProps are not tied to this import they can, and should, remain. *See the closing ESLint comments for any errors reported at this point.
The component should now look like this:
Stateful Components
Stateful components follow some slightly different declarations. As this component is more complex we will also look at declaring types for some additional aspects.
As before, first take a look at the component before adding Flow.
Props and State
As in the function component we first remove the propTypes definition and import, and add the // @flow annotation.
First we will take a look at adding types for Props and State. Again we will create types for these:
type Props = {
  strings: { [string_key: string]: string },
  hideBannerClick: Function,
};
type State = {
  popoverIsOpen: boolean,
};
and specify that the component will use them:
class Banner extends Component<Props, State> {
  constructor(props: Props) {
    super(props);
    this.state = {
      popoverIsOpen: false,
    };
  ...
  };
...
};
Next we hit our first difference between Function and Stateful components, defaultProps. In a Function component these were declared as we are used to, in Stateful components the external Banner.defaultProps syntax is removed, and instead the defaults are declared within the class:
class Banner extends Component<Props, State> {
  static defaultProps = {
    strings: defaultStrings,
  };
constructor(props: Props) {
...
// the below is removed
// Banner.defaultProps = {
//  strings: defaultStrings,
// };
Constructor declarations
stringWithPlaceholder is declared within the constructor. Here we are not looking at why it is declared there (we will assume there is good reason), but rather to see whether flow can be added without any changes to the existing code.
If run in its existing state we would encounter the error Cannot get this.stringWithPlaceholder because property stringWithPlaceholder is missing in Banner [1].
To fix this we must add a single line inside the Banner class block, just beneath and outside of the constructor:
class Banner extends Component<Props, State> {
  constructor(props: Props) {
    super(props);
    this.state = {
      popoverIsOpen: false,
    };
    this.stringWithPlaceholder = ...
  };
  stringWithPlaceholder: string;
...
};
This variable is created in the constructor but not passed in as props. As we are using Flow for type checking the props passed into the constructor, it requires everything within the constructor be type checked. It is known that Flow requires this, and this can be done by specifying their type in the class block.
At this point Props and State are complete. Let’s look at some quick additional examples of type checking within this component. *See the closing ESLint comments for any errors reported at this point.
Return, Event, and Node types
togglePopover takes no arguments, so a simple example of specifying no return value can be seen:
togglePopover = (): void => {
  ...
};
keyboardOnlyTogglePopover returns nothing, but has a single parameter. This is an event, specifically a keypress event. SyntheticKeyboardEvent is used as
React uses its own event system so it is important to use the SyntheticEvent types instead of the DOM types such as Event, KeyboardEvent, and MouseEvent.
keyboardOnlyTogglePopover = (e: SyntheticKeyboardEvent<>): void => {
  ...
};
Popover is defined in render() and returns an instance of the ListPopover Function component we looked a previously. We can specify its return type as a React Node. However, to be able to do so, we must first import it, as it is not accessible by default. There is more than one way to import it, one of which shown below:
import React, { Component } from 'react';
import type { Node } from 'react';
...
const Popover: Node = (
  <ListPopover
    onClose={this.togglePopover}
    isOpen={this.state.popoverIsOpen}
    strings={this.props.strings}
    target={() => document.getElementById('ListPopoverLink')}
  />
);
Type checking imported React components
When Prop types have been declared in a component, they can be used when using that component within another. However, if you are using an index.js to export the first component then the flow, // @flow will need to be added to the index.
// @flow
import ListPopover from './ListPopover';
export default ListPopover;
Marking props as optional
A prop can be marked as optional using the prop?: type syntax, for example:
type Props = {
  strings: { [string_key: string]: string },
  hideBannerClick?: Function,
};
This is supported, but no longer recommended by Flow. Instead all props should be left as required, with no ? , even if optional, as Flow automatically detects defaultProps and marks props with a default as optional internally.
In the section below we can see how manually marking props as optional can cause conflicts with other tools in some cases.
ESLint extensions, default props, and props validation error solutions
Two additions are made to our .eslintrc. For this project specifically you can simply accept their use, or read the detail below if you see any of the three errors:
x missing in props validationerror defaultProp "x" defined for isRequired propTypeCannot get strings.xxx because property xxx is missing in undefined
The rules added, with reasoning, are:
"react/default-props-match-prop-types": [
  "error", { "allowRequiredDefaults": true }
]
When using objects as maps (in this case for the 'strings' prop) a missing in props validation error occurs. This is a bug and so is explicitly ignored here.
"react/default-props-match-prop-types": [ "error", { "allowRequiredDefaults": true }]
When using objects as maps complexities between ESLint, flow, and prop-types come into play.
strings is a required prop, passed as an object of strings. The flow type checks that for each entry in the object the string key is a string, and the value is a string. This is far more maintainable than having to list out the prop type of each specific key.
If the prop is marked as required in Flow then ESLint would error stating: error defaultProp "strings" defined for isRequired propType.
If the prop is manually marked as optional then Flow will error with Cannot get strings.xxx because property xxx is missing in undefined [1].
This is known and is due to refinement invalidation as JSX can transform method calls so Flow cannot be sure that xxx has not been redefined.
This leaves us with fixing the ESLint error. The rules above allows defaultProps to be defined while the Flow type is not marked as optional. Flow will understand this and convert it to optional. ESLint is marked to "allowRequiredDefaults": true, meaning that although ESLint sees the prop as required it will not error.
Final thoughts
Once over the initial hurdle of installation, Flow is fairly straightforward to use. The ability to add it incrementally definitely helps, rather than having to refactor an entire project in one go.
Hopefully the setup instructions and examples here prove useful if you are looking to try Flow out yourself.
Thanks for reading ?
You may also enjoy: