By Dalya Gartzman
You are here because:
- You are using Windows OS version 10+
- You would like to use multiple Python versions on the same computer
- You are tired of the internet telling you to “Just Use Virtualenv”
TL;DR
- Open
Command Promptand enterpip install virtualenv - Download the desired
pythonversion (do NOT add to PATH!), and remember thepath\to\new_python.exeof the newly installed version - To create a virtualenv, open
Command Promptand entervirtualenv \path\to\env -p path\to\new_python.exe - If you are using
PyCharm, update theProject Interpreterand theCode compatibility inspection. - To install packages:
(I) Activate virtualenv: openCommand Promptand enterpath\to\env\Scripts\activate.bat
(II) Install desired packages
(III) Deactivate withdeactivate.
The Long version; Do Read
Prologue
If you are using the Anaconda App this process might be easier using their GUI. I haven’t tried it myself, please let me know how it went if you are going down that road :)
1. Install virtualenv
If you already have some virtual environments, or are using Anaconda, make sure the next steps are performed from outside all these environments.
2. Install Python
You can download python from the official site, for example for python3.7.3 go here.
The file you should be downloading is called Windows x86–64 executable installer, or Windows x86 executable installer if for some reason you are using a 32-bit windows.
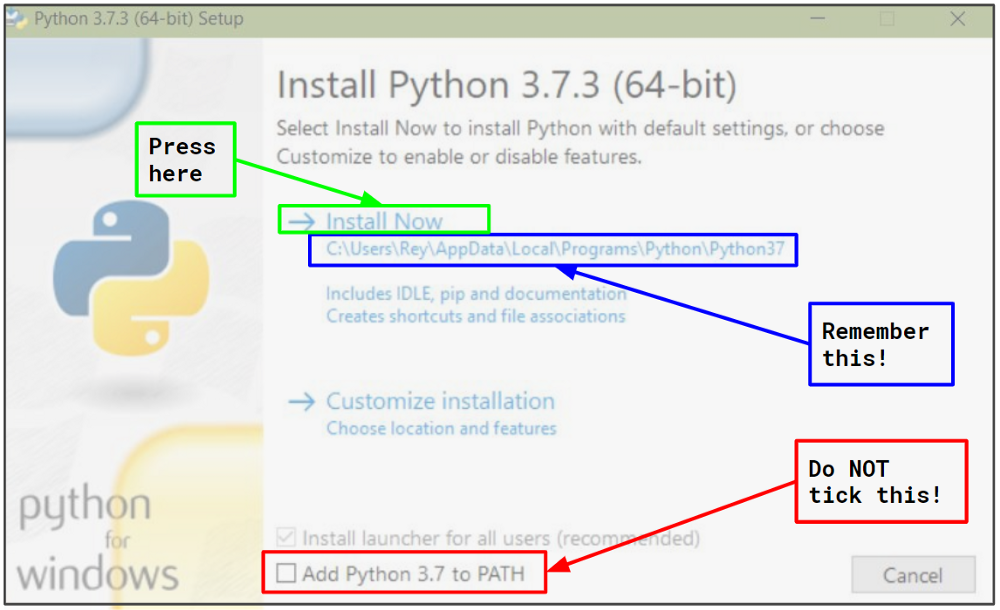
Once downloading is finished, open the executable file and an installation prompt will appear.
- You do NOT want to add the new python to your PATH since we are going to have multiple python versions on the same computer, and we would like for each application to know only one python version.
- Either use the default suggested location for the new python, or supply a location of your choice. Either way, remember this location and let’s denote it from now on with
C:\<some_path>\Python37.
3. Create a virtualenv
Open the Command Prompt, or if you are using Anaconda open the Anaconda Prompt .
Decide where you want your virtualenv to be, for example,C:\Users\<your_username>\Anaconda3\envs\<env_name> .
Enter:
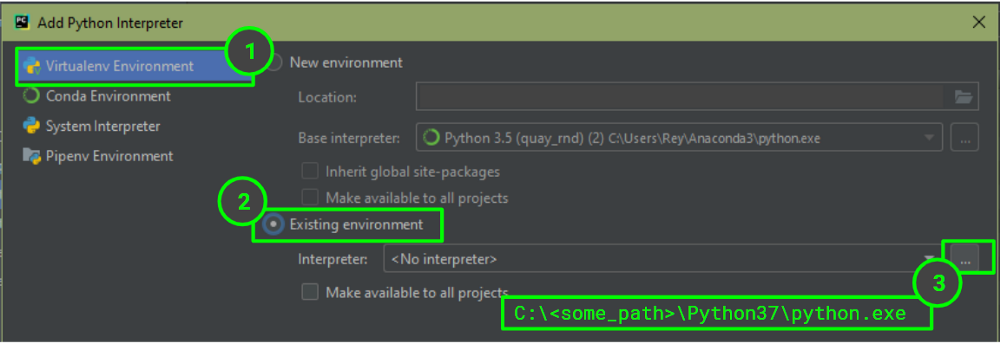
virtualenv C:\Users\<your_username>\Anaconda3\envs\<env_name> -p C:\<some_path>\Python37\python.exe
4. Update PyCharm Interpreter
If you are using PyCharm, open the project you would like to work on (that is/will be written with the new python version), and go to File -> Settings -> Project -> Project Interpreter press the gear icon and then Add.. .
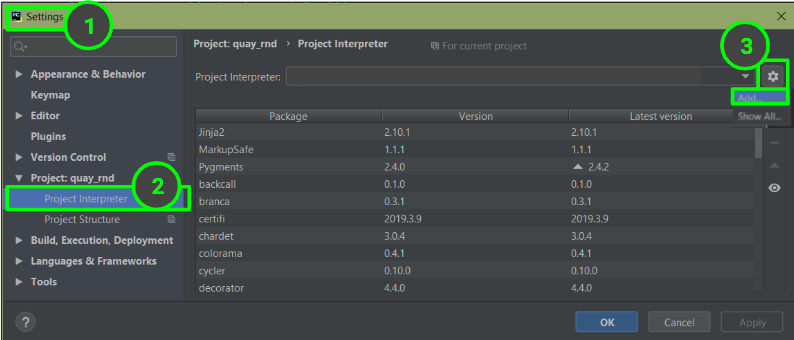
This will open a prompt window that allows you to define a new interpreter:
Assuming you are using Code Inspections, you might need to tell PyCharm which python version to inspect for. Go to File -> Settings-> Editor -> Inspections -> Python -> Code compatibility Inspection , make sure the box on the top indicates the specific project you are working on, and tick the box of your python version.
 If you don’t see your python version on the Options list, this might also be the time to update PyCharm… yup, happened to me too…
5. Install packages
Currently, your virtualenv contains only the crucial packages, pip and setuptools . To install more packages:
- Open
Command PromptorAnaconda Prompt, and activate your virtualenv by enteringC:\Users\<your_username>\Anaconda3\envs\<env_name>\activate.bat - Use
pipto install packages like you usually do. - Deactivate your virtualenv by entering
deactivate.
Epilogue
This morning, when I decided to open a new project with a different python version, I thought, “Yeah, I’ll just use a virtualenv”, because the internet said I can “Just do it”.
Well, it’s working now, so no hard feelings dear internet, but seriously, was the “Just” really justified? Does reinstalling-PyCharm-only-because-I-want-to-have-proper-code-inspections fall under the “Just” category??
Anyway, along the way I stumbled upon several helpful guides, but each one took me “just” one step of the way, so I decided to put it all in one place.
I hope my journey helped you with yours, and may we all enjoy happy coding, with as little as IT-friction as possible :D