By Shane Duggan
Imagine if you had an amazing product landing page, with customers lined up to make a purchase. But your manual JavaScript payment processing with server-side scripts, Authorize.net, or 2Checkout failed you.
Frustrated by being unable to make the purchase, your customer leaves to go to your competitors.
I imagine that would be a terrible feeling. Surely, there is a better way to do this with modern, widely accepted payment gateways. By the end of this tutorial, I will make sure that you won’t find yourself in that situation.
When it comes to accepting payments online, PayPal is one of the most widely-used and trusted options available. There are many new software startups appearing every day that use PayPal to handle their transactions and clients’ payments.
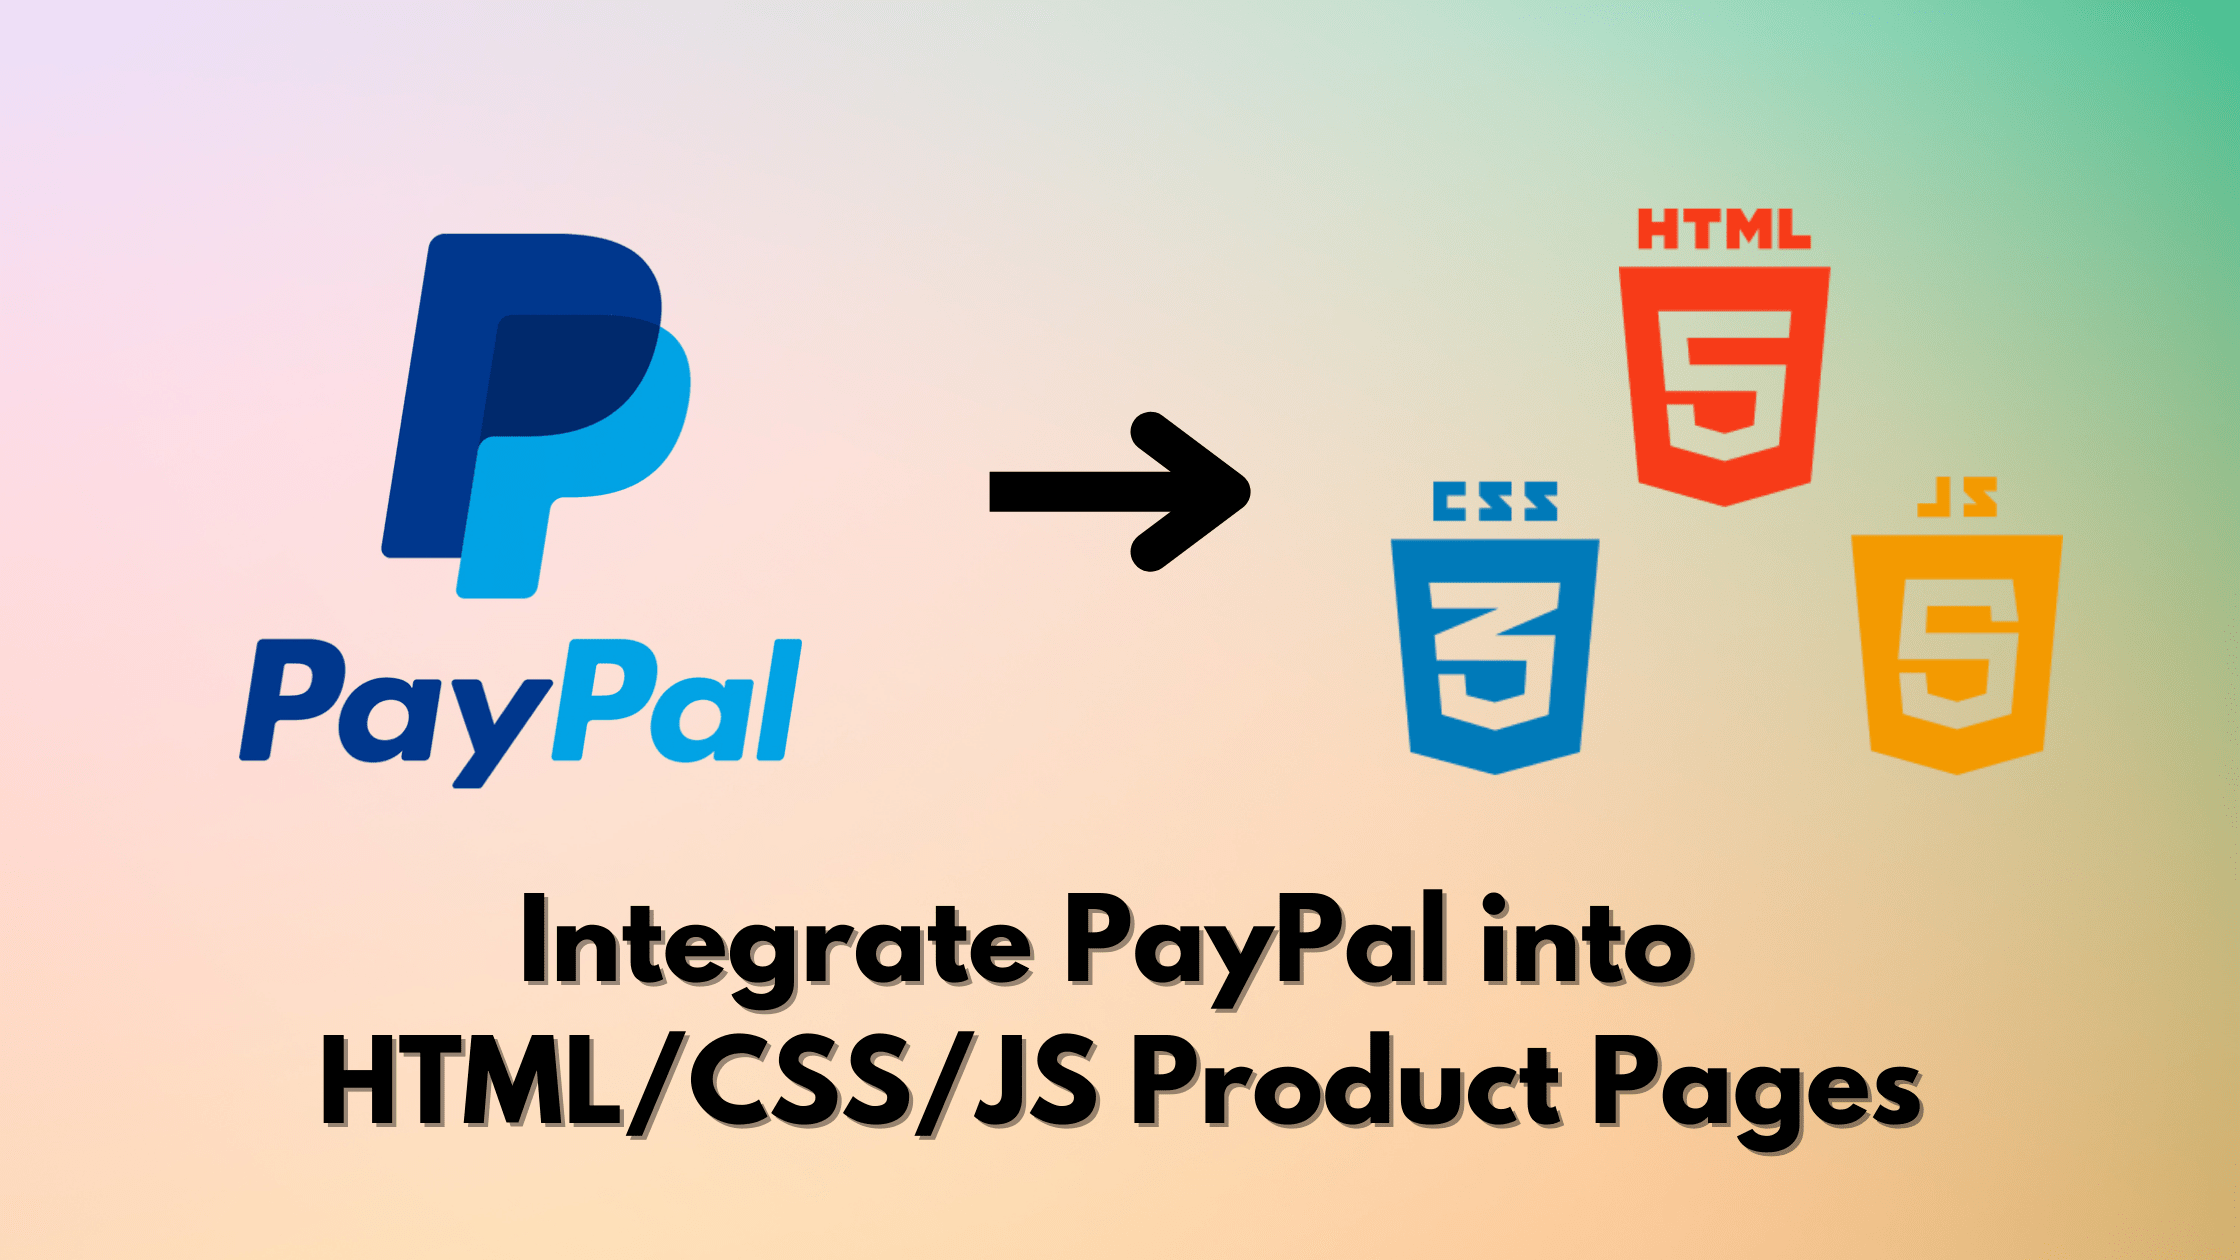
Integrating PayPal into your own HTML/CSS/JS product pages can greatly improve the user experience and streamline the checkout process for your customers.
PayPal also has great developer documentation that makes this integration all the more user-friendly.
In this tutorial, we will take a look at the steps involved in integrating PayPal into your product pages. You'll learn how to set up your PayPal for integration and implement the code into your HTML/CSS/JS pages. Then we'll look at how you can use your newfound knowledge going forward.
How Can You Use This Tutorial?
Now, let me use an example to give you a better idea of how you can use this tutorial. (Fictitious story alert)
Recently, I decided to start a new online startup. After deliberating through countless ideas for software startups, I decided to start an online eBook store.
As my very first product, I published an eBook that covered 10 years of my life experience in programming. Excitedly, I created a product landing page with all my knowledge of HTML, CSS, and JavaScript.
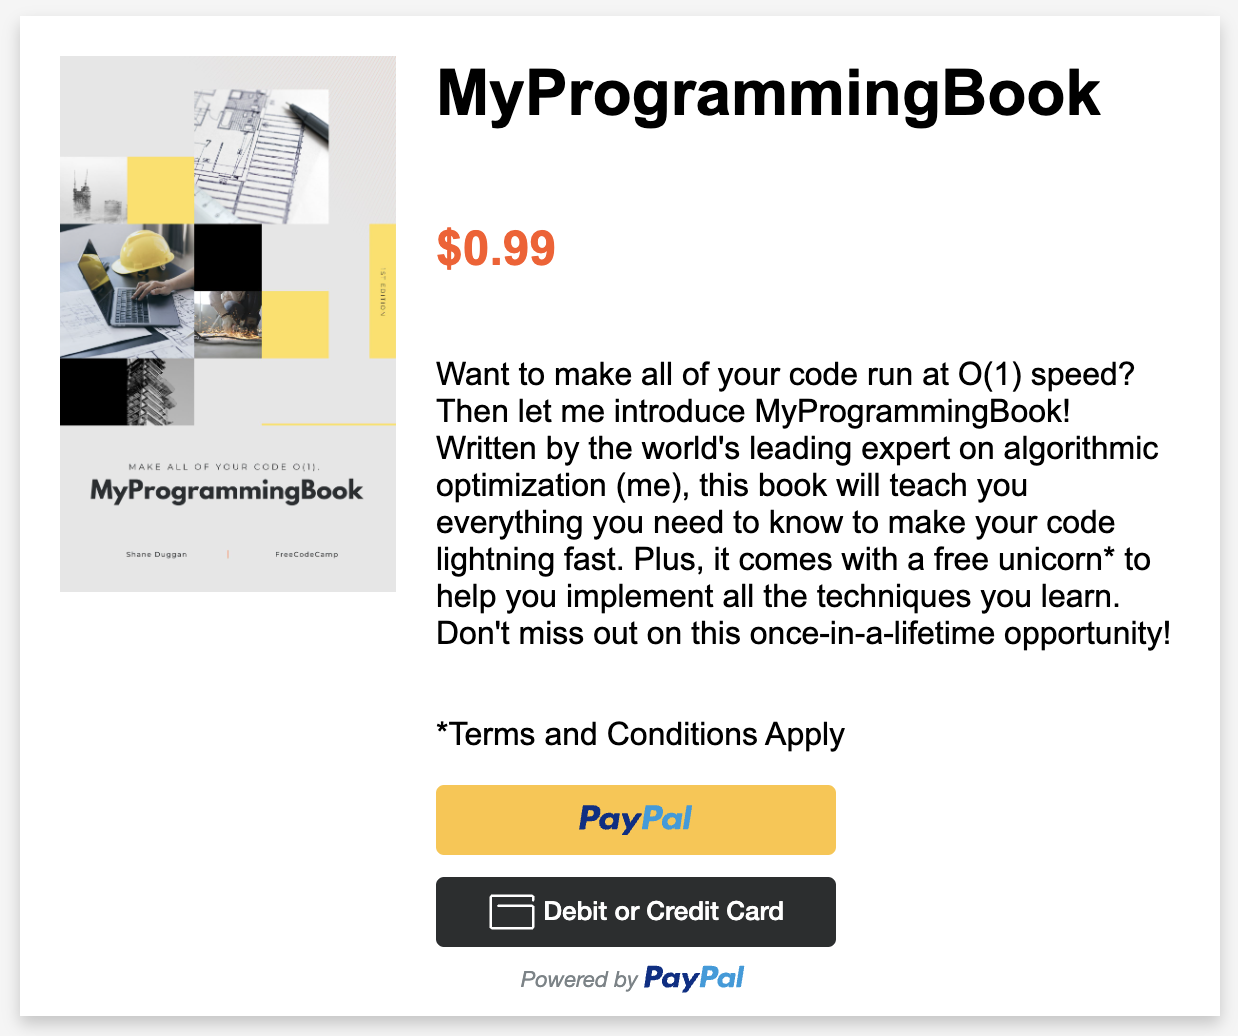
Introducing MyProgrammingBook, a glorious $0.99 programming guide that contains everything you need to know, including how to get all of your searching algorithms to O(1) (not really…). Here is what it looks like:
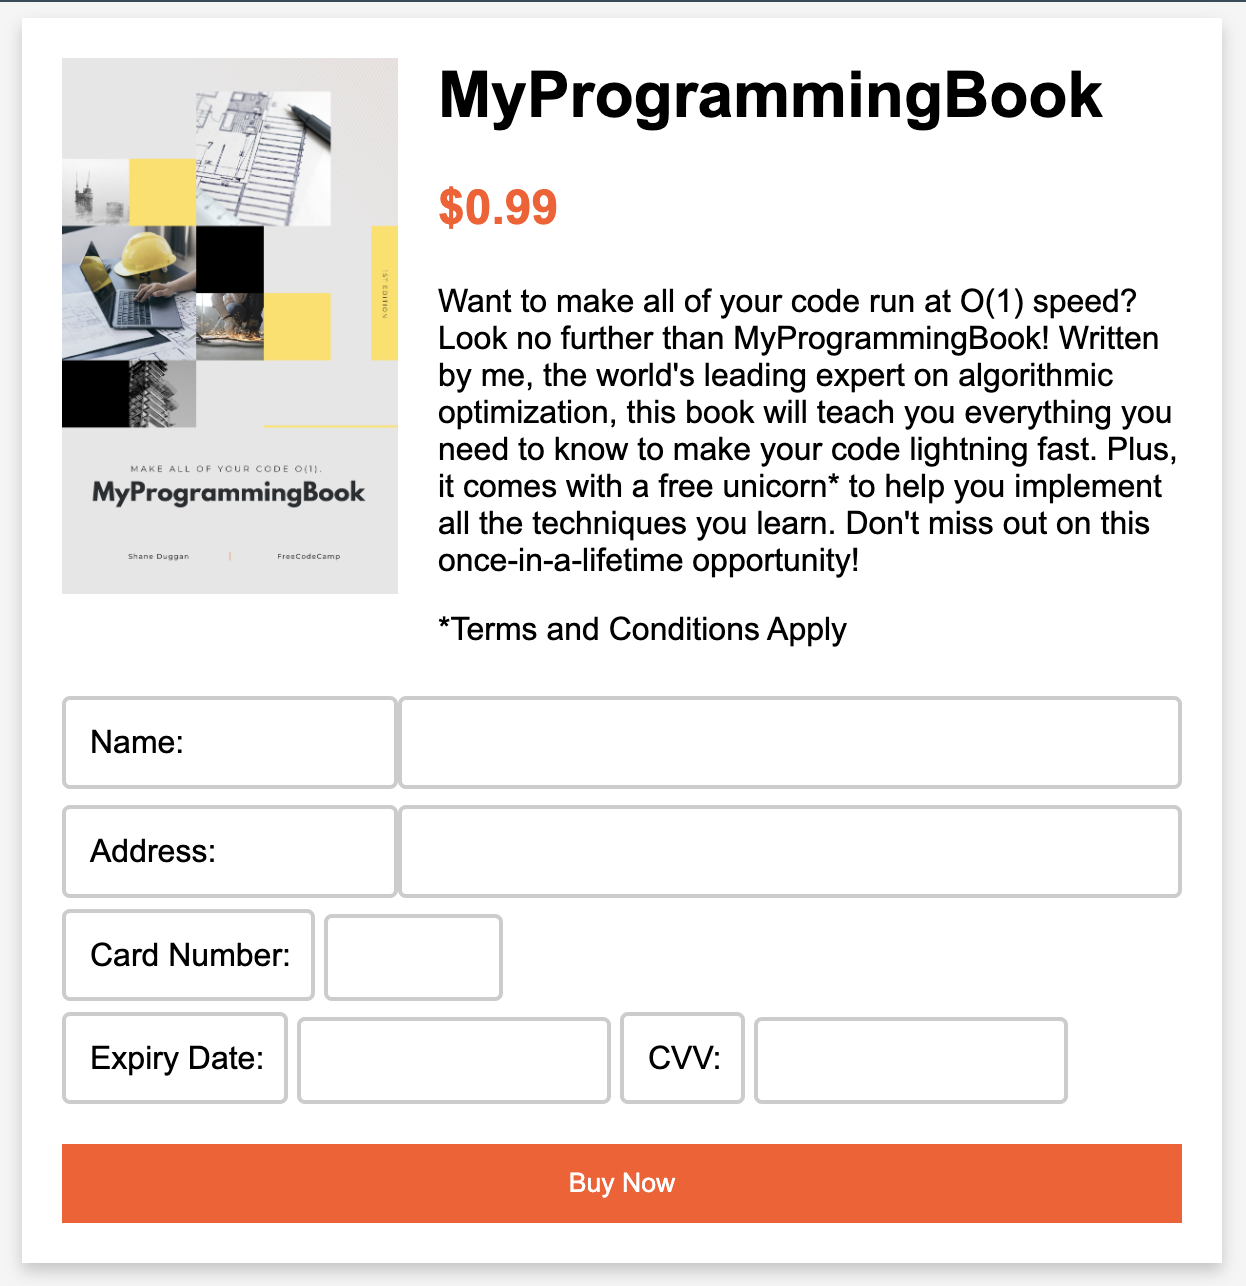
I created this product landing page within an hour using some simple vanilla HTML and CSS. Here are the files I used:
index.html
<!DOCTYPE html>
<html>
  <head>
    <title>MyProgrammingBook</title>
    <link rel="stylesheet" type="text/css" href="style.css">
  </head>
  <body>
    <div class="product-container">
      <div class="product-image-container">
        <img src="myprogrammingbook.jpg" alt="MyProgrammingBook">
      </div>
      <div class="product-info-container">
        <h1>MyProgrammingBook</h1>
        <p class="price">$0.99</p>
        <p class="product-description">
          Want to make all of your code run at O(1) speed? Then let me introduce MyProgrammingBook! Written by the world's leading expert on algorithmic optimization (me), this book will teach you everything you need to know to make your code lightning fast. Plus, it comes with a free unicorn* to help you implement all the techniques you learn. Don't miss out on this once-in-a-lifetime opportunity!
        </p>
        <p>*Terms and Conditions Apply</p>
      </div>
      <form>
        <label for="name">Name:</label>
        <input type="text" id="name" name="name" required>
        <label for="address">Address:</label>
        <input type="text" id="address" name="address" required>
        <div class="card-info">
          <label for="card-number">Card Number:</label>
          <input type="text" id="card-number" name="card-number" required>
        </div>
        <div class="card-info">
          <label for="expiry-date">Expiry Date:</label>
          <input type="text" id="expiry-date" name="expiry-date" required>
          <label for="cvv">CVV:</label>
          <input type="text" id="cvv" name="cvv" required>
        </div>
        <input type="button" value="Buy Now" onclick="submitForm()">
</form>
    </div>
    <script src="script.js"></script>
  </body>
</html>
style.css
* {
  box-sizing: border-box;
}

body {
  background-color: #f5f5f5;
  font-family: Arial, sans-serif;
}

.product-container {
  max-width: 600px;
  margin: 0 auto;
  padding: 20px;
  background-color: #fff;
  box-shadow: 0 4px 8px 0 rgba(0, 0, 0, 0.2);
  display: flex;
  flex-wrap: wrap;
}

.product-image-container {
  width: 30%;
}

.product-info-container {
  width: 70%;
  padding-left: 20px;
}

img {
  width: 100%;
  height: auto;
}

form {
  display: flex;
  flex-wrap: wrap;
}

label, input[type="text"] {
  width: 100%;
  padding: 12px;
  margin-top: 8px;
  box-sizing: border-box;
  border: 2px solid #ccc;
  border-radius: 4px;
}

label {
  width: 30%;
  padding-right: 10px;
}
input[type="text"] {
  width: 70%;
}

input[type="button"] {
  background-color: #ff5722;
  color: #fff;
  padding: 12px 24px;
  border: none;
  cursor: pointer;
  margin-top: 20px;
  width: 100%;
}

input[type="text"][name="card-number"], input[type="text"][name="expiry-date"], input[type="text"][name="cvv"] {
  width: 30%;
}


h1 {
  margin-top: 0;
}

.price {
  color: #ff5722;
  font-size: 1.5em;
  font-weight: bold;
}
script.js
With my outdated knowledge, I accept payment through a form to collect their payment details before manually processing it with a payment provider. A sample JavaScript file might look like this:
// Get references to the form elements
const form = document.getElementById("payment-form");
const cardNumber = document.getElementById("card-number");
const expiryDate = document.getElementById("expiry-date");
const cvv = document.getElementById("cvv");
const submitButton = document.getElementById("submit-button");

// Handle form submission
form.addEventListener("submit", (event) => {
  event.preventDefault();

  // Disable the submit button to prevent multiple submissions
  submitButton.disabled = true;

  // Create an object to hold the form data
  const formData = {
    cardNumber: cardNumber.value,
    expiryDate: expiryDate.value,
    cvv: cvv.value,
  };

  // Perform client-side validation on the form data
  if (!validateFormData(formData)) {
    // If the data is invalid, re-enable the submit button and return
    submitButton.disabled = false;
    return;
  }

  // Send the form data to the server
  // The following is just an example and should not be used in a real-world scenario
  // as it lacks security measures and proper payment gateway integration
  fetch("/charge", {
    method: "POST",
    body: JSON.stringify(formData),
    headers: {
      "Content-Type": "application/json",
    },
  })
    .then((response) => response.json())
    .then((data) => {
      // Handle the server response
      if (data.success) {
        // Payment was successful
        alert("Payment successful!");
      } else {
        // Payment failed
        alert("Payment failed. Please try again.");
        submitButton.disabled = false;
      }
    })
    .catch((error) => {
      console.error(error);
      alert("An error occurred. Please try again.");
      submitButton.disabled = false;
    });
});

function validateFormData(data) {
  // Example validation checks
  if (!data.cardNumber || data.cardNumber.length !== 16) {
    alert("Please enter a valid card number.");
    return false;
  }
  if (!data.expiryDate || data.expiryDate.length !== 5) {
    alert("Please enter a valid expiry date in the format MM/YY.");
    return false;
  }
  if (!data.cvv || data.cvv.length !== 3) {
    alert("Please enter a valid CVV.");
    return false;
  }
  return true;
}
However, this old-school way of taking a payment creates several problems:
- Security: Without proper security measures, sensitive information such as credit card numbers and personal information can be vulnerable to hacking and fraud.
- Compliance: A business may face penalties and legal issues without compliance with regulations such as PCI-DSS.
- Scalability: Processing payments using only HTML, CSS, and JavaScript may not be able to handle a high volume of transactions, especially during peak periods.
- Maintenance: Maintaining and updating a custom payment system can be time-consuming and costly.
- Limited features: Collecting payments using only HTML, CSS, and JavaScript may lack features such as recurring payments, subscriptions, refunds, and fraud detection.
- Lack of integration with other tools: Vanilla HTML, CSS, and JavaScript do not have built-in integrations with other tools like accounting software, inventory management software, and shipping providers.
So a much simpler way, not to mention more seamless and functional, would be to abstract away all of the payment handlings to a third party. Especially so as customers will more often than not be more familiar with using these third-party payment gateways already.
Even if you are not selling a product, this can be great for websites that are selling some kind of freelance service or consultation, a trend we have been seeing in recent times. Allowing the customer to checkout with a familiar third-party payment gateway directly from your website will add greatly to the user experience of your service.
It’s a win-win for you and the customer. You program less and they receive more. So let’s dive in to find out how we can implement this into your own websites.
How to Integrate PayPal into Your Product Pages
Now that we know what we want to achieve, let’s get into action. I have broken down the process into 6 easy-to-follow steps. They are:
- Access PayPal’s developer tools to get your APIs.
- Set up a PayPal sandbox environment.
- Create and customize your PayPal button.
- Integrate your button into your current files.
- Test the integration using the PayPal sandbox environment.
- Go live and start accepting real payments.
We’ve got a lot to cover, so let’s dive right in and get started!
How to Access PayPal’s Developer Tools to Get Your APIs
Step 1 for integrating PayPal into your HTML/CSS/JS product pages is creating a PayPal account. This step is crucial as it will give you access to PayPal's developer tools and APIs, which are necessary for integrating PayPal into your product pages.
If you already have one, just hop straight to the PayPal developer tools.
To create a PayPal account, you'll need to visit the PayPal website and follow the on-screen instructions to sign up. You'll be asked to provide some personal and financial information, such as your name, email address, and credit card details.
Once you've completed the sign-up process, you'll be able to log in to your PayPal account and access the developer tools and APIs needed for integration. It's important to use a valid email address as you will receive important information and updates from PayPal.
Then, you can find the developer tools at the top right of your PayPal dashboard.

How to Set Up a PayPal Sandbox Environment
The next step is to create a PayPal sandbox environment.
What is that, you might ask?
Well, a sandbox environment is a testing environment that mimics the live PayPal environment. It allows you to test your integration before going live, which is a great feature from PayPal to ensure that everything is working as expected.
To set up a PayPal sandbox environment, you'll need to log in to your PayPal account and navigate to the developer dashboard. From there, you can create a new sandbox account by following the on-screen instructions.
Once the sandbox account is created, you'll be able to use it to test your integration by making test payments. You can use the sandbox account in parallel with your live account.

It's important to test your integration thoroughly and ensure that everything is working as expected before going live.
How to Create and Customize Your PayPal Button
This step involves creating the button that will be placed on your product page, allowing customers to initiate the payment process.
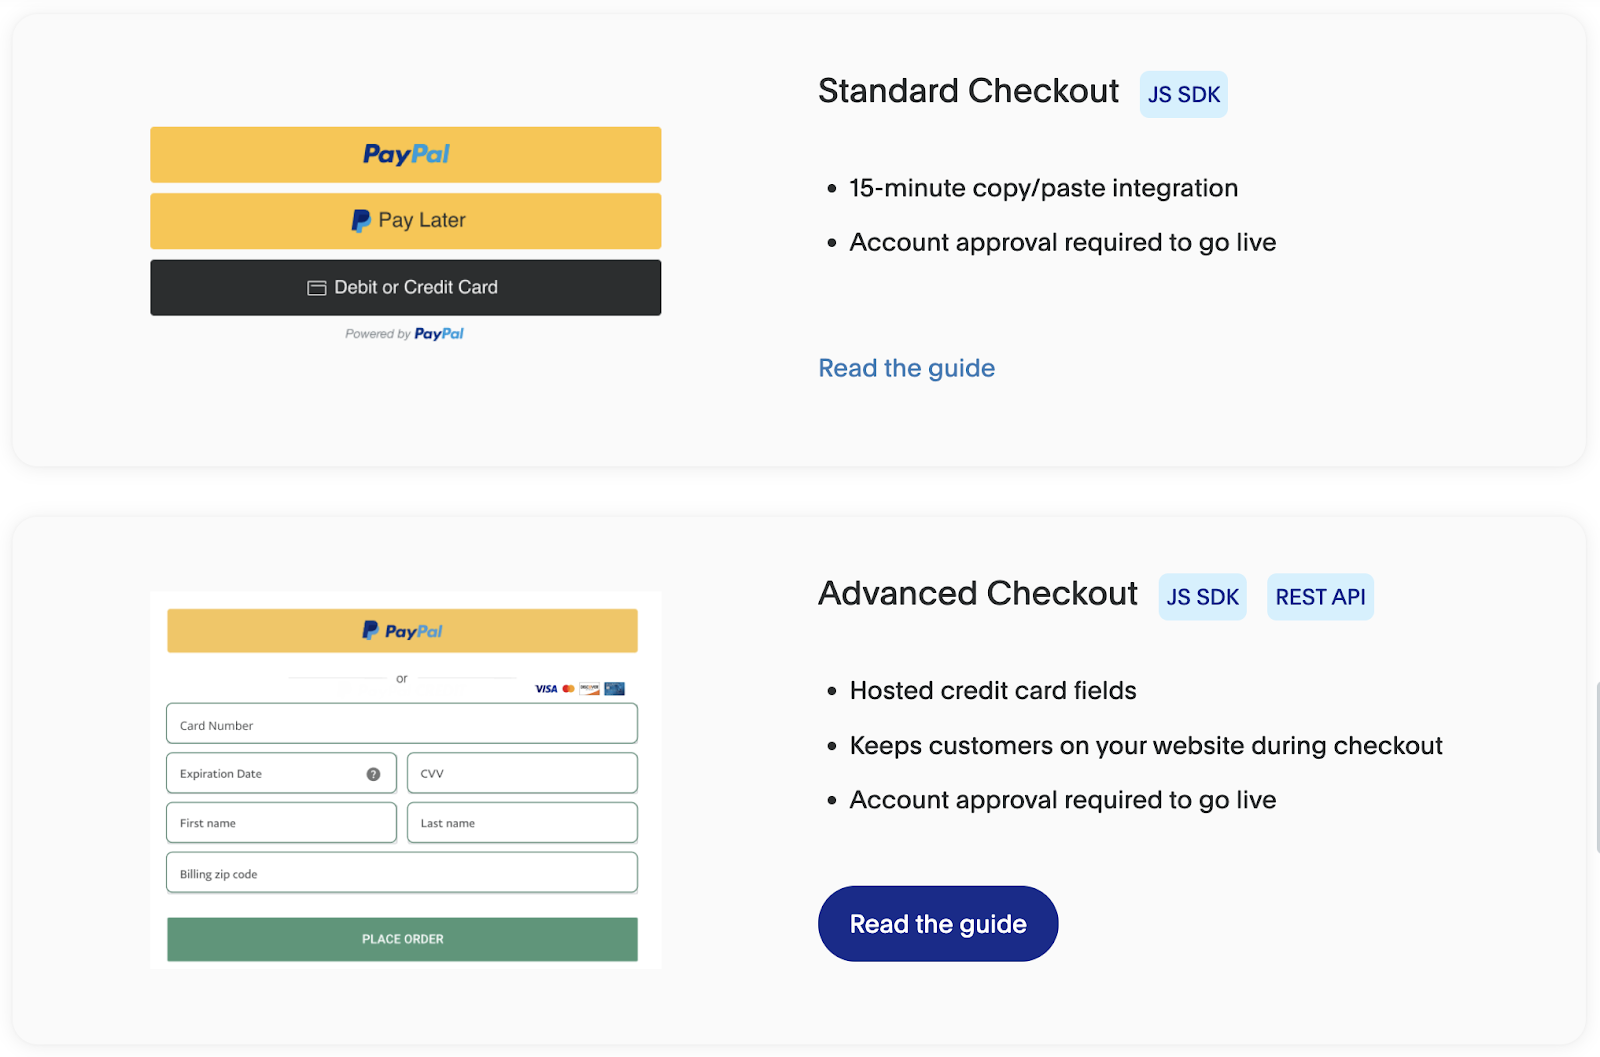
One way to create a PayPal button is by using the PayPal Button Creation Tool, which provides a user-friendly interface for customizing your button. You can choose from 3 different checkout styles, available on PayPal’s website.
Navigate to business tools > PayPal Buttons > Get Started > Smart Buttons. This will bring you to the button customization interface. Adjust the stylings to your liking, then simply click on “Copy Code”.
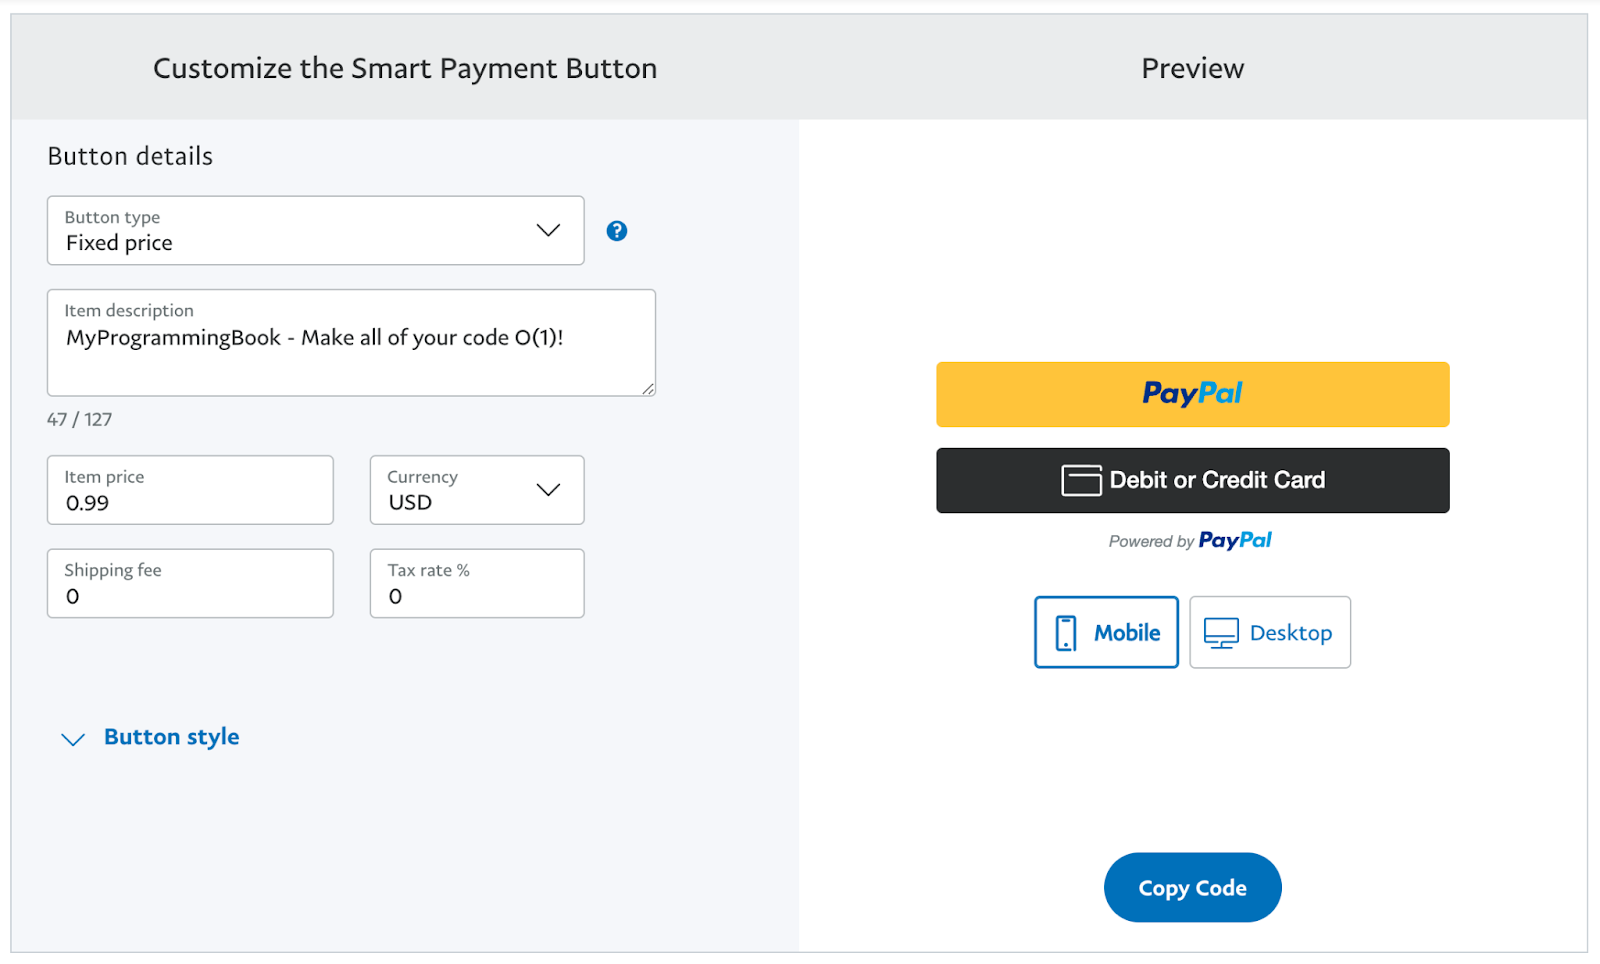
Here is an example of the code for a PayPal Smart Button. Then, we must update our previous files to remove the form input and insert the following code instead. We will be covering that in the next step. Before that, this is the snippet of what you get from PayPal’s Smart Buttons:
<div id="smart-button-container">
<div style="text-align: center;">
<div id="paypal-button-container"></div>
</div>
</div>
<script src="https://www.paypal.com/sdk/js?client-id=sb&enable-funding=venmo¤cy=USD" data-sdk-integration-source="button-factory"></script>
<script>
function initPayPalButton() {
paypal.Buttons({
style: {
shape: 'rect',
color: 'gold',
layout: 'vertical',
label: 'paypal',
},
createOrder: function(data, actions) {
return actions.order.create({
purchase_units: [{"amount":{"currency_code": "USD", "value": 0.99}}]
});
},
onApprove: function(data, actions) {
return actions.order.capture().then(function(orderData) {
// Full available details
console.log('Capture result', orderData, JSON.stringify(orderData, null, 2));
// Show a success message within this page, for example:
const element = document.getElementById('paypal-button-container');
element.innerHTML = '';
element.innerHTML = '<h3>Thank you for your payment!</h3>';
// Or go to another URL: actions.redirect('thank_you.html');
});
},
onError: function(err) {
console.log(err);
}
}).render('#paypal-button-container');
}
initPayPalButton();
</script>
Do note that you will have different fields for your own needs, so do customize your own button and reference the code for that, not from my tutorial.
There are also different button styles to choose from, so feel free to play around to find something that suits your style.
Now that we’re ready, let’s integrate this code into our current files.
How to Integrate Your Button into Your Current Files
With our button code fresh out of the box, let’s integrate this into our current files. Very simply, we just need to replace the HTML fields that we are not going to use, namely the form and replace it with the button we created.
To remain consistent with the programming style we used for the example, I am going to abstract away the JavaScript to the script.js file. That should give us the following files:
index.html
<!DOCTYPE html>
<html>
<head>
<title>MyProgrammingBook</title>
<link rel="stylesheet" type="text/css" href="style.css">
</head>
<body>
<div class="product-container">
<div class="product-image-container">
<img src="myprogrammingbook.jpg" alt="MyProgrammingBook">
</div>
<div class="product-info-container">
<h1>MyProgrammingBook</h1>
<p class="price">$0.99</p>
<p class="product-description">
Want to make all of your code run at O(1) speed? Then let me introduce MyProgrammingBook! Written by the world's leading expert on algorithmic optimization (me), this book will teach you everything you need to know to make your code lightning fast. Plus, it comes with a free unicorn* to help you implement all the techniques you learn. Don't miss out on this once-in-a-lifetime opportunity!
</p>
<p>*Terms and Conditions Apply</p>
<div id="smart-button-container">
<div style="text-align: center;">
<div id="paypal-button-container"></div>
</div>
</div>
<script src="https://www.paypal.com/sdk/js?client-id=sb&enable-funding=venmo¤cy=USD" data-sdk-integration-source="button-factory"></script>
<script type="text/javascript" src="script.js"></script>
</div>
</div>
</body>
</html>
style.css
* {
  box-sizing: border-box;
}

body {
  background-color: #f5f5f5;
  font-family: Arial, sans-serif;
}

.product-container {
  max-width: 600px;
  height: 500px;
  overflow: hidden;
  margin: 0 auto;
  padding: 20px;
  background-color: #fff;
  box-shadow: 0 4px 8px 0 rgba(0, 0, 0, 0.2);
  display: flex;
  flex-wrap: wrap;
}

.product-image-container {
  width: 30%;
}

.product-info-container {
  width: 70%;
  padding-left: 20px;
  display: flex;
  flex-wrap: wrap;
  align-items: center;
}

img {
  width: 100%;
  height: auto;
}

.product-info-container form {
  width: 100%;
  margin-top: 20px;
  align-self: flex-end;
}

h1 {
  margin-top: 0;
}

.price {
  color: #ff5722;
  font-size: 1.5em;
  font-weight: bold;
}
script.js
function initPayPalButton() {
  paypal.Buttons({
    style: {
      shape: 'rect',
      color: 'gold',
      layout: 'vertical',
      label: 'paypal',

    },

    createOrder: function(data, actions) {
      return actions.order.create({
        purchase_units: [{"amount":{"currency_code":"USD","value":0.99}}]
      });
    },

    onApprove: function(data, actions) {
      return actions.order.capture().then(function(orderData) {

        // Full available details
        console.log('Capture result', orderData, JSON.stringify(orderData, null, 2));

        // Show a success message within this page, for example:
        const element = document.getElementById('paypal-button-container');
        element.innerHTML = '';
        element.innerHTML = '<h3>Thank you for your payment!</h3>';

        // Or go to another URL:  actions.redirect('thank_you.html');

      });
    },

    onError: function(err) {
      console.log(err);
    }
  }).render('#paypal-button-container');
}
initPayPalButton();
These files are going to give us the following slick product landing page:
How to Test the Integration Using the PayPal Sandbox Environment
Before going live with your PayPal integration on your product page, it is important to test the integration to ensure that it is working correctly and to identify any issues.
One way to do this is by using the PayPal Sandbox environment that we discussed earlier.
To use the PayPal Sandbox with the account you created earlier, you will be given a set of Sandbox test accounts (buyer and seller) that you can use to test your integration.
With these Sandbox accounts set up, you will need to ensure your PayPal button code on your product page points to the Sandbox environment.
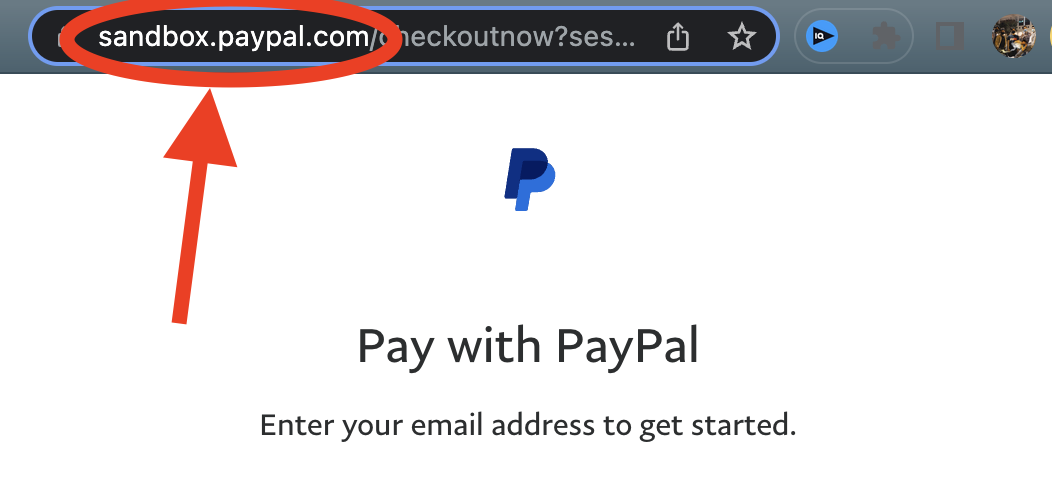
You can do this by checking that the URL in the PayPal button code redirects you to "https://www.sandbox.paypal.com" instead of "https://www.paypal.com".
With your PayPal button code working, you can now test the integration by visiting your product page and clicking on the PayPal button. You will be taken to the PayPal Sandbox checkout page where you can enter your Sandbox test account credentials and simulate a purchase.
Once you've completed a test transaction, you can log in to your Sandbox account to view the transaction details and confirm that it was processed correctly.
How to Go Live and Start Accepting Real Payments
After successfully testing your PayPal integration in the Sandbox environment, you are now ready to go live and start accepting real payments on your product page.
Going live involves a few simple steps to ensure that your integration is set up correctly and ready to process real payments.
The first step is to update your PayPal button code on your product page to point to the live PayPal environment. Conversely to earlier, ensure that the URL in the PayPal button code redirects you to "https://www.paypal.com" instead of "https://www.sandbox.paypal.com".
Next, you will need to update your PayPal account settings to ensure that your account is set up to process live payments. This typically involves confirming your email address and phone number, as well as adding a valid payment method such as a bank card.
It is also important to ensure that your product page is fully functional and that any necessary information such as product details, prices, and shipping costs are accurate.
Finally, you should notify your customers that you are now accepting payments via PayPal, and provide them with clear instructions on how to complete a purchase.
With all these steps complete, you can now start accepting real payments via PayPal on your product page!
Where To Go From Here?
Now that you’re all up to speed with getting PayPal integrations up and running on your own websites, why would this be useful to you? Are there no easier ways to integrate payments into your website? Let me give you some context.
Personally, I thought that no-code tools were becoming the norm in recent times, thinking that I probably wouldn’t need to be coding any web pages in vanilla HTML, CSS, and JavaScript soon. But with the new wave of online startups, such as AI tools and data analytics software, revolving around making API requests from a simple user interface, I think the 3 big languages might make a bit of a comeback.
Wanting to start one of my own (so the story earlier wasn’t entirely fictitious…), I found myself coming back to the good old vanilla web development languages to get the job done. And they did so faster than no-code tools – like this simple sentence-length checker I programmed in under an hour.
So I wouldn’t forget about learning how to integrate features, such as this, into standard HTML, CSS, and JavaScript pages. Sometimes, when it comes to wanting to create a simple product or service page that gets the job done, you might want to rely on old ways with new integrations as your solution.
Wrapping Up and Conclusion
Let me give you a quick recap:
If you're looking to get a simple SaaS company going, then vanilla HTML, CSS, and JavaScript might be your best friends. When it comes to integrating PayPal into your product pages, it is important to remember a few key points to ensure a smooth and successful integration.
- Firstly, it is essential to have a PayPal account and to be familiar with the PayPal Developer documentation.
- Secondly, ensure that your HTML and CSS files are well structured and designed to match your product page.
- Lastly, use the PayPal Sandbox environment for testing to ensure everything is spick and span before going live with real payments.
As a reminder, it is important to keep in mind that collecting payments through a form on your website is not a secure way of accepting payments, and it is recommended to use a payment gateway such as PayPal to ensure the security of your customer's sensitive information.
With these points in mind, you can now confidently set up PayPal on your product pages and start accepting payments securely and easily. I hope you enjoyed this tutorial, and if you did, don't hesitate to get in contact. Wishing you the best of luck selling your products to the masses!