by Payal Gupta
Everything you’ve always wanted to know about notifications in iOS
Pretty Little Alerts..?

Notifications are a way to inform users when new data becomes available for their apps, even when the app is not running in the foreground.
For example, a messaging app might let the user know when a new message has arrived, and a calendar app might inform the user of an upcoming appointment.
With the release of iOS-10, Apple introduced brand new frameworks to support notifications, be it local or remote. This release was focused on customized notifications.
Without wasting any time, let’s just quickly jump in to the details.
Types of notifications
We can broadly classify notifications into two categories:
- Local notifications — the app configures the notification details locally and passes those details to the system. The system then handles the delivery of the notification when the app is not in the foreground.
- Remote notifications — you use one of your company’s servers to push data to user devices via the Apple Push Notification service (APNs).
Further down in the article, we’ll see how we can get ahold of both notification types. Let’s first start with an introduction to this new notification framework that we can use for our cause.
What’s new in iOS-10 for notifications?
With the release of iOS-10, Apple introduced two new frameworks to handle notifications:
- User Notifications Framework — manages both local and remote notifications.
- User Notifications UI Framework — customizes the appearance of the system’s notification interface.
We’ll be using these two frameworks and some platform-specific APIs to configure our notifications.
Along with the frameworks, the Notification service app extension was also introduced that allows you to modify the content of remote notifications before they are delivered.
Apple also allows customizing your notification’s UI though the Notification content extension.
Is it too much to remember? Yup...surely it is. But, don't worry. We’ll see everything step-by-step along with the relevant code. Just take it easy. ?
First things first — configure it!
Request Authorization
To get our app to notify the user of anything, we need to know whether the person using it actually wants that in the first place. Mayby they don’t like their phone ringing and displaying alerts all the time ? or maybe they actually want the updates, but not that irritating sound…naahhh!☠️
So, first of all we need to get permission from the user we’re going to notify. And that’s pretty simple — just two lines of code and we’re done:
You need to write that code in AppDelegate’s method — application:didFinishLaunchingWithOptions:before returning from it.
Please note: Because the system saves the user’s response, calls to requestAuthorization(options:completionHandler:) method during subsequent launches do not prompt the user again.
Adding Categories and Actions — Actionable Notifications
The user notifications framework supports adding categories and actions to the notifications.
Categories — Define the types of notifications that the app supports and communicate to the system how we want a notification to be presented.
Actions — Each category can have up to four actions associated with it. Actions are basically custom buttons, that on tap dismiss the notification interface and forward the selected action to the app for immediate handling.
Okayyy! And what does that mean..??? Some code might help you understand better:
In the above code, we simply created a category named INVITATION with four different actions — remindLater, accept, decline, and comment.
The categories and actions are uniquely identified by their identifiers. Whenever a notification with a category is delivered, the system presents the notification along with all the actions associated with that category once the user expands it. This is what it will look like: ?
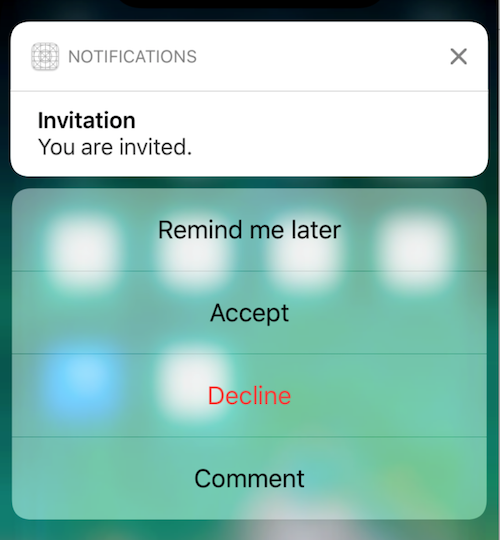
Define all the categories and actions just below where you configured notifications in application:didFinishLaunchingWithOptions: method.
Include the category identifier (eg. INVITATION) when scheduling your notification whether locally or remotely. We’ll see how to do that in the next section.
Scheduling local notifications
Now that we’re done with configuring our notifications, let’s see how to actually schedule one from within the app.
Scheduling a local notification requires just three simple steps:
- Prepare the content
- Add a trigger — when the notification should be fired
- Schedule it for delivery
Let’s get on with the code quickly, so we don’t get confused with everything happening here. LOL ?
In the above code, along with the other content, we have also provided a categoryIdentifier to support actionable notifications. In case we don’t do that, the system will adopt it’s default behavior.
That’s it. That’s all that’s needed. And yes it definitely works...hehehe.? Give it a try before moving on any further. You can download the sample from here.
Please note: Apps behave differently in background and foreground states whenever a notification is delivered.
- App not running / App in Background — the system displays local notifications directly to the user. We don’t get any callback in the app for that.
- App in Foreground — the system gives the app the opportunity to handle the notification internally. The system silences notifications for foreground apps by default.
When the app is in foreground while the notification is delivered, we get the callback in UNUserNotificationCenterDelegate's method — userNotificationCenter(_:willPresent:withCompletionHandler:) where you can decide whether to handle the notification silently or alert the user about it.
Don’t forget to conform AppDelegate to UNUserNotificationCenterDelegate protocol and setting it as the delegate of UNUserNotificationCenter shared object in application:didFinishLaunchingWithOptions:.
let center = UNUserNotificationCenter.current()center.delegate = selfWe’re done with local notifications for now. Let’s move on to how we can schedule a notification from outside our app. Before that, let’s have a look at how to respond to the custom actions.
Responding to User Actions
Configuring notifications? ✔ Scheduling notifications? ✔
What about tapping a notification or any custom action in the notification? Where will it lead? In both the cases, the system notifies the app of the user’s choice.
Whenever the user performs any action in the notification, the response is sent to UNUserNotificationCenterDelegate's method — userNotificationCenter(_:didReceive:withCompletionHandler:), where we can provide handling specific to each action.
Please note: if the app is not running when a response is received, the system launches the app in the background to process the response.
Remote notifications
Push notification or remote notifications, no matter what we call them, are one of the most frequently used with lots and lots of use-cases.
Be it social media or calendar or any of the utilities apps, we can see them almost everywhere. From news apps notifying us of the latest content, to Medium itself alerting us of the latest published articles.
Ever wonder how do they even do that? Local Notifications ?? It could be…it does the same thing — right? Maybe we can do some more configuration in the local one itself and get that working?
But Medium, for example, don’t have access to the app on our personal device, so how could it schedule any notifications? Exactly! It can’t. This is something different and something more than just the local ones.
Ok, how about we send the notification from some point and show it at some other point — will this answer our question? Yup, it surely will. But how to do that? Remote Notifications it is.
This is exactly what they do. This is the feature that has solved THE BIG PROBLEM of “Keeping up-to-date”.
Terminology
- APNs — the centerpiece of the remote notifications feature. It is a cloud service that allows approved third-party apps installed on Apple devices to send push notifications from a remote server to users over a secure connection.
- Device Token — An app-specific token that is globally unique and identifies one app-device combination. It enables communication between the Provider, APNs, and the Device.
- Provider — Server that actually sends the remote notification including the device token and other information to APNs.
Important note: Never cache device tokens in your app. Instead, get them from the system when you need them.
APNs issues a new device token to your app when certain events happen. The device token is guaranteed to be different, for example, when a user restores a device from a backup, when the user installs your app on a new device, and when the user reinstalls the operating system.
When you attempt to fetch a device token but it has not changed, the fetch method returns quickly.
Please note: The ability of APNs to deliver remote notifications to a non-running app requires the app to have been launched at least once.
How it actually works
Below is a small and quick explanation of how all the above technologies work together in sync to complete the remote notifications workflow.

- App registers with APNs
- APNs sends device token to Device with then sends it to App
- App sends this device token to Provider
- Provider sends notifications with that device token to APNs which then sends it to Device which then sends it to the App.
If a notification for your app arrives with the device powered on but with the app not running, the system can still display the notification. If the device is powered off when APNs sends a notification, APNs holds on to the notification and tries again later.
Handle it in the app
Now that we are aware of what remote notifications are and what things are needed to make them work, let’s now move on to how we can make our app support them. Because nothing happens on its own ?. We need to make some configurations for them to work.
To be able to handle remote notifications, our app must:
- Enable remote notifications in capabilities — just one-click and you are done with this step. In the Capabilities tab of our Xcode project, enable the Push Notifications option. Ensure that Push Notifications is added to the App ID that we are using for the project.
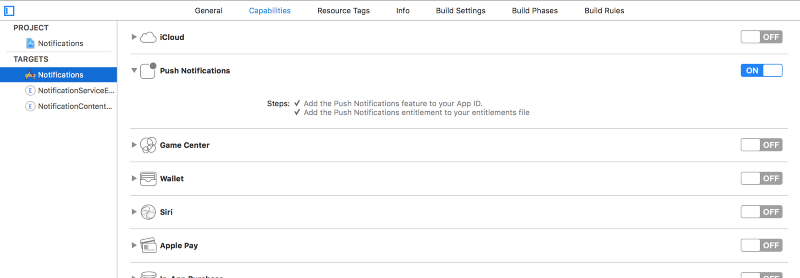
2. Register with Apple Push Notification service (APNs) and receive an app-specific device token
Requesting to register with APNs is quick and easy. Just add the below code in UIApplicationDelegate’s method— application:didFinishLaunchingWithOptions: before returning from it.
UIApplication.shared.registerForRemoteNotifications()Now there are two possibilities: either we get registered successfully or the process fails.
On successful registration, APNs sends an app-specific device token to the device inUIApplicationDelegate’s method— application:didRegisterForRemoteNotificationsWithDeviceToken:.
In case of faliure, we receive a callback in UIApplicationDelegate’s method—application:didFailToRegisterForRemoteNotificationsWithError:.
3. Send the device token to notification provider server
As of now, we’ve received the device token from APNs. Now, we need to send this token to our provider, which will use it while pushing any notifications to our device.
Since we don’t have a provider, for now we can use Easy APNs Provider for testing our push notifications. Further down, we’ll see how exactly we can make use of this tool.
For now, just download and install it on your Mac.
4. Implement support for handling incoming remote notifications
We have our device token, and our provider also knows about it. Next, the Provider will send the notification including this token and other information in it, and we’ll get it on our device.
Now what? What will happen when it arrives? How will it appear on the device? What will happen when we tap on it? What about all the actions that we configured earlier? Can we get them here?
Too many question ❓❓❓Well, don’t worry. We’ll have answers to all of them one-by-one.
What will happen when it arrives? We’ll get a callback in UIApplicationDelegate’s method— application(_:didReceiveRemoteNotification:fetchCompletionHandler:). It tells the app that a remote notification has arrived that indicates there is data to be fetched.
How will it appear on the device? It will appear with the default notification interface. If the notification’s payload is configured with category, it will appear as the actionable notification with all the actions attached to that category. We’ll discuss the payload in next section.
What will happen when we tap on it? Same as local notifications. UNUserNotificationCenterDelegate's method — userNotificationCenter(_:didReceive:withCompletionHandler:) is called with the response object.
Handle it on the Provider
We have covered most of the things we need to integrate push notifications into our app. Although we know how to handle them in the app, we are still short of handling them on the provider.
We have the provider. It knows what device token to use, but that alone won’t pop up a notification on our device with some title and other details. Neither will it make any of the actions appear.
So, pushing notifications from the provider requires the following items:
- A device token
- APNs certificate — we can obtain it from the developer account
- Payload — any custom data that you want to send to your app, and includes information about how the system should notify the user. It’s simply a JSON dictionary with some key value pairs. The below illustration might help you understand it better.
Let’s see what’s all in that JSON dictionary:
- aps dictionary — the most important one. Contains Apple-defined keys and is used to determine how the system that is receiving the notification should alert the user.
- alert dictionary — it is more of a self-explanatory item. Provides the content of the notification.
- category — for actionable notifications. All the actions attached to that category will be available in the notifications.
- content-available — To support a background update notification, set this key to 1.
- mutable-content — To enable a notification’s modification through Notification Service App Extension, set it to 1.
Here you can read more about customizing the payload as per your requirements. This is a reference to the keys that we can add in the aps dictionary
Notification Service App Extension
At this point, we know what remote notifications are, how they work, what all we need to get them working — pretty much everything! Since we just got them working perfectly✌️.
Now the question is, what if we want to modify some content in the notification received from the provider, before presenting it on the device? What if the notification contains some image link that we need to download before delivering it to the user? Can we do that with what we already know? We don’t have access to the provider…so how will we?
We can’t actually. We can’t change what we get, but we can definitely change what we present.
That’s what Notification Service App Extension is all about— modifying the content of remote notifications before delivery. It is as simple as it looks. No fancy code, nothing. It’s really very simple.
Adding Notification Service Extension to the project
Extensions in an xcode project are added as a target. Select File — New — Target — Notification Service Extension.
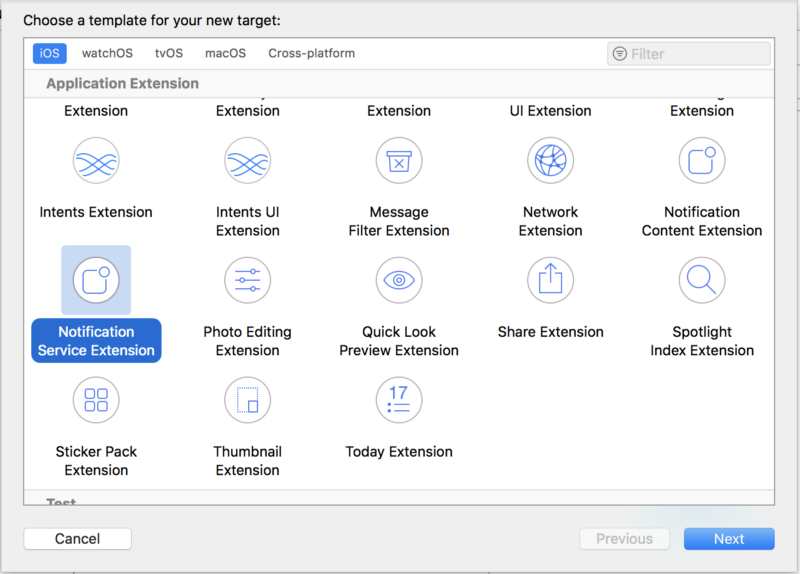
Prerequisites
Before we begin to modify the content, there are some restrictions on when the content is allowed to be modified.
Content can be modified only if:
- The remote notification is configured to display an alert.
- The remote notification’s aps dictionary includes the mutable-content key with the value set to 1.
We cannot modify silent notifications or those that only play a sound or badge the app’s icon.
So, to support any modifications in the notifications’ content, these conditions must be fulfilled.
Modifying the content
The default notification service extension target provided by Xcode contains a subclass of the UNNotificationServiceExtension class for us to modify.
It contains two methods:
didReceive(_:withContentHandler:)— make any needed changes to the notification and notify the system when you’re done. This method has a limited amount of time (about 30 secs) to perform its task and execute the provided completion block.serviceExtensionTimeWillExpire()— Tells us that the extension is about to be terminated. Give us one last chance to submit our changes. If we don’t update the notification content before time expires, the system displays the original content.
Let’s look at an example. We’ll change the body in payload in Code Snippet 7 to “Address: Sea Shells Apartments, Mumbai”.
All the default implementation of both the methods is provided by the extension itself. We just have to make the changes we want, like in Line 8 in the above code snippet. Just a single line of code for now. Similarly, you can modify other fields as per your requirements.
Notification Content Extension
Having an eye-catching UI is always better than a simple default UI. Adding some colors and some pretty fonts is never a bad idea. We’re going to do the same with our notifications to make them look Wow!?
And and and…Apple is here to our rescue again. Notification content extension it is. This presents a custom interface for a delivered local or remote notification.
Adding Notification Content Extension to the project
I think we already know how to do that. Don’t we? We’re going to the same what we did for adding Notification Service Extension. Select File — New — Target — Notification Content Extension.
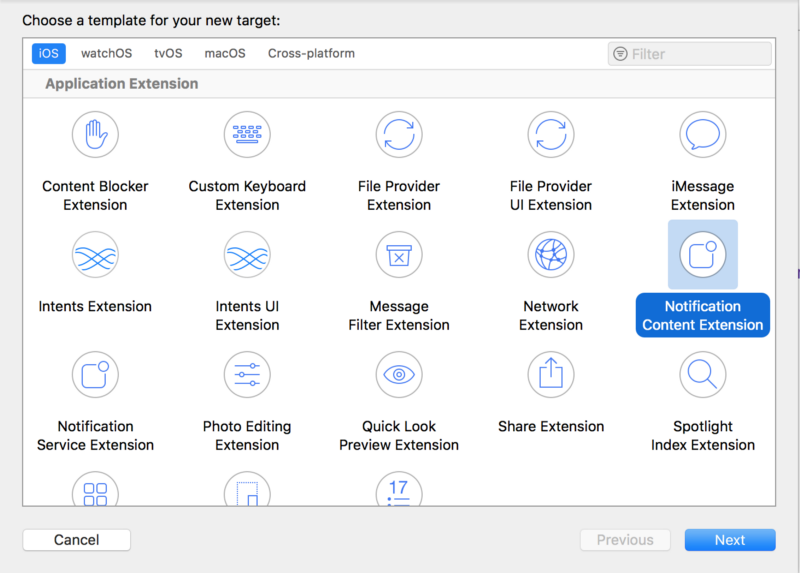
Adding some keys to extension’s Info.plist
To support custom UI for local and remote notifications, we need to make some changes in the Info.plist file of content extension.
- UNNotificationExtensionCategory (reqd.) — A string or an array of strings. Each string contains the identifier of a category declared by the app. Category, I must say, is really really important for notifications. Custom UI will only appear for the notifications lying in the specified categories.
- UNNotificationExtensionInitialContentSizeRatio (reqd.) — A floating-point number that represents the initial size of the view controller’s view expressed as a ratio of its height to its width. It’s the view controller that we’ll use for making custom UI. We’ll discuss that in the upcoming section.
- UNNotificationExtensionDefaultContentHidden — if true: show only custom content. If false: show custom+default content.
- UNNotificationExtensionOverridesDefaultTitle —if true: set the notification’s title to the title of the view controller. If false: notification’s title is set to app’s name.
Here is an illustration that can help us understand the above keys better.
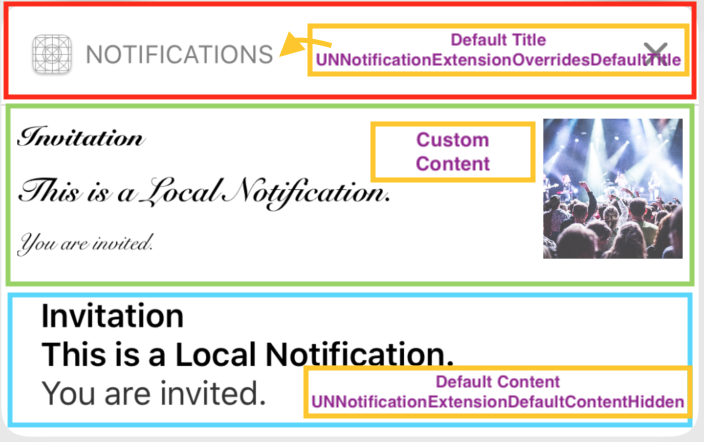
In the above illustration, the keys in Info.plist are configured as:
- UNNotificationExtensionCategory — INVITATION
- UNNotificationExtensionInitialContentSizeRatio — 1
- UNNotificationExtensionDefaultContentHidden — false
- UNNotificationExtensionOverridesDefaultTitle — false
Creating the custom UI
Notification content extension provides us with a UIViewController that conforms to UNNotificationContentExtension protocol. This controller presents the interface of the notification. The Storyboard file in the extension contains a single ViewController that we can use to create whatever UI we want the notification to present.
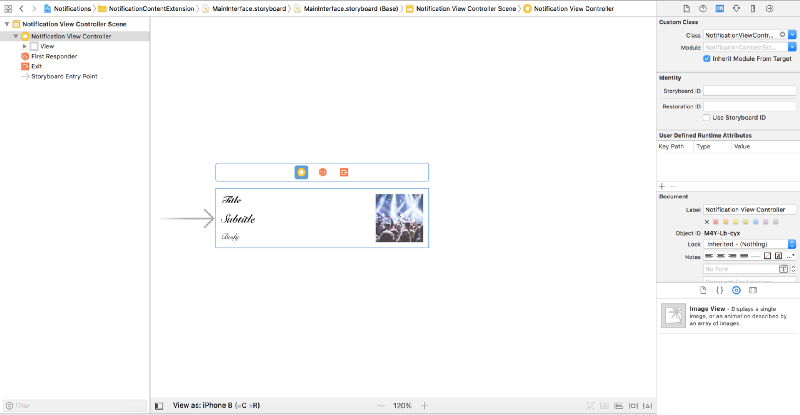
Once we create the UI, we need to connect the elements in the NotificationViewController in order to fill in the details. Whenever a notification arrives with an expected category, we receive a callback in UNNotificationContentExtension’s method — didReceive(_:) . This is the place where we can add details to our customized UI.
We’re almost done with our notification’s custom UI. Just 1 more thing. Since the custom UI is attached to the notifications’ category, that may have some actions attached to it. And…you got that right! ?We’ll get our actions automatically without any custom handling. Brilliant!?
Content + Beautiful UI + Custom Actions — Everything done. What more can we ask for? Apple, you are great!?
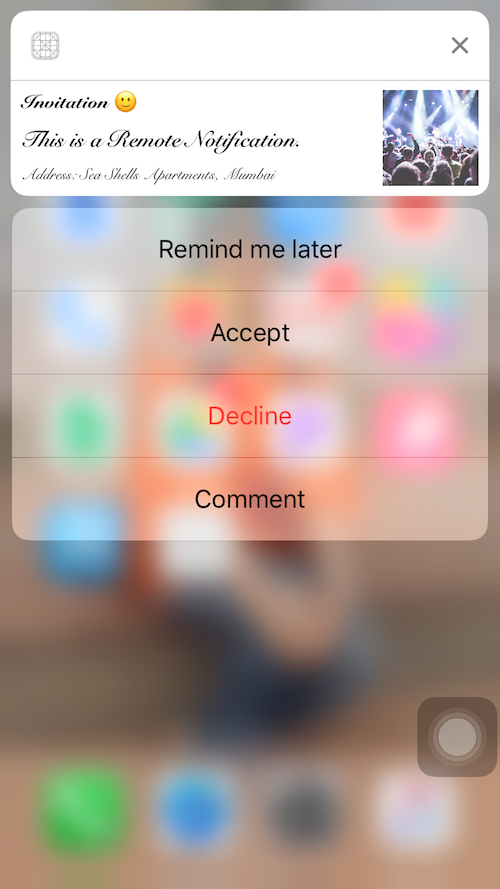
One last point: we can add handling to the custom actions in the extension, too. The system calls didReceive(_:completionHandler:) method to respond to any selected actions. If our view controller doesn’t implement that method, the system delivers the selected action to your app for handling.
If implemented, we need to handle all the possible actions in this method. One thing that is important here is the completion closure.
completion: The block to execute when you are finished performing the action. You must call this block at some point during your implementation. The block has no return value.
The closure accepts a single parameter dismiss of type UNNotificationContentExtensionResponseOption . We provide the following options:
doNotDismiss— Don’t dismiss the notification interface.dismiss— Dismiss the notification interface.dismissAndForwardAction--Dismiss the notification interface and forward the notification to the app.
That sums up our notifications. Too much to remember? Practise makes Progress ?. Try making your own notifications now!
Sample Project
You can download the sample project from here.
And the sample project for Notification Content Extension can be found here.
Further reading
Don’t forget to read my other articles:
- Everything about Codable in Swift 4
- Color it with GRADIENTS — iOS
- Coding for iOS 11: How to drag & drop into collections & tables
- All you need to know about Today Extensions (Widget) in iOS 10
- UICollectionViewCell selection made easy..!!
Feel free to leave comments in case you have any questions.