By Mark Mansur
With the release of CoreML and new Vision APIs at this year’s Apple World Wide Developers Conference, machine learning has never been easier to get into. Today I’m going to show you how to build a simple image recognition app.
We will learn how to gain access to the iPhone’s camera and how to pass what the camera is seeing into a machine learning model for analysis. We’ll do all this programmatically, without the use of storyboards! Crazy, I know.
Here is a look at what we are going to accomplish today:
//
//  ViewController.swift
//  cameraTest
//
//  Created by Mark Mansur on 2017-08-01.
//  Copyright © 2017 Mark Mansur. All rights reserved.
//
import UIKit
import AVFoundation
import Vision

class ViewController: UIViewController, AVCaptureVideoDataOutputSampleBufferDelegate {
    let label: UILabel = {
        let label = UILabel()
        label.textColor = .white
        label.translatesAutoresizingMaskIntoConstraints = false
        label.text = "Label"
        label.font = label.font.withSize(30)
        return label
    }()

    override func viewDidLoad() {
        super.viewDidLoad()

        setupCaptureSession()

        view.addSubview(label)
        setupLabel()
    }

    func setupCaptureSession() {
        let captureSession = AVCaptureSession()

        // search for available capture devices
        let availableDevices = AVCaptureDevice.DiscoverySession(deviceTypes: [.builtInWideAngleCamera], mediaType: AVMediaType.video, position: .back).devices

        // setup capture device, add input to our capture session
        do {
            if let captureDevice = availableDevices.first {
                let captureDeviceInput = try AVCaptureDeviceInput(device: captureDevice)
                captureSession.addInput(captureDeviceInput)
            }
        } catch {
            print(error.localizedDescription)
        }

        // setup output, add output to our capture session
        let captureOutput = AVCaptureVideoDataOutput()
        captureOutput.setSampleBufferDelegate(self, queue: DispatchQueue(label: "videoQueue"))
        captureSession.addOutput(captureOutput)

        let previewLayer = AVCaptureVideoPreviewLayer(session: captureSession)
        previewLayer.frame = view.frame
        view.layer.addSublayer(previewLayer)

        captureSession.startRunning()
    }

    // called everytime a frame is captured
    func captureOutput(_ output: AVCaptureOutput, didOutput sampleBuffer: CMSampleBuffer, from connection: AVCaptureConnection) {
        guard let model = try? VNCoreMLModel(for: Resnet50().model) else {return}

        let request = VNCoreMLRequest(model: model) { (finishedRequest, error) in

            guard let results = finishedRequest.results as? [VNClassificationObservation] else { return }
            guard let Observation = results.first else { return }

            DispatchQueue.main.async(execute: {
                self.label.text = "\(Observation.identifier)"
            })
        }
        guard let pixelBuffer: CVPixelBuffer = CMSampleBufferGetImageBuffer(sampleBuffer) else { return }

        // executes request
        try? VNImageRequestHandler(cvPixelBuffer: pixelBuffer, options: [:]).perform([request])
    }

    func setupLabel() {
        label.centerXAnchor.constraint(equalTo: view.centerXAnchor).isActive = true
        label.bottomAnchor.constraint(equalTo: view.bottomAnchor, constant: -50).isActive = true
    }
}
🙌🏻 Step 1: Create a new project.
Fire up Xcode and create a new single view application. Give it a name, perhaps “ImageRecognition.” Choose swift as the main language and save your new project.
👋 Step 2 : Say goodbye to the storyboard.
For this tutorial, we are going to do everything programmatically, without the need for the storyboard. Maybe I’ll explain why in another article.
Delete main.storyboard.
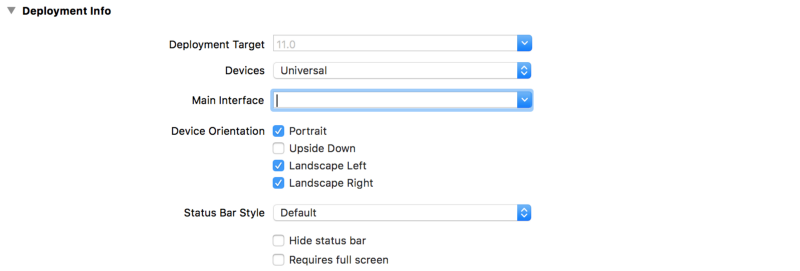
Navigate to info.plist and scroll down to Deployment Info. We need to tell Xcode we are no longer using the storyboard.
Delete the main interface.
Without the storyboard we need to manually create the app window and root view controller.
Add the following to the application() function in AppDelegate.swift:
func application(_ application: UIApplication, didFinishLaunchingWithOptions launchOptions: [UIApplicationLaunchOptionsKey: Any]?) -> Bool {
        // Override point for customization after application launch.

        window = UIWindow()
        window?.makeKeyAndVisible()
        let vc = ViewController()

        window?.rootViewController = vc
        return true
    }
We manually create the app window with UIWindow(), create our view controller, and tell the window to use it as its root view controller.
The app should now build and run without the storyboard 😎
⚙️ Step 3: Set up AVCaptureSession.
Before we start, import UIKit, AVFoundation and Vision. The AVCaptureSession object handles capture activity and manages the flow of data between input devices (such as the rear camera) and outputs.
We are going to start by creating a function to setup our capture session.
Create setupCaptureSession() inside ViewController.swift and instantiate a new AVCaptureSession.
func setupCaptureSession() {

        // creates a new capture session
        let captureSession = AVCaptureSession()
}
Don’t forget to call this new function from ViewDidLoad().
override func viewDidLoad() {
        super.viewDidLoad()

        setupCaptureSession()
}
Next, we are going to need a reference to the rear view camera. We can use a DiscoverySession to query available capture devices based on our search criteria.
Add the following code:
// search for available capture devices
let availableDevices = AVCaptureDevice.DiscoverySession(deviceTypes: [.builtInWideAngleCamera], mediaType: AVMediaType.video, position: .back).devices
AvailableDevices now contains a list of available devices matching our search criteria.
We now need to gain access to our captureDevice and add it as an input to our captureSession.
Add an input to the capture session.
// get capture device, add device input to capture session
do {
    if let captureDevice = availableDevices.first {
        captureSession.addInput(try AVCaptureDeviceInput(device: captureDevice))
    }
} catch {
    print(error.localizedDescription)
}
The first available device will be the rear facing camera. We create a new AVCaptureDeviceInput using our capture device and add it to the capture session.
Now that we have our input setup, we can get started on how to output what the camera is capturing.
Add a video output to our capture session.
// setup output, add output to our capture session
let captureOutput = AVCaptureVideoDataOutput()
captureSession.addOutput(captureOutput)
AVCaptureVideoDataOutput is an output that captures video. It also provides us access to the frames being captured for processing with a delegate method we will see later.
Next, we need to add the capture session’s output as a sublayer to our view.
Add capture session output as a sublayer to the view controllers’ view.
let previewLayer = AVCaptureVideoPreviewLayer(session: captureSession)
previewLayer.frame = view.frame
view.layer.addSublayer(previewLayer)

captureSession.startRunning()
We create a layer based on our capture session and add this layer as a sublayer to our view. CaptureSession.startRunning() starts the flow from inputs to the outputs that we connected earlier.
📷 Step 4: Permission to use the camera? Permission granted.
Nearly everyone has opened an app for the first time and has been prompted to allow the app to use the camera. Starting in iOS 10, our app will crash if we don’t prompt the user before attempting to access the camera.
Navigate to info.plist and add a new key named NSCameraUsageDescription. In the value column, simply explain to the user why your app needs camera access.
Now, when the user launches the app for the first time they will be prompted to allow access to the camera.
📊 Step 5: Getting the model.
The heart of this project is most likely the machine learning model. The model must be able to take in an image and give us back a prediction of what the image is. You can find free trained models here. The one I chose is ResNet50.
Once you obtain your model, drag and drop it into Xcode. It will automatically generate the necessary classes, providing you an interface to interact with your model.
🏞 Step 6: Image analysis.
To analyze what the camera is seeing, we need to somehow gain access to the frames being captured by the camera.
Conforming to the AVCaptureVideoDataOutputSampleBufferDelegate gives us an interface to interact with and be notified every time a frame is captured by the camera.
Conform ViewController to the AVCaptureVideoDataOutputSampleBufferDelegate.
We need to tell our Video output that ViewController is its sample buffer delegate.
Add the following line in SetupCaptureSession():
captureOutput.setSampleBufferDelegate(self, queue: DispatchQueue(label: "videoQueue"))
Add the following function:
func captureOutput(_ output: AVCaptureOutput, didOutput sampleBuffer: CMSampleBuffer, from connection: AVCaptureConnection) {
        guard let model = try? VNCoreMLModel(for: Resnet50().model) else { return }
        let request = VNCoreMLRequest(model: model) { (finishedRequest, error) in
            guard let results = finishedRequest.results as? [VNClassificationObservation] else { return }
            guard let Observation = results.first else { return }

            DispatchQueue.main.async(execute: {
                self.label.text = "\(Observation.identifier)"
            })
        }
        guard let pixelBuffer: CVPixelBuffer = CMSampleBufferGetImageBuffer(sampleBuffer) else { return }

        // executes request
        try? VNImageRequestHandler(cvPixelBuffer: pixelBuffer, options: [:]).perform([request])
    }
Each time a frame is captured, the delegate is notified by calling captureOutput(). This is a perfect place to do our image analysis with CoreML.
First, we create a VNCoreMLModel which is essentially a CoreML model used with the vision framework. We create it with a Resnet50 Model.
Next, we create our vision request. In the completion handler, we update the onscreen UILabel with the identifier returned by the model. We then convert the frame passed to us from a CMSampleBuffer to a CVPixelBuffer. Which is the format our model needs for analysis.
Lastly, we perform the Vision request with a VNImageRequestHandler.
🗒 Step 7: Create a label.
The last step is to create a UILabel containing the model’s prediction.
Create a new UILabel and position it using constraints.
let label: UILabel = {
        let label = UILabel()
        label.textColor = .white
        label.translatesAutoresizingMaskIntoConstraints = false
        label.text = "Label"
        label.font = label.font.withSize(30)
        return label
    }()

func setupLabel() {
        label.centerXAnchor.constraint(equalTo: view.centerXAnchor).isActive = true
        label.bottomAnchor.constraint(equalTo: view.bottomAnchor, constant: -50).isActive = true
}
Don’t forget to add the label as a subview and call setupLabel() from within ViewDidLoad().
view.addSubview(label)
setupLabel()
You can download the completed project from GitHub here.
Like what you see? Give this post a thumbs up 👍, follow me on Twitter, GitHub, or check out my personal page.