

In this article, we will discuss why and how you can use Node.js for the server-side of your Internet of Things (IoT) devices.
Understand the business opportunity
In 2019, the market revenue of IoT reached $212 billion. There are about 26.66 billion connected IoT devices worldwide, and this number is set to reach 75.44 billion by 2025.
The UN estimates that, in February 2020, the world population is currently 7.7 billion people. Simple math tells us that the average person owns around 3 to 4 IoT devices. Do you have one? Maybe a smartwatch? A smart TV? Or a smart car?
Moving further, the population is expected to reach 8.1 billion people in 2025. The same math calculation shows us that, in 2025, an average person will have from 9 to 10 smart devices in their possession.
Do you see where I am going with this? Do you want to join this lucrative market niche and make your IoT device one of these 9 to 10?
 Statistics retrieved from Statista and the United Nations.
Choose the right framework
The client-side of an IoT device is represented by the hardware itself. It is programmed with C, C++, or Lua – low-level and difficult programming languages. But there is not much you can do about it because of hardware limitations.
Along with high performance, users of IoT devices prioritize low cost and energy-efficiency. Thus, at least for now, you should keep working with low-level languages.
On the other hand, the server side of IoT applications offers you more freedom of choice. Here, you are not limited by the hardware, so you can choose any coding language and framework you prefer.
I believe that the right one is Node.js. Here is why.
Node.js is fast and performant
First of all, any IoT device is constantly working with dynamically changing data. This means that you need a framework which can handle real-time applications and heavy data flows.
Node.js is built on Google’s V8 JS engine, which is highly effective and perfectly scalable. Thanks to this feature, Node.js is the number one framework to be used with real-time apps and platforms. Constantly changing data is not a challenge for it either.
Node.js is easy to integrate with IoT protocols
IoT applications actively use a publish-subscribe-based messaging protocol, MQTT. In turn, for transportation and encapsulation, this protocol uses WebSockets. Both MQTT and WebSockets are well-supported and easily integrated with Node.js.
Node.js modules facilitate IoT development
Node.js is augmented with npm, the Node Package Manager, which features a lot of useful IoT modules. There are about 80 packages for Intel IoT Edison, Arduino, or Raspberry Pi. Also, it features over 30 packages for different sensors, beacons, and other tools.
This is why Internet of Things development is simpler and faster with Node.js IoT modules.
Node.js is resource-efficient and scalable
In general, developers prefer working with Node.js because it does not require a lot of resources. The CPU and RAM are not overloaded.
Also, Node.js is highly scalable, which is absolutely necessary for most modern companies.
Beware of the challenges
Entering the IoT niche can lead you down a path to success. No wonder, then, that there are a lot of challenges and traps awaiting you on your way – success is never easy to achieve. And the first and foremost challenge you should be aware of is security.
Security is one of the top problems in IoT sphere, and one of the first pitfalls you will stumble upon. So what should you do?
Secure authentication
Let’s start with authentication. There are a lot of tools for authentication in Node.js: tokens, JSON web tokens, Auth0, and so on. Each has its advantages and disadvantages. To start, you should look at them from the perspective of IoT.
On the one hand, tokens are effective but not 100 percent safe. They are a cool way to set up authentication as they let you identify a specific user and decide whether to grant or deny them access. A token can be encrypted with any algorithm.
However, the hardware (scanners, sensors, hubs, or other IoT things) should store this token or login/password data in firmware. This means that attackers can steal the token if they have physical access to the hardware. The same story goes for JWT or Auth0.
On the other hand, we can use any tools for authentication on the server side. You can easily integrate any authentication tool on the Node.js platform.
There are a lot of npm packages which allow you to do this manually: Auth0, Passport, and JWT. There are also packages for integration with cloud IoT services: @azure-iot/authentication, aws-iot-device-sdk, and so on.
Secure HTTP requests
Next, be careful with HTTP requests from your IoT devices. You should check if you get a request from a proper IoT device.
Firstly, you should implement HTTPS with your IoT devices. Hardware is not a browser and you should implement HTTPS manually on it. For the server-side, you can either do it manually or use hosting with HTTPS configuration and certificates.
In Node.js, it is quite easy to implement:
const express = require('express');
const https = require('https');
const http = require('http');
const fs = require('fs');
const options = {
  key: fs.readFileSync('path/to/your/key.pem'),
  cert: fs.readFileSync(path/to/your/certificate.cert')
};
const app = express();
http.createServer(app).listen(80);
https.createServer(options, app).listen(443);
HTTPS uses SSL or TLS protocols for data encryption. However, to be sure that you have gotten a request from the necessary server or client, use additional data encryption. For example, this is how you can use a signature:
const fetch = require('node-fetch');
const verifier = crypto.createVerify('RSA-SHA1')
const SIGNATURE_FORMAT = 'base64';
//check if it trusted url for your certificate
const trustedUrl = ‘https://trustedUrl/’
const isTrustedUrl = trustedUrl.match(url);
If (isTrustedUrl) {
verifier.update(req.body, 'utf8')
    fetch(isTrustedUrl)
    .then(certificate => {
    // check signature
const isValidSignature = verifier.verify(certificate, reg.header.signature, SIGNATURE_FORMAT);
   })
    .catch(err => console.log(err));
}
To wrap up this part:
- First, you have to check the trusted URL of your certificate.
- Then, you sign a request body with the public key from your certificate.
- Finally, you compare the signed body with the signature from headers.
It is extremely important to know that you're getting requests from the proper devices and that you're not facing a middle attack.
Check out these examples
Asama – tracking the movement of your employees

Asama is a micro-location system, which uses smartwatches and Bluetooth beacons to track movement and activity of employees. Beacons transmit a regular signal.
According to these signals, the smartwatch defines the location of an employee. The smartwatch also analyzes whether the right person is wearing it and if the employee is sleeping or working.
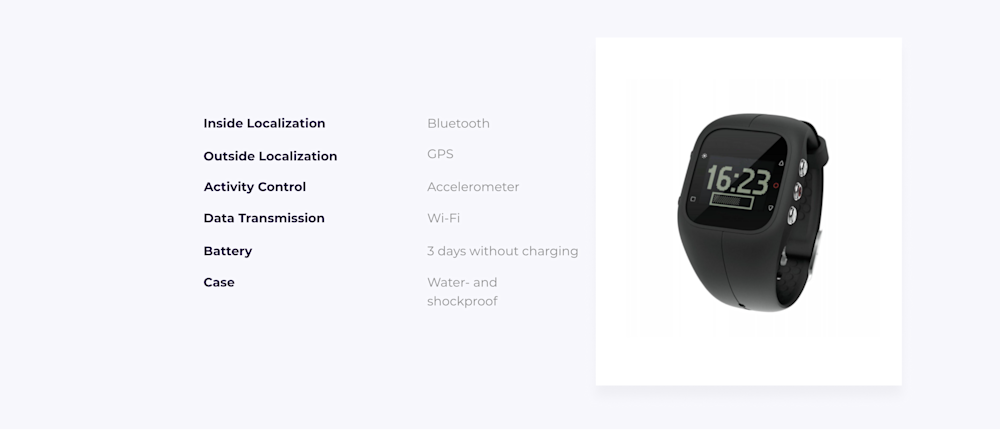
The data is then transmitted to the mobile app, which is installed and configured on the employer’s phone. The system is powered by Node.js in IoT.
This way, managers can track their employees in real time, find the person they need right away, and optimize the workspace. Also, at the end of the week the employer receives an extensive report on employee activity. All this helps to boost the company's performance and productivity.
This solution might not suit a business with a small office and flexible hours. Yet, it works perfectly for industrial plants, construction sites, factories, warehouses, shopping centers, supermarkets, hotels, security agencies, restaurants, or stores.
It's well-suited anywhere you as an employer need to know if employees are coming too late or leaving too early, being absent at the working place, not working actively throughout the day, or not following routes and schedules.

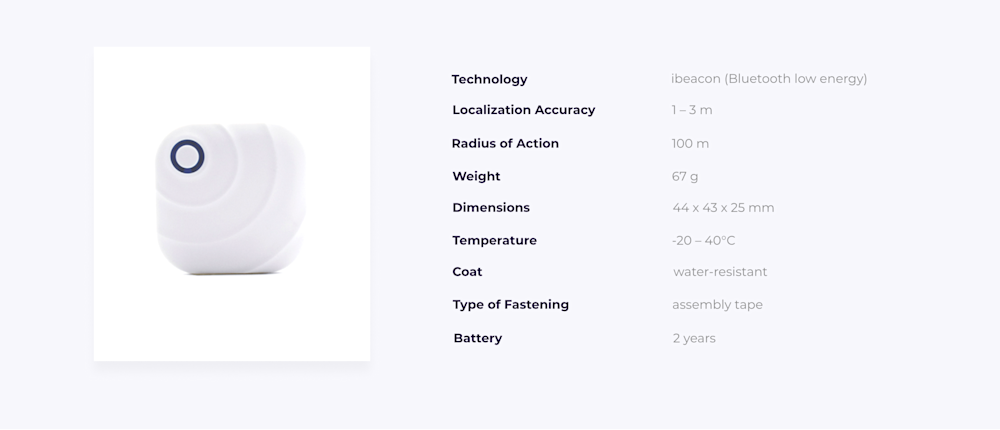
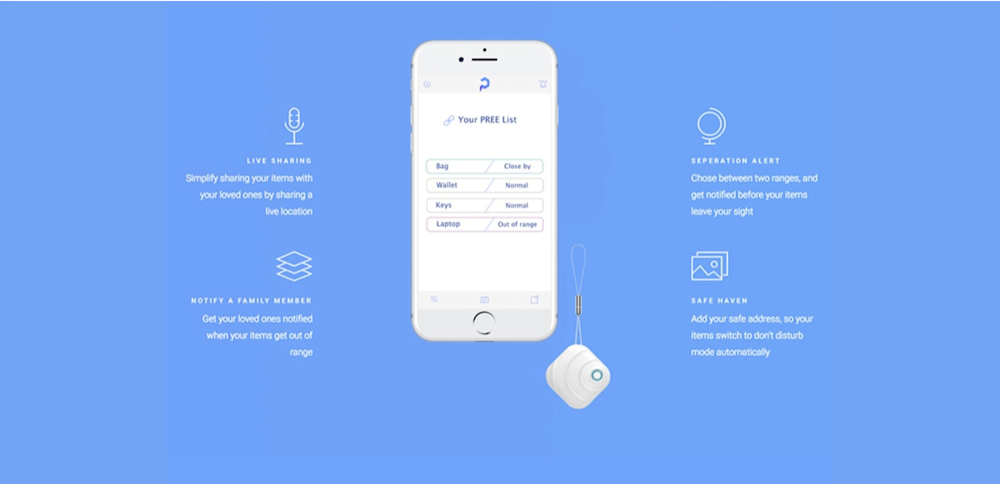
PREE – finding your belongings
PREE is a system of BLE beacons and mobile software which helps people stop losing their stuff. It is a lifesaver for those who often forget their phone, bag, keys, wallet, or any other valuable belongings.
The user can see the location of their item in real time and share it with trusted contacts. Once the item is out of range, they will get a notification, and so will their friends or family members. It doesn't spam others with notifications when they are not needed – for example, when at home, the user can mute them for a certain area.
This Internet of Things IoT system is built with Node.js, Express, and Mongo on the backend and Ionic with Cordova for the frontend. The combination of these frameworks ensures the best user experience.
Validate your idea
Once you have an idea for an IoT product, start with validating it. You can do this in two ways:
- Hire an idea validation team, who will help you test the viability of your product before you invest in development, or
- Hire a software design and development team, who will launch an extensive product discovery process.
Postscript
I would like to send a huge thank you to Volodya Andrushchak, the IoT guru at KeenEthics, for contributing and basically breathing life into to this article.
If you have enjoyed the article, you should definitely read some more about Node.js: What are the Advantages of Node.JS? or NodeJS vs Python: How to Choose the Best Technology to Develop Your Web App's Back End.
The original article posted on KeenEthics blog can be found here: IoT and Node.JS: How to Catch the Opportunity?