
The Fetch API is a JavaScript function that you can use to send a request to any Web API URL and get a response.
In this article, I'm going to show you how to make HTTP requests to external APIs using the JavaScript Fetch API. You're going to learn how to create GET, POST, PUT/PATCH, and DELETE requests using the Fetch API.
To get the most out of this article, you need to have a good understanding of JavaScript promises. You can read my JavaScript Promises article if you need a refresher.
- How the Fetch API Works
- How to Send a GET Request
- How to Send a POST Request
- How to Send a PUT Request
- How to Send a PATCH Request
- How to Send a DELETE Request
- How to Use Async/Await With the Fetch API
- Run Code Examples
- Summary
Let's get started!
How the Fetch API Works
To send a request similar to that of an HTML form, you only need to pass the URL where you want to send the data to as an argument to the fetch() function:
fetch('<Your URL>', {})
The fetch() function accepts two parameters:
- The URL to send the request to (this is a required parameter).
- The options to set in the request. You can set the request method here (this is an optional parameter).
Under the hood, the fetch() function returns a Promise, so you need to add the .then() and .catch() methods.
When the request returns a response, the then() method will be called. If the request returns an error, then the catch() method will be executed:
fetch('<Your URL>', {})
  .then(response => {
    // Handle Fetch response here.
  })
  .catch(error => {
    // If there's an error, handle it here
  })
Inside the .then() and .catch() methods, you pass a callback function to execute when the respective methods are called.
The .catch() method can be omitted from Fetch API. It's used only when Fetch can't make a request to the API, such as no network connection or the URL not found.
How to Send a GET Request Using the Fetch API
The GET request is an HTTP request used to ask for specific data from an API, such as when you need
In the following example, we're going to hit a dummy URL located at https://jsonplaceholder.typicode.com to request for a user registered on the site:
fetch('https://jsonplaceholder.typicode.com/users/1')
  .then(response => console.log(response))
  .catch(error => console.log(error));
The code above will give the following response:
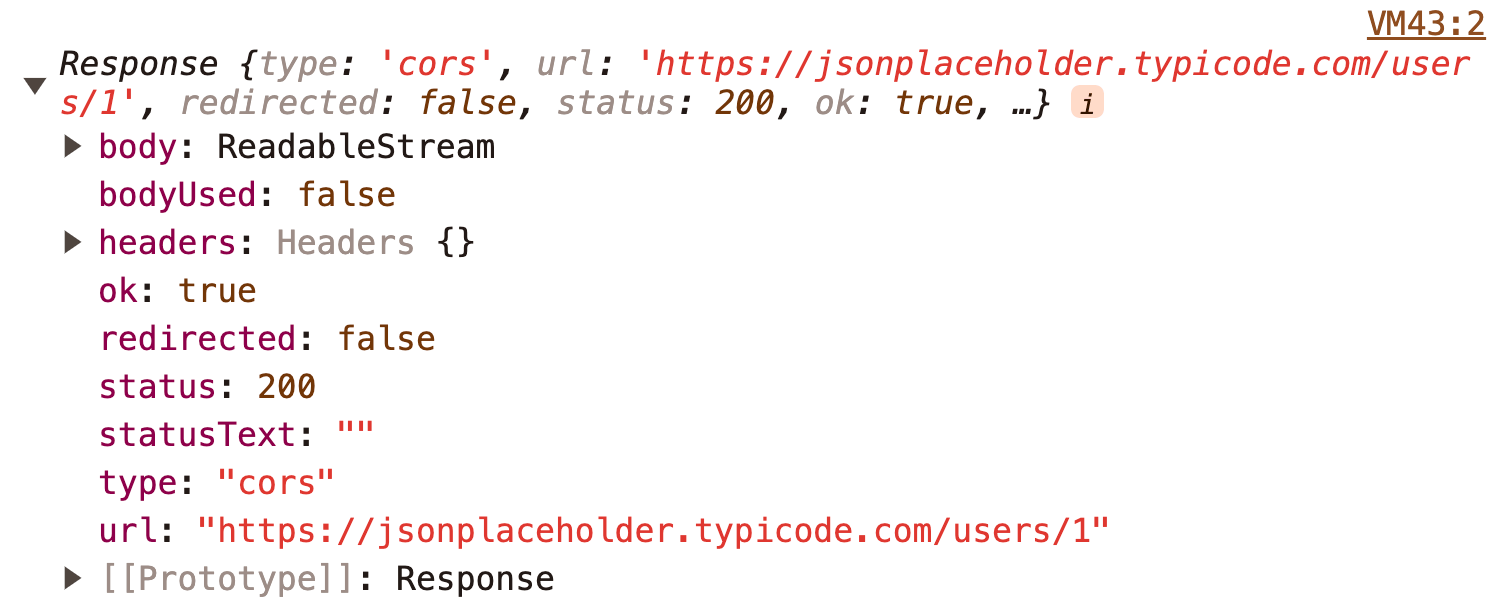 Fetch Request Response
Here, you can see that the body property contains a ReadableStream. To use the ReadableStream in our JavaScript application, we need to convert it to call the json() method:
fetch('https://jsonplaceholder.typicode.com/users/1')
  .then(response => response.json())
  .then(data => console.log(data))
The json() method converts the ReadableStream into a JavaScript object. The data variable above will be printed as follows:
{
  "id": 1,
  "name": "Leanne Graham",
  "username": "Bret",
  "email": "Sincere@april.biz",
  "address": {
    "street": "Kulas Light",
    "suite": "Apt. 556",
    "city": "Gwenborough",
    "zipcode": "92998-3874",
    "geo": {
      "lat": "-37.3159",
      "lng": "81.1496"
    }
  },
  "phone": "1-770-736-8031 x56442",
  "website": "hildegard.org",
  "company": {
    "name": "Romaguera-Crona",
    "catchPhrase": "Multi-layered client-server neural-net",
    "bs": "harness real-time e-markets"
  }
}
Now that you have the data object, you can use this value in any way you want. For example, if you want to display the user name and email in HTML, here's how you do it:
<body>
  <h1 id='user-name'>Waiting for data</h1>
  <h2 id='user-email'>Waiting for data</h1>
  <script>
    fetch('https://jsonplaceholder.typicode.com/users/1')
      .then(response => response.json())
      .then(data => {
        document.querySelector('#user-name').textContent = data.name
        document.querySelector('#user-email').textContent = data.email
      })
  </script>
</body>
In the above code, the Fetch API will run as soon as the browser loads the HTML document.
After processing the response into a data object, JavaScript will change the text of the <h1> and <h2> elements above to reflect the name and email of the user.
If you run the code above, you'll get the following output:
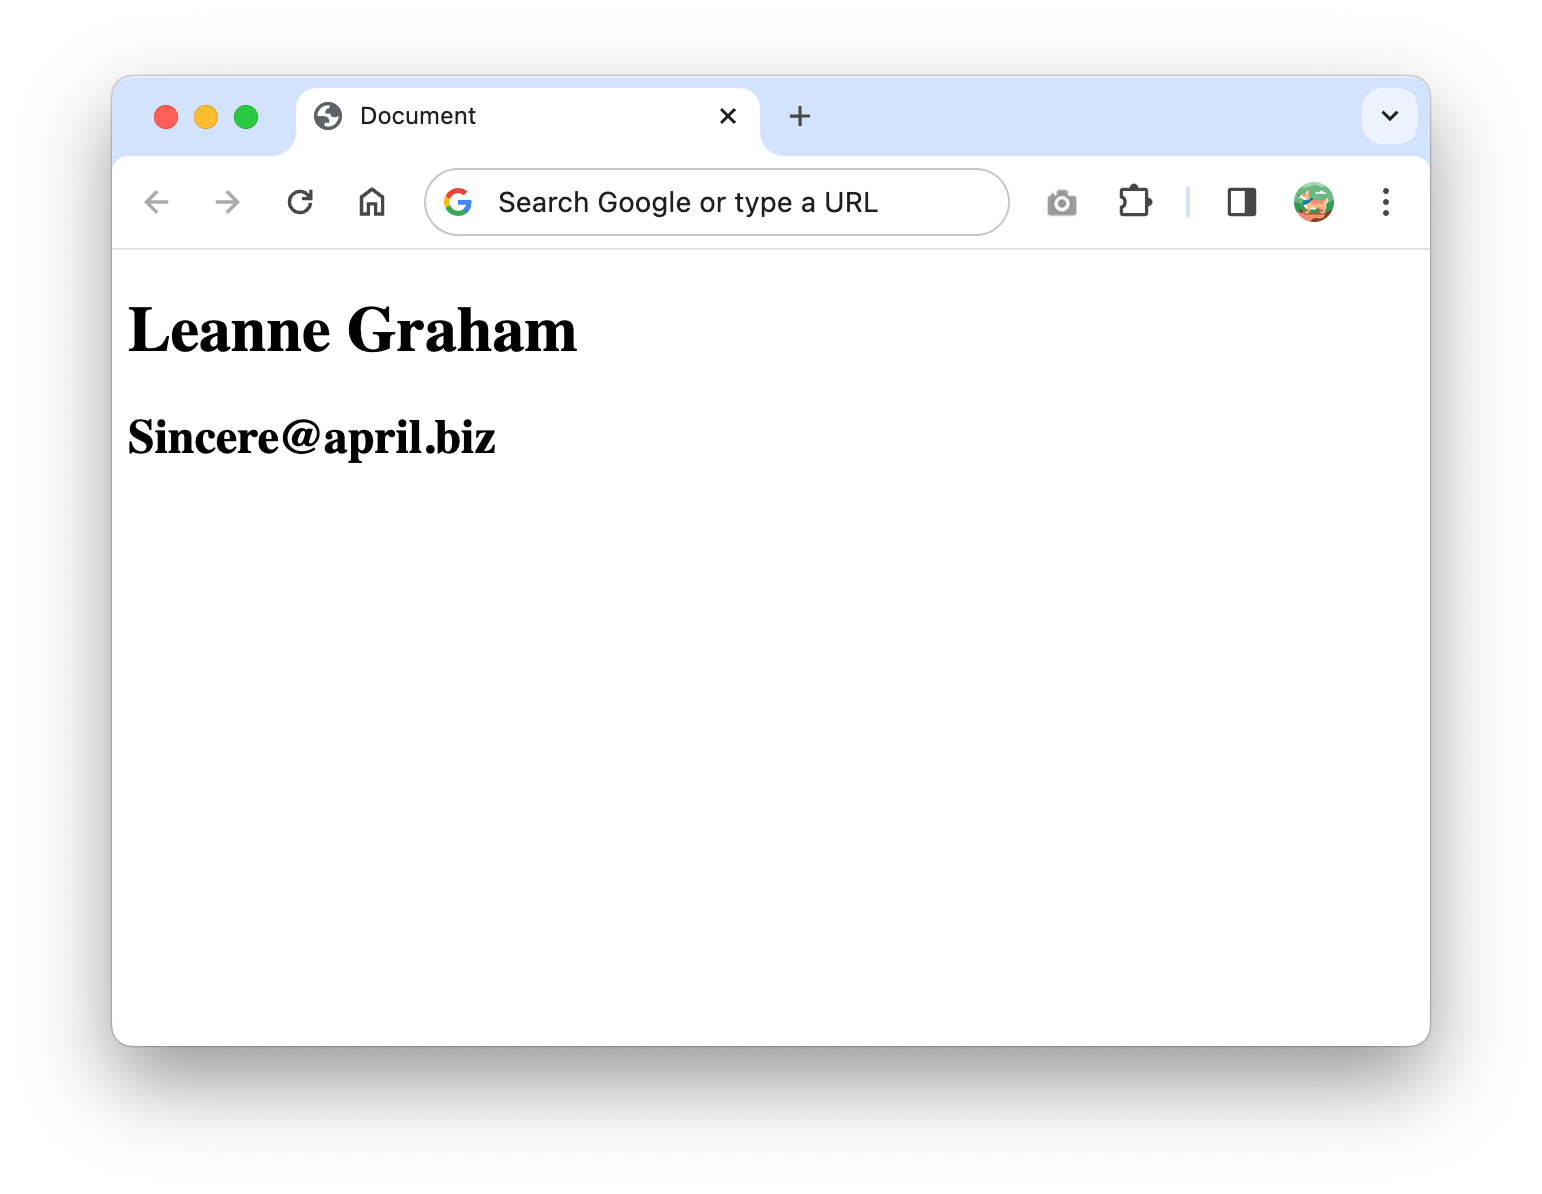 The Fetch Request Output Displayed in the Browser
And that's how you send a GET request using Fetch and display the returned data in HTML.
Note that depending on the request you are asking for, an API might return a different type of data.
In this example, the typicode API sends back an object, but you might also get an array when you request more than one unit of data.
If you access the URL at https://jsonplaceholder.typicode.com/users, you'll see that the API respond with an array of objects.
To handle an array of objects, you can iterate over the array and show the data in HTML as follows:
// example
You need to know the data type returned by the API to handle it correctly.
How to Send a POST Request Using the Fetch API
If you want to send a POST request instead of a GET request, you need to define the second argument when calling the function, which is the option object.
Inside the option object, define a method property as follows:
fetch('https://jsonplaceholder.typicode.com/users', {
  method: 'POST', // Set method here
})
.then(response => response.json())
.then(data => console.log(data))
When you send a POST method, you need to set the request header and body properties to ensure a smooth process.
For the header, you need to add the Content-Type property and set it to application/json.
The data you want to send should be put inside the body property in a JSON format. See the example below:
fetch('https://jsonplaceholder.typicode.com/users', {
  method: 'POST',
  headers: {
    'Content-Type': 'application/json',
  },
  body: JSON.stringify({
    name: 'Nathan Sebhastian',
    email: 'ns@mail.com'
  }),
}).then(response => response.json())
  .then(data => console.log(data))
In the example above, we sent a POST request to create a new user. In the body property, a regular JavaScript object was converted into a JSON string by calling the JSON.stringify() method.
JSON is one of the formats computers use to communicate with each other on the internet.
The response from the typicode.com API would be similar as follows:
{
  "name": "Nathan Sebhastian",
  "email": "ns@mail.com",
  "id": 11
}
This means that we successfully created a new user. Since typicode.com is a fake API, the user won't really be added, but it will pretend as if it was.
How to Send a PUT Request
A PUT request is used to create a new resource or update an existing one.
For example, if you want to update an existing user name and email data. You can use a PUT request to do so:
fetch('https://jsonplaceholder.typicode.com/users/1', {
  method: 'PUT',
  headers: {
    'Content-Type': 'application/json',
  },
  body: JSON.stringify({
    name: 'Nathan Sebhastian',
    email: 'nathan@mail.com'
  }),
}).then(response => response.json())
  .then(data => console.log(data))
The request above will receive the following response:
{
    "name": "Nathan Sebhastian",
    "email": "nathan@mail.com",
    "id": 1
}
Because user data with an id value of 1 already exists, the PUT request above updates that data.
Next, let's look at the PATCH request.
How to Send a PATCH Request
The PATCH request is sent when you need to update an existing request.
For example, if you want to change the name and username data from an existing user.
Here's an example of sending a PATCH request to typicode.com:
fetch('https://jsonplaceholder.typicode.com/users/1', {
  method: 'PATCH',
  headers: {
    'Content-Type': 'application/json',
  },
  body: JSON.stringify({
    name: 'Nathan Sebhastian',
    username: 'nsebhastian'
  }),
}).then(response => response.json())
  .then(data => console.log(data))
The request above will give the following response:
{
    "id": 1,
    "name": "Nathan Sebhastian",
    "username": "nsebhastian",
    "email": "Sincere@april.biz",
    // ... the rest of user data
}
Above, you can see that the name and username property values are updated using the body of the PATCH request.
How to Send a DELETE Request
The DELETE request is used when you want to request that a resource be removed permanently from the server.
To run a DELETE request with Fetch, you only need to specify the URL for the resource to delete and the method: 'DELETE' property as follows:
fetch('https://jsonplaceholder.typicode.com/users/1', {
  method: 'DELETE',
}).then(response => response.json())
  .then(data => console.log(data))
The request above will delete a user data that has an id value of 1.
The API might respond with some message to confirm that the resource has been removed. But since typicode.com is a dummy API, it will send back an empty JavaScript Object {} .
How to Use Async/Await With the Fetch API
Since Fetch returns a Promise object, this means that you can also use the async/await syntax to replace the .then() and .catch() methods.
Here's an example of sending a GET request using Fetch in async/await syntax:
try {
  const response = await fetch('https://jsonplaceholder.typicode.com/users/1');
  const json = await response.json();
  console.log(json);
} catch (error) {
  console.log(error);
}
Handling a Fetch response using async/await looks cleaner because you don't have to use the .then() and .catch() callbacks.
If you need a refresher on async/await, you can read my JavaScript Async/Await article.
Run Code Example
I've also created an example website that shows you how to run these 5 HTTP request protocols at https://nathansebhastian.github.io/js-fetch-api/
Check it out and study the returned data object. To know what API requests you can send to a specific API, you need to look at the documentation of that API project.
Summary
The Fetch API allows you to access APIs and perform a network request using standard request methods such as GET, POST, PUT, PATCH, and DELETE.
The Fetch API returns a promise, so you need to chain the function call with .then() and .catch() methods, or use the async/await syntax.
And that's how the Fetch API works! If you enjoyed this article, you might want to check out my Beginning Modern JavaScript book to level up your JavaScript skill:

The book is designed to be easy for beginners and accessible to anyone looking to learn JavaScript. It provides a step-by-step gentle guide that will help you understand how to use JavaScript to create a dynamic web application.
Here's my promise: You will actually feel like you understand what you're doing with JavaScript.
See you in other articles!