
In this tutorial, you'll learn how to create a game that's inspired by Stick Hero – using plain JavaScript and HTML canvas.
We are going to recreate Stick Hero, a mobile game published by KetchApp. We'll go through how the game works in general, how to use JavaScript to draw on a <canvas> element, how to add game logic and animate the game, and how event handling works.
By the end of this guide, you will have built the entire game using plain JavaScript.
Throughout the tutorial, we will be using JavaScript to manipulate the game state and the HTML canvas element to render the game scene. To get the most out of this tutorial, you should have a basic understanding of JavaScript. But even if you are a beginner, you can still follow along and learn as we go.
Let's get started and build our own Stick Hero game using JavaScript and HTML canvas!
If you prefer video format, you can also watch this tutorial on YouTube.
Table of Contents
- The Stick Hero Game
- Game Phases
- The Main Parts of the Game
- How to Initialize the Game
- The Draw Function
- Event Handling
- The Main Animation Loop
- Summary
The Stick Hero Game
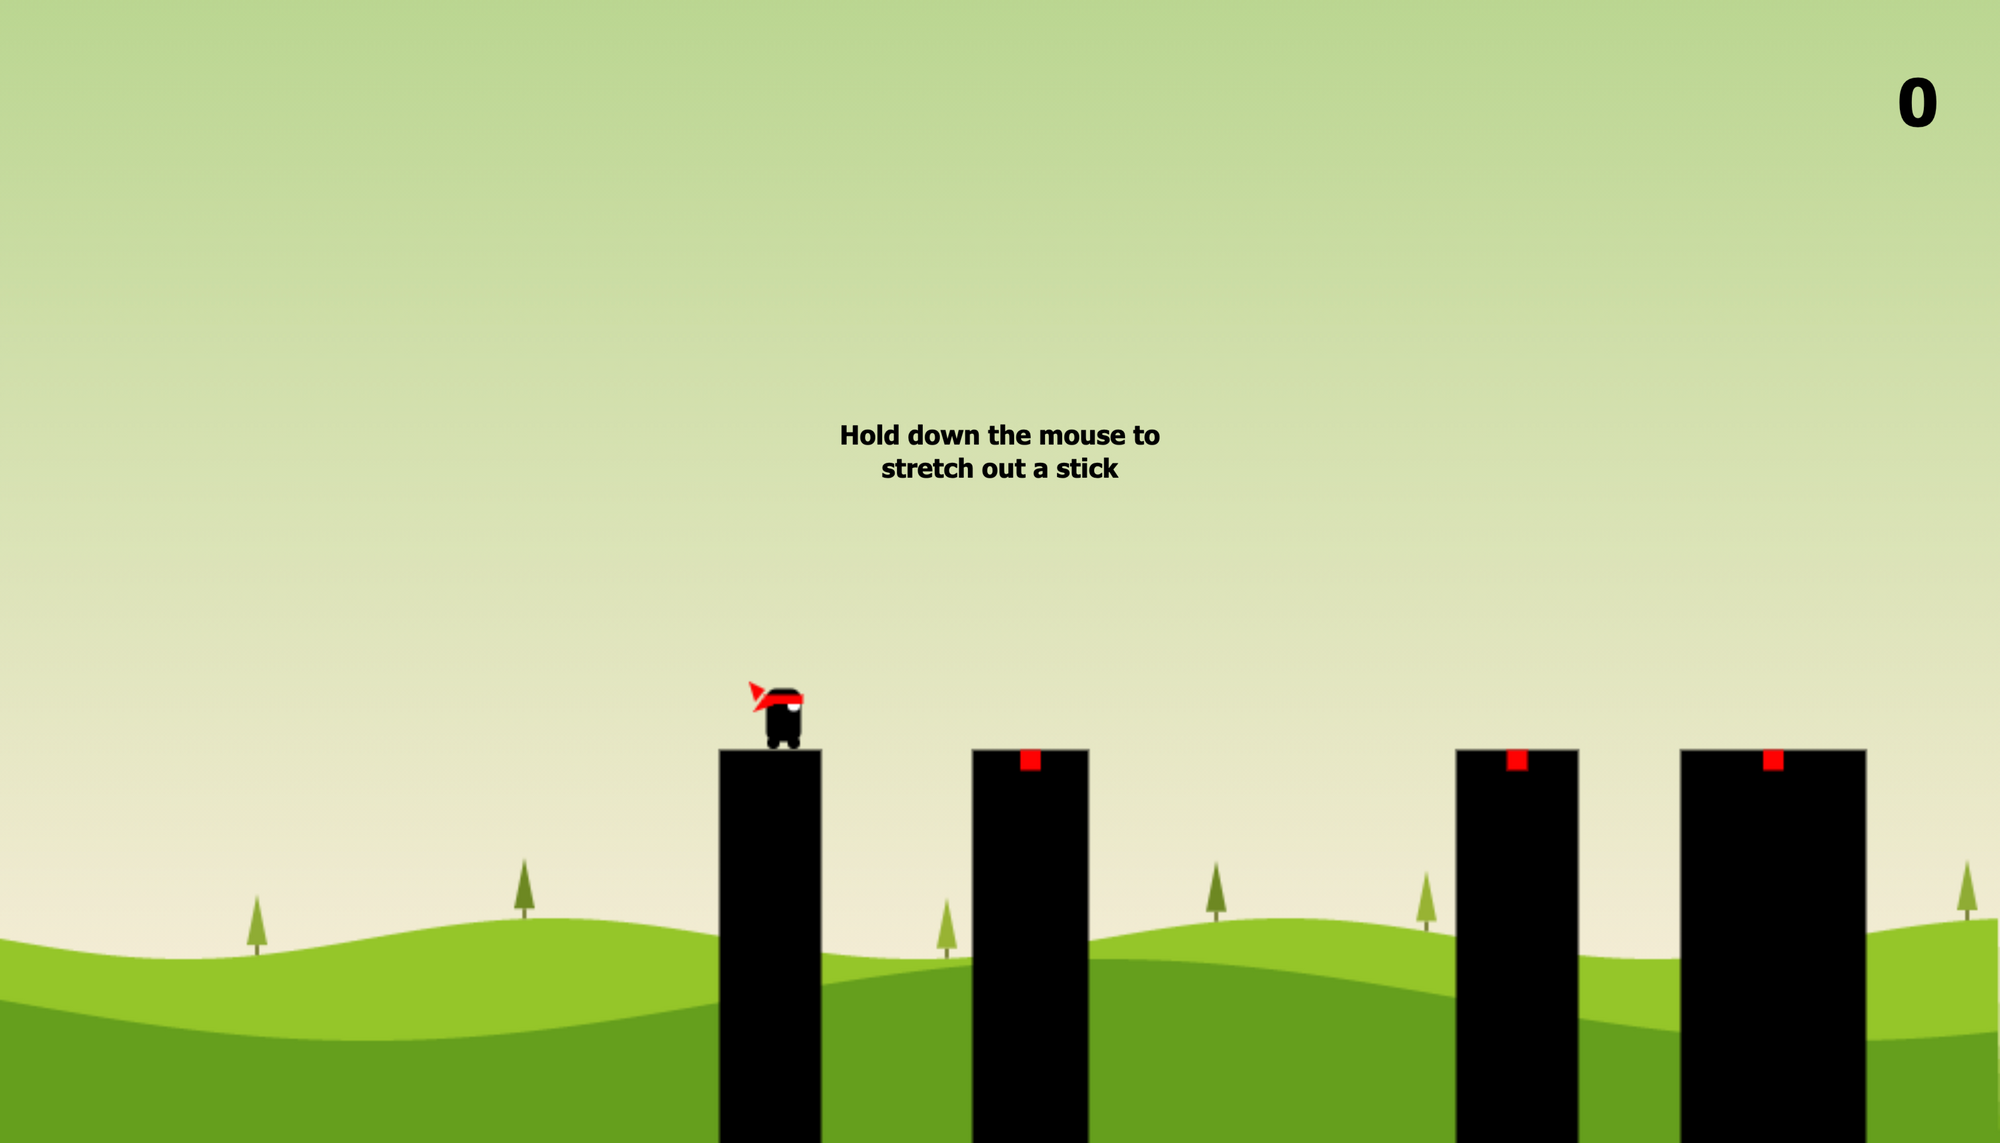
In this game, you control a hero who walks from platform to platform by stretching a stick that serves as a bridge. If the stick is the right size, then the hero can safely cross to the next platform. But if the stick is too short or too long, then the hero will fall down.
You can find a playable version of the game we are about to create on CodePen where you can also see the final source code. Give it a try before we get into the details.
You can also check out the original game both on iOS and Android.
Game Phases
The game has five different phases that loop over and over again untilo the hero falls.
- Initially, the game is waiting for user input, and nothing is happening.
- Then once the player holds the mouse down, the game is stretching a stick upwards until the mouse is released.
- Then once the mouse is released the stick starts turning and it falls down, hopefully on the next platform.
- If that’s the case, then the hero walks along the stick to the next platform.
- Finally, once the hero reaches the next platform, the whole scene transitions to the left to center the hero and the next platform ahead. Then the whole loop restarts from the beginning. The game waits for user input, and once the player holds down the mouse a new stick is drawn.
In a less favorable scenario, the same phases follow each other, but in the walking phase if the other end of the stick doesn’t fall on the next platform, then the hero will only walk until the edge of the stick, and then fall down.
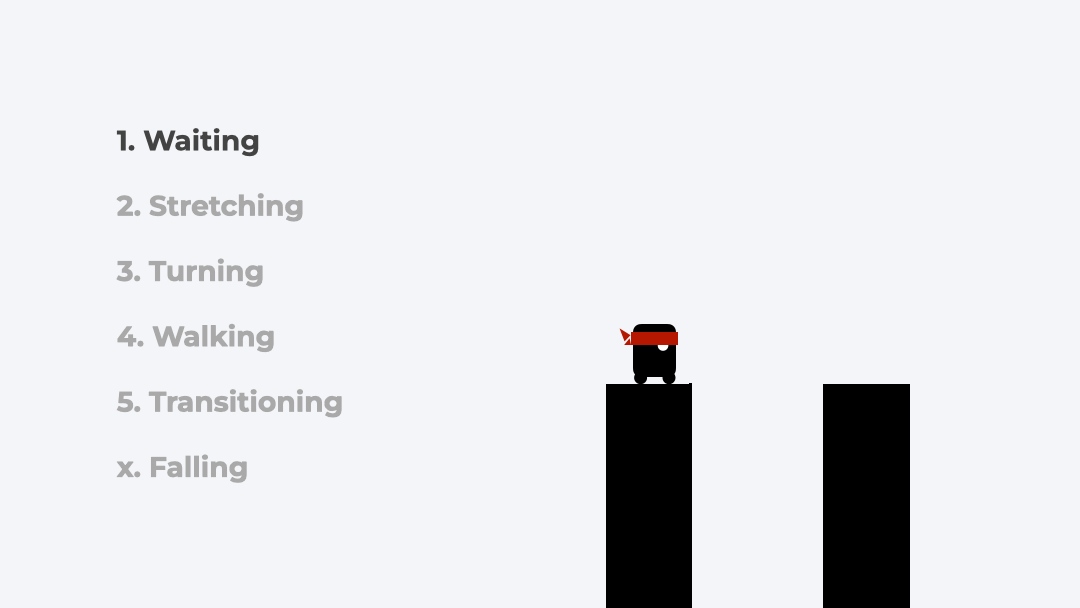 The phases of the game
The Main Parts of the Game
How do we realize this in code? This game has essentially three parts. Game state, the draw function, and the animate function.
We have a game state that is a collection of variables defining every bit of the game. It includes the current phase, the position of the hero, the coordinates of the platforms, the size and rotation of the sticks, and so on.
let phase = "waiting"; // waiting | stretching | turning | walking | transitioning | falling
let lastTimestamp; // The timestamp of the previous animation cycle

let heroX; // Changes when moving forward
let heroY; // Only changes when falling
let sceneOffset; // Moves the whole game

let platforms = [];
let sticks = [];

let score = 0;

...
Then we will have two main functions: one that paints the scene on the screen based on this state (this will be the draw function), and one that will change this state gradually so that it looks like an animation (this will be the animate function). Finally, we're also going to have event handling that will kick off the animation loop.
How to Initialize the Game
To start, let’s initialize the project with a simple HTML, CSS, and JavaScript file. We'll establish the outline of the code and then initialize the state of the game.
The HTML
The HTML part of this game is very simple. Most of the game will live inside the <canvas> element. We are going to use JavaScript to draw on this canvas. We also have a div element that will display the score and a restart button.
In the header, we also load our CSS and JavaScript files. Note the defer tag when loading the script. This will execute the script only after the rest of the HTML is loaded, so we can access parts of the HTML (like the canvas element) right away in our script.
<!DOCTYPE html>
<html>
  <head>
    <title>Stick Hero</title>
    <link rel="stylesheet" href="index.css" />
    <script src="index.js" defer></script>
  </head>

  <body>
    <div class="container">
      <canvas id="game" width="375" height="375"></canvas>
      <div id="score"></div>
      <button id="restart">RESTART</button>
    </div>
  </body>
</html>
The CSS
The CSS won’t contain too many things either. We paint the game on the canvas element and the content of the canvas element cannot be styled with CSS. Here we only style the position of our canvas, our score element and the reset button.
Note, that the reset button by default is invisible. We are going to make it visible using JavaScript once the game ends.
html,
body {
  height: 100%;
}

body,
.container {
  display: flex;
  justify-content: center;
  align-items: center;
}

.container {
  position: relative;
  font-family: Helvetica;
}

canvas {
  border: 1px solid;
}

#score {
  position: absolute;
  top: 30px;
  right: 30px;
  font-size: 2em;
  font-weight: 900;
}

#restart {
  position: absolute;
  display: none;
}
The Outline of Our JavaScript File
And finally, the JavaScript part is where all the magic lives. For simplicity, I have put everything in one file, but feel free to break it down into multiple files.
We are going to introduce a few more variables and a few more functions, but this is the outline of this file. The following things are included:
- We define various variables that together make up the
game state. More on their values in the section on how to initialize state. - We are going to define a few variables as
configuration, like the size of the platforms and how fast the hero should move. We cover them in the drawing section and at the main loop. - A reference to the
<canvas>element in HTML, and getting the drawing context of it. This will be used by thedrawfunction. - A reference to the
scoreelement and therestartbutton in HTML. We will update the score each time the hero traverses to a new platform. And we show the reset button once the game is over. - We initialize the game state and paint the scene by calling the
resetGamefunction. This is the only top-level function call. - We define the
drawfunction that will draw the scene on the canvas element based on the state. - We set up event handlers for the
mousedownandmouseupevents. - We define the
animatefunction that will manipulate the state. - And we will have a few utility functions that we will discuss later.
// Game state
let phase = "waiting"; // waiting | stretching | turning | walking | transitioning | falling
let lastTimestamp; // The timestamp of the previous animation cycle

let heroX; // Changes when moving forward
let heroY; // Only changes when falling
let sceneOffset; // Moves the whole game

let platforms = [];
let sticks = [];

let score = 0;

// Configuration
...

// Getting the canvas element
const canvas = document.getElementById("game");

// Getting the drawing context
const ctx = canvas.getContext("2d");

// Further UI elements
const scoreElement = document.getElementById("score");
const restartButton = document.getElementById("restart");

// Start game
resetGame();

// Resets game state and layout
function resetGame() {
  ...

  draw();
}

function draw() {
  ...
}

window.addEventListener("mousedown", function (event) {
  ...
});

window.addEventListener("mouseup", function (event) {
  ...
});

function animate(timestamp) {
  ...
}

...
How to Initialize the State
To start the game, we call the same function as we use for resetting it – the resetGame function. It initializes/resets the state of the game and calls the draw function to paint the scene.
The game state includes the following variables:
phase: The current phase of the game. Its initial value is waiting.lastTimestamp: Used by theanimatefunction to determine how much time has passed since the last animation cycle. We'll cover it later in more detail.platforms: An array containing the metadata of each platform. Each platform is represented by an object with anxand awproperty representing their X position and width. The first platform is always the same – as defined here – to make sure it has a reasonable size and position. The following platforms are generated by a utility function. As the game progresses, more and more platforms are generated on the fly.heroX: The X position of the hero. By default, the hero stands close to the edge of the first platform. This value will change during the walking phase.heroY: The Y position of the hero. By default, it is zero. It only changes if the hero is falling.sceneOffset: As the hero moves forward, we need to shift the entire screen backwards to keep the hero centered on the screen. Otherwise the hero will walk off the screen. In this variable, we keep track of by how much should we shift back the entire screen. We will update this value during the transitioning phase. By default its value is 0.sticks: Metadata of the sticks. While the hero can only stretch one stick at a time, we also need to store the previous sticks in order to be able to render them. Therefore thesticksvariable is also an array.
Each stick is represented by an object with the x, length, and rotation properties. The x property represents the starting position of the stick that always matches the corresponding platform’s top-right corner. Its length property will grow in the stretching phase, and its rotation property will go from 0 to 90 in the turning phase. Or from 90 to 180 in the falling phase.
Initially, the sticks array has one ‘invisible’ stick with 0 length. Every time the hero reaches a new platform, a new stick is added to the array.
score: The score of the game. It shows how many platforms the hero reached. By default it is 0.
function resetGame() {
  // Reset game state
  phase = "waiting";
  lastTimestamp = undefined;

  // The first platform is always the same
  platforms = [{ x: 50, w: 50 }];
  generatePlatform();
  generatePlatform();
  generatePlatform();
  generatePlatform();

  // Initialize hero position
  heroX = platforms[0].x + platforms[0].w - 30; // Hero stands a bit before the edge
  heroY = 0;

  // By how much should we shift the screen back
  sceneOffset = 0;

  // There's always a stick, even if it appears to be invisible (length: 0)
  sticks = [{ x: platforms[0].x + platforms[0].w, length: 0, rotation: 0 }];

  //Score
  score = 0;

  // Reset UI
  restartButton.style.display = "none"; // Hide reset button
  scoreElement.innerText = score; // Reset score display

  draw();
}
At the end of this function, we also reset the UI by making sure the reset button is hidden and the score is displayed as 0.
Once we've initialized the state of the game and reset the UI, the resetGame function calls the draw function to paint the screen for the first time.
The resetGame function calls a utility function that generates a random platform. In this function, we define what is the minimum distance between two platforms (minumumGap) and what is the maximum distance (maximumGap). We also define what is the minimum width of a platform and what is the maximum width.
Based on these ranges and the existing platformsk, we generate the metadata of a new platform.
function generatePlatform() {
  const minimumGap = 40;
  const maximumGap = 200;
  const minimumWidth = 20;
  const maximumWidth = 100;

  // X coordinate of the right edge of the furthest platform
  const lastPlatform = platforms[platforms.length - 1];
  let furthestX = lastPlatform.x + lastPlatform.w;

  const x =
    furthestX +
    minimumGap +
    Math.floor(Math.random() * (maximumGap - minimumGap));
  const w =
    minimumWidth + Math.floor(Math.random() * (maximumWidth - minimumWidth));

  platforms.push({ x, w });
}
The Draw Function
The draw function paints the whole canvas based on the state. It shifts the whole UI by the offset, puts the hero in position, and paints the platforms and the sticks.
Compared to the working demo linked at the beginning of the article, here we will only go through a simplified version of the draw function. We won't cover painting a background, and we'll simplify the hero’s appearance.
We will use this function both for painting the initial scene and throughout our main animation loop.
For the initial paint, some of the features we cover here won't be necessary. For instance, we don’t have any sticks on the scene yet. We'll still cover them, because this way we won’t have to rewrite this function once we start animating the state.
Everything we draw in this function is based on the state, and it doesn't matter if the state is in an initial state, or if we are further into the game.
We defined a <canvas> element in HTML. But how do we paint things on it? In JavaScript first, we get the canvas element and then get its context somewhere at the beginning of our file. Then we can use this context to execute drawing commands.
We also define a few variables upfront as configuration. We do this because we need to use these values at different parts of our game and we want to maintain consistency.
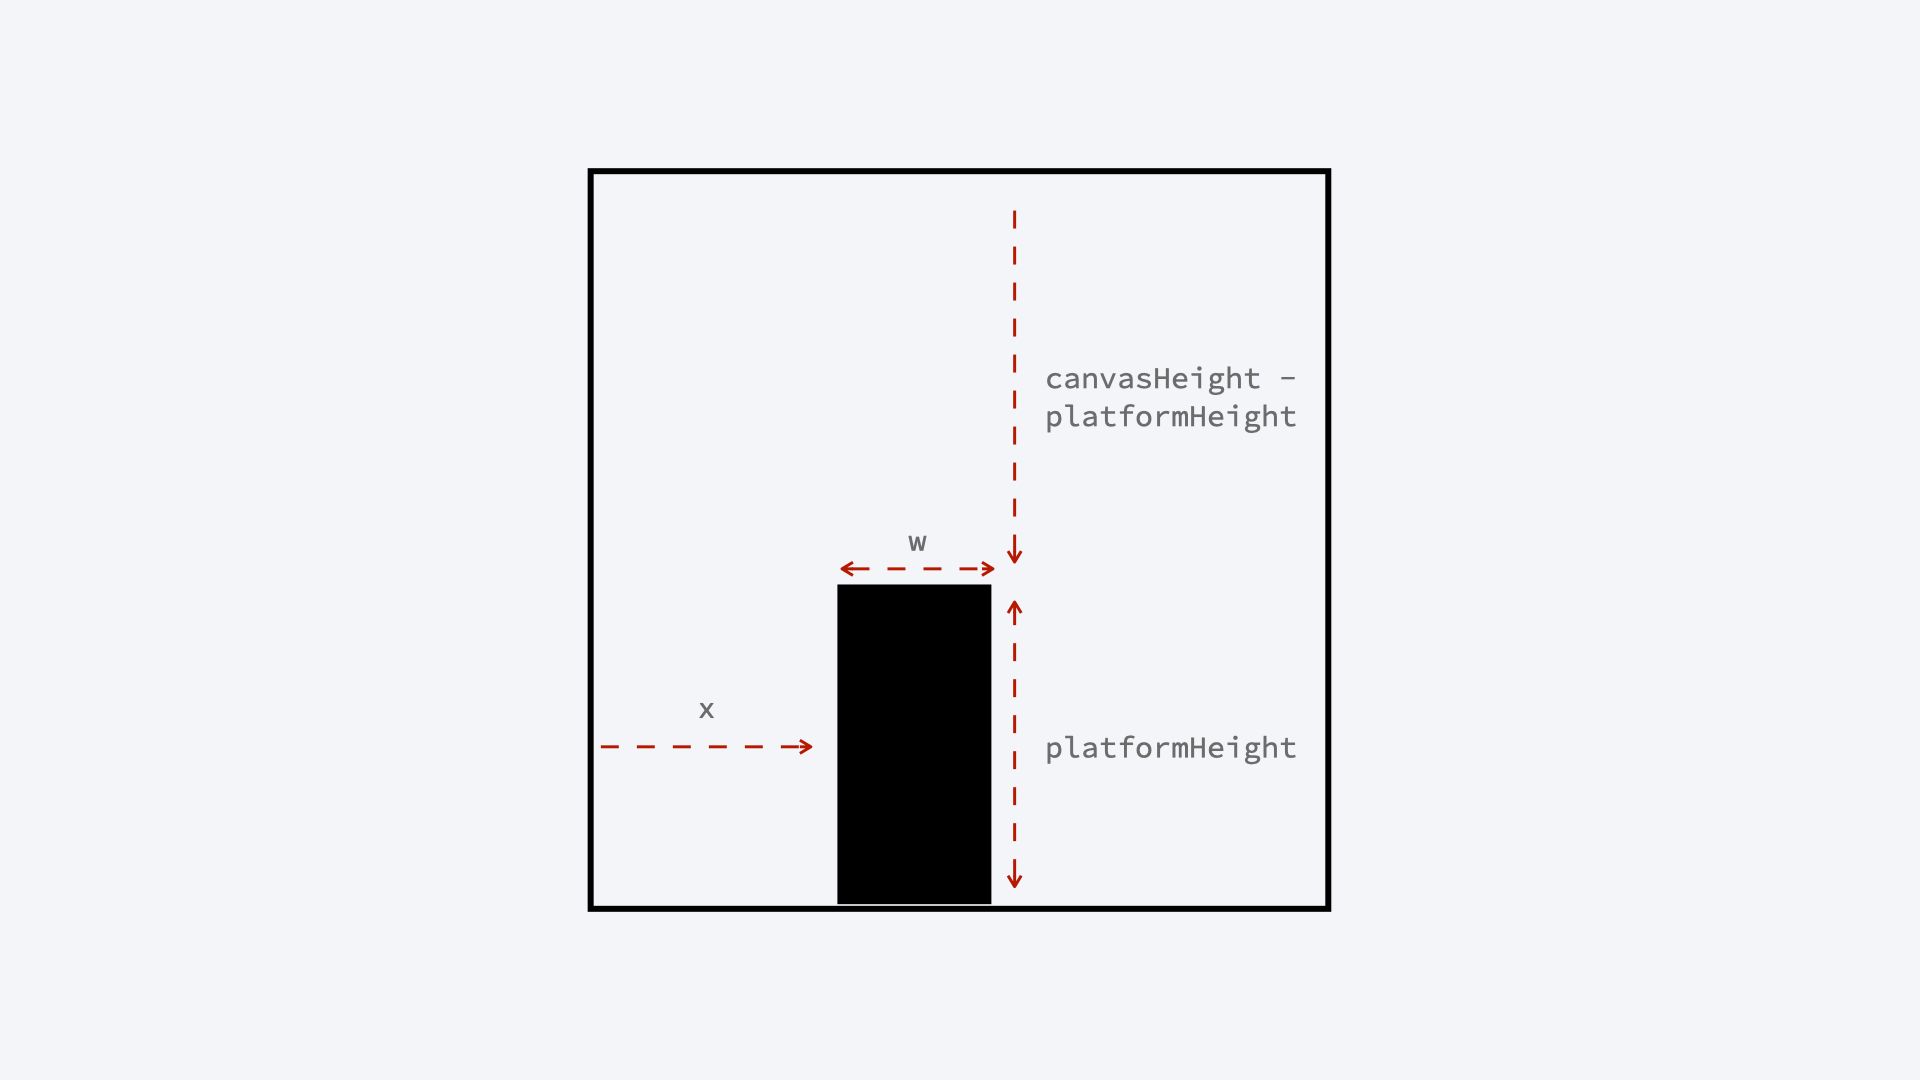
canvasWidthandcanvasHeightrepresent the size of the canvas element in HTML. They have to match with what we set in HTML. We use these values at various places.platformHeightrepresents the height of the platforms. We use these values when drawing the platforms themselves, but also when positioning the hero and the sticks.
The draw function repaints the whole screen from scratch every time. First, let’s make sure that it’s empty. Calling the clearRect function on the drawing context with the correct arguments makes sure we erase everything from it.
...

<div class="container">
  <canvas id="game" width="375" height="375"></canvas>
  <div id="score"></div>
  <button id="restart">RESTART</button>
</div>

...
...

// Getting the canvas element
const canvas = document.getElementById("game");

// Getting the drawing context
const ctx = canvas.getContext("2d");

...

// Configuration
const canvasWidth = 375;
const canvasHeight = 375;
const platformHeight = 100;

...

function draw() {
  ctx.clearRect(0, 0, canvasWidth, canvasHeight);

  ...
}

...
How to Frame the Scene
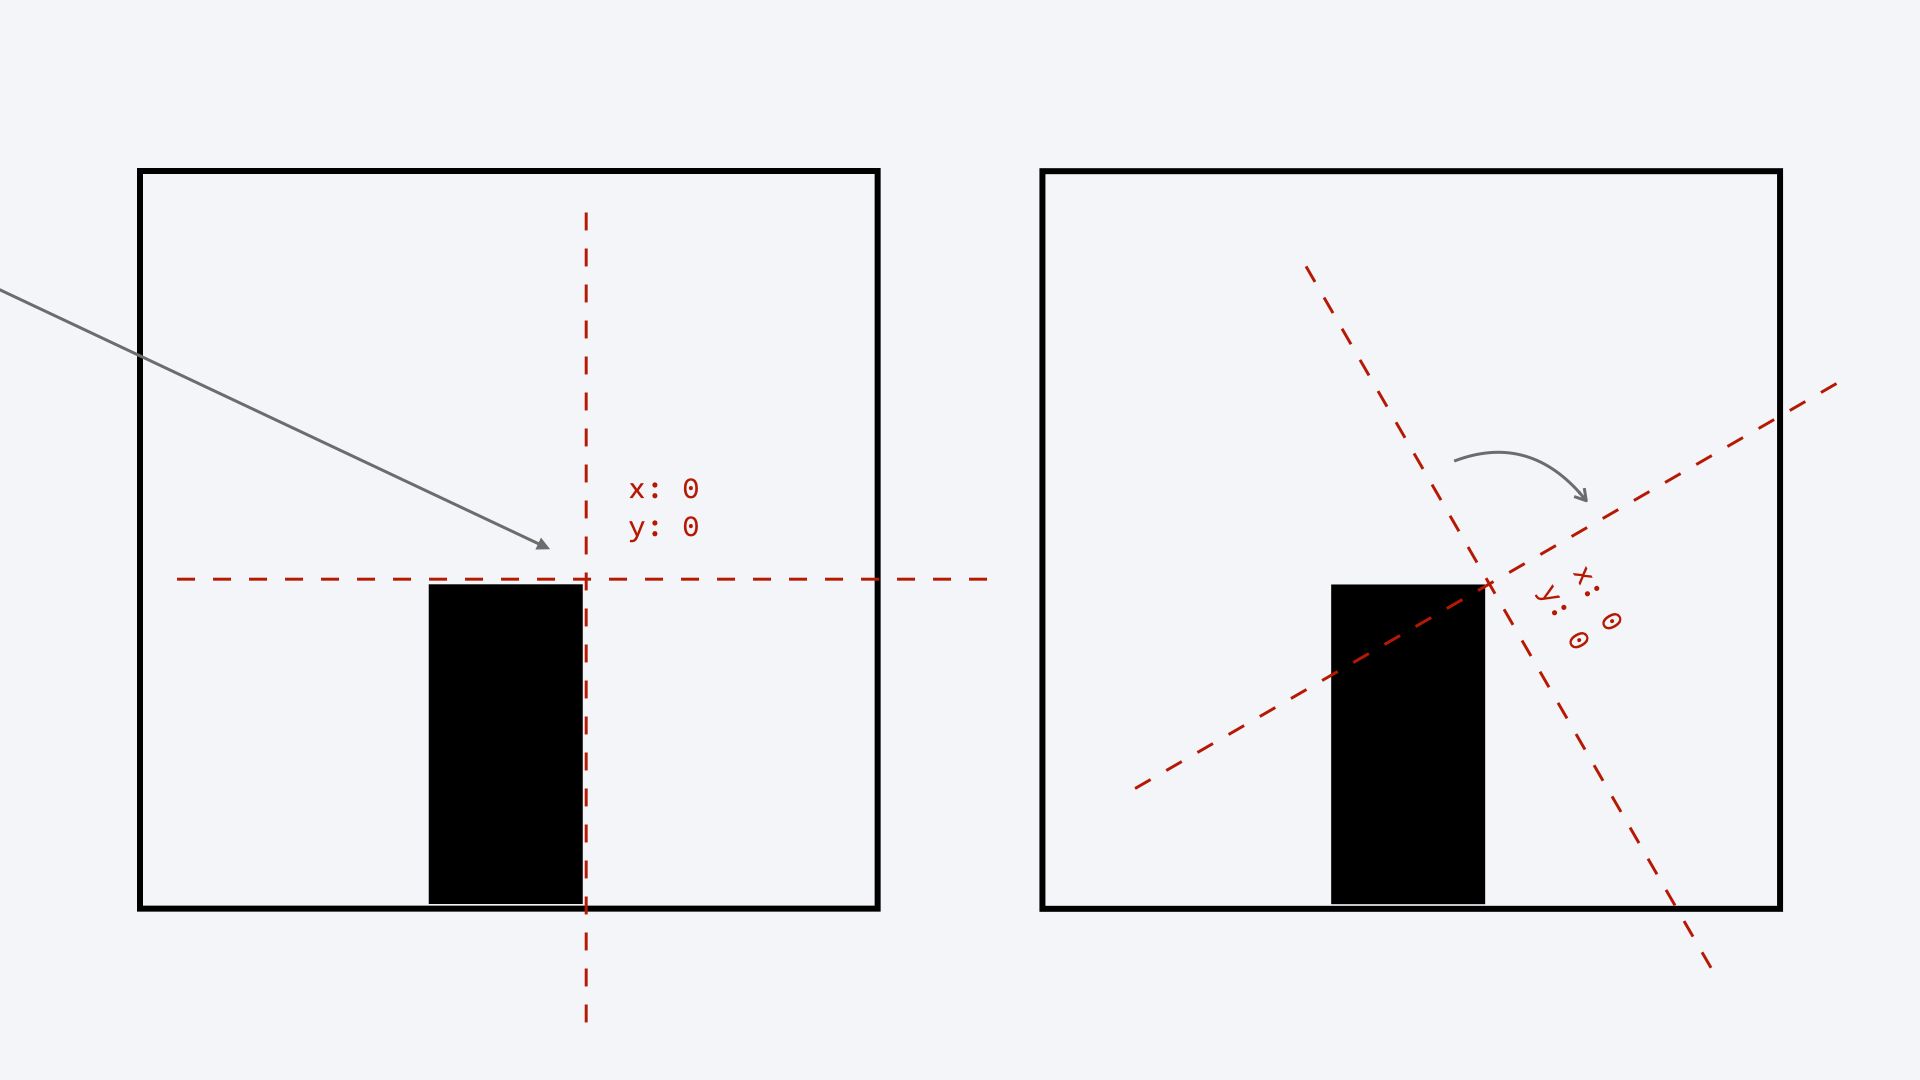
We also want to make sure that the scene has the correct framing. When we use canvas, we have a coordinate system with the center at the top left corner of the screen that grows to the right and downwards. In HTML we set the width and height attributes both to 375 pixels.
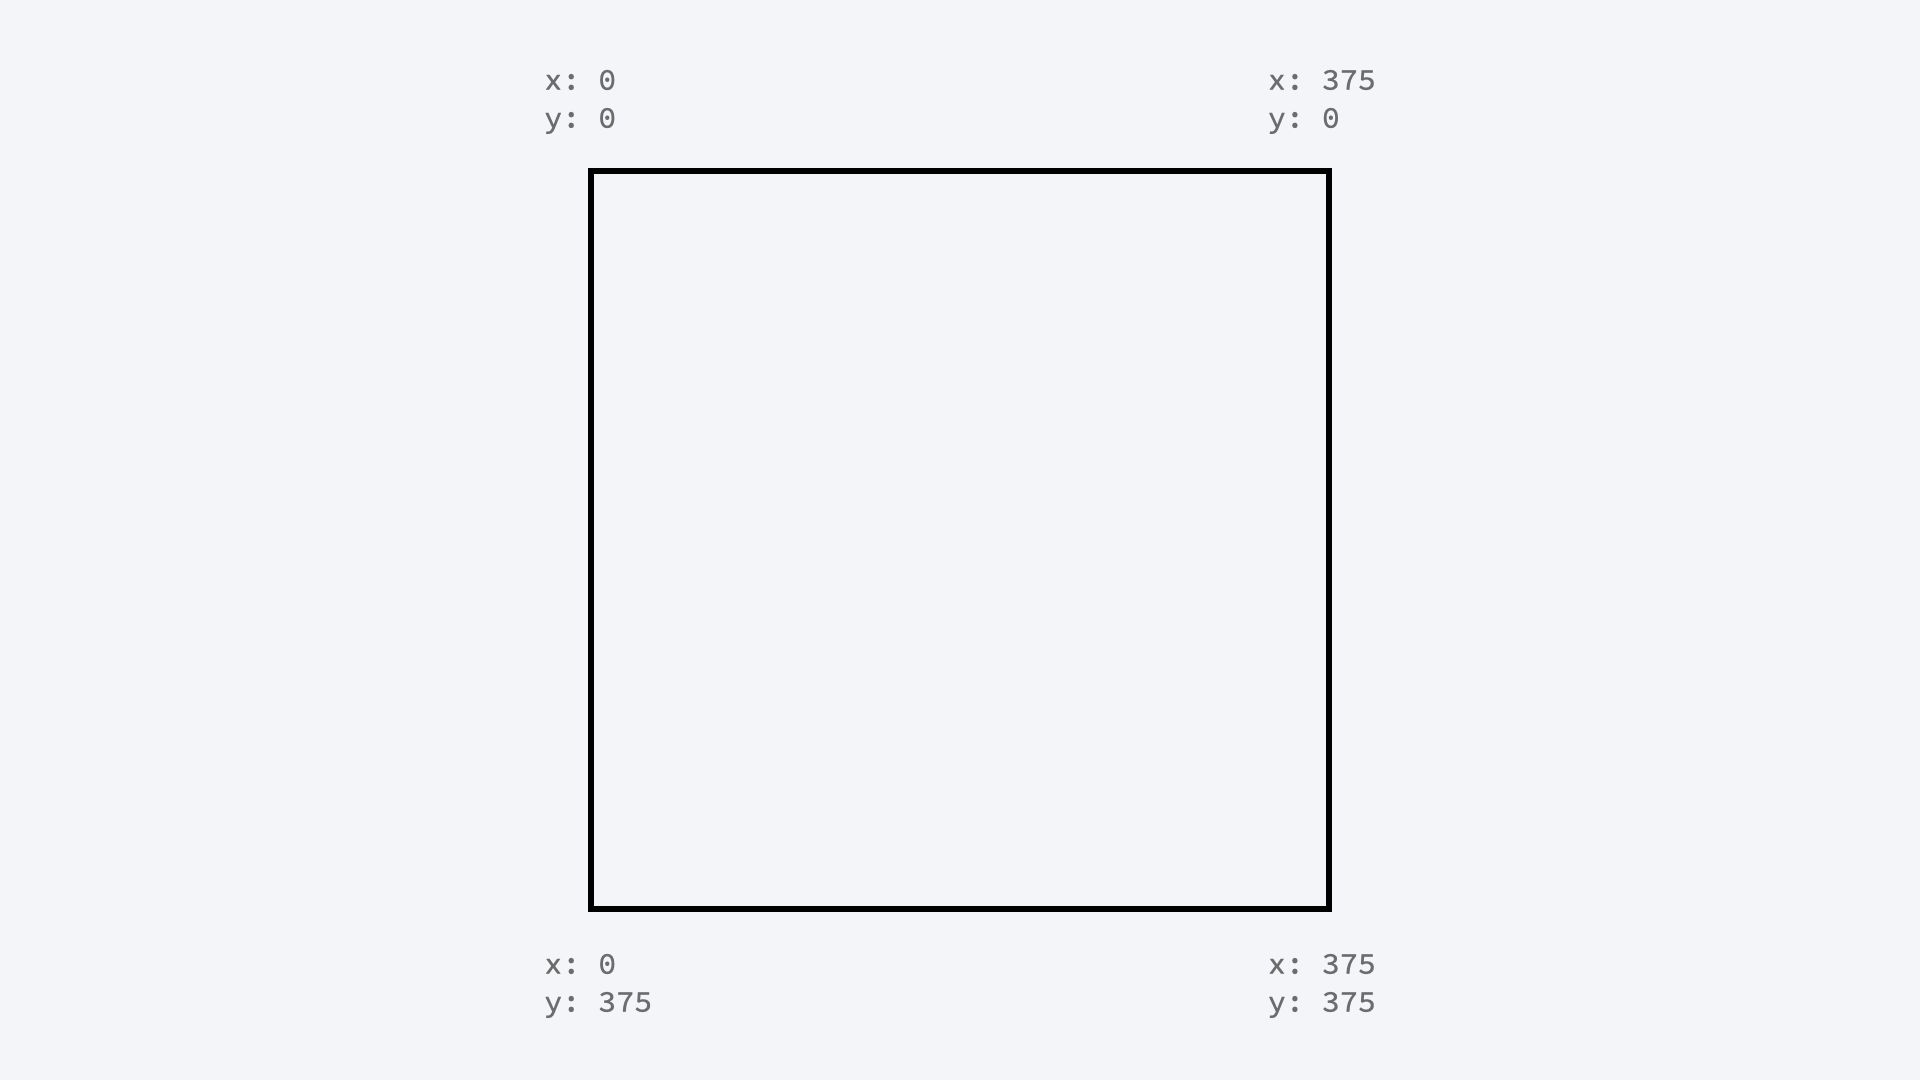 By default the center of the coordinate system is at the top left corner
Initially, the 0, 0 coordinate is at the top-left corner of the screen, but as the hero moves forward the whole scene should shift to the left. Otherwise, we would run out of the screen.
As the game progresses, we update the sceneOffset value to keep track of this shift in the main loop. We can use this variable to translate the whole layout. We call the translate command to shift the scene on the X-axis.
function draw() {
  ctx.clearRect(0, 0, canvasWidth, canvasHeight);

  // Save the current transformation
  ctx.save();

  // Shifting the view
  ctx.translate(-sceneOffset, 0);

  // Draw scene
  drawPlatforms();
  drawHero();
  drawSticks();

  // Restore transformation to the last save
  ctx.restore();
}
It’s important that we do this before we paint anything on the canvas, because the translate command does not actually move anything on the canvas. Anything we painted before on the canvas will stay as it was.
Instead, the translate command shifts the coordinate system. The 0, 0 coordinate won’t be at the top left corner anymore, but it will be out of the screen on the left. Anything we paint after will be painted according to this new coordinate system.
This is exactly what we want. As we progress in the game, the hero will increase its X coordinate. By moving the coordinate system backwards, we make sure that it will be painted within the screen.
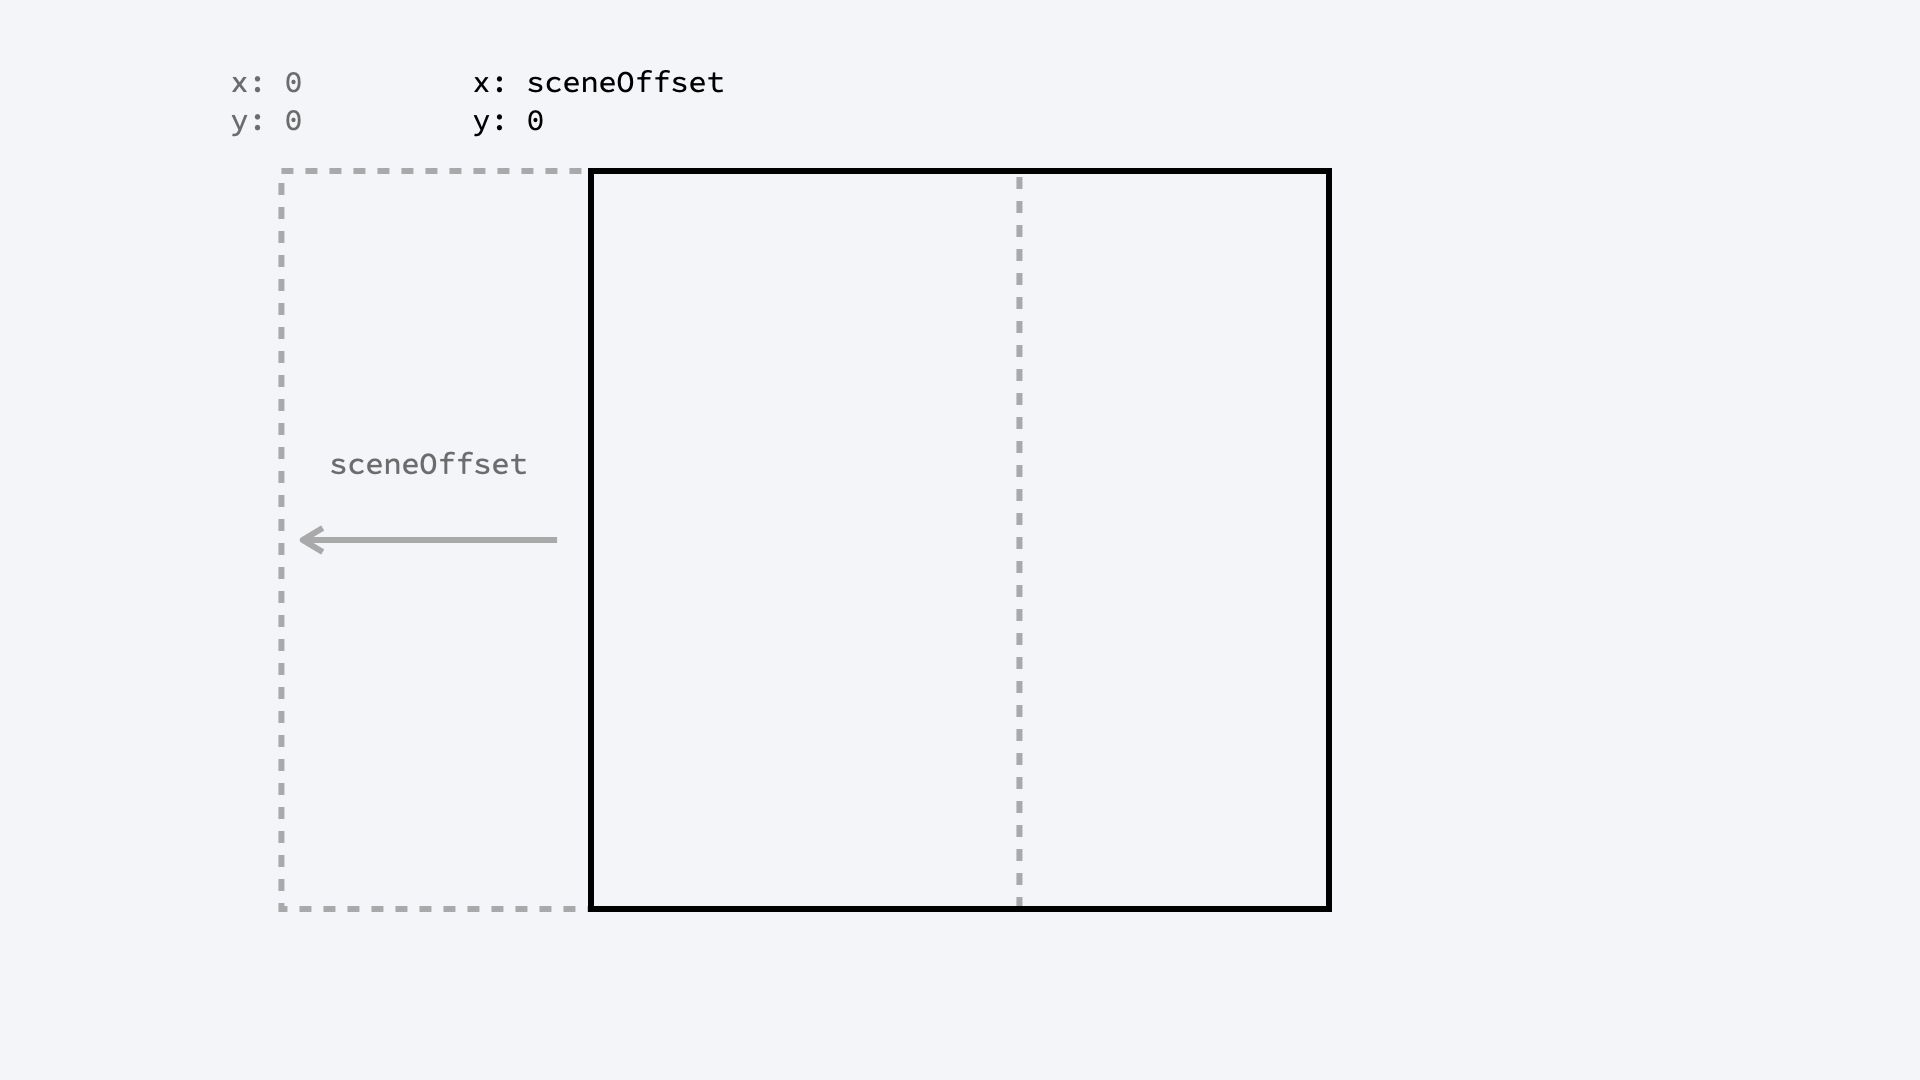 Once we use the
 translate command, the center of the coordinate system will shift to the left
The translate commands accumulate. This means that if we call the translate command twice, the second doesn’t just override the first one, but will add a shift on top of the first command.
We are going to call the draw function in a loop, so it’s important that we reset this transformation every time we draw. Also, we always start with the 0, 0 coordinate in the top left corner. Otherwise, the coordinate system will be shifted to the left infinitely.
We can restore transformations by calling the restore command once we don’t want to be in this shifter coordinate system anymore. The restore command resets transitions and many other settings to the state the canvas was at the last save command. That’s why we often start a painting block by saving the context and end it by restoring it.
How to Draw the Platforms
So that was just the framing, but we haven’t painted anything yet. Let’s start with a simple one, drawing platforms. The metadata of the platforms is stored in the platforms array. It contains the starting position of the platform and its width.
We can iterate over this array and fill a rectangle by setting the starting position, and the width and the height of the platform. We do this by calling the fillRect function with the X, Y coordinates and the width and the height of the rectangle to fill. Note that the Y coordinate is upside down – it's growing from top to bottom.
 Drawing the platform
// Example state of platforms
let platforms = [
  { x: 50, w: 50 },
  { x: 90, w: 30 },
];

...

function drawPlatforms() {
  platforms.forEach(({ x, w }) => {
    // Draw platform
    ctx.fillStyle = "black";
    ctx.fillRect(x, canvasHeight - platformHeight, w, platformHeight);
  });
}
What is interesting about canvas, or at least it was surprising to me, is that once you paint something on the canvas you can’t modify it. It’s not like you paint a rectangle, and then you can change its color. Once something is on the canvas it stays as it is.
Like with a real canvas, once you've painted something you can either cover it, by painting something over it, or you can try to clear the canvas. But you can’t change existing parts really. That’s why we set the color here up front and not afterward (with the fillStyle property).
How to Draw the Hero
We won't cover the hero part in detail in this tutorial, but you can find the source code of the demo above on CodePen. Drawing more advanced shapes is a bit more complicated with the canvas element, and I’m going to cover drawing in more detail in a future tutorial.
For now, let’s simply use a red rectangle as a placeholder for the hero. Again, we use the fillRect function and pass on a X, Y coordinate and the width and the height of the hero.
The X and Y positions will be based on the heroX and heroY state. The hero’s X position is relative to the coordinate system, but its Y position is relative to the top of the platform (it has a value of 0 once on top of a platform). We need to adjust the Y position to be on the top of the platform.
function drawHero() {
  const heroWidth = 20;
  const heroHeight = 30;

  ctx.fillStyle = "red";
  ctx.fillRect(
    heroX,
    heroY + canvasHeight - platformHeight - heroHeight,
    heroWidth,
    heroHeight
  );
}
How to Draw the Sticks
Then let’s see how to paint the sticks. Sticks are a bit trickier because they can be rotated.
The sticks are stored in an array in a similar fashion as the platforms but have different attributes. They all have a starting position, a length, and a rotation. The last two changes in the main game loop, and the first one – the position – should fit the top-right corner of a platform.
Based on the length and rotation, we could use some trigonometry and calculate the end position of the stick. But it’s much more interesting if we transform the coordinate system again.
We can use the translate command again, to set the center of the coordinate system to the edge of the platform. Then we can use the rotate command to rotate the coordinate system around this new center.
 After using the
 translate and rotate commands, the coordinate system will be twisted around a new center
// Example state of sticks
let sticks = [
  { x: 100, length: 50, rotation: 60 }
];

...

function drawSticks() {
  sticks.forEach((stick) => {
    ctx.save();

    // Move the anchor point to the start of the stick and rotate
    ctx.translate(stick.x, canvasHeight - platformHeight);
    ctx.rotate((Math.PI / 180) * stick.rotation);

    // Draw stick
    ctx.lineWidth = 2;
    ctx.beginPath();
    ctx.moveTo(0, 0);
    ctx.lineTo(0, -stick.length);
    ctx.stroke();

    // Restore transformations
    ctx.restore();
  });
}
After the translate and rotate commands, the starting point of the stick will be at the 0, 0 coordinate and the coordinate system will be rotated.
In this example, we draw a line upwards – both its beginning and its end have the same X coordinate. Only the Y coordinate is changing. Yet the line is heading to the right because the whole coordinate system has turned. Now upwards is in a diagonal direction. It’s a bit mind-twisting, but you can get used to it.
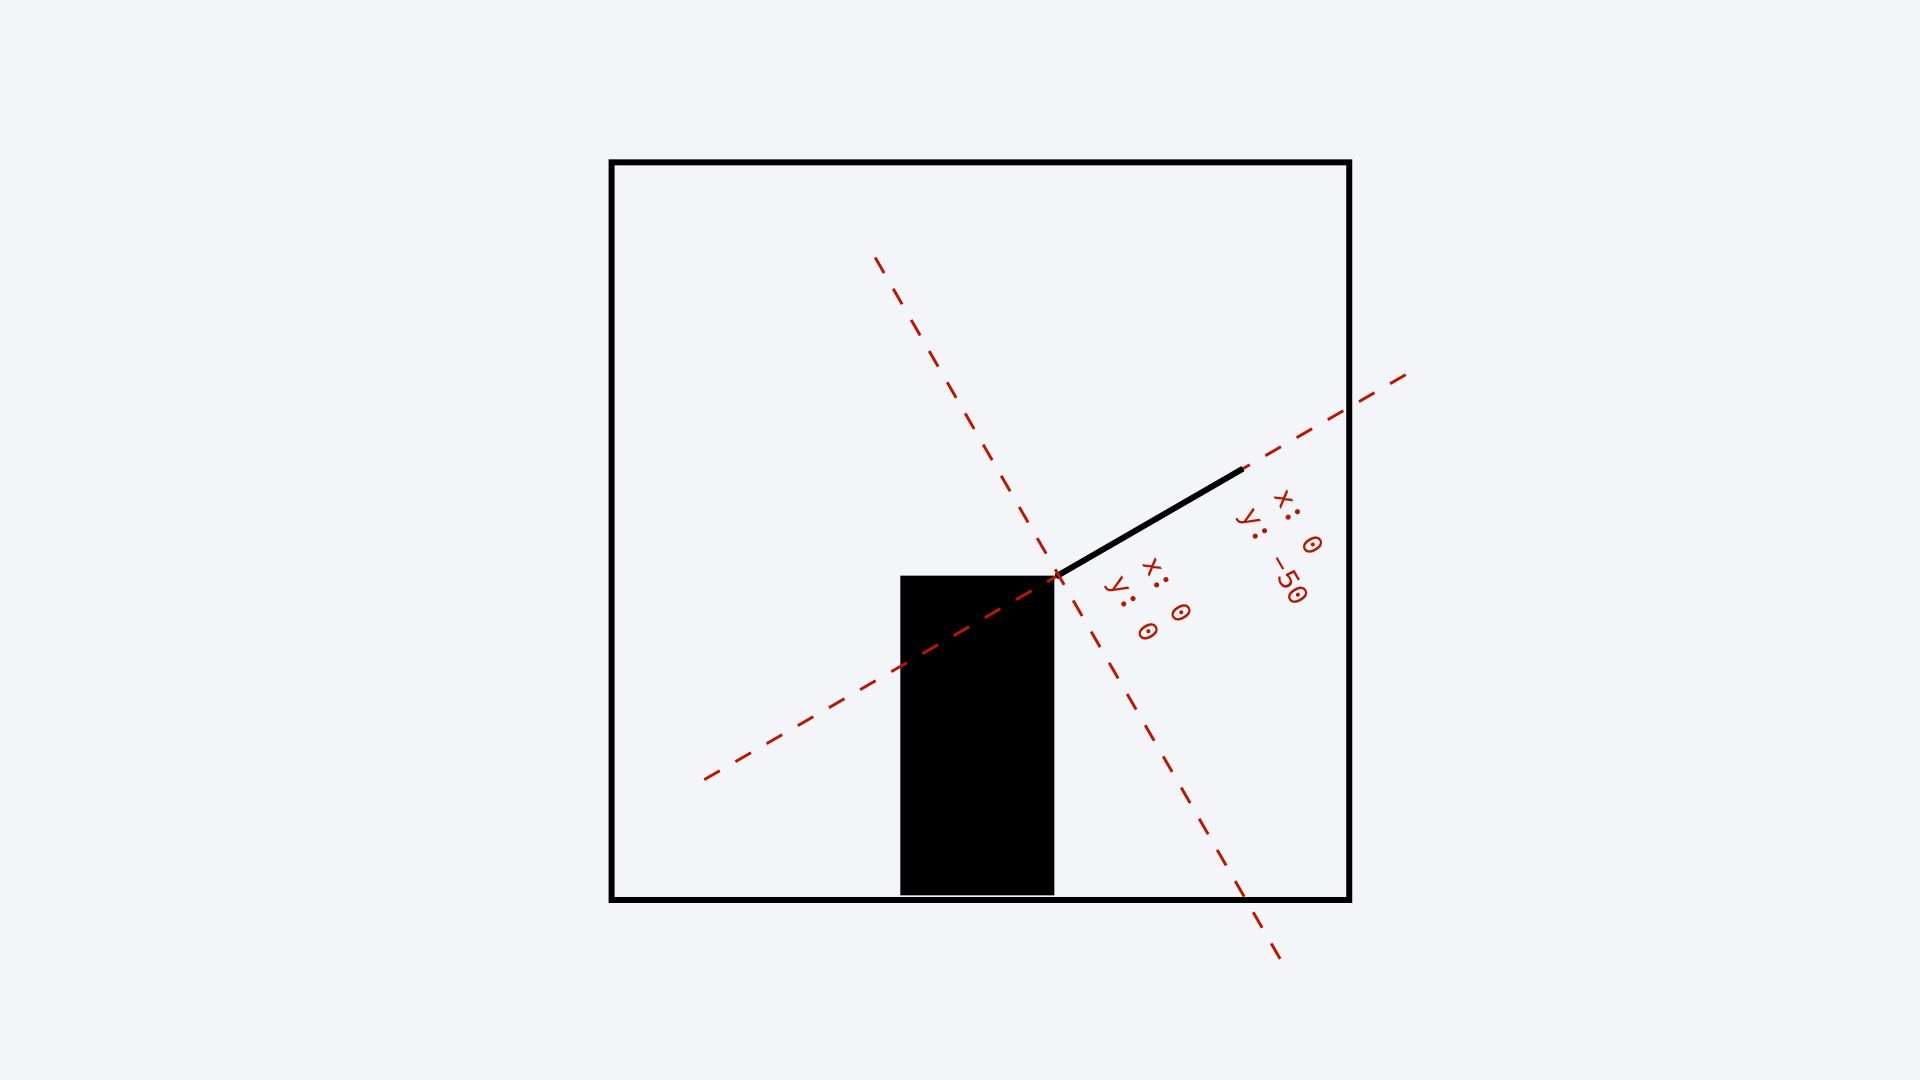 While we draw a line along the Y axis, the line will appear diagonal because of the transformed coordinate system
The actual drawing of the line is also interesting. There’s no simple line-drawing command so we have to draw a path.
We get a path by connecting multiple points. We can connect them with arcs, curves, and straight lines. In this case, we have a very simple one. We just begin a path (beginPath), move to a coordinate (moveTo), then draw a straight line to the next coordinate (lineTo). Then we finish it with the stroke command.
We can also finish the path with the fill command, but that only makes sense with shapes.
Note that because we shift and turn the coordinate system here again, at the end of this function we need to restore transformations (and save the transformation matrix at the beginning of this function). Otherwise, all upcoming drawing commands would be twisted like this.
Event Handling
Now that we have drawn the scene, let’s kick off the game by handling user interactions. Handling events is the easiest part of the game. We are listening to the mousedown and the mouseup event, and we handle the click event of the restart button.
Once the user holds the mouse down, we initiate the stretching phase by setting the phase variable to stretching. We reset the timestamp that the main event loop is going to use (we get back to this later), and we trigger the main event loop by requesting an animation frame for the animate function.
All these are only happening if the current state of the game is waiting. In any other case, we ignore the mousedown event.
let phase = "waiting";
let lastTimestamp;

...

const restartButton = document.getElementById("restart");

...

window.addEventListener("mousedown", function () {
  if (phase == "waiting") {
    phase = "stretching";
    lastTimestamp = undefined;
    window.requestAnimationFrame(animate);
  }
});

window.addEventListener("mouseup", function () {
  if (phase == "stretching") {
    phase = "turning";
  }
});

restartButton.addEventListener("click", function (event) {
  resetGame();
  restartButton.style.display = "none";
});

...
Handling the mouseup event is even simpler. If we are currently stretching a stick, then we stop that and move to the next phase when the stick falls down.
Finally, we also add an event handler for the restart button. The reset button is hidden by default and will be only visible once the hero has fallen. But we can already define its behavior, and once it appears it will work. If we click reset, we call the resetGame function to reset the game and hide the button.
That’s all the event handling we have. The rest now depends on the main animation loop that we just invoked with a requestAnimationFrame.
The Main Animation Loop
The main loop is the most complicated part of the game. This is a function that will keep changing the state of the game and calling the draw function to repaint the whole screen based on this state.
As it’s going to be called 60 times every second, the constant repainting of the screen will make it look like a continuous animation. Because this function is running so frequently, we only change the game state little by little each time.
This animate function gets triggered as a requestAnimationFrame call by the mousedown event (see above). With its last line, it keeps invoking itself until we don’t stop it by returning from the function.
There are only two cases when we would stop the loop: when moved to the waiting phase and there’s nothing to animate, or when the hero falls down and the game is over.
This function keeps track of how much time has passed since its last call. We are going to use this information to precisely calculate how the state should change. Like when the hero is walking, we need to calculate exactly how many pixels it moves based on its speed and the time passed since the last animation cycle.
let lastTimestamp;

...

function animate(timestamp) {
  if (!lastTimestamp) {
    // First cycle
    lastTimestamp = timestamp;
    window.requestAnimationFrame(animate);
    return;
  }

  let timePassed = timestamp - lastTimestamp;

  switch (phase) {
    case "waiting":
      return; // Stop the loop
    case "stretching": {
      sticks[sticks.length - 1].length += timePassed / stretchingSpeed;
      break;
    }
    case "turning": {
      sticks[sticks.length - 1].rotation += timePassed / turningSpeed;
      ...
      break;
    }
    case "walking": {
      heroX += timePassed / walkingSpeed;
      ...
      break;
    }
    case "transitioning": {
      sceneOffset += timePassed / transitioningSpeed;
      ...
      break;
    }
    case "falling": {
      heroY += timePassed / fallingSpeed;
      ...
      break;
    }
  }

  draw();
  lastTimestamp = timestamp;

  window.requestAnimationFrame(animate);
}
How to Calculate the Time Passed Between Two Renders
Functions invoked with the requestAnimationFrame function receive the current timestamp as an attribute. At the end of every cycle, we save this timestamp value into the lastTimestamp attribute, so that in the next cycle we can calculate how much time passed between two cycles. In the code above, this is the timePassed variable.
The first cycle is an exception because at that point, we didn’t have a previous cycle yet. Initially, the value of lastTimestamp is undefined. In this case, we skip a render and we only render the scene on the second cycle, where we already have all the values we need. This is the part at the very beginning of the animate function.
How to Animate Part of the State
In each phase, we animate a different part of the state. The only exception is the waiting phase because then we have nothing to animate. In that case, we return from the function. This will break the loop, and the animation will stop.
In the stretching phase – when the player is holding the mouse down – we need to grow the stick as the time passes. We calculate how much longer it should be based on the time passed and a speed value that defines how much time it takes for the stick to grow one pixel.
A very similar thing is happening in every other phase as well. In the turning phase, we change the rotation of the stick based on the time passed. In the walking phase, we change the horizontal position of the hero based on time. In the transitioning phase, we change the offset value of the whole scene. In the falling phase, we change the vertical position of the hero.
Each of these phases has its own speed configuration. These values tell how many milliseconds it takes to grow the stick by one pixel, turn the stick by one degree, walk one pixel, and so on.
// Configuration
const stretchingSpeed = 4; // Milliseconds it takes to draw a pixel
const turningSpeed = 4; // Milliseconds it takes to turn a degree
const walkingSpeed = 4;
const transitioningSpeed = 2;
const fallingSpeed = 2;

...
How to Move On to the Next Phase
In most of these phases, we also have a threshold value that ends the phase and triggers the next one. The waiting and stretching phases are the exceptions because their end is based on user interaction. |The waiting phase ends with the mousedown event and the stretching phase ends with the mouseup event.
The turning phase stops when the stick falls flat and its rotation reaches 90 degrees. The walking phase ends when the hero reaches the edge of the next platform or the end of the stick. And so on.
If these thresholds are reached, the main game loop sets the game to the next phase and in the next loop, it will act accordingly. Let’s see these in more detail.
The waiting phase
If we are in the waiting phase and nothing is happening, we return from the function. This return statement means that we never reach the end of the function and there won’t be another request for an animation frame. The loop stops. We need the user input handler to trigger another loop.
 In the waiting phase nothing happens
function animate(timestamp) {
    ...

  switch (phase) {
    case "waiting":
      return; // Stop the loop

    ...

  }

    ...
}
The stretching phase
In the stretching phase, we increase the length of the last stick based on the time passed and wait until the user releases the mouse. The last stick is always the one in front of the hero. After every view transition, a new stick is added to the current platform.
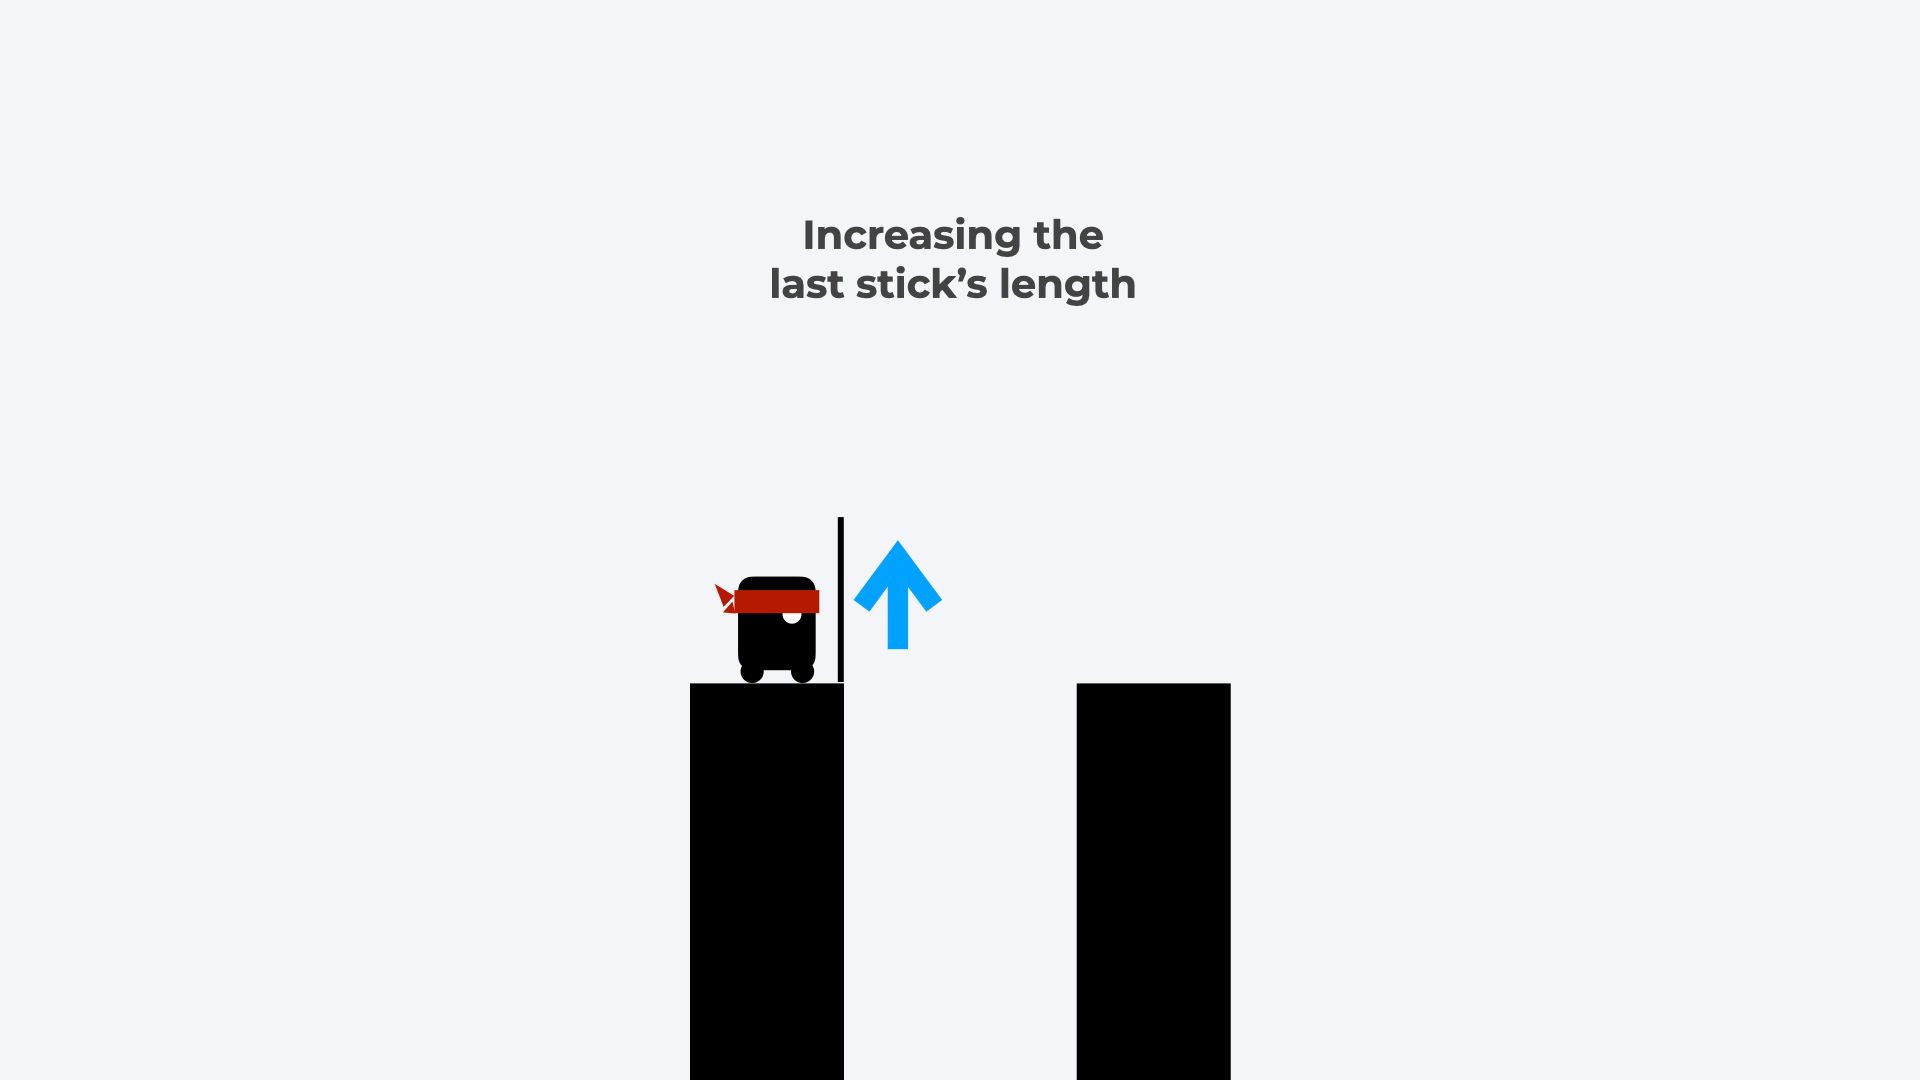 In the stretching phase we increase the last stick's length
function animate(timestamp) {
    ...

  switch (phase) {
        ...
    case "stretching": {
      sticks[sticks.length - 1].length += timePassed / stretchingSpeed;
            break;
    }
        ...
  }

  ...
}
The turning phase
In the turning phase, we change the rotation of the last stick. We only do it until the stick reaches 90 degrees because that means the stick has reached a flat position. Then we set the phase to walking, so the next requestAnimationFrame will adjust the hero and not the stick.
 In the turning phase we increase the last stick's rotation
Once the stick reaches 90 degrees, then if the stick falls on the next platform, we also increase the score value. We increase the score state and update the innerText attribute of the scoreElement (see the outline of the JavaScript file chapter). Then we generate a new platform to be sure that we never run out of them.
If the stick didn’t fall on the next platform, we don’t increase the score and we don’t generate a new platform. We also don’t trigger the falling phase yet either, because first the hero still tries to walk along the stick.
function animate(timestamp) {
  ...

  switch (phase) {
    ...
    case "turning": {
      sticks[sticks.length - 1].rotation += timePassed / turningSpeed;

      if (sticks[sticks.length - 1].rotation >= 90) {
        sticks[sticks.length - 1].rotation = 90;

        const nextPlatform = thePlatformTheStickHits();
        if (nextPlatform) {
          score++;
          scoreElement.innerText = score;

          generatePlatform();
        }

        phase = "walking";
      }
      break;
    }
    ...
  }

  ...
}
This phase uses a utility function to figure out whether the stick will land on the platform or not. It calculates the right end position of the last stick and checks if this position falls between the left and right edge of a platform. If it does, it returns the platform, if not then it returns undefined.
function thePlatformTheStickHits() {
  const lastStick = sticks[sticks.length - 1];
  const stickFarX = lastStick.x + lastStick.length;

  const platformTheStickHits = platforms.find(
    (platform) => platform.x < stickFarX && stickFarX < platform.x + platform.w
  );

  return platformTheStickHits;
}
The walking phase
In the walking phase, we move the hero forward. The end of this phase depends on whether the stick reaches the next platform or not. To determine this, we use the same utility function we just defined above.
 In the walking phase we increase the hero's X position
If the end of the stick falls on a platform, then we limit the hero’s position to the edge of that platform. Then once it’s reached, we go to the transitioning phase. If the end of the stick didn’t fall on a platform, though, we limit the hero's forward movement until the end of the stick and then we start the falling phase.
function animate(timestamp) {
  ...

  switch (phase) {
    ...
    case "walking": {
      heroX += timePassed / walkingSpeed;

      const nextPlatform = thePlatformTheStickHits();
      if (nextPlatform) {
        // If the hero will reach another platform then limit its position at its edge
        const maxHeroX = nextPlatform.x + nextPlatform.w - 30;
        if (heroX > maxHeroX) {
          heroX = maxHeroX;
          phase = "transitioning";
        }
      } else {
        // If the hero won't reach another platform then limit its position at the end of the pole
        const maxHeroX =
          sticks[sticks.length - 1].x +
          sticks[sticks.length - 1].length;
        if (heroX > maxHeroX) {
          heroX = maxHeroX;
          phase = "falling";
        }
      }
      break;
    }
    ...
  }

  ...
}
The transitioning phase
In the transitioning phase, we move the whole scene. We want to hero to stand at the same position on the screen where it initially stood, but now it’s standing on a different platform. This means that we have to calculate by how much we should shift the whole scene back to achieve the same position. Then just set the phase to waiting and we wait for another mouse event.
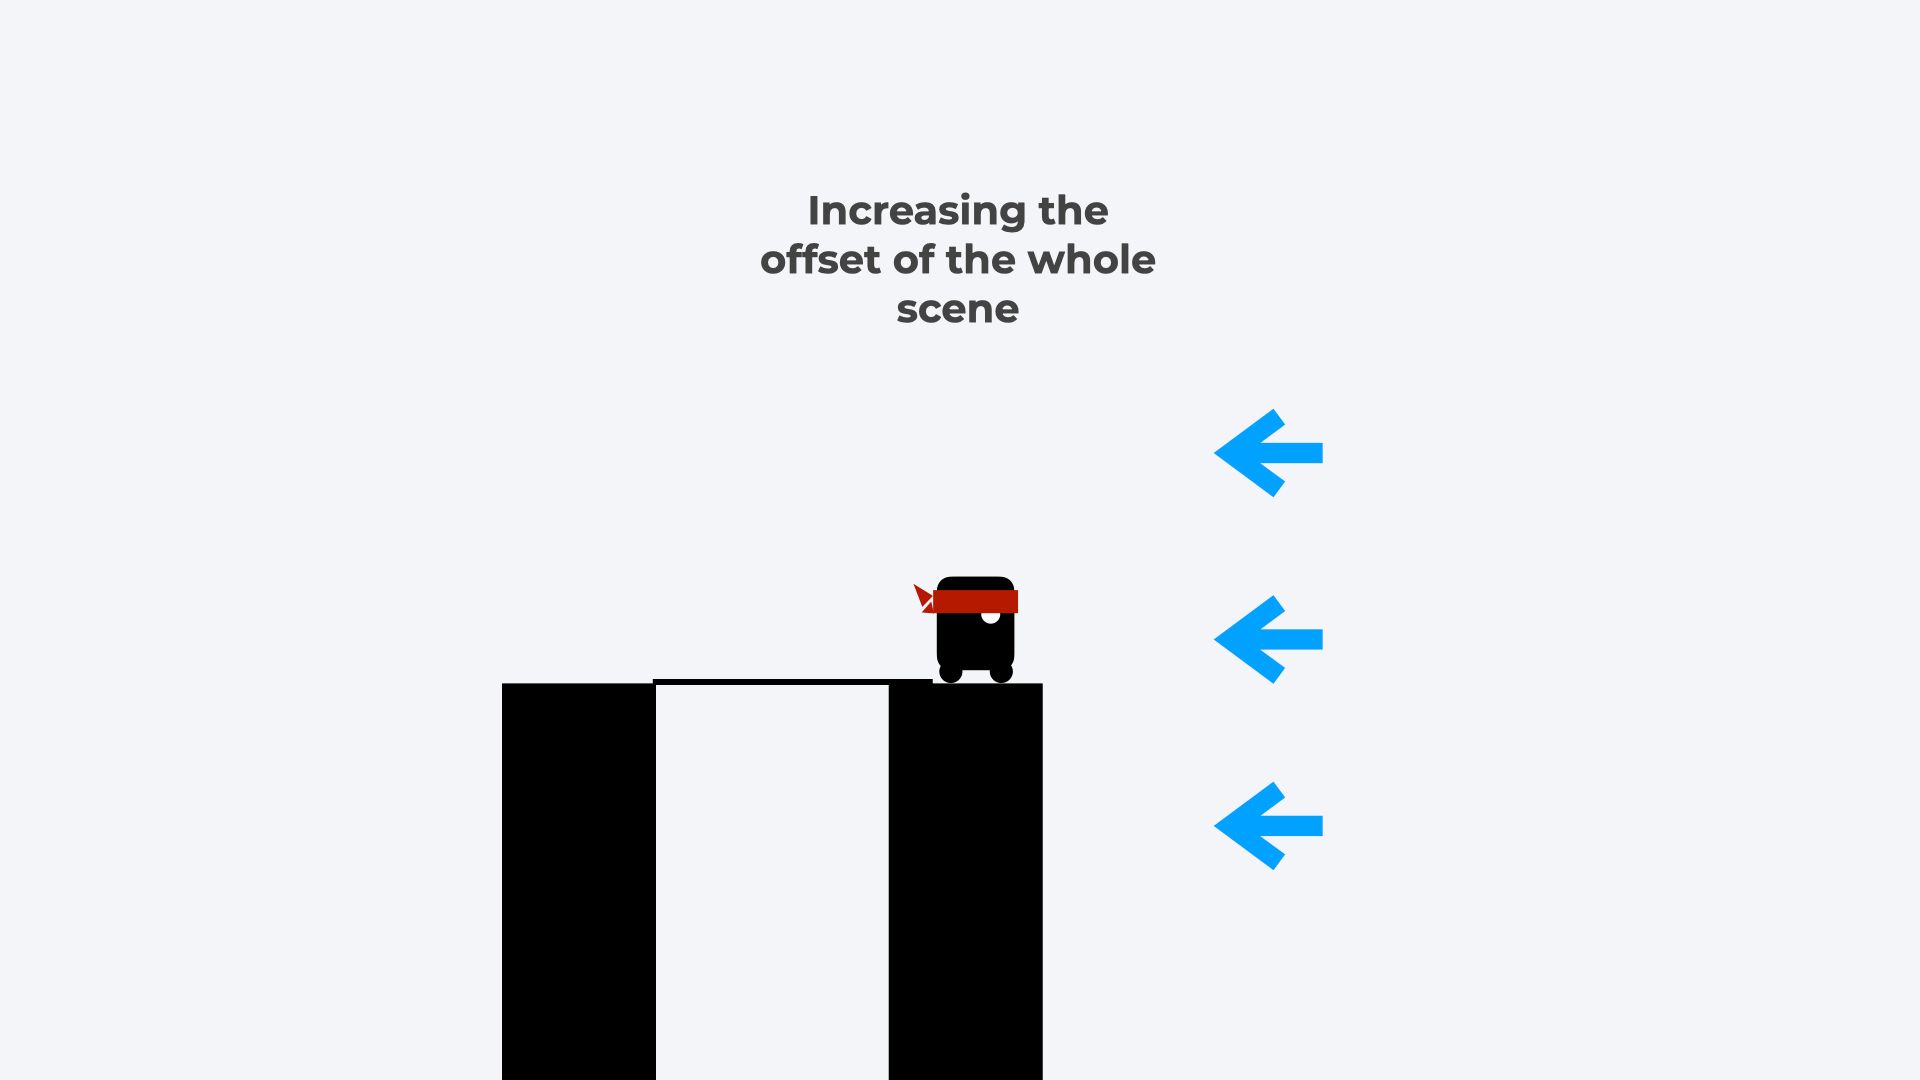 In the transitioning phase we shift the whole view
function animate(timestamp) {
    ...

  switch (phase) {
        ...
    case "transitioning": {
      sceneOffset += timePassed / transitioningSpeed;

      const nextPlatform = thePlatformTheStickHits();
      if (nextPlatform.x + nextPlatform.w - sceneOffset < 100) {
        sticks.push({
          x: nextPlatform.x + nextPlatform.w,
          length: 0,
          rotation: 0,
        });
        phase = "waiting";
      }
      break;
    }
        ...
  }

  ...
}
We know we've reached the right position when the right side of the platform – shifted by the offset – reaches the first platform's original right-side position. If we look back at initializing the platform, we see that the first platform always has an X position of 50 and its width is also always 50. This means that its right end will be at 100.
At the end of this phase, we also added a new stick to the sticks array with initial values.
The falling phase
In the failing scenario, two things are changing: the hero’s position and the last stick’s rotation. Then once the hero has fallen out of the screen, we stop the game loop again by returning from the function.
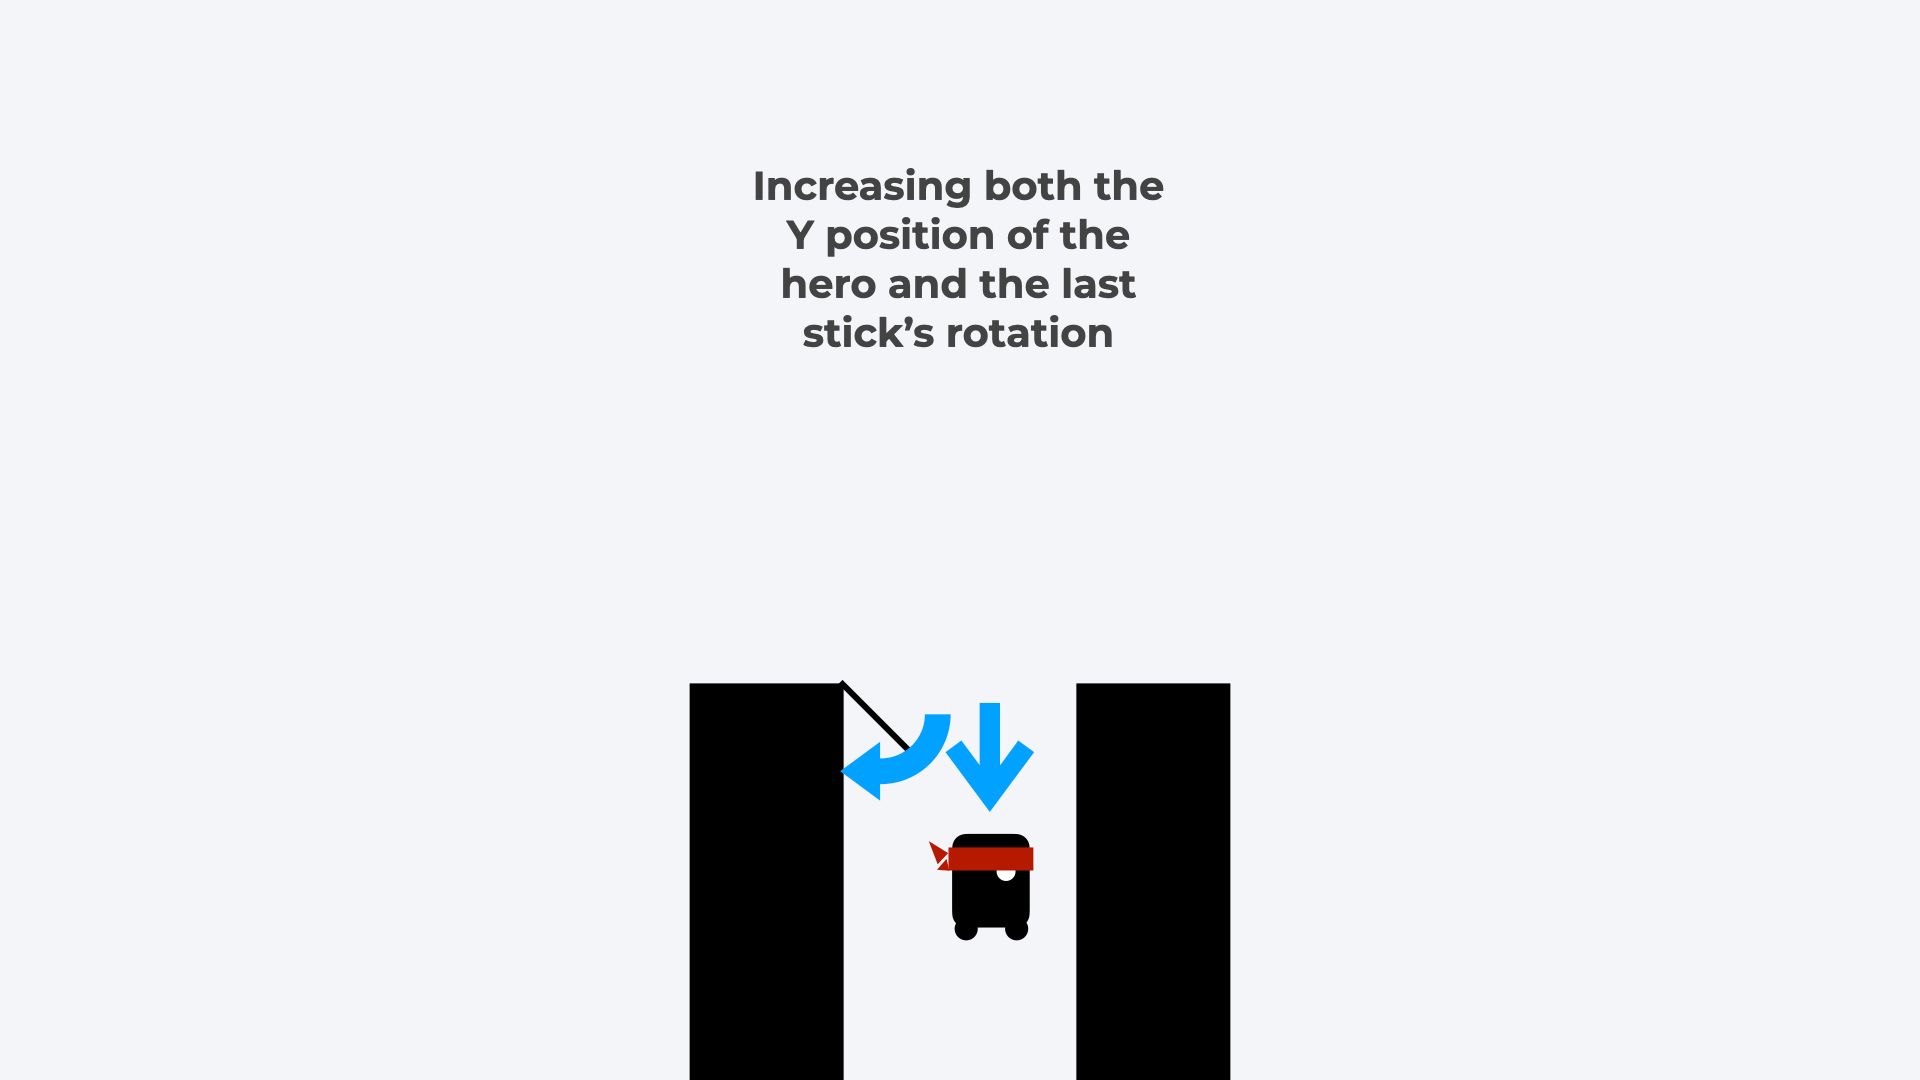 In the falling phase we both increase the Y position of the hero and the rotation of the last stick
function animate(timestamp) {
    ...

  switch (phase) {
        ...
    case "falling": {
      heroY += timePassed / fallingSpeed;

      if (sticks[sticks.length - 1].rotation < 180) {
        sticks[sticks.length - 1].rotation += timePassed / turningSpeed;
      }

      const maxHeroY = platformHeight + 100;
      if (heroY > maxHeroY) {
        restartButton.style.display = "block";
        return;
      }
      break;
    }
        ...
  }

  ...
}
So that’s the main loop – how the game moves from phase to phase, changing a range of variables. At the end of every cycle the function calls the draw function to update the scene and requests another frame. If you did everything right, you should have a working game now!
Summary
In this tutorial, we covered a lot. We learned how to paint basic shapes on a canvas element with JavaScript and we implemented a whole game.
Despite the length of this article, there are still a few things we did not cover here. You can check out the source code of this game for additional features on CodePen. These include:
- How to make the game fit the whole browser window and translate the screen accordingly.
- How to draw a background to the scene and how to draw a more detailed version of our hero.
- We add a double score zone to the middle of each platform. If the end of the stick falls into this very small region, the hero scores two points.
I hope you enjoyed this tutorial. Stay tuned for more here on freeCodeCamp and on my YouTube channel.