
In this in-depth tutorial, you'll learn all about the Document Object Model, or DOM for short. As a web developer, understanding the DOM is fundamental for interacting with web browsers and creating dynamic web applications.
Throughout this guide, we will explore the DOM's hierarchical tree structure, essential properties, and methods for accessing and modifying nodes. We'll also dive into event handling and various techniques for efficient DOM manipulation.
By the end of this guide, you should be able to confidently manipulate the DOM to meet the demands of your web development projects.
Prerequisites:
While this guide is designed to be beginner-friendly and accessible to anyone, having a basic understanding of JavaScript fundamentals will greatly enhance your ability to grasp the practical concepts covered.
Also, familiarity with HTML and CSS is a plus and will help you comprehend and apply the material we cover.
If you're new to JavaScript, consider familiarizing yourself with variables, data types, functions, loops, and basic DOM manipulation techniques before diving into this tutorial. This foundational knowledge will ensure a smoother learning experience as we explore more advanced topics related to the Document Object Model (DOM).
Table of Contents
- What is the Browser Object Model (BOM)?
- What is the Document Object Model (DOM)?
- DOM Tree Structure
– Types of Nodes in the DOM Tree
– Node Relationships - How to Work with DOM Elements
– Traversing the DOM
– Methods for Querying DOM Elements
– Specialized Selectors (Matches, Closest, Contains)
– How to Inspect DOM Elements
– Table Navigation in the DOM - How to Modify DOM Elements
– How to Manipulate Element Content and Visibility
– How to Modify Element Attributes
– HTML Insertion Methods
– How to Manipulate Classes with JavaScript - Event Handling in the DOM
– Common Types of Events
– Event Handlers
– Event Propagation
– Event Bubbling
– Event Delegation - Conclusion
What is the Browser Object Model (BOM)?
The Browser Object Model is like a set of tools provided by the browser itself. It's not part of the official DOM specification, but it's specific to web browsers. As a result, the objects and methods available in the BOM may vary between different browsers.
The BOM provides JavaScript access to browser-specific things like the browser's history, location, and browser window itself.
Window Object
The window Object serves as a global object in the browser, representing the browser window and is the top-level object in JavaScript when we're working in a web browser. You can access it by typing window in the browser console:
console.log(window); // prints the Window object
Since, it's global, you can access it from anywhere and use it to access other global objects such as the console and the alert function.
The window object is a key part of the BOM and provides access to many browser-related things. For example, window.location.href gives you the URL of the current web page.
Functions like alert(), prompt(), and confirm() are also part of the BOM, allowing you to interact with users through pop-up dialogs.
What is the Document Object Model (DOM)?
The Document Object Model (DOM) is a programming interface for web documents. It represents the structure of a web page, allowing interaction with its elements using programming languages like JavaScript.
The DOM contains the document object, which represents the DOM structure of the current web page and has properties and methods that allow you to manipulate the DOM.
You can access the document object by typing document in the browser console:
console.log(document); // prints the DOM object
You use document object to access and manipulate different parts of the HTML document. Elements within the DOM can be accessed using properties and methods of this object.
Examples include accessing the body or title element, retrieving HTML content (innerHTML), accessing text content (innerText) and changing styles.
// Accessing the document's title
console.log(document.title);

// Changing the document's title
document.title = "changed Title";

// Accessing the document's body
console.log(document.body);
// Changing background color of body element using inline CSS
document.body.style.backgroundColor = "red";
You can use the DOM to interact with web pages dynamically. This allows JavaScript to access, modify, and manipulate the content, structure, and style of a web document in response to user actions or other events.
Let's illustrate the concept of DOM manipulation with a simple example:
<html>
  <body>
    <div id="container">
      <p id="message">Hello, World!</p>
      <button id="changeText">Change Text</button>
    </div>

    <script>
      // we select the paragraph element by its ID
      let messageElement = document.getElementById("message");

      // let's add event listener to button element using ID
      document
        .getElementById("changeText")
        .addEventListener("click", function () {
          // this  will change the text content of the paragraph element
          messageElement.textContent = "Text Changed!";
        });
    </script>
  </body>
</html>
In this example, we have an HTML document with a <div> container containing a <p> element and a <button> element.
Using JavaScript, we can select the <p> element by its ID and attach an event listener to the <button> element. When the button is clicked, the text content of the paragraph element is changed dynamically.
DOM Tree Structure
The DOM represents the layout of HTML and XML documents as a tree-like structure, resembling the hierarchical arrangement of elements on a web page. In this tree, each node represents a part of the document, such as HTML elements, attributes, and text.
The top-level node in the tree is called the document node, which represents the entire HTML document. From there, it branches out to include all elements and their relationships within the document. Here's a visual representation of that:
 DOM Tree of Objects
Types of Nodes in the DOM Tree
There are two main types of nodes in the DOM:
- Element Nodes: Represent HTML elements such as
<div>,<h1>,<p>,<span>, and so on. These nodes make up the backbone of the DOM tree and form the structure of the HTML document. - Text Nodes: Represent text content within HTML elements. Text always serves as the last child (leaf node) of an element node and cannot contain any child nodes.
In HTML, whitespace such as spaces, tabs, and line breaks are considered part of the text content within HTML elements and are represented as text nodes.
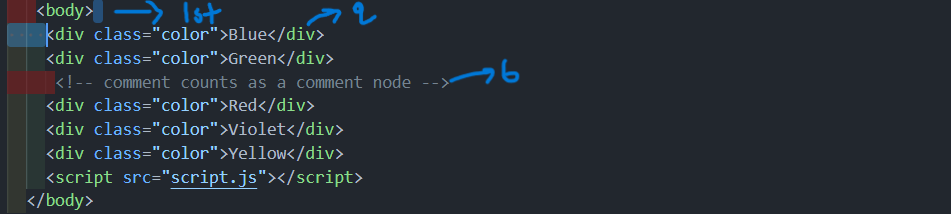 Linebreak is 1st child node, div (Blue) is 2nd, linebreak again 3rd
 We can see all the nodes here including non-element ones (like text nodes or comment nodes)
We also have:
- Attribute Nodes: Represent attributes of HTML elements, for example
id,class,src,href, and so on. - Comment Nodes: Nodes representing comments within the HTML markup.
To access and manipulate DOM elements, we can "walk" through the tree structure using JavaScript. For instance:
document.head: Selects the<head>element of the current HTML document.document.body: Selects the<body>element of the current HTML document.document.documentElement: Selects the root element of the DOM tree, that is<html>.
Once we access an element, we can modify its attributes or properties accordingly. For example, we can alter the background color of the <body> element to red by executing document.body.style.backgroundColor = "red" in the console.
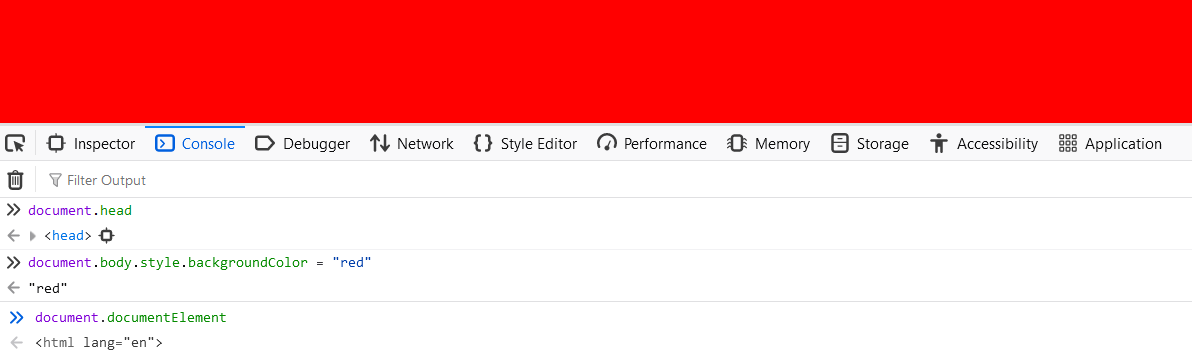 We can see the body color has changed to "red"
Node Relationships
Nodes in the DOM tree have parent-child relationships, which form the hierarchical structure of the tree. A child is an element that directly resides within another element (the parent).
<div id="container">
    <p>Hello, World!</p>
    <button>Click Me</button>
</div>
In the DOM tree, sibling elements are arranged linearly. The element to the right of the current element is called the next sibling, while the element to the left is called the previous sibling.
In the above example, the <p> element (previous sibling of ) and the <button> element (next sibling of
) are sibling nodes as they share the same parent. They are both children nodes of the <div> element with the ID "container". So the <div> element serves as the parent node of both the <p> and <button> elements.
Elements positioned above a given element in the DOM tree hierarchy are called ancestors. In the given code, the <html> element acts as the ancestor of the <body>, <h1>, and <p> elements, and they are descendants of the <html> element.
How to Work with DOM Elements
Now, let's dive into accessing nodes in the DOM using various properties and methods.
Traversing the DOM:
When working with the Document Object Model (DOM), it's important to understand the distinction between element nodes (HTML elements) and non-element nodes (like text nodes, comments, and so on). Certain properties and methods specifically deal with either element nodes or all types of nodes, including non-element nodes.
NodeList vs. HTMLCollection: Different properties return different collections of nodes. NodeList contains all types of nodes, while HTMLCollection specifically holds element nodes. Understanding this distinction is crucial for interpreting the results.
Properties for All Nodes (Including Non-element Nodes): These properties return nodes of all types, including element nodes, text nodes, and comment nodes.
childNodes returns a NodeList containing all child nodes and the parentNode property returns the parent node of the specified node. For example:
// Access the first child of the body node
console.log(document.body.childNodes[0]);


// parentnode; the parent of a <p> element within a <div> would be the <div> itself.
let p = document.querySelector('p'); // Select the <p> element
console.log(p.parentNode); // Output: <div> element (parent of p);
Spaces between tags and line returns in HTML code are considered text nodes by the browser. So, the actual first child node might not be what you expect.
firstChild/lastChild: Returns the first/last child node, again including all types.
document.body.firstChild; // Outputs: First child node (likely a linebreak(text node))
document.body.lastChild; // Outputs: Last child node (likely a script tag)
So we can say the following:
element.childNodes[0] === element.firstChild;
element.childNodes[element.childNodes.length - 1] === element.lastChild;
nextSibling/previousSibling: returns the next sibling/previous sibling node, including all of them.
Element specific properties or Element only navigation: These properties provide a convenient way to access only element nodes, excluding text nodes and comments.
children returns a live HTMLCollection of direct child elements, and the parentElement property returns the parent element node of the specified node.
In the below screenshot, you can see the difference between childNodes and children:
Here, Linebreak (text node) will be considered 1st child node of body element, whereas div.color (Blue) will be considered the 1st child.
For instance, let's say we have this code:
// childnode
console.log(document.body.childNodes);

// children
console.log(document.body.children);
// childnode
NodeList(19) [text, div.color, text, div.color, text, comment, text, div.color, text, div.color, text, div.color, text, script, text, comment, text, script, text]


// children
HTMLCollection(7) [div.color, div.color, div.color, div.color, div.color, script, script]
and, if we refresh the page, the output gets:
NodeList(14) [text, div.color, text, div.color, text, comment, text, div.color, text, div.color, text, div.color, text, script]
HTMLCollection(6) [div.color, div.color, div.color, div.color, div.color, script]
Initially, the NodeList contains 19 nodes. These nodes consist of text nodes, div elements with the class "color", a comment node, and script elements. The HTMLCollection contains 7 elements, which are the div elements with the class "color" and script elements.
When the page is refreshed, some elements or nodes are removed or modified dynamically through JavaScript or other means, leading to the observed changes in the DOM structure.
firstElementChild/lastElementChild returns the first/last child, excluding non-element nodes.
// Both will exclude text nodes and comment nodes.
document.body.firstElementChild; // Outputs: <div class="color">
document.body.lastElementChild; // Outputs: <script src="script.js">
Key Points:
- Choose the right property based on whether you need to target all nodes or specifically element nodes.
- Remember that properties like
firstChildandpreviousSiblingmight return element and non-element nodes, while their element-specific counterparts (firstElementChildandpreviousElementSibling) focus only on elements.
Methods for Querying DOM Elements:
JavaScript provides several methods for accessing elements in the DOM:
getElementById: This method retrieves an element by its unique ID attribute.
let element = document.getElementById("myElement");
getElementsByClassName: This method returns a collection of elements with the specified class name.
let elements = document.getElementsByClassName("myClass");
getElementsByTagName: This method returns a list of collection of elements with the specified tag name.
let elements = document.getElementsByTagName("div");
querySelector: This method retrieves the first element that matches a specified CSS selector.
let element = document.querySelector("cssSelector");
querySelectorAll: This method retrieves all elements that match a CSS selector.
let elements = document.querySelectorAll("cssSelector");
You might be wondering how querySelector differs from querySelectorAll.
Well, querySelector returns the first element within the document that matches the specified selector. On the other hand, querySelectorAll returns a static NodeList representing a list of the document's elements that match the specified group of selectors.
When you're using querySelectorAll, you receive a NodeList, which is similar to an array but not exactly the same. You cannot directly manupulate all elements like appling styles to all elements within a NodeList using methods like style.backgroundColor = 'red'. So we use a forEach loop. For example:
console.log(document.querySelectorAll(".box"));

document.querySelectorAll('.box').forEach(element => {
    // Within the forEach loop, we access each element and set its background color to green.
    element.style.backgroundColor = "green";
});
Let's see what's going on in this code:
- In the first line, we directly change the background color of the element with the class 'box' using querySelector.
- In the second line, we use querySelectorAll to select all elements with the class 'box' and log the NodeList to the console.
- In third line, since
querySelectorAllreturns a NodeList, we need to iterate through each element in the NodeList in order to apply the background color to each element separately. - so basically, we can say
querySelectoris equivalent toquerySelectorAll('section')[0].
Alright, one last method to consider:
getElementsByName: This method returns a list of collection of elements with the specified name attribute.
let items = document.getElementsByName('some-name-attribute');
console.log(items);
These methods are important to understand because they are used in various situations.
For example, when we want to select all the div elements in the document, we can use the querySelectorAll method or the getElementsByTagName method. Both methods will return the same result, but querySelectorAll is more flexible because it can select elements that match any CSS selector. getElementsByTagName can only select elements that have the same tag name.
Matches, Closest, and Contains:
When you're working with JavaScript and dealing with web pages, you often need to find specific parts of the page or do things with them. Three methods you might use are matches(), closest(), and contains().
matches() checks if an element matches a certain style rule. For example, if you have a button and you want to see if it has a class of "active", you could use button.matches('.active'). It will return true if the button has that class, and false if it doesn't.
const button = document.querySelector('button');
if (button.matches('.active')) {
  console.log('The button is active');
} else {
  console.log('The button is not active');
}
If you have an element and you want to find its nearest parent with a certain class, you can use **closest()** like this: element.closest('.classname').
For instance, if you have a link inside a list item and you want to find the nearest list item, you could do link.closest('li').
const link = document.querySelector('a');
const listItem = link.closest('li');
console.log(listItem); // This will give you the nearest list item
And contains() checks if one element is inside another. For example, if you have a div and a paragraph inside it, you could check if the div contains the paragraph with div.contains(paragraph). It will return true if the paragraph is inside the div, and false if it's not.
const div = document.querySelector('div');
const paragraph = document.querySelector('p');
if (div.contains(paragraph)) {
  console.log('The div contains a paragraph');
} else {
  console.log('The div does not contain any paragraph');
}
These methods are handy for navigating around your web page and doing different things with its elements.
How to Inspect DOM Elements
Using console.dir(): console.dir() is not a method of the DOM. It's a method provided by the browser's Console API, specifically used for logging JavaScript objects to the console.
If we log an element using console.log(), we see its HTML representation. But with console.dir(), we get an interactive list showing all available attributes and functions for that element.
tagName and nodeName: tagName is a property specific to HTML elements. It returns the tag name of an HTML element in uppercase letters. For example, if you have an HTML element <div>, tagName will return "DIV".
On the other hand, nodeName is a property of DOM nodes that represents the name of the node. For element nodes, it returns the tag name in uppercase. For other types of nodes, it returns a string representing the type of node (for example, "#text" for text nodes, "#comment" for comment nodes).
Discovering a node's type: Each node in the DOM has a nodeType property that indicates its type. It has a numeric value: 1 for elements, 2 for attributes, 3 for text nodes, 8 for comment and 9 for document. Read-only. This property can be used to distinguish between element nodes and text nodes. For example:
const element = document.createElement('div');
console.log(element.nodeType); // Output: 1
Table Navigation in the DOM
Now, let's learn how to navigate a table element and its child nodes using the DOM. Here, instead of manually writing a table, we will use Bootstrap's pre-designed table.
Before diving into table navigation, let's discuss Bootstrap, a popular front-end framework offering pre-designed components and styles for building responsive web pages efficiently.
To integrate Bootstrap into our project, we'll:
- Copy the pre-designed table from here.
- Paste it into a container
<div>in our HTML. - Include Bootstrap's CSS and JS files in our webpage (which you can copy from here).
Here's how our HTML code will look after integration:
<!DOCTYPE html>
<html>
<head>
    <title>Table Navigation</title>
    <link rel="stylesheet" href="styles.css">
    <link href="https://cdn.jsdelivr.net/npm/bootstrap@5.3.0-alpha3/dist/css/bootstrap.min.css" rel="stylesheet" integrity="sha384-KK94CHFLLe+nY2dmCWGMq91rCGa5gtU4mk92HdvYe+M/SXH301p5ILy+dN9+nJOZ" crossorigin="anonymous">
</head>
<body>
   <div class="container">
    <!-- Bootstrap Table -->
    <table class="table">
        <!-- Table Header -->
        <thead>
          <tr>
            <th scope="col">#</th>
            <th scope="col">First</th>
            <th scope="col">Last</th>
            <th scope="col">Handle</th>
          </tr>
        </thead>
        <!-- Table Body -->
        <tbody>
          <tr>
            <th scope="row">1</th>
            <td>Mark</td>
            <td>Otto</td>
            <td>@mdo</td>
          </tr>
          <tr>
            <th scope="row">2</th>
            <td>Jacob</td>
            <td>Thornton</td>
            <td>@fat</td>
          </tr>
          <tr>
            <th scope="row">3</th>
            <td colspan="2">Larry the Bird</td>
            <td>@twitter</td>
          </tr>
        </tbody>
      </table>
   </div>
    <script src="script.js"></script>
    <script src="https://cdn.jsdelivr.net/npm/bootstrap@5.3.0-alpha3/dist/js/bootstrap.bundle.min.js" integrity="sha384-ENjdO4Dr2bkBIFxQpeoTz1HIcje39Wm4jDKdf19U8gI4ddQ3GYNS7NTKfAdVQSZe" crossorigin="anonymous"></script>
</body>
</html>
Table navigation properties:
The table element supports various properties for convenient navigation, such as:
table.rows: Returns an HTMLCollection of all rows in the table.table.caption: Returns the caption element of the table.table.tHead: Returns the thead element of the table.table.tFoot: Returns the tfoot element of the table.table.tBodies: Returns an HTMLCollection of all tbody elements in the table.
Similarly, the tr (table row) element supports properties like:
tr.cells: Returns an HTMLCollection of all cells in the row.tr.sectionRowIndex: Returns the index of the row in the current section (thead, tbody, or tfoot).tr.rowIndex: Returns the index of the row in the table.
The td (table cell) element also supports the td.cellIndex property, returning the index of the cell in the row.
For instance, to print all rows in the table:
let t = document.body.firstElementChild.firstElementChild; // Selecting the table
for (let i = 0; i < t.rows.length; i++) {
    let row = t.rows[i];
    console.log(row)
}
To print cells in the first row:
let t = document.body.firstElementChild.firstElementChild; // Selecting the table
let row = t.rows[0]; // Selecting the first row
for (let i = 0; i < row.cells.length; i++) {
    let cell = row.cells[i];
    console.log(cell)
}
How to Modify DOM Elements
Once you have access to DOM elements, you can modify them in various ways using JavaScript.
How to Manipulate Element Content and Visibility
innerHTML and outerHTML
You can use innerHTML to access or change the HTML content inside an element as a string. outerHTML, on the other hand, lets you get or set the HTML content of an element as a string, including the original element itself.
Here's an example:
<body>
    Hello World
    <span>Hey I am span</span>
    <script src="script.js"></script>
</body>
let first = document.getElementsByTagName("span")[0]; //

// log and change inner HTML
console.log(first.innerHTML); // Output: Hey I am span
first.innerHTML = "Hey I am changed"; // Modify the content of the <span> element

// log and change outer HTML
console.log(first.outerHTML); // Output: <span>Hey I am span</span>
first.outerHTML = "<h1>Hey I am changed</h1>"; // Reload the page to see the change
textContent property
The textContent property allows you to set or retrieve the text content of an element, ignoring any HTML tags within it. It's useful when you want to update the text content of an element without affecting its HTML structure.
console.log(first.textContent); // output: Hey I am span

// change the text content
first.textContent = "Hey I am changed";
innerText property
The innerText property returns only the visible text content of an element, excluding any text within <script> and <style> elements, and accounting for CSS styling that affects visibility. It takes into account CSS styling, such as display: none, visibility: hidden, and so on and returns only the text that is rendered on the screen.
style property
This property provides access to an object for manipulating an element's inline styles (for example, element.style.color = "red").
hidden property
The hidden provides a simple and convenient way to control the visibility of elements in the DOM without directly manipulating their style properties.
document.getElementsByTagName('span')[0].hidden = true;

// When hidden is set to false, the element is visible.
Note that setting an element's hidden property to true only hides it from view, but it still occupies space in the document layout.
How to Modify Element Attributes
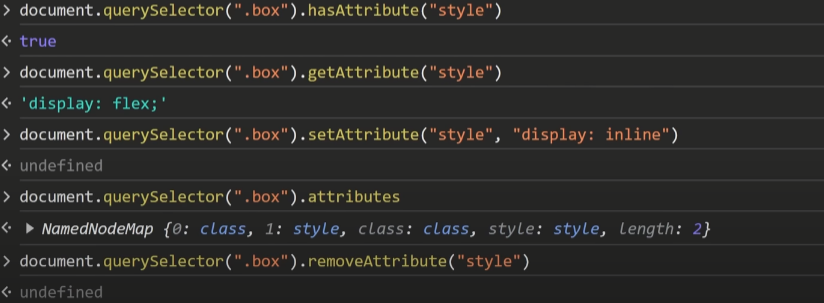
The getAttribute() method retrieves the value of a specified attribute of an element, while setAttribute() sets or updates the value of a specified attribute.
hasAttribute() checks whether an element has a specific attribute, returning true or false. The removeAttribute() method removes a specified attribute from an element.
In HTML5, it's possible to define custom attributes for elements. But to prevent potential conflicts with future HTML or JavaScript updates, you should prefix custom attributes with data-. For instance:
<div id="element1" class="sample" data-category="music" data-rating="5">
    This is the first element.
</div>
To access these custom attributes using JavaScript, we can utilize the dataset property. For example:
console.log(element1.dataset);
This will display a DOMStringMap object containing all the custom attributes associated with the "element1" div. Specific custom attributes can also be accessed by their names. For example:
console.log(element1.dataset.category);

// This code would output the value of the "category" custom attribute, which in this case is "music"
HTML Insertion Methods
In HTML, there are several ways to insert new content or modify existing content dynamically using JavaScript. These are known as HTML insertion methods.
Consider the following HTML as our example:
<html>
<head>
</head>
<body>
    <div class="container">
        <div id="first">first element</div>
    </div>
    <script src="script.js"></script>
</body>
</html>
Classic Way to Insert HTML:
A conventional way to insert HTML is by using the innerHTML property. For example, let's say we want to add an h1 element with the text "Hello World" inside the first div. We can do this using the following code:
let a = document.getElementsByTagName('div')[0];
a.innerHTML = '<h1>Hello World</h1>';
We could also append new HTML to the existing HTML inside the div element. For example:
// This will retain the old content and add a new h1 element.
let a = document.getElementsByTagName('div')[0];
a.innerHTML = a.innerHTML + '<h1>Hello World</h1>';
Using createElement to Insert HTML:
Another method involves creating a new element using createElement, setting its content using innerHTML, and subsequently appending it to the target element using appendChild.
Other HTML Insertion Methods:
<!DOCTYPE html>
<html>
<head>
</head>
<body>
I am outside div (start)
<div class="container">
    I am start of this container
        <div id="first">I am first element</div>
    I am end of this container
</div>
I am outside div (end)
    <script src="script.js"></script>
</body>
</html>
Now, let's consider other methods for inserting HTML content dynamically:
let a = document.getElementsByTagName('div')[0];

// Using createElement and appendChild
let div = document.createElement('div');
div.innerHTML = '<h1>Hello World (append)</h1>';
a.appendChild(div);

// Using prepend
let div = document.createElement('div');
div.innerHTML = '<h1>Hello World (prepend)</h1>';
a.prepend(div);

// Using before
let div = document.createElement('div');
div.innerHTML = '<h1>Hello World (before)</h1>';
a.before(div);

// Using after
let div = document.createElement('div');
div.innerHTML = '<h1>Hello World (after)</h1>';
a.after(div);

// Using replaceWith
let div = document.createElement('div');
div.innerHTML = '<h1>Hello World (replaced)</h1>';
a.replaceWith(div);
This code demonstrates different methods for dynamically inserting HTML content into the DOM using JavaScript.
a.append(div): This method appends thedivelement as the last child of theaelement.a.prepend(div): This method adds thedivelement as the first child of theaelement.a.before(div): This method adds thedivelement before theaelement.a.after(div): This method adds thedivelement after theaelement.a.replaceWith(div): This method replaces theaelement with thedivelement.
The insertAdjacentHTML, insertAdjacentElement, and insertAdjacentText Methods
These methods are used to insert content into the DOM at a specified position relative to a given element. They are helpful when you need to dynamically add new elements or text to your webpage.
insertAdjacentHTML:
insertAdjacentHTML allows you to insert a string of HTML at a specified position relative to the element.
The first parameter specifies where the HTML string will be inserted:
beforebegin: Before the element itself.afterbegin: Just inside the element, before its first child.beforeend: Just inside the element, after its last child.afterend: After the element itself.
Example usage:
let element = document.getElementById('example');
element.insertAdjacentHTML('beforebegin', '<div>New content</div>');
insertAdjacentElement:
It's similar to insertAdjacentHTML, but instead of inserting HTML, you can insert a DOM element.
Example usage:
let element = document.getElementById('example');
let newElement = document.createElement('div');
newElement.textContent = 'New content';
element.insertAdjacentElement('beforebegin', newElement);
insertAdjacentText:
It's similar to insertAdjacentHTML, but instead of inserting HTML, you can insert plain text.
Example usage:
let element = document.getElementById('example');
element.insertAdjacentText('beforebegin', 'New content');
Node Removal:
The remove method removes the element from the DOM.
Example usage:
let element = document.getElementById('example');
element.remove();
These methods allow you to manipulate the DOM dynamically, adding or removing content based on certain conditions or user interactions.
When using insertAdjacentHTML, insertAdjacentElement, or insertAdjacentText, you specify where the new content should be inserted relative to the given element.
When using remove, you simply remove the element from the DOM entirely.
These methods are helpful for dynamically updating the content of your webpage without having to reload the entire page.
How to Manipulate Classes with JavaScript
In HTML, we use classes to group elements and apply styles using CSS. For example, we have a div with an id of "first" in our HTML.
<div id="first">
    <span>Hello, this is text</span>
</div>
We also have CSS styles for classes like "yellow", "red", and "text-dark" to change background color and text color.
.yellow {
    background-color: yellow;
    color: white;
}
.red {
    background-color: red;
    color: white;
}
.text-dark {
    color: black;
}
className: In JavaScript, we can change the class of an element using the className property. For instance, if we want to change the class of the element with the id "first" to "red text-dark", we would do:
// we are applying 2 classes here
first.className = "red text-dark";
If we want to add another class without removing the existing ones, we use the += operator:
first.className += " yellow"; // Adds the class "yellow" without removing existing classes
classList: The classList property allows you to manipulate the classes of an element. We can use methods like add, remove, toggle, and contains to add, remove, toggle, or check the presence of a class.
classList.remove(): Removes a specific class from the element:
first.classList.remove('text-dark'); // Removes the class "text-dark"
classList.add(): But wait, it looked better with that class! We can also add it back with:
first.classList.add('text-dark'); // Adds the class "text-dark"
classList.toggle(): Toggles a class on or off based on its presence:
first.classList.toggle('text-dark'); // Toggles the class "text-dark" (adds if absent, removes if present)
classList.contains(): Checks if a class is present on the element:
console.log(first.classList.contains('text-dark')); // Returns true if the class "text-dark" is present
Event Handling in the DOM
Events are actions or occurrences that happen in the system you are programming, that the system may need to respond to in some way.
In the context of web development, events (Browser Events) can be user interactions like clicks, mouse movements, key presses, and so on. JavaScript allows you to handle these events and perform actions in response to them.
In HTML, you can directly specify what should happen when an event occurs using attributes like onclick, onmouseover, and so on. For example:
<button onclick="alert('hello')">Click me</button>
While you can write JavaScript directly in HTML attributes, it's always better to keep your HTML clean and handle events in JavaScript code separately. This makes your code easier to read and maintain.
You can do this by selecting elements from the webpage using JavaScript and then attaching an event handler to them. Here's how you might do it:
let container = document.getElementById("container");
container.onclick = function() {
    console.log("Hey, this is logged from the script!");
}
In this code, we select the element with the id "container" using document.getElementById(). Then, we attach a function to the onclick event of that element. This function will be executed whenever the element is clicked.
Common Types of Events:
Mouse Events: These events are related to interactions with the mouse.
click: When you click on an element.
- contextmenu: When you right-click on an element.
- mouseover / mouseout: When the mouse cursor enters or leaves an element.
- mousedown / mouseup: When you press or release a mouse button over an element.
- mousemove: When the mouse is moved.
Some Examples of Mouse Events:
// Mouse Button Property Example:

<div onmousedown="console.log('Mouse button:', event.button)">Click me</div>
In this example, the event.button property is used to log which mouse button was pressed.
// Modifier Keys Example:

<div onclick="if(event.ctrlKey) console.log('Ctrl + Click!')">Ctrl + Click Me</div>
This example logs a message when the user clicks the element while holding the Ctrl key.
// Coordinates Example:

<div onmousemove="console.log('clientX:', event.clientX, 'clientY:', event.clientY)">Move your mouse here</div>
This example logs the clientX and clientY coordinates of the mouse pointer as it moves over the element.
// Preventing Selection Example:

<span ondblclick="console.log('Double clicked!')" onmousedown="return false;">Double-click me</span>
In this example, the return false statement in the onmousedown event handler prevents the default selection behavior when the element is double-clicked.
- Keyboard Events – keydown / keyup: When a key is pressed or released on the keyboard.
Some Examples of Keyboard Events:
<input type="text" onkeydown="console.log('Key pressed!')" onkeyup="console.log('Key released!')">
In this example, the input field triggers events when a key is pressed (keydown) and released (keyup).
// Event Modifiers Example:

<input type="text" onkeydown="if(event.ctrlKey && event.key === 'c') console.log('Ctrl + C pressed!')">
This example logs a message when the user presses the Ctrl key and 'c' key simultaneously in the input field.
// Accessing Key Information Example:

<input type="text" onkeydown="console.log('Key pressed:', event.key)">
This example logs the key that was pressed in the input field.
Form Element Events: These events occur when you interact with form elements, like submitting a form, focusing on an input field, and so on.
Document Events: These events are related to the document object itself. Example: DOMContentLoaded (when the HTML is fully loaded and the DOM is ready)
CSS Events: These events are related to CSS animations. Example: transitionend (When a CSS animation finishes)
Now, let's see an example demonstrating the practical application of event handling and input validation in web development:
<html>
<head>
<title>Input Validation Example</title>
<script>
function checkPhoneNumber(event) {
  const validKeys = ['0', '1', '2', '3', '4', '5', '6', '7', '8', '9', '+', '(', ')', '-'];
  if (!validKeys.includes(event.key)) {
    event.preventDefault(); // Prevent default action for invalid keys
  }
}
</script>
</head>
<body>
<label for="phone">Enter Phone Number:</label>
<input type="tel" id="phone" onkeydown="checkPhoneNumber(event)">
<p>Only digits, +, (, ), and - are allowed.</p>
</body>
</html>
In this example, we're implementing input validation for a phone number input field. The onkeydown event triggers the checkPhoneNumber function, which checks if the pressed key is valid (digits, plus sign, parentheses, or hyphen). If the key is not valid, the default action (character input) is prevented.
You can explore more about events here.
Event Handlers
To react to these events, we use event handlers. An event handler is simply a function that runs when a specific event occurs. There are different ways to assign event handlers in JavaScript:
- HTML Attribute: You can set an event handler directly in the HTML code using an attribute like
onclick,onmouseover, etc.
<button onclick="alert('Button clicked!')">Click me</button>
- DOM Property: You can assign a handler using a DOM property like
onclick,onmouseover, and so on.
<button id="myButton">Click me</button>
<script>
  document.getElementById("myButton").onclick = function() {
    alert('Button clicked!');
  };
</script>
- Event Listeners: Event listeners are functions that wait for a specific event to occur and then execute a designated function. This is typically done using the
addEventListenermethod.
addEventListener() and removeEventListener():
These are methods used to assign and remove event handlers, respectively, in JavaScript.
**addEventListener()**is used to attach an event listener to an element, which listens for a specific event (for example, a click or mouseover). It provides more flexibility, especially when you need to add multiple handlers to the same event.
<button id="myButton">Click me</button>
<script>
  document.getElementById("myButton").addEventListener('click', function() {
    alert('Button clicked!');
  });
</script>
const btn = document.getElementById('btn');

// Example 1: Adding event listeners directly with anonymous functions
btn.addEventListener('click', function(e) {
    console.log("Button clicked!"); // Logs a message when the button is clicked
});

// Example 2: Defining functions separately and then adding event listeners
function greet() {
    console.log("Hello!");
}
function farewell() {
    console.log("Goodbye!");
}
btn.addEventListener('mouseenter', greet); // Greets when the mouse enters the button
btn.addEventListener('mouseleave', farewell); // Says goodbye when the mouse leaves the button
With addEventListener, you can also specify additional options as a third argument. Some common options are:
once: A boolean value that specifies whether the event listener should be removed after it is invoked once.capture: A boolean value that specifies whether the event should be captured during the capturing phase. The capturing phase happens before the bubbling phase.
For example:
btn.addEventListener('click', handleClick, { once: true, capture: true });
This will add a click event listener to the button element that is triggered only once and captures the event during the capturing phase.
**removeEventListener()**is used to remove a previously attached event listener from an element.
// Example 1

<button id="myButton">Click me</button>
<script>
  function handleClick() {
    alert('Button clicked!');
  }

  document.getElementById("myButton").addEventListener('click', handleClick);
  // Remove the event handler
  document.getElementById("myButton").removeEventListener('click', handleClick);
</script>
// Example 2
// Assume a user preference
const allowGreetings = true;

// Removing event listeners based on user preference
if (!allowGreetings) {
    btn.removeEventListener('mouseenter', greet);
}
Object Handlers: handleEvent
Instead of assigning a function as an event handler, you can also assign an object that has a handleEvent method. When the event occurs, the handleEvent method of the object will be called.
<button id="myButton">Click me</button>
<script>
  let myObject = {
    handleEvent: function(event) {
      alert('Button clicked!');
    }
  };

  document.getElementById("myButton").addEventListener('click', myObject);
</script>
In this example, when the button is clicked, the handleEvent method of myObject is called.
Event Object:
When an event occurs, the browser creates an event object that contains information about the event, such as the type of event, the target element, and any additional data.
This object is passed as an argument to the event handler function which can be accessed within the callback function of an event listener.
element.addEventListener('click', function(event) {
    console.log(event.type); // Output: "click"
    console.log(event.target); // Output: The element that was clicked
     // We can access more properties like event.clientX, event.clientY, etc.
});
Event Propagation:
Events in the DOM can propagate through the DOM tree in two phases: the capturing phase and bubbling phase.
When an event happens on an element, like a click or a key press, the browser needs to decide which elements should be notified about the event.
Event capturing and bubbling describe the order in which elements are notified about the event. Understanding event propagation is important when dealing with nested elements and event delegation.
- Capturing Phase: In the capturing phase, the event starts from the top of the DOM hierarchy (usually the
<html>element) and travels down to the target element. During this phase, event handlers attached withaddEventListenerand thecaptureoption set totrueare triggered. These handlers are executed before the event reaches the target element. - Target Phase: Once the event reaches the target element, it enters the target phase. Event handlers attached with
addEventListenerwithout thecaptureoption (or withfalseas the value) are triggered during this phase. Handlers attached in this phase are executed when the event is directly targeting the element. - Bubbling Phase: After the target phase, the event bubbles up from the target element to the top of the DOM hierarchy. During this phase, event handlers attached with
addEventListenerwithout thecaptureoption (or withfalseas the value) are triggered again. Handlers attached in this phase are executed as the event travels up from the target element.
Let's look at an example. Consider a <div> nested inside another <div>. If a click event occurs on the inner <div>, the capturing phase starts from the outer <div> and goes down to the inner <div>. Then, the target phase happens on the inner <div>, and finally, the bubbling phase occurs from the inner <div> back up to the outer <div>.
<div id="outerDiv">
  Outer Div
  <div id="innerDiv">Inner Div</div>
</div>

<script>
  const outerDiv = document.getElementById('outerDiv');
  const innerDiv = document.getElementById('innerDiv');

  outerDiv.addEventListener('click', () => console.log('Capturing: Outer Div'), true);
  innerDiv.addEventListener('click', () => console.log('Target: Inner Div'));
  outerDiv.addEventListener('click', () => console.log('Bubbling: Outer Div'));
</script>
Let's understand Bubbling in detail.
Event Bubbling:
Event bubbling is a mechanism in JavaScript where, when an event occurs on an element, such as a click, that event first triggers on the target element and then "bubbles" up through its ancestor elements all the way up to the root of the document (usually <html>). This triggers the same event on each ancestor along the way. Here's an example:
<form onclick="alert('form')">
  FORM
  <div onclick="alert('div')">
    DIV
    <p onclick="alert('p')">P</p>
  </div>
</form>
If you click on the <p> element, the click event will first trigger on the <p> element, then on the <div>, and finally on the <form>. This is because the event bubbles up through each parent element in the DOM hierarchy.
event.target vs. this:
event.targetrefers to the element that initiated the event. It remains the same throughout the bubbling process. In the above example, if you click on the<p>element,event.targetwill be the<p>element.this(orevent.currentTarget) refers to the current element that the event handler is attached to. In the above example, if the event handler is attached to the<form>,thiswill be the<form>element.
How to stop event bubbling:
Sometimes, you might want to stop the event from bubbling up further. You can do this using the event.stopPropagation() method. This method stops the event from propagating to parent elements.
<body onclick="alert('the bubbling doesn't reach here')">
  <button onclick="event.stopPropagation()">Click here</button>
</body>
In this example, clicking the button won't trigger the alert on the body element because event.stopPropagation() is called in the button's click event handler.
event.stopImmediatePropagation() is similar to event.stopPropagation(), but also prevents other handlers on the current element from executing.
Event Delegation:
Event delegation is a technique that allows you to handle events more efficiently by attaching a single event listener to a parent element instead of attaching multiple event listeners to individual child elements. This is particularly useful when you have a large number of similar elements that need the same event handling logic.
parentElement.addEventListener('click', function(event) {
    if (event.target.classList.contains('childElement')) {
        // Action to be performed when a child element is clicked
    }
});
<!-- Example: Event delegation -->
<ul id="myList">
    <li>Item 1</li>
    <li>Item 2</li>
    <li>Item 3</li>
</ul>

<script>
    // Adding a click event listener to the parent ul element
    document.getElementById("myList").addEventListener("click", function(event) {
        // Checking if the clicked element is an li
        if (event.target.tagName === "LI") {
            // Code to execute when an li is clicked
            console.log("Item clicked:", event.target.textContent);
        }
    });
</script>
This approach reduces the number of event listeners and improves performance.
Conclusion
The DOM, or Document Object Model, is an interface that represents the structure of HTML documents. It serves as the bridge between JavaScript code and the browser, allowing manipulation of HTML elements, styles, attributes, and event handling.
The DOM API provides methods and properties to interact with the DOM tree. Examples include querySelector, addEventListener, createElement, innerHTML, textContent, etc.
Through DOM manipulation, developers can dynamically change various aspects of a web page, including text content, HTML attributes, and the structure of the document itself (for example, inserting, updating, or deleting HTML elements).
JavaScript frameworks and libraries like React often utilize DOM manipulation capabilities to efficiently manage and update user interfaces. This lets developers create complex web applications with interactive and responsive user experiences.
To learn more about the DOM, here are a few resources you can check out:
First of all, I wrote a follow-up article, which you can find here:
Client-Side Form Handling with JavaScript.
You can also read more in the following articles: