

JavaScript code in the browser uses an event-driven programming pattern. What this means is that when a specific DOM event happens in the browser, a piece of code will be executed as a response to that action.
In this article, I will help you see and understand how to listen and respond to DOM events using JavaScript.
If you need a refresher on the DOM, I have written an article that explains what the DOM is and how JavaScript interacts with it.
What Are DOM Events and Why Are They Useful?
DOM events are signals exposed by the browser that you can use to run a piece of JavaScript code.
These DOM events occur when the user interacts with the application we've created, such as clicking a button or typing letters into an input field.
As a web developer, you can instruct JavaScript to listen for a specific event and do something in response to that event.
For example:
- When a button is clicked, do change the text of a paragraph.
- When a form is submitted, do a POST request using the Fetch API.
In this article, I will help you see and understand how to listen and respond to DOM events using JavaScript.
How to Listen to DOM Events
To listen for an event, you need to attach an event listener to an element by using the addEventListener() method.
The addEventListener() method accepts two parameters:
- The event
typeto listen to - A function to run when the event is triggered
Element.addEventListener(type, function);
Back to the example, suppose you want to change the text of a paragraph when a button element is clicked. Here’s how you do it:
<body>
  <p id="myParagraph">This is an example paragraph</p>
  <button id="changeText">Change Text</button>
  <script>
    const button = document.querySelector('#changeText');

    function newText(event) {
      const p = document.querySelector('#myParagraph');
      p.innerText = 'The text has been changed';
    }

    button.addEventListener('click', newText);
  </script>
</body>
To insert JavaScript code into the HTML document, we need to use the script tag as shown above.
The button element is selected using document.querySelector() method, then the method addEventListener() is called on the element. This means you attach an event listener to the button.
First, you specify the type of event to listen to, which is a click event in this case. Next, you specify the function to run when that event happens.
In the code above, the newText function will be executed when the click event is triggered.
The event listener will also send an event object, which carries information about the event that was triggered. That’s why there’s an event parameter in the newText function above.
You can log the event to the console to see its details:
function newText(event) {
  console.log(event);
}
If you click on the button again, you will have the following output:
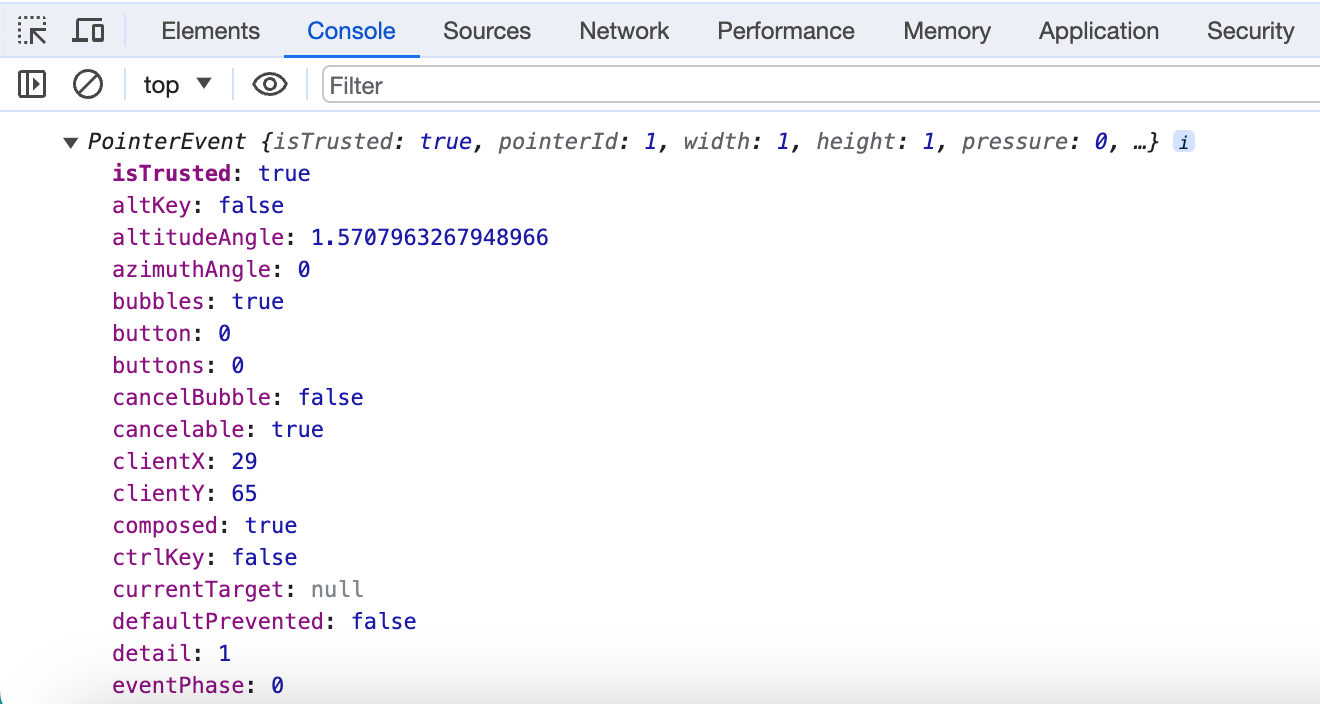 An example Event object log
Depending on what you want to do when an event is triggered, you may need to use the information contained inside the event object.
Here, all we want to do is to change the text of the paragraph, so the event object is not needed. We’ll see an example of using the event object later, when handling the keyboard events.
There are many events you can listen to in the browser. Here are some of the most common events you may need when developing a web application:
| Event | Event is fired |
| click | When you press down and release the primary mouse button. Used to track buttons and clickable elemennts |
| mousemove | When you move the mouse cursor |
| mouseover | When you move the mouse cursor over an element. It's like the CSS hover state |
| mouseout | When your mouse cursor moves outside the boundaries of an element |
| dblclick | When you click twice |
| DOMContentLoaded | When the DOM content is fully loaded |
| keydown | When you press a key on your keyboard |
| keyup | When you release a key on your keyboard |
| submit | When a form is submitted |
If you want to read the full list of DOM event types, you can visit this page.
The DOM Events are broken into several categories. Here we will just look at two of the most common events you might use in your project: keyboard and mouse events.
Keyboard Events
For the keyboard, you can track the keydown and keyup events, which run when you press and release a key, respectively.
To show you an example, run the following code from the console:
document.addEventListener('keydown', event => {
  console.log(`A key is pressed: ${event.key}`);
});

document.addEventListener('keyup', event => {
  console.log(`A key is released: ${event.key}`);
});
Once you run the code above, press a key on your keyboard slowly, then release it slowly.
You should see a log output as follows:
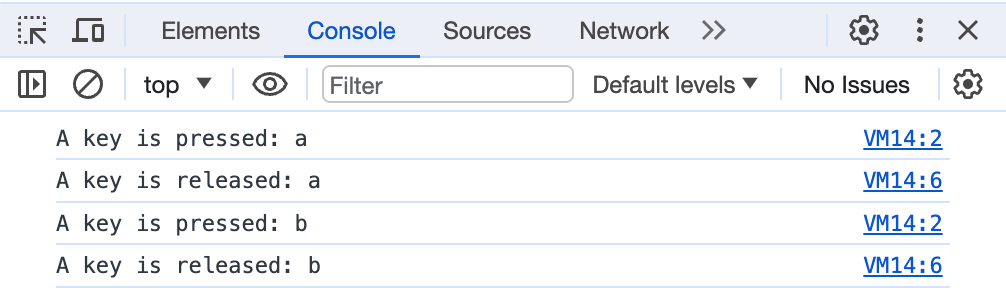 Logging keyup and keydown events
Notice how the 'keydown' log appears as soon as you press a key, and the 'keyup' log appears only when you release the key.
The keyboard events are usually attached to the document object instead of a specific element, because the whole website should be able to listen to that event.
Mouse Events
Aside from keyboard events, the DOM also provides a way to track any mouse events.
The most common mouse events that you can track are:
mousedown– the mouse button was pressedmouseup– the mouse button was releasedclick– a click eventdblclick– a double click eventmousemove– when the mouse is moved over the elementcontextmenu– when the context menu is opened, for example on a right mouse button click
Again, you can test these events by adding an event listener directly to the document object:
document.addEventListener('mousedown', event => {
  console.log(`The mouse is pressed`);
});

document.addEventListener('mouseup', event => {
  console.log(`The mouse is released`);
});
Run the code above, then click anywhere inside the browser. You should see the mousedown and mouseup events logged, respectively.
How to Remove Event Listeners
To remove an event listener attached to an element, you need to call the removeEventListener() method, passing the type of the event and the function you passed to the addEventListener() method as follows:
button.removeEventListener('click', newText);
The above code is enough to remove the 'click' event listener from the button element. Notice how you need to call the removeEventListener() method on the element while also passing the function newText to the method.
To correctly remove an event listener, you need to have a reference to the function attached to the event. If you pass a nameless function to the addEventListener() method, then that event can’t be removed:
button.addEventListener('click', function (event) {
  alert('Button save is clicked');
});
Without the function name as in the example above, you won’t be able to remove the event listener.
How to Listen to Events using HTML Attributes
Aside from using the addEventListener() method, you can also listen to events by adding the on[eventname] attribute to your HTML elements.
For example, suppose you want to listen to a button click. You can add the onclick attribute to your button as follows:
<body>
  <button onclick="handleClick()">Click Me!</button>
  <script>

    function handleClick(event) {
      alert('The button is clicked!');
    }
  </script>
</body>
In the button element above, we add the onclick property and pass the handleClick() function to it.
When we click on the button, the handleClick() function will be executed.
You can also add the onclick attribute using JavaScript as follows:
<body>
  <button id="myBtn">Click Me!</button>
  <script>
    const myBtn = document.querySelector('#myBtn');
    myBtn.onclick = handleClick;

    function handleClick(event) {
      alert('The button is clicked!');
    }
  </script>
</body>
Here, we assign a reference to the handleClick function to the onclick property using JavaScript.
To remove the onclick attribute, you can assign the property to null:
const myBtn = document.querySelector('#myBtn');
myBtn.onclick = null;
Which One Should You Use?
As you can see, there are two ways you can listen to DOM events: the addEventListener() method and the on[eventname] HTML attribute. Which one should you use?
The answer is that the addEventListener() method can be used when you need more extensibility, and the on[eventname] can be used when you prefer things to be simple.
When developing web applications, the .html file should only serve as the structure of the page, while the .js file should define any behavior the web application can have.
To make your application easier to maintain and extend, JavaScript should have access to HTML elements, but no HTML elements should be able to execute JavaScript functions. This is why addEventListener() should be the recommended method.
But addEventListener() doesn't come without a cost: you trade extensibility with verbosity, making your code quite cumbersome to read.
When using the on[eventname] attribute, you only need to specify the function name in your HTML element:
<body>
  <button onclick="handleClick()">Click Me!</button>
  <script>

    function handleClick(event) {
      alert('The button is clicked!');
    }
  </script>
</body>
But when you use the addEventListener() method, you need to query the element you need, call the method, then specify the event and the callback function to run:
<body>
  <button id="myBtn">Click Me!</button>
  <script>
    const myBtn = document.querySelector('#myBtn');
    myBtn.addEventListener('click', handleClick);

    function handleClick(event) {
      alert('The button is clicked!');
    }
  </script>
</body>
As you can see above, there are two additional lines that you don't need to write when you use the on[eventname] attribute.
While it might look insignificant, it will be a serious issue when you work on a large scale application with many HTML and JS files.
In addition, the addEventListener() method also allows you to attach multiple listeners to the same element as follows:
<body>
  <button id="myBtn">Click Me!</button>
  <script>
    const myBtn = document.querySelector('#myBtn');

    myBtn.addEventListener('click', handleClick);

    myBtn.addEventListener('click', handleClickTwo);

    function handleClick() {
      console.log('Run from handleClick function');
    }

    function handleClickTwo() {
      console.log('Run from handleClickTwo function');
    }
  </script>
</body>
When you click on the button above, JavaScript will execute both event listeners.
This is not possible with the onclick property because you can only assign one function as a reference at a time:
<body>
  <button id="myBtn">Click Me!</button>
  <script>
    const myBtn = document.querySelector('#myBtn');

    myBtn.onclick = handleClick;

    // when you assign a new function to onclick,
    // the old function is overwritten

    myBtn.onclick = handleClickTwo;

    function handleClick() {
      console.log('Run from handleClick function');
    }

    function handleClickTwo() {
      console.log('Run from handleClickTwo function');
    }
  </script>
</body>
But I never encountered a situation where I needed to listen to the same event twice, so this advantage might not be useful at all.
Conclusion
The DOM events exposed by the browser enable you to respond to user actions in the appropriate way.
This pattern of using event listeners to do specific tasks is known as event-driven programming, and you'll use this pattern a lot when developing a web application using JavaScript.
There are two ways you can listen to events: using the addEventListener() JavaScript method and the on[eventname] HTML attributes. Each has its advantages and disadvantages, so it's good to be familiar with both.
If you enjoyed this article and want to take your JavaScript skills to the next level, I recommend you check out my new book Beginning Modern JavaScript here.
The book is designed to be easy for beginners and accessible to anyone looking to learn JavaScript. It provides a step-by-step gentle guide that will help you understand how to use JavaScript to create a dynamic web application.
Here's my promise: You will actually feel like you understand what you're doing with JavaScript.
Until next time!