

In JavaScript, developers need to be able to dynamically update a page without replacing the entire content. A traditional method like innerHTML can cause performance issues, because these methods tend to replace the entire content of an element.
The insertAdjacentHTML() method leads to better performance because you use it to dynamically insert new HTML content without affecting the existing content.
In this tutorial, we'll cover the following:
- Introduction to the
insertAdjacentHTML()method - Syntax of the
insertAdjacentHTML()method - Placement options in the
insertAdjacentHTML()method - Browser support for the
insertAdjacentHTML()method - Best Practices for using the
insertAdjacentHTML()method - Conclusion
Introduction to the insertAdjacentHTML() method
The insertAdjacentHTML() method provides an efficient way to manipulate web page structure without replacing all the content of an element. It's also the go-to method for inserting HTML elements or text elements into a specific position.
insertAdjacentHTML is a method in JavaScript that allows you to insert HTML elements or text into a specific position relative to a given element in the DOM (Document Object Model). This method provides flexibility in manipulating the structure of a web page dynamically.
Syntax of the insertAdjacentHTML() method
Here's what the syntax of the insertAdjacentHTML() method looks like:
HTMLelement.insertAdjacentHTML(position, element);
The insertAdjacentHTML method takes two parameters:
position: This parameter is a string representation of where the new HTML should be inserted in relation to the
targetElement. It must match one of the following strings:**"beforebegin"**: Thebeforebeginstring value of theinsertAdjacentHTML()method inserts the HTML element immediately before the specified element in theDOM.**"afterbegin"**: Theafterbeginstring value of theinsertAdjacentHTML()method inserts the HTML element inside thetargetElement, just before its first child.**"beforeend"**: Thebeforeendis a string value of theinsertAdjacentHTML()method that inserts an HTML element inside thetargetElement, after its last child.**"afterend"**: Theafterendstring value of theinsertAdjacentHTML()method inserts an HTML element immediately after the specified element in theDOM.element: The element to be inserted into the
DOMtree.
Placement Options in the insertAdjacentHTML() Method
Now that you've seen the four possible parameters of the insertAdjacentHTML() method, let's see how they work with code.
beforebegin: Here's an example using thebeforebeginparameter in code:
const targetElement = document.querySelector('h1');
targetElement.insertAdjacentHTML('beforebegin', '<h2>Lawal</h2>');
Here's the output:
 beforebegin
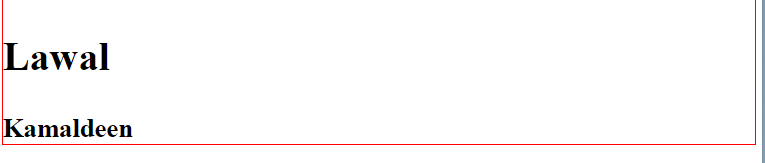
Recall that the beforebegin string value of the insertAdjacentHTML() method inserts the HTML element immediately before the specified element in the DOM.
In the above code result, our newly inserted HTML element h3 got inserted before our targetElement h2. I styleed our targetElement by adding a border to it for easy illustration.
afterbegin: here's an example of using theafterbeginparameter in code:
const targetElement = document.querySelector('h1');
targetElement.insertAdjacentHTML('afterbegin', '<h2>Lawal</h2>');
And here's the output:
 afterbegin
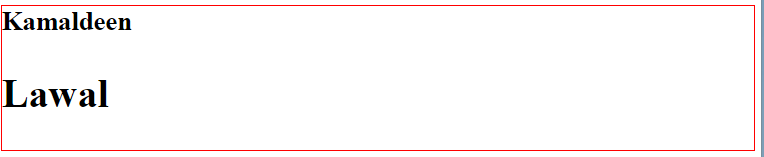
As defined above, the afterbegin string value of the insertAdjacentHTML() method inserts the HTML element inside the targetElement, just before its first child.
By checking the output of our code, you may realize that our newly inserted HTML element h3 got inserted inside our targetElement h2. Again, I styled our targetElement by adding a border to it for easy illustration.
beforeend: here's an example of usingbeforeendin code:
const targetElement = document.querySelector('h1');
targetElement.insertAdjacentHTML('beforeend', '<h2>Lawal</h2>');
And here's the output:
 beforeend
The general definition of beforeend is that it's a string value of the insertAdjacentHTML() method that inserts an HTML element inside the targetElement, after its last child.
From the code result, our newly inserted HTML element h3 got inserted inside our targetElement h2 after its child. I styled our targetElement by adding a border to it for easy illustration.
afterend: here's an example of usingaferendin code:
const targetElement = document.querySelector('h1');
targetElement.insertAdjacentHTML('afterend', '<h2>Lawal</h2>');
And here's the output:
 afterend
As you now know, afterend is a string value of the insertAdjacentHTML() method that inserts an HTML element immediately after the specified element in the DOM.
In the above code, our newly inserted HTML element h3 got inserted immediately after our targetElement h2. I styled our targetElement by adding a border to it for easy illustration.
Browser Support for the insertAdjacentHTML() Method
The insertAdjacentHTML() method is a widely supported method that can be relied upon for your DOM manipulation needs across different modern browsers.
To see the browsers that support this method, check out the summary below:
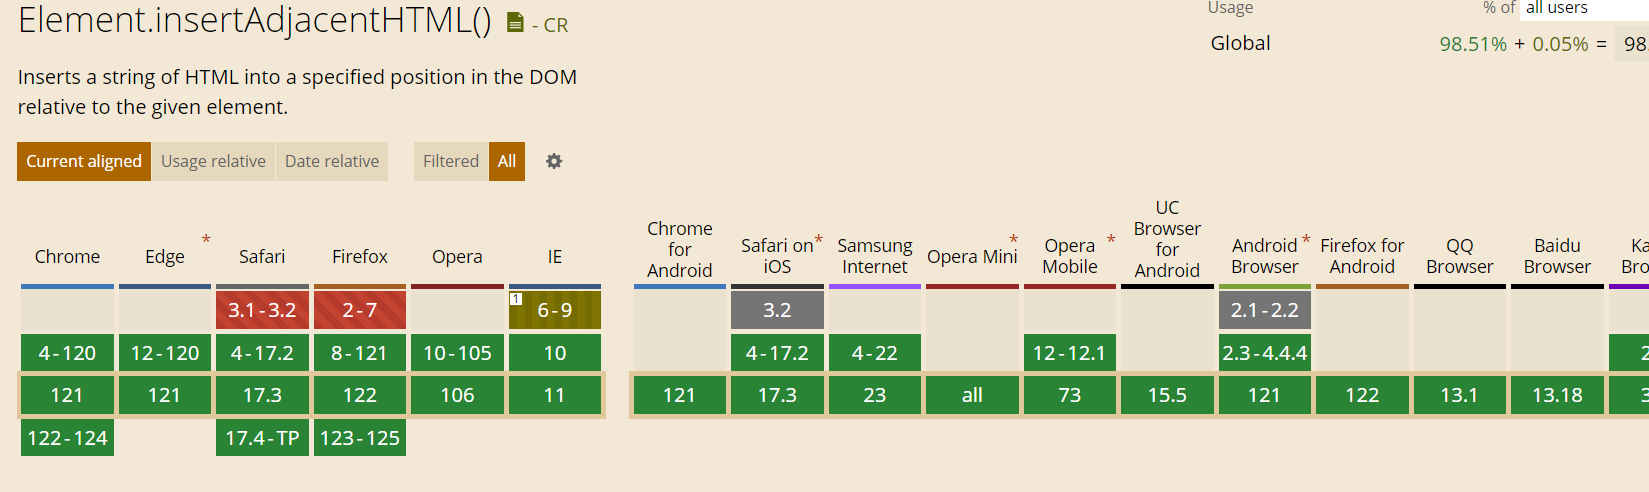 browser compatibility
- Edge: Supported across all versions.
- Chrome: Supported across all versions.
- Opera: Supported across all versions.
- Safari: Supported across all versions, except version 3.1-3.2
- Firefox: Supported across all versions, except version 2-7
Best Practices for Using the insertAdjacentHTML() Method
To effectively use the insertAdjacentHTML() method, here are some best practices to follow:
Understand the method
Understanding how the method works helps you specify the position to insert your HTML content. Understand the various positions and choose appropriately based on your requirements.
// Inserting the HTML content after the target element
document.getElementById('div').insertAdjacentHTML('afterend', '<div>New content before the target element</div>');
Use it sparingly
Overusing dynamic HTML element insertion methods is bad for code maintenance.
For a simple application, a direct DOM manipulation will do the job.
/ Consider Using this:
let newElement = document.createElement('div');
newElement.textContent = 'New element';
element.appendChild(newElement);


// Instead of this:
element.insertAdjacentHTML('beforeend', '<div>New element</div>');
Be conscious of performance
If you frequently insert large amounts of HTML content, manipulating the DOM can be expensive for performance. Try to minimize DOM updates, especially in performance scenarios:
// Consider using batch insertion:
let section = '';
data.forEach(item => {
  section += `<div>${item}</div>`;
});
element.insertAdjacentHTML('beforeend', section);


// Instead of inserting one by one in a loop:
data.forEach(item => {
  element.insertAdjacentHTML('beforeend', `<div>${item}</div>`);
});
Handling errors
When using the insertAdjacentHTML() method, if the HTML content you're trying to insert is invalid, the method may throw an error. Use try-catch blocks to handle these situations appropriately.
const div  = document.getElementById('div');

try {
    // Check if the value of div is true
    if (div.insertAdjacentHTML) {
        div.insertAdjacentHTML('beforeend', '<div>New Element</div>');
    } else {
        throw new Error('insertAdjacentHTML is not supported.');
    }
} catch (error) {
    // Handling the error

    console.error('Error:', error.message);


    // Alternate code
    div.innerHTML += '<div>Fallback: New Element</div>';
}
Conclusion
In this tutorial, you learned about the syntax and placement options of the insertAdjacentHTML() method. We also looked at browser compatibility, and some best practices while using the insertAdjacentHTML() method.