

JavaScript is a widely used web programming language. If you're getting into software engineering or coding in particular and you want to focus on web development, learning JavaScript is probably the best thing to do.
Learning JavaScript empowers you to create dynamic and interactive web experiences. And it lets you to bring websites and web applications to life by adding functionality, interactivity, and real-time updates for a better user experience.
I recently had a 30 Days of JavaScript Tips challenge on Twitter (now, X) where I shared 30 different JavaScript tips with my followers daily for 30 days. I decided to compile those tips into one giant tutorial for campers and everyone else on the internet. That's why you're reading this.
Whether you're just getting started with JavaScript or you're already a seasoned JavaScript developer, you will take something away from this article.
What We'll Cover
- Tip 1: Use
console.table()to Display Arrays and Objects in the Console - Tip 2: Use Template Interpolation to Render Strings Instead of the Assignment Operator
- Tip 3: Convert Strings to Numbers with Unary Plus and Number Constructor
- Tip 4: You Don’t Need to Declare Every Variable with a Keyword
- Tip 5: Use
console.group()with Multipleconsole.log()to Group Related Items to the Console - Tip 6: Style your Console Output with the
%cSpecifier - Tip 7: How
Math.floor(Math.random() * n1 + n2)Generates a Random Number Betweenn1andn2 - Tip 8: Methods of the Math Object
- Tip 9: Capitalize the First Letter of Any Word
- Tip 10: Destructure Arrays with Default Values to Avoid Getting
undefined - Tip 11: Use the Spread Operator to Copy and Merge Arrays
- Tip 12: Use Arrow Syntax to Write Shorter and More Elegant Functions
- Tip 13: Use Destructuring to Extract Properties from Objects
- Tip 14: Use the
startsWith()andendsWith()String Methods to Get the Start and End of a String - Tip 15: Use the
trim(),trimStart(), andtrimEnd()to Handle White Spaces - Tip 16: Use
replace()with thetoUpperCase()andtoLowerCase()Methods to Convert Between Cases - Tip 17: Use the
Array.from()Method to Create Arrays from Array-like Objects or Iterables - Tip 18: Use the
map()Method to Transform all the Elements of an Array - Tip 19: Use the
filter()Method to Filter Through Arrays - Tip 21: Use the Web Audio API to Work with Audio Files
- Tip 22: Use the Web Video API to Work with Video Files
- Tip 23: Preserve Object Integrity by Sealing and Freezing Them
- Tip 24: Use
async...awaitFor Asynchronous Operations - Tip 25: Clone Objects with the Spread Operator,
Object.assign(), andJSON.parse() - Tip 26: Remove Duplicates from an Array with Set and Map
- Tip 27: Map Through and Array and Flatten it with the
flatMap()Method - ip 28: Use the
padStart()andpadEnd()Methods to Pad a string with a Character - Tip 29: Use the
insertAdjacentHTML()method of DOM to Insert a String into the DOM - Tip 30: Use the
createTreeWalker()DOM Method to Traverse the DOM
Tip 1: Use console.table() to Display Arrays and Objects in the Console
console.log will display the array or object as usual, but console.table will tabularize the index and values for you.
Here's how it works with arrays:
const myArr = ['Kolade', 'Chelsea', 10, true];

console.log(myArr);
console.table(myArr);
Here's the output of console.log() and console.table():
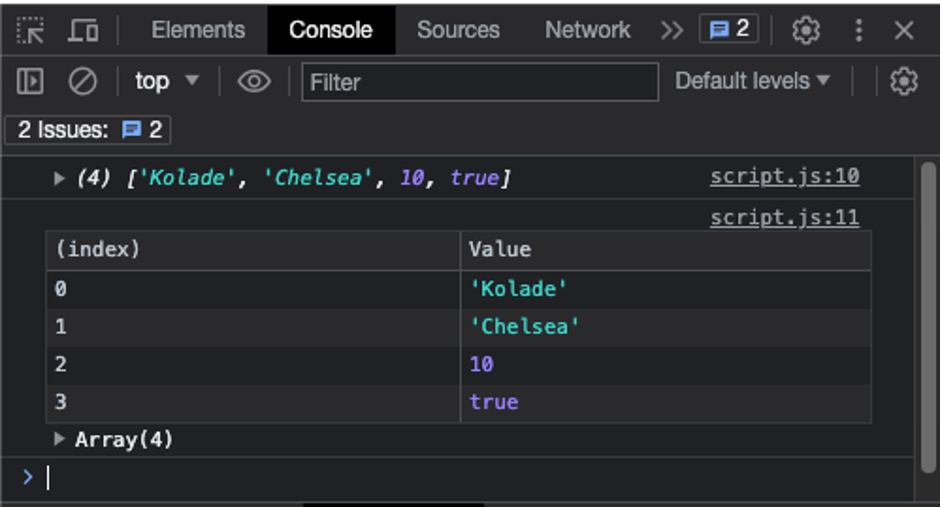
You can see that in addition to tabularizing the array for you, it also shows it the way a console.log() would show it.
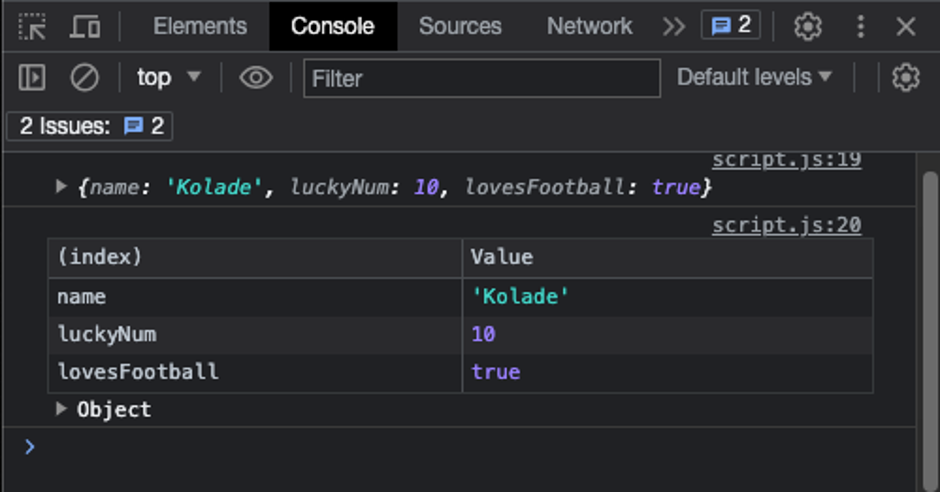
It works with objects the same way it works with arrays:
const myObj = {
  name: 'Kolade',
  luckyNum: 10,
  lovesFootball: true,
};

console.log(myObj);
console.table(myObj);
Tip 2: Use Template Interpolation to Render Strings Instead of the Assignment Operator
The template interpolation syntax is cleaner and more readable than the regular concatenation with plus (+). With template interpolation, you can conveniently embed variables in strings.
const name = 'John Doe';
const age = 20;

const plusConcat =
  'Hi there 👋🏽 \nMy name is ' + name + ' and I am ' + age + ' years old.';

const templateLiteralConcat = `Hi there 👋🏽 \nMy name is, ${name} and I am ${age} years old.`;
Tip 3: Convert Strings to Numbers with Unary Plus and Number Constructor
The unary plus operator (+) and number constructor (Number()) help you convert strings to numbers.
To convert the string to a number with unary, all you need to do is prepend the string with a plus sign. And to do it with the number constructor, wrap the number in Number()
const myNum = '5';

convertNum1 = +myNum;
convertNum2 = Number(myNum);

console.log(convertNum1, typeof convertNum1); // 5 'number'
console.log(convertNum2, typeof convertNum2); // 5 'number'
Tip 4: You Don’t Need to Declare Every Variable with a Keyword
Did you know that if you have multiple variables next to each other, you can avoid using const, let, or var to declare every variable after the first one?
The only caveat is that if you're declaring variables without a keyword, you must separate them with a comma (,) instead of a semi-colon.
This is it:
// declare multiple variables at once.
let x, y, z;

x = 1;
y = 2;
z = 3;

console.log(x, y, z); // 1, 2, 3

// declare other variables after the first one without the keyword.
const a = 'Hello',
  b = 'How are you today?',
  c = 'Are you coding today?';

console.log(a); // Hello
console.log(b); // How are you today?
console.log(c); // Are you coding today?
The above is the same as:
let x;
let y;
let z;

x = 1;
y = 2;
z = 3;

console.log(x, y, z); // 1, 2, 3

// declare other variables after the first one without the keyword.
const a = 'Hello';
const b = 'How are you today?';
const c = 'Are you coding today?';

console.log(a); // Hello
console.log(b); // How are you today?
console.log(c); // Are you coding today?
Tip 5: Use console.group() with Multiple console.log()s to Group Related Items to the Console
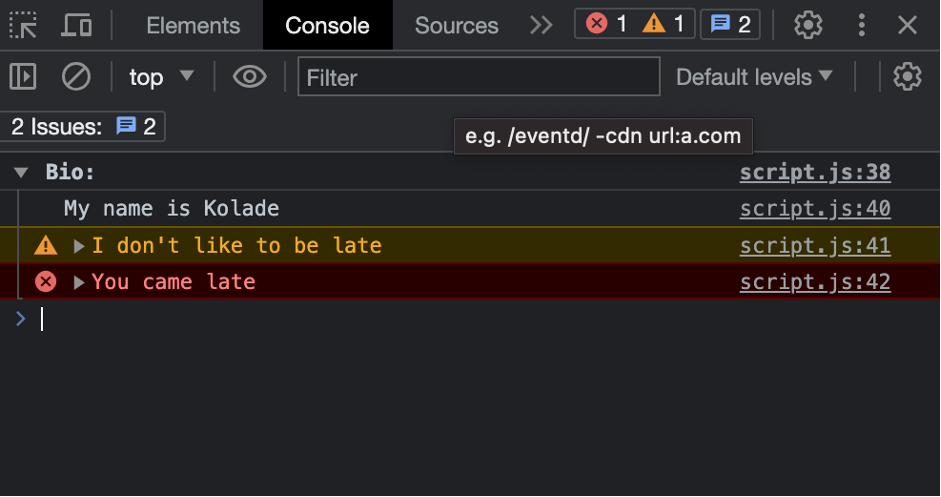
When you have multiple related items like username, bio, and so on and you want to log them to the console, you should use console.group() and console.groupEnd() to close the group.
This will give you a drop down list of all the items:
console.group('Bio:');

console.log('My name is Kolade');
console.warn("I don't like to be late");
console.error('You came late');

console.groupEnd();
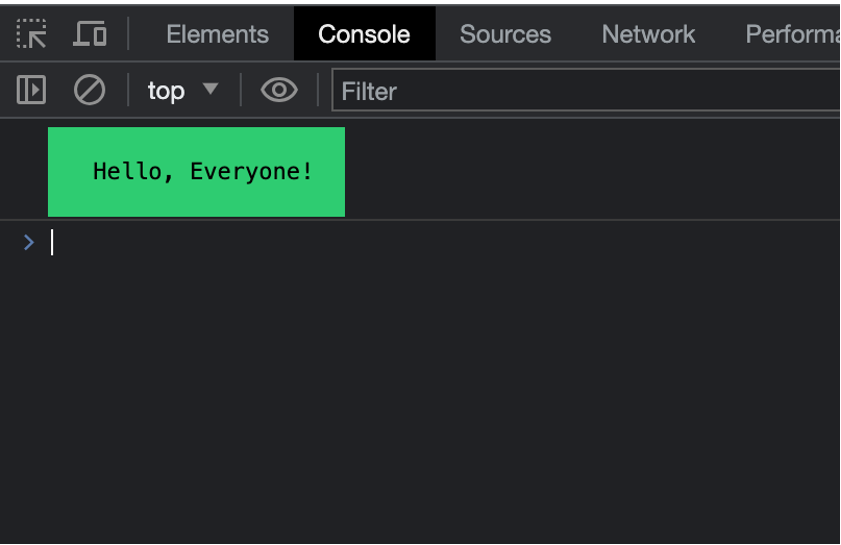
Tip 6: Style your Console Output with the %c Specifier
%c is not a part of JavaScript itself. It's a format specifier provided by modern browsers for styling the console. Whne you want to use it, it has to be the first parameter in the console.log() method.
You can set the styling you want to apply to the console:
const styles = `padding: 15px;
                background-color: #2ecc71;
                color: black`;

console.log('%c Hello, Everyone!', styles);
Or you can put it in directly:
console.log(
  '%c Hello, Everyone!',
  'padding: 15px; background-color: #2ecc71; color: black'
);
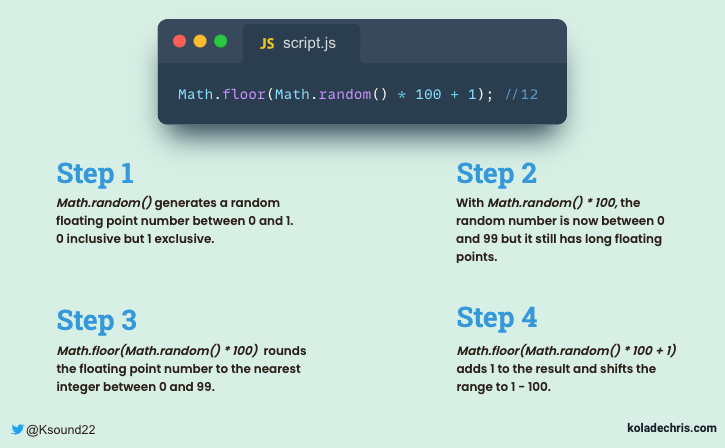
Tip 7: How Math.floor(Math.random() * n1 + n2) Generates a Random Number Between n1 and n2
You've probably seen how Math.floor(Math.random() * n1 + n2) creates a random number between 2 numbers. You could have even used it yourself. But how does it work?
For example, Math.floor(Math.random() * 100 + 1) would generate a random number between 100 and 1, after it follows these processes:
Math.random()generates a random floating point number between 0 and 1 –0inclusive but 1 exclusive- With
Math.random() * 100, the random number is now between0and99but still has long floating points Math.floor(Math.random() * 100)rounds the floating point number to the nearest integer between0and99Math.floor(Math.random() * 100 + 1)adds1to the result and shifts the range to1 - 100.
This infographic below also shows you how it works:
Tip 8: Methods of the Math Object
Here are several methods of the Math object and what they do:
let x;

// Get the square root of a number
x = Math.sqrt(9);

// convert a number to absolute value
x = Math.abs(-5); // 5

// Round up a number to the nearest whole number
x = Math.round(4.6);

// Round up a number
x = Math.ceil(4.2); // 5

// Round down a number
x = Math.floor(4.9); // 4

// Exponent of a number
x = Math.pow(2, 3); // 8

// Get the minimum number
x = Math.min(4, 5, 3); // 3

// Get the maximum number
x = Math.max(4, 5, 3); // 5

// Get a random number/decimal between 0 and 1
x = Math.random();

// Get a random number between 1 and 200
x = Math.floor(Math.random() * 200 + 1); // any number between and 200

console.log(x);
Tip 9: Capitalize the First Letter of Any Word
You can capitalize the first letter of any word by combining the chartAt(), toUpperCase(), and slice() methods.
With chartAt(0), you can get the first letter of the word and use the toUpperCase() method with it, then concatenate the rest of the letters with slice(1).
const str = 'john';
const capitalizedStr = (str) => str.charAt(0).toUpperCase() + str.slice(1);

console.log(capitalizedStr(str)); // John
console.log(capitalizedStr('doe')); // Doe
Tip 10: Destructure Arrays with Default Values to Avoid Getting undefined
If you destructure with a default value, and the expected value is not present in the array or object during destructuring, the default value will be used instead. This helps prevent errors and ensures that your code gracefully handles missing data.
This is how it works with arrays:
// Destructuring without default values
const fruits = ['Apple', 'Banana'];
const [firstFruit, secondFruit, thirdFruit] = fruits;

console.log(firstFruit); // Apple
console.log(secondFruit); // Banana
console.log(thirdFruit); // undefined

// Destructuring with default values
const [fruit1, fruit2, fruit3 = 'Orange'] = fruits;

console.log(fruit1); // Apple
console.log(fruit2); // Banana
console.log(fruit3); // Orange
And this is how it works with objects:
// Without default values
const person = { name: 'John Doe', age: 30 };
const { name, age, occupation } = person;
console.log(name); // John Doe
console.log(age); // 30
console.log(occupation); // undefined

// With default values
const { firstName = 'John', lastName = 'Doe', gender = 'Male' } = person;
console.log(firstName); // John
console.log(lastName); // Doe
console.log(gender); // Male
Tip 11: Use the Spread Operator to Copy and Merge Arrays
You can use the spread operator in various scenarios, such as copying arrays, merging arrays, cloning objects, and passing multiple arguments to functions.
Here's how to use it to copy and merge arrays:
const originalArray = [1, 2, 3];
const copiedArray = [...originalArray];

console.log(copiedArray); // [1, 2, 3]

// merge two or more arrays
const arr1 = [1, 2, 3];
const arr2 = [4, 5, 6];

const mergedArray = [...arr1, ...arr2];

console.log(mergedArray); // [1, 2, 3, 4, 5, 6
Here's how you can clone objects with it:
const originalObj = { name: 'John', age: 30 };
const clonedObj = { ...originalObj };

console.log(clonedObj); // { name: 'John', age: 30 }
And below is how you can use it to pass multiple arguments into any function:
function addNumbers(a, b, c) {
  return a + b + c;
}

const numbers = [10, 12, 8];
const sum = addNumbers(...numbers);

console.log(sum); // 30
Tip 12: Use Arrow Syntax to Write Shorter and More Elegant Functions
Arrow functions provide a shorter syntax compared to traditional function expressions and have some unique features. Understanding arrow functions is essential for modern JavaScript development.
// Traditional Function Expression
function add1(a, b) {
  return a + b;
}

// Arrow Function
const add2 = (a, b) => a + b;

console.log(add1(1, 2)); // 3
console.log(add2(5, 8)); // 13

// Using Traditional Function Expression
const numbers1 = [3, 4];
const numbers2 = [2, 8];

const squared1 = numbers1.map(function (num) {
  return num * num;
});

// Using Arrow Function
const squared2 = numbers2.map((num) => num * num);

console.log(squared1); // [ 9, 16 ]
console.log(squared2); // [ 4, 64 ]
Tip 13: Use Destructuring to Extract Properties from Objects
Object destructuring is a powerful feature in JavaScript. It allows you to extract properties from objects and assign them to variables in a more concise and readable way compared to the traditional dot notation way.
Here's how to extract properties with destructuring:
const person = {
  name: 'John Doe',
  age: 30,
  gender: 'male',
};

// Traditional way
const name2 = person.name;
const age2 = person.age;
const gender2 = person.gender;

console.log(name, age, gender); // John Doe 30 male

// with destructuring
const { name, age, gender } = person;

console.log(name, age, gender);
// John Doe 30 male
Tip 14: Use the startsWith() and endsWith() String Methods to Get the Start and End of a String
The startsWith() and endsWith() methods help you determine if a string begins or ends with a specific substring. Since they both return true or false, they are handy for various string manipulations and conditional checks.
Here's their basic usage:
const message = 'Hello world';

console.log(message.startsWith('H')); // true
console.log(message.startsWith('h')); // false
console.log(message.endsWith('d')); // true
console.log(message.endsWith('D')); // false
With the two methods, you can programmatically extract a certain text or filename, as you can see below:
const files = [
  'text.txt',
  'document.txt',
  'image.jpg',
  'script.js',
  'docs.txt',
];

// Get .txt files
const textFiles = files.filter((file) => file.endsWith('.txt'));
console.log(textFiles); [ 'text.txt', 'document.txt', 'docs.txt' ]
Both the startsWith() and endsWith() methods also support optional start and end positions to limit the range of the string where the check is performed:
const text = 'Welcome to freeCodeCamp';

console.log(text.startsWith('W', 0)); // true
console.log(text.startsWith('freeCodeCamp', 11)); // true
console.log(text.endsWith('f', 11)); // false
Tip 15: Use the trim(), trimStart(), and trimEnd() to Handle White Spaces
The trim() method gets rid of white spaces at both ends of the string. The trimStart() gets rid of white spaces at the start of the string. And trimEnd() removes white spaces at the end of the string.
These three methods are useful when you need to clean up user inputs or remove leading/trailing whitespace from strings.
const greet = '   Hello world!   ';
console.log(greet.trim());
// Hello world!

const greet2 = '   Hello world!   ';
console.log(greet2.trimStart());
// Output: 'Hello, world!   '

const text = '   Hello world!   ';
console.log(text.trimEnd());
// Output: '   Hello world!'

const input = '   ';
if (input.trim() === '') {
  console.log('The input is empty but has whitespace characters.');
} else {
  console.log('The input contains non-whitespace characters.');
}

// Output: The input is empty but has whitespace characters.
Tip 16: Use replace() with the toUpperCase() and toLowerCase() Methods to Convert Between Cases
The toUpperCase () and toLowerCase() methods convert a string to uppercase and lowercase, while replace() takes a string and replaces it with a specified string.
replace() can also take regular expressions. So you can tailor that regex for a particular part of the string then use the toLowerCase() and toUpperCase() methods to convert between cases.
In the code snippet below, I used the regex (^|\s)\w/ to look for the first word and every other word after a space, then convert them to uppercase letters:
function toTitleCase(str) {
  return str.toLowerCase().replace(/(^|\s)\w/g, (match) => match.toUpperCase());
}

console.log(toTitleCase('welcome to twitter (now x)!'));
// Welcome To Twitter (now X)!
I was also able to convert to snake_case by using the regex /\s+/g to look for every space and replace them with underscore (_)
function toSnakeCase(str) {
  return str.toLowerCase().replace(/\s+/g, '_');
}

console.log(toSnakeCase('Convert this to snake case'));
// convert_this_to_snake_case
Don’t forget you can convert to cases without replace() and regex:
function toSentenceCase(str) {
  return str.charAt(0).toUpperCase() + str.slice(1).toLowerCase();
}

console.log(toSentenceCase('hELLo TwEePs! HOW ARE YOU TODAY?'));
// Hello tweeps! how are you today?
If you want to learn more about regular expressions, you can read my book on them here for free.
Tip 17: Use the Array.from() Method to Create Arrays from Array-like Objects or Iterables
Array-like objects or iterables include the multiple arguments you pass to function, and the DOM items you select with the querySelectorAll() method, for instance, list items.
This is how I created an array from a function argument and used the reduce() array method on them:
function sumArguments() {
  // The "arguments" object is array-like
  const argsArray = Array.from(arguments);
  return argsArray.reduce((acc, num) => acc + num, 0);
}

const result = sumArguments(1, 2, 3, 4, 5);
console.log(result); // Output: 15
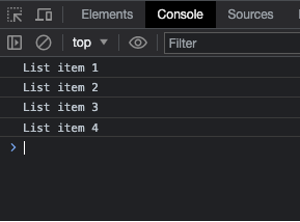
And this is how I created an array from from a set of list items selected with quersySelectorAll():
<ul>
   <li>List item 1</li>
   <li>List item 2</li>
   <li>List item 3</li>
   <li>List item 4</li>
</ul>
const listItems = document.querySelectorAll('li');
const itemsArray = Array.from(listItems);

itemsArray.forEach((item) => {
  console.log(item.textContent);
});
Tip 18: Use the map() Method to Transform all the Elements of an Array
The map() method is a higher-order array method. It allows you to transform elements of an array into new values, creating a new array with the same length as the original but with modified elements.
const numbers = [1, 4, 9, 16, 25];

const squareRoots = numbers.map((num) => Math.sqrt(num));
console.log(squareRoots); //[1, 2, 3, 4, 5]

const names = ['john', 'jane', 'smith'];

const capitalizedNames = names.map((name) => name.toUpperCase());
console.log(capitalizedNames); // ['JOHN', 'JANE', 'SMITH']
It is very common to use map() for showing items coming from an API or the ones you created yourself:
<ul id="item-list"></ul>
const items = ['Item 1', 'Item 2', 'Item 3'];

const itemList = document.querySelector('#item-list');

// Use map() to generate a list of <li> elements
const liElements = items.map((item) => {
  const li = document.createElement('li');
  li.textContent = item;
  li.style.color = 'crimson';
  return li;
});

// Append the <li> elements to the <ul>
liElements.forEach((li) => {
  itemList.appendChild(li);
});

Tip 19: Use the filter() Method to Filter Through Arrays
The filter() method is another array method that lets you create a new array with some elements that pass a specific test.
Here is a basic example in which I got all the even and odd numbers in an array:
const nums = [1, 2, 3, 4, 5, 6, 7, 8, 9, 10, 11, 12, 13, 14, 15];

const oddNums = nums.filter((num) => num % 2 !== 0);
const evenNumbers = nums.filter((num) => num % 2 === 0);

console.log(evenNumbers); // [2, 4, 6, 8, 10, 12, 14]
console.log(oddNums); // [1,  3,  5,  7, 9, 11, 13, 15]
And here is a more complex example where I got all products less than $500:
const products = [
  { id: 1, name: 'Laptop', price: 1000 },
  { id: 2, name: 'Phone', price: 500 },
  { id: 3, name: 'Tablet', price: 300 },
  { id: 4, name: 'Headphones', price: 100 },
];

const cheapProducts = products.filter((product) => product.price < 500);

console.log(cheapProducts);
/*
[
  { id: 3, name: 'Tablet', price: 300 },
  { id: 4, name: 'Headphones', price: 100 }
]
*/
Tip 20: Use the forEach() Method to Loop Through Arrays
The forEach() method provides a cleaner and more expressive way to loop through arrays compared to traditional for loops.
const fruits = ['apple', 'banana', 'orange'];

// with for loop
for (let i = 0; i < fruits.length; i++) {
  console.log(fruits[i]);
}

// with forEach() – cleaner!
fruits.forEach((fruit) => {
  console.log(fruit);
});

/*
Output:
apple
banana
orange
*/
Tip 21: Use the Web Audio API to Work with Audio Files
The Web Audio API provides methods and properties for playing, pausing, controlling volume, and performing other audio-related tasks.
To play audio files or create a music player with the audio API, you have to use it in combination with the audio tag (<audio>).
Here's how I play, pause, and control the volume of a song:
<h1>Audio API</h1>

<audio id="my-audio" src="audio-file.mp3"></audio>
<div id="controls">
    <button id="play">Play</button>
    <button id="pause">Pause</button>
    <input type="range" id="volume" min="0" max="1" step="0.01" value="1" />
</div>
const audioElement = document.querySelector('#my-audio');
const playBtn = document.querySelector('#play');
const pauseBtn = document.querySelector('#pause');
const volume = document.querySelector('#volume');

// play audio with the play() method
playBtn.addEventListener('click', () => audioElement.play());

// pause audio with the pause() method
pauseBtn.addEventListener('click', () => audioElement.pause());

//adjust volume with the volume property
volume.addEventListener('change', () => (audioElement.volume = volume.value));
Read more on the web audio API on MDN.
Tip 22: Use the Web Video API to Work with Video Files
The web video API lets you play video files with themethods and properties built in to it.
Just like the audio API, you can play, pause, control volume of a video with the video API. You also have to use it in combination with the video tag (<video>).
<h1>Video API</h1>

<video id="my-video" src="video-file.mp4" poster="snail.jpg" width="500"
</video>

<div id="controls">
     <div id="current-time"></div>
     <button id="play">Play</button>
     <button id="pause">Pause</button>
</div>
const videoElement = document.querySelector('#my-video');
const playBtn = document.querySelector('#play');
const pauseBtn = document.querySelector('#pause');
const videoTime = document.querySelector('#current-time');

// play video with the play() method
playBtn.addEventListener('click', () => videoElement.play());

// pause video with the pause() method
pauseBtn.addEventListener('click', () => videoElement.pause());

// show video time with the currentTime property
videoElement.addEventListener('timeupdate', () => {
  videoTime.innerText = videoElement.currentTime.toFixed(2);
});
Read more on the web video API on MDN.
Tip 23: Preserve Object Integrity by Sealing and Freezing Them
To avoid tampering with your objects, you can seal them with Object.seal and freeze them with Object.freeze().
When you seal an object, you won't be able to add and remove properties anymore:
const person1 = {
  name: 'Kolade',
  luckyNum: 10,
  footballFan: true,
  club: 'Chelsea',
};

// seal the object with Object.seal()
Object.seal(person1);

console.log(person1.name); // Kolade

person1.favPet = 'Cat'; // You can't add entries to a sealed object
console.log(person1.favPet); // undefined

delete person1.club; // You can't remove entries from a sealed object
console.log(person1.club); // Chelsea

// You can still edit the property values
person1.name = 'Kolade Chris';
console.log(person1.name); // Kolade Chris

// check if the object is sealed and frozen with isSealed() and isFrozen()
console.log(Object.isSealed(person1)); // true
console.log(Object.isFrozen(person1)); // false
When you freeze an object, you can't add entries, and the object is sealed as well. This means you can't add to it and remove from it:
const person2 = {
  name: 'Jane',
  luckyNum: 11,
  footballFan: true,
  club: 'Man United',
};

// freeze the object with Object.freeze()
Object.freeze(person2);

console.log(person2.name); // Jane

person2.favPet = 'Cat'; // You can't add entries to a frozen object
console.log(person2.favPet); // undefined

person2.name = 'Jane Doe';
console.log(person2.name); // Jane – nothing changes

delete person2.club; // You can't remove entries from a frozen object
console.log(person2.club); // Man United

// check if the object is frozen and sealed with isFrozen() and isSealed()
console.log(Object.isFrozen(person2)); // true
console.log(Object.isSealed(person2)); // true
// isSealed() returns true because a frozen object is also a sealed object
The difference between Object.freeze() and Object.seal() is that Object.seal() allows you to modify the entries while Object.freeze() does not. This makes Object.freeze() stronger.
Tip 24: Use async...await For Asynchronous Operations
The async await syntax is more straightforward and cleaner to work with. So, instead of chaining multiple .then() while working with asynchronous data or operations that return a Promise, you should use async await.
Here's what chaining multiple .then()s looks like:
function fetchData1() {
  fetch('https://jsonplaceholder.typicode.com/users')
    .then((res) => res.json())
    .then((data) => console.log(data))
    .catch((error) => console.error(`There was an error: ${error}`));
}
Here's how you can refactor the same code to use async await:
async function fetchData2() {
  const response = await fetch('https://jsonplaceholder.typicode.com/users');
  const data = await response.json();
  console.log(data);
}
You can't use catch() with async await, so you should use try catch to handle errors:
async function fetchData3() {
  try {
    const response = await fetch('https://jsonplaceholder.typicode.com/users');
    const data = await response.json();
    console.log(data);
  } catch (error) {
    console.error(`There was an error: ${error}`);
  }
}
You can also use arrow functions with async await:
const fetchData4 = async () => {
  try {
    const response = await fetch('https://jsonplaceholder.typicode.com/users');
    const data = await response.json();
    console.log(data);
  } catch (error) {
    console.error(`There was an error: ${error}`);
  }
};
Tip 25: Clone Objects with the Spread Operator, Object.assign(), and JSON.parse()
There are several ways and hacks with which you can clone objects, but the most commonly used ways are using the spread syntax (…), Object.assign() and JSON.parse().
const originalObject = {
  name: 'Kolade',
  luckyNum: 10,
  isFootballFan: true,
  club: 'Chelsea',
};

// clone with spread operator
const clonedObject1 = { ...originalObject };

// clone with Object.assign()
const clonedObject2 = Object.assign({}, originalObject);

// deep cloning with JSON.stringify() and JSON.parse()
const clonedObject3 = JSON.parse(JSON.stringify(originalObject));
console.table(clonedObject1);
console.table(clonedObject1);
console.table(clonedObject1);
You can also create a deep clone of an object with the structuredClone(). structuredClone() was added to the JavaScript language in ECMAScript 2019.
const clonedObject4 = structuredClone(originalObject);
console.table(clonedObject4);
Read more about the structuredClone() method on MDN.
Tip 26: Remove Duplicates from an Array with Set and Map
Set and Map are built-in data structures for storing collections of values, each with their own specific characteristics and use cases.
Both Set and Map do not allow duplicate values, so you can use them to remove duplicates from an array by spreading the array into them:
// create unique arrays with Set()
const arrayWithDuplicates = [1, 2, 2, 3, 4, 4, 5];
const uniqueArray = [...new Set(arrayWithDuplicates)];

console.log(uniqueArray); // [1, 2, 3, 4, 5]

// create unique arrays with Map()
const fruitsWithDuplicates2 = [
  'Mango',
  'Cashew',
  'Barley',
  'Mango',
  'Barley',
  'Berry',
  'Cashew',
];
const uniqueFruitsWithDuplicates2 = [
  ...new Map(fruitsWithDuplicates2.map((item) => [item, true])).keys(),
];

console.log(uniqueFruitsWithDuplicates2);
// [ 'Mango', 'Cashew', 'Barley', 'Berry' ]
Tip 27: Map Through and Array and Flatten it with the flatMap() Method
If you want to map through a multidimensional array and you want to make sure all deeply nested items are aggregated into a single array, you can use the flatMap() method. This will flatten the array and map through it as well.
This is how you can achieve that by chaining .flat() to .map():
const numbers = [1, 2, 3, 4, 5];

const doubledAndSquared = numbers.map((num) => [num * 2, num * num]);
const flattenedArr = doubledAndSquared.flat();

console.log(doubledAndSquared); // [ [ 2, 1 ], [ 4, 4 ], [ 6, 9 ], [ 8, 16 ], [ 10, 25 ] ]
console.log(flattenedArr); //  [2, 1, 4, 4, 6, 9, 8, 16, 10, 25]
And this is how you can use flatMap() to do the same thing:
// combine map and flat
const combinedMapAndFlat = numbers.flatMap((num) => [num * 2, num * num]);

console.log(combinedMapAndFlat); // Output: [2, 1, 4, 4, 6, 9, 8, 16, 10, 25];
How cool is that?
Tip 28: Use the padStart() and padEnd() Methods to Pad a string with a Character
The padStart() and padEnd() are string methods that allow you to pad a string with a specified character to reach a target length. These methods are particularly handy for formatting strings and aligning text in columns.
Here is the basic usage:
const originalString = 'Hello';
const paddedString = originalString.padStart(10, '*');
console.log(paddedString); // *****Hello

const originalString2 = 'World';
const paddedString2 = originalString2.padEnd(10, '-');
console.log(paddedString2); // World-----

// combine both padStart() and padEnd()
const text = 'Hello';
const paddedText = text.padStart(10, '-').padEnd(15, '+');
console.log(paddedText); // -----Hello+++++
Here's how you can use both methods to align items in the console:
const products = [
  { name: 'Apples', price: 1.5 },
  { name: 'Bananas', price: 0.75 },
  { name: 'Oranges', price: 2 },
];

console.log('Product      Price');
console.log('-------------------');

products.forEach(({ name, price }) => {
  const paddedName = name.padEnd(10, ' ');
  const formattedPrice = price.toFixed(2).padStart(8, ' ');
  console.log(`${paddedName}${formattedPrice}`);
});

/*
Output:

Product      Price
-------------------
Apples        1.50
Bananas       0.75
Oranges       2.00
*/
And a better usage is formatting the time of a music or video player in the 00:00 of 00:00 format:
function formatTime(currentTime, totalTime) {
  // Helper function to pad a number with leading zeros
  const padWithZero = (num) => num.toString().padStart(2, '0');

  // Format current time in minutes:seconds
  const formattedCurrentTime = `${padWithZero(
    Math.floor(currentTime / 60)
  )}:${padWithZero(Math.floor(currentTime % 60))}`;

  // Format total time in minutes:seconds
  const formattedTotalTime = `${padWithZero(
    Math.floor(totalTime / 60)
  )}:${padWithZero(Math.floor(totalTime % 60))}`;

  // Combine formatted current time and total time with "of" in between
  return `${formattedCurrentTime} of ${formattedTotalTime}`;
}

// Example time values
const currentTimeInSeconds = 125; // Example of a current time in seconds
const totalTimeInSeconds = 3600; // Example of a total time in seconds

// Format the time and display the result
const formattedTime = formatTime(currentTimeInSeconds, totalTimeInSeconds);
console.log(formattedTime); // 02:05 of 60:00
Tip 29: Use the insertAdjacentHTML() method of DOM to Insert a String into the DOM
The insertAdjacentHTML() method of the DOM lets you insert a string of HTML at a specified position relative to a given element. This position could be 'beforeend', 'afterend', 'beforebegin', or 'afterbegin'.
Here's how it works:
<div id="content">
   <p>This is an example.</p>
</div>

<button id="add-button">Add Paragraph</button>
const addButton = document.getElementById('add-button');
const content = document.getElementById('content');

addButton.addEventListener('click', () => {
   const newParagraphHTML = '<p>This is a new paragraph.</p>';
   content.insertAdjacentHTML('afterend', newParagraphHTML);
});
Tip 30: Use the createTreeWalker() DOM Method to Traverse the DOM
The createTreeWalker() method allows you to traverse through the nodes of the DOM tree and perform actions on them based on specific criteria.
This method can be useful for complex document structures or specialized traversal needs.
<div id="content">
<p>This is a <span>paragraph</span> with some <em>emphasis</em>.</p>
<ul>
    <li>List item 1</li>
    <li>List item 2</li>
    <li>List item 3</li>
    <li>List item 4</li>
</ul>
</div>
Use createTreeWalker() to traverse and show all text nodes:
const content = document.getElementById('content');
const treeWalker = document.createTreeWalker(content, NodeFilter.SHOW_TEXT);

let node;
while ((node = treeWalker.nextNode())) {
  console.log(node.nodeValue.trim());
}

N.B: White spaces qualify as a text node – that's why you can see the spaces in the output
Conclusion
Every code example in this article is from my 30 Days of JavaScript challenge on Twitter (now, X). You can checkout my Twitter profile.
I hope these tips help you understand some nuances of JavaScript and let you get some things done in your web projects.