

Hey {username}, we've merged a PR before yours. Please resolve the merge conflicts so we can review and merge your PR.
Have you ever received that kind of message from a maintainer while waiting for your pull request to be reviewed and merged? And then, you're panicking because you don't know what to do? Or maybe you're thinking of closing your pull request, redoing everything from scratch, and opening a new pull request?
Well, the good news is you're not alone.
In this article, I will show you how to keep your remote and local branches up to date. I'll also walk you through resolving merge conflicts in GitHub and VS Code.
Table of Contents
- Prerequisites
- Understanding Merge Conflicts
- How to Keep the Branches Up to Date
- How to Resolve Merge Conflicts
- Final Words
Prerequisites
To follow along with this tutorial, you'll need the following:
Understanding Merge Conflicts
Merge conflicts usually occur when two commits have changes in the same line(s) of the same file(s) from two different branches. Sometimes, it can also happen when someone edits a file, and another person deletes it.
The thing is, Git can't resolve the conflict itself. It needs your help to decide which changes need to be kept.
When there's a merge conflict, you will see a notification in your pull request on GitHub that the branch has conflicts that must be resolved. Maintainers can't merge a pull request when merge conflicts happen. That's because the merge button is deactivated until the conflicts are resolved.
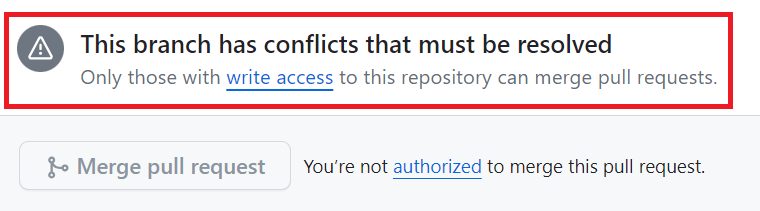 Warning on a GitHub's pull request: This branch has conflicts that must be resolved
How to Keep the Branches Up to Date
Keeping your branches up to date is crucial. Habitually updating your remote and local main and working branches is highly recommended.
The best times to update your branches are:
- before you create a new branch to work on an issue,
- after you commit your last changes and before you push them to the remote repo,
- while you are waiting for your pull request to be reviewed.
When a pull request gets merged while you wait for yours to be reviewed, there will be a warning in your pull request. It tells you that your branch is behind the upstream (original) repository's main branch.
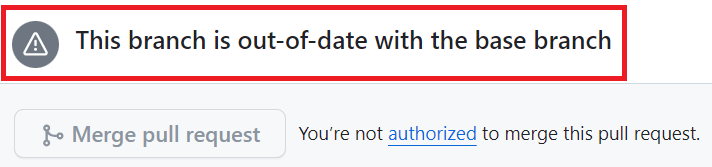 Warning on a GitHub pull request: This branch is out-of-date with the base branch.
How to Update the main Branch in Your Forked Repository
- Go to your forked repository on GitHub.
- Click the "Sync fork" button.
- Click the green "Update branch" button.
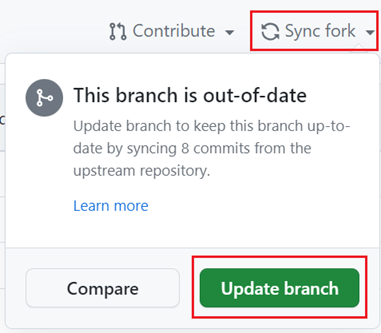 "Sync fork" and "Update branch" buttons on GitHub.
After you update the branch, you will see a notification on the top that your branch is up to date.
 A notification on GitHub: This branch is up to date with organization-name/repository-name:main.
How to Update Your Local Branch
Now, your remote main branch has been updated. Let's update your local branch from your terminal.
Step #1 - Go to Your Working Branch
In your terminal, navigate to your working branch with this command:
git checkout branch-name
Step #2 - Pull the Changes
Pull the latest changes from the main branch of your origin (forked) repository to your local branch.
git pull origin main
Step #3 - Push the Changes
Push these changes to your remote branch. If you need to resolve conflicts, you must fix them before you can push your changes.
git push
How to Resolve Merge Conflicts
You can only start to resolve the merge conflicts after your working branch is up to date. There are two ways to resolve the conflicts:
- On GitHub
- In your VS Code
1. Resolving Merge Conflicts on GitHub
Resolving the conflicts directly on GitHub is only possible when the cause of the conflicts is that there are changes in the same line(s) of the same file(s) from two different branches. For any other type of conflicts, you must resolve them locally in your code editor.
Follow these steps to resolve conflicts directly on GitHub:
Step #1 - Click the "Resolve conflicts" Button
First, go to the upstream repository on GitHub. Then, click the "Pull request" tab. Find and open your pull request, and scroll down.
Towards the end, you will find the "Resolve conflicts" button.
 A notification of "This branch has conflicts that must be resolved" and a "Resolve conflicts" button on GitHub.
Step #2 - Take a Closer Look at the Conflicts
After clicking the "Resolve conflicts" button, you will be redirected to GitHub's conflict editor.
 GitHub's conflict editor
You can see the file(s) that has conflicts on the left sidebar. On the top bar, you can find the number of conflicts in the file. And in the file itself, there are conflict markers <<<<<<<, =======, and >>>>>>>.
The lines between <<<<<<< branch-name and ======= are your changes. Anything between ======= and >>>>>>> main are the changes from the main branch of the upstream repository.
You need to look at the conflicts and decide which one you want to keep or if you need to make entirely new changes.
Step #3 - Resolving the Conflicts
After you decide how you want to resolve the conflicts, delete the conflict markers <<<<<<<, =======, >>>>>>>. Then you can make the changes. If there are several conflicts in the file, scroll down and resolve them before you mark them as resolved.
Once you resolved all conflicts, click the "Mark as resolved" button at the top bar.
 "Mark as resolved" button on GitHub.
If there are conflicts in another file(s), go to the file by clicking the file name at the left sidebar. And then repeat the same steps to resolve the conflicts.
Step #4 - Click the "Commit merge" Button
After all conflicts in all conflicting files have been marked as resolved, a green "Commit merge" button will appear on the top right. Click the button to commit your changes.
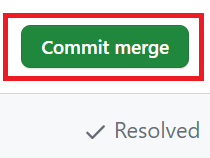 A "Commit merge" button on GitHub.
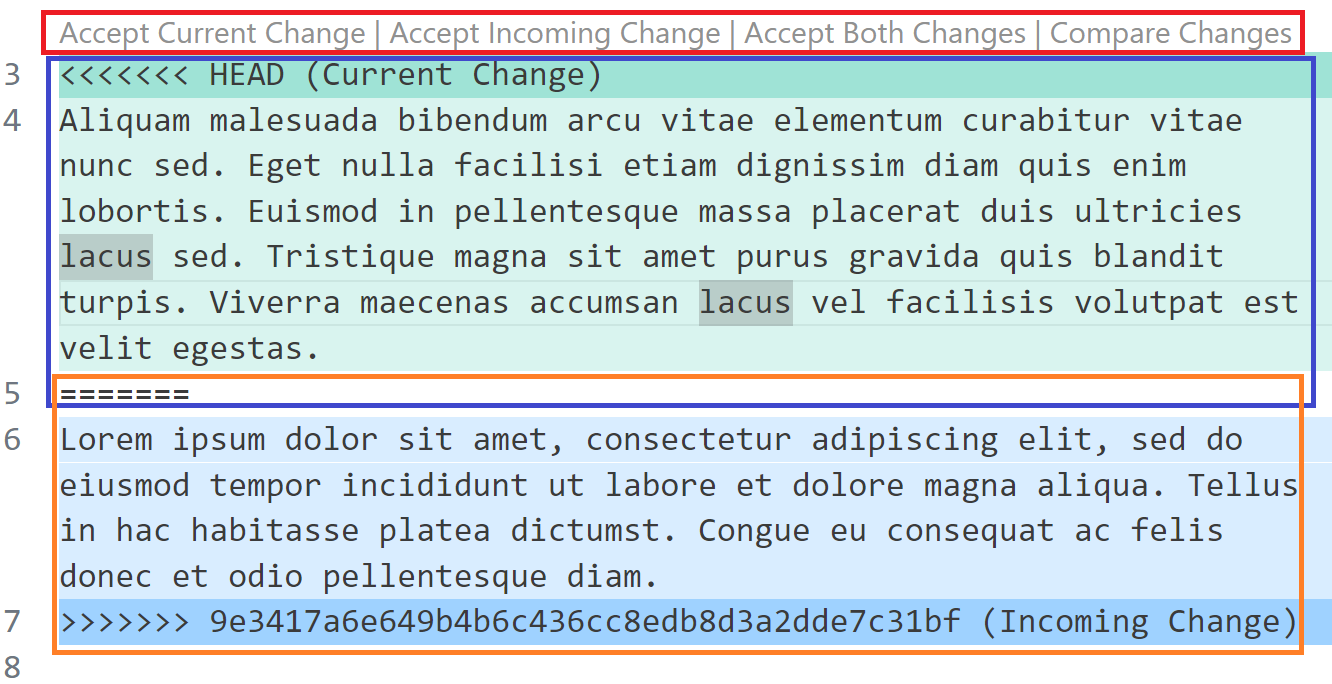
2. Resolving Merge Conflicts in VS Code
After you pulled the latest changes from the main branch of your forked repository, you will see line(s) between the conflict markers <<<<<<<, =======, and >>>>>>>.
You will also see the options for resolving the conflicts:
- Accept Current Change: When you want to keep only your changes.
- Accept Incoming Change: When you want to keep only the changes from the
mainbranch. - Accept Both Changes: When you wish to keep yours and the incoming changes.
 Merge conflicts on VS Code.
The line(s) between <<<<<<< HEAD (Current Change) and ======= are your changes. And anything between ======= and >>>>>>> hash-numbers (Incoming Change) are changes from the main branch of your forked repository.
Follow these steps to resolve the conflicts in VS Code:
Step #1 - Resolving the Conflicts
Take a closer look at the conflicts between the conflict markers. Then, you need to decide how you want to resolve the conflicts.
- You can manually delete the markers
<<<<<<<,=======,>>>>>>>and make the changes.
OR
- You can choose and click one of the acceptance options on the top and modify the changes based on your needs.
Undo the Merging
If at one point you feel confused and want to undo the merge and redo everything from scratch, run the git merge --abort command before committing your changes. It will abort the merge and return your file to the state before the conflicts.
Step #2 - Commit Your Changes
Once you finished resolving the conflicts, you must commit your changes. Run this command to automatically stage and commit the changes:
git commit -am "Your message"
Understanding git commit -am Command
The command git commit -am is different from running git add . followed by git commit -m.
Running git add . will add all files (including newly created files) to the staging area. While adding the -a flag to the git commit, it will automatically stage any files you have committed before. It includes staging deleted tracked files but will not stage newly created files.
So, combining the -a with -m flag to git commit allows you to skip the staging phase and directly write the message for the commit.
Step #3 - Push Your Changes
Now, you can push your changes to the remote branch with the following command:
git push
Final Words
If you liked and found this article helpful, please share it with others. You can find other works on my blog, and let's connect on X (formerly Twitter) or LinkedIn.