By Pavel Vlasov
Have you ever wanted to learn some advanced React patterns? Or build your own game engine? If at least one answer is yes, then this article is for you.
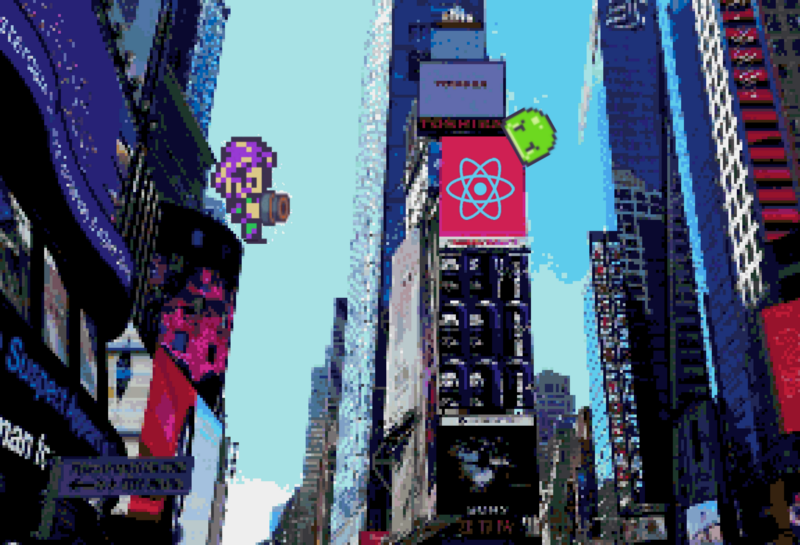
In this tutorial, you’ll learn how to build basic sprite animation using React, styles-components, and requestAnimationFrame. At the end you’ll be able to create characters like this:

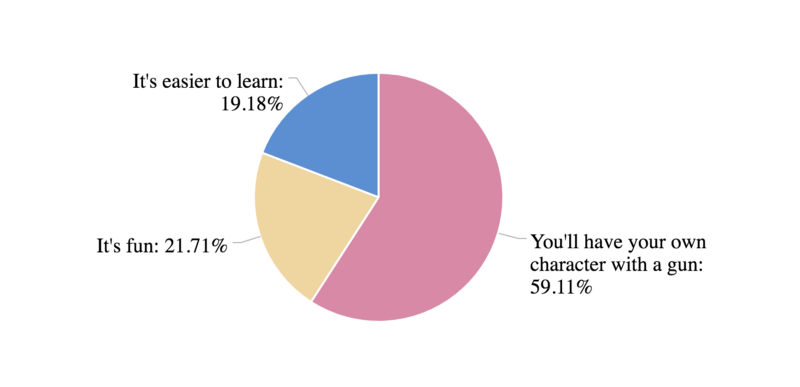
You may ask me why can’t I learn it another way? Well… There’re three reasons for that:
So, let’s do it! ?
Let’s start with a bit of a theory
What is a sprite animation? Wikipedia says that
In computer graphics, a sprite is a two-dimensional bitmap that is integrated into a larger scene.
So basically sprite animation is a repeatedly changing two-dimensional bitmap.
Sprite is usually represented like a png image with different states of the animation:
 Bitmap image
We’ll start by creating a tile component that will show us one frame at a time and allow us to change frames with state property:

Basically, we’ll need to show one part of the image at a time and hide the rest. Pretty straightforward.
Tile
First of all, we’ll create a container component to create the shape of our frame:
width and height represent the size of the tale, and scale increases the size of the image. overflow: hidden will hide the unused part of the image and transform-origin will make a container to keep its top and left the same when we scale it.
Now we need to adjust the position of the inner image. We’ll use the transform: translate CSS property for that:
Now let’s combine everything together in the tile component:
srcproperty contains a link to the imagetileis the object withwidthandheightfields, represents the size of the tilestateframe indexscaleproperty to increase the size of the image (For example,scale = 2is 2x image)
In the next step, we’ll add some movement to our image.
Sprite
We’ll use requestAnimationFrame for that. You may ask why we don’t use setTimeout or setInterval. The problem with timeouts is that the callback will fire somewhere in between frames, that may result in clunky animation.
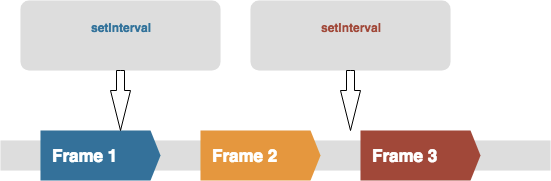 requestAnimationFrame vs setInterval
Also, requestAnimationFrame allows us to synchronize animations of different objects on the screen. In the game you’ll have lots of them!
Let’s put together a Sprite component:
In the animate function, we should change the state of the frame and request a new animation frame:
We use the eframesPerStep property to control the number of states per frame, so our animation won’t be too fast.
What about a gun? ?
Now the only thing we need to do is combine our sprite with the gun image:
And you should get the following result:

The best way to learn something it to build it by yourself. So I encourage you to use this codesandbox:
The TypeScript version is available here as well.
As a bonus, you can implement different animations using files from the assets folder.
You can find the source code here. I used game assets made by finalbossblues.
Hope you enjoyed the article! ?
Follow me on Medium and Twitter to get more updates on new articles. Also, share this article to help others know about it. Sharing is caring ?
Destroy this clap button if you want more.
You can clap up to 50 times! ?
Some more resources about the topic:
Understanding JavaScript's requestAnimationFrame() method for smooth animations
_requestAnimationFrame() is a JavaScript method for creating smoother, less resource intensive JavaScript animations…_www.javascriptkit.com
Originally published at react.camp.