

Welcome to my comprehensive guide on Git, the distributed version control system that has revolutionized collaboration and code management in software development.
Whether you're a seasoned developer or just starting your journey in programming, understanding Git is essential to gain proper control over your code, efficiently managing your projects and collaborating with others.
In this tutorial, I'll take you through the fundamentals of Git, covering everything from its basic workflow to advanced branching strategies and rebasing techniques.
By the end of this guide, you'll have a solid understanding of Git's core concepts and be confident and well equipped with the skills to effectively use it in your development workflow.
Prerequisites:
All you need to bring to the table is a curious and eager-to-learn mindset. This guide is crafted with beginners in mind, so no prior knowledge of version control systems or programming is required. Whether you're a complete novice or have some experience with coding, you'll find this tutorial accessible and easy to follow.
Table of Contents:
- What is Git?
– Difference from other version control systems
– The Three States and Basic Git Workflow - First-Time Git Setup
- Get Help in Git
- How to Get a Git Repository
– Initialize a Repository in an Existing Directory
– Clone an Existing Repository in Git - How to Record Changes to the Repository
- View Commit History in Git
- Undo Things in Git
- Remote Repositories in Git
- Tagging in Git
- Git Aliases
- Git Branching
– Create a New Branch in Git
– Understanding Branches
– Switch to Another Branch in Git
– Visualise Branches in Git - How to Manage Branches in Git
– Managing Merged Branches
– Renaming Branches
– Changing the Default Branch Name - Branching Workflow
- Rebasing in Git
- Conclusion
What is Git?
Git is a distributed version control system that helps you and your team collaborate effectively while keeping your project's history safe. It's like having a time machine for your code!
What makes Git different from other Version Control Systems?
Conceptual Difference:
The big thing that sets Git apart from other tools is how it thinks about data. Instead of storing changes to files, Git thinks of its data as a series of snapshots of your project, means, every time you make a change and save it (commit), Git takes a snapshot of all your files at that moment. If a file hasn't changed, Git just keeps a link to the previous identical file.
Local Operations:
With Git, most things you do don't need a connection to a server. Because you have the entire project history on your computer, operations are super fast. You can browse project history or see changes between versions without waiting for a server.
Data Integrity:
Git makes sure nothing gets lost or corrupted. Every file and directory is checksummed, and Git knows if anything changes.
Git uses a SHA-1 hash, a unique code for each version of a file. If any changes are made to the content, even a single character, it will result in a different SHA-1 hash.
Append-Only Model:
In Git, almost everything adds data to the project, making it hard to accidentally lose information. Once you commit changes, they are safely stored. Experimenting is less risky with Git.
The Three States and Basic Git Workflow
Understanding Git's three states—modified, staged, and committed—is essential for effective version control:
- Modified: Changes made to files in your Working tree that are not yet committed.
- Staged: Modifications marked for the next commit in the Staging area to be included in next commit.
- Committed: Changes permanently stored in the local Git directory.
Basic Git Workflow:
- Modify files in your working tree.
- Stage changes you want to include in the next commit.
- Commit changes, which permanently saves snapshots to the Git directory.
First-Time Git Setup
Setting up Git for the first time involves customizing your Git environment to suit your preferences. But first, you'll need to download Git from Git - Downloads or use the Chocolatey package. Then just follow the installation instructions and you should be good to go.
Git Configuration
We use the git config tool to customize our Git environment. This tool allows us to both retrieve and set configuration variables that dictate how Git operates. These variables can be stored in three different locations:
- System-wide Configuration:
Stored in the/etc/gitconfigfile, these settings apply to all users on the system and all repositories. We can interact with this file using the--systemoption withgit config. - User-specific Configuration:
Stored in~/.gitconfigor~/.config/git/config, these values are specific to you as a user. We can interact with this file using the--globaloption withgit config, affecting all repositories you work with on your system. - Repository-specific Configuration:
Stored in the.git/configfile within a specific repository, these settings override global configurations and apply only to that repository.
Each level of configuration overrides values from the previous level. For instance, values in .git/config will override those in ~/.gitconfig.
To view all configuration settings and their sources/origins:
$ git config --list --show-origin
How to Configure your identity in Git:
Identity in Git is used for attributing commits properly. Let's set up your user name and email address.
$ git config --global user.name "Your Name"
$ git config --global user.email "your.email@example.com"
If you need to override this for specific projects, you can omit the --global option when setting the values, and they'll only apply to that particular repository.
How to Configure Your Default Text Editor
After configuring your identity, it's important to set up your default text editor in Git. This text editor will be used when Git needs you to input messages, such as when writing commit messages or resolving merge conflicts.
By default, Git uses your system's default text editor. However, if you prefer to use a different text editor, such as Emacs, you can set it up like this:
$ git config --global core.editor "emacs"
On Windows systems, setting up a different text editor requires specifying the full path to its executable file. For example, if you want to use Notepad++, you might use a command like this:
$ git config --global core.editor "'C:/Program Files/Notepad++/notepad++.exe' -multiInst -notabbar -nosession -noPlugin"
Make sure you provide the correct path to the executable file of your text editor.
By the way, these – "-multiInst -notabbar -nosession -noPlugin" – are options used to customize the behavior of Notepad++ when it is launched by Git.
How to Change default branch name in Git (optional):
By default, when you initialize a new repository with git init, Git creates a branch named master. But from Git version 2.28 onwards, you have the option to set a different name for the initial branch.
$ git config --global init.defaultBranch main
How to Check Configuration/settings in Git:
You can view your Git configuration using:
$ git config --list
$ git config user.name  # To check a specific setting (e.g., user name):
The git config --list command lists all the configuration settings Git can find at that moment.
How to Get Help in Git
There are three equivalent ways to get detailed help for any Git command:
- Git Help Command:
$ git help <verb> - Using the
--helpOption:$ git <verb> --help - Manual pages (manpages):
$ man git-<verb>
Replace the <verb> with whatever command you need help with. For example, to get help for the config command, you can type:
$ git help config
or
$ man git-config
These commands work offline as well, which is handy.
If you need quick, concise information about the available options for a Git command, you can use the -h option:
$ git add -h # This will display options available for the add command
How to Get a Git Repository
To start using Git, you typically obtain a Git repository. There are essentially two main ways to get started:
1. How to Initialize a Repository in an Existing Directory in Git
Open a terminal or command prompt. Use the cd command to change the directory to your project's location: cd /path/to/your/project.
Once you're in your project directory, initialize a Git repository by running:
$ git init
This command creates a new subdirectory named .git where Git stores all the necessary files for your Git repository. At this point, none of your project files are being tracked yet.
Now, Suppose you have certain files that you want Git to start tracking:
$ git add *.py        # Add all Python files
$ git add README.md   # Add README file
$ git commit -m 'Initial commit'
git add adds files to the staging area indicating that you want to include them in the next commit, and then commit the changes. The -m flag allows you to add a descriptive message to the commit.
2. How to Clone an Existing Repository in Git:
The second way to obtain a Git repository is by cloning an existing one. This is useful when you want to work on a project that already exists elsewhere (for example, a project you'd like to contribute to).
Note: When you clone a repository, Git retrieves a full copy of nearly all data that the server has. This includes every version of every file for the history of the project. This means you'll have a complete copy of the repository's history on your local machine.
To clone a repo, Use the git clone command followed by the URL of the repo you want to clone. For example, to clone the grok-1 repository, you can use:
$ git clone https://github.com/xai-org/grok-1.git
This creates a directory named grok-1, initializes a .git directory inside it, and pulls down all the data for that repository.
BTW, .git is just a convention to signify that the URL points to a Git repository. You can use it or not, it doesn't matter.
If you want to clone into a directory with a different name, you can specify it. To clone the grok-1 repo into a directory named "chatgpt" instead of "grok-1", do this:
$ git clone https://github.com/xai-org/grok-1.git chatgpt
Git provides various transfer protocols you can use for cloning repos. The example above uses the https:// protocol, but you may also see git:// or user@server:path/to/repo.git, which uses the SSH transfer protocol.
How to Record Changes to the Repository
Now that you have a Git repository set up, you'll often need to make changes and record those changes in your repository. The process involves tracking files, staging changes, and committing snapshots. Let's explore the steps involved:
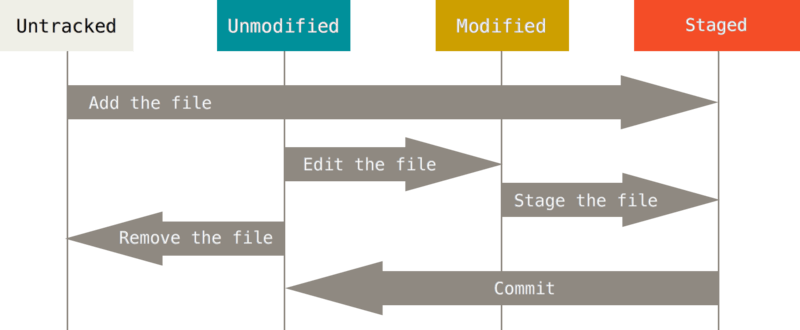 pic credit - https://git-scm.com/
1. How to Check the Status of Your Files in Git:
When working with a Git repository, it's crucial to understand the status of your files.
Git categorizes files into two types: tracked and untracked. Tracked files are those that Git recognizes, either because they were part of the last snapshot (commit) or have been staged. Untracked files are everything else—files that Git is not currently monitoring. To check the status of your repository:
$ git status
This command provides comprehensive information about the current branch, its synchronization status, and the status of your files.
git status also suggests actions you can take. For instance, when files are modified but not staged for commit, git status suggests using git add <file> to stage them. It also suggests using git checkout -- <file> to discard changes in the working directory. These suggestions streamline your workflow by providing quick access to relevant Git commands.
Also, git status offers a Short Status mode (git status -s), which presents a more concise view of your changes using symbols like M (modified), A (added), and ?? (untracked) to represent file statuses.
2. How to Track New Files in Git
When you create a new file in your project, Git initially considers it untracked. To start tracking a new file, you need to add it to the staging area using the git add command.
For instance, let's create a new file called index.html for our project and add it to the staging area:
$ touch index.html
$ git add index.html
After adding, running git status again will show that the index.html file is now tracked and staged for commit.
3. How to Stage Modified Files in Git
If you modify an existing tracked file, you need to stage the changes using git add. Let's say we modify an existing file called styles.css
$ vim styles.css
After making changes, stage the file:
$ git add styles.css
Now, when you check the status, you'll see both the modified file and the new file staged for commit.
4. How to Ignore Files in Git
Often, there are files or directories within a project that aren't intended for Git tracking. These might include log files, build artifacts, or sensitive information like local environment settings (such as *.env or config.json). You can specify these files to be ignored using a .gitignore file.
Create a .gitignore file :
$ nano .gitignore
List the patterns of files or directories you want to ignore.:
$ echo '*.log' >> .gitignore
$ echo 'build/' >> .gitignore
Here, we're telling Git to ignore all files with a .log extension and the build/ directory.
Note: Files already tracked by Git before being added to the .gitignore file will remain tracked. To remove them, you'll need to manually untrack them using Git commands.
Here are some patterns you can use to work more effectively in Git.
- Target individual files or file extensions precisely: For example,
test.txtignores only that specific file, while*.logignores all files ending with.log. - Wildcards for broader matches: The asterisk (
*) wildcard matches any number of characters. For example,*.docignores all files with the.docextension, regardless of their name.
5. How to View Changes in Git:
If you want to see the exact changes you've made to your files before committing, you can use the git diff command.
To see unstaged changes:
$ git diff
And to see staged changes:
$ git diff --cached README.md
git diff provides a detailed view of the actual modifications. Use git diff <filename> to focus on changes within a particular file.
6. How to Commit Changes:
When you are ready to commit your changes, use the git commit command. This opens your text editor for you to provide a commit message. Alternatively, you can use the -m flag to add a commit message directly:
Once you have staged the changes you want to include in the commit, you can commit them using git commit
$ git commit -m "Your commit message here"
7. How to Remove Files in Git:
If you need to remove a file from Git's tracking, you can use git rm. It remove the file from both the repository and working directory. Suppose you want to remove a file named temp.txt:
$ git rm temp.txt
If you only want to remove it from the repository but keep it in the working directory, use the --cached option:
$ git rm --cached temp.txt
8. How to Move (or Rename) Files in Git:
Git doesn't explicitly track file movements. But you can use git mv to rename or move files within your repository. For example, to rename old_file.txt to new_file.txt:
$ git mv old_file.txt new_file.txt
It is equivalent to manually moving the file, followed by using git rm to remove the old file, and then git add to add the new file. git mv basically consolidates these steps into a single command.
These commands form the basic workflow for making changes, staging them, and committing them to your Git repository.
How to View Commit History in Git
After creating multiple commits or cloning a repository, the git log command allows you to examine the commit history.
By default, it lists commits in reverse chronological order, displaying each commit with its SHA-1 checksum, author's name and email, date, and commit message.
Now let's see how can we enhance this output:
How to View Commit Differences in Git:
To view the difference introduced in each commit, you can use the -p or --patch option:
$ git log -p -2 # -2 is used to view the differences introduced in each of the last two commits
How to Display Statistics in Git:
The --stat option provides summarized statistics for each commit, including the modified files, lines added/deleted, and a summary.
$ git log --stat
How to Customize Git Log Output Format:
The --pretty option allows you to alter the log output format. Various options are available for different formats:
oneline: Concise, single-line summary of each commit.short: Default format with author, date, and message.full: Detailed format with commit hash, author, date, message, and diff.fuller: More detailed format, including full file paths.format: Customize the output using format specifiers.
$ git log --pretty=oneline
Useful format specifiers for --pretty=format:
%h:Abbreviated commit hash%an:Author name%ae:Author email%ad:Author date%s:Subject (commit message)
$ git log --pretty=format:"%h %an %ad %s"
ASCII Graph:
Using --graph, you can also visualize branch and merge history.
$ git log --pretty=format:"%h %s" --graph
How to Limit Git Log Output:
In addition to formatting options, git log offers various limiting options to refine the displayed commit history.
-<n>:Shows only the last n commits.--since, --until:Limits commits to those made after/before the specified date.--author:Shows commits only by a specific author.--grep:Filters commits by a keyword in the commit messages.-S:Shows commits changing
Example Usage: View the last 3 commits by author Abbey since a certain date, with patch details:
$ git log --author="Abbey" --since="2024-01-01" -p -3
How to Undo Things in Git
Undoing changes is a common need in Git, and several options are available for this purpose.
How to Undo a Commit in Git
If you've committed too early or need to make additional changes to the last commit, use this command:
$ git commit --amend
This opens the commit message editor allowing you to modify the message. If no changes were made since the last commit, it simply allows you to edit the commit message.
Note: Only amend commits that are still local and haven't been pushed yet to avoid issues for collaborators.
How to Unstage a Staged File with git reset
To unstage a file that was accidentally included, you can use the git reset HEAD <file> command. For example:
$ git reset HEAD CONTRIBUTING.md
The file is unstaged, allowing you to make further changes without committing the unintended ones.
How to Unmodify a Modified File with git checkout
Suppose you made some modifications to files that you later realize you don't want to keep. Use git checkout -- <file> to discard the changes made to a file and revert it back to its previous state.
$ git checkout -- CONTRIBUTING.md
This will replace the modified file with the last staged or committed version.
Undoing Things with git restore
Let's explore the alternatives introduced by Git version 2.23.0, git restore, which serves as an alternative to git reset for many undo operations.
How to unstage a staged file with git restore
If you accidentally stage a file that you didn't intend to commit, you can use git restore --staged <file> to unstage it.
$ git restore --staged CONTRIBUTING.md
The file is unstaged, similar to git reset HEAD <file>, allowing you to make further changes without committing the unintended ones.
How to unmodify a modified file with git restore
To discard changes made to a file in the working directory, use git restore <file>:
$ git restore CONTRIBUTING.md
Similar to git checkout -- <file>, this command discard the changes made to the specified file, reverting it back to the state it was in at the last commit.
Important Note: Use commands like git reset, git checkout --,git restore cautiously as they can discard local changes permanently. Use these commands when you're certain that the changes are not needed and you don't have any unsaved local changes.
Alternatives: Stashing and branching are alternative methods to temporarily set aside changes without discarding them entirely. These methods are safer if you're unsure about discarding changes.
How to Work with Remotes in Git
Remote repositories are versions of your project hosted on the internet or a network. Collaborating with others involves managing these remote repositories, including adding, removing, and inspecting them. Let's learn how to manage them effectively.
How to Show Your Remotes in Git
To start, let's see which remote servers are configured for our project using:
$ git remote
This command lists the shortnames of all remote handles we've specified. For instance, if we've cloned a repository, we'll typically see origin, the default name Git assigns to the server we cloned from.
Adding the -v option provides additional details, such as the URLs associated with each remote.
$ git remote -v
This displays both the fetch and push URLs for each remote, allowing us to understand where our project is hosted and how we interact with it.
How to Add Remote Repositories in Git
To explicitly add a new remote repository, use git remote add <shortname> <url>:
$ git remote add example https://github.com/example/example.git
Here, we've added a remote named example with the specified URL. This allows us to reference this remote repository using the shortname example in our commands.
How to Fetch and Pull from Remotes in Git
To fetch data from a remote repository, we use the git fetch command followed by the remote name:
$ git fetch origin // Here we are not specifying any particular branch.
It downloads any new changes from the origin remote repository to our local repository, allowing us to stay up-to-date with the latest developments.
Alternatively, if we want to fetch and merge changes from a remote branch into our current branch in a single step, we use the git pull command:
$ git pull origin master
Here, we're specifically pulling changes from the master branch of the origin remote repository into our current branch.
How to Push Changes to Remotes in Git
To share our work with others, we push our changes to a remote repository using:
$ git push origin main
In this example, we're pushing our local changes to the main branch of the origin remote repository.
How to Inspect a Remote in Git
Lastly, we can inspect a remote repository to gather more information about it using:
$ git remote show origin
This command displays details such as the fetch and push URLs, the tracked branches, and local branch configurations associated with the origin remote repository.
How to Rename Remotes in Git
Now Suppose we want to rename a remote's shortname from example to new-example:
$ git remote rename example new-example
How to Remove Remotes in Git
If, for some reason, we no longer need a remote repository and want to remove it from our project:
$ git remote remove new-example
or
$ git remote rm new-example
After removal, the remote-tracking branches and associated configuration settings are also deleted.
Tagging in Git
Tagging in Git is a fundamental feature allowing developers to mark specific points in a repository's history as significant. Typically, tags are used to denote release points, such as v1.0, v2.0, and so forth.
How to List Existing Tags in Git
Imagine you're working on a project with multiple release versions. To list existing tags:
$ git tag
Also, you can search for tags matching a specific pattern using the -l or --list option. For Example:
$ git tag -l "v2.0*"
This command will list tags like v2.0, v2.0-beta, and so on, matching the specified pattern.
How to Create Tags in Git
Git supports two types of tags: lightweight and annotated.
Lightweight Tags
Use lightweight tags when you want to mark a specific commit without adding any additional information. Example:
$ git tag v1.1-lw
To view commit information associated with this tag, use:
$ git show v1.1-lw
Annotated Tags
Annotated tags, on the other hand, contain additional info such as tagger information, date, and a tagging message.
Creating an annotated tag involves using the -a option with the git tag command, along with a tagging message. e.g:
$ git tag -a v2.0 -m "Release version 2.0"
To view detailed information about this tag, including the commit it points to and the tagging message, use:
$ git show v2.0
How to tag an older commit in Git
Sometimes, you might forget to tag a specific commit. Not to worry, you can tag it later by specifying the commit checksum
Example: suppose you forgot to tag a commit with ID abcdefg. You can tag it as follows:
$ git tag -a v1.2 abcdefg
How to Push Tag to a Remote repo in Git
To push a specific tag to a remote server, you can use:
$ git push origin <tagname>
If you have multiple tags and want to push them all at once, you can use the --tags option:
$ git push origin --tags
How to Delete Tags in Git
To delete a tag locally (removing from local repo):
$ git tag -d <tagname>
For Example, to delete a lightweight tag named v1.4-lw:
$ git tag -d v1.4-lw
On the other hand, you can delete a tag from a remote server in two ways:
- Using the
git pushcommand with a refspec:
$ git push origin :refs/tags/v1.1-lw
- Using the
--deleteoption withgit push:
$ git push origin --delete v1.1-lw
How to Check Out Tags in Git
To view the state of files at a specific tag, you can check out that tag:
$ git checkout v2.0
This command puts your repository in a "detached HEAD" state, where you can view files but cannot make changes directly.
If you need to work on files at that tag, it's better to create a new branch:
$ git checkout -b v2.0-branch v2.0
Now you can make changes and commits without altering the original tag.
Git Aliases
Git aliases are shortcuts or custom commands that you can create to simplify and streamline your Git workflow.
To create a Git alias, you use the git config command with the --global flag to make the alias available across all your Git repositories.
Basic Aliases for Common Commands
You can create aliases for frequently used Git commands to make them easier to remember and type. For example:
$ git config --global alias.co checkout
$ git config --global alias.br branch
$ git config --global alias.ci commit
Now, instead of typing out the full commands, you can use shorter aliases like git co, git br, and git ci respectively.
You can also create custom aliases for actions you frequently perform or for improving command readability. Example:
$ git config --global alias.unstage 'reset HEAD --'
Now, you can use git unstage <file> instead of git reset HEAD -- <file> to unstage a file.
How to Combine Multiple Commands in Git
Aliases can also be used to combine multiple Git commands into a single alias. For example, let's create an alias to stage all changes and then commit them with a single command:
$ git config --global alias.commitall '!git add -A && git commit'
Now, running git commitall will stage all changes (git add -A) and then commit them, saving you time and keystrokes.
Git Branching
Branches in Git provide a powerful way to manage your project's codebase, allowing for parallel development and experimentation without affecting the main codebase.
Git branching allows you to diverge from the main line of development, work on features or fixes, and then merge your changes back. Unlike many other version control systems, Git's branching model is lightweight and efficient, making branching operations nearly instantaneous.
What are Branches in Git?
A branch is a lightweight, movable pointer to a commit. The default branch name is often "master," but it's not special – it's like any other branch.
Creating and switching between branches allows you to work on different features simultaneously.
How to Create a New Branch in Git:
When you want to start working on a new feature or experiment with an idea, you can create a new branch in Git. This new branch serves as a separate line of development, allowing you to make changes without affecting the main branch.
$ git branch new_feature
This command creates a new branch named 'new-feature' pointing to the same commit as the current branch. Branches can coexist, and Git keeps a special pointer called HEAD to indicate the current branch.
Understanding Branches
Firstly, let's grasp the basics of branches in Git. When you initialize a Git repository, you start with a default branch, usually named 'master' or 'main'. Branches are essentially pointers to commits, enabling you to work on different features or fixes independently.
To view all branches in your repository, use the command:
$ git branch
This will display a list of branches with an asterisk (*) indicating the currently checked out branch. For additional information like the last commit on each branch, utilize:
$ git branch -v
How to Switch to Another Branch in Git:
To switch to an existing different branch, use git checkout.
$ git checkout new_feature
This command switches the 'HEAD' pointer to the 'new-feature' branch, making it the currently active branch.
To create and switch to a new branch in one operation:
$ git checkout -b <newbranchname>
In Git version 2.23 onwards, you can use git switch instead of git checkout.
- Switch to an existing branch:
git switch existing-branch. - Create and switch to new branch:
git switch -c new-branch.
How to Visualize Branches in Git:
After creating and switching branches, you can visualize the branch structure using:
$ git log --oneline --decorate --graph --all
This command displays a concise and graphical representation of the commit history and branch pointers, allowing you to see how branches diverge and merge over time.
How to Manage Branches in Git
How to Manage Merged Branches
As your project evolves, you'll merge branches back into the main branch once their changes are finalized. To identify merged branches, execute:
$ git branch --merged
This command lists branches that have been successfully merged into the current branch. These branches are generally safe to delete using:
$ git branch -d branch_name
However, for branches containing unmerged work, use:
$ git branch --no-merged
Deleting such branches requires the '-D' flag:
$ git branch -D branch_name
This ensures that you don't inadvertently lose any unmerged changes.
How to Rename Branches
To rename a local branch:
$ git branch --move old_branch_name new_branch_name
This command updates the branch name locally. To reflect the change on the remote repository, push the renamed branch:
$ git push --set-upstream origin new_branch_name
Verify the changes using:
$ git branch --all
Ensure to delete the old branch on the remote:
$ git push origin --delete old_branch_name
This ensures uniformity across local and remote repositories.
How to Change the Default Branch Name
Renaming the default branch, often 'master', requires caution and coordination, as it impacts project integrations and collaborators.
$ git branch --move master main
Once renamed, push the updated branch to the remote repo:
$ git push --set-upstream origin main
Make sure you remember to update references and configurations across dependencies, tests, scripts, and repository hosts. Once done, delete the old master branch on the remote:
$ git push origin --delete master
This is different from $ git config --global init.defaultBranch main that we discussed in the configuration part in the following ways:
$ git branch --move master main: This command renames the existing branch named "master" to "main" within the current repository. It is a sort of local operation that affects only the repository.$ git config --global init.defaultBranch main: This command sets the default branch name for new repositories globally. It does not rename existing branches but ensures that any new repositories created thereafter will use "main" as the default branch name instead of "master".
Additional Resource: Consider checking out this official Git resource for its informative visuals and diagrams which can provide you more clarity on remote branches and branch management concepts.
Branching Workflow
Let's understand branches in more detail and look at a common branching workflow that is used in large projects.
Long-Running Branches:
In Git, long-running branches are branches that remain open over an extended period.
Topic Branches:
Topic/Feature branches are short-lived branches created for specific features or pieces of work. Unlike long-running branches, which persist over time, topic branches are created, used, and often deleted once the work is complete.
Example: Let's consider a scenario where a team maintains two long-running branches: master and develop.
- The
masterbranch contains only stable code, possibly what has been released or will be released. - The
developbranch acts as a staging area for ongoing development. While it might not always be stable, it serves as a testing ground for new features.
Developers merge changes from feature branches into the develop branch for testing. Once features are thoroughly tested and stable, they are merged into master.
Note how changes progress through different levels of stability, moving from the least stable (feature branches) to more stable ones (such as the develop branch), as they undergo testing and refinement, and are finally merged into the most stable main/master branch.
This maintains a clear separation between stable and development code, ensuring that only thoroughly tested features make their way into the stable release.
Branching Best Practices
- Create Descriptive Branch Names: Use meaningful branch names that reflect the purpose or feature being developed.
- Delete Unused Branches: Once a branch has served its purpose and its changes have been merged into the main branch, consider deleting it to keep the repository clean and manageable.
Rebasing in Git
In Git, when you're working with branches, there are two primary ways to integrate changes from one branch into another: merging and rebasing.
Unlike merging, which can create a cluttered history with multiple merge commits, rebasing produces a linear history, making it easier to understand the sequence of changes made over time.
Basic Rebase Example:
Imagine you're working on a project with two branches: "feature" and "master". You've made some commits on the "feature" branch and now want to integrate these changes into the "master" branch using rebasing.
First, you switch to your "feature" branch:
$ git checkout feature
Then, you rebase your feature branch onto the master branch:
$ git rebase master
This command takes all the commits/changes you made on your "feature" branch and applies them on top of the latest commits in the "master" branch, and replays the commits one by one.
Not only master branch, you can also rebase a topic branch onto another topic branch. Example:
Suppose you're working on a project with two feature branches: "frontend" and "backend". You made some commits on the "frontend" branch and now want to integrate these changes into the "backend" branch.
Let's use a different approach this time -
use --onto option of git rebase to rebase the "frontend" branch onto the "backend" branch:
$ git rebase --onto backend frontend
After rebasing, switch back to the "backend" branch and perform a fast-forward merge:
$ git checkout backend
$ git merge frontend
Now, your project history appears linear, reflecting the sequential integration of changes from the "frontend" branch into the "backend" branch.
Rebasing vs Merging: Which is Better?
Rebasing Use Cases:
- Suitable for feature branches that need a clean integration into the mainline branch.
- Preferred for open-source contributions where a clean commit history is valued.
Merging Use Cases:
- Appropriate for collaborative environments where transparency in the project's development process is crucial.
- Useful for projects where maintaining an accurate historical record is a priority.
Conclusion
This handbook serves as a comprehensive guide to understanding and utilizing Git, a powerful version control system widely used in software development.
From basic workflows to setting up a repository, tagging, and branching remote repositories, we have learnt a comprehensive suite of features that will help streamlining the development process.