
Hey everyone! If you're wondering what infrastructure-as-code means, then you've come to the right place.
In this article I will explain the concepts behind Infrastructure-As-Code (IaC) at a high level and dive into a category of IaC known as server templating.
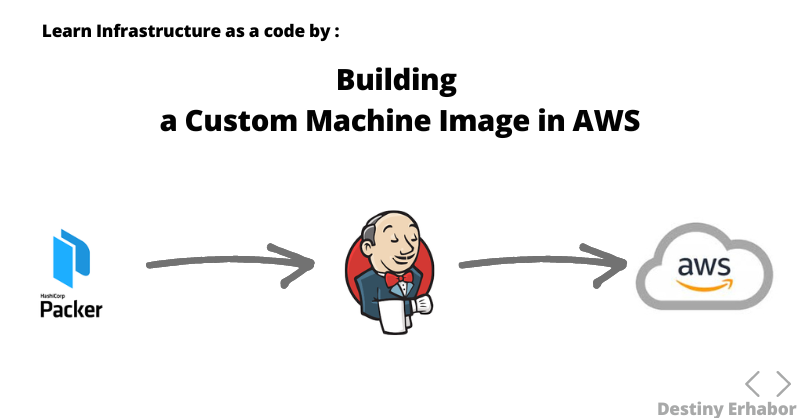
For the purpose of this article, we will be using a server templating tool called Packer to create a custom Amazon Machine Image (AMI) and use it to launch an AWS EC2 instance.
What is Infrastructure-As-Code?
Infrastructure-As-Code (IaC) refers to the process of managing and supplying infrastructure using code rather than manual methods.
The core concept is that you define, deploy, update, and destroy your infrastructure (servers, databases, networks, configuration, and so on) by writing and executing code.
Types of Infrastructure
What is Mutable Infrastructure?
You can change and configure infrastructure that is mutable depending on your needs. You can log into servers, apply fixes, update configurations, and more.
Let's say we have a web application that we want to deploy to the cloud or to an onsite server.
We configure the program to install all necessary instructions and configurations after deployment in order for it to be production ready. We manually or automatically change the server whenever a new upgrade/configuration to the application is required.
This is fantastic for a few servers, but for many servers, it can result in application mismatches unless you use configuration tools like Ansible. This is referred to as mutable infrastructure. It follows the BUILD, DEPLOY, CONFIGURE pattern.
Benefits of Mutable Infrastructure
- Resolve issues more rapidly. Rather of having to build a new server from the ground up, IT staff gets to know each server on a "personal" level, allowing them to diagnose issues more quickly.
- Updates are usually quicker and can be tailored to each server individually.
- The infrastructure can be tailored to the exact requirements of the server-side applications.
Challenges of Mutable Infrastructure
- Because each server has a unique configuration, which is known as configuration drift, technical difficulties are difficult to diagnose or reproduce.
- Because you have to manually configure the servers, provisioning servers is frequently a lengthy procedure.
- Server changes aren't always recorded, making version tracking more complex.
- Update failures happen more often because of a range of unanticipated factors such as network connectivity, unresponsive repositories, DNS downtime, and so on.
- If updates aren't applied correctly, there's a higher danger and complexity in production workloads. Due to these unexpected situations, debugging is tough.
Fortunately, you can employ immutable infrastructure to avoid the issues that mutable infrastructure can cause.
What is Immutable Infrastructure?
In immutable infrastructure, components are recreated and replaced rather than updated after they're formed. This makes your product more consistent and reliable.
Making your infrastructure immutable is the best way to ensure scalability in the realm of IaC.
Now, from the use-case in mutable infrastructure, instead of configuring the server after deployment, how about configuring it before deployment, like in the mutable infrastructure above?
Immutable infrastructure is based on this concept, which you can implement with the help of technologies like Packer.
Benefits of Immutable Infrastructure
- There is no configuration drift because there are no adjustments to make.
- Tracking and rollbacks are significantly easier with discrete versioning. Each new server or virtual machine may be tracked by the IT department as it is deployed.
- Testing is made easier by the uniformity of setups across several servers.
- Predictable state due to the fact that the infrastructure is never changed, which reduces complexity.
- In a multi-threaded context, safe thread code means mutation is almost non-existent.
Challenges of Immutable Infrastructure
- Infrastructure can't be changed while it's in place. For example, if a zero-day vulnerability is discovered, all servers with the same configuration must be updated.
- Immutable infrastructure's increased agility and dynamism can occasionally conflict with standard IT security measures.
- Copying array data from one location to another incurs overhead. Instead of writing data to the local disk, data is externalized.
Types of Infrastructure-As-code Tools
There five five broad categories of IAC tools:
- Ad hoc scripts
- Configuration Management tools
- Orchestration tools
- Provisioning tools
- Server Templating tools
What are Ad Hoc Scripts?
An Ad hoc technique is when you build a script in your preferred programming language (like Bash or Python) to automate a task, configure a tool, and run it on the server.
What are Configuration Management Tools?
Large amounts of software is installed and managed using provisioning tools on existing servers.
When clustering computers, keeping the hardware and software as homogeneous as feasible is ideal. This helps make sure that performance is consistent and that the separate nodes get along with one another.
Configuration management tools make it simpler to manage the software side of clusters. Some of these tools include:
- Chef
- Puppet
- Ansible
- SaltStack
What are Orchestration Tools?
How do you manage VMs and containers once they've been created? You need to roll out updates, monitor the health of your VMs, and distribute traffic between VMs and containers in the real world. Even communication with one another over the internet is possible (server discovery).
Orchestration tools are designed to deal with these issues. Orchestration is the simultaneous automation of many operations in order to reduce production difficulties and time to market.
Some of these tools include:
- Kubernetes
- Marathon/Mesos
- Amazon Elastic Container Service
- Docker Swarm
- Normad
What are Provisioning Tools?
The code that runs on each server is defined by configuration management tools, server templating tools, and orchestration tools.
Provisioning tools, on the other hand, are in charge of creating servers, databases, load balancers, monitoring, secure socket layer (SSL) certificates, and many other aspects of your infrastructure.
Example of provisioning tools are:
- Terraform
- CloudFormation
- OpenStack Heat
What are Server Templating Tools?
Server templating is a popular alternative to configuration management that has lately gained traction.
The goal behind server templating tools is to build an image of a server that takes a fully self-contained "snapshot" of the operating system (OS), software, files, and all other essential characteristics, rather than launching a number of servers and configuring them by running the same code on each one.
You can then install that image on all of your servers using another IaC program.
Examples of server templating tools are:
- Packer
- Docker
- Vagrant.
In this article, I'll go through how to generate a custom image using Packer server templating tools, and you'll see how to deploy the custom image on AWS instance .
Packer and the Custom Image
What is Packer?
Packer helps you create and customize images that already have specific applications installed, so that your programs are copied over, and so on.
These images are known as machine images, and each platform has its own image format name with preloaded applications.
For example, here's how some platforms identify these images:
- AMAZON (AMI)
- VMWare (VMDK/VMX)
- VirtualBox (OVF)
Packer lets you generate your own custom machine image and bake your code and configuration into it before deploying it to the server. It's finished. There's no need to alter the config because it's already baked into the image.
And for any subsequent updates, you destroy the server and spin up a new server with a load balancer to help maintain the destroying of one server and the starting of another.
Core Packer Building Blocks
There are three major building blocks in the Packer configuration file:
- builders
- provisioners
- post-processors
Builders create the machine and generate the image across platforms. This is a very important component. The builder block can take an array of different builders from different platform.
Provisioners help you install, customize and configure the machine image, either through third party software or built-in ones.
And post-processors run after the image has been build and customized.
Enough of the theory...
Now, it is time for us to build some immutable system with Packer, shall we?
Prerequisites and Installation
- Create an AWS account
- Create an IAM user
- Create and Download your user secret and access key
- Download and Install Packer
How to Build Your First Image with Packer
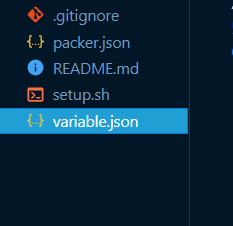
First, create a folder called packer_custom_image.
Open the folder and create the following files: packer.json, variable.json, setup.sh, and .gitignore.
- packer.json contains all the necessary code for creating the custom i=machine image
- variable.json contains sensitive information we want to keep alway from the public
- setup.sh contains shell scripts we will need to run instructions to our image
- .gitignore contains files/folders hidden from the Git remote server
Note that Packer files used the .json extension and have a format like the JavaScript JSON script.
Folder/File structure
Let's get started!
First let's define our variables and Packer builders inside variable.json like this:
 {
     "description" : "myWebServer",
    "access_key" : "enter-aws-your-key",
    "secret_key" : "enter-aws-your-secret"
    "source_ami" : "enter-yours"
   }
Alright so what's going on here?
- descriptions: This variable detects the name of the machine image we are creating
- access_key and secret_key: Your IAM user credentials you created and downloaded. These are required by Packer for authentications and authorization.
- source_ami: The source AMI is the AMI you want to used as a base for your custom AMI. AWS has numerous AMIs such as Amazon Linux, Ubuntu, Windows, Redhat and so on. You can choose from these as a base image. In our case we will use the Amazon Linux AMI.
Now, log into your AWS console. Click services and search for EC2.
Click the launch instance button (we are not launching any instance, we just want to copy our base image).

Next, scroll to Application and OS Images (Amazon Machine Image). Click and choose Amazon image, then copy your most recent AMI.

Then close the instance (DO NOT CREATE/LAUNCH).
Next, let's update the packer.json file like this:
{
    "builders": [
        {
            "type": "amazon-ebs",
            "access_key": "{{user `access_key` }}",
            "secret_key": "{{user `secret_key` }}",
            "region" : "us-east-1",
            "ami_name" : "myfirstami",
            "source_ami" : "{{user `source_ami` }}",
            "instance_type" : "t2.micro",
            "ssh_username" : "ec2-user"
         }
    ]
 }
Let's see what's going on here:
- builder: As previously stated, the builder creates the machine image and can produce identical images across multiple platforms, such as AWS and Azure, thus the array. It requires the builder.
- type: Builder type name
- access and secret keys: For authentication, it fetches data from the variable.json file we created for security, hence the "{{user
variable-name}}" format. - variable-name: the name we gave in our variable.json file (you should use this similar format for variables you don't intend to make public)
- region: identifies the AMI region.
- ami_name: Custom name for our custom machine image name.
- source ami: For the machine image we want to customize from the AWS AMI.
- Instance type: For the temporary instance required by Packer to create our image.
- ssh username: For credentials to create the temporary instance as related to the builder platform. AWS is the word that comes to mind in our case.
Next, we'll customize the image with provisioners. We will be customizing the source AMI with a Jenkins instance.
Update the packer.json, and add the following after the builder array block:
 {  ...
         "provisioners":
            [
                {
                    "type": "shell",
                    "script": "setup.sh"
                 }
             ]
}
The provisioners come after the builders and take an array as well. We can use many provisioners for a single or multiple builders, giving us more flexibility.
- type: The shell type is the most basic and widely used provisioner. It can accept a script property (external file to run our code), inline properties to run as on the command line, or file properties to upload files, code, and other stuff our images.
- scripts: Takes an external script property to run our configurations.
Let’s setup the scripts file we created earlier.
setup.sh
sleep 30
sudo yum update –y
sudo wget -O /etc/yum.repos.d/jenkins.repo \
    https://pkg.jenkins.io/redhat-stable/jenkins.repo
sudo rpm --import https://pkg.jenkins.io/redhat-stable/jenkins.io.key
sudo yum upgrade
sudo amazon-linux-extras install java-openjdk11 -y
sudo yum install jenkins -y
sudo systemctl enable jenkins
sudo systemctl start jenkins
sudo systemctl status jenkins
The script installs Jenkins and its dependencies into our image and starts up the Jenkins instance.
Optionally, we can pass post-processors and sensitive-variables. There are numerous post processors you can use after an image has been built and altered.
packer.json
{  ...
        "post-processors":
            [
                {
                    "type": "manifest",
                    "output": "out.json"
                  }
             ]
 }
- type: Takes the type of post processor instance, the manifest type defines the way we want our image architecture to be printed after it's created.
- output: the name of the file to print the after the baked image artifacts
- Sensitive-variables: Packer allows us specify sensitive variable to omit from the post processor manifest. Let's add our secret and access key:
{...
    "sensitive-variables":
        [
            "secret_key",    "access_key"
         ]
 }
How to Run and Test the Code
In your terminal, in the root directory, run the code. You should see out.json and out.json.lock created at the root of your application. (These files contain your build and artifacts.)
packer build -var-file="variable.json" packer.json

AMI in the AWS Console
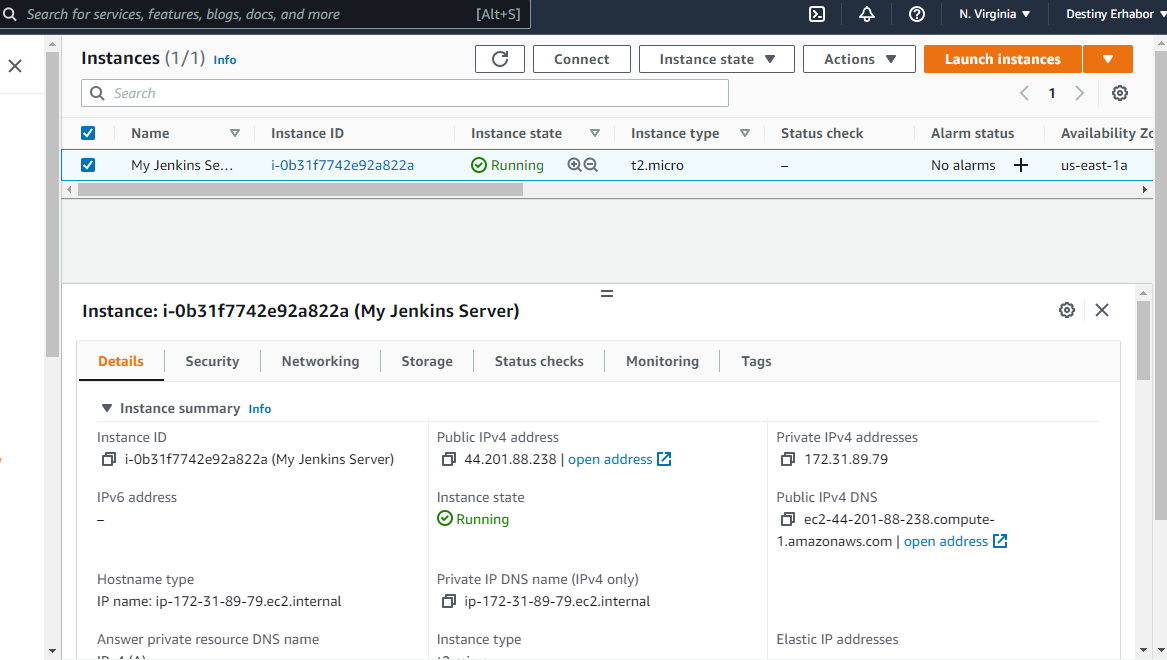
Now, let's log in to our AWS console to view our just created custom image. We will also need to spin up an EC2 instance to verify if our image has the proper configurations of the Jenkins instance baked into it.
- Go to your AWS console
- Click service and search for EC2 and scroll to image
- There click AMI and find your newly created custom image

Yay! Our image was created successfully. Now it's time to launch an instance from it.
- From the AMI page, select the recent created AMI and click the Launch instance from AMI at the top right corner. This takes you to the instance page.
- Name and tags – Give the instance a name. say ""My Jenkins Server"
- Application and OS Images (Amazon Machine Image) should remain same (that is, our image)
- Instance type – Leave as default "t2-micro". This allows us to use AWS's free tier
- Key pair – We will need to create a new key-pair to allow us login (SSH) to the instance from our computer terminal. Click the Create new key button and the following window should show:
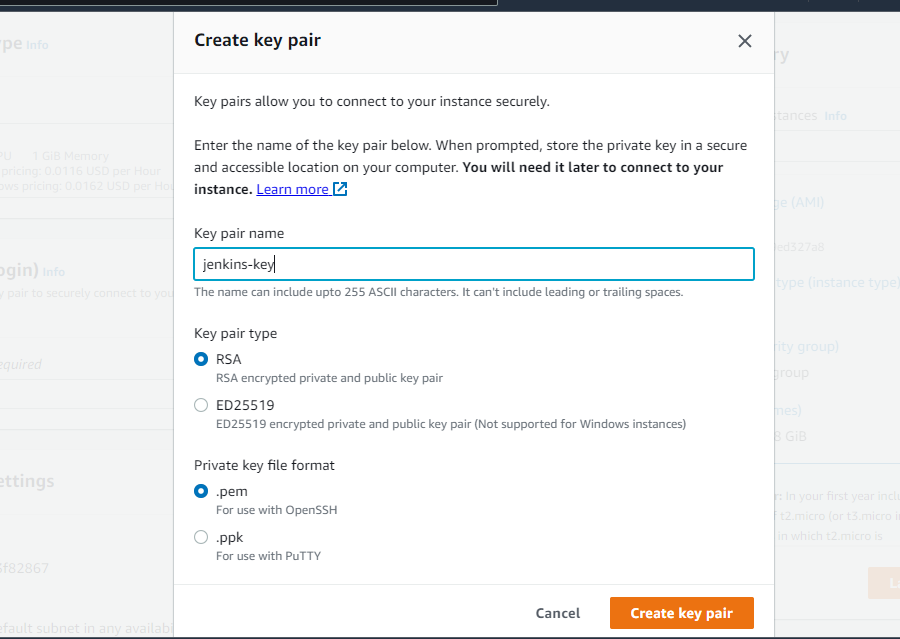 create new keypair
- Give the key-pair a name and type. If you are using Windows, you can choose the .pem private key file format and use your Windows powershell to SSH into the server. Or you can use .ppk and you will need to download PuTTy, an application that helps give you SSH to remote servers.
- Click the Create key pair once and the key pair is automatically downloaded on your local system (take note of the file download location)
- Network settings – We will need to setup some networking to allow access to our Jenkins instance, and to allow SSH, HTTP, and HTTPS. So click edit and scroll to inbound security groups rules to add the following rule (custom TCP at port 8080) and allow access to anywhere. For more security you can add access from only your IP or customize to your desire.
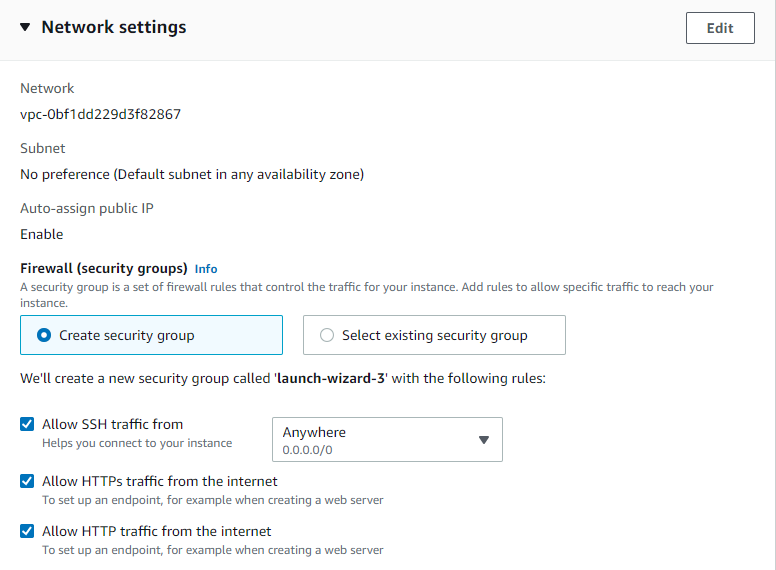
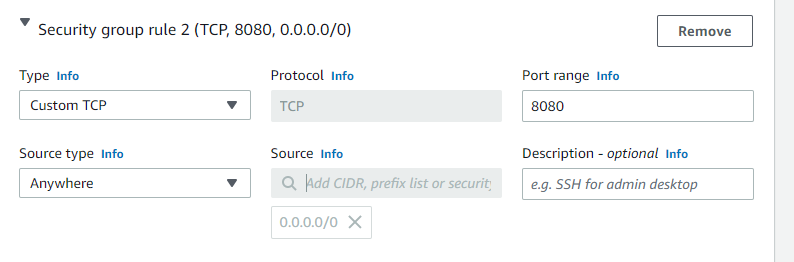
Custom TCP at Port range will allow us view our Jenkins instance from our browser after SSHing into it via public IP or DNS.
Leave Configure storage and Advance Details as Default.
Then click launch and wait for a bit for the instance to fully launch. Once it's launched click on the instance to find all your configurations (DNS, IPs, and so on)
Now, for the final step, Remember the key-pair that was downloaded into our local system? We will need that now to SSH into this instance that has our Jenkins server.
Open your terminal (PowerShell for Windows users) and enter the following with your correct public-dns or (replace with public ip) and key-pair path:
ssh -i /path/key-pair-name.pem ec2-user@instance-public-dns-name
Follow and accept the prompt to successfully login.
Enter sudo systemctl status jenkins to check the status of the Jenkins instance. If it's not running, start it by entering sudo systemctl start jenkins on the terminal.
 Start jenkins instance
Now, let's launch our instance from the browser. Open your favourite browser and Enter 'http://44.201.88.238:8080' to see the Jenkins instance:
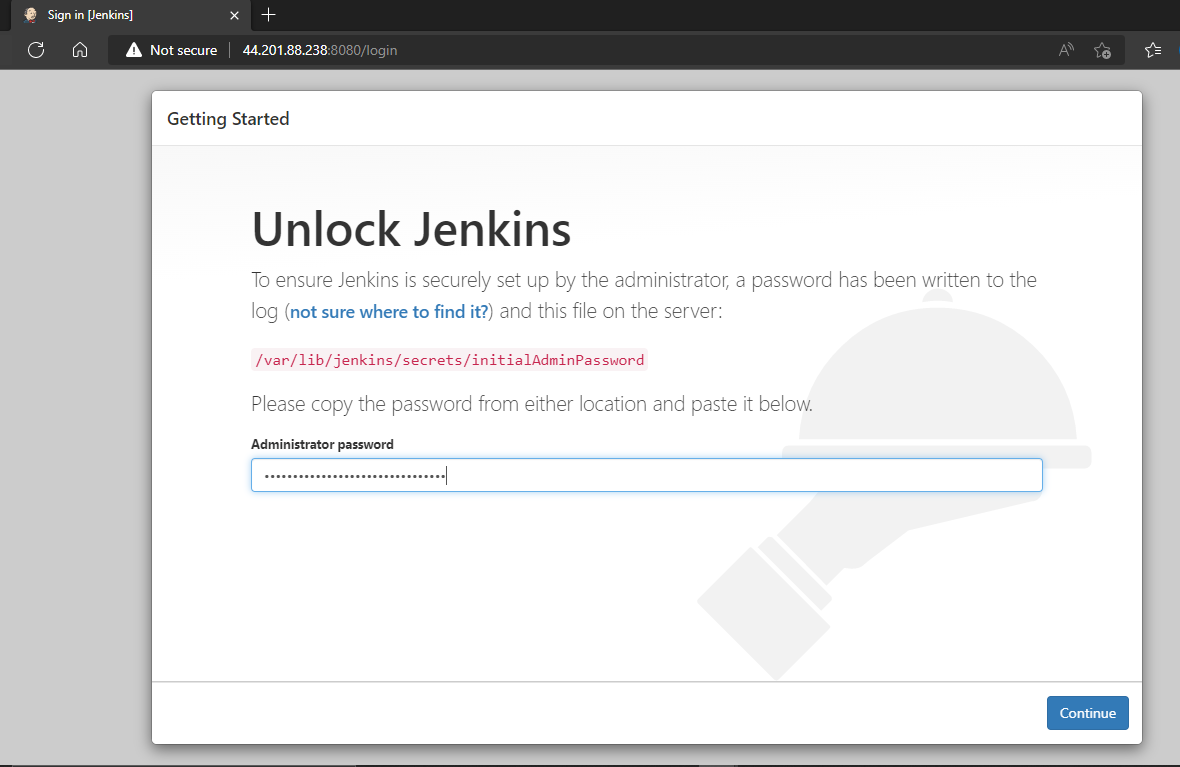
Enter the following inside the EC2 instance terminal to see the password and login.
sudo cat /var/lib/jenkins/secrets/initialAdminPassword
Then unlock and enjoy all the features of your newly created Jenkins instance.
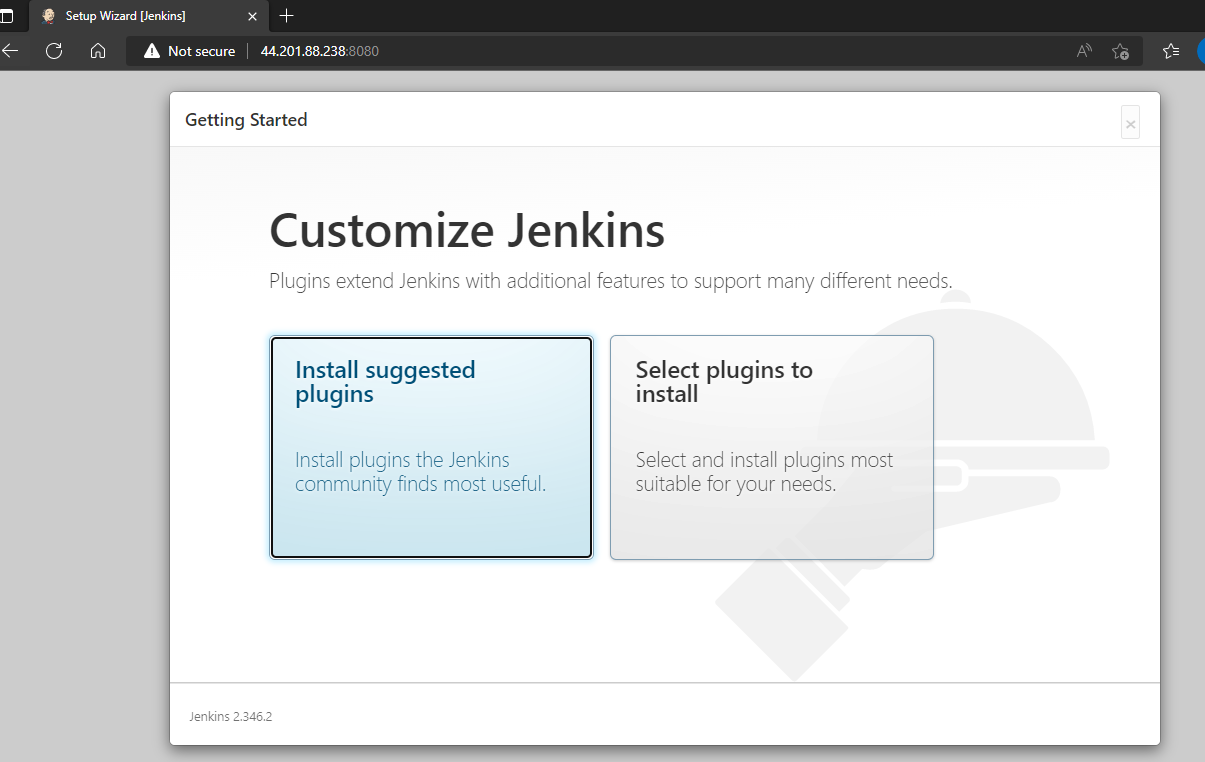
Congratulations, You Made It!
You can see the full code for this tutorial here:
Clean Up
If you want to avoid unnecessary charges from AWS (based on resource use) and since we are not using this in production, we should clean up our resources.
To finish up, you can log into your AWS console and terminate the EC2 instance launch with the custom image and delete the image if you are not using it.
Summary
In this tutorial, you have learned what infrastructure as a code is at a high level and how it apply in mutable/immutable practice.
You have also learned how to create a custom image with a powerful too called Hashicorp Packer. For our case we customized a Jenkins server into the image but you can extend it with any custom configurations.
And finally we tested our image by launching an EC2 instance.
I hope this article helps you understand what infrastructure as a code is and how you can use it tools in your applications. Happy learning!