

According to Google trends, React is the most popular JavaScript frontend framework. Unless you're in the U.S. state of Nebraska, that is. 😀
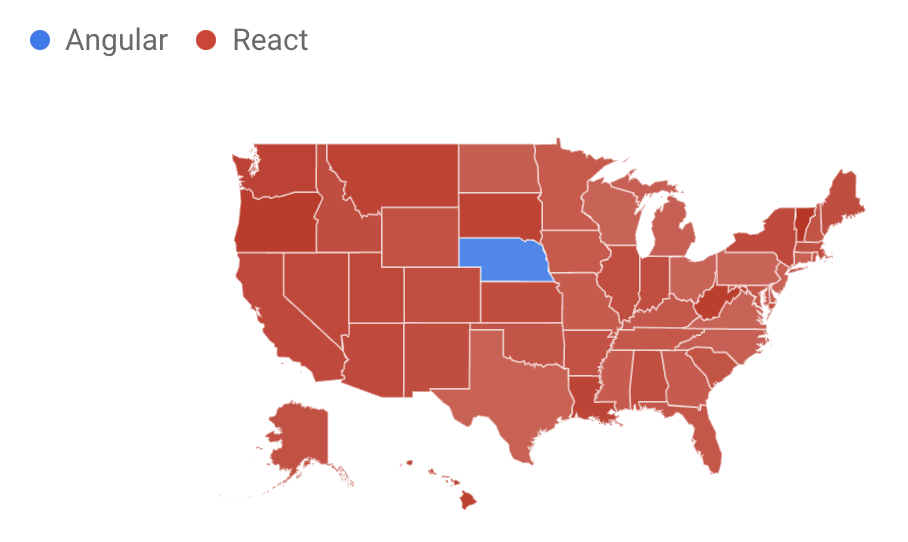 Google Trends (React vs Angular)
React is a declarative, efficient, and flexible JavaScript library for building user interfaces. We just released a full React course on the freeCodeCamp.org YouTube channel.
Thomas Weibenfalk created this course. He is an excellent developer and has developed many great courses.
In this course, you will learn React.js from the ground up starting with the fundamentals all the way to more intermediate and advanced topics. You will learn by building a real app.
You will learn:
- React
- JSX
- Styled Components
- React Router
- State and Props
- Context
- CSS
- API handling
- Hooks
- TypeScript
- Persist state in SessionStorage
- Deploy to Netlify
- And much more.
Watch the full course on the freeCodeCamp.org YouTube channel (7-hour watch).
Transcript
(autogenerated)
react is one of the most popular JavaScript frameworks in this comprehensive and well made course.
Thomas Weibenfalk will teach you everything you need to know to start using react.
Hello, and welcome.
I'm Tomas vevo to developer from Sweden.
And thank you for enrolling this course.
I'm actually a little bit of extra proud on this one, because I created a lot of courses during the years now, but this one is the first ever course I created because I love react.
And I wanted to create courses.
So this is the third iteration the third version, meaning that I've improved it a lot and listened to you guys on what stuff you want in the course.
So I think it's actually really good.
There's always room for improvement, of course, but this one, I really enjoyed this one.
And it was fun making it also.
So hopefully, you'll find a lot of basic stuff and intermediate stuff, and maybe some advanced stuff to learn in this course.
And I think we have to get started.
So let's do that.
Let's take a look at the application that we're building in this course.
And it's a nice little move application that is based on the Movie Database API.
So you'll have to create an account at the Movie Database.
But we'll do that in the next video.
So I thought I could show you the application so that you have a little feeling about what we're going to build in this course.
And this one is always going to show the most popular movie here we have this hero image.
So we're going to create this one.
And we also have some text, and we have a header up here also, then we can search for movies, or examples, Star Wars.
And we'll see all the movies here.
So that's how the basic functionality of this application is.
And if we click on the movie, you can see that we get all data from that movie.
So that's nice.
We're going to show the actress and also some information about the movie itself, we can see the revenue, the budget, and the running time, for example.
And here, you may think that you can also click on actors.
And yeah, of course, we could do that.
But I have to limit this tutorial somewhere.
So this course is not going to go there.
But it's a great foundation, if you want to build upon this application.
So you can add in the functionality of showing information about the different actors and stuff like that.
We also have this little breadcrumb menu appears, we can go back to the homepage.
And in this version of the course, this is version three, I'm going to show you how to create the styles also are going to be fairly quick when I show the stars because I still want to have the main focus on react itself.
So that's something that's new in this version three of this course.
And of course everything is going to be responsive, we're going to create that one also, as you can see here, the grid, for example, with the movies, it changes depending on the viewport size.
So that's nice.
So it's a fully working application.
And to be honest, I'm quite proud of this design, I created the design myself course I'm both a developer and the designer.
So that's why I love doing design stuff also.
And I think it looks pretty neat.
Actually, I've updated it slightly, since two previous versions to look a little bit more modern.
But I think it's mostly Yeah, I changed some colors, for example, on the bottom and stuff like that.
Alright, so that's the application.
In the next video, I'm going to talk about the Movie Database API, and how you can register to get your own free API key that I'm going to use in this course.
Okay, so let's talk about the Movie Database API.
That's the API that we're going to use in this course.
And the Movie Database has a great API for fetching a lot of movies, TV shows and stuff like that, we are going to focus on the movies.
So that's what we're going to do here.
And you can sign up for a free account at the Movie Database.
So just go to the movie db.org.
And click Join TMDB.
And then you can fill out a username and password an email and create an account.
And when you have created an account, you probably get an email where you have to verify yourself before you can log in.
But when you have created your account, make sure that you go back to the movie DB and click on login.
And then you enter your username and password just as a regular site that you log into.
All right, and then you're presented with this dashboard kind of thing.
I think it's a dashboard.
And the only thing you have to do is go up here to your profile and click on this round button up here.
And then you have the settings here so she'll settings.
And then at the left menu here, you can see that you have something that's called API.
So click on API, I guess I probably have to blur this ones out because I don't want to show you my own API key.
This is the one that we using API key version three auth.
So this is the one that we're going to use.
So make sure to save this somewhere for now because we are going to add it to our application in a little while.
So make sure that you have easy access to this one as we're going to paste this in into our application in a little while when we have bootstrapped our application with something that's called create react app.
And I'm going to talk more about that in a little while.
Before we start creating our application, I just want to talk a little bit about react and what it is.
So if you go to the React js.org, you can read more about react.
And this is a great starting point, if you just started out with react, they have different documentation, they have tutorials, and a blog and stuff like that.
And you can read everything that you need to know to get started with react.
So I tried to make this course kind of beginner friendly.
But react is kind of at least intermediate in its own nature.
So it's hard to make it really, really beginner friendly.
It also depends a lot on how you learn stuff, I love to learn stuff in this product oriented way, where I just build some product and learn along the way.
So I only create courses on how I want to learn stuff myself, but it's very individual.
So some may think that it's not beginner friendly at all, and so many things that it is.
That's why I also recommend to check out react js.org to read about the very, very basic stuff, at least in react.
So what is react? Yeah, React is a JavaScript library for building user interfaces, as they tell you here, I think, actually that this sentence is a little bit misleading, because you're using react for so much more than to just build a user interface.
For example, I build a lot of stuff, I build small games, I build a Pac Man game, for example.
And I build all the logic in react also.
So it's not only the view layer, so it can be a little bit misleading here, I think.
Just thinking about that you create the components for the view.
But that's not the case, you can use react for so much more if you want to do that.
And in this application, we're building everything in react.
So we have all the API calls and everything it's done from react.
So that's how we're going to use it in this course.
And react uses declarative peridinium.
I don't even know if I pronounced that correctly.
But hopefully, you know what I mean.
So react is declarative.
But for example, jQuery is imperative.
And when something is declarative, you explain, in this case, the user interface, how it will look, you don't have to tell it exactly how you want to achieve that look, you just tell it that we want our UI to look in a certain way.
And then react takes care of the rest.
For example, in jQuery, we have to grab the DOM elements.
And we have to modify the DOM elements.
And we have to create them row by row, and then attach the element to the DOM itself.
So there can be a lot of code involved in doing something simple, actually.
But in react, for example, we have as the Savior, it's component based.
So we create a component, and then we just tell react to use that component.
And it will render out that to the dome for us.
And this will be more clear as we go along in the course and create our own components and create the application itself.
So don't worry if you don't understand everything right now.
So it's declarative, its component base and learn once write anywhere yet as to tell you here, they don't care about the rest of the technology stack.
So that's great, you can use a lot of stuff in combination with react.
So what is a react component? Yeah, we can take a look here, for example, here they create, this is a class and this is kind of, I like to call it the old way, the classes still exist, I don't use them anymore.
And in this course, we're going to focus on creating functional components.
And I'm going to tell you more about that later.
And in the end of the tutorial, when we're finished application, I also going to show you how to convert some of the components, the stateful components to class components, just in case, you need to know how to create class components also, because the reality is, if you start working for a company or a client, there may probably be some components that are still class components.
Because there's a lot of applications made in react that's made before we had state in functional components.
That's why you had to had a class before to have stayed in them.
And we're going to talk about that later also.
So this is a component they created with a class and they call it Hello message.
And as you can see here, they using something that's very much like regular HTML, they have this tag here with a Hello message.
And this name is a so called prop the sending in, and we're going to talk more about props also later, so don't worry about that.
But this is actually not HTML.
It's something that called JSX.
And that's something that we're also going to learn in this course.
So we create the component here, we tell it to use this component and react will take care of the rest and create this div with our text Hello.
And in this case, it's going to be the name that we send in with a prop.
So the name is going to be Taylor.
It's going to type out Hello Taylor.
As you can see here.
So this is very, very neat with react, we can reuse these components in our application.
So that's short on what react is.
And as I told you, we're going to learn a lot more stuff in the course itself when we create application.
And hopefully, at the end of the course, you'll have more understanding of react and how awesome it is.
Because I really love react, I'm really passionate about using react.
And actually, this course is also something that I'm very passionate about.
Because this is my first ever course I created.
And this is the third version, meaning that I have listened to people that have enrolled this course before and changed stuff and added stuff to make it more optimal and more perfect.
And hopefully, you will enjoy this course.
For this course, I provided you with a sip file that you should download before you start the course.
And this zip file contains a few folders here, as you can see, and it may look maybe a little bit different when I am the recording of this course, because I haven't really recorded it yet, but I think it will look this way.
But if it looks a little bit different, it's okay.
Hopefully you can read the folder names and understand what they for.
So I'm going to provide you with a folder that's called files to be copied to the project folder.
These are files that we're going to use for the course.
So I have created a file for us the setups API, so we don't have to write our own functions for fetching the data.
So I'm going to show you that when we fetch data from the API, I have a config file and a helpers file.
And I'm going to talk more about those later also.
And then I have a few images that we also need for the course.
So that's why I have this folder that we're going to copy over to a project when we have created it, and the public folder, the index dot HTML file, I have this here, because I'm using a Google Font for this one.
So I've already provided that one in the index dot HTML, so we don't have to do that ourselves.
So that's the one that we have to copy later.
And I'm going to show you that when the time comes.
And you're also going to have two options.
If you don't want to create everything from scratch, when I set up the application, you can just ignore that and start from a project without the styles.
And this is if you want to create the styles also, I structured this course.
So you should be able to fairly easily just skip the parts where I create the styling for the components.
Some people have, you don't want to create the CSS and the styling.
So that's why I made it in this way.
So this is the one you should use if you want to create the styles.
Otherwise, you use the one that's called with styles, that one will provide you with all the styling, so you don't have to type in the styles.
And you can skip those videos.
So if you want to start from one of those projects, you navigate inside of that one, and in your terminal, you type npm install, and that's going to install all the dependencies for you.
And then every time you start up the application, you can type in NPM start.
And that's also something that I'm going to show you, so don't worry about that.
Then you have a folder with the finished app if you want to check out the result.
But please be aware here, you have to put your own API key in a file that's hidden here now is called dot end.
inside of that one, you have to paste in your own API key, otherwise, it won't work.
And that goes for the step solutions.
Also, I have provided you with step solutions that corresponds to each video.
And if you want to run an example, from a particular step solution, you also have to paste in your API key in the dot m file.
And I also got to talk more about the dot m file.
But this is the start of files.
So you have to think about if you want to create the styling in this course, and you also have to think about now if you want to set everything up from scratch.
Or if you don't want to do that, you can just start from one of these folders here, navigate inside Odin type npm install, or if you're using yarn, you should be able to use that one also.
And then NPM start or yarn start to start up the application.
Alright, let's move on in the next video.
I'm just shortly going to talk about the tooling that I'm using for this course.
Just a short, short little video about what tooling I'm using for this course, I think you already should know this tooling and have it installed to be able to fully take advantage of this course.
Otherwise, it can be a little bit hard.
if you for example, haven't used NPM that I'm going to use to install dependencies.
I suggest that you learn about that first, because this is a beginner slash intermediate course in react.
It's not a beginner course in coding, you should know some JavaScript and especially iOS six syntax, we're going to use a lot of iOS six syntax in this course.
So it should be a good idea to shape up your knowledge in JavaScript before starting to learn.
react.
But that's only my opinion.
But of course, you should do it your own way.
If you want to learn react before vanilla JavaScript, it's totally up to you, I shouldn't tell anyone on how they want to take on their coding journey.
All right, so I'm using NPM.
And that means that I have to have node installed, we're not using no de s, per se.
But no, Deus includes the NPM package manager.
So that's why we have to install that one.
So if you don't have that installed, make sure to grab the latest version and install it.
Then I use Visual Studio code as my ID.
So that's what I'm using in this course.
And then I'm going to use create react app and bootstrap our react application really fast and easy.
So that's what we're going to do.
And I'm actually going to do that in the next video.
So let's get started with our application.
I'm happy to see that you're going to create this project from scratch.
And we're going to use create react app to bootstrap our application.
So let's get started.
If we look at the homepage for create react app, you can find it at create dash react dash app dot Dev.
And then they have something here in the menu that's called get started.
And the only thing that we have to do is remember this row here mpex, create dash react dash app.
And then you have the name of your application that you want to create an empty x is something that's provided with NPM in the latest versions, so you don't have to globally install create react app to use it, this will make sure that we grab the latest version.
So I always use mpex, instead of first globally installing create react app.
So this is really great, because then I know that I'm using the latest version, and you don't have to install it globally.
But if you want to do that, you can of course install create react app globally first, but this is the command that I'm going to use.
So make sure that you navigate inside of your terminal.
I'm using a terminal that's called hyper, I get a lot of questions about that what terminal I'm using, I actually don't remember the name of the theme, but I style it a little bit to my likings.
So that's sweet.
So hyper is a great terminal.
If you want to have a customized terminal.
You also have a built in Terminal in Visual Studio code, of course.
So let's get started, make sure that you navigate inside of a folder where you want to create the reputation.
And then we type in MP x and then create dash, React dash app.
And then we have the name of our application.
And I'm going to name it react dash or dB.
And RM DB stands for react Movie Database.
So that's the best I could come up with.
You can use whatever name you want.
And then we can hit Enter, and then wait for it.
It will install everything for us.
So it will take a little while.
All right.
Hopefully that installed correctly for you.
And create react app has now hopefully bootstrap or application, you could set up this yourself and not use create react app.
But create react app is actually used in in many production applications.
And it's actually used right now for a client that I work with.
And it's a fairly large application.
So you can do a lot of stuff with create react app.
And it's using Babel and Webpack in the background to set up direct environment for you.
So that's what you can do yourself if you don't want to use crate react app.
But I'm not going to show that in this course, because I think it's a little bit advanced for a beginner course.
And actually, we're going to be fine with create react app, that's all that we need.
So we also want to make sure that it works.
So make sure that you navigate inside of the product folder, I'm going to clear this and then type in a CD, React dash or MDB, or whatever you named it.
And then we're inside of that folder.
And then we can type NPM start.
And it should start up our environment.
This is the finished one that's here now.
So it's going to be replaced by this application here.
So it's working.
And we have successfully bootstrap our application.
And that's sweet.
In the next video, we're going to install a few dependencies that we're going to use for this project.
We are bootstrap the application.
And now we're going to install some dependencies that we're going to use for this project.
And the first one is going to be something that's called react router.
And react router is the standard in react application for handling routes, because this is a single page application.
And we need something to handle or rolling because we are going to have different pages.
And the one that we're going to use is called react router.
There is another library that's called reach router.
And I'm actually using that one in version two of this course.
But the team that created reach router and react router is the same team.
So they're going to kind of merge them together into react router, version six.
And this one is still in beta mode, but I've talked to them and I think that I should have this one in this course, because it will soon be out.
And the API won't likely change because we're not going to use the most advanced stuff in this router library.
So we will be fine.
And we have some instructions down here.
I'm at github.com, forward slash react training forward slash react dash router, forward slash releases.
And down below here, we can see that we have some instructions on how to install it.
So I'm going to bring up my terminal, do something like this.
And we could of course, just copy this one and paste it in.
But in my courses, I wanted to learn as much as possible.
And it's always a great idea to not copy paste too much and type stuff in because that will make you remember stuff much easier.
So that's what we're going to do now.
So I'm going to type in MPM II, or if you're using yarn, you can, of course use that instead, I'm going to use NPM for this whole course.
And I'm typing in I instead of typing out the complete word install, that's a short term for install.
So NPM I, and then we need to install something that's called history.
Also, that's another library that's used in combination with react router, and we can install them in one go.
If I type history here, then I have a blank space.
And then I can type in the other library that I want install.
And in this case, it's going to be react dash, router, dash dome.
And then we have an add sign.
And next, and this will grab the better version of react router.
So press enter, and wait for it.
Hopefully, that installed for you correctly.
So I'm going to clear my console again.
And we're going to move on to something that's called styled components, styled components is a super great library to use in combination with react with styled components, we can create our CSS in isolated and scoped components.
So that's really, really great.
And we have a lot of features that we have, for example, in SAS, we can do nesting and stuff like that.
And we can send him props and change our styling dynamically.
And we're going to talk more about styled components as we go along in this course, because we are going to create the styling.
If you choose that path there, I really think you should if you want to have some CSS practice, but it's up to you, I provided you with different alternatives for this course.
So we're going to install style components.
And you can read more about it at style dash components.com.
So go back to the terminal, and we type in MPM is styled dash components.
And we press enter.
Alright, that went smoothly.
So clear the console yet again, and we move on to the last dependency that we need.
And that is something that's called prop types.
Prop types is a great tool in react, where you can type check your props that you send into your components.
So as they say, here is runtime type checking for react props and similar objects.
So that's great.
Today, a lot of people use TypeScript instead, then you don't need to use prop types.
And I actually use TypeScript a lot myself, I'm starting to like it actually.
But in our case, we're not using TypeScript.
Right.
Now, I'm going to show you that at the end of this course in a special module that I created, where we refactor everything to use TypeScript instead.
But for now, we're not using TypeScript.
So that's why we're going to use prop types.
And I'm going to talk more about this later in the course.
And I've placed it title at the end of the course, because I don't want too much stuff going on when we learn react.
So that's why, so I'm going to talk about it at the end of the course.
And when you create a component that has some props, you should use prop types to do type checking on your props.
But I'm not going to do that first, I'm going to add it in later in the course.
So we don't get distracted or have too much stuff going on.
All right, to go back to the terminal, type in NPM.
I dropped dash types, and press enter.
So that's it.
That's our dependencies.
And of course, I didn't mention it at the start of this video, you should of course be in the folder that we created the application that we bootstrapped with create react app, it's very important, you have to navigate inside of that folder.
Otherwise, it won't work because we're installing the dependencies in that project folder.
Alright, in the next video, we're going to copy some files from the store to file c file to this project that we're going to need to make this work.
If we look inside of our project folder, React dash orientdb, we can see that we have some different folders and files here.
And for example, if we look in the public folder, we can see that we have some image files and the index dot HTML file.
And this is the folder that the dev environment is going to build for us.
So the public folder is the finished files that we're using for running the application.
So that's everything inside of there.
And the source folder.
The src folder is going to be the folder where we create all our stuff for application.
So you can see we have some CSS file, we have an app file, an index file and an index CSS file.
We also have a test file.
We're not going to do any tests in this course.
So this one, we're not going to use.
And we have a service worker, we're not going to use this one either.
And we have the set of tests that we're not going to use.
If we take a look inside of a zip file, the starter files that you should have downloaded for this course.
And we take a look inside of the first folder here, one files to be copied to product folder.
Alright, so that's the files that gonna be copied to the project.
So make sure that you mark them here, copy them, move back to your folder, your project folder, and paste them in.
And then you're going to choose to replace the old folders.
This one is in Swedish here.
So you probably don't understand it if you're not from Sweden.
But what it says here is to replace it, so I'm going to click that button.
And then it's going to ask me if I want to merge the source folder or if I want to replace it.
So if it asks you to merge it or replace it, always choose replace.
All right, so we successfully copied the files.
And if we take a look inside of the public folder, here, we're going to have exactly the same files.
The only difference is that I've added in a Google import of a font that's called Abel or Apple, I don't really know, if I pronounce it correctly, it sounds better to pronounce it, Abel.
So I think that's the correct one.
That's the only thing I've changed here.
And that's the in the index dot HTML file, the other files remain the same.
So that's the public folder.
And if we look inside of the src folder, you can see that it's lesser files now.
And that's because I removed all the files that has something to do with tests, or the service worker and all the CSS files that we don't need, because we're going to use styled components.
And I also added in some files and a folder, we have the images folder.
And this one, of course contains the images that we're going to use for this course.
And then I have a file that called API dot j s.
And inside of this file, there are some functions that are going to handle the API calls to the Movie Database API.
And in the previous versions, we actually created this ones ourselves in the course.
But I think that was just a distraction from react and react syntax.
Because this is a course about learning react.
And the thing is that this is regular JavaScript inside of this one, it has nothing to do with react per se.
So that's why I created this one for you instead, and placed them in a file.
And of course, I'm going to talk more about these functions when we reach that point in the course.
And then I have a config file.
And this config file contains everything that has to be set up with a Movie Database API.
And I have a helpers file also, and help us file contains a couple of functions that will help us to convert some numbers into money, and also to convert our time.
And I'm gonna talk more about these two files also, later in this course.
So these are the files, hopefully this one will work.
So if we go back to our terminal, and this one is running now, so just to be sure, I'm going to break it and run NPM start just to see that it works.
It's always a great idea to see that stuff works when you're sharing something.
And then I go to my browser and reload the page.
And you can see I'm at localhost 3000, just as before.
But now this nice little rotating react logo is removed, and it says start here.
And that is because I removed that one.
And I've modified this file so that we can start from here now in this application.
So if it says start here, you know that you successfully copied all the files, hopefully, and it should work for you.
In the next video, we're going to move on and actually use that API key that you got when you registered for the Movie Database API.
Okay, we got one more thing to do.
And then we finished with the setup of our project.
And that is that we're going to create a dot m file and paste in our API key.
So in our application folder at the root, we're going to create a new file, I'm going to call it dot E and V dot m, and create react app has built in support for environmental variables, the only thing that you have to do is to name them with react first.
So react, underscore, and that's important, otherwise, it won't recognize it.
And this one is going to be called AP underscore API underscore key, all capital letters.
And then we have an equal sign.
And then you can paste in your API key here.
And that's everything you have to do.
So just paste it in just after the equal sign, and you're good to go.
And save the file.
This API key is then used in the source folder in my config.js file.
You can see that our get it to here, process dot n dot react app API key.
And this is all managed inside of the Create react app.
When it starts up or dev environment and creates all the files for us and stuff.
It will take care of these various really important to market with react underscore before the actual name of the environmental variable and all this Here is something that I created for you.
So you don't have to care about this.
So I create the different resources from the endpoint on the Movie Database here.
And we're going to use these resources in the course later.
And then I'm going to talk about more.
So I have different endpoints for the search, for example, and to get the popular movies.
And this was our for the bonus videos at the end, where I create the login, and voting that also provided with the Movie Database API, you can log in with your account, and cast a vote on a movie, or on old movies.
If you want to do that.
Then we have the image base URL.
This one is also from the movie database.
So these ones are provided from the API.
So just use them according to their instructions.
And we have a backdrop size, we can set the size of the backdrop and the poster size on the images, we can set different sizes here and I mark them here for you if you want to try to change them and see what it does.
So we don't have to think more about these as I set them up for you.
And there's also a file, it's called API dot j s.
And inside of this one, I created the actual code that is going to fetch the data, we can call these functions later when we fetch the data.
And we don't have to type in all of this ourselves.
And of course, I'm also going to talk more about these functions later when we fetch the movies.
So this one is for fetching all the movies, and this one is for fetching one movie.
And then we have this one here that will fetch the credits.
And below here, these are all for the bonus material also.
So you don't have to care about those in the kind of main part of the course.
So we have three functions here that is going to fetch data for us.
So that's one thing I changed actually, in this version of the course before this, we created these ones ourselves in the course, but I think it's a little bit advanced for a beginner course.
And I also think that it takes the focus on react itself, because this is JavaScript, it's not react specific code.
So that's why and I want this experience, I want this course to be a fun course also.
So you don't get tired and stop the course and won't finish it.
So that's why I created these ones for us.
Alright, so that's the config and a py file.
And then I have one more file that's called helpers dot j s.
And this one contains two functions, that's going to help us to calculate the time and also convert to money, because the numbers that we get from the API has to be converted both the time and the money.
So I'm going to use these ones later in the course also.
Alright, so create the dot m file, create a variable, React underscore app, underscore API underscore key capital letters equals and then you paste in your API key.
Otherwise, it won't work because you can't access the API.
one really important thing to notice here is that this environmental variable won't be safe, because it will be visible in the client.
So don't think that this one won't show up in the browser, of course, you have to look for it.
But if you're good at looking through code, you will be able to find this API key.
So this is not a safe way to provide an API key if you want to hide it from the browser.
In our case, it's not that kind of a secret key, that doesn't matter.
And for the sake of the course, it would be too advanced to create a system that will hide this for us completely.
So notice, this one won't be safe in the client.
Before we move on, I want to talk about a really important aspect of react that I think a lot of people actually forget.
And that is when we create stuff with react, we are also using something that's called JSX.
And it stands for JavaScript, XML.
And if we look here, I'm at the React js.org page now, and they show us here how to create the component.
And this is a class component.
And as I told you, before, we are going to create functional components.
So we're not going to create class components for this application.
But they are using JSX.
Here, and this is JSX.
You may think that this is HTML, but it's actually not it's JSX.
And JSX is something that is really great to use in combination with react, because we can render out our different components like this by using HTML ish syntax.
I think a lot of people actually forget it.
Because I don't know exactly the percentage, but I think at least 99% of the applications use JSX.
In combination with react, some people don't use it.
And that's what I'm going to talk about here.
Because you can create components without JSX in react.
And that is if we scroll down here, you use something that's called create element on the React objects react dot create element, we specify if we want some props.
And then we specify the Child Elements for this element.
And you can see up here, React dot create element, we have the component that we want to create, we have the props, and also we have the children and this is the spread syntax in JavaScript, he has six.
That's why they use three dots here to explain this though.
This one Here is actually the same as this, this one here, will transpile down to react dot create element.
But it wouldn't be practical to use react dot create element for every component and everything you do in react, you can see that it's not that readable, and it will get kind of messy.
And I actually think that react wouldn't be that fun to use if you use it this way.
So I'm just going to show you how to create an element with react dot create element also.
And in the next video, I'm going to talk more about JSX.
But now I'm going to show you just a small example on how you can create an element with react dot create element.
So let's move back to our terminal and make sure that our dev environment is running.
So NPM start, always use NPM.
Start, when you start up your dev server, you can see that we have it running here now.
Then I go back to Visual Studio code.
And I'm going to be in the app.js file.
For this one, it's inside the src folder.
And this is kind of the heart of our application, we have the index.js.
That is the start file for the application.
And you can see the there are import the app component here, these imports are e6 syntax for import.
So we can import a model.
And in this case, the model is a component.
And it's called app.
So I import that one here.
And then it's used here and this one is JSX.
So this is the heart of our application, we have both a library that's called react.
And we have react Dom because react can be used for other stuff than the DOM, for example, you can create native apps with react.
But we are going to use the library react DOM.
And this one is all set up with create react app for us.
So you can see that from the React Dom that we import here, we call the render method.
And we give it the component that we want to render.
And we'll tell it where we want to render it.
So from the document dot get element by ID, we get the root element.
So if we look inside a republic and the index dot HTML, you can see that we have a div here, that's called root.
And it's inside of this div, that we're going to render out our complete application within close to public folder node, and go back to the index.js file.
So we're telling react to render our application to a div that's called route.
And it's also in something that's called react strict mode.
It wasn't that before.
But this is a default.
Now with great drag that in strict mode is actually great.
It's going to do a few more checks if you do some stuff that it shouldn't be doing when you code your application.
So it's always a good idea to using the strict mode in react.
Alright, so let's move back to the app.js file.
And as you can see, here, we have this element here, we have the div that's called AP.
And I render out start here.
And that's the one that we saw before, when we started up the application.
You don't have to type this in if you don't want, because I want to show you this, this has nothing to do with application that we're going to build.
So I'm going to create a little component now.
And then I'm going to remove it and we can continue on creating our application.
I'm going to do it with an arrow function, I like to use arrow function, they don't do it here.
But you can change this one if you want to an arrow function const app equals, and then we create an arrow here instead, like that, I'm used to using arrow functions.
So I use them for components also.
So const, I'm going to create a component that's called store, and I have an arrow function.
And then from react, we import react here, you always have to import react at the top, and another call create element, I have a parenthesis, I'm going to create a div.
And then we're not going to have any props because we haven't talked about props yet.
So I set that one to now, and then I'm going to render out the screen.
This is a little store like that, and I'm going to remove the sidebar, we can see the component here.
So this is instead of using JSX.
And if we want to render this one out, instead of returning this one here, I'm going to return the store.
And as this is the function now, I also have to call it like this, save it.
And then I'm going to go back to the application.
And you can see this is a little star, so it renders out perfectly.
And this is just a small example.
And I want to just for you to notice that you don't need to use JSX.
And this is actually the React functionality at its core.
So you don't have to use JSX.
But we are going to use JSX because it's sweet, and it's fun to work with.
And I think actually that it would be a small l creating applications without JSX at least I think so.
So, I remove everything I created here and save the file.
Again, just make sure that it works stored here.
And it works and that's great.
So that's a little bit about react dot create element and using react Without JSX, just a small, small note on that one, I'm not going to go any deeper into it, because I don't think it's actually relevant to use react without JSX.
So that's why.
Okay, I talked a little about using react without JSX.
But I actually don't think that's a great idea.
So that's why I also want to talk a little about JSX before we move on with this application.
So JSX stands for JavaScript, XML, and it's pretty similar to regular HTML.
So if we take a look here, you can see that they create an h1 tag here that says hello word.
And this looks just like plain HTML.
But as they say, here, this fun attack syntax is neither a string nor HTML, I actually don't think it's a fun attack as to say here, but alright, you get the ID, why JSX.
We can read here more about why we are using JSX.
And the main thing here thing is that they don't want to put markup in one file and logic in another file, they want to have them combined in one file.
And that may sound scary for some, because a couple of years ago, you shouldn't ever mix them together.
But in react, it works really great.
And as they say, here, rack components contain both markup and logic.
So JSX is something that is created to look pretty similar to HTML, there are a few differences.
And I wanted to talk about those here.
Because in this case, we create an h1 element.
And that looks exactly the same.
But there are some stuff that differ from regular HTML.
And for example, you can see you can embed JavaScript as expressions here.
For the source area in the image tag, for example, you can use curly brackets, and then you embed your JavaScript expression.
And that's super great that you can combine them this way.
And also, as you look at tab index, it's camel cased that differs from HTML.
And they say it here also seems JSX is closer to the JavaScript, then to HTML, react, Dom uses camel case property naming convention instead of HTML attribute names.
So remember that, that you have to use camel case in JSX.
And there are some few differences.
For example, when you set a class on an element, you don't use the class keyword, you use class name, camel cased.
And they also mentioned it here.
And it took a little bit of time for me to get used to this one.
And no, I actually typing class name when I type out regular HTML.
And also, it's good to know that JSX is quite safe, it prevents injection attacks and stuff like that.
So I think you'll learn a lot about JSX.
As we go along in this course, because we are going to use practical examples in this course, not the most important part is to remember that JSX is not HTML.
And it's also used camel casing when you create an attribute.
Before we dive in and create our components with state and props, and all these vital things in react, you can sit down, relax, have a drink, have a beer, have a cup of tea, or whatever you're drinking.
And just listen to me in this video, where I'm going to talk a little about props and state in react, the first thing you can do is to imagine that this is a room seen from above.
And the gray circle here is a lamp that's not turned on.
And the orange one is a lamp that's turned on, each of these lamps has a light switch that is often on.
So if I click this one here, I can turn this light on and the light switch is going to change to on.
And this one I can turn it off.
So both lamps are off, and I turn this one on, and I turn this one on.
And this is made possible because I can use state in react.
So I have two states for the lamps.
I have one state for the first time and one for the second lamp that is a Boolean that is telling if the lamp is on and off.
But if we think about this, we actually have a state of the room also, because we need a state also for the light switch to change from off to on.
Because these are kind of tied together so that you can look at the state in different perspectives.
In this case, I will look at the state from the room perspective.
So I haven't placed the states in the lamps or in the light switches, I have placed the states in the room itself because we have a room stage and for the room is going to be if the lamps and the light switches are on or off.
So we have a state for the room itself.
And this is what I talked about in the for example the React documentation, they tell you that you can lift up the state to a parent component if you want to use that stayed in multiple child components.
Because if we placed the state in the lamp itself, for example, we could only access that state in the lamp unto its child components.
Of course, we could place the light switches as a child to the lamp, but that wouldn't be the most effective way of doing it.
And it would complicate things if you want to reuse your code.
So what I've done here is study is that I had this room here and I placed the components in the room and I'm also going to have the state in the room so we can use that state both for the lamps and the light switches and I'm going to show you how Do this now, and also talk a little bit more about state and props.
So if we take a look inside of the code here, this is the application that I created for you.
You can also open it up from the source files in this course, I provided it there.
So I have the index file, the standard index file that shows the app component, and app component is actually going to be the room.
So I could also name this room because this is actually the room component.
And as you can see here, in the room component, I'm creating two states.
In react when you create a state with hooks, you use something that's called the use state hook.
Before we had hooks, we had to use classes to have state in them.
So you couldn't ever create a functional component that has stayed in them.
But now we have hooks, and that means that we can have stateful functional components.
And that's sweet.
So when we call this use state hook, we can initialize it with an initial value.
So in this case, I'm giving it false, because I want this lamp to be turned off initially.
Then I do something that's called ear six destruction here on destruction of this array that I get back from the use state hook.
So we can name our state here to whatever we want.
In this case, I name it is lamp one on and then we have the Center for the state center is lamp one on.
And there's a few things you should know about state in react.
And the first one is that you should look at the state as immutable, you should never mutate the state, then that means that you always should use the state setter that you get back to set the state in react.
If you're modifying the state directly, for example, try to change this one.
This means that your component won't rerender.
And that's no good.
And it can also cause a lot of trouble in the future for you in the application.
But if you use the setter and change the state and don't mutate the state, your component will rerender and update the DOM.
And this is how stuff works in react, you update the DOM when your components rerender.
And one more thing with functional components is that we can add as many states as we want with the use state hook in the class components, you can only have one state, so you have to turn to create an object with different properties to hold your state.
So this is super sweet, we can divide the states up now depending on how we want to structure the state.
So in this case, I created two states, I have one for the lamp one, and I have one for lamp two.
So they are doing the exact same thing.
The only difference here is when I initialize it, I set this one to true and this will turn lamp two on.
Alright, now I have two functions.
And these ones are going to be called when we click the light switch.
So I have one for the light switch one and one for the light switch two, you could have one function instead.
But I want to make it really, really clear on how stuff works.
So that's why I created two of them.
So we have one function for the switch one and one for the switch two.
And this one will set is lamp one, that's the setter for the state one for the lamp one.
And what I do here is that I provide it with an inline function.
And when you provide the state setter with a function, it will get called with the previous state.
So in this case, I'm going to flip that boolean value.
So when I click the button, the first time this value is going to get be true instead because it's false initially.
And this one for a button two is going to be false because it's true.
All right, these are functions for a light switches.
So if we looked at the JSX, here, what we return to the dome, this one is a room component.
And if I go up here, you can see that this is the style component that we're also going to talk a lot about in this course, I create a style component, that's a div here.
So I set some styling on that one on the room itself, I make it 500 pixels width and 500 pixels in height, then I set a border on it, and the margin zero in order is going to center it on the screen.
So everything is wrapped in this room component, then I have a component, that's the lamp, I'm going to talk about that in a second.
And I also have the light switch.
So we have the state in this app component.
That's the room.
So this is where I kind of gather all the states for this little simple application.
And this way, I can use this state in both the lamp component and the light switch.
Because as you can see here for the lamp component i created something that's called props, props is something that you can create and that will get sent along into your component that you create props is an object.
So you can create as many properties on that object as you want.
In this case, I created a lamp on Prop.
So this one will be sent into the lamp component in the prop object.
I also created a prop that's called position.
And this is how I can make the lamp appear on the left or on the right in the room.
And lamp on is going to be the state for the lamps.
So this one is going to be a Boolean.
And that way this component will know if the lamp is on and off.
And I'm going to show you that in a second.
And I do the same with a light switch.
And for this one I have the callback as I showed up here.
I give this one a prop that I call callback.
It doesn't have to be Call callback, that's the name that I chose.
And the switch on, I'm going to give it a lamp state for this one.
So you can see that I use the lamp states for both the lamp and the light switches.
And this is what I talked about before, if we created the state for the lamp in the lamp itself, we wouldn't be able to access this state for the light switch, then we have to create the light switch as a child of the lamp.
And that's no good, as you probably can see now, because now we can place as many lamps and light switches we want in our room.
So it would be much harder to do it if we place the stain in the lamp itself.
And I also have a position prop for the light switch.
So let's go inside of the lamp component that I created here.
I also have a wrapper div for this one that's a styled component.
So I wrap everything in that div.
And the interesting thing with style components is that they also can have props because they are also valid react components.
So we can use props in our style components to modify our CSS.
And that's one of the super strengths with style components, I think, because as you can see here, this is this is something that's called a template literal.
And in this template literal, we can grab the props that are sent into this component.
So in this case, I create dollar sign and curly brackets, and I can use a JavaScript expression.
And I have this inline function here that gets the props.
So if we look at the wrapper component down here, you can see that I also send in a prop lamp on and the position.
So I'm just sending along these props that are initially sent into the lamp component.
So I get them in the lab component, and then I also send them along to the wrapper component.
That's the style component.
And by doing this, I can, for example, check here, if the props dot position equals to the left, then I'm going to set the left value to 20 pixels.
Otherwise, I set it to three or underneath two pixels, and that will place it to the right in the room.
So this way, I can modify my CSS and make it very, very dynamic.
So that's really sweet that you also can use props in the style components.
Alright, that's how style component and props works.
So if we look at the lab component here, I'm sending in these props here.
And what I'm doing here is I'm using iOS six destructuring.
So from the objects that we get that you usually call it props, I'm destructuring out these values that are sending, if I didn't do the destructuring here, and I just do it like this, you can see that it wants me here now, then I have to type in props, dot and props, not because the props is an object, so I have to grab those specific properties from the toggle.
But if I destructor it out as I do, here, I don't have to type that in every time.
So I just structure out the properties here instead.
And there's a few things you should know about props because they differ from state.
And the main difference is that the props are passed into the components.
And you should never ever change the props in the component that gets the props, the props, values are changed from the parent that is sending in the props to the component.
So if the props change in the parent, it's also going to rerender, this component here.
So never ever change the props values in this component, you can change the state in the component with a state setter.
And that's how you, for example, can trigger a rerender.
When you change the state in a component.
So that's fine, you should change the state in the component with the setters.
But a prompt should never be ashamed in a component that receives the props.
When the prop value changes, this component will rerender and it will have the new value in the props.
So that's how props works.
All right, we can check out the light switch.
Also, I'm doing the same here I am destructuring out the props here.
And I have this bottom component.
That's the star component.
And I modify it with props here also.
So I'm doing the exact same thing here.
And you can see here that are sending the callback, that's the function that I have in the app component here.
So that's the one I'm sending in with a callback prop into the light switch.
And then I have my button, and the button has an onClick handler an onClick handler will trigger this callback function.
And this makes this component very dynamic because by using props, you can make your component dynamic.
And you can use it in different situations.
In this case, I can send in whatever callback function I want to be triggered when I click on the button.
So that means that I can use this button in different situations.
In this case, I also showing the switch on and off because I was sending in the prop switch on.
So it probably won't be useful, too much less than this use case specifically.
But if you want you can use this button for something else done to trigger a lamp to be turned on or off, you can turn something else on and off and have another callback function and that will work.
So that's what you use props for.
Also, you can make your components dynamic and reusable by giving them some props.
And by using these props inside of the component.
You can adapt your component and change the logic you can change the JSX and what it should render and stuff like that.
So that is really useful to us.
props for that.
Alright, so that's short on state and props.
I hope this one gave you some insight before we start creating our own.
So let's move on in the next video, I'm going to talk more about style components and what they are.
There's one less thing I want to talk about before we start creating some code for real.
And that is styled components.
Because in the next video, we're going to create a global styles for our application.
And we're going to do that with styled components.
So just a short talk about style components and why it's so great.
And I think the biggest benefit is one that you get scoped CSS.
And that means that you can have the same class names for different components, it doesn't matter because it's scoped to that component.
And number two is that you can use syntax, kind of like sass, for example, you can nest stuff, and you don't need to have polyfills, and stuff like that, it will create all that automatically for you.
And number three, is that you can have props inside of it.
And props is something that we're going to talk a lot about in this course, because it's an essential part in react.
And that means that you can modify the CSS by sending in different props to your styles, you don't need to know exactly now how props work, because we're going to talk about that later in the course.
And also, you can use just plain regular CSS, and that's super great also.
So that is some benefits that style components will provide to you when using it in your application.
So we already install this library.
And when you use it, you have to import something that's called style, I think they have an example down here, here, input styled from styled components.
And style is an object that holds different properties.
For example, in this case, they want to style a bottom.
So these properties corresponds to what they are called in HTML.
So if you want to style a button, if you want to create a style component, that is a button, you use style dot button, and then you have a template literal.
So this is something that's called a tag template literal.
And that is a function that you call with a template literal.
So this is e6 syntax in JavaScript.
And it's super great, because if we move up here, again, you can see, we have this template literal.
Here, you have the starting backtick.
And you have the end back to here.
And inside of here, we can write our CSS.
In this case, they're using style dot A, because they want to style an a tag.
And then they do some stuff here, plain regular CSS.
But here is something that's happening.
That's not plain CSS.
And this is because we using a template literal here, we can use JavaScript expressions inside of this template literal.
And when you want to use an expression inside of a template literal, you do that with $1 sign, and you wrap it inside of curly brackets.
And then you can have any JavaScript expression that you want inside of here, and it will interpolate it into the string.
And in this case, you can see that they have their props, and they have an inline arrow function.
And from the props, they grab a prop.
That's called primary.
And you can set this CSS conditionally, depending on this primary prop.
And we're going to talk more about this later, as I told you, so don't get intimidated.
If you don't understand this syntax right now, hopefully, you will understand it fully when this course is over.
This is just a short introduction, before we create the global styling.
And we're going to do that in the next video.
It's time to start coding.
And we're going to start by creating some global styles.
The first thing you have to do is to start up your dev environment.
And you do that by navigating inside of the folder of your application.
And then you type NPM start, and that will start everything up for you.
And hopefully it looks something like this, it should say start here.
And it's always a good idea to have your console open.
I'm on Chrome now.
So it looks something like this.
And also I can recommend an extension.
That's called react developer tools.
And then you will have access to something that's called components here.
And if we open that up, we can see our application here.
But in this case, we don't have any components yet.
So it will just show the app component here.
But this is a great tool when you develop stuff in react.
So highly recommended install react developer tools.
Okay, so let's move back to our application inside of Visual Studio code, or whatever ID or using an inside src folder, we're going to create a new file that I'm going to call that I'm going to call global style, capital G and capital s.js.
So this is going to hold all the global styles for our application.
And we're going to create a global styles with style components.
So that's why we have to import a special thing from the style components.
That's called create global style.
So we start by doing that import curly brackets.
Create Lobel style camel case, that means that there's a capital D and a capital S.
And we ported from style dash components.
And this is how we import the module with e6 syntax.
In this case, it's not what's called the default export from this library.
So that's why we grabbing it inside of the curly brackets, we are going to create default exports from our different components.
And then we don't need to use the curly brackets.
But I'm going to show you that later when we create our first component.
Okay, so we have this create global style method that we imported.
Here, we are going to use a global styles inside of our app component later, meaning that we want to import it here and use it down here in the JSX.
So that also means that we have to export this styled component from this file, so export.
And this is a const.
Also e6 syntax, it stands for constant.
So that's what we have in JavaScript.
Now we have let's we have const.
And we have various, I'm always using const.
Before I know if this one is going to change, and then I change it to a left, it's going to change in the application.
But usually const will do, at least when you do functional programming, as we mostly going to do in this course.
So const means that this one is not going to change.
As with everything, there are special cases when it can change.
For example, if you create an object with a const, you can change the properties in that object, but you can't change the object itself.
Alright, enough about that.
This one is going to be called Global style.
And this is a component, and every component that you create in react is going to have a capital letter to begin with.
So capital G and capital S in this case, and it's going to equal and then we call this method that we imported up here, create global style.
And in this case, we're not going to have a dot and something here because this is the global style.
So we're going to have double backticks, creating our template literal.
And then I do like this.
And then we can write our CSS inside of this template literal.
And the rest of your is going to be regular plain CSS.
So first, I want to set up some CSS variables.
To call on Route, we do that on the route.
And when you create a CSS variable, you do that with double dash.
And then you have your variable name.
So max width, this is camel cased, as you can see here, are going to set the max width to 1280 pixels.
And then I have another variable double dash white.
And then I set my white color, another variable double dash light gray.
This one is going to be E double dash med grade, or medium grade.
And this one is going to be 335 re 535 double dash, dark gray.
And this one is one c one c one C double dash font super big.
That's a funny name, I forgot that I call it that.
All right, you can call it whatever you want.
This one is going to be 2.5 REM.
And the next one is double dash and font big 1.5 REM double dash font med or medium 1.2.
REM.
And the last one is going to be double dash font small, one REM.
And that's our CSS variables that we're going to use for this application.
Then I'm going to set the font for the whole application and also do some resetting here.
So I have an asterisk.
Like that, I set the box sizing to border dash box.
And then I set the font family to able and that's the Google Font that is important from the index dot HTML file.
And then a how to backup font or sans serif.
Alright, that's the resetting then on the body.
I'm going to set a few things also.
So we're going to set the margin zero, the padding is going to be zero, like that.
And then as I told you with start components, you can nest stuff inside of the body, we can nest the h1 tag like this, and set the font size to two REM font weight is going to be 600 and the color and I'm going to grab this from my variables that I created up here.
And when you grab a variable in CSS, you do that by typing out various parenthesis and then the variable name in this case it's going to be double dash white.
So that's the h1 then I'm going to set the age three The font size is going to be 1.1 or M.
And the font weight is going to be 600 on that one also.
And then one more thing to do here, and that's the p tag.
So font size, one REM for the p tag, and the color is also going to be white.
So var, double dash white.
And then I also do some auto formatting.
And sometimes when I do this, create global styling, the auto formatting doesn't work.
I don't know why.
So I do it manually instead and save the file.
Always remember to save your files, it's very easy to forget to save the file, and then it doesn't work.
So this is everything that we need for our global styles.
Now we're going to move inside of the app.js file.
And up here where we import react, we can mark it with styles.
And then we import global style from dot forward slash global style.
So this means that we import in this one that we created here, this constants called Global style, we can import it because we export it inside of this file.
We don't do a default export, as I'm going to show you when we create components.
That's why we use curly brackets and import this as a named import.
And we're importing it from the file that's called Global style.
You don't have to type out.js.
It's enough we just typing out global style, it will figure the file extension out itself.
Right there we have our global stock component.
But how do we use it in our application, we should place this at the top level of our application.
And as we're going to have a component that wraps are complete application.
In this case, it's the div that's called app, it has a class name of app, we're going to change this out later when we have the routing setup.
But for now, that's a wrapping div.
So inside of that one, we can use a global style.
And we self close it like this, we don't have any props to send into this one.
And we're not setting a class name or stuff like that.
So when you use the playing component without class name, and props in react, you do it like this.
And this is very similar to an HTML tag.
So we save the file, go back to a browser.
And the only thing we can see now is that the margins and padding have changed here, it's just right at the edges here now.
And it wasn't that before.
So we know that our global styles are working.
And we can actually just comment this one out, save the file, go back to a browser.
And you can see that the margin is there now.
That way, we know that it's working.
And hopefully we didn't do any mistake in the CSS itself.
So it should work.
Otherwise, we have to adjust that later.
All right, in the next video, we're going to start creating the header component for the application.
So we're going to create our first real component in this application.
And it's going to be the header component.
So the first thing we do when we create a new component is to create a file for that component.
And you can see that we have our src folder here and we have an images folder.
But we don't have a folder, that's going to hold our components by usually create a folder, that's called components.
That's what I'm going to do now.
components, all lowercase letters, and inside of this folder, we're going to create all of our components.
And the thing is that the structuring of an application is something that's highly subjective.
So you can have your own opinions on how you want to structure it.
And if you want to structure it in a different way, you can of course do that.
But please be aware that this course will have this folder structure.
And you have to think about it.
If you change stuff yourself.
If you just want to focus on learning react, I highly recommend that you use this folder structure that I created for the course, I also going to have a folder for each component because I want to separate out my styles and have the styles in separate file and have the component itself in a separate file, I've created this course you don't have to create the styles if you want.
So that's easier for me to handle it that way by separating the mouth.
So therefore, I also think it's nice to have everything related to component in its own folder.
So we're going to create a new folder inside of the components folder.
That's called header.
capital H.
So we inside the header folder, and this is something in Visual Studio code.
It won't show a complete tree structure here when you just have one folder.
But this will change later.
But we're inside a header folder.
And inside a header folder, I got to create a new file that's called index.js.
And this is also something that's highly subjective actually, because I'm going to create my component in the index.js file.
So we're going to have one folder for each component, and each folder is going to have an index dot j s file.
And this is great when you import stuff as I'm going to show you later.
But it's not that great if you, for example, have 10 components open up here, they all are going to be named index dot j s.
So that's the downside by doing it like this.
But this is a fairly small application.
So I don't think it matters.
But I can actually show this if we have a component that's named test component, we import it like this.
And from dot forward slash, we have our folder, that's called test component.
Like this, of course, we don't have this one Oh, this is just an example.
It's exported as a default export.
So we import it like test component without the curly brackets, we can name it to whatever we want.
But I like to name them just exactly as they are in the files.
And we import it from the test component folder.
And then if we have a file, that's called index.js, we don't have to type out anything more here, it will automatically grab that index.js file.
But if we named this file, for example, test component, also, we have to specify it like this.
We have to type it out two times.
And I don't like to have to type it in two times.
So that's why I'm using an index.js file instead, as this is a fairly small application.
So we don't get confused up here when we have a lot of components open.
So that's my explanation to why I'm using this structure.
And that's also why are named my files like this.
Alright, so delete this one here, we're also going to create placeholder components for the styles, because we're going to use the style components inside of this component itself.
So that's what we're going to do.
And we do that by creating another file.
That's called heather.styles.js.
And this is how I like to name my style component files.
So I have the component name, and then I have a dot, and then I mark it with styles.
And then I have a.on, the file extension.
Alright, so from the style components, we import styled, like this import style from style components, components, it should be an S.
Now, I'm just going to create placeholder components because I am going to create the styles in the next video.
So if you have choose to skip the styles, you don't have to do them.
Justice before, you always have to export these ones, because they are in a separate file, and we are going to import them in the index.js file soon.
Export const I have a component that I like to name wrapper, and it's going to be a style dot div.
So this is a div that I'm going to start.
And I just have the double takes.
And I ended there because this is just a placeholder now, so we could just copy this one.
But as I told you, I want to repeat stuff and type it in many times when you learn things.
So we export const, I have another component that is going to be called content.
And it equals from the start, we have another div double backticks and then we export const logo, IMD and it equals a style.
And this is an image, it's the logo that we're going to style, double backticks and and it and then we export const TMDB logo.
img, be careful with the capital letters here.
This is the Movie Database logo.
So capital TMDB, capital L and capital II.
From the styled, we're going to style another image like this.
So this is the four style components that we're going to use for this react component.
So save the file, and I'm going to show you in the next video, how to create the styles the actual CSS, but move inside of the index.js, we're going to create our header component.
Now, the first thing you do when you create a react component is to import react capital or from react.
And that will make sure that we are using react in this component.
Then I have some images for the logo.
So if we look inside of the image folder, I have the TMDB logo.
This is an SVD.
So we just see some code here.
And then we also have the React movie logo.
And that's also an SVG.
So move back to the index dot j s, we're going to import this ones now.
So import our IMDb logo, you can name it to whatever you want here, but I chose to name it RMD v logo, you could just name it logo, of course if you want to do that, but I want to separate them out because we're going to have the TMDB logo also.
And we're going to import it from dot dot forward slash that's in the header folder that we want to go up one more folder so dot dot forward slash again.
And then we have our images folder.
And then we grab the React dash movie dash logo dot SVG.
In this case, it's really important that you also type out the SVG extension, otherwise it won't work when it's an image.
So that's the rmvb logo.
Then we import the TMDB logo from doc dot forward slash dot dot forward slash images, forward slash TMDB, underscore logo dot SVG, like this.
And as you can see, this can be a really long file path here.
And that's no good.
In some cases, of course, you could set up this with create react app, so you use absolute important step.
But I choose to not do this in this course, as I want this to be kind of beginner friendly.
And to be honest, we're not going to have that long file path.
So that's why Okay, so that's our logos.
That's our images for the logos down, we're going to import the styles that we created inherit old styles dot j, s, because we export them here, as I told you, so we want to import them in this component.
So import curly brackets, we have our wrapper, we have our content.
We have our logo, IMD, we have our TMDB logo, no logo, IMG TMDB logo IMG.
And we're going to import this once from dot forward slash header dot styles ended with a semi colon.
I'm going to remove this sidebar here so we can see what we're doing.
That's it, we have everything we need to assemble this component for now.
So we're going to create a component that's named header.
And we're going to use just functional components in our application, because now you can have stayed in your functional components.
A couple of years ago, you had to create a class if you want to have some state, but now we have hooked and we can use just functional components.
So I like to create my components with an arrow function.
So cost header equals parenthesis, and a fat arrow.
And that's an arrow function, you can have regular function if you want to have that also.
And then of course, you just do it like this instead function header.
You have curly brackets, but I like to have the arrow function.
And that's because you can make an implicit return like this, if we just returning JSX, we can add parentheses, and you don't need to type out return.
And in our case, we're going to have the wrapper.
That's the style component that we created.
And inside of the wrapper, we're going to have the content.
That's also a style component that we created.
And then I'm going to have the logo IMG.
And we can set the source on this one because this is an image tag that we styled.
So we can use the same attribute the SRC is going to equal and we have imported our our IMDb logo, or IMDb logo, like this was set on OLT.
Now we can name it or IMDb dash logo.
And then we can self close it like this.
So that's a logo for this application.
And we have the Movie Database logo TMDB logo, IMG we have the SRC, it's going to be the TMDB logo IMG and we set the old TMDB dash logo, and we self close it, do some auto formatting.
And now you can see.
Okay, I just named it TMDB logo, of course, that style component, we shouldn't use that.
So TMDB logo course.
Now you can see that it complains here, because we're not exporting this one, it says it's never used.
And that's because we don't export it.
You should always export it.
And I like to do the export here at the bottom.
So export default header.
And this is also a sixth syntax for exporting something.
So in this case, we don't have a named export, we export it as a default.
Some people like to have their export here, instead, I don't like that.
So that's why I have it at the bottom here.
But you can do however you want.
And this is our header component for now.
But we're not actually using it.
If we go back to our application here, you can see that nothing has happened because we have created a component, but we're not actually using it yet.
So we have to do something about that.
So let's go back to our app.js file.
And inside of this div here the wrapping div.
This is also something that you have to know because in react you can always just return one component, you have to wrap the components if you have multiple of them in another component or in something that's called a fragment that I'm going to talk about later in this course.
So inside of here, we're going to have Our header component, but first, we have to import it, of course.
So what I like to do, I like to mark it with components, like this.
And then I import Heather from dot forward slash components forward slash Heather.
Like this, when you want to use a component in react, you have to import it first like this, this is a module that we import, our component is a module that we import with EF six syntax like this, right, and then we can use the component here for now we don't have any props for this one.
So just as we did with the global style, we can insert the component here down in the JSX.
And we have our header.
So do some auto formatting and save it.
And if we go back to our browser, you can see that we can't really see the images now.
And that's because we haven't set the styling for the images now.
So that's what we're going to do in the next video.
Or if you choose to not create the styles, you probably will see the header up here.
Now if you're using the styles that you copied over to your product folder, but in the next video, we're going to create the styles and that will make the header show up with the logos we have created or had a component, but we can't really see anything.
So we have to create the styles for it.
Also, you can see it.
Yeah, it looks like crap here.
So we have to give this some styling also.
So we see it have nice little logos and or header.
So inside our file, that's called header.styles.js.
We're going to start by creating the reference style component, we're going to set the background on that one background.
And from our variables, we're going to grab the one that called dark gray, like this.
And then I'm going to give it some padding zero and 20 pixels.
And that will give it some padding on the sides.
We'll save it, go back to our browser.
And now you can see that we see all gigantic logos here on our gigantic header.
So we have to do something about this one also.
So we have our content div.
This one is going to be displayed as a flex, because I want to place the logos on the left and the right.
And we can do that with flex.
So first we align items to center.
And this will align them vertically.
And then we justify the content.
And we set it to space between and this will create space between them and push them to the side one is going to be pushed to the right and one is going to be pushed to the left.
And I'm also going to set the max width of this one.
And that's why I also have a container that called content because the rapper is going to have this background of dark gray.
But I don't want the content itself to have the full width, the max width is going to be from our variable dash dash max with like this.
And I'm going to set some padding at the top and bottom are 20 pixels and zero on the sides.
And I set the margin to zero, all and this will center the content div itself, save it go back and see what we've got so far, you can see that they are pushed to the size.
And that's great.
Flexbox is really neat to do stuff like this, but the size isn't correct on the logo.
So we have to modify this.
So we have our logo IMG.
That's the main logo, and that's the style image, we set the width to 200 pixels on this one, save it, go back to the application, you can see that we have the correct size here.
But we also want to change this size on the logo when we are on smaller devices.
So we create a media query at media screen and Max dash with I don't really know if you need to actually use screen today.
I think it's not necessary, but I'm used to that.
So I will do that.
I set the max width to 400 pixels.
This means that when the screen size is lesser than 500 pixels, this one will kick in.
So we set the width 150 pixels on that one, save it go back to our application and see what we got.
So I can make this smaller.
And you can see that there.
The logo gets smaller also.
So we know that the media query is working.
And this is also something that's super great with styled components, because you can nest the media queries as I did inside of this component.
I think this is very readable to do it like this because you know that this specific media query belongs to this component.
All right, so that's the main logo.
Then we just have the style, the TMDB logo also.
I'm going to set the width 200 pixels on this one.
And then I set a media query on this one also at media screen and Max with 500 pixels.
So it may see seem redundant to have two of them here.
But actually, as I told you, I think this is very readable.
If you want to change a media query for just that component, you can do that inside of the nested media query here.
And I like that a lot.
So for this one, I'm going to set the width to 80 pixels, and save it, go back to the application.
And there you have it, this is our header.
And you can see that it's working on both of the logos when we make the viewport smaller.
Sweet, that's the stars for the header.
In the next video, we're going to scaffold out our homepage.
Alright, we're going to start building the homepage for our nice little application.
And we're going to have all this stuff here, on our homepage, the homepage is going to be what's called a container component.
And then we're going to create different components.
For example, for the hero image for the search bar for the thumbnails for the grid, and for the Load More button.
Let's go back to our code editor.
And inside a components folder, we create a new file that we call home.
dot j s capital H.
And this one, I don't have a folder for this one, because this is kind of more container component.
So we don't have any styling in this one, we're going to apply the styling on the individual components instead.
Alright, so the first thing we always do when we create a component in react is to import react, import react from react, then I'm going to create a little comment here and call it config because we're going to import some stuff from the file, let's call config.js.
And inside of this file, I've set everything up for you that's needed for the Movie Database API, and I export them here in an object.
So we're going to import a few things from this file in the home component.
So go back to the home dot j s, and we import curly brackets, we're going to import the poster underscore size, all capital letters, we're going to import the backdrop, underscore size.
And the image underscore base underscore URL.
Remove this sidebar here.
We're going to import them from dotnet, forward slash config, like this, and be very careful here with the spelling all capital letters and underscore.
Alright, then later, we're going to import a lot of components here.
So for now, I just mark it like this, we're also going to import to hook.
So I marked that one also.
And we're also going to import an image.
So if we go back and look here in the images folder, I have this image that's called no underscore image.
And this one is a fallback image if we don't get an image back from the Movie Database API.
So we have this funny little smiley balloon here that will fall back to if we don't have an image to go back to the home.js.
And we import are going to call it no image.
And when you do an import like this, you can call it whatever you want.
So doesn't need to be named like this.
I'm going to import from doc dot forward slash images.
And I grabbed the no underscore image dot jpg, very important to have the file extension when importing images like this.
Alright, then I'm going to create the component itself.
And as I told you, I like to create it with an arrow function, you can have a regular function, if you want to do that.
I have a const home, I have a capital H.
All react components always have a capital first letter.
Very important always name your components with a capital first letter.
So home capital H.
And then we don't have any props for this one.
So I just leave it empty here the parenthesis and then I have an arrow function.
And I have curly brackets because this one is going to have some logic inside of it, we have to have a return statement and make an explicit return.
So return for now we can just return a div that says homepage like this.
Alright, then we can also actually scaffold out our states that we're going to have in this component.
And for that one, we're going to need a hook that's called use state.
So make sure to import that one up here.
You type in a coma and then you have curly brackets.
And we import use state from the React library.
And the use state hook is the hook that you use in functional components in react to create a state.
So when we call the use state hook, we'll get an array back.
The first value is going to be the state value itself and the second value is going to be the setter for the state.
And the standard for grabbing and using these values is to use the Six syntax for destructuring.
So I create a const, or the structure of the state and the setter for the state set state.
And you can call it whatever you want here, but I want to call this state, you could call it cool like this, but I don't actually think it's that cool.
So I'm gonna stick with state like this.
And then we have an equal sign, and we call the use state hook.
For now, we'll leave it empty, but it could provide it with an initial state in here.
But we don't do that for now.
So as you can see, here, I'm calling use state and this one will give us an array back.
So from that array, I destructor out the state and the setter for the state.
Otherwise, we could do it like this.
But you shouldn't do that.
We have a const stayed, you stayed like this, and this state will be an array with the first value date value here.
And then we have the setter, or the state as the second value.
And then as we didn't destructor, this one out here, we just put it in this constant called state.
If we want to grab the state, we have to type it in like this, to use the index zero because that's the first value in the array.
And if we want to set the state, we have to grab the setter like this with the second value in the array, that is the index one.
So that's no good.
Actually, it's much better to do it like this, instead, we destructed out and we can also name them individually by doing it like this.
Alright, so this is the way to go, this is the way you should do it.
So that's the state we'll that will hold all the movies, then we're going to have the state for the loading, the loading and set loading equals use state and this one, I'm going to give an initial state, I'm going to set it to false.
And this is also great with the use state hook, you can have as many of these ones as you want, you can split the state up into multiple ones.
And you couldn't do that in the class components in react, because before we had the use state hook, we needed to create a class to have state in react.
And then we just had one state and you have to have a state object with all the stuff in it.
But now we can separate them out into different states.
And that's super great.
So I'm going to create the third one that are called error and set error.
And this one is going to be used if we receive an error from the API.
So we can have this as a flag, and we set this one to false also.
Right.
So that's the states, we have to do one more thing, because we have created this component.
And we also have to export it.
So export default, home like this.
See if we can get some more formatting.
Now it looks great.
Anyways, alright, save the file.
But if we go back to our application, you can see that we don't see anything yet it just start here.
That's because we have created a component, but we're not actually using it.
So in the app.js file, up here, where we import the header, we're going to import home from dot forward slash components, and home like that.
And then we can use that component down here.
So we remove start here and use a component and we self close it, because we're not sending in any props.
So we just type out the name in a tag like this, save the file, go back to the application.
And you can see that it says homepage.
And that's great.
We know that it's working.
And you may wonder why we have all these warnings here.
But they are just warnings because we're not using these values.
Now, they will disappear later when we use them in the component.
So nothing to worry about there.
In the next video, I'm just going to do a short talk on the standard hooks, that's indirect library, and then we move on and actually fetch some data from the Movie Database API.
Okay, before we move on, I just want to make a brief talk about the built in hooks that's in the React library, we can also create our custom hooks.
And we're going to do that in this course also, but we have some hooks that's built in that you probably going to use most of the time when you create react applications.
So I'm on the React js.org.
And I'm in this chapter here that's called hooks.
This is great if you want to know more about hooks, because honestly hooks can be a little bit hard to grasp in the beginning.
So I highly recommend that you actually read this chapter here if you're completely new to hooks.
And if you're new to react, this is a great way to start doing some reading before you do any course or create anything with react.
It's always a good idea to have some basic theoretical knowledge before you start with something.
But of course, it depends on how you like to learn stuff, so I shouldn't tell you how to do it.
Alright, so they have an introduction to hooks, they have different chapters here, we actually going to look at this one number seven hooks API reference, and I'm going to talk about the hooks that's built in the library, sort of separated in basic hooks and additional hooks.
And the basic hooks are probably the ones that you're going to use not maybe 99% but perhaps 95% of the time, and then you're going to create some own custom hooks and use some special hooks sometimes.
So we already talked a little about the use state hook.
That's the one that you use for creating state in a functional component in react.
So that one we imported in the last video, and we initialized it and set it up in the home component, we're also going to use the hook that's called use effect.
And use effect is a hook that you can use for side effects.
So in our case, we're going to grab data from an API, and that's a side effect.
So we're going to use the use effect hook for grabbing that data.
And we're going to use the state to keep that data in our application, then you have a hook that's called use context, we're not going to use that hook in the main part of this course.
But I am going to use the use context hook in the extra chapter at the end, where I create a Movie Database, login in the application and make it possible for you to cast a vote on the movies, then I'm going to set up a global state that holds the login information of the user by using the use context.
So that's the basic hooks.
And then you have some additional hooks use reducer, that's something that's very similar to if you, for example, have used Redux.
The use reducer is very similar to that one.
And it can be used instead of the use state hook if you want more.
I don't know if it's a more complex state.
But yeah, yeah, maybe a more complex state than the use state, we want to use it in this course.
And the use callback and use memo hooks are hooks that you can use to memorize stuff.
If you don't want to recreate for example, a function on each render, they are very handy if you for example, run into something that's called an infinity loop with the use effect.
That's very common actually, in react that you can do that.
Because if you set the state in a use effect that will trigger a rerender.
And if you have a dependency in the use effect, for example, a function that recreates on each render, that will trigger that effect again, and that will set the state again, and it will trigger the effect again.
And yeah, you get the point here, it will create an infinity loop, then you can use the use callback to wrap that function inside the use callback hook.
And that won't recreate the function on each render.
Because by default, if you create just a regular function, React will recreate that function on each render.
And use effect.
If you specify that one in one in something that's called a dependency array that we're going to talk about, then that use effect will trigger again, because it will think it's a new function because that function has been recreated on the next render.
So use callback and use memo or hooks you can use to memorize stuff in react, but I think there are a little bit more advanced, so I won't use them in this course, they use ref hooked, we actually going to use that one because I'm going to show you a little trick in this application.
And a neat little use case to use this one use ref is basically a hook you can use to create a mutable value that won't trigger a rerender, you can see just maybe like you're kind of a regular variable that won't trigger a rerender.
So we can use this one to create a mutable value.
Because if we have it in a state, it will always trigger a rerender when we change that value.
But if we change the value with the use ref hook, it won't trigger a rerender.
Use imperative handle, I've never used this one.
So I'd actually don't know what is for use layout effect, it's very similar to use effect.
They only differ in when they trigger.
So there's no use case for the use layout effect in this course.
So I won't go into detail.
And use debug value.
I haven't used this one either.
These are the built in hooks in react.
But I think the strength about hook is that you actually can create custom hooks.
And we're going to do that in this course also, that was a brief introduction to hooks in react.
So in the next video, we're going to fetch some data from the Movie Database API, we're going to use the use effect hook and the use state hook for that.
Alright, let the fun begin, because now we're actually going to fetch some data from the Movie Database API.
And that's super exciting, because it's always great when you see the magic happens when you have that nice little JSON object with all the data that we fetch from an external source.
I like that I love it.
Alright, so we're going to be in the home.js file for this one.
Now, the later we're going to kind of break this one out and place it in its own custom hooked.
But for now, we're going to be in the home component and created inside of here.
So we're already importing US state.
But we're also going to import use effect, because we're going to use this one for fetching the data.
Then I have this file here, that's called api.js.
And inside of this file, I created all the functions for fetching data from the API.
And I will also say that this will probably one of the most advanced videos in this course and also one of the longest so you can care a little extra about this video because it's kind of advanced stuff in this one.
Alright, in this file.
api.js, I have this omit here where I export a couple of functions.
The three first ones are the ones that we actually need to care about the other ones is for the bonus material for this course.
So you don't have to care about that now.
So this one is the one that we're going to use now fetch movies, and this will fetch a lot of movies, multiple movies, then I have this fetch movie without the s and this one will fetch an individual movie.
And then I have fetch credits.
And that's the credits for the movie itself.
So these ones are going to be used for the individual movie page.
And if we take a quick look at this fetch movies, here, you can see that this one has two parameters of search term and page.
So we're going to give it the search term and the page that we want to fetch.
And I have a ternary operator here.
And that's ies six syntax for kind of a shortcut for if an else so I do a check here, I check if I have a search term, and then I have a question mark.
And if this one is true, if I have a search term, it will run this one to the right to the question mark.
And if this one is false, I have a colon here, it will run this one to the right of the colon.
It's a shorthand for if and else, then I have to do this because we have different resources from them point depending on if we're doing a search, or if we're grabbing the most popular movies.
So that's why I have this ternary operator here.
If we in the search, we're going to use this resource from the endpoint here and also attach the search term.
And then we also grab the correct page.
So we add this as a parameter to the URL.
And then I return on the wait.
And I actually waited two times.
And that's because I first await the fetch from endpoint.
And then I await when I actually converted with JSON, because this one is also async.
So that's why I have to await.
And as I have an await, I have marked this one with an async.
So I'm using the async await syntax for this one, you could also use the good old them.
But I think that's not as readable.
I actually like this a lot more.
So that's why I'm using the async await syntax for this one.
Alright, and I think that's it for this file.
We don't have to care about this, because we're going to import this function.
So go back to home.js.
And just below here, I'm also going to remove the sidebar on market with API.
And then I import API from dot dot forward slash API.
And this will give us this object where we can access those functions are talked about.
Alright, so that's the API, then down in the actual component here, just above the return statement, we can create a new function that we're going to call fetch movies.
And as we fetching from the API, and we're going to use a wait, we have to mark this with async.
And then it's going to have two parameters is going to have the page and the search term.
And we can set the default value on the search term to an empty string like this.
And I have an arrow, and I call the brackets.
So we create this function here is an async function, because we're going to fetch from the API and await the data.
This one is going to get the page we can send in what page we want to grab.
And then we can also send in the search term, we haven't actually created this one yet, because this one is going to be another state when we create the search bar.
So we're going to add in more states here later, and also have a state for the search term.
And if we don't send in a search term, we're going to fall back to an empty string.
So we set this one as default.
So that's the fetch movies function.
We're going to read this in a try and catch block, try and catch.
And we can get the error in this case, I'm not actually going to set the error, I'm just going to have a flag that setting if it's true or false.
But of course, you can have a state where you can store the message from error Also, if you want to do that.
So in the catch, we're just going to have set error, and we set it to true.
And here to see how I use this setter for the state.
So we destructor it out here.
And to set a new state for that one, we call this one and we give it the value.
So I call set error, and I give it the value true and this will change that state to true inside of try block will first going to set the error to false.
Because now we grab a new data.
So we have to make sure that this one isn't set to true because we don't have an error before we have fetched anything.
And we're going to set the loading to true because now we're fetching so we set this flag to true.
And this is how we can keep track on when we actually fetching and we can show the loading spinner and stuff like that.
All right.
Then I create a course that I call movies.
And this course is going to hold all the movies.
So I'm going to wait.
And from the API that we imported up here.
We have that function that I showed you.
That's called fetch movies with an s really important, and then we're going to give it the search term and the page So this will hopefully grab the movies for us.
And we can try yourself with console log movies.
But if we go back to our application, you can see that we don't actually get anything here because we haven't triggered this function.
And we have to do that in a use effect.
So we have the function now, but we haven't triggered it, do some more formatting, and go below the function here.
And we call the use effect.
And the use effect is called with an inline function like this.
And then we can do what we want inside of this use effect.
So what we want now is to trigger this only on Mount only when we mount this home component on the initial run of this one.
So we can do this by specifying a comma here, and an empty array.
This is what's called a dependency array.
For the use effect, we can specify different dependencies on when we want this use effect to trigger.
In our case, we just wanted for now, the trigger when we start up the application, and when the home component mounts, so I specify this as an empty array for now.
And when we specify it as an empty array, it will just run once.
So that's really neat.
In this case, we can just call fetch movies, we're going to send in one, because we want to fetch the first page, we can also mark this one actually with initial render.
So we are specified an empty dependency array, meaning that it will only run once on the initial render.
And inside the use effect, we call our fetch movies function.
And hopefully, we will get the console log of all the movies if we save this one and go back to our browser.
And yes, you can see here we have the movie object here.
So in this object, we have the page one.
And this is all from the Movie Database API.
So it's nothing that we have set up here, we have a total pages of 500, total results of 10,000.
And we have the actual movies in a property that's called result.
And this is an array, and we get 20 movies at a time from the API.
So that's sweet, we know that we grabbing data, and we know that it does triggers once.
And that's super great.
So now when we have the data here, we can actually set our state because we have our state up here and we want to put our movies in the state.
So I'm going to call set state.
And for this one, I'm going to provide it with an inline function is a callback function, that's going to be called with the previous state by the state setter, if you provide a state setter with a function, it's going to be called with the previous state.
And that's great, because we need a previous state when we set the state.
And I'm going to show you why in a second.
So we have a parameter that are called prayer, you can call it whatever you want.
In the state, we want to set an object, so we want to return an object, so I have a parenthesis and curly brackets.
If we didn't have the parenthesis, it would think that these curly brackets marks the scope of the function itself.
And that's no good.
We want to return an object and an object also is marked with the curly brackets.
So we have this parenthesis before and this parenthesis after, this will make sure that we return an object.
And this parenthesis here is for the setter, of course, so we have two parentheses here at the end.
So I have this little neat little plugin.
Also in Visual Studio code where you can see I get these different colors of the parentheses.
So it's really easy to see the parenthesis, I think it's called rainbow brackets that plugin.
So we're going to set the state we have the movies inside of this cost.
So I'm going to use the e6 syntax that's called spread, I use three dots and spread the movies.
And this is because I'm going to take this object here and spread it out here.
That means that we creating a new object, it's going to take all the properties from this movies and spread them out inside of this object here.
When you set the state in react, you should always provide it with a new value, you should never mutate the state in react because if you mutate the state directly, it won't trigger a rerender.
And there can be a lot of trouble.
You should always use a satellite this to modify the state.
And you should always provide it with a new value and not mutate the state.
Really, really important.
Never mutate the state in react.
Okay, so we have the movies.
And then if you remember, we have this property here that's called results.
So this is holding all the movies.
But in our case, we need to decide on how this new state should look because if we load more movies, we want to append the new movies to the old state to the old movies and not wipe them out.
So we have to do some check here for that on the results.
So we have the results property, colon, and then I'm going to put it on a new row.
I'm going to check if the page is greater than one.
Then I have a question mark.
This is a ternary operator here again, are going to return a new array are spread out from the previous state prep.
That's the one here as I told you, this one is getting called with the previous state So from the previous state, I spread out the old result, three dot prevot dot results with an S at the end.
All right, so that's the old movies that we already have in the state, then I have a coma.
And I'm going to attach the new movies from the new movies, dot dot dot movies, dot results.
And this one is going to append the new movies to this array.
So we get an array with the old movies and the new movies.
And that's great.
Then we have a colon because if we're not loading more, we can wipe out the old movies and just give it the new movies that we got in this concept called movies.
So dot dot, dot, movies, dot results, like this is some auto formatting.
And this will hopefully work.
We don't know if it works, because we haven't created a load more button yet.
So we'll see that later in the course.
And there's one more thing we have to do, because we setting the loading to true here.
And we have to set it to false when we have grabbed all the movies.
So just below the try and catch block here at the end of this function, we're going to set loading to false like this, save the file, go back to see that it works.
reload it, and yes, it works.
And that's super great.
But we call slogging it out here, we don't know if it works with the state.
So we remove this console log, and go down here somewhere just above the return statement, and we can console log out the state instead, save the file.
And we hope for the best.
Go back to the browser.
And yes, you can see we have the state here.
And you may wonder why is it showing this many times.
And that's because if we look in the home component, we have three different states here.
So it will rerender each time we change one of these states.
And some may say and go crazy, oh, we have a lot who renders that crazy, it will make this application so slow.
But yeah, you shouldn't worry about that, actually, because react will diff those things and only update things in the DOM that has changed.
So it doesn't matter if it rerender this many times.
And to be honest, React is fast.
So even if you had a lot of rear Enders, you won't have any performance issue in an application of this scale, don't worry, it's completely okay that it renders all these times because it won't rerender the complete page, it will only run the stuff that has changed.
All right, that's how you fetch data from the Movie Database API with a use effect hook and then you put it in the state with the use state hook.
In the next video, we're going to take all this logic here and create our own custom hook and place that data inside of there.
And then we can get rid of this one in the home component.
So it will look a lot cleaner.
Okay, we're grabbing data from the Movie Database API with the use effect hook and we place it in the state with the use state hook, we're going to move all this logic inside of a custom hook instead, because that will make this component A lot cleaner.
And it's always great to separate out this logic, if we want to reuse it somewhere else in the application.
In our case, we don't need to do that.
So we do it just because we want to clean up this component and to separate out this logic.
So that's why you create custom hooks.
Either you do it because you want to reuse some logic somewhere in your application, or you want to clean it out and have that separated out.
So inside of the src folder, not in the components folder, this time inside of the src folder, create a new folder, that's called hooks.
And inside of that folder, create a new file that's called use home fetch camel casing, dot j s, capital H, capital F.
And why do I name it like this? Well, React wants you to name all your custom hooks with use and then your name.
That way react knows that this is a custom hook, you could skip to use use.
But you shouldn't do that you should always name them with use before the name, always do it like that.
Otherwise, it can give you trouble in the future.
So inside of this file, I'm going to create a new function.
I'm going to export it also because we're going to import this one in our home component and use this custom hooked, export const use home sets.
And I create a regular arrow function like this.
Alright, so that's our function, then we go back to our home component inside of the components folder.
And we're going to grab all this logic here, all the states, the first move is function and the use effect.
We can keep the console log for now is going to give us an error but that's okay, we're going to fix that soon.
Go back to the use home fetch custom hooked paste the logic in here and it complains now because we haven't imported this ones here.
So we could actually just copy them from the home component but just as before, I want us to type in stuff a lot here because we learning stuff.
So we're going to import from the rack.
library, we're going to need the use state.
So import curly brackets, you state coma use effect.
And we're also going to use the hook that's called use ref laters, we can import that one also.
And we import it from react.
And you can see the red, don't import react in this one, because we not need the actual react library, we just need this stuff from that library.
So that's why we don't have any JSX or anything here.
So that's why we don't need to import react itself, we also need to import the API.
And that one, we can actually just copy this one from the home.
So go back to the home, cut this one out here, the import API like this, go back to the US home fetch hooked and paste it in here.
And this one should be it.
All right, is more of mining.
And we only have this function or we're not actually returning something, we have to return something in our custom hook also.
So go down to the bottom of the function.
And here we're going to return our state's for now, we're going to return more stuff in this one later, when we create more stuff.
But now we return on object.
And we have the state, we have the loading and error like this.
And this is also a sixth syntax, as we return this object, this one is automatically going to get the property state because it has the same name.
And all of these ones has the same name.
So we don't have to specify them explicitly, it will figure this out itself.
All right, there's one more thing I want to do inside of this one before we finished for this video.
And that is I want to create an initial state.
So up here, I create a const initial state, it's always a great idea to have an initial state if you want to reset stuff.
And we want to do that later.
So I'm going to structure the state just as the one that we got back from the Movie Database API.
So we have the page, it's going to be zero initially, then we have the results.
That's the property that holds all the movies are going to provide it with an empty array initially, where the total underscore pages is going to be zero.
And the total underscore results, it's going to be zero also.
So this is the initial state.
And now we can give this initial state to the use state here where we create a state.
So provided with the initial state, and this will make sure that it gets the state.
All right.
So that's our custom hook.
For now, we go back to the home component.
And now we have to use this custom hook.
I already created this comment here where we're going to import it.
So we import curly brackets, use movie fetch, like this, from dot dot forward slash hooks, and use home fetch.
Then inside our sad little empty home component, we're going to use this one.
And yet again, I'm going to use ESX destructure syntax to get those properties from the object that we exported here.
We export an object with all these values here.
So I'm going to destructure them out here.
curly brackets stayed loading an error, equal sign and our call my custom hook use movie fit.
So this will hopefully work.
We console log in out to state so save this file, make sure that you also save the hook itself.
And go back to the browser.
reload it.
Yeah, I have some arrow here.
Use movie fetch is not exported, didn't I export it? export const? Yeah, it should be used home fetch, of course, not use movie fetch.
A change this one to use home fetch.
us home fetch homefacts like this, save the file, go back to the browser.
And you can see that we have our state here.
And that's great.
You can see there's a lot of renders.
And a lot of people will say, oh, crazy.
There's too many renders, this is a performance issue.
But it's actually not.
So this is totally fine.
But you can see that it we have our initial state here first, and it's zero, everything is zeroed out.
And then we get the data here.
And we have all the movies inside here.
So that's sweet.
And I promise you it won't be any performance issue in this application because of these renders.
So this is how you create a custom hook in react.
Always name your custom hooks with use before you have your name.
That's really important, you should always name them like this.
In the next video, we're going to start creating the components for the homepage and we're going to start with the hero image.
In this video, we're going to create this hero image here in the application.
So we're going to grab a background image and all the text here from the Movie Database API.
Actually, we have already grabbed them.
So we're going to use that data inside of the hero image component.
So let's go back to our code editor.
And inside the components folder, create a new folder that we call hero image, capital H capital I, and inside the hero image folder and create a new file that we call index dot j, s, and also file that we call hero image dot styles.
dot j s, just as before, are just going to scaffold out the style so we can use them in the component, but I'm going to create the actual styles in the next video instead.
So if you already have this file here and choose to not create the styling for this course, you already have this file here and don't need to do this.
So in the hero image.styles.js import style from style components like this, then I'm going to export a cost that are called rapper is going to equal from style dot div, I'm going to create a div I have backticks like this, then I'm going to export const content equals styled.do, exactly the same and double backticks.
And I'm going to have one that's called export const text equals styled dot div double backticks.
And that's it.
That's three Olam, save this file and go inside the index.js file, we import react from react, then we're going to import the styles.
So I marked it with styles, import, wrapper, calm content, and text from dot forward slash hero image styles.
Right? Then I create the component itself const hero image capital letters h n i equals and this one is actually going to receive some props.
And a probe is something that you can send into component.
So that component can change dynamically, depending on the props, a prop should never be changed inside a component that receives the props.
So they can only change if something rerun this and they get a new prop.
So that's how that works.
And the props is sent into component on a prop object like this.
So we have the Prop, I have an arrow function.
And for this one, I'm just going to return JSX.
So I can make an implicit return.
So I have parenthesis so I can skip the return statement.
And then I have my wrapper.
And this is a style component, we scaffold it out just recently, this one can also receive a prop.
So when you send in a prop to a component, you do it by naming the prop and then you give it the value.
In this case, it's going to be from the prop that this component get prop.
There's going to be a prop that called image.
So we send out along to this style component, that's named wrapper.
And in the next video, I'm going to show you how we can set the background image in this component by sending in the image URL to the style component that's named wrapper.
So that's what I'm doing here.
So I'm sending this URL along to the style component on a prop that's called image inside this wrapper, we're going to have the content.
And inside the content, we're going to have the text like this.
And inside the text, we're gonna have a regular h1 tag.
And in JSX, when you want to use a JavaScript expression, you create curly brackets, and then you type in your expression.
In our case, we want to show the title.
And this hero image is going to receive the title from the prop that's called title like this, and you end it with a curly bracket.
You can have any JavaScript expression inside of here that you want.
So you can do some calculations and map through stuff and things like that, that we're going to do later also are going to show you that now we have a p tag.
Yet again, I have curly brackets, I have the text and curly brackets.
And that one is from the prop dot txt.
There's more formatting.
And then I export default hero image.
This looks fine, actually.
But I want to show you a little trick here now that you should use when you create your components, because now we have to type out prop dot image prop dot title prop dot text.
So instead you can use e6 syntax up here and destructure out these props from the prop object.
So we have parenthesis, number of curly brackets, so we have destruction of this object.
And then we have the image, title and the text And then we can remove prop here on all of these.
So I think you should get used to always doing it like this because it will look a lot more cleaner with the structure mount up here.
So we don't have to type in prop every time.
Alright, save the component.
And just as usual, we can't see anything.
Now if we go back to our application, because we haven't used the component yet, save it, go back to home.
And up here, where I marked it with components, we import hero image from dot forward slash, hero image.
And now we can use this component.
So below here, instead of homepage and this div, we can just return the hero image like this.
But we want to send along some props to this one also, because this one needs the title and stuff like that.
And we also need to check that we actually have any movies in the state.
So we can't actually do it like this, because it will throw an error if we don't have any movies in that array.
So what we can do here, instead it we return something here inside of the parenthesis, because we're going to need multiple rows to move this one inside of here, instead.
And as I told you before, we can only return one parent element in JSX.
So we have to wrap this one because we'll have more components here later.
So we can create something that's called a fragment in react, we could of course, create a div like this and move this one inside.
But sometimes we don't actually want to create a div, we just want to return this without creating a div.
And you can do that by creating a fragment.
And this is the shorthand for fragments, you just create this angle brackets and an end angle bracket.
And this will work.
So inside of here, we also want to check if we actually have some results in the state.
So just as before, as I did in the hero image itself, if you can see are in the JSX, where I have a JavaScript expression, I can do the same in the home.
To go back to the home, I have a curly bracket, and now I can use any JavaScript expression that I want.
So I want to check if state results.
And the hero image is going to be the first movie, it's going to be the most popular movie.
So I grabbed the first element in the array, I check if that one exists.
And then I do something that's called a short circuit.
So I have double ampersands.
And I'm going to move this column bracket to the end of here, because I want this one to be nested inside of this one.
So this means that if this one is true, it will run this code here.
If it's false, it will just fall back.
And sometimes some argue that you shouldn't do it like this, because it will return the actual value false here, but JSX won't show it.
But if you want, you could instead do a ternary operator like this.
So if this one is true, we return the hero image.
And then we have colon otherwise we return null, we can put it on its own roll.
And this will also work.
And we want to give this theory some props.
So we have a prop of image.
And that one is going to equal.
And this one I have to construct because the image URL is constructed by the image base URL that we that we get here, and also the backdrop size.
So I have backticks in dollar sign curly brackets, I'm going to grab the image base URL like this.
And this one is going to be long, so I'm going to remove the sidebar.
So this is a template literal.
And you can interpolate expressions like this in a string literal.
Alright, then I'm going to add the backdrop size, like this.
And then I'm going to add, you can see I have dollar sign and curly brackets for all of them here, dollar sign and curly brackets again, from the State DOT results, I grab the first element again.
And then we have something that's called backdrop, underscore path.
Be very careful about the spelling here.
So you get that correctly.
It's really, really easy to make a typo here.
And then it won't work.
This will get us the image URL.
And these ones are all set up in this file here.
Let's call config.
They are set up as per instructions from the Movie Database API.
You can see the image base URL is this URL here.
So that's the one and then I set the backdrop size.
You can change this size if you want and try it here.
You can make them smaller, and you can set them to the original size.
I set them to width 1280 in this case.
So that's what I'm grabbing here.
And I'm generating the string here by merging them together in this template literal here.
Right now we have the title.
And we get that one from state auth results.
The first element and we have a property that's called original underscore title like this.
And then we have the text yet again from state results.
From the first element, you could also break this out in its own variable if you don't want to type this in every time.
So there's probably been a lot of things you can optimize in this application.
But as this is a beginner slash intermediate course, I don't want to do a lot of stuff like this, because it will only take time.
And it will be confusing with all the other stuff going on.
So we have a property here, that's called overview.
And these are, of course, all from the Movie Database API is nothing that I have created.
These are named like this from the Movie Database API.
All right, do some auto formatting.
So you can see here I send in three props, image, title, and text.
And these are the ones that I destructed out in this component itself.
So when you want to give a prop two a component, you do it like this, you named the Prop, and then you give it the value.
And then you can grab those props inside of this component.
So save the file, go back to the browser, and you can see that we can't see anything yet.
But if I mark it here, you can see that we have the text.
But we don't actually have set any styling for this one yet.
So that's what we're going to do in the next video.
And then we'll hopefully see this nice little hero image in our application.
It's time to create the styles for the hero component.
So move back inside of the code editor, and the file that's called hero image dot style dot j s that we created in the last video.
So we have all these components here, and just give it some space here.
And we're going to start with a wrapper, and to the wrapper, we send in a prop.
If you remember this one here, you can see we have this image prop here.
So just as we do with regular component, we can send him props to style component.
And this is something that is super great with style components.
Because this way, we can do some stuff with a CSS.
And in our case, we want to set a background image, the usual way you did that back in the days was that you had to create some inline CSS when you had a dynamic image.
And you didn't know from the beginning where it came from, or what didn't what his name was, you had to set it with an inline styling on the element itself in the HTML.
But in this case, we can do it much, much cleaner and sending a prop to this component.
And we set the image here.
And also we're going to create if you look here at the finished application.
I don't know if you see it now.
But there's a slight little gradient down here also, because I want this text to be able to be seen on any different background.
That's why I have a dark little gradient below this text here.
So that's what we're also going to create.
So in the repple component, we have this div that we styling here with style components.
So we have the background.
And we're going to set a linear gradient first linear gradient, parenthesis, and is going to go to bottom RGB a and I use this because I want to set the alpha value 0000.
And these values are auto generated from somewhere on the internet, I usually do that when I create gradients, it's so easy to just go there and type in your gradient and it will give you the code.
So that's why all these values may seem a little bit odd.
This one is 39%.
And the RGBA is going to be 0000 again, and 41%, rgba, 000 and 0.65.
That's the alpha value.
And I see you know that this one shouldn't even need to have to have these ones here.
I think actually, I can remove this one here.
We don't need that one.
And then we said 100%.
And just after the parenthesis, the end parenthesis, we have a comma.
And then we specify the URL.
And now we can grab that prop that was sent in here.
And you do that as this is a template literal, just as before we use dollar sign in curly brackets, and we can grab those props, you create an inline function and this one will get called with the props.
And from the props, we grab the image and if you want to destructure amount, you can do that also here, then you have a parenthesis and then hold the object.
Then we restructure the image.
And we do it like this.
Right.
Now we have a coma from the variable, regret dot Ray.
And hopefully this will work.
Do some auto formatting and save it go back to the browser.
And you can see that we actually had the image here but we haven't set any other properties.
So that's why it will look like this.
So let's go back here and we're going to set the background On size 100% and cover, we're going to set the background position to center the height is going to be six 600 pixels.
position is going to be relative, because we're going to absolute position or text.
So that's why we have to set this to relative.
And we're also going to have a slight animation on this one.
So I set an animation that are going to call animate hero image, and is going to be for one second.
If we look at the finished here, you can see that it kind of fades up.
So that's the animation that I'm going to create.
And I do that below here.
And nested inside of here.
So act keyframes, and the name is animate hero image.
I go from Opacity is going to be zero to Opacity is going to be one, save it, go back and see what we've got.
There you have it, there's some little border up here.
I don't know why.
Let's see if it's sort itself out when I create other styles.
But you can see that it it animates in here quite smoothly.
So that's great.
Alright, let's fix the other components.
So we have the content, padding is going to be 20 pixels on that one, we set a max width, and we grabbed from our variable max width.
And Morgan is going to be zero in order to save it, let's check it out, you can see that it's in the center now.
That's great.
And that one removed that nasty little border up there also, that's sweet.
Then we have the text.
Let's create that one also, I set the cell index 200.
Just to place it on top, I set the max with the 700 pixels on this text position is going to be absolute.
from bottom we're going to set it to 40 pixels and margin right is going to be 20 pixels.
The min height is going to be 100 pixels.
And the color is going to be from the variables we have the white.
All right, so that's our text.
And inside we have the h1 tag.
So for that one, I set the font size.
And for more variables, we have font, super big camel casing.
And then I'm going to have a media query on this one media screen.
And Max course I have to end this way to see my colon max with 720 pixels.
And I set the font size to variable dash dash formed big, so I'm making it slightly smaller.
Right, that's the h1.
Then we have the p tag, it's gonna have a font size.
From the variables, we grab font med.
That's the medium size.
And then we have a media query media screen and you set the max with the 720 pixels.
For that one, the font size is going to be a variable font small.
So this means of course, that up until 720 pixels, we will use the form small otherwise it will use the font medium.
And the same goes here, we use the font big up until 720 pixels otherwise was used the font super big.
All right, then we're going to have a media query on the text itself.
So media screen and max width 720 pixels.
And we set the max with 200%.
And there may be room for optimization in the CSS because I haven't put the most focus in the CSS for this course, as this is a course in react.
But I wanted to show you how to create the CSS also.
So that's why I included it.
But there are room for optimization I'm sure of that.
Go back and see what we got in it.
seems to be working.
Let's see what happens.
Yeah, you can see it gets smaller.
And that's great.
Now, it's actually starting to get fun because now we see different stuff happening here, things are displaying on the screen.
And that's what I like with front end development to actually see it's put together like this.
Alright, in the next video, we're going to create the logic for the grid component.
So we have our hero component, and the next component would be the actual search bar.
But I'm going to save that one for later.
So we're going to create this grid now instead, in this video.
So let's start by creating a logic just as usual.
And in the next video, we create the styles, go back to the code editor.
And inside the components create a new folder, that's called grid.
And inside the grid, create a new file that's called index dot j s.
And another file is called grid dot styles dot j, s and capital G on the grid, of course, and just as before, we're going to be in the grid dot styles dot j s first to create the placeholders for the style components.
So import styled from styled components, then we export the columns that we call wrapper.
And as you can see here, this is great with starter components, because I named them the same, but it doesn't matter, they will be scoped to that component.
So we can have this exact same name.
That's super sweet.
So the styles won't interfere with each other.
So style dot div, double backticks.
And then we export const content, and that equals A styled dot Dave, also n double backticks, save it and go inside of the index.js file.
So we import react from react, hopefully you're starting to learn is now so this will be in your muscle memory later.
Then we have the styles, we import the wrapper, and the content from dot forward slash grid styles.
Then we create a component itself const grid equals, and I'm going to destructure or two props that we're going to send into this one.
So header and children.
I have an arrow function, and I'm going to do an implicit return.
And you may wonder what children is.
And that is a default prop that we can use in react.
When we nest stuff inside a component, they will be accessible in the children prop.
So that's great, I'm going to show you how that works in a second, we're going to have a wrapper.
Then we have an h1 tag.
And then I have curly brackets because I'm going to grab the header prop and display that here.
Then we have the content.
And for that one, I create another curly bracket, and I grab the children.
So that means that whatever I wrap inside of this component, when I use it, I can display it here by displaying the children, then we need to export default grid like this and save it.
So this is pretty much it for the grid component.
If we go back to the home.js file, we can import it up here.
Import grid from dot forward slash grid.
And then just below here below the hero image, I'm going to use the grid here.
And this one is going to get one prop is the header equals popular movies.
So inside the grid, I'm going to map through all of the movies in the state.
So I have curly brackets and State DOT results.
I map that's also a sixth syntax, we have a movie.
In this inline function, I can make an implicit return.
So I have parenthesis.
And I use a lot of e6 syntax here as you can see, and hopefully you know a bit about it before you start this course because it will be too long of a course if I explain every little syntax in detail, but I try to explain some stuff for you.
And hopefully, you'll learn a lot also from it.
But the map method is something you can use instead of a for loop.
So use the map on the array, the results array, and it will map to each item in the array.
We haven't created a thumbnail yet.
So we're going to create a div.
And I think we have a property that's called title.
So I map through every movie and now I'm just going to show a div in the grid that shows us the movie title.
Or format it save it go back to the application.
And you can see that we have all the movies here so displaying the title, and you can see that it also warns us now each child in a list should have a unique key prop That's when we map through things, we have to market with a key also otherwise, React will complain.
React is using this internally to diff stuff and to optimize itself.
So we can set a key on this one.
And we're going to give it the movie.id.
So this is a unique ID that we get from the Movie Database API, it's sometimes return two of the same movie, and this one will actually give a warning done.
So it's some bug in the API, I think, because it should only return one of each movie.
So if it gives you a warning, it's probably that because it has probably returned more than one of the same movie.
So you could actually add something else, you could add a random number, also to the movie ID if you have that problem.
So let's go back to the application.
And you can see that it doesn't complain now.
So now it's happy, we have provided a unique key.
And that's super great.
And we have the titles, but it looks like crap.
Now because we haven't styled it and we haven't created the thumbnails yet.
In the next video, we're going to style the grid itself, and then we're going to create the thumbnails.
So we have our grid, but we have to style it also.
And that's what we're going to do in this video.
Move back to the code editor and in the file that's called grid doc stars dot j s in the grid folder, we have already created this one here.
So we're just going to fill them up with CSS.
And also I can tell you, if you don't have that plugin installed in Visual Studio code, I have a plugin that's called VS code dash style dash components.
So that's the one that's create this nice syntax highlighting inside of this style components.
So that's a little tip if you haven't installed that one.
Alright, so let's create the stars for the wrapper.
First, we're going to set the max width from our variable that's called max width.
Then we set the margin to zero auto, that will center the div, and we give it some padding zero and 20 pixels that's padding on the sides.
And then we have the h1 tag, I'm going to set the color from the variable mid gray on that one.
And then also, I'm going to have a media query.
So at media screen, and Max dash with 768 pixels.
And this one is going to change the font size from the variable font big.
Alright, save it go back to the browser.
And you can see that we have this nice Morgan's here, but we haven't actually created a grid yet.
So that's what we're going to do next.
Inside the content component, we're going to display a grid.
Then we set something that's called grid template columns, grid dash template dash columns, we're going to set this one to repeat.
And this is a little trick you can use if you want to create a responsive grid, so we repeat these columns, we set it to auto fill a coma, and then we use the min max 200 pixels, that's the minimum width that those little thumbnails can have.
And then we set it to one fragment, so we don't specify an exact pixel width on the max value.
And this is CSS Grid syntax.
And the CSS Grid will probably require a complete course on its own.
So I'm not going to go there.
Grid gap, we're going to set that one to two REM so that will give it some spacing between the rows and the columns, save it, go back to the browser, and you can see that we have our grid.
So now it's showing us five items on each row.
If we do like this, you can see that it is responsive.
And that's super great.
That's a neat trick you can use if you have a grid like this, just with one row in CSS Grid, you can make it fully responsive.
So that is really, really cool, actually.
And it works because we set this one to repeat the columns, and we set it to autofill.
And then we set a min and max value.
So we're telling it when it's 200 pixels wide, it can't go lower.
So then it removes one column instead.
And it's going to do that all the way down to the mobile devices.
All right, that's the styling for the grid.
It was pretty fast.
I think.
In the next video, we're going to start creating the thumbnails.
We have the grid now, but we haven't created the thumbnails for the movies.
So that's what we're going to do next.
Move back inside of the code editor and inside the components folder, create a new folder that you call thumb, capital T inside of that folder, you create a new file that's called index dot j s.
And then you create another file that's called thumb dot styles, dot j s, I hope you're beginning to see the pattern here on how I structure the components.
So first, we're going to start in the thumb dot style dot j s, just as before.
So we import styled from styled components.
And for this one, we're only gonna have one component.
So export const.
Image capitalized.
And this one is going to be styled dot IMG because we styling the image here.
Right, save it and go back to the index.js file or the thumb.
So first, we import react from react.
Then we mark it with styles an import image from dot forward slash thumb styles.
We're going to import some more stuff here later, because these thumbnails are going to be clickable, we're going to create that later when we have set up the routing, and also started to create our movie page.
So for now, we create our thumb component, cost thumb equals, I'm going to destructure out an image prop movie ID and clickable, I make an implicit return on this one, because I'm only going to return JSX.
For this one, I'm going to have a wrapping div, like this.
And then we're going to use this prop to tell if it's clickable or not.
And then we're going to have a ternary operator here.
But for now, we're just going to return an image.
That's the image that we created here.
The source is going to be wrong the image prop.
Eric is that an old of movie thumb on that one.
With self, close it.
And then down below here, we export default, some save the file, then we're going to go back to the home component and also import this one.
So up here, import some from dot forward slash thumb.
Alright, and below here, where we map through all of the movies, we're going to use a thumb instead of this div, remove this one here, and we use the sum, then we're gonna have a key for this one also, because we always need to have a key when we are mapping through components like this and display them.
So the key is going to be just as before the movie.id we're going to set it to clickable, that's going to be true, it's always default to true.
So you don't have to do this, if you want to set it to true.
For now that one isn't working, because we didn't utilize it in the component itself.
But we're going to fix that later.
Then we have the image prop and we're going to give it the URL to the image.
And for this one, we're also going to use that fallback image if we don't have any image for the movie.
So we're gonna have a taller operator here, movie dot poster underscore path.
So we're checking if we have imposed a path if we don't have that we're going to display the fallback image.
But if we have this path, we know that we can grab that image.
So we have a question mark.
I'm typing it on another row here, but it's the regular ternary operator.
Then we have the image base URL.
And I'm actually going to show you the other way now not do it like this here.
But you can do it the old way with plus, instead, where the poster size, and then we have the movie dot poster path, movie dot poster underscore path.
Be very careful with the spelling, it's very easy to make a little typo here.
And that will break everything.
Alright, so that is when we have a poster path, then we have the colon.
And we're going to display the no image if we don't have a poster path.
So that's the image, then we're going to send in the movie ID.
And that is because when we click on a thumbnail, we need to have the movie ID for that thumbnail.
So we know what movie to grab and display on the individual movie page.
So movie.id and then we're going to close the thumb component.
So be very careful here.
It's a little bit nested.
And it's very easy to type something wrong here.
But this should be right i think i really hope so.
I save it back to the browser.
And as you can see we have the thumbnails but it doesn't look right.
And that's because I haven't styled them yet.
But at least we display something.
So in the next video, we're going to start the thumbnails some to make it look something like this instead.
Really pretty modern.
I hope Okay, we soon have a grid with nice little thumbnails, we just have to style the thumb component itself.
Inside the thumbnail styles dot j s, we already created this one, we're going to style it inside of the image style component.
So we're going to set the width to 100%.
The max width is going to be 720 pixels, transition, all 0.3 seconds.
And that is because I want some nice transition on hover.
Objects object dash fit is going to be cover border dash radius is going to be 20 pixels.
And the cover here will center the image and make it fit nicely into the thumbnail.
So that's a really handy little rule you can use in CSS for stuff like that.
I also got to have an animation on this one because I want it to fade up, we can actually look at that in the finished application.
You know, you can see here that these thumbnails are also fading up just as the hero image.
That's what I wanted animation for.
So I call it animate thumb.
0.5 seconds.
So we're going to create that animation.
So add keyframes and animate them.
Right from a set the opacity to 02.
It's going to be opacity one, that's the animation.
And then I also want to set the hover effect.
So colon hover like this.
And I said to pacity to 0.8, there's an auto formatting and save it back to the application.
And as you can see, it's looking great.
So that's nice, it's working, it's starting to look like something, we can compare it to this one here, and it looks exactly the same without the search bar.
So we have a few things left to do, we have to create the spinner also when we loading and the search bar and the bottom for loading more.
In the next video, we're actually going to create the spinner component.
So we have that ready when we want to show it when we're fetching more.
Okay, we have our hero image on our grid.
So we're going to create the spinner in this video.
Back inside of the code editor and the components folder, and inside a components folder, create a new folder that we call spinner.
And then we create a file, let's call index dot j s and another file.
Let's call spinner dot styles, dot j s, it's been beginning to be a little bit repetitive here.
But as I said so many times before now is always great to repeat stuff when you learn it.
So even if it's boring, it's better to repeat it, because then it will be in your muscle memory later.
So that's why I repeat a lot of stuff also in this course.
And this one is a little bit special actually because we have the component itself in the index.js file, but the component is really just going to be a styled component.
So in this index.js file, we're just going to import the start component in this file.
So we can create this actually in this video and then we import it and then it will be finished.
So in the spinner.styles.js file, we import styled from styled components.
We export a const that we named spinner, and it equals A styled dot div double backticks and inside the backticks we write our CSS, we set the border to five pixels solid.
And we have the variable of light gray.
We set the border dash top to five pixels solid with a variable dash dash med gray.
We set the border dash radius to 50% because this one is going to be a circle so that's why the width is going to be 50 pixels and the height is also going to be 50 pixels.
We have an animation on this one also.
We call it spin 0.8 seconds is going to be a linear animation and is going to be infinite.
That was at the Morgan 220 pixels.
All right, then we create an animation at keyframes.
Spin we go from 0% Transform.
we rotated Cyril degree, here, I'm using PreSonus data.
So you can use whatever you want.
We didn't do that in the thumb styles I'm using from two in that one instead.
So I like to change stuff a little bit when I create courses like this so that you see that you can create it in many different ways.
So here, I'm using percent instead.
And it should say, transform, not Transform, transform, and rotate zero degrees, and it will see my colon.
And then we go to 100%.
And the transform is going to be rotate 360 degrees, some auto formatting, and save it.
Then we go back to the index.js file in the spinner folder.
And for this one, we just import the spinner that we created a style component.
So from dot forward slash spinner dot styles.
And then we export it, export default spinner.
So that's it for this component, we can actually see if it works also.
So go back to the home page home.js, we import it first here.
Imports spinner from dot forward slash spinner.
Alright, and then here just below the grid, we can place the spinner and also a soy, we don't actually need the use state and use effect here more so we can delete those ones also save the file, go back to the browser.
And as you can see, just below here, it's spinning like crazy.
And of course, it's only going to be shown when we fetch data from the API.
But for now, we're showing it all the time, but we're going to fix that later.
So that's how you create a really simple spinner with some CSS and style components in react.
In the next video, we're going to start creating the search bar.
So we created a grid with a thumbs and we have our hero image and we want to create our search bar.
Next, if we look at the search bar in the finished application, we can see that we have this nice little icon here and I created this myself, first I had an icon from Font Awesome.
But then I thought maybe we shouldn't import the whole Font Awesome library just to have one outcome.
So that's why I created an SVG image instead.
And then it says search movie, and then we can type in something to search for in here.
So this is how it works.
So let's go back to our code.
And inside a component folder, create a new folder, that's called search bar, capital S, capital B.
And inside of that folder, you probably guessed it, we create a file, let's call it index dot j s, and a file that's called search bar dot styles.
dot j s.
And we do as we always do, we're going to be in the search bar dot styles dot j s, and we're going to scaffold out the style components import style, from style components, then we export a const, called wrapper.
And he's going to equal a style of theme.
And we have double backticks.
And we export, not triple backticks double backticks and a semi colon, then we export the course that called content.
It's going to equal style dot div, double backticks and a semi colon, save it go back to the index.js in the search bar folder, we import react coma, we're also going to import a few other stuff here, we're going to need to use state we're going to need to use effect.
And we're also going to need to use ref this one.
And we import it from react.
So why do I need these things? Well, the state we're going to use to create what's called a control component.
And that means that we're going to have our input field but it's going to be controlled by react, the input field is going to be based on the value in the state.
We're going to use the use effect to trigger when this local state changes.
And then we're going to update the search term so that it will fetch new movies from the API.
And use ref is going to be used to show you a little trick that we can use if we don't want to do something in the use effect on the initial render.
So then we're going to import the image that's going to be that little icon I showed you.
So import search icon, camel casing from dot dot forward slash dot forward slash again, images and we have something that's called search dash icon dot SVG.
Don't miss the file extension there.
Then we have the styles, the import, curly brackets, wrapper and content from dot forward slash sport dot styles.
All right, so that's our imports.
And then we create a component const search bar, capital S capital V equals, and we're going to destructure out the prop that's going to be set search term camel cased by a narrow.
Now for this one, we're going to make an explicit return because we want to have some logic in it.
So we have a return statement, parenthesis.
Now we have our wrapper.
And inside a wrapper, we're going to have our content like this.
So the first thing we need is the icon and it's going to be an image.
So image SRC is going to be the search icon.
We can set an author on that one, also search dash icon with self, close it like this, just a regular img tag, then we're going to have an input field.
And it's going to be a type text.
We're going to have a placeholder.
Let's go going to be searched movie.
And then we're going to have an on change handler and value.
But for now, I'm just going to surf close this.
And to do some auto formatting and export this component, export default search bar.
And then we're going to import it in the home component just to see that we got something here.
So go back to the home, and close all this, go back to the home.
And just below the hero image, we're going to place that component But first, we need to import it.
So import search bar from dot forward slash search bar right down below the hero image just above the grid, we can place a search bar, save it go back to the browser.
And you can see that we have our input field here.
But we haven't started yet, of course.
So hopefully it's gonna look something like this, when we're finished, go back to the code and the search bar in index.js file, we're going to make this what's called a controlled component, a controlled component in react is a component that react control.
So the input value is going to be based on a state that we create.
And when that state changes, it also changes the value in the input box.
And this is great because then we know that our state is in sync with the actual value in the input field.
We create a state of here const, we can call it state and set state equals use state.
And it's going to be an empty string for stores.
On our input field, it's all formatted them like this, I want to have them like this, instead, we're gonna have an on change handler equals, and for this one, I want to create an inline function, you could also create a function up here for that one if you want to do that instead.
But I want to show you how to do things differently.
So in this case, I created an inline function, we have the event, or you can just type in E, for example, you can name it whatever you want, then we set the state with the event dot turn target dot value, and this will give us the value in the input field.
And we need to have this inline function as we are actually invoking this function here with that value, otherwise, it won't work.
So by having this inline function, we can provide this one with value.
So that's why you have this inline function.
Otherwise, it will run this function instantly.
And that's no good.
So if we, for example, had a function that we didn't want to send in some arguments to that we just want to trigger on change, we can have it like this instead.
And that will work but in this case, we want to send in the argument or the current value.
So that's why we have this inline function.
Alright, so that's the unchanged and then we set the value to the state.
And there we have successfully created a control component.
We can see if it works, go back to the browser, type something in and you can see the value here now is controlled by react.
As soon as we set this value to some state value here, we are making this a control component.
And every time it changes, it's going to trigger reset state and it gets the value here and replace the value from the text input.
In the state, and then the value is displayed in the textbox itself.
So it's kind of a closed circle here on how things work.
It goes around in this way.
Now we have our input field, but we want something to happen.
Also, we want to set the search term that we're going to create in our hook that we created before.
So we actually going to create a new state inside of use home fetch.
So up here in the US home fetch hook, we're going to create a cost, call it search term capital T, and set search term, then it's going to equal use state.
And we'll set it as an empty string initially, then we also need to export this one.
So export it down here.
And we only need a setter for this one.
So we can export the set search term like this, save the file, go back to the home.js.
And up here, where we where we use or use home fetch hooked, we can destructure out the set search search term, the set search term arrived.
And this one is going to be the prop for our search bar.
So I'm going to call this prop set search term also.
You can call it whatever you want.
And then I give it to set search term.
So this way, we pass this along down to our component to the search bar, so that we can use it in the search bar.
So when this one triggers when we set the search term is going to trigger here.
So actually changing the state in our hook here.
That's exactly what we want, because then we can use it in our hook when we fetch stuff.
But in this case, we want to have a slight delay when the user types something in before it tries to fetch the data, we can look here in the finished application, you can see when I type something in here, that I have a slight delay, otherwise, it wouldn't be a good user experience if it just instantly started to fetch data.
So that's why I do it this way instead, otherwise, we could have used this state to actually fetch the data.
But in our case, we want a slight delay.
And then we set the search term that we're going to use for fetching.
So that's why I have dual states for this one.
So let's create a use effect in the search bar use effect.
We have an inline arrow function just as before.
And we have the dependency array.
And we're going to fill it out in a second.
I'm going to show you how to create a timeout in react now and how we can use it in a use effect.
So first we create a timer.
We use the set timeout that's built in JavaScript, we have an inline function for that one.
And then we're going to call the set search term.
That's the one that we created.
And we're going to give it the state like this.
And I'm going to set it to half a second, that's 400 milliseconds.
So this one will trigger after 500 milliseconds.
If you want some other value, you can of course type that in instead.
And you can see here now that it instantly complains, because we haven't specified this as a dependency.
So we specify and set search term as a dependency.
And it also complains, because it needs the state, that's also dependency to this use effect.
So this linting rules are actually really good.
It tells us stuff so that it is so that we actually do this correctly.
And we should always specify the dependencies and handle it inside of the use effect if we need to.
Alright, but there's one more important thing we have to do with the timer.
And that is declared a timer on each render, because otherwise, it will just create a lot of timers.
And that's no good.
And there's a handy little thing with the use effect that we can use for this.
Because if we return a function in the use effect, so every time before a new render, it will trigger this function.
So we can clear our timeout inside of that function.
And this will take care of that we clean up this timer.
So we don't have a lot of timers that just ticks in the background.
And you can imagine you have a lot of stuff that you want to do maybe to clean up stuff.
So you can always do that in a return function with the use effect.
This one doesn't trigger until this render has finished and is going to render again.
So that is sweet.
We can say this one.
And we can actually go back to the use on fetch.
And up here.
We can console log the search term, so we can see that something is happening.
So go back to the application again.
Yeah, I have a typo somewhere.
Maybe I didn't save the home.
Save go back to the browser.
Yeah, no, it's worse.
You can see it's really important to save your files because it will break otherwise, be sure to save all the files.
So if I type in test, and you can see here after 500 millisecond it will trigger.
So that's sweet.
We know that that is working and we Use this to fetch data from the API.
But there are one more thing I want to do.
And I promised you to show you a little trick with the use ref.
And that is because the use effect always trigger on the initial render, and we don't want to trigger a fetch.
When this component mounts, we only want it to trigger when the user has typed something in.
So that's why I'm going to create a cost that's called initial up here.
And I'm going to use ref.
And I set it to true.
So when we call the use ref hook, this one will create a mutable value for us that you can compare to something similar as a mutable variable.
So we have this initial const, and the actual value is going to be in the initial dot current, that property will hold the value true right now.
So I set is the true and inside the use effect, I'm going to check if initial dot current, that's going to be the true value right now, if it is true, in it, it should say initial, like this, right? Then I instantly going to set the initial dot current to false.
And you can see here, I can mutate this variable directly, I don't have to have a setter for this one, because this one won't trigger a rerender.
That's the biggest difference from a state that when you use ref, it won't trigger a rerender.
And then if this one is true, we know that this is the initial render, and then I'll just return, we don't do anything more inside of the use effect.
And we set it to false.
So next time, this one triggers, this one is going to be false.
And it's going to run our logic.
So this is how you can create a neat little code snippet here, to skip the initial render in the use effect, save the file, just make sure that it works.
Yeah, and it seems to be working.
We've learned how to create a control component in react, and the component controls the input field with the state.
So the input field always has the same value as the state and that's the control component or state is synced with the input field.
And then we created a timer that will trigger each half a second and call this set search term to set the stay there.
And the state is going to be the value from the input field.
And we also pass this one along from the US home fetch.
So that's how you pass data down to your components.
That's what props are for, you can pass data down to your component, and we can use it in that component.
And that means that we also have this value in our use home fetch hook to use the fetch data later, that can remove this console log for now, save the file, and this will be it actually for the search bar.
In the next video, we're going to style the search bar.
And then we're going to create the logic for fetching the data.
were created our search input field, but it doesn't look good.
So we have to style it also.
And that's what we're going to do now.
So in our search bar dot styles file, we're going to create the wrapper first.
And I'm going to display it as a flex.
I'm going to align items center.
Now not aligned a line I set the height 200 pixels.
The background is going to be from the variables, we have the dark gray.
And I'm going to give it some padding on the sides, zero and 20 pixels, do some more formatting, save it go back to the browser.
And you can see that we have the search bar here.
And now we have to style kind of the inner part of the search bar.
And we do that in the content.
Inside the content, I'm going to set the position to relative because we want to place the icon with an absolute position.
The max width is going to be from the variables we have our max width, the width is going to be 100%.
The height is going to be 55 pixels, the background is going to be from the variables met gray.
And Morgan is going to be zero in order.
And the border dash radius is going to be four pixels and the color from the variables we have our white.
Save it go back and see what we've got so far.
So we have this inner part now of the of the search bar to add the style icon and the search bar input field itself.
So inside the content, we're going to nest some stuff here we have our icon that's the IMG I set the position to absolute.
And this is why I use relative appear, otherwise it won't work.
So it needs to be relative to the actual content div is going to be left 15 pixels.
So 14 pixels, and will is going to be 30 pixels, save it go back.
And now it seems to align correctly and it also has the correct size.
Great.
Then we have the input field itself.
So down below the IMG type in input, we set the font size to 20 pixels in this one position is going to be absolute left is zero, margin is eight pixels.
And zero padding is going to be 000 and 60 pixels.
border is zero, the width is going to be 95%.
The background is going to be transparent.
The height is going to be 40 pixels.
And the color is from the variables and is going to be white.
So go back to the browser.
And you can see that it works now but we have this nasty little outline, you shouldn't remove the outlines, actually, but in this case, I think it's fair to do it because it doesn't look good.
So I'm going to remove them.
So inside the input, I'm going to nest focus.
And I'm going to remove the outline, I set it to none.
And hopefully that will remove it.
Yeah, you can see it removed.
Now.
One thing you can do also, if you want is to style this for mobile devices, maybe make it a little bit less insight in font size, and stuff like that, if you want to really fine tune it here, but it seems to be working now.
All right, and that's it for the search bar.
That's the style for the search bar.
In the next video, we're actually going to hook this up to the API and fetch some data.
We've created our search functionality on our search bar, but we can't really search for anything.
Yep.
So if we type something in, we just get this console log here.
So we're going to implement the actual functionality where we fetch the search data from the API.
Let's go back inside of the code editor.
And we're going to be in the use home fetch hooked.
And down here, where we say initial render, we're going to change this one to initial and search like this, because we're going to use this use effect both for the initial render and the search.
And it's actually pretty easy, because now we just have this empty dependency array, meaning that we only trigger this use effect once on Mount.
But we also want to trigger this one each time to use the search for something.
And up here we have our search term.
And in this one, we're going to store what the user typed in in the search bar.
And that means that we want to trigger the use effect when the search term changes down here in the dependency array, we specify a search term, meaning that this use effect will trigger each time the search term changes, and it will also trigger one time on Mount.
So we can actually use this one for the initial setting also.
Because when we search for something, we always want to fetch the first page just as we do on the initial amount.
So that's fine, we're fetching the page one.
But we also want to provide the search term.
And that's also fine for the initial fetching, because the search term is going to be an empty string.
So we know that we're fetching the most popular movies, because we're not specifying any search term.
There's one more thing though, that we have to do, and that is to wipe out the old state before we make a new search, because we want to wipe it out and then make a search, show the loading spinner and then show the new movies that we grabbed from the search.
So we can set state to the initial state here, and that will wipe out the state.
And that's really all there is to it.
So we say this file, go back to our application, we try to search for something.
And you can see that it works.
Now this one changes because this one will always grab the first element in the array of movies.
And that's fine.
Actually, you can have it like this if you want, but I want to remove this hero image when we're in a search.
We can do that also to go back to our code.
And then inside of the home.js.
Down below here where we show the hero image.
We can also specify that we don't want to show this one if we have a search term, so not search term, double ampersand so now we're checking that we don't have a search term and also that we actually have a first element in the array.
or movies.
But you can see that you won't see her now.
And that's because we haven't exported this one from our hooked.
So go back to the hooked.
And down below here, we can export this one also search term like this, save the hook, go back to the home notice, and up here where we destructure out everything from the hood, we can also destructure out the search term like this, save the file, go back to our application, we tried to search again.
And now you can see that it disappears.
This is exactly what I want.
If you want to keep the hero image, you don't have to do this.
And then it reappears when we don't have anything in the search bar.
All right, there's one small thing that I also want to do, and that is in the home.js.
And if we look down below here, where we have the grid, I'm going to create a ternary operator now because now it says popular movies, even when we're in a search.
So this one, I'm going to create a curly bracket and also curly bracket here at the end, and then I check if I have a search term, I have a question mark.
And if we have a search term, I create a string I wanted to say, search result.
And if we're not in a search, it's gonna say popular movies.
So if we have a search term, it's gonna return what's the right to the question mark, and that search result.
Otherwise, it's going to return popular movies, save the file, go back to the application.
This time, I'm going to search for Indiana Jones.
And now you can see that the header on the grid changes.
So that's great.
It says search results.
And I remove this and it says popular movies.
So that's our search, we have implemented all the logic for the search bar.
And in the next video, we're going to start trading the Load More button.
Okay, let's start creating a button that will go at the bottom here.
And the spinner will not show all the time, it will only show when we loading stuff back in the code.
And inside the components create a new folder that's called baronne capital V.
And you guessed it, we create a new file, let's call index dot j s.
And we create another file that's called Baran dot styles dot j s.
And we're going to be in that file and import styled bomb style components.
And for this one, we only going to have one style component.
So we export const.
And it's going to be a wrapper equals a style dot button in this case, and double backticks Auto format it and save it and then we go back to the index.js file.
And we're going to create a bottom.
So we import react from react.
Then we have our styles, we import the wrapper that we created wrapper from dot forward slash buttons and dot styles.
Right, now we have our component const bottom.
Then I just structure two props.
One is called text and one is called callback.
And I create an error and I make an implicit return on this one.
I'm going to add the rapper is going to be type button.
And it's going to have an onClick handler.
And it's going to be the callback that was sent in as a prop.
And then I'm going to display the text inside of the bottom.
So this is a button that we created as a start component and call it wrapper.
And it's going to trigger a callback function when the user clicks on the button, and then we show the text we can send in what text we want to this button.
If we want to reuse it, then we export default, bottom, save it, then we go back inside of the home component.
And at the top, we're going to import bottom from dot forward slash bottom.
And then at the end over JSX, we're going to show the bottom.
And we have to think about this because we don't want to show the bottom if we read the last page of movies.
So we have to take that one into consideration.
So just below the spinner here, I'm going to use the curly bracket and create a JavaScript expression, we're going to check from the State DOT page.
If that one is less than State DOT total underscore pages, we know that we're still not on the last page.
And I have a double ampersand make a short circuit here.
I also want to check so that we're not loading anything.
So if not loading, and then I have another pair of ampersands.
And I have a parenthesis, put it on a new road just to make it a little bit more readable.
And then I'm going to show my bottom.
So the text is going to be load more.
And for now I'm not giving it the callback.
This is it for now.
So this statement will check if the page we're currently on is less than the total pages.
And then we know that we still want to show the Load More button.
And it will also check that we're not loading anything because when we loading something, we want to show the spinner instead.
And we have the spinner here.
So we can actually create another statement here, the creator curly bracket, and type in loading and double ampersand, and we end it with another curly bracket like this.
So this will show the spinner if the loading is set to true.
And if it's set to false, it will not display the spinner, but then it will display the button instead.
If we go back to the application, we can see the button down below here in the corner.
But it doesn't look right, we have decided also to look like this here.
And that's what we're going to do in the next video.
We have our ugly little button here down at the corner, so it's time to style it, go back to the code, and inside of button dot styles dot j s file and we have the wrapper here, we're going to give it some nice little style here, we start by displaying it as blocked display block, we set the background.
For more variables, we have the dark gray, we set the width to 25%.
The min width is going to be 200 pixels, the height is going to be 60 pixels.
The border dash radius is going to be 30 pixels.
And the color is from the variables dash dash white, the border is going to reset to zero, the font size is going to be from the variables font big Morgan is going to be 20 pixels and auto transition is going to be all 0.3 seconds.
I'm lazy here I can set it just the property data wants to have a transition, but I said it all outline is going to be none.
And the cursor is going to be pointer, then I want a little hover effect all sorts of over a set of pacity to 0.8.
That's why I had this transition here.
Also, I just want to check also, the font sizes here.
Font big.
Maybe we can use this one instead on the styles for the search bar because I think I have.
Yeah, I have the font size, or 20 pixels, we can use the variable instead variable on big and see how it looks.
Yeah, I think that looks nice.
Actually, we can use that one instead.
But let's check out the button.
Yeah, you can see that it works.
It looks great.
Now, we only have to create a logic footer button now when so that we actually can load more movies.
So that's what we're going to do in the next video.
This is actually the last video for the homepage.
So we're going to create the fetching logic for loading more movies.
And we're going to start in the US home fetch hook that we have in our hooks folder.
And we're going to start by creating a new state.
So this is going to work in a way that we have a state with a kind of a flag that was set to true or false.
And we set that one to true when we click on a button.
And then we're going to trigger reuse effect.
Because as I said before, I think this is great practice with the use effect hook and also the state hooks.
So you could do this in other ways also.
But this is a quite neat way of doing it we have this state that was set to true or false.
And when it changes, we trigger that use effect.
And then we can trigger to load more movies, we first create the state const is loading more camel casing as always.
And then we have the setters set is loading more, it's going to equal and we call the use state hook we set it to false initially.
And this one is going to be triggered from the button itself.
So we have to export it down here also.
So after the set search term, we can export set is loading more.
So there you have it, I removed the sidebar, so we can see the complete row here.
Now we're exporting six of those.
So that's our state.
So we can go back to the home.js file.
And here we have our button but we first need to destructure out the set is loading more set is loading more.
There's some auto formatting, and it will clean it up for us a little bit.
So we just structure that one also.
And that means that we can use it in this component.
And one thing that we also didn't do is to actually check if we have an error so we can do that before the return statement here.
If error We can return a div that says something went wrong.
Like that.
And that will make sure that if we get too narrow, we won't display everything here, we will display this error message instead of.
So you can create a more sophisticated stuff here, if you want to do that.
In our case, I think it's enough for this course.
Alright, so let's move on to this set is loading more.
So we have our button down below here.
And we already created a callback prop.
So we give it the callback prop curly brackets, and this one is going to have an inline arrow function.
Because I want to call this one with an argument set is loading more.
Yeah, I'm going to remove the sidebar set is loading more, and we're going to set it to true like this.
So this will change this state when we click the bottom.
And if we check out the application, we won't actually be able to see anything.
Now, you can see that it renders when we click the bottom because it costs logs this out, so we know that it's working.
And one great thing to know that is that if I click a few more times here, you can see that it don't rerender anymore.
And that is because we're giving it the same value.
So react won't update the state if it gets the same value.
So it's good to know that with react, if you give it the same state value, it won't rerender it.
So react is kind of smart, it already knows that it has the same value.
So it won't do anything, a quick little pro tip in react.
Alright, so we know that the button is working.
So we move back to the use home fetch hook.
And we're going to create another use effect down here.
below the search use effect, I'm going to mark it with load more.
So just as before I create another use effect, an inline arrow function, and we have the dependency array.
And we want this to trigger when the is load more is changing.
So it's load loading more like this.
And the thing is that we only want this use effect to trigger when we actually is loading more.
So if not, is loading more if this one is false, we're just going to return we don't want to do anything else in this use effect.
This one should only do something when we load more movies.
And what we want to do now is to call or fetch movies function again.
In this time, we want to give it a State DOT page, plus one because we want to load the next page.
And we also give it a search term if we're in a search.
And now you can see that it was associated because it wants a few other dependencies, it tells us that we need to specify the search term and the State DOT page.
That's what we're going to do the search term and the State DOT page.
And now it will be happy at us.
And that is because these ones are outside of the use effect.
So we should always specify dependencies in the dependency array.
And we should handle them inside of the use effect hook.
If there's something we don't want to do when something change, we should account for that inside of this use effect.
So we fetching movies, and then we set is loading more to false.
Do some more formatting and save it.
And hopefully this should work.
So we have the use effect of triggers.
When we change the is loading more Boolean.
If we're not loading more, we will just return we don't do anything else in this effect.
Otherwise, we call the fetch movies function.
And we give it the next page that we want to fetch.
And we also give it a search term.
And then we set it slowly more to force again so that we go back to what it was before.
And then we can do it all over again, if we want to click the Load More button again, save it and go back to the browser and see if this works.
We click the load more.
And as you can see, it works.
And I love when stuff just works.
And you can see that our loading spinner is showing showing up also.
It's fast, so we can't hardly see it, but it's there.
So it's working.
And we can also see in the console, here we are at page 11.
And we have 220 results now.
So that's great.
We know that load more is working.
We can also try it out so that it works when we search for something.
And it does.
So that's sweet.
I'm happy with this.
Hope you like it too.
You can see also those those images, some of them has some strange proportions.
So if you want you can tweak the CSS to take that into account also.
In the next video, we're going to start creating our routes for application.
We're going to start creating the routing for our application.
And before we do that, I just want to talk shortly about react router.
Especially the version six that we're using.
It's not officially released when I record this tutorial.
So hopefully it released now, when you watch this tutorial, because it is, as they say, here, it's around the corner.
And I actually talked to this guy, Michael Jackson here on Twitter.
And he said that I should use this version in my course, because it's that stable now, and it's not going to change that much.
And we're not going to use all the advanced functionality in the router itself.
So that's why we installed the next version of react router when we install the dependencies for this application.
And there are a few changes in it if you compare it to version five.
And I actually don't want to talk about version five, because that will soon be deprecated.
So just wanted to mention why I chose to use the version six of the React router, because this is the future version.
And it has the API that is going to be used for a long time, hopefully, in the future.
So that's why I use it.
In this tutorial, I want to make sure that this tutorial uses the latest stuff, so that you know that you're up to date on the things that you learn.
So that's why so just a few words, words here you can compare, for example, they brag here with a react router, version five, that the bundle size is 20.4 kilobytes minified.
And the version six is only going to be 8.5 kilobytes minified.
So if you care a lot about size on your packages, this one is drastically smaller than the version five.
And then they also show you some stuff here on how you use the router.
But that's what I'm going to show you in the next video.
But if you want to read more about this one here, you can go to react training.com forward slash blog forward slash react dash router dash version six dash pri, forward slash.
And then you can read more about it or just google react router version six, and you will probably find a lot of information about it if you want to read more about it.
So let's get started.
We're going to create the routing in the next video.
We're finished the home page and we have our application here.
And we have this nice little grid with all the movies, but we can't actually click on them to view a movie.
And we can't click on the logo up here.
So we have to fix that.
And we're going to do that by creating some routes for our application.
So the first thing we're going to do is if we go back to the code, we're going to create two more components inside a components folder, we're going to create a new file that called not found dot j s, and also not a file that's called movie dot j s, capital M on movie and capital and capital F are not found.
So we're just going to scaffold This one's out.
So we have something to route to.
If we're in the movie.js file, we import react from react, then I create a component are called movie that is going to be an arrow function.
And I'm just going to return a div that says movie.
And now export default movie, do some more formatting and save it always save your files.
Alright, then I copy this one.
And I go inside of the notfound file that we just created.
I paste it in and I change this one, I'm going to share them in one go not found like this and save it.
And there you have it we have two components to play with.
And this one, the movie dot j s is going to be the individual movie component for showing the movie.
So we're going to be working a lot in this component later.
This one is going to be a series I'm not going to create a fancy and not found component.
So you can do some stuff on your own in this one if you want to do that.
So we scaffold out two components.
And then we can move inside the app.js file that you find in the src folder not in the components folder.
So app.js.
And the first thing we have to do is to actually import all the components we need from the router library from react router.
We can mark it here with routing.
If we want to do that.
Then we import we have curly brackets, we're going to import something that's called browser router, capital D capital R.
And this name is a little bit long.
So if you want to rename this module, you can do that by typing s and router.
So we import it as router.
I think I'm going to remove this sidebar also.
Alright, so that's the first one we import browser router, but we import it as router so we can use it with the name router instead.
Then we import another component that's called routes.
And then we import another component that's called route very similar names here.
So be careful when you import these ones.
And we import them from something that's called react dash router.
So be very careful here.
We're not importing it from just react dash router.
We Pulling it from react router DOM.
So this one is using react router in the background.
But this one is specifically created for using in the dome.
Alright, so that's all the inputs that we're going to do.
So let's create our components down below here.
And I'm actually going to change this one to an implicit return.
So I delete the return and the curly bracket.
And I want to create an arrow function instead const f equals because it's only with arrow functions, you can do an implicit return and I remove the curly bracket there, do some auto formatting, to me, it looks a little bit cleaner.
And this div is going to be replaced this wrapper div that has a class name of app going to be replaced with a router to so we wrap our complete application with the router.
So it's really important where you want to put the routes, you should wrap it with the router.
And that is the browser router that we imported here, but we renamed it to router.
So that's why I use it as router here.
Then the header is going to be shown on both the home page and the individual movie page.
So the header is going to be left out of the routes.
So I'll leave that one here.
And then I use the route component.
And inside of the routes component, we can create our routes.
And the first route, we're going to use the component that's called route.
So we have three different components here from the router library router, we're going to wrap our complete application in this case, and then we have routes, that's going to wrap a route because you can route in different components if you want to do that.
So let's say that you have a component deep down in your app tree, and then you want to create some routes for just that component, you can wrap them in this route component, and then you create the routes.
So you don't need to have them here in the top of your application.
And then you use the route component to actually create your route.
And this route component has a prop that's called path.
So we can specify the path where we want to show a specific component.
And in this case, it's a forward slash because it's the homepage.
And then we have another prop that's called element is going to equal and here we can give it a component.
And we want to give it the home component like this.
And then we also have to self close the route component.
That means that we can remove this home component here.
So that's the first wrote, if we want, we can save this to see that it still works, go back to the application, reload it, and you can see that it works.
So that's nice, then we're going to create another route.
So we use the route component again, we set the path, and this one is going to be forward slash.
And then we're going to do something special here because when we're going to fetch an individual movie, we need the movie ID and we can send a long route params for that.
And we create a route params for the route by specifying a colon, and then we name it.
So movie ID.
So this means when we create a link on the thumbnails that we're going to do soon, we can send along the ID for the movie.
And that ID, we can grab that in our movie component and grab data from the API.
And you can name this to whatever you want.
Because this is a rod puram that you decide what you want it to be named.
So I want it to be named movie ID.
And then we specify the element on this one.
And we give it the movie component.
And we also close the route component.
We haven't actually import the movie components, we can do that.
Import movie from dot forward slash, components.
Movie.
And then we can also import not found from dot forward slash components and not found.
There you have it.
So that's the route for the individual movie, we save it.
And we can't actually click on the thumbnail now because we haven't created that one.
But what we can do is go up here, create a forward slash, and then we type in some ID.
And you can see that it types out movie here now.
And that is because it's showing the movie component so we know that it's working.
That's sweet.
And then if we remove this one, we'll show the homepage instead.
Alright, we're going to create one last route.
And that is for our not found component.
So we create a route with a path of forward slash and an asterisk.
And this will make sure that we show the not found component on any other route that don't exist.
And we set the element to the not found component.
And we also surf close this route, save it go back to the application.
We know that it works if we specify an id like this, it shows the movie component But what happens if we create Another route here like this, yeah, then I chose to not found.
And that's super sweet because then we have a fallback component if the user tries to go somewhere else in our application.
So that's the route set up in our app.js file.
Then if we move inside of our header component, and the index.js file, we're going to create a link on the logo.
Up here, we have to import curly brackets, and the component is called link from react dash router dash DOM.
And this is actually quite simple.
It works the similar way as the a tag does in HTML.
So we have a link component we specified to and in this case, it's going to lead to the home page, so we have a forward slash.
And inside the link component, we just put our logo like this.
So we wrap it inside of the link component.
And this will make sure that we can link to the homepage, so go back to the browser.
For now, we specify an ID.
So we're in the movie component, and then we click on this logo.
And we go back to the home page.
So really easy to make links with react router.
You can also make them programmatically.
But we're not going to do that in this course, because it's kind of a little bit more advanced.
And we don't really need it in this application.
But we have to add a link to the thumbnail also.
So that we know that we can click on a thumbnail, and that will lead to a specific movie.
So inside the thumb component, the index.js file will do the same thing up here we import curly brackets link from react dash router dash dome.
And we have this prop here that's called clickable because we are going to use this thumbnail for the movie poster on each individual page also.
And that means that we won't be able to click that one.
So we have to have this Boolean to check if we should be able to click the thumbnail or not.
And the way I solve this is to create a ternary operators.
So here just below the div we check if clickable is true.
It's enough to type in clickable, then we have the question mark.
And I have parenthesis.
And I'm going to use my link component and it's going to link to and in this case, we want to use the movie ID because as I talked about before, we are going to send along this ID in the route.
And we can grab it later in the movie ID params that we create here.
So we have backticks.
I create a template literal here.
So I have forward slash, then I have dollar sign curly brackets, and I'm going to give it the movie ID and this will give it a link with a forward slash and the movie ID close the link component.
And then we have our image.
And in this case, I'm going to copy this one and paste it in.
So this is if the thumbnail should be clickable, then in the ternary operator Be very careful here it should be after this parenthesis, I create a colon and then I create a new pair of parenthesis.
And I move this image inside of that one.
And I also have to end the ternary operator with a curly bracket.
And then I do some auto formatting.
So what did I do here? Well, I create a ternary operator checking if the clickable is true or not, I show the link component with the image wrapped inside it.
And that means that we'll be able to click on this thumbnail.
Otherwise, that's what's right to the colon here, I just show the image as it is or don't wrap it in a link component.
So the user won't be able to click it.
Save the file, go back to the application.
And hopefully we should be able to click our thumbnails, you can see that we have this nice little hand here.
That means that we've created a link.
So if we click this one, you can also see that we have the movie ID up here.
And that's the one that we're going to grab in the puram in our movie component.
So it's working great.
And this is actually it for the routing, there's no more routing we need to do in this application.
And in the next video, we're going to start creating the movie page.
Okay, we're just going to do a little bit of scaffolding in our movie component before we move on.
So up here we're already importing react, we're going to import some stuff from the config also.
So import, we're going to need the image, underscore base, underscore URL capital letters and the poster underscore size.
And we're going to import it from dot dot forward slash config.
Then we're going to have our components we're going to create new ones for this one.
But two of them we already created.
We're going to import the grid from dot forward slash win.
Then we're also going to need a spinner so import spinner Apart from dot forward slash spinner, and then we're going to create the other ones later, we're going to create a hook for this one.
And we also need an image.
And that's the fallback image just as before.
So import, no image, from dot dot forward slash images, and no underscore image dot jpg.
And as always be very careful to actually add the extension here, when it's an image.
All right, and then we have our movie component, this one is actually not going to have an implicit return, we create curly brackets, because we're going to have some logic in this one.
So we create a return statement, parenthesis.
And then we're going to create a react fragment, like this.
And inside for now, we can just have a div that says, movie, do some auto formatting, and save it.
And I think this should be it, go back to the browser.
Try something else here.
Or we could actually just have clicked on one of these.
Yeah, and it shows movies.
That's great.
We know that it works.
And then we can move on.
And we're going to start by fetching the data from the API so that we have something to work with.
All right, we're going to create our second custom hook.
Now, I'm not going to create it first in the movie component, and then move it to a custom hook.
Because now we know how we can create a custom hook.
So that's why I'm doing it instantly in that one instead.
So in the hooks folder, let's create a new file that's called use movie, fetch capital M, capital F, and dot j s.
And as I told you before, it's important to name your hooks with use before the name.
This is the actual finance.
So it doesn't matter here.
But it's important that you name your actual hook with use before.
So for this hook, we're going to import curly brackets, we're going to need use state and use effect from react.
Just as before, we don't really need a main react library for this one, because we're not doing any JSX and stuff like that.
So that's why we're not importing it, we're going to import the API object from dot dot forward slash API.
And that will give us access to all these nice functions that are created for us.
Then we create the actual hooked, so export const, use movie fetch, equals and this one is actually going to have a parameter, because it's going to be the movie ID.
And I'll talk more about that in a second.
So that's the arrow function.
And up here, I create three states, the state and setter for that state.
I call the use state hooked.
And I'm going to give it an empty object as default value.
Now I create a loading state and set loading.
You state I'm going to set this one to true initially, because this component is going to start by fetching the data for a movie, so we can set that one to true.
And then we're going to have the error and a set error just as before, and this one was set to false.
So you state and give it an initial value of false, right.
So that's the state we're going to need for this one.
And then we're just going to need one use effect.
For this one, because we only fetching data one time, and that is when the component mounts, and then we're not going to fetch anything more, because then we have all the data from the movie that we need to have the inline arrow function.
And we have the dependency rate.
And this one is going to change if the movie ID changes, it actually not going to change now, because we just do it initially, as I told you, but as I also told you, we need to specify all the dependencies for our use effect.
So that's fine, in this case, to have it there, it only going to fetch it one time.
And then as a use effect can't have an async function here, we create another function that async fetch data equals async.
And in this case, I placed it inside of the use effect, and I'm going to show you why in a second also.
So we have an async arrow function.
And then we can do our fetching logic inside of this one, and it's going to be quite similar to the other one that we did.
So we have a try block.
And we're going to catch the error if there is one.
And if there is an error with set error to true like this.
Then in our try block, the first thing we do is this That loading to true.
And we also set error to false.
Yes, that's we did before.
And then we can fetch our data.
But I have a typo here.
It just say, error.
Yeah, I guess I misspelled it up here.
Yeah.
There you have it, right.
Yeah, this one too.
Ah, something like that.
Right.
So first, we're going to grab the movie data from one resource from them point.
And then we also have to grab the credits that we get from another resource from them point.
So we have const, movie equals a weight.
And from the API, I created a function that called fetch movie without an S at the end.
There we go, going to give it the movie ID.
Right.
So that's the movie, then we also want to fetch the credits.
So we create a cost to that when that we named credits, we await again from the API dot fetch credits.
And we also give it a movie ID.
So hopefully, we got all the data that we need here in those costs.
But we want to do some stuff here.
And that is, we only want to show the director solely because if we look at the finished application, and we go back, and we click Whoa, yeah, there you have it encountered two children with the same Keith.
And this is what happens sometimes with this API.
And I really don't know why.
So if you get this warning, you can create your own unique key somehow, by maybe have a random number and the movie ID, I don't know, you can do it in many different ways.
But for now, it doesn't really matter.
So we have the movie here.
And as you can see, here, we are showing the directors, we need to get the directors somehow from the API.
Because from the API and the credits, we get something back, that's called crew.
And the crew contains more than the directors.
So we have to filter out the directors to just get the directors name.
So I mark it with get directors only.
And then I create the new cast, I call it directors equals and from the credits, that's the one up here, we have the crew properties.
And I'm going to filter this one filter is a built in method in JavaScript, we have a member a crew member.
So I'm going to check if the member dot job, this is also a property that we get back from the Movie Database API, are going to check if that one is equal to director with a capital D.
And that will filter out all the directors and put them in this const.
Or format it.
And then we have all the data that we need, so that we can set our state, so we call sub state, that's the setter for our state.
In this case, we don't need to use a previous value.
So I'm just returning an object here, I spread out the movie.
That's the data that we got back here.
So we spread out everything from that one.
And then we have a property that's called actors.
And I'm going to give it the credits dot cast.
So from the credits, we have the cast, and we also got the directors from the crew.
So the actors is a property that I create myself that I want to have in my state.
And I'm going to have all the cast inside of the actors property.
And the last one is going to be the directors, there can be more than one director.
So that's why it's called directors with an S.
And as this is iOS six syntax, we just need to type out this it will create it like this automatically.
Alright.
Then we're going to set loading the false like this.
Auto format it and this should be for this use effect.
Actually, I think for now, we need to return something from our hook also.
return an object with the state loading and error.
Save it go back to the movie.js file.
We can see if it works.
So down here I marked it with hook.
I'm going to import use movie fetch Rome dot dot forward slash hooks and use movie fetch.
And then we can try out our hooked and see if we get some data back.
So at the top of our component, we can destructure out the properties that we exported from the hooked I also want to show you how you can rename something when you're distracted.
So we have the state that we destructed, and we have a colon, and I want to call it movie instead.
So that's how you rename it.
And then we destructor out loading and error.
Then we call or use movie fetch choked.
And we also want to give it the movie ID.
But we haven't really got the movie ID.
So how do we get it? Yeah, and this is from the route that we have up here, as I told you about before, we have the ID up here in the routes, we can get that one from the router.
So we have to import something up here.
So we import curly brackets, it's a hook that's called use params.
From react dash router, dash dome.
So with this hook, we can grab that params that we have in the URL.
So we'll do that before we destructure out the state and everything here from our use movie fetch hook to make sure that we have the ID to send into that hook, the const, and then we destructure out the movie ID equals and we call the use params.
That's everything you have to do.
And this one is named movie ID because we named it that in the app.js file.
We call it movie ID.
If we call it something else here, we have to distract it with that name.
But this will give us that ID that we have up in the road here in our application.
So hopefully this will work when we tried to console log out the movie, and this is actually the state but I renamed it to movie.
So that's why I can console log it out as movie.
Save it.
So we try it out, click a movie and nothing shows up.
And I think I know why we go inside the use movie fetch hook, we also need to actually invoke this function here.
So we do that at the bottom of our use effect hook.
Fetch movie.
Did I name it fetch data, we can rename it to fetch movie instead, like this.
And make sure to invoke it at the bottom of the hook.
Save it go back to the application.
And now you can see that we have the data here.
So we have all the actors.
And we also have the directors that were filtered out here.
So that's great.
All the data that we need is here.
I want to show you one more thing here.
And that is if we were to remove this, that movie function outside of the use effect like this, it tells us here that we need to specify the fetch movie, and that's okay, because it's outside the use effect.
Now, we do that.
And then it gives us another warning here.
And this is because this function two will get recreated on each render.
And this use effect will think that it's a new function that gets on each render, and it will create an infinity loop.
So that's no good.
So if we want to have it placed outside of the use effect, we need to wrap it in something that's called a use fallback hook, we can import that one up here.
And then we wrap this one in the use callback hook like this.
And then at the end of it, we need to have a dependency array.
In this case, it's empty.
And then it gives us another warning.
And then it says that it needs to specify the movie ID because the movie ID is something that's outside of this one here.
We also need to specify this one, we specified a movie Id like this.
And now it won't complain.
And this one will not get recreated unless the movie ID changes.
So this will stop the Infinity loop.
And we can see that it won't go into an infinity loop here.
If you want to do it like this, instead, you can do that.
In this case, we don't need to call this function from anywhere outside of the use effect.
So I'm just going to revert it back and not use the use callback hook.
So I'm going to have it inside of my use effect instead.
Like we had it before.
Save it make sure that it works again, and it does.
So that's how you use the use callback hook to stop infinity loops in react.
But in this case, we won't need it.
So it's better to have this function directly in the use effect hook instead.
Alright, let's move on and create some nice components for our movie page.
Alright, we're going to create this nice little breadcrumb navigation up here on each individual movie.
So go back inside of the code editor inside the components folder, create a new folder that's called Brad Trump.
capital B, capital C and you create another file inside of that one.
Let's call index.js.
And you create a file, let's call the breadcrumbed dot styles, dot j s a bit repetitive now, but it's good because that means that we probably be learning something here.
So inside the breadcrumb dot styles file, we're going to scaffold out to style components.
But first we import styled from styled components, then we export the class, that's called wrapper.
And is equals a style.do, double backticks.
And then we export const, that's called content.
It equals A styled dot div, all formatted and save it.
Go back inside of the index.js file in the breadcrumb folder, first, we import react from react, we're going to import the link from react dash router dash DOM.
Because we want to be able to link back to the home page, then we have our styles, import wrapper, and content from dot forward slash breadcrumb dot styles, then we create our component cost breadcrumbed.
equals, then we're going to destructure to prop is called movie title.
And we create an arrow function and we can make an implicit returns we have parenthesis we're going to have the rapper num, we have the content.
Now we're going to use the link from the React router DOM is going to link to and where do we think it's going to link? probably guessed it, it's going to be forward slash because we want to link to the home page.
This is the first element in the breadcrumb menu.
So we're going to have a regular span here.
And it's going to say home.
So that's the first one, then after the link, we create another span.
And we're going to have a pipe like this, I think it's option seven on Mac.
Yeah, option seven.
Or you can have whatever you want inside of there.
But I'd like to have that as a divider.
And then we have the last span and that's it's going to be the movie title.
Do some more formatting.
And then we need to export default this one also.
Next export default breadcrumb, right.
So this is going to be a two level breadcrumb, we only have the home button to click on to go back to the home page.
And then we show the movie title, save the file and then go back to the movie.js file.
Up here where we have the component imports, we import breadcrumbed from dot forward slash breadcrumb.
Right.
Now we can use it down here in our JSX.
One thing we can do first is that we can return something here, if we loading.
So if loading return, we're going to return the spinner if we're loading something, which we are going to do initially.
And if we have an error, return a div that says something went wrong, or something else if you want that.
So this will make sure that we show the loading spinner initially when we load in all the data for the movie.
And if we have an error, we want to show that JSX down here, I don't know why it's a spinner, you know, and deleted.
Alright, so instead of the movie here, I'm going to remove this one, and I'm going to use my breadcrumb and it has a prop that's called movie title.
For that one, I'm going to give it a movie dot original underscore title.
And I close the component like that, save it and go back to the browser and click a movie and you can see that we have our bread crumb here.
It looks like crap but we're going to style it in the next video so don't worry.
And it seems to be working here with a title and everything and we can click the home button to get back to the home page.
That's not so in the next video.
We're going to give it some styling.
Alright time to give this little breadcrumbs, some styles and we do that inside of the breadcrumb dot styles file.
We have components inside of that one, we have the wrapper and the content.
So let's start by styling the wrapper, I'm going to display it as a flex align items is going to be center and justify content is also going to be center.
I set the width 100% The height is going to be 70 pixels.
And the background is going to be from the variable that's called matte gray.
And the color is going to be also from a variable but that's the white one.
Save it go back and see what we've got so far.
You can see that we have it here but it looks not good now, so we have to fix this also.
And that's the one here does the content.
So the content was set at one also to flex display flex.
The width is going to be 100%.
The max width on this one is going to be from the variable max width and the padding is going to be zero and 20 pixels.
Then we have the span element inside our breadcrumbs, we're going to style up one also span we set the font size.
What do we have in the global style here in the root? For me, I think it's the font medium.
So variable dash dash, font med
And the color is going to be for the variable is going to be white.
The padding dash, right is going to be 10 pixels.
And then we're also going to have a media query for this one.
So add media screen and Max dash with is going to be 762 pixels.
And I'm just going to change the font size here font size.
And I think yeah, I forgot all of them now.
Yeah, font small.
That will do, I think.
So from the variable, font small.
Alright, save it and go back to our application.
And there you have it, and it should change in font size.
Yeah.
So it's working, and the link is working.
Great.
There's some padding there.
I have it there also, okay.
Yeah, it doesn't matter, you can adjust that one if you want to do that.
Alright, so that's the styles for the breadcrumbs.
So let's move on and create our movie info component.
We're going to create the movie info component.
So we looked at an individual movie, or we can look at anyone.
It's this component here, it's kind of a hero component.
So I think this will be the largest individual component in this application.
So we're going to do a little bit of JSX.
And also, it's going to be a little bit of styling for this one.
So we better get started with this move back to your code editor.
And inside a components folder, create a new folder that we call movie info, capital M capital I.
And then we'll create a new file index dot j, s, and then another file inside of that folder, that's called movie info, dot styles dot j s.
And we scaffold out the style.
So import, styled from styled components.
And for this one, we're actually also going to import some other stuff here, because we need the image base URL and the backdrop size from the config.
And I'm going to talk about that when we style this component, but we import them now.
So import, capital letters, image, underscore, base, underscore URL, and also the back drop underscore size.
And we grab them from dot dot forward slash dot dot forward slash config, right.
And we scaffold out three components here.
So export const, rapper, equals style, Dave, double backticks, export const.
content, hopefully beginning to see my pattern on styling.
In this one, I usually have a wrapper and the content.
This one is also going to be styled div.
And then we're going to have a third one.
That's going to be called export const text.
And it's also going to equal the style of div that will backticks.
Like so save the file, go back to the index.js file in the movie info folder.
Now we can start building this massive component.
Now it's not really that massive, I think it's about 50 rows or something.
All right, import react from react, and then we're going to have a component, so we're actually going to use the thumb component for this one.
So import thumb from dot dot forward slash, thumb.
Alright, so that's the component that we need.
We also need something from the config.
So import the image underscore base underscore URL, and also the poster.
underscore size.
From dot dot forward slash dot dot forward slash double dot dot forward slash config.
Then we have an image.
And it's going to be the fallback image as we always use, so import no image from dot dot forward slash dot dot forward slash, again, images.
No underscore image dot jpg.
All right.
And then we have our styles.
The import curly brackets, wrapper, content, and text from dot forward slash, move info dot styles.
Right, that's our imports.
Then we're going to create the component itself.
So we have a const.
Movie.
info equals anger is a structure of a prop.
That's called movie we're going to give it the movie data as a prop, an arrow function and we can make an implicit return on this one.
First, I actually going to export default its export default movie info, like so, then inside of here, we're first gonna have a wrapper.
And this one is actually going to take in a prop.
That's going to be the backdrop image.
So we have a prop that called backdrop.
And from the movie, we have a property that's called backdropped.
underscore path.
And we close the component and inside the wrapper, we have our content, like so then we're going to use a thumb component again.
And this is actually great, because you can see here how you can reuse components in react.
And this is kind of the fundamentals of working with components, you can reuse them in your application.
So you should always code with that in mind, if you want to reuse it somewhere, you should make the components flexible.
So you don't need to create similar components, it's better to use one component that you can modify with props instead.
So we have our thumb.
And on that one, if you remember, we have an image prop.
So we're going to give it the image.
And this one, just as before, I'm going to check if it's as a movie poster path, I use a ternary operator for this one, I have a question mark.
And also note, I created curly brackets here, because this is a JavaScript expression.
And as I like to do it with template literals, I'm going to have double backticks.
And I have $1 sign and then I'm going to grab the image base URL, then I have another dollar sign and curly brackets, I'm going to grab the poster size.
And then lastly, I'm going to have a new dollar sign and curly brackets.
And I'm going to grab the movie dot poster underscore path.
So that is if we have a poster pass.
Otherwise, we have a colon and we show the no image that we imported.
That's the image prop.
Then we have the clickable prop.
And in this case, we're going to give it false because we don't want this one to be clickable, we set an OLT of movies thumb.
And then we can close this component, do some more formatting, save it and we can actually go back to our move it up JS component and import this one here where we import the components, import movie info, from dot forward slash, movie info.
And then below here below the breadcrumb or we can use a move in for component like this, we give it a drop of movie.
And it's going to be the complete movie stayed.
If you want, you can specify it even more in detail if you don't want to give it the complete state but I think for simplicity's sake, I give it the complete state here to work with, say the file go back to our browser.
And you can see that we have our image here.
And we can click it and that's great.
So yes, yes, it works with some other stuff here.
Yeah, it does.
That's great.
Move back inside of the index.js file in the movie info folder.
So we created our thumb and just below the thumb, we're going to have our text.
So we use the text style component.
And inside of that one, we're going to have an h1 tag.
And I'm going to grab the movie dot title for that one.
Then we have an age three tag.
And it's going to say plot or something else if you want that.
Next we have a p tag.
And we're going to grab the movie dot overview.
And that's the short text about the movie.
And inside of here, I actually going to create some regular classes with class name, because I want to show you that also, you could create stock components.
Also, if you want to do that for these that I'm going to create now.
But I'm going to create a regular div with a class name or rating dash directors, I'm going to have both the rating and the directors in this one.
And inside of this one, I'm going to nest another div.
And inside that div, I'm going to nest an H three tag that's going to say rating, like that.
And then I have another div with a class name.
That's going to be that's going to be score.
And then I'm going to grab from the movie dot vote underscore average.
And that will give us the score from the API.
Let's do rating.
Then below this wrapping div are going to create another wrapping div and this one going to have a class name of director and inside of that one are going to have another age retag and it's going to say director and I'm going to do a little trickier because if there's more than one director, we won't To say directors, so I create curly brackets.
And inside here I oops, don't know why did like that, okay.
And inside the curly brackets, I can have a JavaScript expression.
And I can check if movie dot directors dot length.
If that one is greater than one, I'm going to add in an S, like this.
Otherwise, I just return an empty string.
If there's only one, it will say director, otherwise it will say directors.
then below that header, we create another pair of curly brackets, because now we have to loop through the directors and display them in our dome.
So from our movie, we have this property that's called directors, we're going to map over that one.
And we have a director, we can make an implicit return in this arrow function.
So we have a p tag with a key, it's always important to include a key as you know, otherwise, React will complain react uses the key internally to diff stuff, so it knows what to change in the DOM.
Okay, so the key is going to be from from the director, we're going to grab something that's called credit underscore ID.
And this will be unique, right, and inside the p tag, we have another pair of curly brackets, and I'm going to grab the director, dot name, auto formatted.
So that's the directors and this should hopefully be it.
So we can save it, go back to the application and see what we got, we probably won't see anything because this text is white, I guess.
Or if we check here below, we can see that we are the last it is in white now.
So you can see it, the rating is 5.1.
And we have a directory also.
So we know that it's working, we just have to give it some styling to make it look nice.
And that's exactly what we're going to do in the next video.
We have finished a logic for a movie and four components.
So it's time to style this one.
Go back inside of the code editor.
And inside the movie info dot styles dot j s, we start off with a wrapper.
For this one, we set the background and this one is going to be based on a prop that we're selling.
That is called backdrop.
So I'm going to create a ternary operator here because if we don't have a backdrop, then we're going to set the background to be just black.
And if you remember when we grab a prop in a style component, we can do that with $1 sign and curly brackets.
Because this is a template literal.
So that's how you create a JavaScript expression.
And then I'm going to destructure out from the props.
So I have a parenthesis and curly brackets again.
So I'm going to destructor out the backdrop like this.
And then I create an inline arrow function.
And then I'm going to create a ternary operator here to check if the backdrop exists.
So backdrop, then I have a question mark.
And then I do another template literal.
Inside of here, we have the URL.
And I have a regular single quote, I don't actually know if we need this one.
But I'm gonna leave it in just to be sure.
And then dollar sign curly brackets.
And I grabbed the image base URL.
And then I have again, dollar sign and curly brackets, and I grabbed the backdrop size, and I have a third dollar sign and curly brackets.
And I'm going to grab the backdrop, that's the one that we send into this component.
So that is if we have a backdrop otherwise, to the right of the colon.
I'm going to show a black color.
And then we have a semi colon to MDS with just after the last curly bracket.
This can be a little bit nested here and hard to read actually see if it does something if I yeah, it's all formatted on one row.
Okay, yeah, that's fine.
I'm going to remove this sidebar.
So you can see this is maybe easier to read.
So I check if the backdrop is true.
And then to the right to the question mark are going to parse in the image base URL and the backdrop size, and then we'll have the backdrop that we're sending to this star component.
If this exists, we're going to show that one as a background.
Otherwise, we set the background to be black.
Right, then we're going to set the background dash size.
It's going to be cover and then we have the background dash position.
That one is going to be center.
And I'm going to set a little bit of padding on this one.
So 40 pixels and 20 pixels.
And I have an animation also because I want this one to fade off just as the other ones.
animate movie info, camel casing, and one second and then I create The keyframes so add keyframes like this, and then we go from.
Or if you want to use 0%, instead, we set the opacity to zero, and then two, or 100%.
If you use that instead, Opacity is going to be one, save it and see what we got.
Okay? I must have some typos somewhere because we we don't see the background.
Yeah, and that's because I need to have this single quote here also, at the end, save it and go back.
And there you have the backdrop.
That's sweet, I can actually try also to remove those and see if it works without them.
Yeah, and it seems to be working.
So we don't actually need to have those single quotes.
Alright, sweet.
Okay, that's the wrapper move down.
And then we're going to style the content itself, we set the display to flex, the max dash with is going to be from a variable max with.
Then we set the margin to zero and all the background, I'm going to set a transparent black on this one.
So RGB or RGBA, I don't think you need a actually 000 and 0.7.
That will make it a little bit transparent.
Then we have a border radius of 20 pixels.
And we have a media query on this one also.
So at media screen, and max width is going to be 768 pixels on this one.
And then we're going to display it as a block and set the max height to none.
And that's it for the content, save it, go back to the application.
And you can see that we have the content here.
But we need to do some more styling here on the text to get it to look exactly as we want.
So we have our text style component here.
And for this one, we set the width to 100%.
I set the padding to 20 pixels, and 40 pixels.
Set the color from the variables white.
And overflow is going to be hidden on this one.
Then I'm going to grab a class.
That's called rating dash director.
So that's the one that I created inside of here.
rating dash directors, you can grab them just as a regular class in the star component.
So that's why you don't need to create a separate star component for each and every element.
If you don't want to do that some elements are really small.
And maybe it's not justified to have its own style component.
So we're going to display it as a flex and justify content is going to be flex dash start.
Then we have the sport class.
This one is also going to display it as a flex align dash items is going to be center and justify content is going to be center so these three will center stuff for us.
And you could also create a separate class if you don't want to type them in all the time.
The width is going to be 35 pixels.
The height is also going to be 35 pixels background is going to be white.
So FFF and the color is going to be black.
And you could also of course create variables for these ones.
If you want to do that and place them in the global style where we have the other CSS variables.
The font dash width is going to be 800 border dash radius is going to be 25 pixels.
Or you can actually set it to 50% if you want that is instead because this is a circle and the Morgan is going to be zero.
That's the score.
And then we have our director.
So dot director the Morgan is going to be 0004 pixels on that one.
And inside of that one we have a p tag and we set the margin to zero on that.
And below we have the last one that's the h1 tag.
And that one is going to media screen and Max dash with 760 pixels.
And we set the font dash size, the variable, dash dash font big.
Right? Save it go back to the application.
Yeah.
So there's something here that doesn't look right.
And I think I know what it is.
Yeah, this one is called directors.
And probably, I misspelled this one yet rating directors, we should have an S zeroes on that class, make sure that you add an s and save it.
Go back to the application.
And now it should look right.
Yeah, it does, we can see if it looks great on another movie, also, and it does.
Sweet.
So that's the movie info component.
In the next video, we're going to check out this little movie info bar that's below here we can see the running time to budget and the revenue.
Let's create the movie infobar.
And that's the one here with running time, budget and revenue.
We're going to start as always by creating the component first and then we create the styles in the next video.
So we start off in the components folder by creating a new folder that we call movie infobar, capital M, capital I capital D.
And inside of that folder, we're going to create a new file that's called index dot j s.
And then we're going to create another file that's called boring stuff.
No, I'm just kidding.
Of course not.
But it's getting a little bit repetitive here, it's going to be called movie in full bore.styles.js.
Of course, we start off by scaffolding out those components, import styled, ROM styled components.
And we export constant, we have our wrapper, style dot div, double backticks.
And then we're going to have our content export cones content equals stand, dot div, and double backticks.
Save the file and go back to the index.js file, we import react from react.
And then we're going to use some helper functions that are provided for us, they will take a look in the helpers.js file, you can see that I have one function for calculating time, and one for converting the money.
So this one for example, the Convert money, JavaScript has something built in that we can use for converting into a currency.
And this one I said is one for converting it into US dollars, you can change this one if you want to have another currency.
And this one is going to give us the time in hours and minutes.
So these are the ones that we're going to import in the component.
So move back to the index.js file.
And I mark it with helpers.
Import calc, time, camel casing and convert money also camel casing wrong.
dot dot forward slash and dot dot forward slash again, help us right, then we have our styles.
So we import curly brackets and wrapper and content.
From dot forward slash movie and FUBAR stars, all right.
And then we can create our component.
So we have our concept of movie info bar equals, this one is going to get some props.
So I destructure the time, the budget and the revenue.
And I have an arrow function and I make an implicit return.
And I think I'm also going to export default, before we start creating our JSX.
So export default movie info bar.
All right, we start off with our wrapper.
Now we have our content.
And the first div we're going to have is a deal if we have a class name or column on that one.
So we have a p tag, a running time colon, then I have a curly bracket, and we invoke the function that's called calc time that we import it.
And we give it the value of time, and we end it with a curly bracket.
So that would give us the correct time.
And actually, the other two days are going to look almost exactly the same.
So I'm going to copy this one and paste them in two more times.
The class name is going to be column also on this ones, but this one we can change it to budget.
And instead of chart time, we're going to invoke convert money instead and we're going to give it budget.
Now the last one is going to be revenue.
And we also invoke convert money and give it the revenue.
Right? Save it.
And this is our movie in football, we just need to make sure that we use it in the movie component.
So move back to the movie.js imported up here, import movie info bar from dot forward slash, movie info bar.
And then below just below the movie info.
We use that component movie info bar.
And we also have to give it some props time is going to equal movie dot runtime budget is going to equal movie budget.
And the revenue is going to be the movie dot revenue.
And then we close the component like this, do some more formatting, and we get him on each row.
So that's much nicer.
We can see it here now.
So we have these props here.
Now.
This should be it for a movie and FUBAR.
If we save this one, go back to the browser.
And nothing shows.
And that's because we haven't styled it yet.
I thought we should see something at least.
But I guess it's because the Yeah, the text is white now.
So that's why so you can see down here that we have the running time we had the budget.
But the budget is actually Ciro that's no good.
Or is it zeroed out on that particular movie? Yeah, it was, it didn't have any budget.
Right.
So in the next video, we're going to start it.
Alright, we're going to create the styles for the movie.
And for Boris, make sure that you insert a movie in FUBAR dot stars file.
And we start as always with wrapper, we display it as flex, align the items.
To center, I'm going to set a min height on this one 200 pixels.
And the background is going to be from the variables and I'm going to grab the dark gray.
I set the padding to zero and 20 pixels.
Save it go back and see what we got so far.
Yeah, we can see it down here.
So go back to the code, then we're going to start the content, we display it as a flex.
I set the max win over variable from the variable max width.
I set the width to 100%.
And the Morgan is going to be CRN auto.
Then, we have that class that's called column.
So dot column.
That's the one if you remember that we have here the class name column.
And I also got to display that one as a flex flex box is a really handy tool in CSS a line items is going to be Sunder and justify content is going to be Sunder assess the background, from our variable are going to grab med grade, a set of border dash radius to 20 pixels, the margin is going to be zero 20 pixels, and the flex is going to be set to one.
Then I'm going to style the first child we have we have three of them.
So I want to start the first shot a little bit differently.
I want to set the Morgan dash left to zero.
And I also want to start the last child with colon last dash child I set the Morgan dash right to zero.
Right.
Now we just have a media query left at the bottom here at media screen and Max dash with several 168 pixels are displayed as a block below that pixel size.
And the column dot column is going to have a margin of 20 pixels and zero, right? This should be it, save it back to the application.
If it works, yeah, there you have it.
It works on mobile devices also.
That's super great.
That's the movie infobar.
And now we just have the grid with the actors left to do and then we've finished the basic stuff with this application.
Alright, let's create the last component for our application.
And that's going to be the actor.
Inside a components folder, create a new folder that the name actor.
And then you create a new file inside of that folder that we're going to call index dot j s.
And we created another file that's called actor dot styles, dot j s.
And inside the actor dot styles dot j s, we import styled Rome style components.
And then we export the cost that we call wrapper equals style dot div, double backticks.
And then we're going to have another one, export const is going to be called image capital I, of course, equals style dot IMG, we're going to style this image tag, save it, go back to the index.js file, and we can create our actual component.
So import react from react.
Then we have our styles.
And we import the wrapper and the image, ROM dot forward slash actor styles.
Then we create the component const actor equals parenthesis and another a destructor.
Out inside of the curly brackets, the name, the character and the image URL.
We have an arrow function, we make an implicit return we have the wrapper, then we're going to display our image, we have the source or image URL ot is going to equal actor dash thumb.
And then we close it.
Now we have an H three tag, that's going to display the names of curly brackets and name that's the prop name.
And then we have a p tag and we have curly brackets and we're going to grab the character that's going to be the name of the character.
Right, then we just need to export default actor and or component is good to go.
So go back to the movie.js file imported up here, import actor from dot forward slash actor, right, and then move down to our JSX.
I'm just below the movie info bar.
We're going to show these actors and we're going to show them inside of our grid.
So we first display a grid.
The header for this one is going to be actors.
If you remember, we have this prop that's called header where we can set the title of our grid.
And inside a grid, we're going to map through all the actors.
So we have curly brackets, and from the movie dot actors, we're going to map through each actor.
So we have an actor and an inline arrow function, parenthesis, we make an implicit return.
Then we display an actor, it needs to have a key, as always, when we met through stuff in our JSX in react, so the key is going to be from the actor dot credit underscore ID.
That's the key.
Then we have a prop that's called name.
So we're going to give it the actor dot name.
And a scroll up a little bit here.
And then we have a prop that's called character.
And for that one, we give it the actor dot character.
Like so now we have an image URL.
And it's going to equal and this one is also going to be that ternary operator that we use before because we want to display a fallback image if we don't have that one.
So we check if we have an actor dot profile underscore path.
And then we have a question mark and we're going to return our nice little URL.
So I have double backticks dollar sign and I have curly brackets and I grab the image base URL and then directly after that I have another dollar sign curly brackets and I grabbed my poster size.
And then I have a third dollar sign and curly brackets.
And I'm gonna grab actor dot profile underscore path.
Be very careful with the spelling here.
It's very easy to get a typo when you do stuff like this.
Now we have our colon and if we don't have a profile path, we give it a no image.
And then below here we need to close that component also do some auto formatting.
So this should be my friend We have hopefully finished the base of the application.
And then I'm going to teach you some other stuff that's useful in react.
So this should be it, I hope, save it and go back to the browser, you can see that we have the accuracy, but it doesn't look good, because we haven't styled them yet.
But at least it's working.
And these are in white, there, you can see the character they play in the movie.
So we're going to style them in the next video.
And then we have this nice actors grid.
Alright, let's give those actors some styling.
So inside our code in the actor.styles.js file, we have two style components.
So let's start with wrapper as usual.
I'm going to set the color from our variables, we have white, I set the background.
And also from our variables, we have the dark gray, I set the border dash radius to 20 pixels, padding is going to be five pixels, and the text align is going to be Sunder then I'm going to have an age three tag nested here, I set the Morgan to 10 pixels 000.
on that one, and then we have the p tag is going to have a margin of five pixels and zero.
All right, so that's everything for the wrapper, then we have the image, just a few lines of code left, we display it as a block, the width is going to be 100%.
The height is going to be 200 pixels.
And albeit dash fifth is going to be cover and the border radius is going to be 15 pixels.
And this should be it, save it go back to the application.
And hopefully you have a nice grid.
Yeah, almost.
There's something wrong here with a background.
Yeah, and that's because I have a typo, it should say border radius, like that Not radius.
Save it go back.
And there you have it.
Let's make sure that it works on all devices.
And it does.
Sweet, sweet, sweet.
And that concludes the basic stuff for this application.
In the next video, we're going to talk about prop types and how you can type check the props that you send in to your components.
I'm going to talk about something that's called prop types.
And prop types is something you can use on your components in react to type check the props that you send into your component.
So you have this special property on your components you create.
That's called prop types.
I'm on the official react page.
Now, reg deus.org.
And just as to say here, React has some built in type checking abilities.
I'm going to show you how to convert this application into TypeScript later in the chapter.
So if you don't use TypeScript, you should use prop types instead.
That way, you can at least type check your props that you send in it.
So they tell you here to run type checking on the props for a component, you can assign a special prop types property.
And I'll give you an example here.
So they import the prop types that's from the library that we installed earlier prop types up here.
Then they have the component name, and then assign and then assigned to this property that's called prop types.
So this one has a lowercase letter to start with.
And this one has an uppercase letter.
So this one is the actual property on the component itself.
And this one is the one that you import from the library that's called prop types.
So it can be a little bit confusing, but we're going to practice this in our components.
So hopefully, you'll get a grasp of it quite quickly, you have this special property on your component that's called prop types.
And that is an object.
And here you can specify your props.
And from the prop types that we import up here, you have different types you can check against.
So this one will get a warning if the prop isn't a string that this component receives.
And if we scroll down here, they show you everything you can do here.
And we are actually just going to do those simple checks if it's a string, a number or a Boolean.
But you can also check against an object, for example, you can set all the properties in an object, and then you use something that's called shape.
And then you specify your orbit shape inside of that one.
So you can do some more advanced prototype validation here, instead of just check that it's an object.
You can check all the properties on the object by using the dot shape.
So I highly suggest that you read this one on rxjs.org.
If you want to know more about prop types.
I think a lot of people now are starting to use TypeScript with react.
And with TypeScript.
We don't have to do this.
We have it for free in TypeScript.
So prop types is only If you don't use TypeScript, and that's why I won't go into super detail about it either, because I think TypeScript is actually great to use in combination with react.
But you should know at least that you can do some deeper prop type validation by using some of these syntaxes.
Here, you can also check an object with with warnings on extra properties.
And you can do an exact check here, if you want to do that.
And you can also check if you send in an array that should have only numbers, you can check that also.
So that you make sure that the array doesn't contain strings, for example.
Or then you can do the same with an object here.
So there's some really useful stuff inside of here that you can learn if you want to get more advanced into prop types.
But we are going to use the most simple use cases.
And we're going to check for strings, numbers, and Boolean and also for functions, I think.
So in the next video, we're going to learn about the most simple forms on how we can use prop types on your components.
Okay, let's start doing some prop type validation.
So we're going to do that with the prop types library that we installed in the beginning of this course.
So let's begin at the top here with the actor in the components folder, and then we're going to move away down and go through all our components.
So in the actor, make sure that the import prop types, capital P, capital T, from Prop, dash types, right.
And then just below the component at the bottom here, just above the export default, we have our actor component, so we're going to use the special property that's called prop types on that one.
So actor dot prop types, and this one is lowercase p, not capital T, as it is up here.
Be very careful here is can be quite confusing, actually.
So prop types, is going to equal and we have an object.
And then we can specify our different props that we have here.
So we have the name, Prop, and the name prop.
We know that this one is a string.
So from the prop types that we import that capital P prop types with capital P prop types, we have something that's called string, so we're going to check against if it's a string.
All right, then we have the character.
And from prop types with capital P, we're also going to check if that one is a string, and we have the third one, image URL, Rob types, dot string, all of these are going to be strings.
So we say this one, go back to our application.
And we can see here, we're going to need to be on an individual movie here.
So we have this movie here, nothing shows up here.
But if we go inside, or I'm just going to close this here.
So if we go inside our move it up JS component, we have our actor here.
And we know that this name, for example, is a string.
So if we change this one to a number, for example, 10, save it, go back to our application, you can see that we instantly get a warning here fail prop type, invalid prop name of type number supplied to actor expected string.
So this is a very handy way when you develop your application to know that you're sending the correct props to your components.
And this is only available in development mode, it will not be in production.
So it's kind of a tool when you develop this application to actually validate your props that you're sending to your components.
So we're going to change this back now, and hopefully get an idea on how it works.
Now, that was our actor.
Then we have our bread crumb.
So just as before we import prop types, capital P capital T from prop dash types.
And below the component we have the component name, breadcrumb dot prop types.
With a lowercase p, it's going to equal an object.
And for this one, we have a prop.
That's called movie title.
And from the prop types with a capital P, we're going to check if it's a string, right.
So that's the bread crumb.
Then we have the button.
For that one, we have two props.
So we import prop types, capital P, from prop dash types.
And below the component.
We have the bottom dot prop types.
lowercase p equals an object.
We have our text prop that one We're going to check prop types, capital P here and a little bit repetitive here that we check if it's a string.
And then we have a coma, and we have a callback.
And from the prop types, capital P, this one is going to be a function.
So we have that one also on the prop types object.
funk, we can check if it's a function, save it, go back to our application and check Yeah, it seems to be right.
Let's have baronne.
Then we have our grid, import prop types capital P from prop dash types, below the component, grid dot prop types lowercase p, then we have two props for this one, header, prop types dot string, we check if it's a string.
And we actually don't need to check the children because that is a built in Prop, so we don't need to verify that one.
That's the grade that we have the header and the header don't have any props, we can skip that one, we have the hero image.
And this one has reom to import prop types capital P from prop dash types.
Below the component, type in hero image, dot prop types lowercase p, we have our object.
And we have the image we check against the prop types with capital P dot string.
All of these are going to be strings.
Also, we have the title, prop types dot string.
And we have the text prop types.
dot string, right? image, title and text.
Save the component we move inside of movie info component.
And for that one, we have one prop import prop types from prop data types.
And below the component movie, info dot prop types equals an object.
And we call it movie I think, yeah, movie.
And this one is an object.
So prop types dot object.
And this is what I talked about before in the last video.
If we go back here, you can see if you want we can save this object with dot shape.
But I think there's too many properties in this object.
Now to actually do this.
I don't think it's worth it.
So just check if it's an object.
But if you use dot shape, you can shape the complete object here and check every property on the object.
All right, let's move on we have the movie info bar.
And for that one, we have three of them.
So import prop types from prop dash types.
The loader component, movie infobar equals an object.
And we have the time and prop types.
dot this is going to be a number so we have the number property check against.
That's the time then we have the budget, prop types.
DOT number is also going to be a number.
We have the revenue, prop types DOT number all three of them are numbers.
movie in forbore Yeah, of course, I also have to have dot prop types like this.
Right? Just check the application.
Everything seems to be working.
Movie info isn't the fun is it because I typed in Yeah, this one is auto generated when I typed in movie info below.
Okay, just remove it, save it.
Then we have the search bar.
Import prop types from prop data types.
Right below the component.
We have the search bar dot prop types equal an object.
So we have the callback function.
So prop types dot func, we check if it's a function.
Save it.
The Spinner will not have any props for that one.
We have the thumb and we have three of them there.
So import prop types from prop Types below the component, we have thumb dot prop types, lowercase p equals an object.
And we have the image.
I think image movie ID and clickable image, prop types capital P, dot string, that's the URL for the image.
So it's a string.
Then we have the movie ID, prop types, DOT number, the ID is a number, and then clickable.
Prop types, dot, and this is a Boolean.
So we have something that's called bool.
And this will check against a Boolean.
Right? Now, it's actually our last component, I think we don't have anything in home and movie and not found.
That's the last one.
And I saved this for last, actually, because we built the whole application.
Sure, you should do this from start when you build a component, I didn't want to confuse you too much before we have learned more about react.
So that's why I said it last.
But you should have as a habit to always do this when you create a component that receives some props.
So that's why I saved it for last.
I think that sums it up about prop types, I'm not going to go all crazy about prop types.
Hopefully you learn something here to get you started with prop types.
And actually, I don't think in this application, we don't need to do any deeper checks here, actually.
Okay, in the next section, we're going to see how we can persist our state in the session storage.
We have almost finished replication, there are some things we can do to optimize it.
Because now Yeah, it works.
But for example, here, those movies here, we always reload those movies when we visit each site here.
And also, when we go back to the start page, we always fetch from the API.
And that's what we're going to talk about here.
Because in your browser, you have something that's called local storage and session storage.
And we're going to utilize the session storage to store the data that we already retrieved.
If you open up the panel, and you have something that called application, and inside application, you have the storage.
And there you can see the local storage and the session storage.
And these here are all the movies that are stored from the application.
So you can see it's the movie ID here, and here we have the data for the movie that's stored here.
Then we also have the homestead.
This is from the other application that is finished, not ours.
I just wanted to keep them here to show you how it's going to look when we store this stuff in the session storage, local storage and session storage are quite similar.
The big difference is that the local storage persist until you decide to remove it, the session storage only persist over a session.
So every time you create a new session, the session storage will get wiped out.
And you may wonder, wouldn't it be better to have the local storage for application? Yeah, it would probably, but this page here is based on all the popular movies.
So it changes a lot.
So that means if we store it in the local storage and never remove it, we always get the same list of movies here.
And that's no good.
So that's why it's better to store it in the session storage.
And also, each individual movie here.
Also sharing just because we have a rating, that one has zero rating.
Okay.
Let's select another one, that one has 7.6.
So the rating will change depending on the voting.
So there is stuff that can change in each movie also.
So that's why I chose the session storage for both of them.
But if you want, you can use the local storage instead, the code is going to be the same except that you swap out session storage for local storage when we write the code.
In the next video, we're going to learn how to persist the state in the session storage for the homepage.
Okay, we're going to learn how to persist the state in the session storage.
And we're going to start by creating a little function that we can use to read from the session storage.
So go back inside of the code editor, and in the file, let's call helpers dot j s that's the one are provided for you in the store defies we're going to add in a little function at the bottom here in this file.
So we export the const is persisted, stayed like this equals, then we have a parameter that's called state name or name, you can name it whatever you want, then I have an arrow function.
And then we create a cost that we call session state equals and from the session storage, session storage.
We have a method that's called get item.
And this is what I talked about before if you want to use the local storage instead, you can just change this one to local storage and it will work you just swap this one out to local storage.
Alright, so we invoke The method is called get item, we give it the state name.
And this will return the state from the session storage if there's a state, otherwise it will return No.
So it will get the item from the session storage with the name that we provide, there would need to return something from this function that we created.
So return, and I'm going to do a short circuit here, I checked, if session state.
If we have something in this one here, now I have double ampersand and it will return what's the right of the ampersands.
Otherwise, it will return this one.
And this will be now if it couldn't find this one in the session storage.
Let's say that we have something in the session state, it will run what's to the right of the double ampersand so we can return that state.
But we can just return it as it is because you can only write to the session storage and to the local storage as a string.
So we have to parse it back from a string into JSON.
So that's also what we're going to do when we write to the session storage, we're going to first convert it to string but now we have to parse it back and forth, we can do that with JSON capital letters, parse, and then we give it the session stayed like this.
And this will parse it back to JSON object and we return it save the file.
And this is it for this little function.
So let's move inside of the use home fetch hook down below here.
Our search an initial use effect hook.
In this one, we can check if we have a session state before we retrieve anything from the API.
So there are a couple of things we have to consider here.
Because we want to check the session storage on the initial render, before we fetch anything from the API.
If we have something in the session storage, we retrieve that one instead.
And later, we're going to create a hook that also writes to the session storage.
And we're not going to write to the session storage if we're in a search.
And that means that we also don't want to retrieve anything if we are in a search.
So that's why we're going to create an if statement here.
Just at the top in this use effect if and we'll have an exclamation mark, and search term.
So this means if not search term, then we're going to check the session storage.
So we create a new cost, call it session stale equals, and then we also have to import a function that we created in the helpers file, it's up here at the top with the market with helpers, and import is persisted state from dot dot forward slash helpers.
So that's our function that we're going to use here.
To the right of the equal sign, we call that function is persistent state.
And for our homepage, we're going to create a state that is called the home state.
So we are hard coding in the string here for this one, you can make it a little bit more elegant if you want to do that.
But I have a string here that I call home state.
So that's the property that we're going to write to the session storage.
And this one should actually be called stayed like this.
Then I'm going to nest in another if statement here.
You could do this in multiple ways.
But I think this one is more readable for this course.
So that's why I have a nested if statement here also.
So if session state, we check if we have something here, then we're going to set the state and give it the session state.
And it's also important that we return because we don't want to do anything else here, because otherwise it will fetch it from API also.
And this is all that we need to retrieve something from the session state, we make sure that we don't check the session storage if we're in a search.
But if we're not in a search, we check if we have something here.
And if we have something in the session storage, we set the state with the form that we retrieved here.
And then we return, we return early from this use effect.
Otherwise, it will work as before here.
We set the state first with the initial state to wipe it out.
And then we fetch the movies from the API.
All right, save it, just make sure that everything works.
And it does.
So that's great.
I'm also going to wipe out the old session storage here.
This one is from react dev tools.
So when you delete it, it will create a new one.
Right.
But we don't actually have something to retrieve yet, we also need to write something to the session storage.
So if we go down here below our load more use effect, we're going to create another use effect.
And I mark it with right to session storage.
And then I have my use effect like this.
This one is going to have a dependency rate.
And it's going to write to the session storage when the search term seniors and also when the state changes and yet Again, I checked if not search term.
Because if we're in a search, we don't want to write that one to the session storage.
And this is of course, optional.
Also, if you want to, to save the search, you can do that also.
But I don't think that's a great way of doing it to have your last active search on the homepage.
So that's why.
So if not, in a search term, we can set on the session storage.
And this is the same as before, if you want to store it in local storage, you change this one to local storage instead.we have a method that's called set item, just as we had the one that's called get item.
In this case, we're going to set it the first argument is going to be the name that we wanted to have in the sessions to session storage.
And for this one, I chose the name homestead, just as the one as I grabbed up here, really important to have the same name.
It's a hard coded string there, then the second argument is going to be what we want to write to the state.
And if you remember, I mentioned that we can only write a string to decision storage and to the local storage.
So we have to stringify it.
And we can do that with JSON, capital letters, dot stringify.
And we give it the state like this.
And even if we didn't specify these ones first, you can see that it complains that it wants to search term and the state now so this is the linting rules for hooks that is included in create react app.
So it's really great to have that one.
All right.
So that's how we write to the session storage, save the file, go back to the browser.
And you can already see when I say the file it that it wrote the whole state here for us.
So we have the results here.
And we can actually go back to the code and do some console logging.
So up here in the search and initial inside the if statement where we grabbed from the session storage, we can console log, grabbing from session storage, like this.
And down below here, we can console log grabbing from API and save the file.
And then if we go back to the console, you can see grabbing from session storage.
And if we reload the page, it works, it grabs from the session storage all the time.
And then go back to the application here.
And we delete the homestate in the session storage, go back to the console, reload it.
And now you can see that we grabbed from the API.
So if we load some more movies here, a few of them.
And then we reload the page, you can see that we have them here, instantly.
And that's because we save it to the session storage.
In the next video, we're going to persist the state in the session storage for each individual movie.
Okay, one more thing to do with the session storage.
And that is to store each individual movie in the session storage.
That's what we're going to do back in the code editor.
So we're going to be in the use movie fetch.
And we only have one use effect in this one.
So down at the bottom of that one, we run that fetch movie function.
And before we do that, we're going to check if we have something in the session storage just above that one.
Just as before, we create a const that we call session state equals.
But of course, first we also have to import that function up here.
To mark market with helpers, an import is persisted state from dot dot forward slash help us.
Yeah, I don't know why I did like this.
Okay, to the right of the equal sign here, we got to run is persistent state.
And we're going to check for the movie ID.
Because each movie is going to be stored in the session state with its own ID.
So that will give us null or the actual state.
So if session state, if we have a session state, we're going to set the state and give you the session state.
And then we're also going to set the loading to false.
This one because we setting it to true up here, when we start.
That's why we have to set it to false also Otherwise, it will keep on showing the spinner.
Okay, and then we make an early return, just as we did before.
Otherwise, it will run this function here that fetches the movies from the API, right auto format it and save it.
But we're going to create the use effect also for writing to the session storage.
Right this session storage then we create our use effect.
With an inline IRA function, it's going to have a dependency array.
And it's going to change on the movie IDs change and the state change.
And these actually won't change because we're just grabbing data one time for each movie.
But as I told you many times before, you should specify all the dependencies for each use effect.
If there's something that won't work, because you specify them here, you should handle it inside of the use effect.
And that will make sure that you have less errors in your application.
For this one, we don't need an if statements, we can write to the session storage dot set item, and we're going to give it the name of the movie ID, each movie is going to be stored in the session story with its own ID, that's how we separate them out.
Then we have a comma and we give it the state.
But just as before, we have to run JSON stringify.
State, because we can only write the string to the session storage.
All right, save this one and go back to the application.
And here, you can see that it already saved the movie here.
So here's the movie for that one.
So if we check this one out, I think it's down below here, you can see that it will instantly grab that movie.
And if we choose not one, here it is zero rights to decision storage.
And next time, it will instantly grab it because this one here you can see where the loading spinner on this once, but next time, we don't have to reload it.
That's how you utilize the session storage to persist the state in your application.
In the next section, I'm going to show you how to deploy this application, it's time to deploy the application.
And for this course, I'm going to show you how to deploy it to netlify.
I think netlify is a great and very easy way to deploy your react application.
So that's why I'm not sponsored in any way by netlify.
I just like it.
And I know that there's a lot of people that likes it also.
So I think netlify is a good choice for this.
So the first thing you have to do is to create an account at netlify, it's free.
So make sure that you create an account.
And that will show you kind of a dashboard here, I have a lot of sites here now.
So yours will be empty if you don't have an account already.
So make sure to create an account at netlify.
We will need it in the next video.
So in this video, I'm going to show you how to create a production build of the application that we're going to deploy to netlify.
So back into the terminal and create react app is really simple to use.
It has a built in command that we can use to build our site.
So make sure that you're inside your application folder.
And then you run NPM, run build like this.
And this will build the application for us.
As it says here, it will create an optimized production build for us.
So that's great.
And it will place it in a folder that's called build.
If we move inside our code editor again, we can see that we now have this folder that's called build.
And this is a complete site in here.
It's the it's the production build of our site, we have to do one small thing here when we're deploying to netlify if we want our routing to work correctly, because for example, I can show you here, this is the site here.
If I go to this site and choose a movie, grab this URL, that's the direct URL to the movie, and then paste it in here, you can see that it works now.
And that is because I created that little file that we're going to do now.
Otherwise it won't work, it will show an error here.
And that's because we using in with react router.
So that's why we have to have that little file.
So back inside of the code editor.
And inside a build folder at the root create a new file, the name is going to be underscore redirects like this, it's very important that you name it exactly like this underscore redirects.
And then inside of that one, we're going to type in forward slash asterisk, forward slash index dot HTML, space and 200.
And this will make sure that the routing will work in our application.
So save the file.
And now we ready to deploy it on natla phi.
So that's what we're going to do in the next video.
I'm going to show you two ways in this video how to deploy your site to nullify, and the first one is going to be really easy actually.
Because if you log into your account at nullify, and you're at this dashboard side, down below at the bottom, you will have this little sewn here where you can drop your site want to deploy a new site without connecting to get drag and drop your site folder here.
And this is really sweet with netlify actually.
So if we grab our folder, that's the folder here where the complete application is your working folder with application, you have the folder inside of that one that's called build.
So make sure that To grab the build folder that we build in the last video, and just drag and drop it here, you can see that netlify starts to build your site.
And I actually didn't have time to finish that sentence before it's published my site.
So you have the link here, it will create a randomly generated name, you can change that if you want to do that, click this link.
And you can see that your application is up and running.
So that's how easy it is to deploy, who would nullify, that's one way of doing it.
Another way is to use something that's called the netlify COI.
And that's what we're going to do next.
So make sure to be inside of your terminal.
So of course, you're going to be in the folder where your application is, we've already built our application, otherwise, you have to build it.
So NPM, run build, and also add in that little file that I showed you in the last video for the routing to work in nullify, then we're going to install the natla phi COI, I have already installed it, but I can show you again, of course NPM, install netlify dash c ally dash D.
So that means that I install it globally.
Alright, that installed correctly, I'm going to clear my console.
And then we can run nullify deployed like this.
And then you're faced with different questions here.
So in this case, we're we're going to create and configure a new side.
So make sure that you navigate down to that one.
And it's waban Fox team, in this case, you will probably also just have one team to choose from.
So select that one.
And then you can create a site name, if you want to do that.
I won't do that now.
But you can also change it later.
So we'll use the default and just press enter here.
And then it asks for the public directory down here.
And if you remember, the Publish directory is the build folder.
So we type in dot forward slash build and press Enter.
And there you have it, but the site isn't actually live yet, because we now have the opportunity to see if our site works.
So you have a website draft URL, we can click that one.
and here we can try our application to see that it works before we actually go live with it.
Right, it seems to be working back to the terminal.
And if we read here, we can add the dash dash prod flag if we want to go live with it.
So we run nullify deploy dash dash prod and this will make it go live.
Yeah, of course, I shouldn't have space, it should be dash dash prod like this.
And the public directory is just as before dot forward slash build.
And you are provided with a couple of URLs here.
So this is the unique deploy URL for this deploy.
This isn't actually the live site.
So this is the live site here on this link, you can click that one and open it up.
But I want to go inside of natla phi and check that is actually here, you can see that is here.
So you can click this one and see if it works.
And it works.
And that's sweet.
So that that is actually also quite simple to do it in the terminal like this.
So if you change something in your application, you can deploy it very easily without logging into netlify from the browser.
So you just type in netlify deploy.
And if you know that it works, you can flag it with prod like this.
And you can do this every time you change something on your site.
Alright, in the next video, I'm going to show you how to deploy with continuous deployment.
That means when you change something and push it to GitHub, I'm going to use GitHub for that one is going to deploy it automatically.
Okay, we're going to talk about continuous deployment on netlify.
Now, and that means that you can have, for example, in this case, I have a repository on GitHub that I'm going to use for this one, I published my site here to get up and I'm going to use this one for continuous deployment.
And that means that when I push something to this repository here, netlify will automatically build my site and publish it.
So that's really, really neat.
Actually, just make sure that you add to Git ignore file to not upload the dot m file.
And also just one other thing you have to do, and that is the file that we created in the build folder, you have to move that one inside of the public folder instead, you can see that I have the underscore redirects in the public folder.
And this will make sure that this one is included when netlify builds the side.
So that's all you have to do and push it to your repository.
I'm using GitHub, you could use Bitbucket or some other service if you want to do that.
So this is the complete side.
Then I'm going to move inside of nullified and I'm at my dashboard.
You have something that's called new side from get I'm choosing Get up because that's what I'm using.
So it's authorized me here.
So you have to log in, then I can search for my name is RM DB version three.
So I select that repository.
And we're going to build from the master.
That's correct.
The command is going to be MPM run build.
And we the Publish director is the build folder.
So that is correct.
But we have one more thing to do, because we have an environmental variable for our site.
So we have to set that one up also Show Advanced.
and here we can create a variable new variable.
So you can set the name here and the name is going to be react underscore app underscore API underscore key, just as the one that we had in our application in the dot env.
file.
Alright, there, we need to give it some value.
And here, we can give it the API key to the Movie Database API.
So I'm obviously not going to show that for you.
So I'm going to paste that one in.
And then I'm going to click Deploy site.
So make sure that you also paste in your key here, and then click Deploy site.
And now we just wait for it, it's going to build the site.
So it will take a little bit longer now.
And hopefully this will work.
And if we want to see the build log, we can also do that by clicking here deploying your site, and it will show us the log.
And there you have it, the site is live, it says here, so we're going to try that out.
Go back to our dashboard.
And here's the side.
Click the link, we make sure that it works.
And it does.
And that is great.
Just going to make sure also, that these unique links work if we paste that one in.
Yeah, and it works.
Sweet, sweet, sweet.
This is how you publish on netlify.
And this also concludes the main part of this course, I hope you enjoyed it, there are some bonus parts.
In the next part, I'm going to show you how to use class components instead of hooks.
And then I'm going to show you how to convert this application into TypeScript.
And lastly, I'm going to show you how to use the login and vote system for the Movie Database API.
We're going to reflect our application into using class components instead of react hooks.
I actually don't use class components anymore.
And I think a lot of people don't do it.
But the chances are that if you get a job as a react developer, you will work with a code base that at least has some class components.
So there's a lot of applications out there that still has class components in it.
And it's actually not even deprecated from the React libraries.
So it's a legit way of creating components in react.
So in some sense, it's a matter of preference.
I don't think I ever will use them again, actually, because I love hooks.
And I always use functional components with hooks.
But I want to show you how to do it with class components also.
And there's three components that we have to refactor because we have three components with stadium.
And that's the search bar to home and the movie.
And we're going to start with the search bar.
So make sure that you're inside index.js file in the search bar folder.
And there will be a lot of errors and warnings here when we remove stuff here now, but we'll fix that as we go along in this video.
So first of all, this one is a functional component, we want it to be a class component.
And then up here, instead of importing use state use the fact that you use ref, we can import something that's called component like this.
And instead of the const here, we delete all of this here.
And we create a class that we call search bar just as before the same name, and it extends component.
So if we did an important one up here, we had to specify extend react dot component, this is a little shortcut you can do here.
So we can remove these ones here.
In a class component, you have one class property, that's called state.
And that is the only state holder you have.
So that's one.
So that's one downside with classes.
If you use you state and react hooks, you can have as many states as you want to separate them out.
Here we only have one.
So we have the class property.
That's called state.
And now you can see that I'm not using the constructor like this.
Because we don't need to do that Babel and Webpack will make sure that it will be transpiled down correctly.
So we have this class property here.
That's called state and it equals an object.
We're going to have a property that's called value, and it's an empty string.
So that's the value for our input field in the search bar.
And then we also got to have a class property that's called timeout.
And we set that one to know right, the use effect we can use That one anymore.
But we can reuse this logic here for the timer.
So I'll remove these ones for now.
And in a class component in react, you have something that's called lifecycle methods.
And there's three of them that you should know, that's probably the most used once you have one that's called component did mount.
And that's the one that's going to trigger initially in the component.
And then you have another one that's called component did update, and that's the one that we're going to use now.
And then you have the last one that's called component will unmount.
And that one is triggered just before the component will unmount.
And in that one, you can do some cleanups and stuff like that.
But we're going to use to underscore component did update.
And you could do this in several ways, you don't actually have to use this lifecycle method to get this to work.
But I want to use it here to show you how this lifecycle method works.
So component did update like this, this one is going to give us the previous props and the previous state.
So I make an underscore prep props, we're not going to use the props, because we don't need to check against the previous props.
So market with an underscore just to tell that we won't use that one.
And then we have the prep state, the prep state we will use.
Alright, so that's the component did update lifecycle method.
And this one will trigger on each update on the component.
So what do we want to do here, now the state here with value is going to be the text that the user typed in, in the input field, because this is a control component to keep it in the state.
So we want to check if this dot State DOT value, it's the value here.
And as this is a class, we have to use this.
So this dot State DOT value, if that one isn't equal to the prep State DOT value, we want to do something otherwise, we will go into an infinity loop here, and that's no good, we check here, if the value in the state isn't the same as the previous one, then we know that we should do something.
All right.
And then we have one prop that sent in to this component, and we can destructure that one out.
So const, it's called set search term equals this dot props.
So we destructure this one out from the props.
Because we send in this function here, that's going to trigger when we do a search, then we have a timeout.
It's the one here to copy this one, move it inside of there.
Instead of const timer, we're going to set this one to this timeout that we created up here.
So this doc timeout, is going to equal this one here.
And the first thing we also have to do is to clear this timer, so clear timeout, this stop timeout, and this is why I have this appears so that we can access it here and clear it before we do something else.
Alright.
And inside of this timeout here, we're going to grab our state value.
And we can also destructure that one out.
So cost value equals this dot state.
So we grabbed that property from our state.
And instead of the state here, we give it the value like this.
So every time we type something in, we're going to set the state and that will update the component, and it will trigger this one, we cleared the current timeout and then we set a new one.
And at every 500 milliseconds, we will trigger this search function just as we did before.
Then, in the class component, we have a render method.
And inside the render method, we can return this logic here, we can grab this one, turn it out and paste it inside a render method like this.
And this one, we have to change this one, this dot state value.
And also when we set the stage this one is incorrect here, we should specify this dot set state.
And our state will look like this we have an object like this URL, we have appropriately this called value.
And the value here is going to be the same.
And now you can see we don't have any errors in this component.
And that's great.
If you want you can also destructure this value out up here just before the return statement, cost value equals this dot state like this, and then we can use the value like this instead.
Save the component, go back to our application, make sure that you're running the application, then we can try if it works, and it's working.
So it works exactly as before, we're just using a class instead now.
So this is how we refactor the search bar to a class component instead.
In the next video, we're going to refactor the homepage.
We refactor the search bar into a class component.
And now we're going to refactor the home component.
So make sure that you're inside the home.js file.
And first, we can remove this hook here, like this, and up here, we're going to import the component and the home function, we create a class called home that extends component like this.
And the use on fetch, we're not going to use that one, we're going to copy that logic and use it inside of this component instead.
So we have our state equals an object.
And I'm going to have a property for this one, that's called movies, that's going to hold the array with all the movies.
And I'm going to give it the initial state.
And this one, we have that one inside of our hooked, that's called use home fetch.
So copy this one.
And we can paste it in maybe here, he need she stayed, he need to stayed.
Yeah, it shouldn't be a see my column, because this is no big.
So we have a comma.
And then we're going to have the search term, because now we have everything in the same state.
We can't separate them out, then we have is loading more is going to be set to false initially.
And we have loading is also going to be set to false.
And we'll have the error false.
So this is how the structure of a state is going to be.
Yeah, I said I did this one is going to be an array, but it's going to be an object.
And then we'll have the results, that's going to be an array that holds all the movies.
So you can structure it however you want.
This is the way I choose to structure it the movies is the data that we get back from the API, and the other ones are the ones that we create ourselves.
All right.
Then we're going to make some room here and go back to the use home fetch hooked.
We have our fetch movies function here, to grab that function.
Everything, copy it, go back to the home.js file and paste it in here.
Below the state, we have to remove const.
That's movies, it's the same here.
Here, we have to do something else, because we don't have the state as separate states.
Now, to remove these ones.
And this doc set stayed, we have our object, we set the error to false.
And we set loading to true like this.
And here you can see we only changing the properties that we want to change, React will merge the other ones automatically.
And this is actually different from how the state works in a functional component with use state.
With the use state hook it won't merge the old Stadium, they also have to make sure that you also provided one if you want to keep it.
But in this case, we changing the error and the loading here and other ones will stay the same.
So this is how it works in class components.
All right, we have our movies, this one is going to be the same.
The set state is going to be quite different now.
First, I'm going to spread out the previous state.
And then I gotta have my movies properties.
Because inside of this movies property that we created up here, we're going to place everything that's returned from the Movie Database API.
And that's the stuff that we have here, I'm actually going to remove the sidebar also.
So move this one up inside of the movies object here.
So we spread out the previous movies and never have the results.
And then we check if the page is greater than one just as before.
But here we have to change this one because from the previous state, we also have to go inside the movies property, like this.
So prep dot movies dot results.
The movies dot results is going to be the same here because this is the new data that we grabbed from the API, so we merge that one.
This one is also going to be the same.
So this is our set state for the movies and then below we have a coma and then we set loading False.
And then inside of the catch, we don't have a set error.
So this set stayed.
We set the error to true.
And we also set the loading to false.
Like this, we can remove this set loading here.
This is our fetch movies method.
That's called a method.
Now because we're in a class, then we don't have the use effect here to trigger.
So we're going to have a few functions here, we're going to have one that's called handle search.
equals, we have the search term, or create an arrow function for this one.
And when we search for something, we're going to call this set state parenthesis and we have our state object movies, we're going to set the movies to the initial state just to reset it just as before.
And then we also give the state the search term.
And as this is a sixth syntax, we don't have to specify it like this, it's enough to just specify search term when the name is the same.
Okay, so we set this state and when we have set the search term, and also reset the movies to the initial state, we want to do something when that state has updated.
And in a react class on the set state, we have a callback function that we can use that will trigger when the new state is set.
So we have a coma, and I create an inline arrow function here and go on another row here.
So then we want to fetch the movies, this dot, that's movies.
And we give it the one because we're fetching from page one, this dot stayed.
And we give it a search term, like that.
And we can actually remove those curly brackets, I don't think we need them.
If we don't want to have them, it's up to you to decide.
All right, so that's the search, then we have the handle handle load more function.
And it's only going to be an arrow function like this.
And I'm going to type it in on another row, this dot fetch movies.
And from this dot State DOT movies, we have the page.
And we're going to add one to the page, because now we're grabbing the next page.
And then we give it the start state the search term.
So we also provide a search term if we're in a search, right? We can actually auto format it yet, because there's some arrows down below here.
So we're going to create a random method.
And then we're going to move this one this logic here, inside of the random method, like this.
And then we have a few things to correct here.
So first, I want to destructure out some stuff from the state.
So up here, as the first line in the render method, I have a const.
I destructuring.
out the search term movies, loading and error equals this dot state.
All right, so that will fix a few things.
Here, we have to change stayed, because it's going to be from the movies dot results.
And I do that on all three of these movies.
And instead of set search term on the search bar here for that Prop, we're going to give it this dot handle search.
And here instead of state, we're also going to map through the movies dot results.
Down below here, we change state.
The movies on this callback here is going to be this dot handle load more instead.
And now we can auto format it.
And hopefully we won't have an error.
But there's one more thing that we have to do.
Because it won't fetch anything yet.
Yeah, of course, I have to have this dot set state.
And I haven't imported API either.
So go back to the US home fetch.
Grab this one up here, copy and go to the home.
We can paste it in here.
And this will get rid of all the errors, but we're not actually fetching anything.
Now, if we save this one, go back to the application.
You You can see that it's, it's empty here, because we won't we don't trigger on the thing, we need to have a lifecycle method to trigger when this component mount.
And we have a lifecycle method built in for that.
It's called component did mount.
So we call that one and inside, we're simply going to invoke this dot fetch movies.
And we give it a one, because we want to grab the first page or format it and save it, go back to the application.
And now you can see we have our data and our movies here.
And hopefully, everything works as it should.
Yeah, it works.
So that's how you do it.
And yet again, the app will look exactly the same here, we have the same functionality in the application itself.
But we have refactored the homepage, to use the class component instead.
And as you can see, I think there's a lot more code here.
And I think it's actually not that easy to separate out things.
So that's why I prefer to use functional component and the use state hook can use effect instead.
I don't really like this way of doing it anymore, especially with the state because you have to nest a lot of stuff here.
As you only have one state, it's much easier when you can separate them out into different states as you can with the use state hook.
Alright, just one more thing to do in this section.
And that is to refactor the move a component to use a class component instead.
And that's exactly what we're going to do in the next video.
We're almost finished with a refactoring into class components, we only have the movie page left to do.
And we're going to do that right now.
So go back inside of the code editor and the inside a movie.js file.
And for this one, we're actually going to do a little special thing here.
And that's because we are using this hook here, use params.
That's from react router, version six.
And there's actually no good way of grabbing the params in a class component with react router, they have completely removed that functionality.
And they do not support that for class components.
That's why I'm going to do a little trick down below here at the bottom, just above where we export this one here, we're going to create the functional component for this one const.
movie with params, like this, and then it's gonna take in some props, we have an arrow function, actually going to remove the sidebar again.
And then we have our movie component that we have up here.
So this one is going to spread all the props that this component receives that way, we can have more props, if we want to do that.
So we just pass them along to the movie component.
Then I'm going to create a prop that's called params.
And inside here, I invoke use params, like this.
And then instead of exporting the movie itself, I'm going to export movie with params.
So what I'm doing here is creating a wrapper component that will show the movie class component and also provide it with the params for us.
So that's the best way I found of doing this actually, there may be some other solutions also.
But I think this is actually kind of neat, because you can do it on one roll like this, before you have something that's called with router that you can wrap your component with.
But that's actually not provided in the React router Dom or in the React router library anymore.
So that's why I have to do it like this.
Alright.
So let's reflect to this one, we're going to remove this hook here.
And we can also grab from the use movie fetch hooked, we can grab the API import.
And I'm going to paste that in the movie up here somewhere, maybe there.
And we're not going to use that hook anymore.
And of course, we have to rename this one also.
And up here, we're going to import component just as before, and we rename this one we create a class class movie extends component.
This one, we can remove that one also.
And we can actually create a render method right now and move this logic inside of that one.
Something like this.
All right, now we have some serious refactoring to do here.
So first, we're going to create our state.
Whoever class property state it's an object movie.
I'm going to set that one to an empty object to start with.
Then we'll set Loading to true and error to false, like this.
All right, that is the modal formatting there also, then from the use movie fetch hook, I'm going to copy this fetch movie function like this.
For this one, I'm not going to implement the session storage.
So I'm just copying this one here.
And I didn't do that in the home component either.
Right pasted in here in the mover component, we remove the const from fetch movie.
Let's just before we have to refactor this one, this one becomes this set stayed parenthesis and we have our object error is going to be false.
And loading is going to be true like this.
And then we can also destructure out or or Prop, because we're sending that in with that special little component that are created down here.
So now we have access to a prop, that's called params.
So destructor that one out, because we're going to need the movie Id like this equals this dot props, dot params.
And that will grab that one for us.
All right, these ones are going to be the same.
This one also set state we have to change this one, this one also this dot set state, and the state is going to be movie, we have that property, it's an object.
So we move these ones up inside of that object.
And then we have a coma.
And we set the loading property to false like that.
That should be if we're not one, we're going to remove the set loading.
And here, change the set error to this dot set state.
parenthesis and object error.
True and loading the false.
All right.
And I think that's it for that function.
And then we're going to have a lifecycle method also, for this one, the component did mount we're going to do something when the component mount, and the only thing we're going to do is to invoke this dot fetch movie.
And then down below in the render function.
We can destructure out from our state const.
We have our movie.
We have the loading, we have the error.
And that's it.
Then we grab them from this stuff stayed.
And hopefully, it will work here now.
Yeah, I think that's fine.
There's a more formatting.
And let's see if it works.
We save the file, go back to the application.
is grabbing from the session storage? No, I think.
Yeah, it works.
So that's sweet.
We have successfully refactored this application into something that what I think is a worse application because we use in classes.
Now, I wouldn't do it like this, I would keep the functional components and the state with hooks, and the use effect and the use state stuff that we use in the application.
But it's up to you to decide that.
But hopefully this gave you an idea on how class components works in react, and to keep state in class components.
And the lifecycle methods.
There's more lifecycle methods, but I won't go into them here because I'm not using them in this application.
So that's why all right, in the next bonus section, I'm going to talk about TypeScript.
And we're going to refactor our application into TypeScript.
Welcome to this bonus section, where we're going to reflect your application into using TypeScript.
And TypeScript itself is quite a large topic.
So we will only scratched the surface actually.
But hopefully, that's going to be enough to give you a basic understanding of how TypeScript work and especially with react.
So TypeScript is an extension of JavaScript.
And it adds types to JavaScript.
So that's great, because JavaScript is actually quite a loose language where you can do whatever you want, and it still works.
So it can be a little bit messy if you're in a large application.
So TypeScript will transpile down to JavaScript in there.
And so that's why, as they say here, all valid JavaScript code is also TypeScript code.
So you can decide how much you want to type stuff and how strict you want to be with TypeScript.
And TypeScript is gaining a lot more ground.
And it's almost a standard today, when you create something from scratch.
A lot of applications, of course, don't use TypeScript, as they are And there's a lot of code base out there that hasn't been refactored.
And you probably shouldn't do it for all of the applications either.
But TypeScript is great if you have quite a large application, and you want to keep track on types.
And it's really great also, because it's kind of like to have a second coder beside you, that tells you what you do wrong.
Meanwhile, your code.
So it's a great way to write a lot more error, less code.
I think that's one of the great things with TypeScript because you have a really powerful IntelliSense with TypeScript, and it will tell you if you do something wrong.
All right, that was a really short introduction to TypeScript.
In the next video, we're going to set up a project and start refactoring our application into using TypeScript.
Alright, let's start refactoring our application into using TypeScript.
And I'm actually going to create a complete new application with create react app.
And that's because you can also create an application with TypeScript support, and it gives you some defaults and setup that we can use.
So we don't have to do that ourselves.
If we look here, with create react app, we can flag it with template and TypeScript.
And that will create our application with TypeScript support.
So that's what we're going to do first.
So make sure that you're inside a folder where you can create a new project, and then go inside a terminal.
And that's going to show you this also.
And then we type in MP x, create dash react dash app.
And then we name our application, React dash or IMDb dash, Ts.
And I think you also must have only lowercase letters in the naming.
Then we flag it with template type scripts, like this.
And we press enter, and we wait for it.
Alright, that's the bootstrapping of the application itself.
So let's navigate inside of that folder, CD, React dash or IMDb dash Ts.
And you can see that we have some different files here.
So that's great.
Well, one more thing that we need to do before we can start coding, and that is to install our dependencies in this TypeScript application, also, to have the style components.
And we also have the React router.
So let's start with the style components, MPM, I style dash components.
And as this is a TypeScript project, we also need the types for style components.
And if a library won't provide you with types, by default, you can usually find the types in AD types forward slash, and then you can type in the name of the library that you're installing.
So in this case, it's going to be ad types, forward slash styled dash components.
And we'll press enter.
Alright, so that installed correctly.
And then we also need to install the React router, the next version, the version six and the types for that one.
So MPM I, if you remember, we also install a library that's called history, that one is used for react router, history, space, and then we have the React dash router dash dome at next, just as before we grab in your next version, and that is the version six, then we have a space.
And we're going to grab the types for this one also.
So add types, or a slash, React dash router, dash dome, and we press enter.
Alright, so that's the dependencies we need for this product.
But there's one more thing we have to do, because now we have bootstrap this new TypeScript application.
But we want our old files inside of that one.
So if we look here, here's the file for this project.
I'm also showing the hidden files here.
So we have the Git and Git ignore.
So now inside of this src folder, here, we have all the TypeScript files.
But we want our files instead.
And therefore, we can actually remove some of those files here, we don't need to set up tests, we don't need a service worker, we don't need a logo index CSS app, we can still keep the index actually, because that one is already set up for us.
The other ones we can delete.
So just keep the index TSX and the React app and the.ts.
And remove the files.
Like this.
And then from our finished application, I'm using the hooked version now.
So not the class based one, use the hook based one.
And we're going to grab from the src folder, the API app components, config, global style helpers, hooks, images, everything except the index.js file, copy these ones, and go inside the src folder of the newly bootstrapped TypeScript project and paste them in.
And the application won't work now because we have to do a lot of stuff here to get it to work, but that's fine.
There's one more thing we have to do also analysis to copy your dot m file like this or if it says that you can't copy it because it's hidden, you can create a new dot m file and set up your environmental variable for the Movie Database API there again, so just copy.
So just copy that code from your other m file and create a new one and paste it in.
Because it's really important, because we need that one to be able to fetch data from the Movie Database API, we have copied all the files that we need for our TypeScript project.
And that means that we can close the other project and we're going to be in the new project from here on.
In the next video, we're going to convert this base files here, the API, app config, global style helpers, and stuff like that into TypeScript.
And then we'll move on with the components and the home and the movie page.
Okay, before we do anything, I have to correct the mistake I did in the last video.
And that is the dot m file, it shouldn't be in the src folder, it should be in the root folder.
So move this one out to the root folder of your project.
And make sure that it's outside the src folder, otherwise it won't work, we can go inside of our terminal and try to start a project up, we will get an error or probably a lot of them.
As you can see, because we haven't actually converted anything into TypeScript yet.
So that's why.
So first in the index dot TSX file, we have to do some cleanup, we're going to remove the index dot CSS, we're going to remove the ServiceWorker like this, and save the file.
And then we have something that's called react dash app, dash m.ts.
And this is the references for the types for react scripts.
So we'll leave this alone.
And also we have something here that you can see that's called Ts config dot JSON.
And this is the the config you can set up for TypeScript.
So this is why I wanted to bootstrap the application with create react app, because they already set this one up for us.
So they have a lot of great defaults here, that set up for us.
And if there's something special you want to configure for TypeScript, you can do it in this file.
So you can add them here, it's actually a lot you can do to set it up just as you like it.
But we're not going to do that we're going to use the defaults that create react app provides for us.
So we cleaned up the index dot TSX file.
And we're going to refactor all of the other files here in this video.
So we can start with the api.js file, we have to rename it, we're actually going to rename all of these files.
Because they they should be called.ts.
So that it indicates that it's a TypeScript file, so we renamed them to.ts.
Instead, all of these files is going to be.ts.
The app is actually going to be dot TSX.
And that's because we using JSX, inside of that one, otherwise, it won't work.
So every time you use JSX, make sure that you have the file extension dot TSX.
Otherwise, type TypeScript will fail.
Alright.
So that's the renaming of the files.
And then we can start in the api.ts file.
And for this one, we're actually going to create some types because we returning data from the API, and we need to type that data.
But first, we can start to actually type the functions themself.
So here, you can see that it complains, no parameter search term implicitly has an any type.
And that's because we haven't set any type.
This one, if we want to specify a type on this parameter, we use a colon.
And then we specify it as a string.
And you can see that it stops complaining now.
And that's great.
And the page, this one is actually going to be a number.
So we specify it as a number.
So that's how you specify parameters, you have a lot of types you can specify for them.
And then if you want to specify the return type on the function, you can see that TypeScript actually won't complain out because the default setup don't force us to specify a return type.
But I want to show you how we can do that.
And in this case, it's a promise that we return because we're fetching from the API and we get back a promise.
So if we want to type the return type to be a promise, we have a colon here.
And then we specify it as a promise.
But the promise needs something else you can see here represents the completion of another, blah, blah, blah, generic type promise requires one type argument.
And when you send in a type argument type like this, you do it inside of angle brackets, and we're going to specify that this is going to be the type of a new type that we're going to create.
That's called movies.
We haven't created this one yet.
So of course, it complains.
So we're going to do that in a second.
We're only going to specify this const here also, the endpoint that we create here.
We have a colon and then I type it as a string.
So that's how we typed this function.
And now we're going to create a type.
That's called movies.
And the actual data that we get back from the API is, it has a lot of properties.
So I'm only going to type the properties that I'm actually using inside of the application.
So we can mark it with types here.
And then I got to export this type, because I'm going to use it in another file.
So that's great.
You can also export the types, you don't have to specify them all over the place, you can specify them in one file, and you can export them and import them wherever you need them.
So export type movies like this.
And from the API, we get the page.
And that one is going to be a number, you could also create something that's called an interface.
And then you do it like this.
They are almost the same today, in the new versions of TypeScript before there was some major differences.
Actually, the recommendation is to use type in a react application.
So we're going to do that.
So export type movies and then equals and the object, then we have the results.
And the results is actually going to be all the movies, we're going to specify another type, that's called a movie, that's a singular movie.
And this one is going to be an array.
So it's going to be an array of the movie type.
So this is how we specified our array.
So if you had an array, for example, with only numbers, you can specify it like this.
But we are going to create another type object, that's called movie.
And we're going to do that in a second.
But first, we're also going to type the total pages, it's going to be number.
And then we have the total results, that one is also going to be a number.
Do some more formatting.
And you can see in the type of bacteria that it uses see my colon and not coma as in a regular JavaScript object.
I actually think it will work with coma also.
But the formatting is set up, so that it uses see my column, but you can see that it, it seems to be working.
But when I want to format it, yeah, it will return to the semi colons.
Okay.
All right.
So we need to specify each specific movie here.
So we create another type that I export, export type movie equals an object.
And here we have a few more of the different properties.
So we have the backdrop underscore path is going to be a string, the ID is going to be a number, the original underscore title is going to be a string, the over view is going to be a string, it's easy to have a typo here.
So be careful.
popularity is going to be a number, poster underscore path is going to be a string, the title is going to be a string, the vote underscore average is going to be a number.
And the vote underscore count is going to be a number, the budget is also going to be a number.
And then we have the run time, it's the number also and and the last one is the revenue.
And it's also going to be a number.
So that's the type of object for a singular movie.
And now you can see that it won't complain here, because we using that one and telling the results is an array of the type movie.
So each element in the array is going to be an object of this type.
So that's how we specified it now.
All right, and you can see that it won't complain here now, because we using this type here, the movies, so that's fine.
Then we move on to the fetch movie, the singular fetch.
For each movie, we have this parameter here.
So we have to use parentheses.
When we type this, the movie ID is going to be a number.
And the return type is going to be a promise again.
And this time, it's the movie, we already created this one because it's a single movie.
So we have this object here.
So that's great.
And we can also specify the endpoint, you can see that it won't complain because the default setup won't force us to specify everything.
But it's always a great ID to specify what type you return in the context.
All right.
So that's the fetch movie.
And you can see also bonus material for login.
We're not going to type this one.
So I'm going to stop here for the basic fetch functions here.
So fetch credits We have the movie ID, that one is going to be a number, like so.
And it will also return a promise that we create a type that called credits.
But before we do that, we can also specify the credits endpoint as a string.
All right, then we go up here, again, just below the type movies, we're going to export the type that's called credits, it's always a great idea to export the types because you never know when you need them.
That way, you make sure that you can access them from anywhere in your application, the ID is going to be a number, the cast, we're actually going to create a new cast object for that one.
So it's going to be an array with an object that we specify as a cast.
And we're going to do that in a second, we have the crew, and it's also going to be a new type object.
So an array of crew like this.
So up here, we export the type to cast equals, we have the character is going to be a string, the credit underscore ID is going to be a string, the name is going to be a string.
And a profile underscore path is also going to be a string.
If you want to type these in one row, instead of typing them out, when all of them going to be a string, you can do it like this.
You have a square bracket, and then you have the property, the property is going to be a string.
And then the type is going to be a string like this.
And this will also work.
But I think it's better to be more explicit and type all of them like this, then we have the crew.
So export type, crew equals object job is going to be a string name is also going to be a string, and the credit underscore ID is going to be a number or to format it and save it.
And hopefully this will work, you can see that it will, it will give us some arrows here now because I won't type this one here.
Or is it only Yeah, I can actually just type this one.
So we don't have an error, the request token is going to be a string.
The username is also going to be a string.
And the password is also going to be a string some more formatting, and then we have them on the wrong row.
So that will get rid of the arrows.
But we won't focus on these below the bonus material, all of these ones here.
So that's what we're doing.
Alright, save the file.
So that's the api.ts, then we'll have our app dot TSX file.
You can see here now that it complains, because we don't have the types for this one.
And that's because we're using the next version.
So in this case, I'm just gonna ignore it, because I know it will work.
So when you ignore something with TypeScript, you can do that by command and n at Ts dash ignore.
And that will get rid of that error.
So we have to do this for now, before it is officially released, then they will provide the types for it.
And then we don't have to do it like this.
And the only thing we have to do more is to specify our react component.
So this is a functional component.
And if we do a colon, and react.fc, we have that built into react.
So we have that type for a functional component.
So this is everything we have to do to specify this as a react functional component.
Alright, save the file.
Then we have the config.ts file.
And the only thing we have to do here, if we want is to specify those strings, because all of them is strings.
This one can be undefined also.
So yeah, well, we can do it, API URL colon string, this one colon string.
And if it can have more than one value, we can have this pipe.
And we specify it as undefined also, because you can see if I remove this one here, it complains because it tells us that type string, undefined is not assignable to type string, because we saying that it can only be a string, but it can actually also be undefined.
So TypeScript tells us that Yeah, you're doing something wrong here.
So this one could also be undefined, so you should do something about it.
So that's what we're doing here.
Pipe undefined, like this, and it will be happy and all of the other ones will be strings here.
So I'm just going to do it quite fast.
string, string string Spring lists one here, a string and this string and the last one a string.
Right, save the file.
That's the config.
And then we have the global style, we don't need to do anything inside of here, this is a start component.
So it's fine like it is now, the helpers.ts here, we're going to start this ones up also.
So here we have this time puram.
So we create parenthesis.
And this one is going to be a number.
But the return type of the function itself is going to be a string.
So we type it like this, and ours is going to be a number.
And the means is also going to be a number.
So that's it for that function, then we have to convert money, parenthesis, it's going to be a number, and it's also going to return a string.
And this one is a special one.
So you can see that this format here.
The type is actually this one here into into DOT number format, international number format.
So copy this one.
And we can actually specify this as a type also for it.
Like so.
Then the last one inside of this file, is the state name.
This one is going to be a string.
Jason, of course, has an Annie type as a return type, we can specify Annie, it shouldn't actually complain here.
Yeah, and that's because this is named the wrong way.
Here it should be session state.
So that's why.
So JSON dot parse, has an any type.
So that's why we have to specify it as Annie, you should avoid specify anything as Annie, because you remove all the type checking here when you specify it as any, because you're saying that it can be of any type.
So always make it a habit to not use any if you can do only use it in specific case like this one, because this one will return.
And that's why we have to specify it as an ID.
And that's it for these files.
Here, we can start up our application to see that it works NPM start.
And it seems to be working.
So that's sweet.
In the next video, we're going to refactor the homepage to use TypeScript and also the components that we use on the home page itself.
Alright, let's continue to refactor the application into TypeScript and move inside of the component home dot j s, we're going to rename this file to Ts.
And also I can tell you that if we look here in the terminal, I don't run my dev environment, because when you change the file names, it will break.
So you'll have to restore it again.
So that's why I'm going to start it up later.
But if some stuff don't work, because I've changed some file name, or things like that, try to break it and start up your dev environment again.
rights are renamed the home Ts like this.
And then inside of that file, the only thing we have to do here is to specify this as a react dot functional component react.fc.
And you can see there actually made a mistake here, this one shouldn't be Ts, then it won't work because we have gay sex here.
So this one should be dot TSX.
So change that one to home dot TSX.
And then it will work hopefully, here we have some stuff that it complains about.
And that is because we haven't typed anything yet in our hooks that fetches that data.
So if we move inside of the hooks, and use home fetch, first we rename this file to.ts.
Here, we're not using any Deus Ex, so we can name it to.ts.
Okay, the first thing we have to do here is to import the type movie.
And we do this inside of curly brackets, because this is not the default export.
And then it complains here on the page, this one is going to be a number and a search term, it actually interprets this one as a string, because we set it as a default string here.
So we don't have to specify anything more here.
But it complains about the state.
And that is because if we hover over this use state, you can see that results is set to never it doesn't know what type this will be.
That's why we can specify it as movie and an array.
So we're telling it that we're setting this to an empty array, but it should interpret it as a movie array.
So that's why we imported it up here.
And that's why we also get the types on the state correctly here.
So in the home, you can see that the warnings has disappeared because now it knows all these types because it interpreted from this hook here as we telling it that this state is Gonna be of this type.
And then it follows along inside of this file, that's super great.
Say the home also, then we're going to refactor the components that we're using for the home component.
So we have the bottom.
So in the index.js file, that one is going to be renamed to index dot TSX.
And the style file is going to be renamed to.ts.
Because we're not using any JSX inside of that one.
And for a style file, we don't need to do anything there.
But in the index dot TSX file, we have to do some stuff, because now we have some props here.
And we're also going to remove prop types.
We don't need that one when we're in TypeScript.
So remove everything that has to do with the prop types, then here are going to specify types.
And I created a type that are called props.
You can call it whatever you want, it doesn't need to be called props.
So we have the text prop here, text, that's going to be a string.
And then we have the callback, then I'm going to type this very loosely, it's going to be a function that returns nothing.
So when we specify to void because void means that it won't return anything.
So this is a click callback.
All right, but it still complains, we have created a prop object.
So we have to specify the button as a react dot functional component react.fc.
And if we want to specify our props, we can do that inside of angle brackets.
And then we use our props object.
And then you can see that it works.
It knows the types now of these props, you can see if we hover over them, you can see the types.
Right, so that's it for the bottom.
Now we have the grid, the grid styles, we're going to rename that one to grid styles.ts.
And the index is going to be renamed to dot TSX.
Yet again, for the stars, we don't have to do anything here because we're not sending in any props to the style components.
In the index dot TSX file, we have to do some stuff, though.
So we remove the prop types.
And also make sure to remove them at the bottom here, like this.
Then I specified types.
And I create a type props an object and we have the header.
We set up one as a string, the children, we don't need to type that one because that's built in to react.
So we specify the grid to react.fc.
We have angle brackets, and we give it the props object.
This is it for a grid.
Move on to the header header dots header styles is going to be.ts like this, and the index is going to be dot TSX.
Nothing to do in the stars file.
But in the index dot TSX.
We can do some stuff.
We only have to specify this as a react.fc.
That's everything for the header.
All right, then we have the hero image here we image dot Stiles is going to be renamed to.ts.
And this index.js is going to be renamed to dot TSX.
Instead, in this star component, we actually have to do something because we have this prop here and we haven't thought that one up here.
I mark it as types.
I create a type props equals, we have the image and this is going to be the URL so it's a string.
And when you type a style component, you do it here just after the components you choose to create.
We have the angle brackets again, and we send in the props like this.
There you have it, that's the styles.
Then we have the index dot TSX remove the prop types.
Just as before we specify our types, type props equals an object image is going to be a string title is going to be a string and the text is also going to be a string we specify it as a react.fc.
We have the angle brackets and send in the props.
And this should be it for this component save it move on.
Moving for moving football These are for the movie page we have the search for the index.js is going to be renamed to index dot TSX.
The search for styles is going to be.ts we don't have to do anything In this style file, but in the index dot TSX, we remove the prop types.
everything that has to do with prop types.
Then we have the types.
I create a type props equals an object.
And then we have the set search term and this one is going to be a callback.
And how do we type this one? Well, this has implicitly an Annie type.
But if we go back to the home, and see where we have the search bar, you can see here, and here, we actually get that type.
So when you hover over stuff, we get the type.
And that's really good, because we can actually just copy this one, copy and move back to the index dot TSX file in the search bar.
And then we paste it in here.
So this is the React dot dispatch.
And inside here where the React dot set state actions, so this is the type for the setter for the use state.
And it's a string in this case, if it was a Boolean, it would have said Boolean here instead of something.
First, we have a react dot dispatch.
And we specify the type that is, is that it is a state action.
And we specify that one that it's a string that we're going to set this state with.
So the search bar is going to be a react.fc component, we have the angle brackets, and we give it the props.
And that's it for the search bar, move on to the spinner, spinner Stiles is going to be renamed.ts.
And the index is going to be renamed to dot TSX.
The Spinner we don't have any props for that one.
And this one is actually nothing to do because it just exports the star component.
And the last one is going to be the thumb.
So we renamed the index to dot TSX.
And the thumb styles is going to be.ts.
So nothing to do with the styles but in the index dot TSX remove the prop types like this.
And then we specify types, type props, equals, the image is going to be a string because it's the URL to the image, then we have the movie ID, that one is going to be a number and the clickable is going to be a Boolean.
And then specify this as react.fc.
And we give it the props.
And this should be it save the component.
And I think we should be able to start up our application.
So we run NPM start.
Let's see if we have any errors.
It actually seems to be working.
Alright, that's great.
I didn't have any typos or stuff like that.
That always makes me happy when it works the first time.
Okay, so that's the home component.
In the next video, we're going to convert the movie page and all the components for that page into TypeScript.
So we're going to refactor to move a component and also actually the not found component.
So we're going to start with a not found this one is a small component, so we just specify this as a react of FC.
And that will be that one.
And we also have to rename it to dot TSX.
And save the file.
And now if we look in the console, you can see that it gives an error, that's because we renamed that one.
And that's what I meant before break it, and you have to restore it, otherwise, it won't work usually.
Okay, so let's move inside of the movie.js file, rename it to move it off TSX.
And then we're going to refactor some stuff here.
So we specify it as react.fc.
We don't have any props for this one.
And you can see that it complains now because it can't interpret the types here.
So we're going to fix that in the hook.
So go inside the hooks and use movie fetch, we renamed this one to.ts.
And we also need to import some stuff here, we need the movie type object, we need a cast and crew.
That's the one that we created all errors, we import a mural.
So now I'm going to specify some types.
Export type, movie state, and the movie state is going to be the movie.
But as I'm also creating these properties, myself, the actors and the directors, I have to add these ones, so we can actually merge them together to one type.
So we use the ampersand and then we have the object The actors is going to be an array of cast, this and the directors is going to be an array of crew.
And that will create a type object with the movie.
And then we merge in the actress and type domestic an array of cast.
And then we have the directors and we type them as an array of crew.
Right? The movie ID, it complains, here, we have to specify the types.
It was specified as a number.
And the use state here, it doesn't know what state is this actually.
So we're going to specify the state, we have the angle brackets, and then we can give it the movie state.
And then it will know that this state will have this type.
But it complains now, and that is because we're setting it to an empty object.
And it doesn't like that, because we say that it can only be a movie state.
So we could do it like this, if we want to tell it that it can also be an empty object.
Or we can do as we did before, we say as movie stayed, like so.
And it won't complain anymore.
So that's everything we have to do, I think the movie ID okay.
Yeah, we also have to make this a string because this persistent state function is taking in a string.
And this is actually a number enough.
So you can see how great it is with TypeScript, because it's telling us when we're doing something wrong, so we convert this one to a string with a built in function like this.
And then I bet it's the same here yeah.to string, like so.
And this will hopefully be it.
Back inside a movie dot TSX file.
Yeah, and this is because we get a string back from the API.
And now it wants a number.
So we can convert this to a number.
And there are smoother ways of doing this.
So you don't have to convert it like this.
But I think it's a great practice in TypeScript.
So that's why I did it this way.
So we can convert it because TypeScript will complain if we send in the wrong type.
But of course, we could be more consistent and refactor some stuff in the use movie set and also in the API file, to specify the correct type from the beginning.
With course in the API here, you can see that the movie ID is a number, we could specify this as a string, instead, we can actually do that.
So we make this a string.
Or we specify this as a number, this one should be a string.
And we save it go back to the movie.
And now it should work.
Yeah.
So that's probably the way to do it instead.
So you don't have to do all this converting.
And now we have to refactor the components that we use for the movie page also.
So let's begin with actors, right, the dot styles is going to be active.stars.ts.
And index is going to be dot TSX.
We don't have any props in the styles.
So we're only going to be in the index dot TSX.
Remove the prop types just as before.
And then we have the types.
types, I created type props equals an object, we have the name is going to be a string, the character is going to be a string, the image URL is going to be a string also, we specify this so react.fc.
And I give it to props.
Just as before, save the file, then we're going to be in the breadcrumbs.
So rename this one also.ts.
And the index is going to be dot TSX.
Same goes with the stars.
We don't have to do anything but in the index dot TSX.
Remove the prop types.
A lot of repetitive stuff here, but that's great when you learn things.
As I told you before, I specified a types type of props equals an object.
We have the movie, that's the URL, so it's a string.
And then this one is going to be a rec.fc and where the angle brackets and give it to props.
Yeah, I actually named it movie title.
That's what it should say.
Right, that's the breadcrumb.
Then we have the movie info renamed the index.js to index dot TSX and the movie info tiles is going to be renamed to.ts.
And the story in the stars because this one was sending in some props to up here, a market with types created type props, equals, we have the backdrop, and is going to be a string.
Just as before, we have the angle brackets here on the component that we crave, and we send in the props.
Don't know why it's still red.
Yeah, that's because this one should be named animated movie info like this.
So yet again, you see TypeScript is great, because it will warn us, if we don't do stuff the right way, it will warn us save it.
Because I didn't see this actually, when I created it before in the course, I forgot to name this one.
And I didn't see a warning.
But now TypeScript warns me about this, save the file, and go inside the index dot TSX file like this, we remove the prop types.
And we're going to have some types for this one.
For this one, I'm going to import the movie state from dot dot forward slash dot dot forward slash hooks, and use movie fetch.
Like so.
And then I also going to specify a type props equal an object, and we have the movie, and the movie is going to be the movie state type.
So you can see here I import the types, I don't have to specify them again.
I mean, if you really love structure, you can create specific files for your types and have them inside of those files.
All right, movie info, it's going to be a react.fc are going to give it to props, like so.
Alright, then it complains here, this one shouldn't be here.
And compliance.
Again, I did a mistake here.
And you see TypeScript is great.
It tells me that this mistake Yeah.
And that's because I'm not providing a movie ID for this one, because we shouldn't be able to click it.
So go back inside of the thumb.
And this one, movie ID should be set to optional, you can set an optional prop with a question mark like this, save the file, go back.
And you can see that the warning disappeared from the movie info.
Alright, save that file.
And we'll have one more component to go.
That's the movie info bar, rename this to dot TSX.
And the styles.ts, we don't have to do anything with the styles.
And inside the index, we remove the prop types like this.
And then we specify the types.
So I have a type props.
An obit time is going to be a number, the budget is also going to be a number and the revenue is going to be a number.
And then we specify this as the rec FC, we have the angle brackets and give it to props, we auto format it.
And it should hopefully work, save the file.
And this my friend should be it actually we have successfully, hopefully, refactor this one into TypeScript.
So let's make sure that it works.
Go inside the terminal and run NPM start.
And it works.
super great.
There you have it, you have a TypeScript application now.
And everything works as it should.
No arrows anywhere.
Sweet.
There is the TypeScript part.
And in the next part, I'm going to show you some extra stuff that the Movie Database can do.
And that is a neat little login system.
And then you can vote on the movies.
We've reached the last section of this course.
So first, congrats to you because we've come a long way in this course.
And I hope you've learned something about react.
In this part of the course, I'm going to show you how to create a login for the Movie Database API from our application, and you will be able to vote on the different movies.
So first, I just want to show you on developers dot the movie db.org what we're going to use to make the login work.
So down here where it says movies, I clicked on this one, you can see the complete API for the movies.
And they have one here, that's a post that's called rate movies.
So this is the one that I clicked on here.
And by posting to this URL here, we can rate the movies and we have to provide our API key and we Also to provide a session ID.
So that's where we do the login.
And the login is, I think, somewhere.
People search, where do they have a authentication, they have a lot of stuff here.
And first you have to create a request token.
And then we create a session.
So we get a session IDs.
So there's two steps you have to do to be able to log in.
And they also recommend you to actually reroute to the Movie Database for making the login.
But it also provided with a solution here that we don't actually recommend where you can log in from your own site without leaving that application or the site.
So that's the one I'm going to use here.
And the reason for this bonus chapter in the course is actually that I want to show you how to create a global context and store the user the logged in user in that global context.
That's the main part that I want to show you.
And also, I got a lot of requests to show how to make a login form and be able to vote on the movies.
There is one thing though, that's not going to work with this solution.
Because it's not a fully solution.
Really, in this case, you have to use your login from the movie database to be able to log in.
So we won't be able to create a new users and stuff like that.
And the best thing would probably be to build your own API, your own back end somehow to have your users log in there and save data so that you can save all the stuff about the user.
So there's a lot of different approaches.
And this is absolutely not a fully login system and voting system.
I just want to show you some small tips and tricks here to get you started if you want to create your own fully functional logging system, and stuff like that, Okay, so let's get to it.
I'm just going to show you the code shortly here, before we move on in the api.js file.
I have created these functions for us here down below this comment to your bonus material below for login, I have a function that called GET request token so that that will obviously get the request token from the API.
And then I have this one that's called authenticate.
And I did some comments here also.
So first, we have to authenticate the request token that we get from this one.
And then we have to get the session ID with a request token.
So there's actually three steps and not to order them because we have to get the request token first.
And then we authenticate that request token.
And then we get the session ID and then we are logged in.
And then I have this function down below here.
That's called rate movie.
And this one will send a rating score to the Movie Database API, and hopefully return an object that says that we were successful.
So that's what we're going to be using in this part of the tutorial.
So let's get started.
In the next video, we're going to create a global context and a global state that we can use to store the user in.
Alright, let's start by creating a context for our application.
And we are touching on China have advanced stuff now in react.
So don't feel bad if you don't understand all of this stuff the first time.
All right inside the src folder, we're going to create a new file that we call context, dot j s.
all lowercase letters seem to be in the root of the SRC, not in the components or anything like that, in the root of this are See, I can close this one here.
So we have the context.js file, and inside of that one, we're going to import react, comma and the use state that we imported from react, then I'm going to create something that's called a context in react.
And when we create a context, we are creating something that will make it possible for us to provide our application with something in this context that we want to use down in the component tree in the application.
In this case, it's going to be estate value and a setter that we're going to use.
So the context can be any value that you want to provide down to your application.
But it's really, really handy if we want to have a state and a setter that we want to be able to access from anywhere in the application.
So I'm going to export this one because we have to import the context in the component where we want to use it.
So export const, I call it context.
With capital C, you can call it whatever you want.
It doesn't need to be named context.
And from react.we have something that's called create context.
And I call this one.
You could also of course, imported up here, like this.
We can do that instead.
If you feel that that is better.
I don't know really.
All right.
Then I'm going to create something that's called a provider.
The provider is going to wrap our application and make sure that we provide this value to our application so we can decide where we want to wrap this provider in our application.
In our case, we're going to wrap it in the app component later so that we can The value to our complete application.
So we wrap it high up in the hierarchy, so that the complete application and all the components will have access to this value.
So I created a const, I call this component use a provider, I destructure out the children's, because we're going to use this component to wrap our application.
So that means that the children is going to be the app.
In this case, I have a fat arrow.
And then I'm going to create a state const.
State Set state just as we did before, I call the use state hook.
And I can give it the value of undefined as initial value.
Right, that's our state's we creating this one in the use of provider, then we want to provide this one to our application.
So I'm going to return from the context we created up here.
context, that's a component, we have something that's called a provider.
So context dot provider, capital C, capital P, and then we have a prop is called value and inside the value prop, we can provide this value that we want our application to have access to.
So a curly brackets, and I want to provide an array with the state and the set state, that will make sure that we get the exact same structure as we do here with the state, we have the state itself, and then we have the setter in an array.
So that's what I'm doing here, I'm giving it the exact same structured array.
Alright, so inside this one, we're going to return the children.
And this makes sure that we can use this provider to wrap any component in our react application, and it will provide it with these values.
Now we have to export default use of provider like this, save this file, we finished here.
This is how you set up a global context and a state that you want your application to be able to access globally.
Now, we're going to move inside of the app.js file, and inside this file up here somewhere, we can mark it with context.
And we import, use the provider.
That's the one we created from dot forward slash context.
All right, so that's our provider component.
And we want to place it high up in the hierarchy.
So we can just place it here inside of the router.
Use a provider like this.
And we're gonna take this one here and move it down and do some auto formatting.
So we're wrapping or complete application inside of the use of provider.
And this makes sure that our complete application will have access to the state that we created.
So we're going to use this one later.
But first, we're going to create a login page.
So that's what we're going to start doing in the next video.
We're going to start creating our login component.
And I didn't say that I'm using the version of the application without TypeScript.
So you shouldn't use the one with TypeScript use the original one that we finished before we did anything with TypeScript.
And also before we refactor it to classes, because I'm using the functional component version, just to be super clear, so that you know what product you're using for this one.
Alright, let's move on inside of the components folder, we're going to create a new component component that called login dot j, s, capital L.
And we import react.
And we're also going to need you stayed and use context, that's the new hook that we're going to use to grab our context.
I'm going to show you that in a second.
And we import this one's from react.
Then we're going to import something that's called use navigate from react dash, router dash DOM.
And this one is used if you want to navigate programmatically in your application, then we're going to need a functions that I showed you in the API file, so import API from dot dot forward slash API.
For this one, we're going to reduce the button component.
So I marked it with components import button from dot forward slash bottom.
Right.
And then we're also going to create some styles for this one.
So we can actually do that now and scaffold them out first.
So we create a new file in the components folder that's called login dot styles dot j s.
We're going to create the actual styles in the next video.
But for now, we import styled from styled components.
And we export const wrapper and it equals A styled dot div and double backticks save the file Go back to the long end note as we marked it with styles and import refer from dot forward slash login styles, login login dot stars like this, and then we need our context.
So I marked it with context.
And we import context from dot dot forward slash context.
And that's, of course, the one that we created before.
All right, then we can create our component cost login equals, we don't have any props for this one, to make an explicit return, and we have a return statement.
And we can create the JSX.
First, I'm just going to export default first also.
So don't forget that one export default login.
In the return statement, we're first going to return a wrapper.
And inside a rapper, I'm going to create the label.
I'm going to type in username colon, number load at one, I created an input field input, the type is going to be text, the value we're going to grab the value later from the state.
So I'm gonna just mark it with state value for now.
And the name is going to be username.
The onchange is going to be handled input.
And that's the function that we're going to create, we can scaffold this one out here, first const handle input equals on our function, we're going to take in the event, I can skip the parentheses as it's the only one parameter.
And we just create an empty function from now like this.
Then we're also going to have a function that's called handle Submit.
And we'll leave it empty for now also.
Right, so let's continue here with the input.
So we can close this one here, then we create another input field.
type for this one is going to be password.
We don't want to show the characters that the user type in this one, because it's the password input box value is also going to be a state value that we're going to add.
The name for this one is password.
And onchange is also going to be handled input.
So we have the same function to both of these input fields, and we close it here, then we're going to have a submit button and we use a component, the bottom component, the text is going to be login.
And also we don't have to provide us with a prop that's called text and we send in the text, we could also wrap the text with this component if we want to do that instead.
And then we grab the text with the children prop.
We have a callback.
And that's going to be the handle Smith for this one.
Do some auto formatting, save it.
So that's the basic structure of our component, we want to be able to use this component so we have to create a new route for it.
And we can do that in the app.js file.
First up here with where we have the components, we're going to import login from dot forward slash components forward slash login, they will have the component and then we can create it somewhere here we create a new route with a path.
This one is going to be shown when we go to the path login, the forward slash login and the element is going to be our component.
Login.
And then we close the route component and some more formatting, save it, go back to our application, make sure that it's running.
I'm actually not running mine.
So I'm going to type in NPM start.
Whoa, I heard it really sumed in here.
And I'm going to bring up the console for later.
So if we go up here in the route, and type in forward slash login, you can see that we show our component here.
So that is working.
Great.
Go back to the application and the login component.
We're going to create a few states for this one.
So at the top of the login component, we create a state that we call user name and set the username, equals use state are going to create an empty string as initial state for this one, we create another state, that's called password.
And the setter is called Set password equals use state with an empty string as initial value also for this one, something like that.
And then I also want to notice state, that's called error and set error.
And we have a use state call.
And we set it to false initially.
So these are the three states that we have, you could also have won combined states for input fields, if you want to have that is used to create them separately like this, then we're going to grab our context, we're importing it up here.
And we can grab the context with a hook that's called use context.
And our context is going to be the state that we created.
So we create a new cost.
And we can just structure it out just as before, we have the state, the state is actually going to be the user.
So we can be more specific, we call it the user and the set user.
And it equals, we call the use context hook.
And this works as simple as we just give it the context.
And this one is going to bring in the context for us.
And the user, we're not going to use this one, we're only going to use the set user, we can mark it with an underscore.
If we want to do that.
This is also very subjective on how you like to do stuff like this, then we have a hook that we will see imported for our navigation.
So we create a course that we call navigate.
And we call that hook use navigate.
And this will make it possible for us to use this navigate const to navigate programmatically in our application.
Alright, so first, we're going to make these input fields controlled by this component.
So we have to hook them up with state just as we did with the search bar.
And we have this handle input here, where we get the event from the input field, so the input fields, the value for this one, we can change this one now.
It's going to be the state that's called username.
No, not a capital N, all lowercase letters, and this one is going to have the value from the password state.
All right.
So this will make sure that it is connected to the state.
So now when these input fields change, we can make that change in the handle input because we have an on change handler on them.
And we can set the different states in the handle input.
And you can see here that I give them a name.
So first, we want to grab the name.
So I create a const name equals e dot current target dot name, and this one is going to grab the name that are set here on the name prop.
Then we have another cost with the value.
And we get that one from e dot current target dot value.
So we need the name and the value.
And actually, you could do this in a one liner.
If we use just one state for our input fields, we could set the name of the properties in an object dynamically with the name that we get from the input field.
And then we set the value so that will create new values in the object.
Depending on how many input fields we add to our application.
But in this case, I have a separate state for each input field.
So I do it like this instead, in a small application like this, I think this is more readable, actually.
But this means that we have to check now what input box that we type in.
So we have an if statement.
If named equals username, then we're going to set the username stayed with the set username, stay setter, and we have the value.
So we set the name of the input box, and then we get the value.
If the name is username, we know that we should set the state for the username.
So that's what we do in here.
And if the name equals password, we're going to set the password state.
And we give this one the value also.
This one maybe should have a lowercase m instead not an uppercase, so we change this one just to be consistent.
Or format it save it and we can see if it works, go back to the application.
And we can type something in here.
And yeah, it works.
So we know that we have our control components.
So that's great.
So our input fields are working, then we'll have to submit something and actually grab something from the API to make the login.
And we do that in the handle submit function.
The first thing we're going to do is to set the error to false just when we did when we finished our movies, and then I have a try block and then a catch block and we have the error.
For this catch.
We can set that or True.
That's the only thing we're going to do inside of the catch block.
So we're going to be in the try block now.
And first, we need to get the request token.
So I create a new const.
I actually noticed now also that I forgot to bump up the font size.
So I'm going to do that now, from now on is going to be bigger.
Okay, so I have a cost with a request token.
We're going to wait from the API, I have this function GET request token.
And of course, this one has to be an async function, because we are waiting here.
So Mark this one with a sync.
So that will hopefully get us the request token, if something goes wrong here, the catch block will set the error to true and we're going to handle that just in a second down in the JSX.
The cost, we're going to grab the session ID We await again, from the API, I have a function that's called authenticate.
And for this one, we're going to give it the request token first.
And then we give it the username, and then the password.
All right, that will hopefully get us our session ID.
And then we can set the user.
And this one, the set user is actually the context that we created, because we're grabbing the context here and the setter for the user.
So we're setting this one in the context, I'm going to set it with an object First, I want to set the session ID.
So I gave it from the session ID that's the one that we'll get back from the API.
We have a property that's called session underscore ID, all lowercase letters, and then I'm going to set the username.
And as this is also e6 syntax, I don't have to type out this twice, because it will interpret this automatically.
Alright, and then we just have one more thing to do.
And that is we have to navigate somewhere when we successfully logged in.
So we can navigate programmatically with react router, we use the navigate that we got here from that hook us navigate, we placed that one, we placed what we get back here in the navigate cost.
So navigate parenthesis and we just specify the URL.
And in this case, we want to go to the homepage.
So we specify it like this.
And I want to do some console, log in here, console log, the session ID just to see that we get something here, save the file, go back to our application.
And now we haven't styled this one.
We're going to do that in the next video.
But we can use the input fields here anyways.
So my login is vevo and then I have my password that I'm not going to tell you something like this, and I tried to log in.
And you can see that we get this object back from API, we get the session ID and the success is telling us true.
So that's really, really neat.
We know that our login system is working, and it redirected us to the homepage.
To go back to the login page.
I want to do one more thing here before we finished with the logic for this component.
Down below here just above the first label, I have a curly bracket and I'm going to create a short circuit, I'm going to check if the error is true.
Double ampersand If the error is true, we're going to have a div with a class name of error.
And then I'm just going to say there was an error, something like this.
And then I want to format it.
And then I'm going to say this file.
So you can of course type in whatever you want to save the file, go back to the application.
So just try to type something in here and click Login.
And you can see that we show this one here.
Instead, there was an error.
And we also get an error in our console.
So we know that the try and catch block is working.
So this is our login component and the logic and in the next video, we're going to create the styles for this component.
We have our login component and the functionality for that one.
And now we're going to create the stars for it.
So go back inside of the code editor and the login dot styles dot j s file.
We have our wrapper that's the only style component that we use him for this one.
First, we're going to display it as a flex.
we align dash items to center and we justify the content Center also just the center stuff.
Then we set the flex direction on this one is going to be column and we can save it to see what we've got so far.
You can see that we're centering it here in the middle of the screen.
So that's great.
Go back to the code, I'm going to set a max width to 320 pixels, the padding is going to be 20 pixels.
And the color is going to be from the variables, we have a color that's named dark gray.
So double dash dark grey.
Save it go back just to see what we've got, right? When I set the max width to 320 pixels, it's showing it to the left.
But if we set the margin to zero and auto, and save it, that will place it in the center again, so that's great.
All right.
So that's everything for the wrapper.
Now we have the input, we nest, this one inside of the wrapper component, we set the width to 100%.
On the input fields, the height is going to be 30 pixels.
border is going to be one pixel solid.
We have a variable for color.
And we also use dark gray for that one.
Then we set the border dash radius to 20 pixels, the margin is going to be 10 pixels and zero.
And the padding is going to be 10 pixels, save the file, go back to the application.
And you can see that we created this nice little input fields here sweet with rounded corners, and it matched the overall the overall look of the application.
Then we just want to style our error class also dot error.
And for that one, I'm just going to set the color to red.
You can style this a little bit better if you want to do that.
So if we type something in here and click login, you can see that this is the error.
All right.
And that's actually it for this login component, I'm not going to do any heavy styling, as this is the bonus section of this course.
So if you want to do it nicer, you can do that yourself.
In the next video, we're going to be in the header and showed a logged in user and also have a log in bottom.
Okay, let's create the login system from the header, we're going to show a bottom to log in.
And I'm just going to place it in the middle actually here.
It may be should be to the right.
But yeah, as I told you, I'm not doing any heavy styling for this section.
So you can style it to your own liking later.
So let's go back inside of the application and inside the header component, so the header folder and the index.js file.
The one thing we need to add to the imports here is to actually import the context.
So we import context.
From dot dot forward slash and dot dot forward slash, again, we have the context file like this.
And this one is making an implicit return.
Now we need to have some functionality inside of it, we have to change this one into an explicit return.
Like this, we add the return statement here or reformat it just to make it a little bit nicer.
Some people also have the formatting to activate when you save the file, I'll actually I actually don't like that, because sometimes when I save it, and I'm not finished, it starts to format stuff.
And I don't like that.
That's why I do it manually, instead.
Alright, const user, we're going to grab the user from the context, we don't need to set anything here, we just need the user.
And recall the use context hooked, we actually need to import that one also appear.
So import react comma, curly brackets use context.
So we give this use context, hook the context.
And this will bring us the user.
So we don't need to destructure out the setter for the state, we just need to use so so that's why we're not destructuring out that one.
And we can do a console log user like this.
Save the file, go back to our application, I'm going to try to login again.
I click Login.
And you can see that we get this console log here.
So we have the session ID and the username of vaman.
And that's of course for vaman fault.
All right, so we know that our context is working great.
And that's sweet.
So go back to the index.js file in the header folder.
And now we can use this one here.
So just between the two logos here.
I'm going to create curly brackets.
And the first thing I'm going to do is to check if we have a user and then I create a ternary operator.
So I have a question mark, parenthesis and the first thing I'm going to do if we have User are going to show a span with a class name of logged in, like this.
And I'm going to type out logged in as colon.
And then I have new quarter brackets, and I grabbed the use of dot username.
And that's from the object that we get back from the context, of course.
So when we are logged in, we're going to show the text logged in as and we also show in the username.
Otherwise, if we're not logged in, we have a colon, here, we have a new pair of parenthesis, are going to use the link component.
And it's going to link to if you remember this one, the link component is the one that we use from react router to navigate inside of our application.
This one is going to link to the login page like this.
And inside the link, I'm going to have a spam that has a class name of login.
And it says login and then do some nice auto formatting.
I'm going to move this one off and save the file and see if it works.
Go back to the application, we can't hardly see it here.
We're going to style this in a second.
But we have a login button.
So it takes us to the login page.
So here again, I'm going to log in.
And this is something that you also can do if you want you can store the user information in the session storage or in the local stories, there's a lot of discussion going on, on what is the best practices to use.
In this case, we have a session ID, so we have to request a new session ID on each session from the Movie Database API.
So I'm just storing it in the application itself.
So that means that it will get wiped out every time you reload application, I had to log in.
Again, if this was in the real world, we probably would have a login system that will also save this token somewhere.
So you don't have to log in every time.
And I actually have a YouTube video, where I show how to create a back end and set up JSON Web tokens and how to create a login system in a react application.
So this is a very simple use case on how you can create a login system here.
All right, that was a side note, I'm going to click the Login button.
And hopefully up here Yeah, you can see that we showing logged in as beiben.
So it's working, we have to give it some styling also.
And this is just going to be a couple of rows.
So I'll do it in this video.
So inside the header.styles.js inside here, we actually don't need the class names that are set, we can just set the color to a variable of white, like this, and then we have the a tag, I set the color to the same variable there, double dash white.
And the text dashed declaration is going to be set to none.
Auto format.
Let's save it.
And also if we want, we can remove these classes, we don't need them, we can just have a span on this one's awesome thing like this, save the file, go back to the application, you can see that now we see it.
And yeah, this is probably not the most beautiful way, it doesn't look that good, because I'm just placing it in the middle.
Now, we would have some dedicated space for a login button and stuff like that.
But this is just to show the functionality.
So I'm not going to style it any better than this.
So I clicked the login.
And I log in again.
click the Login button, whoops, something, I guess I typed the password wrong here.
I log in again.
And that works.
And now we can see that we have this white text instead.
And it tells us that I'm logged in.
So that's great.
In the next video, we're going to create the rate component that we're going to show somewhere here, I think we're almost finished with the voting system.
But we need a rating component that we can place here in the movie info component.
So we're going to create that will now move back inside of the code editor and inside of components create a new folder that we call Wraith, capital R.
And inside of that folder, we create a new file that's called index dot j s and I actually not going to have any styling for this one.
I'm going to use the components as they are.
So first I'm going to import react.
And I'm also going to need the use state for this one.
Because it is going to be a control component I imported from react.
Then I create my component rate equals, and I'm going to destructure out the callback for this one.
Because when we vote, we need to have a callback function that will do something.
And in this case, it's going to send a request to the API.
That's a component I'm also going to export default rate like this.
And the first thing we do in this component is to create a state with a value and set value equals use state And we're going to start with the value five, the rating is going to be between one and 10.
And then we have the return statement and we return our JSX.
So I'm going to make it simple here, I create a wrapping div, and then I create an input.
And the type is going to be range.
So we create a range slider, the min value is going to be one, the max is going to be turn, and the value is going to be our state value.
And then on change, we have to change this state value.
So I want to show you also that you can create an inline function instead of creating a function up here to where the event E, I create an inline arrow function.
And then we set the value e dot turn target dot value, and this is enough.
And we will close this component.
Alright, so that's a range slider after the range slider, we want to show of our value like this.
And then I create a p tag just to get it on a new row.
And I create a button.
I have an onClick handler on this button.
And in this case, we have an inline arrow function because we are going to call our callback with a value.
And we give it the value if we don't have this inline arrow function here, and we just type it out like this, then it's going to instantly run this and it won't work.
So we have to have an inline function here as we providing an argument to this callback function.
Right, close it and inside of the button with type out rate, do some more formatting, save it, we're gonna move inside of movie info component in the index.js file.
And up here where we import the thumb, we also got to import our rate component, dot dot forward slash rate.
And then we're going to show the rate component somewhere below.
theme, we're going to place it Yeah, maybe here, just above the M tag for the text.
So I create a new div and inside that div, I have a p tag rate movie.
And below that one, we use a rate component.
And for now, we don't have a function that we're going to send into this one the callback function.
So just showing the component just to see that it works and shows up, save the file.
Go back to the application.
And you can see that we have the rate slider here.
And we have a rate bottom, it doesn't work.
Now, as you can see, because we're not sending in the callback function to it.
But this one will work in the next video, because we're going to tie all this together and make it work so that when we press this red button, we will send along this rating number to the API, and we will rate this movie.
Alright, we're almost finished.
And this is actually the last video in this course.
So hope you enjoy the course, we're going to tie this together.
So let's move inside of the code and inside the movie info component in the index.js file, the first thing we have to do is to grab the context, the context or import context, from dot dot forward slash and dot dot forward slash again, and context.
So we're going to use the context.
And that means that we also need to import from up here, the use context hooked.
Right.
And now you hopefully can see how handy it is to have this global state because we can access it from any component in the application.
And in this case, we're going to grab the user and the session ID.
So you can send along the session ID to the API when the user rate the movie.
And now we're making this implicit return, we're going to change this one to an explicit return, so return and I created curly bracket, and then we need to have one below also.
There is some auto formatting, and go back up if it's in space.
And first, we're going to grab the user from our context, just as we did before the cost user use context.
And we've given you the context.
So this will give us the user here.
And then we are going to send in a callback function to our rate component here. So we're creating this function here in this component and send it along to the rate component.
We're going to call this function calls handle rating. This is going to be an async function because we're making a an API call.
We have the value And then we can do some stuff inside of here.
So this value is going to be the value from the range slider.
So create a new cost rate equals, then I wait.
And from the api.id and I imported up here.
No, I also need to import the API.
We do that up here, import API from dot dot forward slash dot dot forward slash API, like this, then I go back down here and change this one.
API dot, I'm going to grab the function that's called rate movie.
And if you want to know more about these functions, you can always check them out in the api.js file.
Because I told you probably too many times now that I pre made these functions for you.
So you don't have to do that in this course.
Alright, move back to the movie and for an index.js file.
So the rate movie function is going to take in three arguments.
So we have the user dot session ID.
And we have the movie ID, because we need to know the movie ID of the movie that we want to rate.
And we also want to give it the value, that's the rating value.
Right.
And that's actually everything we need to do.
In this case, I just want to console log out to rate to see that we get something back and that the rating was working.
So we can use this handle rating.
Now down below here, we can give it to the rate component, we have a prop.
That's called callback.
And we give it to hand reading and save the file. And hopefully this should be it.
Go back to the application.
Yeah, we have one more thing to do, because I don't want to show this rate slider when we're not logged in.
So we can do that also.
So just here, when we have the rating, outside of the wrapping dem are going to create a ternary operator, I'm going to check if you sir.
Then I'll double ampersand, and I move my M curly bracket down here or to format it.
And it will also auto generate this parenthesis.
So if the user exists, if we're logged in, we're going to show the rating.
Otherwise, we don't show anything.
Save the file go back to our application, you can see that we're not showing the rate slider now we have to log in.
So we click the Login button, and I log in.
And now we're logged in, we're going to go to movie here.
Now you can see that we see the rating slider.
So I don't actually know if this movie is any good, but I'm going to give it a rating or eight.
And I click the red button.
And here you can see in the console that we got a success of true and status code one, a status message success.
And if we click rate again, you can see that we get another message because it says that the item record was updated successfully.
So you can update your rating score.
If you want to do that.
There's also a resource in the endpoint if you want to remove the score also.
So there are some neat stuff that you can do with the Movie Database API.
And I hope this inspired you to actually build more stuff into this application, because now you have a good foundation.
And for example, the next step you can do is to create a logout button for the user.
And the way I would do it in this case is that I can just wipe out the global context the state here and remove the user from the global state.
And that will log out the user we don't have to do anything else with the Movie Database API or something like that.
Alright, that's it for this course.
I hope you enjoy this.
I sure enjoy this.
This is the third iteration of the course.
So this is the third time that I actually update it and re recorded from scratch.
And if you want free tutorials, you can always visit my YouTube channel, search for vaman Fox, or you can go to vevo in fact.com if you want more courses from me.