

Welcome to this comprehensive guide to learning React. If you're looking for an efficient and well-thought-out approach to understanding React fundamentals, you've just hit the jackpot.
This guide follows the 80/20 rule – we'll focus on a few key React concepts that you'll use in the majority of your work with React.
I created this resource for beginner and intermediate developers. In it, I’ll cover all the basic concepts you need to know to get started with React.
Are you ready to build your first React app? Let’s get started.
By the time you finish this guide, you should have a solid understanding of React basics, including:
- What is React?
- How Much JavaScript Do You Need to Know Before Learning React?
- Why Learn React?**
- How to Set Up React
- Key Concepts to Understand in React
- What is JSX?
- What is React State?
- Props in React
- How to display list items in React
- React Event Handlers
- React Hooks
- Data Flow in React
These topics will form the foundation for all advanced concepts you'll learn later on.
This guide is a great resource for JavaScript programmers who are starting to learn React.
What is React?
React is a JavaScript library for building web app user interfaces.
It's open-source and developed by Facebook. With React, you can create a quick and scalable web app by breaking the UI down into smaller components.
React adopts a declarative style, but what does that mean? You might have come across the terms imperative and declarative in coding discussions, so let's break it down.
In imperative coding, you instruct the computer on what steps to take to achieve the result.
Here's an example:
let num = [1,2,3,4];
let tripled  = [];
for(let i = 0; i < num.length; i++){
    let newNum = num[I] * 3;
    tripled.push(newNum)
}
console.log(tripled)   // [ 3, 6, 9, 12 ]
In the code above, we give step-by-step instructions to carry out certain tasks. If our instructions are incorrect, the machine might not deliver the expected outcome. It only does what we clearly instruct it to do.
On the flip side, in declarative programming, we state our desired outcome, and the computer works out the steps to achieve it.
Here’s an example:
let num = [1,2,3,4];
let tripled = num.map((n) =>  n * 3);
console.log(tripled)  // [ 3, 6, 9, 12 ]
In each cycle, the program multiplies the num by three and adds it to an array.
We aren’t providing step-by-step instructions, yet the actions are carried out. This declarative approach is what makes React run so efficiently, and it's one of its standout features.
How Much JavaScript Do You Need to Know Before Learning React?
The initial question often is, how well should you know JavaScript before tackling React? I think it's important to have a solid understanding of JavaScript's core concepts before diving into any framework or library, as it will benefit you in the long run.
Let’s say you want to become a web developer and you want to use React as your primary technology.
Here is a high-level roadmap you can use to make sure you have the knowledge you need:
- Learn the basics of JavaScript.
- Learn about web pages and web development technologies like HTML and CSS.
- Learn the basics of Node.js and Express.
- Be able to write some kind of simple Node.js web app.
- Learn about the different frameworks (React) and technologies developers use to develop Node.js apps.
- Learn some kind of database to use with Node.js.
- Learn computer science basics, like Algorithms and Data structures.
- Learn best practices for writing good code.
- Learn how to design the architecture of a React.js app.
Having some kind of plan in place is important. You can always change and adapt the plan, but if you don’t have the plan to begin with, you’ll be aimlessly wandering and you may end up frustrated and be more likely to give up.
So the simple answer to this question is, once you're confident in your JavaScript basics, go ahead and start learning about and building projects with React. You can read this article to make sure you understand those fundamental JS concepts.
The tech field moves quickly with new languages or frameworks coming out often. If you focus on building a strong foundation, you'll be set to dive in.
Here are some more useful resources for learning JavaScript:
- freeCodeCamp's JS course
- The Modern JavaScript Tutorial
- '33 JavaScript Concepts' on GitHub
- Official JS Documentation (MDN)
Why Learn React?
There are a number of reasons why learning this popular JavaScript library is beneficial.
Here are a few:
- React is well-liked in frontend development due to its reusable UI components, flexibility, and ease of debugging. This helps developers build large web apps more efficiently.
- Chances are, you'll come across a React project either in your current job or in the future.
- For a JavaScript programmer, facing React-based questions in job interviews is common.
- Many frameworks or libraries, like NextJs and Gatsby, are built on top of React.
- React enhances your development skills as it encourages good practices. It helps you consider data flow and global state management in your apps, along with its design patterns prompting you to think about various scenarios and edge cases.
For more insights, you can read my article on Why You Should Learn React.
How React Stands Out from Other JavaScript Ecosystem Tools
Firstly, React is speedy as it utilizes the virtual DOM to display data, updating only the altered parts when data changes.
React also encourages breaking down code into small, reusable chunks. This makes it manageable rather than tackling a large codebase all at once.
Beyond this, React simplifies debugging and speeds up large-scale development.
It's also SEO-friendly, which is crucial for business visibility on search engines like Google. And being open-source with a large community, React offers ample support and a variety of tools and extensions to ease its usage and debugging.
Now, with a better understanding of React's benefits, let’s go ahead and set up React in our local development environment.
How to Set Up React
First, you need to install Node.js. It allows you to execute JavaScript code and run React applications on your computer.
You can install it from the website and check its current version using the code snippet below.
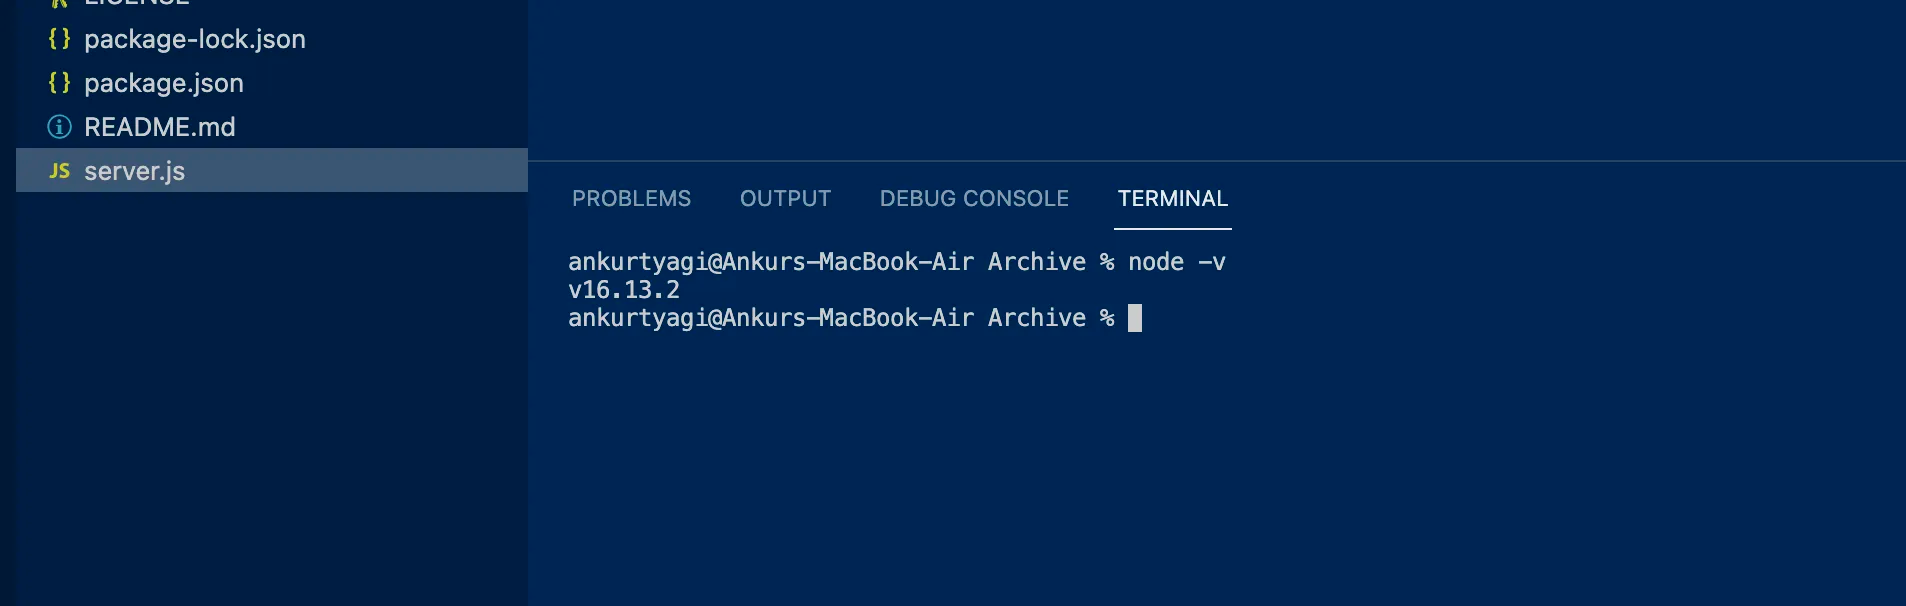 Setting up local development environment
Ensure you have Node 14.0.0 or higher on your machine to install the latest React version.
Then, to quickly set up a React app, there are a couple ways you can go. If you want, you can use the official tool, create-react-app. Executing npx create-react-app my-app will download the latest React version. But this method is no longer recommended for installing React.
Instead, you can create a React app using Vite, which is a development environment for modern applications.
Run the code snippet below within your terminal, provide a name for your project, and select React as the framework.
npm install
Start the development server by running the npm run dev within your terminal.
The app will launch on your local port 5173 by default.
Now, we're set to deep dive into the core concepts of React.
Key Concepts to Understand in React
React Components
The browser returns a set of React elements, called components, that appear on the computer screen.
In React, a web page can be divided into multiple components that make up the entire elements on the screen. This helps us adhere to the DRY (Don’t Repeat Yourself) principle and write cleaner code.
React splits the UI into independent and reusable pieces (components). Each component name must start with a capital letter, which makes it readable. They have their own styles, APIs, logic, and structures.
There are two types of React Components:
- Class or stateful components
- Functional or stateless components
Class Components (Stateful)
This method for creating React components is considered outdated. Although still supported by React, it is not recommended because new features in React are based on function components and hooks.
Class Components are declared using the JavaScript class keyword. They are called stateful because the variables within the components are linked to them using the JavaScript this keyword.
To create class components, you need to extend the default React component which contains a constructor function with all the required states. The class component displays its elements via a render function.
Let’s consider a Hello World component using Class Components.
import React, { Component } from 'react';

class HelloWorld extends Component {
  constructor(props) {
    super(props);
    // Initialize state
    this.state = {
      greeting: 'Hello, World!'
    };
  }

  render() {
    return (
      <div>
        <h1>{this.state.greeting}</h1>
      </div>
    );
  }
}
The code snippet above creates a Class Component with a state called greeting containing a "Hello World" value. The state is declared using the this.state keyword and the render method then displays the value of the greeting state within an h1 element.
Remember: you should generally avoid using class components in your applications, and use functional components instead – which we'll discuss now.
Functional Components (Stateless)
Functional components are a modern way of writing React. They follow the JavaScript ES6 method of writing functions. A functional component accepts a single argument known as props (object data), mostly returned with a JSX element.
Functional components receive data as props from different components. You'll learn how to manage state a little later in this guide.
Consider the example below:
import "useState" from "react"
function App() {
  const [name, addName] = useState('');
  function handleAddName(event) {
    addName(event.target.value);
  }
  return (
    <div>
      <form>
      <label>
        Name:
        <input type="text" value={name} onChange={handleAddName} />
      </label>
      </form>
      <p>
        Welcome {name}, I hope you will learn a lot in this Handbook.
      </p>
    </div>
  );
}
Function components are declared similarly to JavaScript functions. The difference is that components accept props and render JSX elements. You'll learn more about JSX next.
What is JSX?
Every component you see uses JSX. The best thing about React is that you can easily embed JavaScript into JSX. It gives you the flexibility to build fast UIs. But wait, what is JSX?
JSX stands for JavaScript Syntax Extension, and it lets you use HTML-like syntax in your React components.
A function called React.createElement() enables us to create JSX elements in React. It accepts three arguments – the HTML element, an object containing the HTML element’s attribute, and the content of the HTML element.
Let’s see some examples: The code snippet above creates a button that displays “Click here” with a background colour and text color attributes.
React.createElement(
'button',
{ color : 'white', backgroundColor: 'blue'},
'Click here'
)
But developers don’t create JSX elements this way. In fact, you don’t need to use the React.createElement() function because it creates a lot of unnecessary lines of code and will be difficult to create deeply nested JSX elements.
Instead, React provides an easier way of writing JSX elements. They are similar to HTML elements and accept an attribute called className that replaces the class attribute in HTML.
There are two rules concerning JSX elements:
classis a JavaScript keyword. Therefore, useclassNameinstead of class when styling your JSX elements.- A component can only return one JSX element. But when you need to display more than one JSX element, put them in a single container element.
Let’s see some examples:
function Greeting() {
  return (
  <h1 className="heading">Welcome to React </h1>
  );
}
The code snippet above shows a Greeting component that returns a single JSX element. It displays “Welcome to React” using the h1 element. The className attribute adds the “heading” style to the JSX element.
Consider another component that returns multiple JSX elements:
function Greeting() {
  return (
<div>
  <h1 className="heading">Welcome to React </h1>
 <p>This message is sponsored by FreeCodeCamp
</div>
  );
}
The code snippet above returns more than one JSX element nested within a parent element. So it is important to note that all JSX elements must be within a parent container.
What’s the Difference Between HTML and JSX?
JSX syntax looks like HTML. In HTML, we use class attributes for styling purposes. In JavaScript, ‘Class’ is a reserved word. So we can’t use the class keyword. For this, React uses className instead of Class as the default for styling.
Consider the example below:
<!DOCTYPE html>
<html lang="en">
    <head>
        <style>
            .heading {
                color: #3498db;
            }

            .paragraph {
                font-size: 18px;
            }
        </style>
    </head>
    <body>
        <h1 class="heading">Welcome to React</h1>
        <p class="paragraph">Happy learning</p>
    </body>
</html>
The code snippet above shows an HTML document that displays a heading and paragraph elements on the web page. The elements are styled using the CSS class selector (HTML class attribute).
Let’s recreate this with JSX elements:
'const App = () => {
    return (
        <div>
            <h1 className='heading'>Welcome to React</h1>
            <p className='paragraph'>Happy learning</p>
        </div>
    );
};
The code snippet above displays the heading and paragraph JSX elements and uses the className attribute to style each of them. You can add a CSS file containing your styles within your project.
What is React State?
State is a key concept in React apps. You can think of state as a collection of information or objects that tell you where you can access and store your data. Anything outside of a component, for example, can’t access its data. It’s private and controlled by the component.
Every React component has its own state. Whenever a state changes, the component gets re-rendered. This happens when a user clicks a button, responds, or interacts with something on the page.
The children components can access these states via props (which we’ll discuss below) passed by the parent’s component.
Let’s consider some examples of React state:
const [name, setName] = useState("")
const [age, setAge] = useState(0)
const [products, setProducts] = useState(["rice", "beans"])
The code snippet above shows some examples of React states. A state can be an array, string, object, or number. The useState hook accepts the initial value of the state as a parameter, and the state name and state function (for modifying its value) are destructured from the useState hook.
const [stateName, stateFunction]= useState(<initial_value>)
Consider a form that accepts a user’s name and age and displays them, like this:
function UserInfo() {
  const [name, setName] = useState('');
  const [age, setAge] = useState(0);

  function handleNameChange(event) {
    setName(event.target.value);
  }
  function handleAgeChange(event) {
    setAge(parseInt(event.target.value));
  }
  return (
    <div>
      <form>
      <label>
        Name:
        <input type="text" value={name} onChange={handleNameChange} />
      </label>
      <label>
        Age:
        <input type="number" value={age} onChange={handleAgeChange} />
      </label>
     </form>
      <p>
        Your name is {name} and your age is {age}.
      </p>
    </div>
  );
}
export default UserInfo;
The code snippet above accepts the user’s name and age and stores them within the React states. The functions handleNameChange and handleAgeChange accept the user’s input and update the state’s values.
Global State vs Local State in React
Global States refers to state values used in multiple components within the application. In some cases, they can be updated anywhere within the application.
For instance, when a user changes from dark to light mode while using your application. This state affects the overall view of the application to ensure that all the components change colour.
To do this, you may need to declare a state like this:
const [darkmode, setDarkMode] = useState(false)
This state gets updated when a user toggles a switch within the application. This state is global because it is passed into all the components within the application to ensure that their views change depending on the state's value.
Let's see an example:
const App = () => {
    const [darkMode, setDarkMode] = useState(false);
    return (
        <div>
            <Home darkMode={darkMode} />
            <Profile darkMode={darkMode} setDarkMode={setDarkMode}>
        </div>
    );
};
From the code snippet above, we have an App and a Profile component. The App component is a higher-order component that renders two components and contains a state called darkMode that toggles the mood of the application.
The sub-components (Home and Profile) accept the states and update their element's colour depending on the state's value.
From the Profile component, darkMode is a global state, and name is a local state because the name state is declared and bound to the Profile component only, and darkMode is available to other states apart from the App component.
Local states are state variables bound to a component. They are used outside that component, meaning they are local to that component.
For instance, the name state is local to the Profile component:
const Profile = () => {
    const [name, setName] = useState("Ankur");
    const toggleName = () => setName("Tyagi");
    return (
        <div>
            <h1>Hi, I'm {name}</h1>
            <button onClick={toggleName}> Toggle Name </button>
        </div>
    );
};
The code snippet above toggles the name state between “Ankur” and “Tyagi” when a user clicks the button, and the state is not used anywhere outside the Profile component.
Props in React
Props are data transferred from a parent to a child component. Props can’t be modified, because they are read-only. A child component can not change the values of the props received from the parent component.
The diagram below shows that a component accepts props from another component and displays them as JSX elements within the component.

For example, let’s consider an application that allows users to toggle the application theme.
const App = () => {
    const [darkMode, setDarkMode] = useState(false);
    return (
        <div>
            <Home darkMode={darkMode} />
            <Profile darkMode={darkMode} setDarkMode={setDarkMode}>
        </div>
    );
};
The code snippet above shows that the Home and Profile components accept the darkMode state and its function as props. The Home component accepts the darkMode value and the Profile component accepts the state’s value and its function.
Now, how do we access the prop values within these components? You can do this via a method called Destructuring.
Destructuring props in React
Props destructuring is a simple phenomenon similar to how we get object values in JavaScript. Let’s see an example:
const profile = {
 name: "Ankur Tyagi",
 age: 22,
 role: "Technical Writer",
};
From the code snippet above, the object contains a name, age, and role property. In JavaScript, you can get the values of each property using the objectName.
Therefore, you can access each value as shown below:
console.log(profile.name)  //"Ankur Tyagi"
console.log(profile.age) //22
console.log(profile.role) //"Technical Writer"
However, destructuring provides a better and much cleaner way of getting the values within an object or array.
const profile = {
 name: "Ankur Tyagi",
 age: 22,
 role: "Technical Writer",
};
//Destructuring the object
const { name, age, role } = profile;
console.log(`My name is ${name}. I am a ${role} and ${age}years old`);

const friends = ["Tejas", "Brad", "Ankit"]
//Destructuring the array
const [first, second, third] = friends

console.log(first)
From the code snippet above, the object properties and array values are destructured from the parent enabling us to reference each values using the property name or a variable name. Destructuring provides a cleaner way of accessing the values in an object or an array.
But React uses this ES6 syntax to simplify how you access values within objects and arrays and values from props. Note that when you pass data into components via props, the data is added as a property to the props object.
const App = () => {
    const [darkMode, setDarkMode] = useState(false);
    return (
        <div>
            <Home darkMode={darkMode} />
            <Profile darkMode={darkMode} setDarkMode={setDarkMode}>
        </div>
    );
};
The Profile component destructures the darkMode and setDarkMode values from the props object parameter, thereby, enabling us to interact with the data directly.
Every React component has a default props object that enables data sharing between components and you can access the props value using any of the destructuring methods below:
const Component = (props) => {
State vs Props
State and props are used for holding data within a React application. But they serve different purposes.
- States are mutable, and Props are immutable. Data stored in a state can be modified, while Props can not be modified (read-only).
const App = () => {
    //👇🏻 state
    const [name, setName] = useState("Ankur");
    ////👇🏻 modify state
    const changeName = () => setName("Tyagi");

    return (
        <div>
            <Profile name={name} />
        </div>
    );
};

//👇🏻 accepts name as props
const Profile = ({ name }) => {
    return (
        <div>
            <h1>Hi, I'm {name}</h1>
            <p>Welcome to my tutorial</p>
        </div>
    );
};
The code snippet above shows that when you declare a state, React allows you to create a function that modifies the state value. Also, states become props (read-only) when you pass them into other components.
- State are local to a component while Props are from a parent component. From the code snippet above, the name state is local to the App component but becomes a prop when passed into the Profile component.
How to Display List Items in React
So far, you’ve seen how to display states and props values within JSX elements in React. But in some cases, you may need to display list items on a webpage – for example, data received from an API endpoint. How do we render this in React? You’ll learn about that shortly.
Let’s consider the following code snippet that renders a list of foods:
export default function App() {
    const products = ["Rice", "Beans", "Yam", "Eggs"]
    return (
        <div>
            <ul>
                {products.map((item) => (
                    <li>{item}</li>
            ))}
            </ul>
        </div>
    )
}
In React, the JavaScript function array.map() is used to render list items. But the code snippet is incomplete. Each list item must have a unique key prop to enable React keep track of each item within the list.

To fix this, update the code snippet as shown below:
export default function App() {
    const products = ["Rice", "Beans", "Yam", "Eggs"]
    return (
        <div>
            <ul>
                {products.map((item, index) => (
                    <li key={index}>{item}</li>
            ))}
            </ul>

        </div>
    )
}
The array.map() function accepts two arguments: the list item and its position within the array. So you can set the key prop to the index (item position) to enable React to distinguish each item from the others.
The key prop optimizes React's performance and is useful for performing CRUD operations with list items.
Let's consider a to-do list that enables users to create and delete to-do items.
import { useState } from "react";

export default function App() {
    const [todoList, setTodoList] = useState([]);
    const [todo, setTodo] = useState("");

    const handleSubmit = (e) => {
        e.preventDefault();
        setTodoList([...todoList, { todo, id: Math.random() * 1000 }]);
        setTodo("");
    };
    const handleDelete = (id) => {
        const newTodoList = todoList.filter((item) => item.id !== id);
        setTodoList(newTodoList);
    };

    return (
        <div>
            <h1>Todo List</h1>
            <form onSubmit={handleSubmit}>
                <input
                    type='text'
                    name='todo'
                    id='todo'
                    value={todo}
                    onChange={(e) => setTodo(e.target.value)}
                    required
                />
                <button type='submit'>Add Todo</button>
            </form>

            <div>
                {todoList.map((item) => (
                    <div key={item.id}>
                        <p>{item.todo}</p>
                        <button onClick={() => handleDelete(item.id)}>Delete</button>
                    </div>
                ))}
            </div>
        </div>
    );
}
The handleSubmit function accepts the user’s input and adds it to the to-do list, and the handleDelete function removes the selected to-do from the to-do list using its id.
The code snippet above displays the items within the to-do list and uses the items’ ids to identify each to-do when adding and removing items from the list.
React Event Handlers
When we click some button or interact with the UI, we expect a response. This is made possible with Event handlers. These event handlers determine which action is performed when the user interacts with them (that is, when some event is performed).
If you know how to handle events in JavaScript, it won't be that hard to understand how to do it in React. There are just a couple differences.
In React, event handlers are written in camelCase form like this: onClick, onChange, and so on.
Here’s an example that shows the difference between writing event handlers in HTML and React. Both code snippet executes a function called handleClick when a user clicks the button.
In HTML:
<button onclick="handleClick()">
You clicked a button
</button>
In React:
<button onClick={handleClick}>
You clicked a button
</button>
In React, you need to use event handlers when submitting a form and modifying the value of a state. Let’s see some examples:
import { useState } from "react";

export default function App() {
    const [todo, setTodo] = useState("");

    const handleSubmit = (e) => {
        e.preventDefault();
        console.log({ todo });
    };

    return (
        <div>
            <h1>Todo List</h1>
            <form onSubmit={handleSubmit}>
                <input
                    type='text'
                    name='todo'
                    id='todo'
                    value={todo}
                    onChange={(e) => setTodo(e.target.value)}
                    required
                />
                <button type='submit'>Add Todo</button>
            </form>
        </div>
    );
}
There are two event handlers in the code snippet above: the onSubmit and the onChange handlers.
The onChange event handler updates the todo state with the form’s input as the user enters a value into the form field.
The onSubmit event handles the form submission. In most React forms, you’ll come across the function event.preventDefault(). It prevents the page from reloading (default action) every time a user submits the form.
React Hooks
Hooks are a critical feature of React that were introduced in V16.8.
In class components, we encounter some problems:
- We have to take care of Auto-binding and “This”
- The code gets lengthier, and serval lifecycle methods are hard to follow.
- It is hard to share logic and reuse components
To solve all of these class-related problems, the React team created hooks. They help you write cleaner, more readable, and maintainable code. So let’s learn about few of the Hooks and how to use them.
The useState hook
useState is used for creating a state variables. It enables us to create and change state variables within our components.
useState returns a pair of values. The first one is the current state and the second is the function that updates it.
const [value, setValue] = useState(<initial Value>)
Let’s create a counter using the useState hook:
function Counter = () => {
    const [count, setCount] = useState(0);
We initialize a count state and set it to “0”. The handleClick function modifies the count state using the setCount function to increase the count value by 1.
The code snippet below modifies the count state when the user clicks the increment and the decrement buttons.
function Counter = () => {
    const [count, setCount] = useState(0);
    function handleClickInc(){
        setCount(counter => counter + 1)
    }
    function handleClickDec(){
The useEffect hook
The useEffect hook is an essential hook that enables us to perform actions when various changes occur within a React component, such as data fetching, when a component re-renders, and so on.
The useEffect hook accepts two parameters: a function and a dependency array. The function is executed depending on the conditions within the dependency array.
useEffect(()=> {
There are three ways you can use the useEffect hook:
- Without a dependency array
- With an empty dependency array
- With a dependency array containing values.
Without a dependency array
A useEffect hook without a dependency array will run every time the component re-renders due to an event or a state change. You should not use the useEffect hook this way because it leads to performance issues.
Assuming there is a useEffect hook within the Counter component, it will return when the component mounts on the page and every time the counter changes.
import { useEffect, useState } from "react"

export default function Counter() {
    const [count, setCount] = useState(0);

    const increment = () => setCount( prev => prev + 1)
    const decrement = () => setCount( prev => prev - 1)

    useEffect(() => {
        console.log("Run everytime count changes");
    });


    return (
        <div>
            <h1>Count: {count}</h1>
            <div>
                <button onClick={increment}>Increase</button>
                <button onClick={decrement}>Decrease</button>
            </div>
        </div>
    );
}
Note that you should avoid using useEffect without its dependency array – it will cause performance issues within your application.
With an empty dependency array
A useEffect hook can also contain an empty dependency array. This means that the function within the useEffect function should run only once – when the component mounts or is loaded on the web page.
This method is mostly used when you need to fetch data from an API endpoint and display it on the web page when it loads.
Here is an example, the useEffect function runs only once (when the page mounts). An empty dependency array tells React that the useEffect runs once – when the component is rendered on the web page.
import { useEffect, useState } from "react"

export default function App() {
    const [count, setCount] = useState(0);

    const increment = () => setCount( prev => prev + 1)
    const decrement = () => setCount( prev => prev - 1)

    useEffect(() => {
        console.log("Run only once when component is mounted");
    }, []);

    return (
        <div>
            <h1>Count: {count}</h1>
            <div>
                <button onClick={increment}>Increase</button>
                <button onClick={decrement}>Decrease</button>
            </div>
        </div>
    );
}
With a dependency array containing values
In this previous section, you learned that declaring a useEffect function without a dependency array causes performance issues. So how can we execute function that runs when the counter changes?
This is where the dependency array helps. It contains the values that the function depends on. The function runs when the component is rendered and when the value of variables within the array changes.
Let’s update the useEffect hook to run only when the count changes.
import { useEffect, useState } from "react"

export default function App() {
    const [count, setCount] = useState(0);

    const increment = () => setCount( prev => prev + 1)
    const decrement = () => setCount( prev => prev - 1)

    useEffect(() => {
        console.log("useEffect runs when count changes");
    }, [count]);

    return (
        <div>
            <h1>Count: {count}</h1>
            <div>
                <button onClick={increment}>Increase</button>
                <button onClick={decrement}>Decrease</button>
            </div>
        </div>
    );
}
The useReducer hook
The useReducer is commonly used in components that have a large number of states and multiple event handlers. It enables you to manage complex states within your application.
You should just use the useState hook when there are a few states within your components. Use the useReducer hook when you have a lot of states to manage.
The useReducer hook is divided into four parts: the state, the reducer function, the action, and the dispatch function.
The state is an object containing all states declared within the application.
The reducer function manipulates the state directly and returns a copy of the result, and the dispatch function triggers the reducer function when an event occurs.
The action is an object containing a type and a payload property.
The type property specifies the exact action to be executed by the reducer function, and the payload can accept data from the user or other parts of the application.
Let’s see how this works by re-creating the Counter component using the useReducer hook:
import { useReducer } from "react";
The useReducer hook accepts two arguments: the reducer function and the state object. It returns the states and the dispatch function.
const [state, dispatch] = useReducer(reducerFunction, {states});
From the Counter component, the useReducer hook accepts the reducer function and the counter’s initial state.
import {useReducer} from "react"
//👇🏻 declares the useReducer hook
 const [state, dispatch] = useReducer(reducer, { counter: 0 }));
After declaring the useReducer hook, you need to create the reducer function which handles the state manipulation.
//👇🏻 reducer function
 const reducer = (state, action) => {
  switch (action.type) {
   case "increase":
    return { counter: state.counter + 1 };
   case "decrease":
    return { counter: state.counter - 1 };
   default:
    return state;
  }
 };
The reducer function accepts a state and action parameter. The action object determines the action to be carried out by the reducer function.
Finally, we have the dispatch function that states the type of action and passes its value into the reducer function to enable it carry out the required task.
const increaseCounter = () => {
  dispatch({ type: "increase" });
 };

 const decreaseCounter = () => {
  dispatch({ type: "decrease" });
 };
You can also pass data into the reducer function via the dispatch. For example, you can increase the counter by 2 by passing the data as a payload via the dispatch function.
const increaseBy2 = () => {
  dispatch({type: "increaseBy2", payload: {number: 2}})
 }
Then, create its action within the reducer function as shown below:
const reducer = (state, action) => {
  switch (action.type) {
   case "increase":
    return { counter: state.counter + 1 };
   case "decrease":
    return { counter: state.counter - 1 };
   case "increaseBy2":
    return { counter: state.counter + action.payload.number };
   default:
    return state;
  }
 };
The useReducer hook is much more useful in components containing numerous states and various state modifications, because it enables you to write the code in a cleaner way.
Data Flow in React
Data flows from top to bottom in React, meaning you can only pass data from a parent to a child component. This is where props come in handy. But sometimes you may need to pass data from a child to a parent component. How do we achieve this?
You can accomplish this by lifting the state up. This involves moving the state from the child component to the parent component where the state is needed. Keep in mind, though, that this solution may not be effective because it might lead to prop drilling.
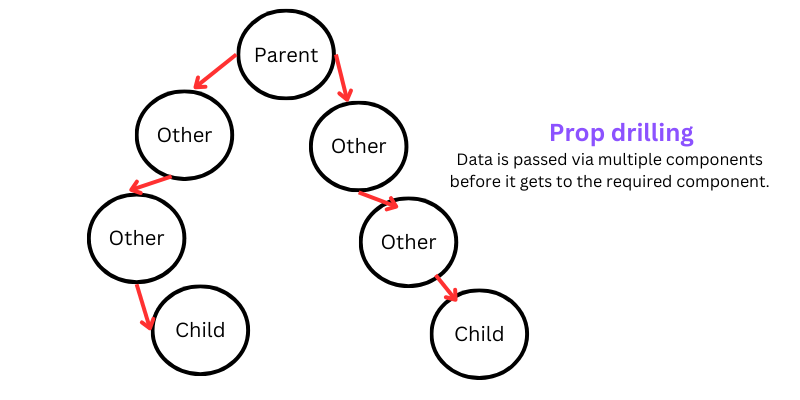
What is Prop Drilling?
Prop drilling occurs when the parent and child components are not directly linked, and you need to pass the data via multiple components before it reaches the child component that needs the data.
Let's consider an example: suppose we have an App component that renders various parts of the application. Then, a Products component displays the list of available products, and we need to show the total number of products within the Nav component at the top of the screen.
To solve this, you may need to move the products into the App component and pass them as props into all the child components until they reach the Nav and Product components. This process is called prop drilling. The product data will have to pass through components that do not require it.
State management libraries like Redux Toolkit, React Context API, and Zustand can help solve this problem. They enable you to create a store within your application that allows all the components to access the store independently without interacting with a parent component.
Any changes made to a state within the store reflect within all the required components. Feel free to research and learn about this topic more.

Wrapping Up
That’s all for this tutorial. I hope you found the discussion enlightening and are now better equipped to make informed decisions in your React journey.
If you're eager to dive deeper into React and expand your skills, I've got a treasure trove of resources right on my blog. From beginner-friendly tutorials to advanced tips and tricks, there's something for everyone looking to master this powerful library.
Don't miss out on my latest React tutorials:
- Understanding React Hooks: A Beginner's Guide - Read Here
- State Management in React: Redux vs Context API - Read Here
- How to Use and Validate Forms in React - Read Here
If you want to learn React according to industry standards, here is where I’ve shared my experience: Best Practices for Keeping a React Project Clean and Efficient.
You can get in touch if you have any questions or corrections. I’m expecting them.
And if you found this tutorial useful, please share it with your friends and colleagues who might benefit from it as well. Your support enables me to continue producing useful content for the tech community.
Now it’s time to take the next step by subscribing to my newsletter and following me on Twitter.
 A newsletter on Career, Business, Writing and Life advice for Engineers