
State management is a complex topic in mobile application development. But it's also a necessary topic that plays a major role in building dynamic mobile apps.
If you master state management, you'll be able to build any kind of dynamic application. This is because the UI that's being rendered on the mobile device will be determined by the state of the data that your app holds at that time. This is why it's critical to master state management in front-end application development.
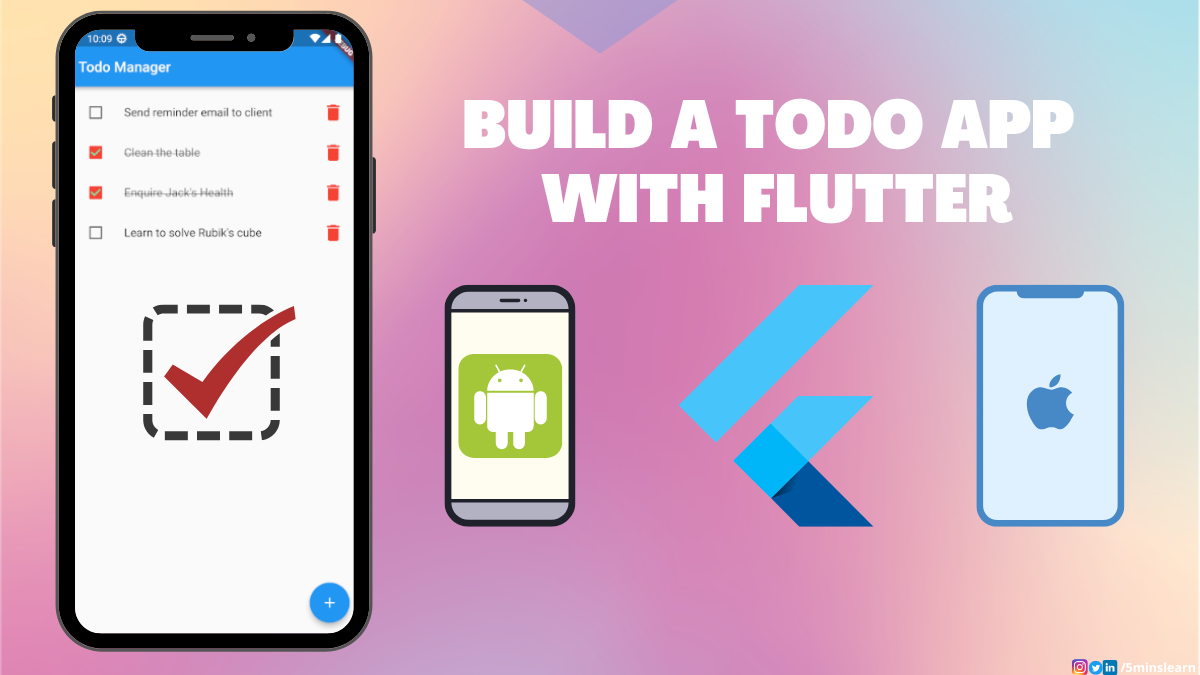
In this article, we'll learn state management by building a Todo app in Flutter.
First, let's look at some theory on state management before we dive into app development.
What is State in Flutter Apps?
State defines the user interface of your app. In other words, the user interface is built by the current state of the app.
When the state of a Flutter app changes, it'll trigger the re-draw of the user interface. This is called Declarative UI, which Flutter uses – whereas native mobile apps (Android & iOS) are built with Imperative UI, where the user interface is defined earlier.
Types of State
There are 2 types of state. They are:
- Ephemeral State
- App State
Ephemeral State
Ephemeral state is the state that is contained in a single widget or a screen/page of an app.
App State
App state is the state that is shared between user sessions and is used across many parts of the app.
How to Choose the State for Your App
There is no single rule as to which state to choose. It's depends on your use case. It's often a good idea to use Ephemeral state at first and then refactor your code in the future if you face any need to use App state.
What We'll Build
In this tutorial, we'll be building a Todo app. This app will have the functionality to create a todo item, list all the added items, update an item, and delete an item. Here's the sneak peak (screenshot) for you.
 Todo App
App Development
Let's put on our development shoes and start building our app.
Create the Project
Here are the super simple steps to create your Flutter project. If you want a detailed explanation, please read the "How to Create the Project" section in the blog and come back here.
- Open your VS Code
- Hit "CTRL+SHIFT+P" (Mac users replace CTRL with CMD)
- Type "Flutter"
- Select the "Flutter: New Project" option
- Select "Application" from the next list
- Select the folder to create your project in the next prompt
- On the final prompt, enter your app name and press "Enter"
That's it! Our boilerplate app is ready.
Select the preferred device to run your app on the bottom right and hit "F5". Your app will run on your selected device. You should see the following screen in a few seconds.
 Flutter Boilerplate App
Time to Refactor the Code
We have a Flutter boilerplate app. By default, it'll have a lot of items, so let's refactor our code. We'll be working on the main.dart file in the lib/ folder to build this entire app.
Initialize Git
Initialize Git by running git init in the root folder of your repo.
Remove comments
I've removed all the comments in the main.dart file and added a commit.
Rename Classes
Rename MyApp to TodoApp in the main method by pressing F2 in VS Code.
 Rename class name
On the first page, we'll be listing the created to-do items. Let's rename it from MyHomePage to TodoList.
 Rename
 MyHomePage to TodoList class
In the above screenshot, the title of the MaterialApp is set to "Flutter Demo" and the title passed in TodoList is set to "Flutter Demo Home Page". Let's change both of those to "Todo Manager".
How to Build the Todo App
Let's build the core functionality of our app.
We need a Todo class. This class will define the properties of a todo. In our case, we'll have the following items:
- Name of the todo
- Status of the todo (Backlog / Completed)
Let's define a Todo class with the above properties:
class Todo {
  Todo({required this.name, required this.completed});
  String name;
  bool completed;
}
Add the above code at the bottom of the main.dart file.
How to Add a Todo
Look at your code for a class named _TodoListState. In the body of the build method, set the children property to an empty array. Refer to the below screenshot:
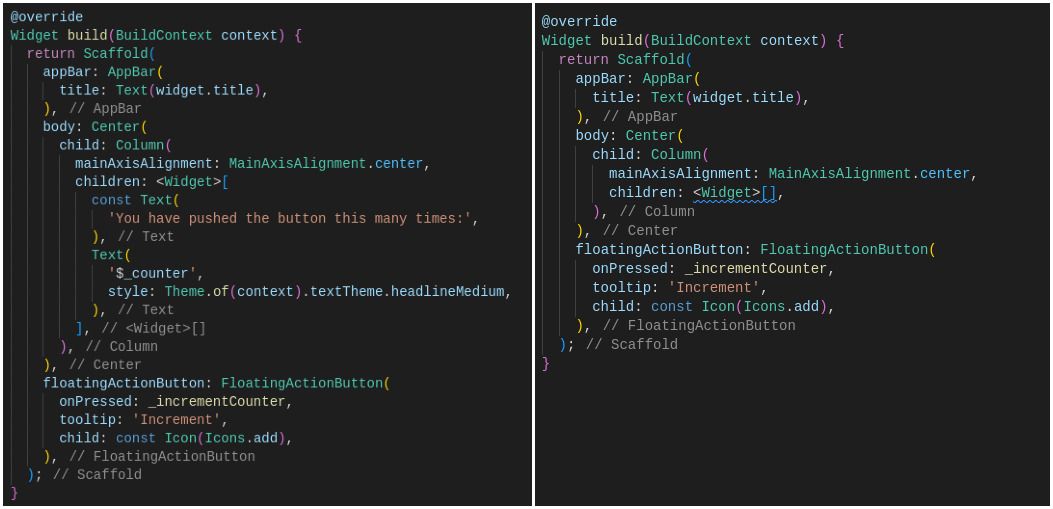 Before and After removing the
 Text widgets
Remove the two Text widgets inside that children property.
Now we'll replace the counter variable with a todo list.
int _counter = 0;
Replace the above line with the following code. The first line is the todo list and the second line defines the controller to get the name of the todo from the user:
final List<Todo> _todos = <Todo>[];
final TextEditingController _textFieldController = TextEditingController();
Remove the _incrementCounter method and add the method to add a todo:
void _addTodoItem(String name) {
    setState(() {
      _todos.add(Todo(name: name, completed: false));
    });
    _textFieldController.clear();
}
So far we have defined our todo list and an input controller. We've also created a method that accepts input text and adds that to the todo list with a completed status set to false and a clear input field.
The reason we have used the setState method is to refresh the UI after we update the todo list. As our component is a stateful widget, whenever a change in state is detected, the UI will render again with the updated state.
We have built the functionality code to add a todo. Let's build the UI code. Let's ask the user the name of the todo on pressing the Floating action button at the bottom right. When the user tries to save the todo, we'll call the _addTodoItem method defined above.
floatingActionButton: FloatingActionButton(
    onPressed: () => _displayDialog(),
    tooltip: 'Add a Todo',
    child: const Icon(Icons.add),
),
 Before and After of Floating Action Button code
In the above method, we have changed the onPressed property to call the _displayDialog method. As it's not defined yet, it'll show an error. We'll define the method next. We have also changed the tooltip property to "Add a Todo".
Here's the code (_displayDialog method) to show a dialog box with an input field, add, and cancel button. Add this method inside the _TodoListState class:
Future<void> _displayDialog() async {
    return showDialog<void>(
      context: context,
      T: false,
      builder: (BuildContext context) {
        return AlertDialog(
          title: const Text('Add a todo'),
          content: TextField(
            controller: _textFieldController,
            decoration: const InputDecoration(hintText: 'Type your todo'),
            autofocus: true,
          ),
          actions: <Widget>[
            OutlinedButton(
              style: OutlinedButton.styleFrom(
                shape: RoundedRectangleBorder(
                  borderRadius: BorderRadius.circular(12),
                ),
              ),
              onPressed: () {
                Navigator.of(context).pop();
              },
              child: const Text('Cancel'),
            ),
            ElevatedButton(
              style: ElevatedButton.styleFrom(
                shape: RoundedRectangleBorder(
                  borderRadius: BorderRadius.circular(12),
                ),
              ),
              onPressed: () {
                Navigator.of(context).pop();
                _addTodoItem(_textFieldController.text);
              },
              child: const Text('Add'),
            ),
          ],
        );
      },
    );
  }
Let's understand this huge piece of code.
The Future class is used for asynchronous computation.
Quoting from the documentation,
"An asynchronous computation may need to wait for something external to the program (reading a file, querying a database, fetching a web page) which takes time. Instead of blocking all computation until the result is available, the asynchronous computation immediately returns a
Futurewhich will eventually 'complete' with the result. "
In our case, it'll wait for the user to tap the Add or Cancel button.
The _displayDialog method will return the showDialog method by building the UI.
The barrierDismissible property is used to define if the pop up has to be closed if the user taps outside of the alert dialog. We have set that to false which means the alert dialog will not be closed on taping outside.
The builder of this showDialog method returns an AlertDialog consisting of title, content, and actions property. The title is set to display the text "Add a todo". The content property will render an text input field with automatic focus enabled and the hint "Type your todo".
The actions property will render 2 buttons, Cancel and Add. The Cancel button is an outlined button, and pressing it will close the dialog. The Add button adds the text to the todo list and closes the dialog.
Let's test our app. Click on the floating action button and you should see the UI similar to the one below:
 Add Todo UI
If you try to add a todo, it'll be added to our todo list. But, you'll not be able to see any change on the UI.
How to List the Todos
We have added the code to add todos to the list. But wait – how can we verify that? We have to find if the todo has actually been added to the list.
Let's verify that by rendering the list of todo items in the UI. To do so, we have to design the UI for a single todo. Let's do that.
Add the following code at the end of main.dart file:
class TodoItem extends StatelessWidget {
  TodoItem({required this.todo}) : super(key: ObjectKey(todo));

  final Todo todo;

  TextStyle? _getTextStyle(bool checked) {
    if (!checked) return null;

    return const TextStyle(
      color: Colors.black54,
      decoration: TextDecoration.lineThrough,
    );
  }

  @override
  Widget build(BuildContext context) {
    return ListTile(
      onTap: () {},
      leading: Checkbox(
        checkColor: Colors.greenAccent,
        activeColor: Colors.red,
        value: todo.completed,
        onChanged: (value) {},
      ),
      title: Row(children: <Widget>[
        Expanded(
          child: Text(todo.name, style: _getTextStyle(todo.completed)),
        ),
        IconButton(
          iconSize: 30,
          icon: const Icon(
            Icons.delete,
            color: Colors.red,
          ),
          alignment: Alignment.centerRight,
          onPressed: () {},
        ),
      ]),
    );
  }
}
Here's the brief explanation of the above code.
First, we created a class with the TodoItem and we extended it from the StatelessWidget class as we don't need to maintain state for this class.
We accept a Todo, which is passed via constructor to our class. The code in the build method determines the UI. It renders the ListTile widget with the Checkbox widget passed to the leading property.
The title property renders a row of Text and IconButton widgets. The Text widget shows the name of the todo and the IconButton widget displays the delete icon.
Notice the _getTextStyle method passed to the style property of the Text widget. This method strikes out the text if the todo is marked as complete. Nothing changes on tapping any of these widgets, as the corresponding properties are left empty (onTap, onChanged, and onPressed).
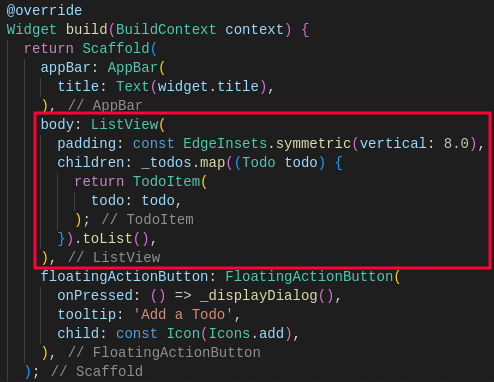
Change the body property of the build method in _TodoListState with the following code:
ListView(
    padding: const EdgeInsets.symmetric(vertical: 8.0),
    children: _todos.map((Todo todo) {
      return TodoItem(
        todo: todo,
      );
    }).toList(),
),
Here's the highlighted screenshot showing the changes on the build method of the _TodoListState class:
 Rendering the list of todo items
The above code defines a ListView widget iterating over the created todos and passing each todo to the TodoItem widget.
We're done with listing the todos. Let's verify if both creating and viewing a todo works fine.
 List of created todos
Cool! There are our todos.
But tapping on either the Checkbox or Delete button will have no effect.
I hope you can guess what we'll be doing next. Yes, we'll be adding the code to mark the todo as completed and delete a todo item.
How to Update a Todo
Let's mark the todo as complete on pressing the checkbox near each todo.
We have 2 fields in our Todo class. They're name and completed status. Whenever a Todo is created, the default value of the completed field is set to false. This means the todo is in progress. We can change that to true whenever we complete the task.
Define a method called _handleTodoChange in the _TodoListState class. Add this method below the _addTodoItem method which we defined to add a todo to the list.
void _handleTodoChange(Todo todo) {
  setState(() {
    todo.completed = !todo.completed;
  });
}
In the above code, we accept a todo and change the completed status of the todo. So, whenever this method is called with a todo, it's completed status will change from true to false or vice versa. Remember that we have wrapped this inside a setState method to render the UI after making the change.
We have to trigger this method when a user taps on a todo or taps on a checkbox. We should pass this method to the TodoItem class. While calling the TodoItem in the build method of the _TodoListState class, pass the _handleTodoChange method as shown below:
return TodoItem(
    todo: todo,
    onTodoChanged: _handleTodoChange,
);
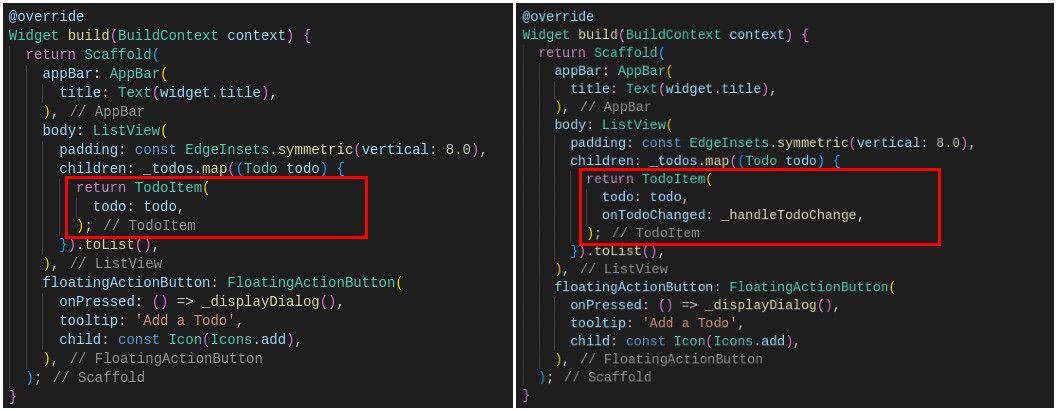 Before and After adding a method to change todo status
As we're passing the method to the TodoItem class, we should receive the same method in the TodoItem class. To do so, we have to define this method in the constructor of the TodoItem class. Go to TodoItem and change the constructor to include the onTodoChanged method.
TodoItem({required this.todo, required this.onTodoChanged})
      : super(key: ObjectKey(todo));
You may notice in the above code that we use **this**.onTodoChanged, which means we're binding the method passed to a method in this TodoItem class.
Let's define a method with the same name and set the return type to void (as we don't expect anything from that method).
final void Function(Todo todo) onTodoChanged;
So, wherever we call this method in our code, the status of our todo will be changed to the opposite. Let's call this method in the onTap property of the ListTile widget and onChanged property of the Checkbox widget.
onTap: () {
    onTodoChanged(todo);
},
 Call
Call onTodoChanged method on tapping the todo or checkbox
That's it. We're done. Let's run our app and verify if we're able to complete the todo.
 Mark todo as complete
That's awesome right? We're able to mark the todo as complete and revert back.
How to Delete a Todo
We have only one item left to complete this app. We should be able to delete a todo, if we create one by mistake or if it's no longer applicable.
Steps to delete a todo are similar to updating a todo. We'll doing the exact 4 steps as we did for updating a todo.
- Define the
_deleteTodomethod - Pass the method on
TodoItemrender - Receive the method on
TodoItemconstructor - Bind the method
- Call the method on button tap
I would recommend that you try this by yourself as we'll be repeating the steps we did earlier. After you're done, you can verify your implementation by cross checking with my steps.
Here's the method to delete the todo. Add this in the _TodoListState class below the _handleTodoChange method:
void _deleteTodo(Todo todo) {
  setState(() {
    _todos.removeWhere((element) => element.name == todo.name);
  });
}
This method accepts a todo, compares it with the todo list, and identifies the todo which matches with this name. Then it deletes it from the list and finally updates the state.
Let's pass the method reference to TodoItem in the build method of the _TodoListState class.
return TodoItem(
  todo: todo,
  onTodoChanged: _handleTodoChange,
  removeTodo: _deleteTodo);
Change the constructor to accept the removeTodo method.
  TodoItem(
      {required this.todo,
      required this.onTodoChanged,
      required this.removeTodo})
      : super(key: ObjectKey(todo));
Define a method with the same name and set the return type to void (as we don't expect anything from this method).
Our final step is to call this method on pressing the delete button.
IconButton(
  iconSize: 30,
  icon: const Icon(
    Icons.delete,
    color: Colors.red,
  ),
  alignment: Alignment.centerRight,
  onPressed: () {
    removeTodo(todo);
  },
),
That's it. I hope it's super simple. Let's test our app.
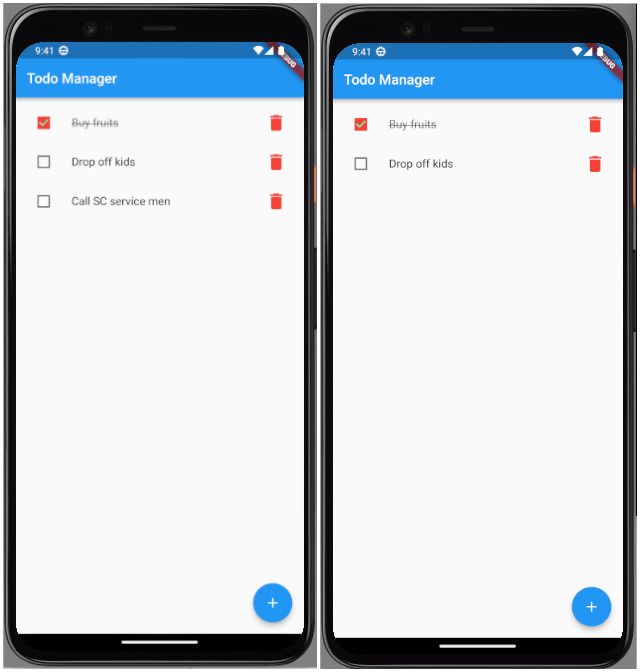 Last todo is deleted
Wow! It works.
In the above screenshot, you can see I created a todo with the name "Call SC service men" which should be created as "Call AC service men". So, that was a mistake. I don't want that todo now as it'll confuse me. I would rather create a new todo with the right spelling. So, I pressed the delete button which almost instantly deleted my todo.
Cool! We have built our own todo app.
Conclusion
In this article, you've learnt about state management in Flutter. Along with that, we've built a simple todo app in Flutter implementing CRUD functionality.
CRUD stands for Create, Read, Update, and Delete. We created a todo, listed it on the UI, updated its status, and finally deleted it.
This repo has my code. You can use it for your reference.
Here are few exercise to challenge yourself. Try to extend this app by adding the following functionalities.
- Show a message saying "No todo exists. Please create one and track your work", if no todo was created.
- I know about a bug in this app. I hope you don't know – so I'm revealing it here. But you have to fix it. Create two todos with same name and try to delete one. You'll be amazed to see both of them deleted together. Here's a tip for you to fix. Assign a random id for each todo and while deleting, filter the todo by id.
- Add functionality to edit the name of a todo
- This app was completely built on Ephemeral state. So, if you close and open the app again, your old todo items will not be there. Add a functionality to store the todo in the device storage. Show the todos to the user when they reopen the app by reading them from your device storage.
To learn more about Flutter, subscribe to my email newsletter on my site (https://5minslearn.gogosoon.com) and follow me on social media.