
By Per Harald Borgen
This article will teach you the bare minimum you need to know in order to start creating apps on top of the Dropbox API.
Once you’ve read it, you can also check out our free course on the Dropbox API if you’re interested in learning more. In that course, you’ll learn how to build an expense organizer app using modern JavaScript.
 _Click here to get to the course_
This article uses JavaScript for its examples, however, the SDKs are very similar across languages, so even if you’re for example a Python developer, it should still be relevant.
The setup
In order to build on top of Dropbox, you first need a Dropbox account. After you’ve registered, head over to the developer section. Choose My apps on the lefthand side of the dashboard and click Create app.
Choose the following settings, and give your app a unique name.
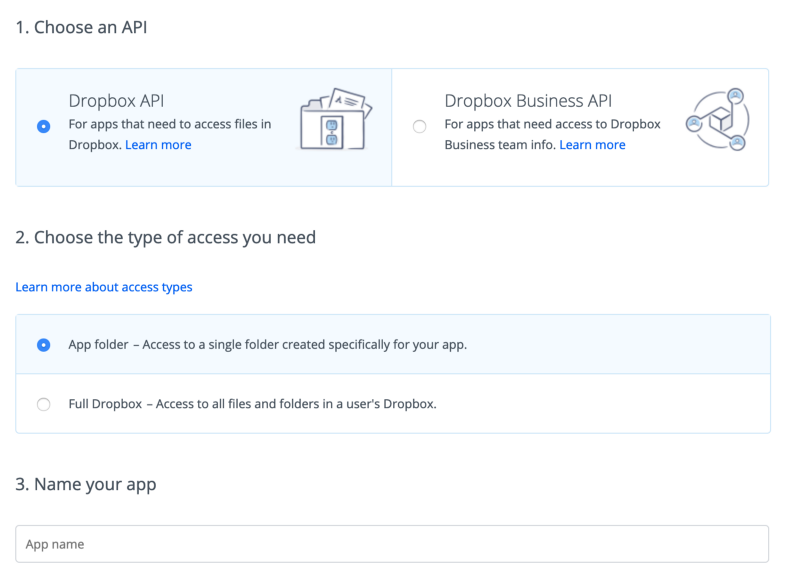
Preferred settings for this tutorial
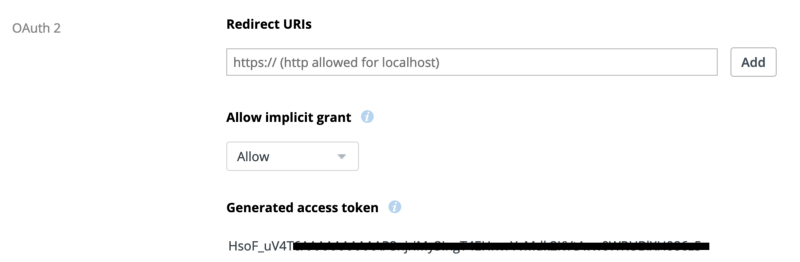
In the dashboard, go to OAuth 2 section under Generated access token and click the Generate button to get an API accessToken, which we will save for later.
Now, let’s install the Dropbox desktop app. Log in to the app with your new developer credentials and you should be able to see a folder with the same name as your newly created app. In my case, it’s LearnDbxIn5Minutes.
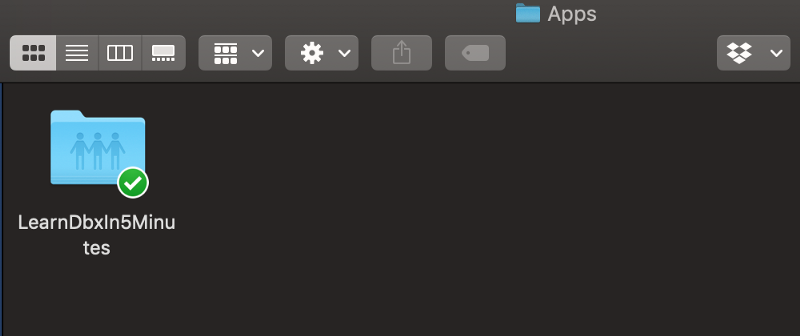
Drop some files and images into the folder, so we can access them via our API.
Installation and initial Dropbox class
Now let’s install Dropbox library to our project.
npm install dropbox
or
yarn add dropbox
Import Dropbox and create dbx with our token and fetching library passed into our class instantiation. If you prefer axios or any other fetching library, feel free to pass it instead.
import { Dropbox } from 'dropbox';

const accessToken = '<your-token-from-dashboard>';

const dbx = new Dropbox({
  accessToken,
  fetch
});
Note that Dropbox is a named import. The reason is that there are other sub-libraries within 'dropbox', for example, DropboxTeam, but we will focus only on Dropbox in this tutorial.
Getting files
The first method we’re going to look at is for getting files.
dbx.filesListFolder({
  path: ''
}).then(response => console.log(response))
filesListFolder() takes a path to the target folder and lists all the files inside. This method returns a promise.
Also, it’s worth keeping in mind that you’ll provide an empty string '' and not a slash'/' in order to get to the root of our app. Now the root is the root of our application folder and not that of the Dropbox account. We can always change that option in the settings of our app.
When we run our code, the console should log the entries of our Dropbox folder:

Getting more files
In this part, we’re going to look at loading further files, with potential for implementing pagination or an infinite scroll feature.
For this purpose, Dropbox has got a concept of a cursor, which indicates our current position between the files that we’ve received and the ones that need to be sent.
For example, we have a folder with 10 files, and we requested 5. The cursor will let us know that there are more files to download via has-more: true property on the response. We can continue requesting files using filesListFolderContinue() passing in cursor until there are no more files left and we get has_more: false.
const getFiles = async () => {
  const response = await dbx.filesListFolder({
    path: '',
    limit: 5
  })

console.log(response)
}

getFiles()
When we examine the response we got in the console we can see has_more: true.
![]()
Let’s update our code to handle cases when we’ve got more files to receive.
const getFiles = async () => {
  const response = await dbx.filesListFolder({
    path: '',
    limit: 5
  })

// We can perform a custom action with received files
  processFiles(response.entries)

if (response.has_more) {
    // provide a callback for the newly received entries
    // to be processed
    getMoreFiles(response.cursor, more => processFiles(more.entries))
  }
}

getFiles()
We provide the cursor to let the API know the entries that we’ve received, so we won’t receive the same files again.
const getMoreFiles = async (cursor, callback) => {
  // request further files from where the previous call finished
  const response = await dbx.filesListFolderContinue({ cursor })

// if a callback is provided we call it
  if (callback) callback(response)

if (response.has_more) {
    // if there are more files, call getMoreFiles recursively,
    // providing the same callback.
    await getMoreFiles(response.cursor, callback)
  }
}
Note the callback we are providing to getMoreFiles() function. It’s a really neat trick to make sure that our newly received files get the same treatment as their predecessors.
In the end, when there are no more files to get, we receive has_more: false

It’s also worth mentioning that the recursive call is implemented here for simplicity of the tutorial, rather than for the performance of the function. If you have large amounts of data to load, please refactor this out into a more performant function.
Getting thumbnails
The third method we’re going to study is for getting thumbnails for our files.
In order to request thumbnails for the uploaded files, we can call filesGetThumbnailBatch().
dbx.filesGetThumbnailBatch({
  entries: [{
    path: '',
    size: 'w32h32',
    format: 'png',
  }]
});
This endpoint is optimized for getting multiple thumbnails and it accepts an array of objects, where each object can have multiple properties specified.
The essential property is path, which holds the same caveats as in filesListFolder().
In our response, we can access our images via the thumbnail properties.

You can see that the thumbnails are not returned as links, but as really really long strings — this is a base64 image. You could use the string in your HTML to set src of <img> to "data:image/jpeg;base64, ${file.thumbnail}".
And if I render my response, I would get these amazing cats!


Image credits: Max Pixel (1, 2, 3)
Moving files
Lastly, we’re going to cover moving our files from one folder to another.
We can use filesMoveBatchV2() for moving our files in batches from one folder to another. This method works best when implemented as a part of an async function.
The method accepts entries array of objects, that consist of from_path and to_path properties.
filesMoveBatchV2() returns either success if the call was immediately successful, in case there are only a few files to process. However, for bigger workloads, it’s going to return an object with a property async_job_id, and that means that your call is being executed and we will need to check up on it at a later stage.
We can use filesMoveBatchCheckV2() to keep checking for completion of our job until it’s complete and is not in_progress any more.
const entries = {
  from_path: 'origin_folder',
  to_path: 'destination_folder
}

const moveFiles = async () => {
  let response = await dbx.filesMoveBatchV2({ entries })
  const { async_job_id } = response
  if (async_job_id) {
    do {
      response = await dbx.filesMoveBatchCheckV2({ async_job_id })
      // This where we perform state update or any other action.
      console.log(res)
    } while (response['.tag'] === 'in_progress')
  }
}
Wrap up
Congratulations! You now have a very basic understanding of Dropbox API and its JavaScript SDK.
If you want to learn more about the Dropbox API and build an app on top of it with Vanilla JavaScript, be sure to check out our free course on Scrimba. It has, along with this post, been sponsored and paid for by Dropbox. This sponsorship helps Scrimba keep the lights on and it enables us to continue creating free content for our community throughout 2019. So a big thanks to Dropbox for that!
Happy coding :)