
By Ian Wilson
Today in web development, we will be learning how to:
- Easily setup a GraphQL Server with NodeJS
- Mock data without a database using json-server
- Build a CRUD app that speaks GraphQL
- How Apollo saves us a lot of time and effort
If any of these items interest you, read on! Be sure to check out the source code for this repo if you would like to refer to the completed example.
Gentle Introduction
A couple years ago, I spun up my first Node HTTP server with Express. It took only 6 lines of code on my end.
const express = require('express')
const app = express()

app.get('/', function(req, res) {
  res.send({ hello: 'there' })
})

app.listen(3000, () => 'Listening at http://localhost:3000')
This reduced the necessary effort for building server side apps greatly, especially considering we could use our familiar JavaScript.
The floodgates were opened for countless tutorials and videos on setting up a Node server, usually for building some sort of CRUD REST API in record time.
CRUD refers to an app, server, or backend that can create, read, update, and delete — perhaps from a real database.
But this is 2018, we can do much cooler things.
Let’s replace REST with GraphQL.
Enter GraphQL
GraphQL is a declarative data fetch and manipulation layer that makes consuming APIs more client friendly.
Some benefits of consuming data via a GraphQL server are:
- You get exactly the data you are requesting by specifying the fields you need.
- Fewer requests and less over-fetching. GraphQL queries are usually specific enough to avoid grabbing unnecessary records or fields.
- Strongly typed schemas, as opposed to raw JSON fields that have no opinion on the type of data being returned.
- GraphQL playground for data exploration that comes with autocomplete and built-in documentation. If you like working with Postman, you would be right at home with this interface.
That last point in particular makes on-boarding new developers much easier.
They no longer have to study your hundreds of endpoints on swagger, because they can explore the types and relations between them in this interface.
More on this soon, let’s get to coding.
Getting Started and Installing Dependencies
Let us start by creating a directory and initializing a package.json file.
mkdir social-graphql && cd social-graphql && npm init -y
Our tech stack will look like this:
- JavaScript running with Node (no client side code today)
- Babel for writing modern ES6
- Express for quickly setting up an HTTP server
- Apollo Server for all of the useful GraphQL utilities that help us set up the server and build schemas
- json-server for testing on a fake dataset (much easier than querying a real database)
npm install -S express apollo-server-express graphql json-server axios
In addition, we’ll have some dev dependencies that’ll assist us.
npm install -D babel-cli babel-preset-env nodemon npm-run-all
With the dependencies out of the way, we can get into coding.
Starting with a basic HTTP server
Let’s create an HTTP server that handles the index route. That is, if I run the server and navigate to http://localhost:3500 I should see the JSON message, as opposed to ‘Cannot GET “/”’.
Create an index.js file:
import express from 'express'

const PORT = process.env.PORT || 3500
const app = express()

app.get('/', function(req, res) {
  res.send({ hello: 'there!' })
})

app.listen(PORT, () => `Listening at http://localhost:${PORT}`)
This is very similar to the code at the beginning of the article, with the exception of the import syntax and the port being configurable through environment variables.
To get the import syntax working here, we’ll need to take advantage of our babel preset. Create a file called .babelrc and:
{
  "presets": ["env"]
}
Finally, to run the server, update the start script in package.json to this:
"scripts": {
  "dev:api": "nodemon --exec 'babel-node index.js'"
}
And then enter npm run dev:api in your terminal. By navigating to http://localhost:3500 you will be able to see a response that says “hello: there!”.
Unlike the more typical node index.js in an npm start script, we are using a dev command along with nodemon executing babel-node.
Nodemon restarts your dev server whenever you save files so that you don’t have to. Usually it executes with node, but we are telling it to execute with babel-node so it handles our fancy ES6 imports.
Upgrading to Apollo
Alright, we have put together a basic HTTP server that can serve REST endpoints. Let us update it in order to serve GraphQL.
import express from 'express'
import { ApolloServer } from 'apollo-server-express'
import { resolvers, typeDefs } from './schema'

const PORT = process.env.PORT || 3500
const app = express()

const server = new ApolloServer({
  typeDefs,
  resolvers,
  playground: true
})

server.applyMiddleware({ app })

app.get('/', (req, res) => {
  res.send({ hello: 'there!' })
})

app.listen(PORT, () =>
  console.log(`Listening at http://localhost:${PORT}/graphql`)
)
Then, inside a new file that I will call schema.js, insert:
import { gql } from 'apollo-server-express'

export const typeDefs = gql`
  type Query {
    users: String
  }
`

export const resolvers = {
  Query: {
    users() {
      return "This will soon return users!"
    }
  }
}
The Resolvers and Schema (type definitions)
Here, if you are new to working with GraphQL, you’ll see this funny syntax we’re assigning to typeDefs.
In ES6 JavaScript, we can invoke a function using backticks as we are with gql. In terms of vanilla JavaScript, you can read it like this:
gql.apply(null, ["type Query {\n users: String \n }"])
Essentially, it calls gql with an array of arguments. It just so happens that writing multiline strings is convenient when expressing a JSON-like query.
If you are still running the server, head over to http://localhost:3500/graphql. Here you’ll be able to see a fantastic interface for testing our queries.
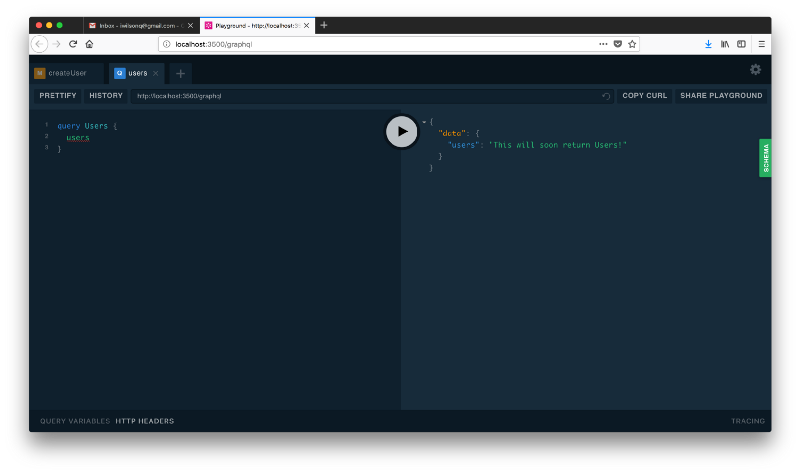
That’s right, no more tossing cURLs at an obscure endpoint, we can test our queries with autocomplete, prettifying, and built-in documentation. It’s also out-of-the-box with Apollo, so you don’t need to install additional packages or apps.
Now, let’s make this query a little bit more interesting.
Implementing a Real-World GraphQL Query: List Users
Before diving too deeply into this section, be sure to copy db.json from this repository into your working directory alongside index.js and schema.js.
Then, update the scripts in package.json:
"scripts": {
  "dev": "npm-run-all --parallel dev:*",
  "dev:api": "nodemon --exec 'babel-node index.js' --ignore db.json",
  "dev:json": "json-server --watch db.json"
}
Re-run the server with npm run dev and press on.
In a GraphQL server, there is a concept of the root query. This query type is the entry point for any data fetch requests to our GraphQL schema. For us, it looks like this:
type Query {
  users: String
}
If we are serving users, posts, or airplanes, the client that is requesting data must do it by going through the root query.
type Query {
  users: [User] # here the "[]"s mean these are returning lists
  posts: [Post]
  airplanes: [Airplane]
}
For instance, if we wanted to define a new query on our server, we would have to update at least two places.
- Add the query under the Query type within our type definitions.
- Add a resolver function under the Query object in our resolvers object.
We would then need to make sure we have the correct type of the return data. For a lists of users, that means returning an array of objects, each with a name, email, age, friends, and ID.
Our current schema has our users query returning a simple string. This is no good, as we expect user data to come back from this route.
Update schema.js as follows:
export const typeDefs = gql`
  type User {
    id: ID
    name: String
    age: Int
    email: String
    friends: [User]
  }

  type Query {
    users: [User]
  }
`
Great, we have the user type, and the root query that returns some list of users.
Let us update the resolver:
export const resolvers = {
  Query: {
    users() {
      return userModel.list()
    }
  }
}
Inside of our resolver, we call list from the userModel, which we have yet to define.
Inside a new file called models.js, add the following:
import axios from 'axios'

class User {
  constructor() {
    this.api = axios.create({
      baseURL: 'http://localhost:3000' // json-server endpoint
    })
  }

  list() {
    return this.api.get('/users').then(res => res.data)
  }
}

export default new User()
This class forms an abstraction layer over the logic that directly handles our data.
Finally, at the top of schema.js, add this import:
import userModel from './models'
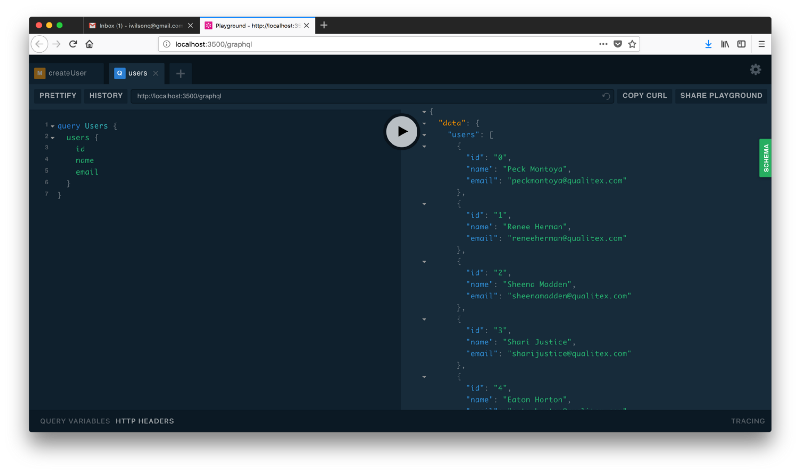
Back to http://localhost:3500/graphql, paste and run this query:
query Users {
  users {
    id
    name
    email
  }
}
The user query now looks a little more exciting! For each user in our db.json file, we have returned their id, name, and email.
Since we are using json-server hosted on a local port, we use the model as if it were retrieving data from a remote API.
In many cases, our model would be making database calls or retrieving data from a key-value store like firebase.
However, from the perspective of a client, they have no idea how the model is retrieving the data — they only know about the shape of the data.
This abstraction makes GraphQL an ideal tool for resolving data from multiple sources into a single query.
Friends of Friends: A More Intense Query
Getting a list of users is neat, and so is the GraphQL playground. But so far, you could easily do the same work with a REST endpoint.
What if you wanted to retrieve the users, as well as all of the friends for a particular user? We want to run a query like this:
query UsersAndFriends {
  users {
    id
    name
    friends {
      id
      name
    }
  }
}
In order to do this, note the shape of data in our db.json file: each user has a friends field which is an array of objects keyed by ID.
Basically, we are going to make some sort of request for each ID that we find, for each user.
Does it sound like an intense computation?
It is, we would be executing a new query to our data store for every single friend of every single user we retrieve.
Implementing some sort of cache would help tremendously in reducing the amount of work done to complete the query — but let us not worry about optimizing it for now.
In models.js, and this find method to the User class:
class User {
  constructor() {
    this.api = axios.create({
      baseURL: 'http://localhost:3000' // json-server endpoint
    })
  }

  list() {
    return this.api.get('/users').then(res => res.data)
  }

  find(id) {
    return this.api.get(`/users/${id}`).then(res => res.data)
  }
}
Now we can use this method in a new User resolver. The difference in this resolver is that it gets used when it is trying to resolve connections to a particular type, friends here.
Otherwise, the query would not know how to resolve a list of Users when it sees friends.
export const resolvers = {
  Query: {
    users() {
      return userModel.list()
    }
  },
  User: {
    friends(source) {
      if (!source.friends || !source.friends.length) {
        return
      }

      return Promise.all(
        source.friends.map(({ id }) => userModel.find(id))
      )
    }
  },
}
In the friends method, source is the parent value that the resolver function gets called with. That is, for the user with id 0, Peck Montoya, the value of source is the whole object with the list of friend ids.
For root queries, source is most often undefined, because the root query is not resolved from a particular source.
The friends method returns when all of the requests to find individual users have been resolved.
Now try running this query if you didn’t try earlier:
query UsersAndFriends {
  users {
    id
    name
    friends {
      id
      name
    }
  }
}
Mutations: Creating a User
So far we have just been getting data. What if we wanted to mutate data?
Let’s start by creating a user with a name and age.
Take a look at this mutation:
mutation CreateUser($name: String!, $email: String, $age: Int) {
  createUser(name: $name, email: $email, age: $age) {
    name
    email
    age
  }
}
Some differences at first glance:
- we denote this code with “mutation” rather than “query”
- we pass two sets of similar looking arguments
The arguments are basically type declarations for the variables expected by our query.
If there is a mismatch between those types and the ones passed by a client such as a web or mobile app, the GraphQL server will throw an error.
To get this query to work now, let us first update the User class in model.js:
create(data) {
  data.friends = data.friends
    ? data.friends.map(id => ({ id }))
    : []

  return this.api.post('/users', data).then(res => res.data)
}
When we fire off this request, json-server will append a new user with the data we passed up.
Now update schema.js to the following:
export const typeDefs = gql`

  # other types...

  type Mutation {
    createUser(name: String!, email: String, age: Int): User
  }
`

export const resolvers = {
  // other resolvers...
  Mutation: {
    createUser(source, args) {
      return userModel.create(args)
    }
  }
}
At this point, the query should work. But we can do a little better.
Simplifying Query & Mutation Arguments
Rather than write out every single argument for the mutation, we can define input types. This will make future mutations and queries we write more composable.
export const typeDefs = gql`

  # other types...

  input CreateUserInput {
    id: Int
    name: String
    age: Int
    email: String
    friends: [Int]
  }

  type Mutation {
    createUser(input: CreateUserInput!): User
  }
`

export const resolvers = {
  // other resolvers...
  Mutation: {
    createUser(source, args) {
      return userModel.create(args.input)
    }
  }
}
See that if we wanted to implement an UpdateUser mutation, we could probably take advantage of this new input type.
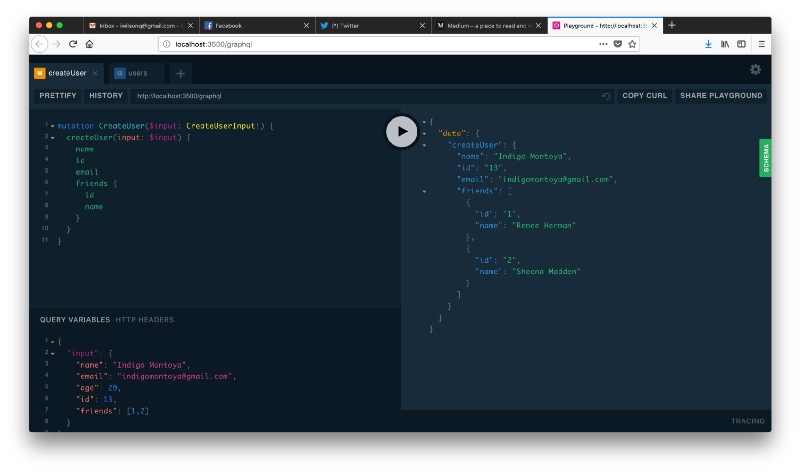
Now try out this mutation:
mutation CreateUser($input: CreateUserInput!) {
  createUser(input: $input) {
    name
    email
    age
    friends {
      id
      name
    }
  }
}
In order to populate the variables that go into the query, click and expand the tab labeled “Query Variables“ in the lower left of the GraphQL playground.
Then, input this JSON:
{
  "input": {
    "name": "Indigo Montoya",
    "email": "indigomontoya@gmail.com",
    "age": 29,
    "id": 13,
    "friends": [1,2]
  }
}
Assuming all went well, you should see a response with the user we just created. You should also see the two users with ids 1 and 2.
Now our create method isn’t totally complete — the friends of our newly created user have no idea that our new user is their friends.
In order to create a user with references to their friends, we would need to update the friends list of the users who were referenced as well.
I will opt to leave that as an exercise to the reader if they are so inclined.
Connecting the Dots (Wrapping Up)
Be sure to check out the source code for this repo if you would like to see how I implemented the deleteUser and updateUser mutations.
Using GraphQL with Apollo in my own projects has been a blast. I can honestly say its just more fun to develop GraphQL schemas and resolvers than it is to implement HTTP route handlers.
If you’d like to learn more about GraphQL, check out these publications on Medium:
If you enjoyed this article and would like to see more in the future, let me know in the comments and give me a follow on Twitter and Medium!