By Sai Balaji K
Hello everyone! In this article we are going to learn how to use UISearchController in iOS Apps.
What are we going to build?
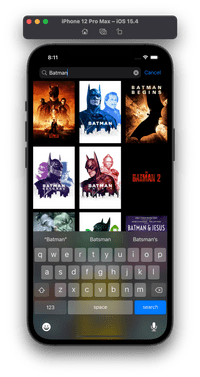
We are going to build a movie search application which uses the TMDB API to fetch movie info and display it using a UICollectionView based on a user's search query.
Project Setup
Open up Xcode and create a new blank iOS App project – make sure you select UIKit and not SwiftUI.
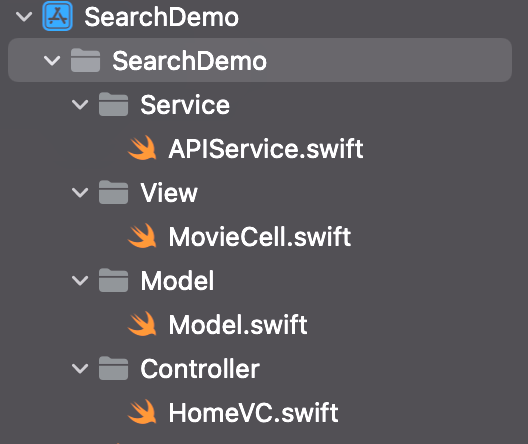
In this app we are going to use the MVC Pattern so organise the project by creating the following groups and Swift files:
Now close your Xcode project. Open up the terminal and move to your project directory. Here we need to add SD WebImage Cocoa Pods to asynchronously download and cache the movie poster images.
Type the following command in the terminal:
pod init
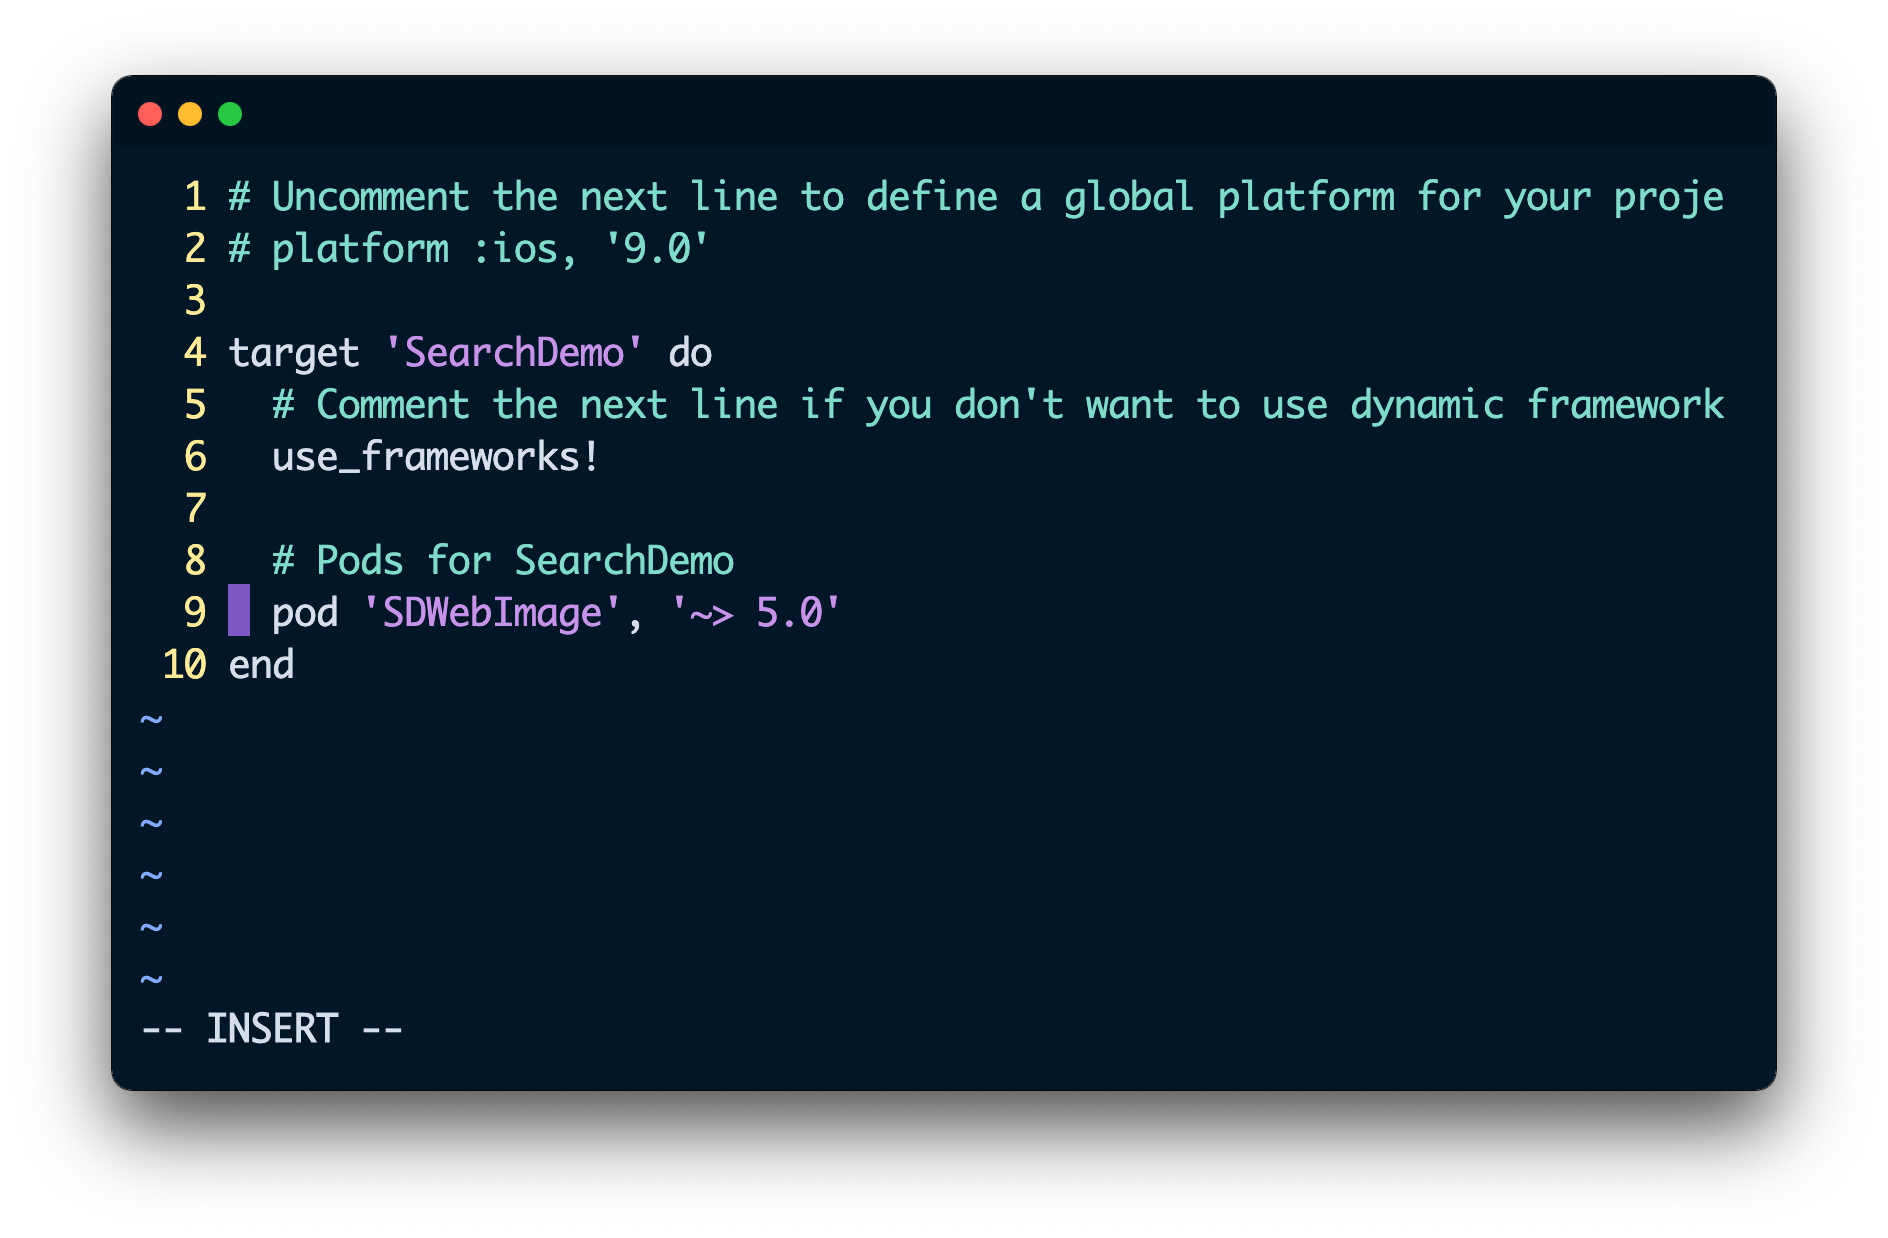
Now when you list the contents of the directory, you can see that there is a new Podfile. Open the file using any text editor (here I've used Vim). Edit your Podfile so that it looks similar to the below image. Save and close the Podfile.
Now that we have specified the SD WebImage, we can install the dependencies by running the below command:
pod install
As you can see, we have successfully added the SD WebImage pod in our iOS project. Now run the below command to open our project in Xcode.
open PROJECT_NAME.xcworkspace
After opening Xcode, make sure you build your project by hitting Command+B.
How to Design the User Interface using UIKit and Programmatic UI
Our app needs three UIElements navigation bars to hold the search bar, UISearchBarController for actual search, and a UICollectionView to display the search results.
Open up your Scenedelegate.swift file and add the following code inside it which will connect to the session method:
func scene(_ scene: UIScene, willConnectTo session: UISceneSession, options connectionOptions: UIScene.ConnectionOptions) {
        guard let scene = (scene as? UIWindowScene) else { return }
        window = UIWindow(windowScene: scene)       window?.rootViewController=UINavigationController(rootViewController:HomeVC())
        window?.makeKeyAndVisible()
    }
Since we are using a programatic UI, first we need to mention our Root View controller – that is, the first screen which will be displayed when the user launches the app.
Here in this app we're using only one View Controller, so we wrap it inside a UINavigationController. This provides a navigation bar where we can place our UISearchController.
Open up the HomeVC.swift file and add the following properties:
 private var SearchBar: UISearchController = {
        let sb = UISearchController()
        sb.searchBar.placeholder = "Enter the movie name"
        sb.searchBar.searchBarStyle = .minimal
        return sb
    }()

    private var MovieCollectionView: UICollectionView = {
        let layout = UICollectionViewFlowLayout()
        layout.scrollDirection = .vertical
        layout.itemSize = CGSize(width: UIScreen.main.bounds.width/3 - 10, height: 200)
        let cv = UICollectionView(frame: .zero, collectionViewLayout: layout)
        cv.register(MovieCell.self, forCellWithReuseIdentifier: MovieCell.ID)
        return cv
    }()
First we create our UISearchController and configure its properties such as placeholder text and style.
Then we create a UICollectionView and specify the type of layout our collection view should use. In this case it is UICollectionViewFlowLayout and other properties such as scroll direction, item size, and specifying a custom CollectionView cell class which we will create later in our project.
Inside the HomeVC class create a new function and add the following code to configure auto-layout constraints programmatically for our UICollectionView:
    //MARK: - HELPERS
    func configureUI(){
        MovieCollectionView.translatesAutoresizingMaskIntoConstraints = false
        MovieCollectionView.topAnchor.constraint(equalTo: view.topAnchor).isActive = true
        MovieCollectionView.bottomAnchor.constraint(equalTo: view.bottomAnchor).isActive = true
        MovieCollectionView.leftAnchor.constraint(equalTo: view.leftAnchor).isActive = true
        MovieCollectionView.rightAnchor.constraint(equalTo: view.rightAnchor).isActive = true
    }
First we say that we don't need to convert the auto resizing mask into the constraints. Then we pin our collection view to all four sides of our View Controller.
Inside the viewDidLoad() method add the following lines of code:
  override func viewDidLoad() {
        super.viewDidLoad()

        navigationItem.title  = "Movie Search"
        view.backgroundColor = .systemBackground
        SearchBar.searchResultsUpdater = self
        navigationItem.searchController = SearchBar
        view.addSubview(MovieCollectionView)
        MovieCollectionView.delegate = self
        MovieCollectionView.dataSource = self
        configureUI()
    }
Here we first specify the title for our ViewController followed by the background color which is the systemBackground color. If the device is in light mode it shows a white background. If it is in dark mode, then it shows a dark background.
Then we set current the view controller as the search result updater, then add our SearchController to the navigation bar, add the UICollectionView to the ViewController, and setup delegate and datasource. Finally we pin the UICollectionView by using auto-layout.
Create an extension for HomeVC and implement the UISearchResultsUpdating protocol and its stub method updateSearchResults.
extension HomeVC: UISearchResultsUpdating{

    func updateSearchResults(for searchController: UISearchController) {
        guard let query = searchController.searchBar.text else{return}

        }

    }


}
The updateSearchResults() method will be called whenever the text entered in the search bar changes or when the user taps the search button on their keyboard.
Next we need to create that custom UICollectionView cell. Inside the MovieCell.swift file, add the following code:
import Foundation
import UIKit
import SDWebImage

class MovieCell: UICollectionViewCell{

    static let ID = "MovieCell"
    private var MoviePosterImageView: UIImageView = {
        let imageView = UIImageView()
        imageView.contentMode = .scaleAspectFit
      //  imageView.image = UIImage(systemName: "house")
        return imageView
    }()

    override init(frame: CGRect) {
        super.init(frame: frame)
        addSubview(MoviePosterImageView)
        configureUI()
    }

    required init?(coder: NSCoder) {
        fatalError("init(coder:) has not been implemented")
    }

}

extension MovieCell{
    func configureUI(){
        MoviePosterImageView.translatesAutoresizingMaskIntoConstraints = false
        MoviePosterImageView.topAnchor.constraint(equalTo: topAnchor).isActive = true
        MoviePosterImageView.bottomAnchor.constraint(equalTo: bottomAnchor).isActive = true
        MoviePosterImageView.leftAnchor.constraint(equalTo: leftAnchor).isActive = true
        MoviePosterImageView.rightAnchor.constraint(equalTo: rightAnchor).isActive = true
    }
    func updateCell(posterURL: String?){
        if let posterURL = posterURL {
            guard let CompleteURL = URL(string: "https://image.tmdb.org/t/p/w500/\(posterURL)") else {return}
            self.MoviePosterImageView.sd_setImage(with: CompleteURL)
        }

    }
}
Here we create our custom collection view cell by sub-classing the UICollectionView class and implementing the init() functions.
We create a UIImageView to display the movie poster image and setup auto-layout constraints for it. Then we create a user defined function which takes the Movie poster URL string a parameter and downloads it asynchronously without affecting the UI Thread/Main thread. It does this by using the SD WebImage CocoaPod which we added earlier.
How to Set Up Our API
Before moving on, you'll need to get your API key for the TMDB API by creating an account (it's free). We are going to use the Movie Search end point of the API which takes the API Key and movie name as parameters.
https://api.themoviedb.org/3/search/movie?api_key=API_KEY_HERE&query=batman
You can examine the API response by running it in Postman.
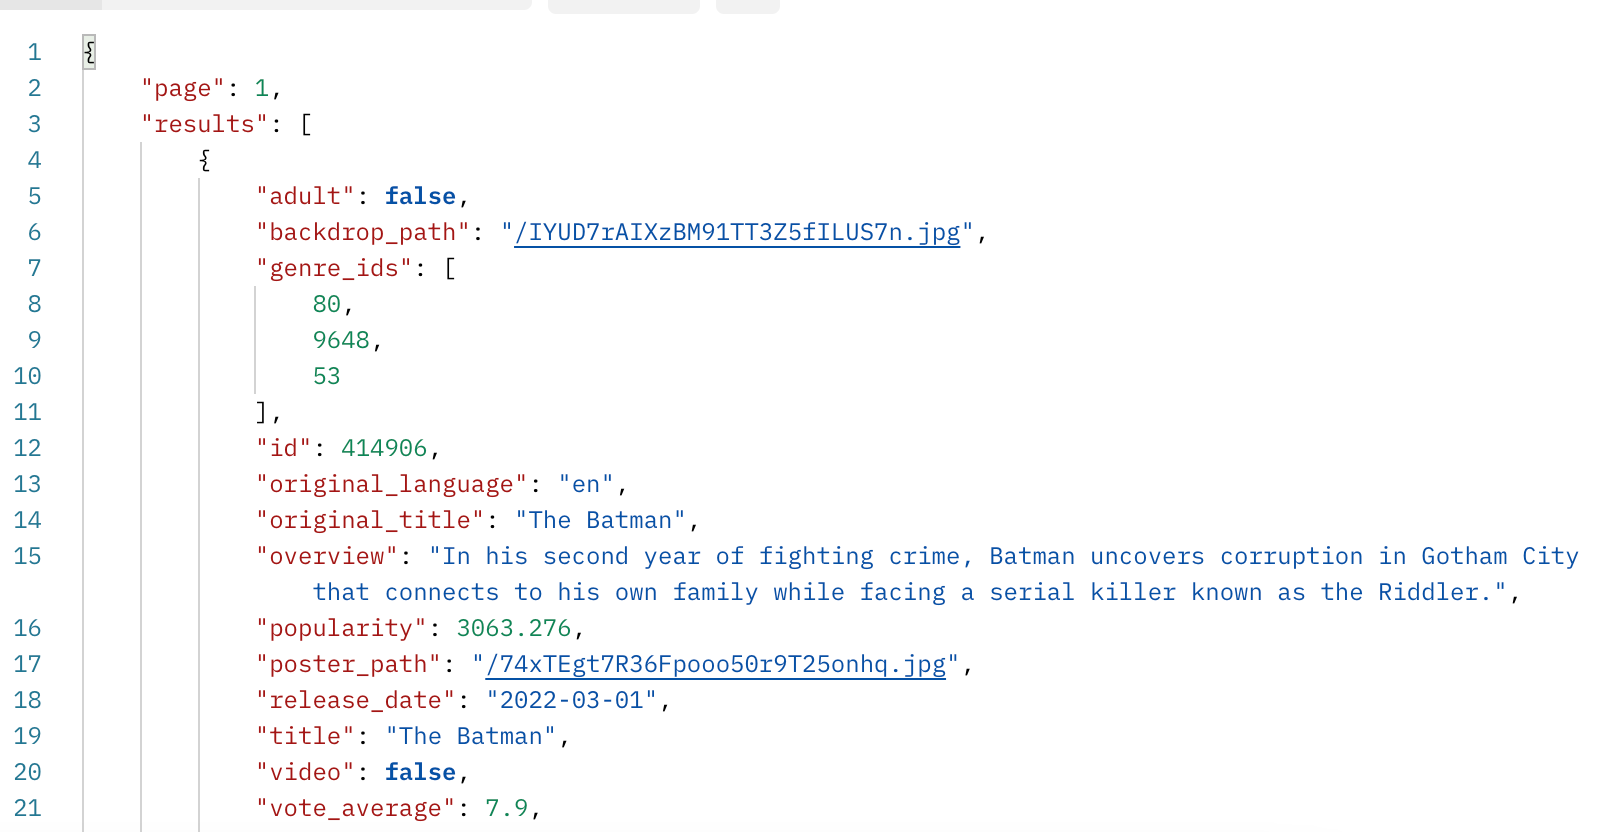
How to Create a Model for the API Response
Now we get a JSON response from the API. We need to decode them to Swift which we can do by creating a model struct that implements the Codable protocol.
WE can generate the model struct for our JSON response easily by using JSON to Swift websites. Here is the model code for the API response – you can just copy and paste it inside the Model.swift file:
import Foundation

struct TrendingTitleResponse: Codable {
    let results: [Title]
}

struct Title: Codable {
    let id: Int
    let media_type: String?
    let original_name: String?
    let original_title: String?
    let poster_path: String?
    let overview: String?
    let vote_count: Int
    let release_date: String?
    let vote_average: Double
}

struct YoutubeSearchResponse: Codable {
    let items: [VideoElement]
}


struct VideoElement: Codable {
    let id: IdVideoElement
}


struct IdVideoElement: Codable {
    let kind: String
    let videoId: String
}
How to Perform HTTP Requests Using Swift
Now we need to write some Swift code to perform HTTP GET requests which return the JSON response of the API.
Swift provides a URLSession class which makes it easier to write networking code without needing any third party libraries like AFNetworking, AlamoFire, and so on.
Open APIService.swift and add the following code:
import Foundation

class APIService{
    static var shared = APIService()
    let session = URLSession(configuration: .default)

    func getMovies(for Query: String,completion:@escaping([Title]?,Error?)->Void){
        guard let FormatedQuery = Query.addingPercentEncoding(withAllowedCharacters: .urlHostAllowed)  else{return}

        guard let  SEARCH_URL = URL(string: "https://api.themoviedb.org/3/search/movie?api_key=API_KEY_HERE&query=\(FormatedQuery)") else {print("INVALID")
            return}


        let task = session.dataTask(with: SEARCH_URL) { data, response, error in
            if let error = error {
                print(error.localizedDescription)
                completion(nil,error)
            }
            if let data = data {
                do{
                    let decodedData = try JSONDecoder().decode(TrendingTitleResponse.self, from: data)
                 //   print(decodedData)
                    completion(decodedData.results,nil)
                }
                catch{
                    print(error)
                }
            }
        }
        task.resume()
    }
}
Here we created a class named API Service with the singleton pattern so we need an instance for this class as a static member of the class. Then we created a session for our networking task with the default configuration, followed by a user defined method getMovies().
Then we created our networking task – in this case we need to perform HTTP GET requests which can be performed using the dataTask() method of the URLSession class. It takes the URL as a parameter and gives a completion handler which contains data returned from the API, error data if any error has occurred, and a response which has HTTP Response information such as status codes and their corresponding messages.
If there is any error, then we escape out of this function with error data. If not, then we decode our JSON data based on our Swift Model and escape out of this function with the decoded data.
How to Display the Search Results on the UICollectionView
In HomeVC.swift, create a private property which is an array of Title objects. These will hold each movie's info returned by the API.
private var Movies = [Title]()
In HomeVC.swift create an extension for the HomeVC class and implement the UIColletionViewDelegate and UICollectionViewDatasource protocols. Then implement numberOfItemsInSection (which is equal to the number of movies returned by the API) and cellForItemAt (which actually populates the cell with API responses, like download and set the poster image).
 func collectionView(_ collectionView: UICollectionView, numberOfItemsInSection section: Int) -> Int {
        return Movies.count
    }
    func collectionView(_ collectionView: UICollectionView, cellForItemAt indexPath: IndexPath) -> UICollectionViewCell {
        if let cell = collectionView.dequeueReusableCell(withReuseIdentifier: MovieCell.ID, for: indexPath) as? MovieCell{
           // cell.backgroundColor = .systemBackground

            cell.updateCell(posterURL: Movies[indexPath.row].poster_path)
            return cell
        }
        return UICollectionViewCell()

    }
Finally we need to make actual API call which we do inside the updateSearchResults() delegate method which we have implemented previously. Inside that method add the following code:
    func updateSearchResults(for searchController: UISearchController) {
        guard let query = searchController.searchBar.text else{return}
        APIService.shared.getMovies(for:query.trimmingCharacters(in: .whitespaces)) { titles, error in
            if let titles = titles {
                self.Movies = titles
                DispatchQueue.main.async {
                    self.MovieCollectionView.reloadData()
                }

            }
        }

    }
Here, whenever the user types in the search bar or presses the search button, we make an HTTP GET request to fetch a movie (based on the name entered in the search bar). Then we reload the CollectionView which updates the collection view cells with the movie poster.
Note that we need to do this in the Main Thread/UI Thread, because by default iOS automatically makes HTTP request in background thread. This means that we need to use UI/Main Thread to update our UI elements.
Now run your app in the simulator to see the result:
Congratulations! You have learned to use UISearchController in iOS apps.