By Kalalau Cantrell
Using webpack 4 and dynamic imports
 A tasty split
This article is part of an episodic guide for learning Webpack through various examples. If you need a refresher on what loaders and plugins are as far as Webpack goes, or what a basic webpack.config.js file looks like, check out this article I wrote that focuses on those basics.
If you are like I was, you have heard the term code-splitting before and have read some about it. But perhaps you kept running into posts about how to do it with this or that framework, rather than explanations of what is it for, and a basic example showing that purpose.
Although I highly value frameworks and the speed and structure they bring to coding, especially within teams, I also value understanding programming concepts as deeply as is practically possible.
This often means that if I’m trying to learn a new concept, I will try to decompose that concept into smaller sub-concepts and then study each in isolation before integrating them all together.
To use a non-programming example, if wanted to learn how to longboard, I’d want to focus heavily on just keeping my balance while standing on the longboard before I worry about going fast, doing tricks, or customizing my longboard setup.
So, to learn about code-splitting, I decided that I wanted to make as small and easy of an app as possible, which for me meant no frameworks and nothing fancy.
App overview
I want to share the little app that I made to help me explore code-splitting with Webpack. My hope is that it may help you better understand the topic as well. All we’re going to do is make the single page app depicted in the below gif.
 A tasty route
If you want to follow along in your code editor, check out the code in the code-split branch of this repo. Once you install the packages, npm start will run a development server for you if you want to see the code-splitting in action.
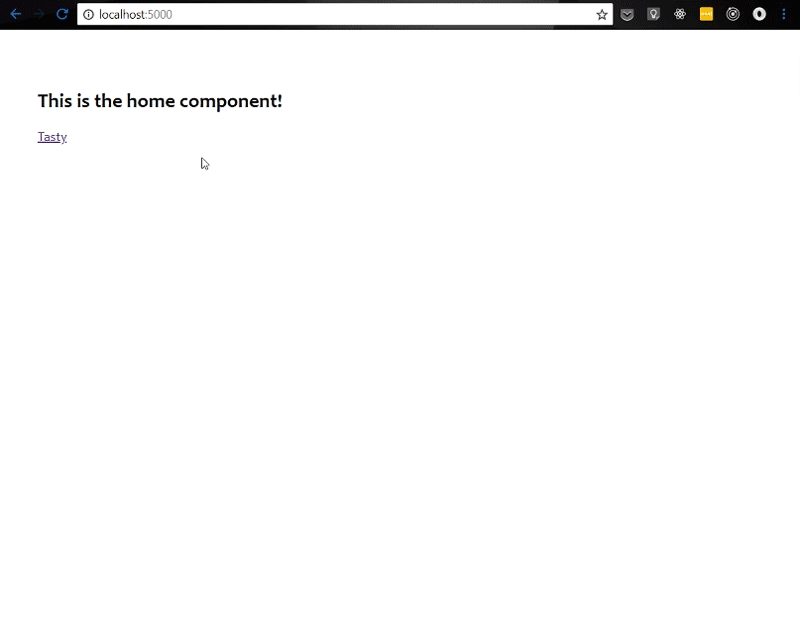
Our app has two routes — a home route, which the user starts off on, and a tasty route. The view for the home route is very basic — just a header and a link to the tasty route.
The view for the tasty route, however, has much more going on. It features a delightful donut animation made with SVG and all the markup and CSS that goes along with that kind of thing. That is a lot of code compared to our home route. P.S. thanks Ben Visser for creating the animation.
Does it make sense to have the user download all the code for this app right away, including the code for the tasty route and its animation? Only if you were interested in causing slow initial load times and frustration, not to mention fear of missing out on what could have happened if the user stuck around for your app to load ;). So, let’s figure out how to code-split this thing.
First, however, is a high-level overview of the code behind the app. The app is written in vanilla JS. I only used one external library, [navigo](https://www.npmjs.com/package/navigo), to handle our client-side routing. Let’s look at the index.js file:
And here’s what the App module does:
And here’s an example of a UI component, our Home component:
No code-splitting
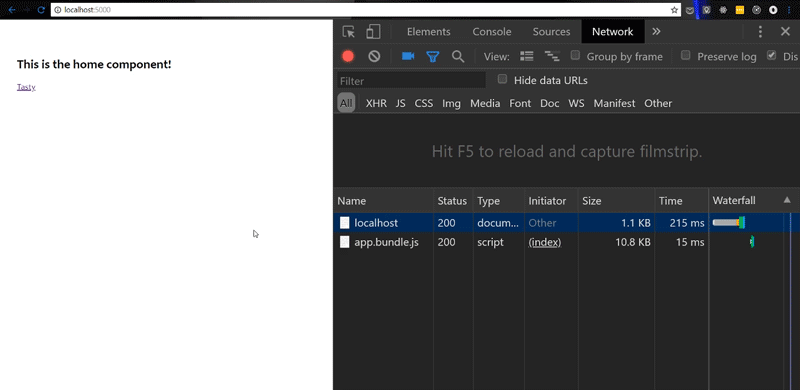
Without code-splitting, you would be sending your user one big bundle of code when they initially load your app. Let’s establish a baseline by looking at the size of our bundle here with no code-splitting.
You can see in the image below that the size of our bundle is 22.8K. Although that’s not very big compared to real apps in the world, let’s pretend it is for the sake of learning.
Code-splitting with dynamic imports
Now let’s bring in the code-splitting! Remember, what we want to do is keep the user from having to download the code needed to render the tasty route until it is needed.
To accomplish this, we our going to use a feature that is coming to JavaScript called dynamic imports. Even though the feature hasn’t landed in the ECMAScript spec yet, Webpack and Babel allow us to use it now.
A dynamic import allows us to asynchronously fetch a module. It returns a promise. Within the promise callback, we can specify what to do with the module once it’s loaded. The syntax for a dynamic import looks like this:
import('./path/to/module')
When Webpack sees a dynamic import like this, it does not bundle up the imported module into the current bundle. Instead, it splits the bundle into two smaller chunks.
The current chunk may be synchronously loaded (like our initial page load), but the module that is imported by our dynamic import is asynchronously loaded. In our case, the module for the tasty route is loaded when the user vists that route.
In order to access the dynamic import feature, we’ll need to npm install a few Babel packages into our build process: babel-core, babel-loader and babel-plugin-syntax-dynamic-import are definitely needed.
Depending on the browser you’re using, you may not need babel-preset-env (i.e. the current version of Chrome supports all the other JavaScript syntax we’re using) but let’s get it anyway just for good measure.
Then, we configure Webpack for Babel:
So finally, we can write our dynamic import:
Here’s what this code says to do: when the tasty route is triggered, first fetch the Tasty component. Then, once it finishes loading, render it to the page.
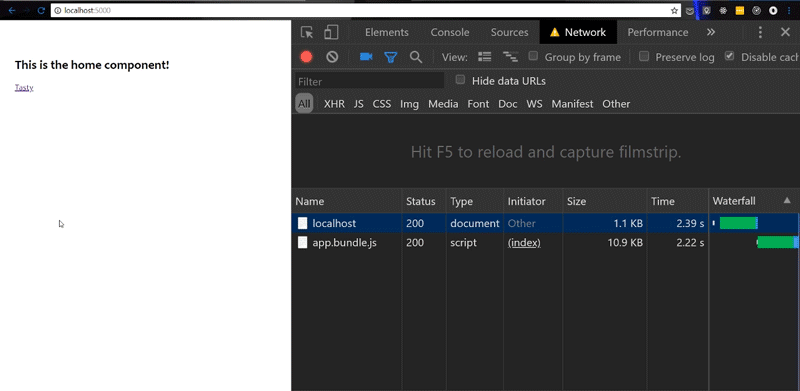
Let’s see what this does for us. In the image below, you can see that the initial page load now downloads a bundle that’s 10.8K instead of 22.8K — much better! Then, when the user clicks to go to the tasty route, another bundle chunk of 13.6K is downloaded.
Webpack automatically names these chunks — if you want control over that, check out this section of the webpack docs.
UX improvements
It’s great that we’ve saved the user from having to wait extra time for the page to initially load. But, can you guess what would happen if the user was on a super slow connection and tried to load the tasty route?
With the way we currently have things setup, the page would just hang there until the Tasty module fully loaded. These few moments of hanging might leave the user wondering if our app was even working.
Let’s improve this experience by giving the user some signal that our app is doing something while they wait:
Now, our app will show a loading spinner while the Tasty component loads. While this may increase the size of our initial bundle some, it gives the user an indication that something is going on while they wait.
This trade off exchanges some performance for a better user experience — finding that balance is what it’s all about!
Conclusion and further reading
I hope this example served as a simple portrayal of the benefit of code-splitting as well as how to use a tool like Webpack to help you do it.
I also hope it showed that code-splitting is not a technique that’s useful just for certain frameworks. In fact, vanilla JS apps can make use of code-splitting, and even apps that are mostly server-rendered but have interactive widgets embedded here and there can make use of the technique.
If you want to dive deeper into some granular code-splitting that webpack lets you do, look into the [optimization.splitChunks](https://webpack.js.org/plugins/split-chunks-plugin/) plugin that comes with webpack 4.
Please clap if this helped you learn something, comment below with any questions, and feel free to say hi to me on Twitter.