
In the good old days, installing an operating system meant pulling together all the hardware components, firing your new computer up with an installation disk in a peripheral drive, and setting the installation process loose do its thing. The total elapsed time could run anywhere between hours and weeks.
These days I can say to myself "I wouldn't mind testing that on a server running a particular version of CentOS" and - depending on a number of variables and assuming the original image has already been downloaded - I can have a fully-functioning virtual system ready within 30 seconds. Your exact results may vary, but not by that much.
You can see how all this works in my new Pluralsight "Linux System Optimization" course - on which this article is based.
What's been driving all this change? Virtualization. And, in particular, container virtualization.
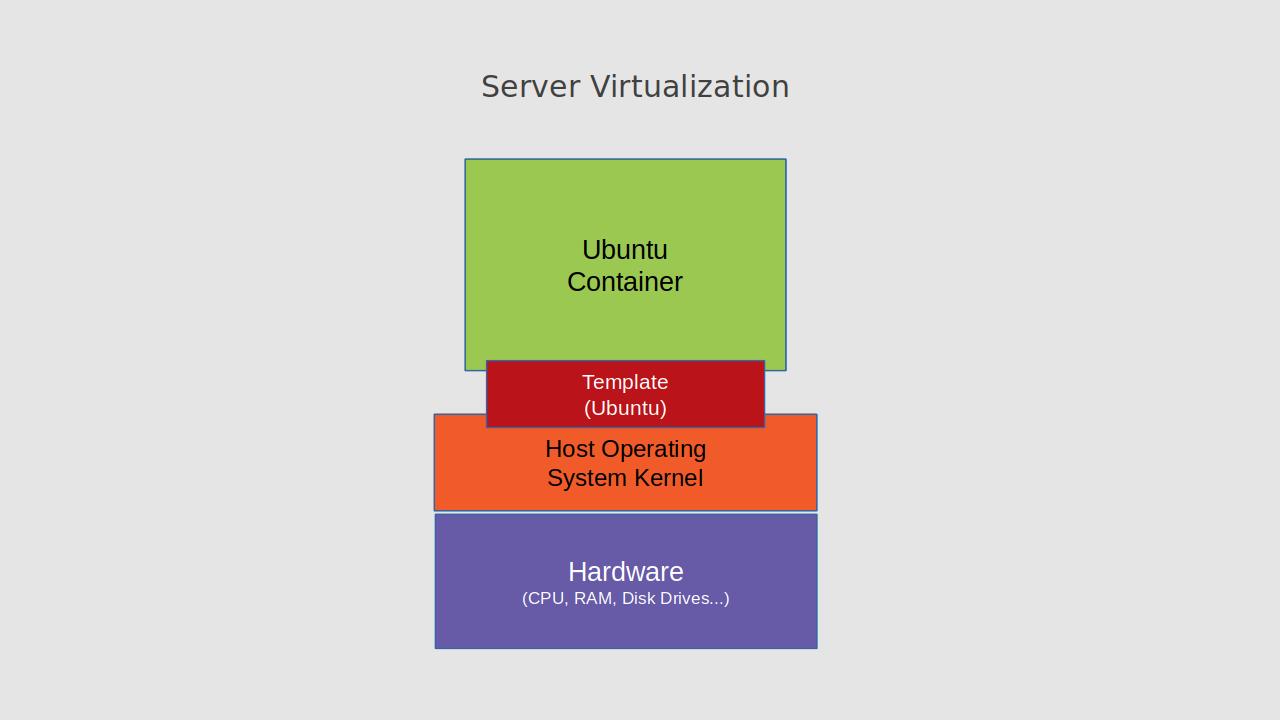
A virtualized OS is a file system containing all the software libraries, binaries, and configuration files you would need to launch a traditional machine. It's just that this particular file system isn't stored in the root or boot partition that your computer would read as it powers on, but on some other part of your storage volume.
And "powering up" your virtual computer happens when some software cleverly fools the files into thinking they're running all by themselves on their own hardware, when they're really sharing space and resources with the host operating system and, perhaps, some other virtual computers.
Broadly speaking, there are two kinds of software systems used for server virtualization administration: hypervisor and container.
Hypervisors provide a layer of abstraction that permits guest VMs to create an isolated environment with access to the system hardware that emulates a bare metal server. This means that hypervisor VMs can be built from any operating system compatible with your underlying hardware. But it also means that they'll use up more space and more memory and compute resources.
Container Virtualization
Containers, on the other hand, share the host computer's OS kernel and exist within carefully secured and isolated spaces managed by system tools like cgroups. Because they share the kernel, the memory and system resources consumed by containers can be truly minimal, with absolutely nothing wasted. And, as you'll see, the speeds you'll get running container applications will be breathtaking.
A lot of container-related attention over the past few years has been focused on Docker and, more recently, Google's container orchestration tool, Kubernetes. In fact, Kubernetes is well suited for enterprise-scale microservices architectures.
But there's an older and, arguably, more mature implementation of the container model that hasn't gone anywhere. The Linux Container Project, LXC, and its more recent toolset, LXD, have strengths that many would argue make it a better candidate for some use cases than Kubernetes. In particular, LXC excels at building light and fast sandboxed environments for testing and application development.
In this article, I'm going to show you how to install LXD, how to prepare and launch a simple container running the ultra-small Alpine Linux, and then how to open a shell session within your new container. I'll also explain how to find and launch multiple versions of other distributions.
One thing I can tell you right away is that whenever I teach LXC, students respond with amazement at how powerful and efficient using containers can be.
When we're done with all this, you'll be able to fire up machines to hands-on test out whatever it is you're learning or working within seconds. When an experiment goes bad, you can instantly shutdown and remove a container and build another one to replace it. There's simply no longer any excuse not to learn.
Building LXD Containers
We're going to get LXC running working on a fresh install of an Ubuntu 18.04 machine. In this demo, we'll install and initialize an LXD environment and then use the LXD version of the LXC command line interface to download and launch an Alpine Linux container. We'll confirm everything worked and then take a bit of a look around to see how the environment is populated.
I'm going to use the snap package manager to install LXD because that's now the official recommendation. And not just for LXD, mind you: all kinds of applications are drifting to alternate managers like snap or AppImmage and Flatpak. I still love my Debian aptitude, but you can't fight the whole world.
$ sudo snap install lxd
LXD - which, again, is an updated toolset designed to manage the LXC API - comes in a package that includes all the regular LXC dependencies. One install command and we're done.
It's important to initialize the LXC environment using the lxd init command. You could set things up yourself manually, but you're more likely to get it all right this way. The init process will ask you a bunch of questions and, for now at least, the default answers will all work.
$ sudo lxd init
Once that's done, we're ready to build your first container. Whichever Linux distribution and version we want, we'll need to find and download the image. The LXC project maintains a repository of quite a range of images at images.linuxcontainers.org. You can see that there are usually multiple versions of each distro, permitting you to build containers that'll work with just about any software you can throw at it.
I'm going to use the latest version of Alpine Linux because it's really small. Feel free to use any image you like - including the big boys like Ubuntu and CentoOS. Alpine, of course, will download very quickly.
But before we do that, I should tell you how to figure out the command line syntax necessary to get your image.
As you can see in this screen shot from the LXD website, you can get three pieces of information you'll need from the page itself: the name of the distro - Alpine, in this case - the release number - 3.10 - and the architecture. We're after amd64.
 From the images.linuxcontainers.org page
We're now ready to trigger the download by running the launch command:
$ sudo lxc launch images:alpine/3.10/amd64 demo
Notice how the syntax is "lxc" even though this is technically an LXD interface. "images" tells LXC that our image lives in the public repo we saw earlier. Our three bits of data - the distro name, release number, and architecture, are entered separated by forward slashes. I'll use "demo" as the name of my container. That should be all we need.
You can see how small Alpine is by how quickly it downloads. My internet connection isn't that fast and I haven't played any games with the recording. To confirm that it worked, I'll run "lxc ls" to list all the containers currently installed. There's just the one. And its current status is "running".
sudo lxc ls
+------+---------+----------------------+------------+-----------+
| NAME |  STATE  |         IPV4         |    TYPE    | SNAPSHOTS |
+------+---------+----------------------+------------+-----------+
| demo | RUNNING | 10.125.45.119 (eth0) | PERSISTENT | 0         |
+------+---------+----------------------+------------+-----------+
You can open a non-login root session in a container using the "lxc exec" command. Just specify the container name and then tell LXC that you want to run a shell using the sh interpreter (you might prefer /bin/bash if you're working with an Ubuntu or CentOS container - your call either way). As you'll be able to see for yourself if you're following along at home, we've got a normal Linux command prompt and anything Linux-y is now possible.
$ sudo lxc exec demo sh
~ #
You could also run a single command without opening a full shell by typing the command instead of this sh.
$ sudo lxc exec demo ls /
bin    etc    lib    mnt    proc   run    srv    tmp    var
dev    home   media  opt    root   sbin   sys    usr
You can bail out of the shell any time you like using exit and return to your host. Here, besides listing running containers, I can also list any storage pools. The default pool that was created during initialization is there, and we can see where the disk image is stored. /var/lib/lxd is, by default, where all LXC resources are kept.
$ sudo lxc storage ls
+---------+-------------+--------+--------------------------------+---------+
|  NAME   | DESCRIPTION | DRIVER |             SOURCE             | USED BY |
+---------+-------------+--------+--------------------------------+---------+
| default |             | btrfs  | /var/lib/lxd/disks/default.img | 3       |
+---------+-------------+--------+--------------------------------+---------+
I can similarly list all my networks. There happen to be a few network bridges on this system (I've been playing around a bit, as you can see). There's also the physical enp0s3 bridge used by the host Ubuntu server. Although between you and me, that one's not physical either, as this is actually a VM running in Oracle's Virtual Box.
$ lxc network ls
+---------+----------+---------+-------------+---------+
|  NAME   |   TYPE   | MANAGED | DESCRIPTION | USED BY |
+---------+----------+---------+-------------+---------+
| enp0s3  | physical | NO      |             | 1       |
+---------+----------+---------+-------------+---------+
| lxdbr0  | bridge   | YES     |             | 1       |
+---------+----------+---------+-------------+---------+
| mynet   | bridge   | YES     |             | 0       |
+---------+----------+---------+-------------+---------+
| testbr0 | bridge   | YES     |             | 1       |
+---------+----------+---------+-------------+---------+
If we needed to, we could easily add a new virtual interface to our container using the "lxc network attach" command. Here, I'll specify the physical network and then the name of our container.
$ lxc network attach enp0s3 demo
With that done, you could open a new shell in the container to see what's changed. There should now be an eth1 interface listed. You may need to reboot for all the changes to take full effect. By doing that you can also marvel at just how fast this thing can reboot itself - for all intents and purposes, it'll happen faster than you can type your exec command to open a new shell.
Enjoy your new environment!
This article is based on content in my Pluralsight course, "Linux System Optimization." There's much more administration goodness in the form of books, courses, and articles available at bootstrap-it.com.